SPIETH Stuttgart Use and care manual

Art. 025
Spannreck „Stuttgart“
Horizontal Bar „Stuttgart“
Seite 1 aus 8
Page 1 of 8
SPANNRECK „STUTTGART
“ / HORIZONTAL BAR
„
STUTTGART
“ ART. 025
D
Aufbau
-
und
Gebrauchsanleitung
E
Assembly and u
ser manual

Art. 025
Spannreck „Stuttgart“
Horizontal Bar „Stuttgart“
Seite 2 aus 8
Page 2 of 8
SPANNRECK „STUTTGART
“ / HORIZONTAL BAR
„
STUTTGART
“ ART. 025
Beschreibung Description
•FIG-zertifiziert, ORIGINAL REUTHER.
•Das Reck mit durchgehender, starkwandiger
und biegeelastischer Recksäule.
•Reckstande ist durchbruchgesichert, mit
eingebautem Stahlseil, aus hochwertigem,
rostbeständigem, vergütetem Spezialstahl.
•Doppelverspannung mit 2 Sicherheits-
Keilspannschiebern bietet hohe
funktionsgerechte Elastizität des Gerätes.
•Stahlseile sind mit Sicherheitsschäkel am
Spannkopf verbunden. Dadurch unterstützt
Spannkopf das optimale
Schwingungsverhalten.
•Keilspannschieber funktioniert nach Reuther
Vorspannungsprinzip und dient für
individuelle Feineinstellung der
Gerätspannung. Durch seinen speziellen
Schiebemechanismus ist einfaches Lösen
und Verklemmen der Verspannung
ermöglicht.
•Durchbruchgesicherte Reckstange mit
REUTHER Verspannungskopf ist gemäß
FIG-Vorschrift hergestellt. Eine weltweit
einzigartige Konstruktion von SPIETH durch
zusätzlich eingebautes Stahlseil. Dadurch
bleibt das Reck selbst bei Bruch der Stange
verspannt. Das ist ein wichtiges
Sicherheitskriterium.
Abmaße gemäß FIG-Normen:
Höhe: 280 cm
Höhenverstellung: von 255 - 295 cm in Stufen
von 5 cm.
Höhe der Niedersprungmatten: 20 cm
Verpackungsinfo:
Netto-Gewicht: 53 kg
Brutto-Gewicht: 56 kg
Verpackung: 1 Karton 255x20x17 cm
•FIG certified, ORIGINAL REUTHER
•Horizontal with more flexible, thick-walled
uprights.
•Steel rope cored break-proof bar is made
of high quality special stainless steel.
•Double tension system with 2 safety slide
adjusters provides the apparatus with
great functional elasticity.
•Tensioning ropes are connected with
safety shackle on the tensioning head.
The special construction of the head
maintains an optimal vibration ratio.
•The functioning of slide adjuster, which
assures an individual fine tuning of
apparatus’s tension, is based on the
Reuther pretension principle. Due to its
special slide mechanism loosening and
fixation of the slide adjusters is eased.
•The break-proof bar with RETHER tension
head meets FIG requirements. A
worldwide unique construction of SPIETH
bar implies an additionally built-in steel
rope, which assures consistent tension of
the horizontal bar, even if the bar itself
breaks down. This very important feature
became a safety criterion for gymnasts
Measurements according to FIG norms:
Height: 280 cm
Height adjustment: from 255 to 295 cm in steps
of 5 cm
Height of standard landing mats: 20 cm
Packing data:
Net weight: 53 kg
Gross weight: 56 kg
Package: 1 carton 255x20x17xcm

Art. 025
Spannreck „Stuttgart“
Horizontal Bar „Stuttgart“
Seite 3 aus 8
Page 3 of 8
SPANNRECK „STUTTGART
“ / HORIZONTAL BAR
„
STUTTGART
“ ART. 025
Montage- und Bedienungsanleitung:
Installation and user instructions:
Bitte lesen Sie diese Anweisung, bevor Sie
das Gerät zusammenbauen.
Den Aufbau des Gerätes empfehlen wir mit 4
Personen durchzuführen.
Lieferumfang
2 x Fußscheiben mit beigelegter Halbkugel,
einzeln verpackt
2 x Recksäulen mit montiertem
Verspannungskopf mit M 10 Schrauben für
Distanzhalterung, einzeln verpackt
2 x Verstellrohre mit montierter Senkschraube,
einzeln verpackt
1 x Reckstange, durchbruchgesichert, einzeln
verpackt
2 x Seile 5 m lang mit montiertem Umlenkhalter,
zusammen verpackt
2 x Seile 5 m lang mit montierten Umlenkhalter,
Keilspannschieber, und Kette, zusammen
verpackt
2 x Spannschlösser mit montierter Kette,
zusammen verpackt
Please read this instruction before
apparatus assembly.
We recommend conducting apparatus
assembly and installation with the assistance
of 4 persons.
Scope of delivery:
2 x foot discs with hemispheric element,
individually packed
2 x uprights of the horitzontal bar including
mounted tensioning head with M 10 screws for
distance holder, individually packed
2 x adjusting tubes including mounted
countersunk screws, individually packed
1 x break-proof bar, individually packed
2 x ropes 5 m long with mounted rope
redirecting device, individually packed
2 x ropes 5 m long with mounted rope
redirecting device, slide adjuster, and chain,
packed together
2 x quick release locks with mounted chain,
packed together
Benötigte Werkzeuge:
1 x Imbusschlüssel 8
Necessary tools:
1 x Allen key 8

Art. 025
Spannreck „Stuttgart“
Horizontal Bar „Stuttgart“
Seite 4 aus 8
Page 4 of 8
SPANNRECK „STUTTGART
“ / HORIZONTAL BAR
„
STUTTGART
“ ART. 025
1. Montieren Sie das Verstellrohr gem. Abb. 1 1. Install the adjusting tube as it is shown on
Pic. 1
2. Für die FIG-Normhöhe Fixieren Sie das
Verstellrohr in der Standsäule so, dass 6 Löcher
sichtbar am Verstellrohr zu sind
2. To adjust the apparatus for the height
required by FIG, fix the adjusting tube so that
the 6 holes on it stay visible.
3. Legen sie die Standsäulen so auf den
Hallenboden, dass die Gummiteller möglichst auf
dem Aufstellpunkt des Recks liegen.
3. Put the uprights on the hall floor in a such
way that the rubber parts are situated on the
mounting points for horizontal bar
4. Hängen Sie nun die Spannseile gem. Abb. 2
in die Standrohre und schließen dann die
Notglieder.
Achtung: 2 Personen halten das Gerät, während
die anderen die Spannseile einhängen.
4. Hang the tensioning ropes on the upright, as
it is shown on Pic. 2, and close the safety link.
Attention: 2 persons have to hold the
apparatus, while others hang the tensioning
ropes.
5. Reckstange in die Spannköpfe einhängen 5. To fix the bar to the tensioning head
6. Mit leichtem Zug nach Außen das Reck in die
Standposition bringen.
Achtung: Reckstange kann ohne Zug nach
außen aus dem Spannkopf springen.
6. With light outward pull bring the horizontal
bar in standing position.
Attention: without outward pulling the bar can
jump out of the tensioning head
Abbildung 1
Zusammenbau Recksäule mit Fußscheibe
E
Picture 1
Assembly of the horizontal bar’s uprights with foot disc
1
2
3
D HER-067-01
Rändelmutter DES-077
Nasenschraube USB-101-02
Verstellrohr
E HER-067-01
knurled nut DES-077
snug bolt USB-101-02
adjusting tube
4
5
6
D HER-172
Hulbkugel EGY-012
Fußscheibe mit
Gummiteil
DES-146
Senkschraube
E HER-172
hemispheric
element
EGY-012
foot disc with rubber DES-146
countersunk
screws
1
2
3
4
5
6

Art. 025
Spannreck „Stuttgart“
Horizontal Bar „Stuttgart“
Seite 5 aus 8
Page 5 of 8
SPANNRECK „STUTTGART
“ / HORIZONTAL BAR
„
STUTTGART
“ ART. 025
1
2
3
4
D
Abbildung
2
Gesamtansicht
E
Picture
2
General view
1
2
3
4
D USB-102
Reckstange USB-123
Umlenkhalter mit
Kette
USB-029
Seil mit Keilspannschieber, Umlenkrolle,
Umlenkhalter, Kette
USB-121
Kette mit
Spannschloss
E USB-102
bar USB-123
Rope redirecting
device with chain
USB-029
rope with slide adjuster, deflection
pulley, rope redirecting device, and chain
USB-121
chain with quick
release lock

Art. 025
Spannreck „Stuttgart“
Horizontal Bar „Stuttgart“
Seite 6 aus 8
Page 6 of 8
SPANNRECK „STUTTGART
“ / HORIZONTAL BAR
„
STUTTGART
“ ART. 025
Einstellen des Gerätes
Die Seile durch Anziehen der Spannschlösser
spannen, dass die nötige Spannung des Gerätes
erreicht ist. Mit den Keilspannschiebern kann die
Spannung reguliert werden.
Setting up of the apparatus
Through closing of quick release locks tense
the steel ropes up to the necessary tension
level. The tension can be regulated with the
help of slide adjusters.
Betätigung der Kleispannschieber
Die Keilspannschieber können durch
gegeneinander schieben der 2 Teile verklemmt
werden. Werden die Keilspannschieber
auseinandergezogen, lösen sich die
Klemmungen
Operation of slide adjuster
Slide adjuster gets jammed, when 2 parts of
slide adjuster are shifted together. When the
slide adjuster parts are moved against each
other, the slide adjuster gets released.
Pflegehinweise:
Von Zeit zu Zeit sollten Sie alle beweglichen
Teile von Magnesiastaub reinigen und wieder
leicht einfetten.
Hervorstehende Stahldrähtchen an den
Verspannungsseilen sind eine
Verletzungsgefahr. Sollten sich einzelne
Stahldrähtchen lösen, dann müssen die Seile
sofort ausgetauscht werden!
Sollte das Gerät nach dem Training nicht
abgebaut werden, so entspannen Sie das Gerät
durch Öffnen des Schnellspannverschlusses.
Care instructions:
From time to time, all movable parts have to be
cleaned and newly slightly greased.
Protruding steel wires on the tensioning ropes
may cause injuries. If single steel wires are
released, the rope must be immediately
exchanged!
If the apparatus is not demounted after
training, release the tension through the
opening of quick release locks.
Art. 025
Spannreck „Stuttgart“
Horizontal Bar „Stuttgart“
Seite 7 aus 8
Page 7 of 8
SPANNRECK „STUTTGART
“ / HORIZONTAL BAR
„
STUTTGART
“ ART. 025
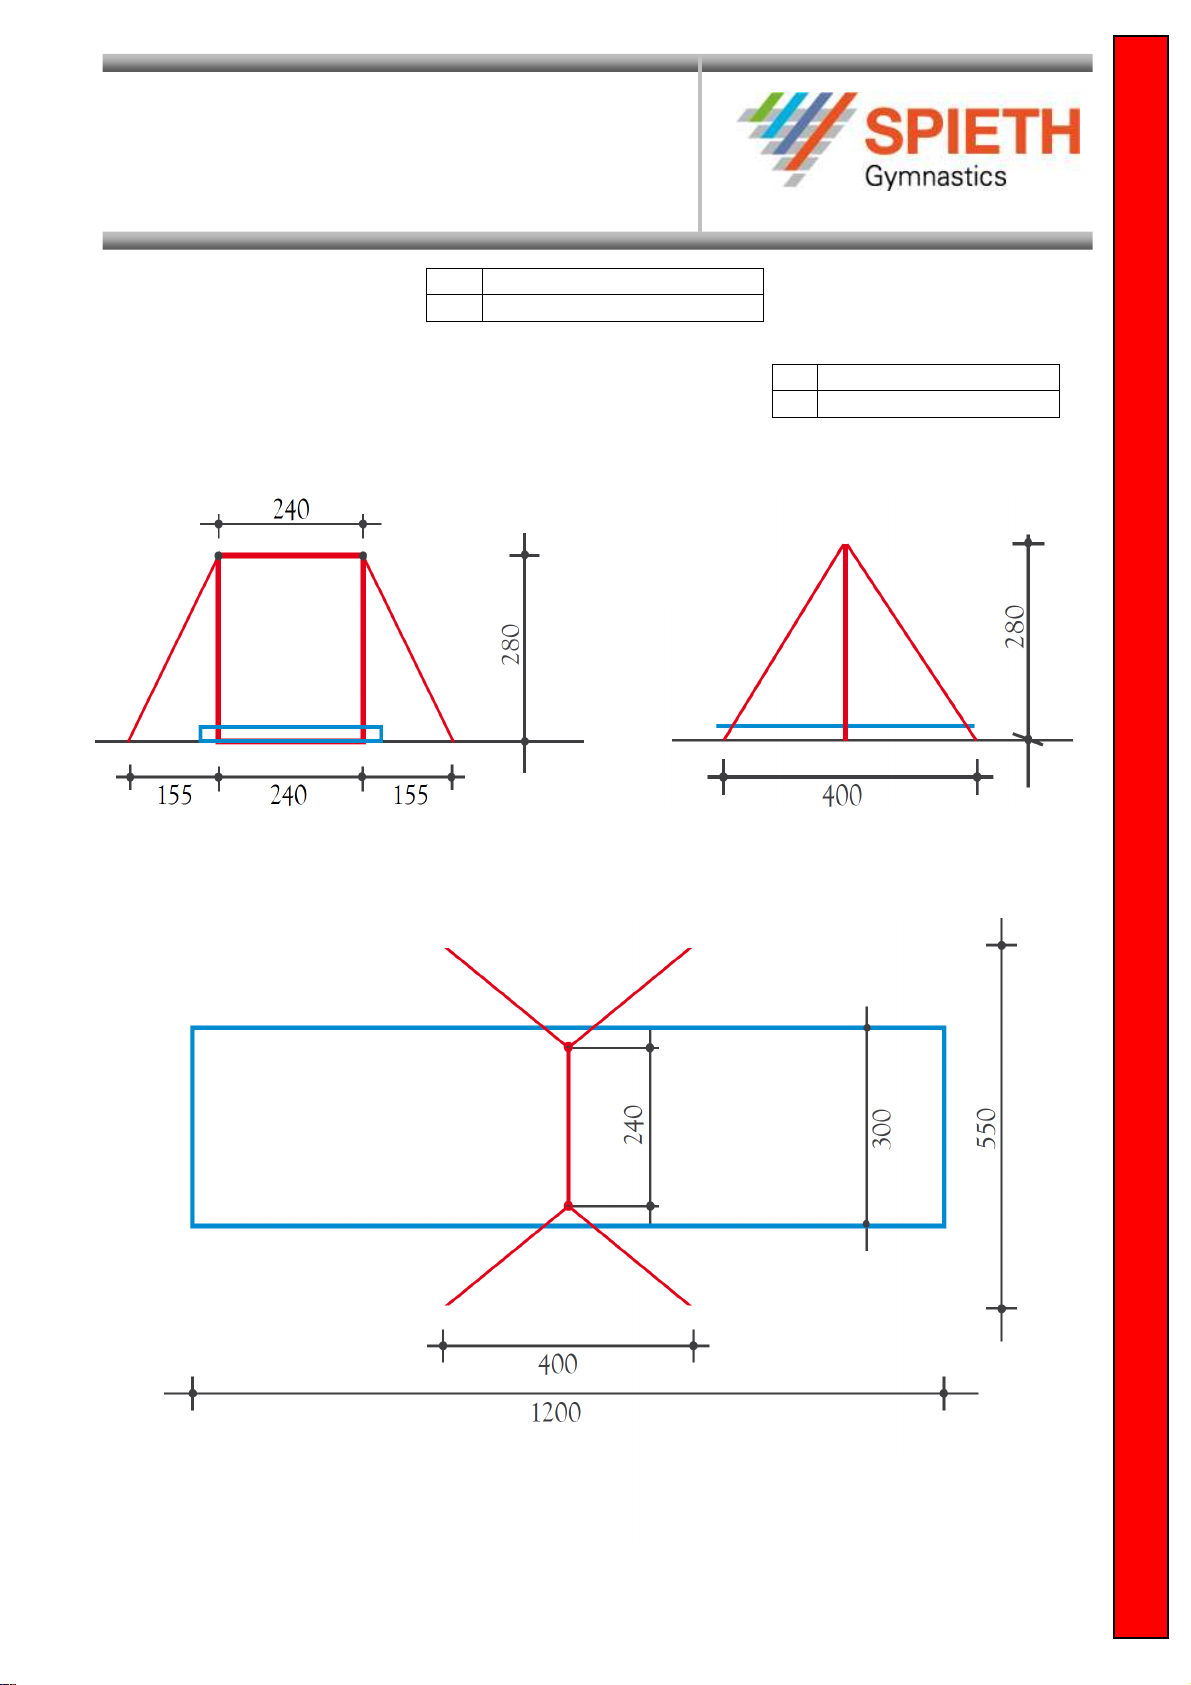
D
FIG
-
Wettkampfnormen
E
FIG Competition n
orms
D Alle Maße in mm
E All dimensions in mm

Art. 025
Spannreck „Stuttgart“
Horizontal Bar „Stuttgart“
Seite 8 aus 8
Page 8 of 8
SPANNRECK „STUTTGART
“ / HORIZONTAL BAR
„
STUTTGART
“ ART. 025
Vor jedem Benutzen des Turngerätes sind die
Verspannung und Bodenverankerungen auf Funktion
und Haltbarkeit zu prüfen!
Beim Benutzen dieses Turngerätes übernehmen Sie ein
Risiko der Verletzungen. Um dieses Risiko zu
reduzieren und um den sicheren Betrieb des Geräts zu
gewährleisten müssen die folgenden Anweisungen
allezeit streng beachtet werden:
1. Benutzen Sie dieses Turngerät nur unter
Beobachtung des ausgebildeten und qualifizierten
Instrukteurs / Personals.
2. Das Turngerät darf nur mit richtigen und
funktionsfähigen Niedersprungmatten benutzt
werden, die vom Internationalen Turnverband (FIG)
zugelassen sind. Sollten Sie über Ihre Matten im
Zweifel sein, benutzen Sie dieses Gerät nicht.
3. Berücksichtigen Sie immer Ihre eigenen Grenzen
und die Begrenzungen dieses Turngerätes.
4. Vor jedem Benutzen prüfen Sie dieses Gerät auf
gute Stabilität.
5. Prüfen Sie das Turngerät vor jedem Einsatz auf
korrekte Installation sowie die Verankerung,
Verspannung und Schlösser dieses Gerätes. Sollen
Sie im Zweifel sein, benutzen Sie dieses Gerät
nicht.
SPIETH empfiehlt, keine Veränderungen an den
gelieferten Geräten vorzunehmen. Sollten die
Geräte durch nicht sachgemäße Handhabung
verändert, oder keine Original-Ersatzteile verwendet
werden, lehnt SPIETH jegliche Verantwortung in
Schadensfällen ab. Dadurch tritt automatisch auch
die Produkthaftung außer Kraft.
Allgemeiner Hinweis:
Turngeräte und Matten haben eine begrenzte
Lebensdauer, und Materialien ermüden nach einer
bestimmten Zeit. Bitte prüfen Sie mindestens alle 3
Monate sämtliche Teile, die einer verstärkten Abnützung
unterliegen. Dies betrifft hauptsächlich Sicherungen von
verstellbaren Teilen und Mechanismen, Barrenholme,
Reckstangen, Ringe, etc. Ersetzen Sie alle abgenutzten,
fehlerhaften und fehlenden Teile. Im Zweifelsfall holen
Sie sich einen Sachverständigen zu Rate.
Aus Sicherheitsgründen empfehlen wir eine jährliche
Wartung der Turngeräte und Matten durchführen zu
lassen!
Check all tension cables and floor anchors for proper
function and stability before using the apparatus!
You assume a risk of serious injury in using this
equipment. However, in order to minimize the risk and
to assure secure functioning of the apparatus, down
mentioned rules are to be strictly followed:
1. Use this equipment only under the supervision of
a trained and qualified instructor / staff.
2. This gymnastics equipment may only be used with
mats approved for each apparatus by the
International Gymnastic Federation (FIG). Do not
use this apparatus if in doubt concerning suitability
of mats.
3. Pls. consider your own limits and the restrictions
of this gymnastics apparatus, while using it.
4. Check this equipment for proper stability before
each use. The apparatus must be tensed by
means of matching auxiliary equipment.
5. Always check the apparatus for its correct
installation, particularly for the anchorage,
tensioning and locks before each use.
SPIETH does not recommend any modification of
the equipment supplied. Should the equipment be
modified through improper manipulation or
introduction of not SPIETH spare parts, SPIETH
assumes no responsibility for the damages
caused. This means the end of warranty for the
SPIETH product.
General advise:
The life period of gymnastic equipment and mats is
limited. Also materials wear off after a certain period of
time. Pls. check all parts, which are the subject to
severe wear and tear, at least once in 3 months. This
is mainly relevant for the security of adjustable parts
and mechanisms, rails, bars, rings, etc. Replace any
worn off, defective and missing parts. If in doubt, ask
for the advice of a specialist.
For security reasons, we suggest you to perform the
maintenance of gymnastics equipment and mats once
per year.
SPIETH Gymnastics GmbH – safety in gymnastics
04/02/2013
Offizieller Partner von FIG / UEG / DTB
SPIETH Gymnastic
s
GmbH
Zeppelinstrasse 126 · 73730 Esslingen
Telefon +49 (0)711 / 319 710
Telefax +49 (0)711 / 319 7111
Internet: www.spieth-gymnastics.com
E-Mail: info@spieth-gymnastics.com
WARNUNG
WARNING
Other SPIETH Accessories manuals


Popular Accessories manuals by other brands


Hytronik
Hytronik HIM32 Installation and instruction manual

Sygonix
Sygonix 2489874 operating instructions

La Crosse Technology
La Crosse Technology TX13U instruction manual

aeolus
aeolus UC-1801 quick start guide

Pil Sensoren
Pil Sensoren P41-50-I-CM12 manual

Gorilla Gadgets
Gorilla Gadgets FAHARI user manual


