Splash STREAMBox User instructions

E info@splashmonitoring.com Web. www.splashmonitoring.com
Setting Up Your Enasolar Inverter and SPLASH Monitoring
(Domestic Installation)
This document is intended to be a brief guide to the steps you need to take to get your Enasolar Inverter monitored by
Splash Monitoring. It assumes the Inverter is already installed and connected to the PV panels. You will also need to
follow the Enasolar Installation Manual carefully.
Installation Guidelines
The most reliable long-term results are achieved when the STREAMbox and its power supply are installed away from
daily operational areas. This will minimise the risk of the power or internet connections being disconnected from the
STREAMBox. It is prudent to minimise this risk byfollowing the following guidelines:
If possible install the STREAMBox and power supplies well away from daily operational areas such as
someone’s desk or work bench.
Try and secure the STREAMBox by attaching it to a wall or shelf with screws, Velcro or double sided tape.
This shouldprevent it from slipping and becoming disconnected.
Always secure the STREAMbox power cord to the STREAMbox using the P clip supplied. The P clip should
be located on the back of the STREAMbox using one of the existing jack posts, as illustrated:
Always ensure the LAN cables you use are in sound condition with their retaining clips intact, and make sure
they are securely fitted to the equipment bygiving them a gentle tug.
Always ensure that all cables are secured using cable ties to protect them from accidental snagging.
Never stretch cables to the point where anymovement could cause them to become dislodged.
Always install the STREAMbox with the ridged heat sink outwards and the side vents unobstructed. It doesn’t
matter what orientation it is installed; horizontally on its bottom (the flat black surface); or vertically on its side.
The STREAMBox and power supplies will be labelled ‘DO NOT SWITCH OFF’, but you should inform people
with access to the installation area that this equipment should not be turned off; for example cleaning and
maintenance personnel.
NOTE if the power and or internet connection is disconnected from the STREAMbox, nominated persons will receive
an emailor text message advising them that the STREAMBox has been disconnected.
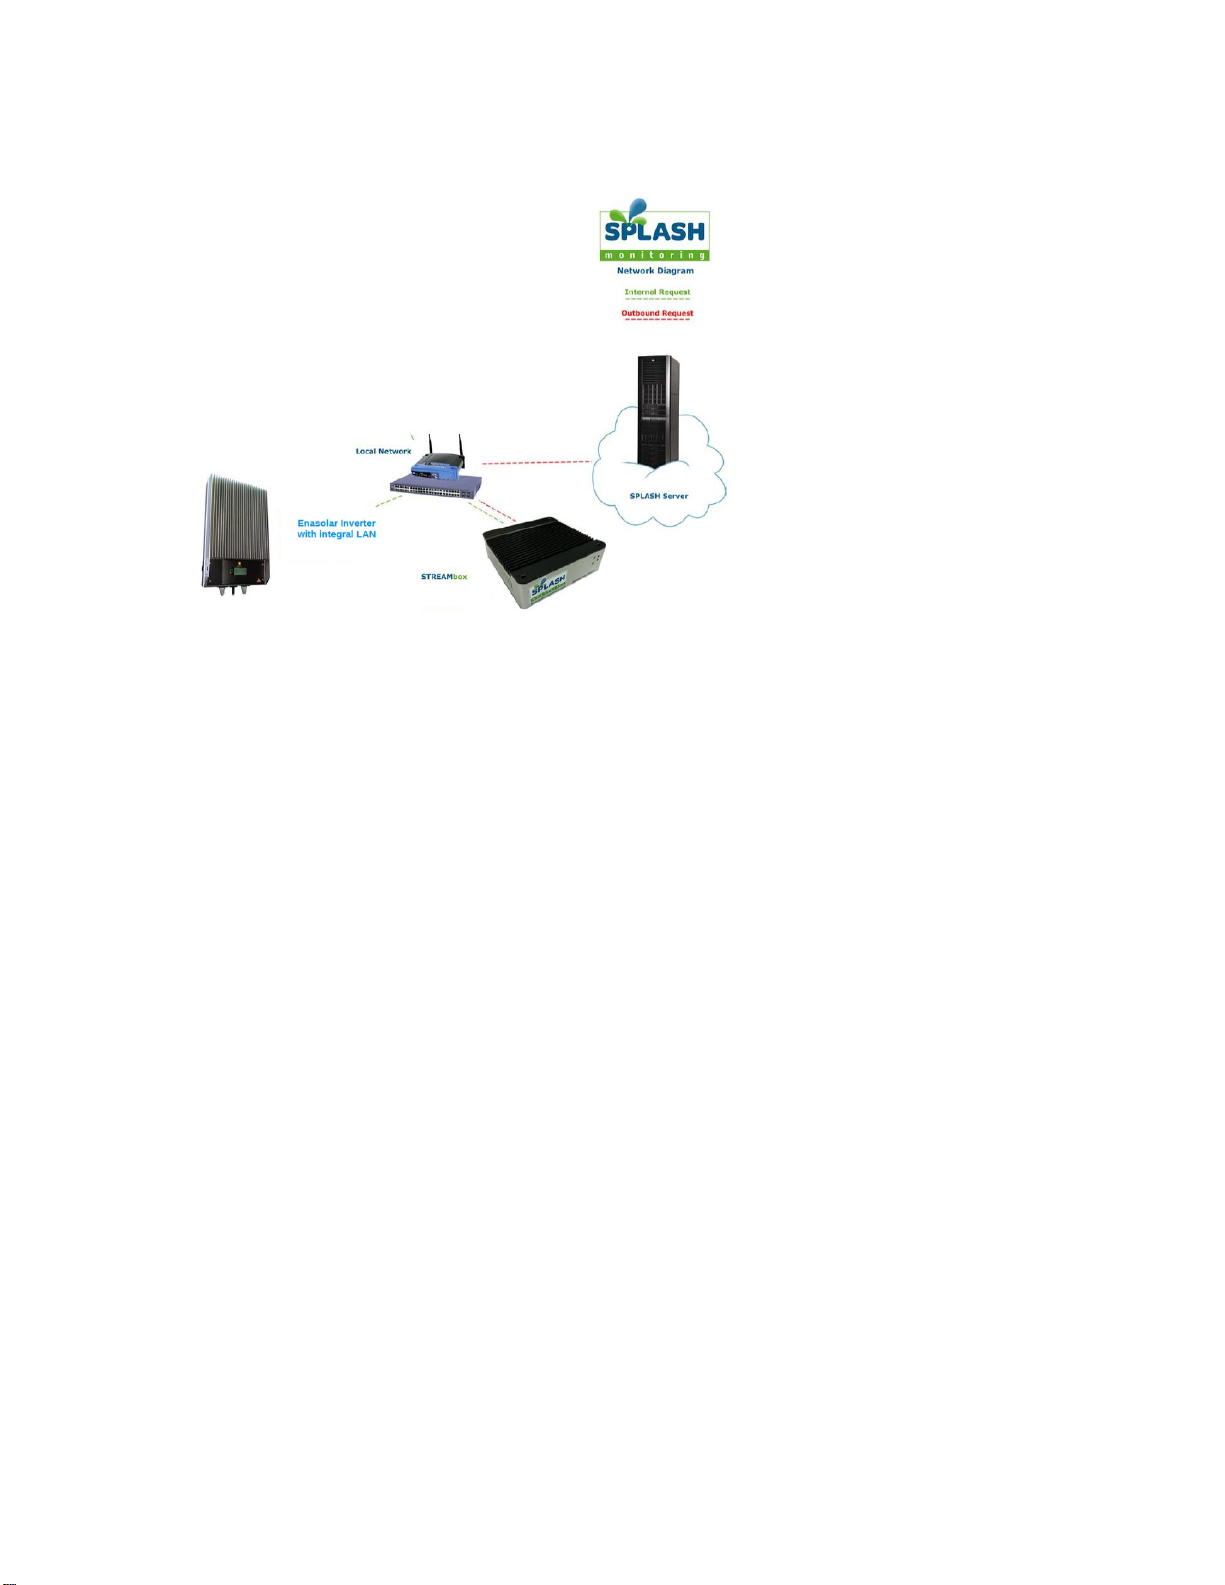
Setting Up Your Inverter
For the installation you will need:
The Enasolar Inverter Installation Manual
A USB to miniature-USB cable (for connecting your PC into the Inverter)
AWindows PC connected to the internet
A SPLASH Monitoring STREAMBox
CAT5 or CAT6 cables to connect the Inverter(s) and STREAMbox to the router / network
STEP 1 - Introduction to IP addresses
(NOTE if you understand IP addresses skip Step 1 and go straight to Step 2 -Setup Options).
The STREAMbox uses IP addresses to communicate with your router and each of your inverters. All devices on a
network must have a unique IP address otherwise there will be a conflict when trying to communicate between devices.
An IP address looks like: 192.168.1.13 where each of the numbers between the dots is known as an “octet”. IP
Addresses always consist of four octets.
Most devices on a domestic network, such as your PC and laptop, ask the router to give them a unique IP address
when they first connect to the network. Most domestic routers will issue what is known as a “class C” address, where
the first three octets (“192.168.1”in our example) are known as the “network address” and the fourth octet (“.13”in our
example) is known as the “device address”. All addresses issued by the router (known as DHCP allocated addresses)
will have the same “network address” but a unique “device address” between 1 and 254, depending on your router’s
DHCP range. Unfortunately there is no standard DHCP range and this varies between router manufacturers, but in our
experience the range rarely extends beyond device address 200. So, in other words, when your PC asks for a DHCP
allocated address from your router you will usually be allocated an address between 2 and 200 leaving the range
between 201 and 253 to be allocated manually (we avoid using 1 and 254 because the router itself is often allocated
one of these address).
When one master device, such as the STREAMBox, needs to interrogate one or more slave devices, such as an
inverter, the slave devices are often manually given a fixed IP address by the installer or user. This fixed IP address
must be outside the router’s DHCP range, so as not to conflict with router issued addresses, and of course it must be
unique.
STEP 2 - Setup Options
Background
Unless special provisions have been made, the Enasolar inverter comes factory configured to acquire an IP address
from your router (DHCP). Similarly, the factory default settings for the STREAMbox are to acquire an IP address for
itself from your router, and then to scan IP addresses in two different network ranges: from aaa.bbb.ccc.210 to
aaa.bbb.ccc.219, where aaa.bbb.ccc is the network address of your router; and 192.168.66.210 to 192.168.66.219,
which is an arbitrary range we have selected to avoid any conflict with most domestic routers. If the STREAMbox finds
an inverter on either of these address ranges it will scan it automatically every 10 seconds and send its information to
the Splash Monitoring web site.
Setting the fixed IP address
You will need to set up the inverter with a fixed IP address from one of the ranges above. The best one to choose is
<network address>.210 because you will be able to log onto the inverter from your PC in the event you need to
diagnose anyissues with it.
However, if <network address>.210 conflicts with your router’s DHCP range, then you will need to choose
192.168.66.210 as the fixed IP address. The disadvantage of this address is you will not be able to log onto it without
reconfiguring your PC or laptop.
If you are installing more than one inverter, or any other solar device to be monitored, choose “.210”for the first one,
“.211”for the second one, and so on.
Establishing your Network Address
To establish your network address, once the inverter has been connected to your network or router, you can look on
the inverter’s front panel: tap the metal surrounding the screen, then scroll through the inverter displays until you see its
IPaddress. The network address is the first three octets of the IP address displayed.
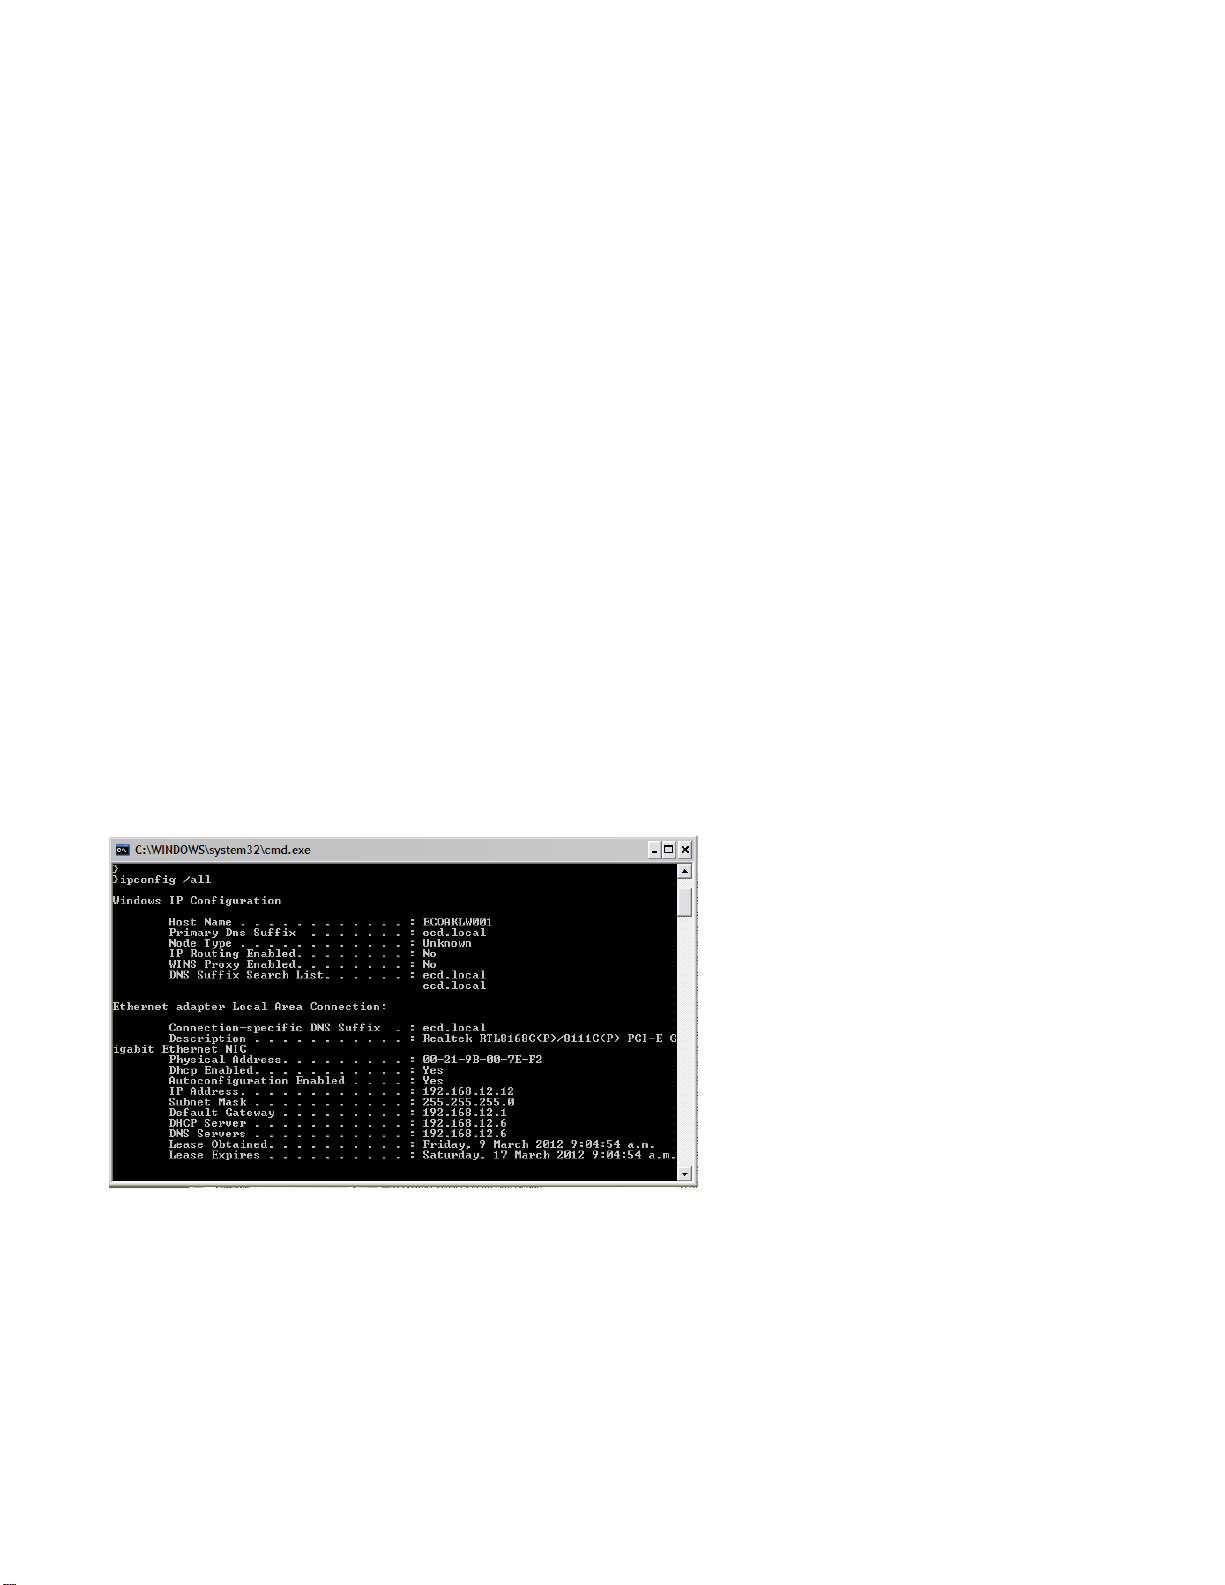
Alternatively you can find the network address by going to the command prompt on your network attached Windows
PC and typing “ipconfig /all” at the command prompt. You should see something like:
The network address is the first three octets of the Default Gateway address (“192.168.12”in the above example).

STEP 3 - Configuring the Inverter:
1. Log on to the Enasolar web site and download the Inverter configuration software from the Partner section. See
separate document for details.
2. Connect the USBcable from your PC to the Inverter.
3. Uncheck “DHCP Enable” and “Disable Remote Monitoring”. Set the “Default IP Address”of the Inverter to your
chosen IP address and save your settings. The “Subnet Mask” is 255.255.255.0. The “Gateway”and “DNS
Server”don’t matter for SPLASH Monitoring but enter the Gateway and DNS addresses from the “ipconfig”
command as described above. Again SPLASH Monitoring makes no use of the “Hostname”or “Inverter Name”,
but you should choose something appropriate for these fields.
4. If it is a wireless inverter, you will need to set up the “SSID”, “Security Mode”and “WPA Passphrase”. You’ll need
to get this information from the wireless router or the router’s owner.
5. Power off the AC to the inverter and back on again. This may not be necessary, but in practice we’ve found that
this is sometimes needed to re-initialise the inverter’s settings.
6. If you chose an IP address on your router’s network you can check access to the Inverter by entering its IP
address into your web browser. You should see the inverter’s home page.
7. Connect the STREAMbox to the network and power it up.
8. This step is not strictly necessary as the next step is your definitive check that all is well. However, after about 2
minutes you can check web access to the STREAMbox by entering http://splash/ into the web browser on a PC
which is connected to the same network. If this doesn’t work you can use the STREAMbox’s IP address.** You
should be presented with the STREAMbox’s Web Information Page. To change any of the settings (not
recommended unless you know exactly what you’re doing) you will need to log on using the first 5 characters of
your fingerprint as the password. Use of the Web Information Page is described in detail here:
www.splashmonitoring.com/assets/SM-STREAMbox-Web-Information-Page.html
9. After about 8 minutes log onto the Splash Monitoring web site and claim your fingerprint (see the “Getting Started”
document). Then scan your fingerprint on the Dashboard and if the installation was successful you will see data
from the inverter appear below the scan button.
10. If you have data on the Dashboard then you can go on to configure your site according to the instructions provided
in the “Getting Started” document, or on the web site.
11. For further help or trouble shooting assistance please go to www.splashmonitoring.com/help
12. Newer Enasolar inverters are Splash ready, but older ones may need to have a configuration file loaded:
Download the “SWES-2KWBEN-08.bin” file onto your PC then load it onto the Inverter by entering the following url
into your web browser: http://<inverter IP address>/mpfsupload. Browse to the location of the above file on your
PC and then click upload. Wait for the upload to complete.
** You can ascertain the IP address of the STREAMboxby plugging a monitorinto the VGA socket on the back of the STREAMbox,
then switch off and back on to re-boot. At the end of the boot sequence the STREAMbox’s IP address will be displayed on the
monitor. Enter this IP address into your web browser to get the STREAMbox web page. Alternatively you can try to guess the
STREAMbox’s IP address by trying to browse to addresses either side of your PC’s address as described in the “ipconfig” command
in step 2 above.

Trouble Shooting:
“No Stream Found” on the SM Web site:
This is because the web site hasn’t received any data from the STREAMbox.
Allow at least 10 minutes after powering up the STREAMbox before starting your diagnostic checks.
Check the connections between the STREAMbox and your router and ensure you have a solid green
light at the top left of the RJ45 socket and a flashing green light at the top right of the socket.
No solid green light could indicate: the STREAMbox is switched off (check the power light on the front
of the STREAMbox); or the router isn’t powered up, or the LAN cable isn’t connected to the router; or
the LAN cable is faulty. To eliminate the LAN cable and router, connect the LAN cable to a known
working device like your laptop or PC and if you can get a web session, then the LAN connectivity is
OK.
Trypower cycling the STREAMbox –switch it off, wait 5 sec, switch it back on.
Try logging on to the STREAMbox: enter “splash” in your web browser’s address line, or if your
STREAMbox has a fixed IP address, enter that into your web browser. For instructions on how to use
the STREAMbox’s ‘Web Information Page’ go to http://www.splashmonitoring.com/assets/SM-
STREAMbox-Web-Information-Page.html
The most common issue we encounter is the site’s network firewall not allowing outbound traffic. This
is rarely an issue with domestic routers, but very common in managed commercial networks. Unless
you have someone you can ask (like a network administrator) a good way to detect this issue is to log
onto the STREAMbox and run a ‘Healthcheck’ report. This will give you lots of information including
whether the STREAMbox can ‘see’ the internet.
The STREAMbox is not able to work with a proxy server. If you have a proxy server you will need to
make special arrangements with your network administrator to have the STREAMbox circumnavigate
it by issuing a fixed IP address with appropriate privileges.
Table of contents
Other Splash Inverter manuals

Popular Inverter manuals by other brands

Tomahawk
Tomahawk TG2000i Operation manual

Santerno
Santerno SUNWAY M XS user manual

Xantrex
Xantrex PROwatt 600 owner's guide

SolarEdge
SolarEdge SE15K-AU installation guide

Generac Power Systems
Generac Power Systems PWRcell XVT076A03 Installation and owner's manual

opti-solar
opti-solar SNMP Manager quick guide


EnerSys
EnerSys OutBack Power ALPHA OUTBACK ENERGY Radian... Service instructions

GYS
GYS PSW 601 W manual

Hisense
Hisense AVD-76UX6SEL Operation installation maintenance manual

Hoymiles
Hoymiles HM-300 Quick installation guide

SMA Solar Technology
SMA Solar Technology Sunny Tripower 15000TL Service manual

Beretta
Beretta IDRA MS 200 Installation and operation manual