Sportneer P110M User manual

MOTORIZED TREADMILL
Model: P110M
User Manual
Please read all precautions and instructions in the manual carefully before using this equipment and
save it for future reference.

1. Safety Cautions....................................................................................................1
2. Specifications.......................................................................................................5
3. Assembly Instructions.........................................................................................5
4. Operation Guide .................................................................................................10
5. Program Chart ...................................................................................................22
6. How to Fold and Move .......................................................................................25
7. Suggested Stretching ........................................................................................26
8. Maintenance.......................................................................................................28
9. Exploded Drawing ..............................................................................................32
10. Parts List ..........................................................................................................33
11. Troubleshooting...............................................................................................35
12. FCC Statement .................................................................................................36
CONTENTS

1
SAFETY CAUTIONS
1. IMPORTANT SAFETY INSTRUCTIONS
WARNING –To ensure users can get the best performance from the treadmill, please read the user manual
carefully before assembly and use, and keep it for future reference.
* Users with heart or other health problems may catch serious physical injuries when using the device. Please
consult a doctor before using the treadmill. If you feel dizziness or breathing difculties, please stop exercising
immediately.
* Please read, understand and carefully follow all warnings, instructions, and procedures on the treadmill and in
this user manual before use. Otherwise, damages or injuries may occur.
* The treadmill is not suitable for people with physical, sensory or mental disabilities (including children)
and those who lack of experience and knowledge, unless he/she use use it under safe conditions and the
supervision/guidance of a special personnel.
* Place the treadmill on a flat and solid ground. Do unplug the power cord when the device is in no use. Before
turning off the treadmill, switch all controls to OFF position and then unplug the power cord from the connected
outlet.
* Keep the power cord away from hot surfaces or hot ground.
* Keep the top surface of its moving parts clean and dry, especially keep the power cord away from moving parts,
e.g. the incline bracket and front wheels.
* Do not place the power cord under or around the treadmill. Do not use the device if its power cord is damaged
or not long enough or soaked by water. Please contact our customer service team or the distributor to replace
the cord.
* Place the safety key in a safe place away from children.
* Do not use parts that are not recommended by the manufacturer.
* Do not use this device in conned spaces. Ensure that the vent is unblocked by cotton bers or hair.
* Do not drop anything in the cracks and openings of the treadmill. If it occurs, please turn off the device and
unplug the power cord. Remove the matters carefully to make sure there are no foreign objects any more. If
you’re unable to remove it, please contact the after-sales team.
* Treadmill is intended for use in cool, dry conditions only. Please avoid to store the device in extremely cold, hot
or damp areas as this may lead to corrosion and other related problems. Its allowed working temperature is 5 ~
40 Celsius degrees.
* Do not use the treadmill in paint or drug spraying environments to avoid explosion.
* Do not place any liquid near the equipment unless it is placed on bottle rack with airtight lid.
* Do not exceed the maximum bearing weight 220LB/100KG. Only one person is allowed to operate the equipment
at a time.
* This treadmill is only intended for consumer use only. Do not place animals on or near the machine.
* This machine is only intended for household use.
* Wear appropriate sports wear when using the treadmill. Do not wear loose clothes that may get caught in the
treadmill. Do not operate the equipment with bare feet or socks. Athletic clothes are recommended. Always
wear athletic shoes & never run on the treadmill with bare feet, only stockings or in slippers or sandals.
* Keep loose clothing, shoelaces, towels, and other items away from the moving parts.
* Hold the hand rails when getting on and off the treadmill or exercising on the treadmill for your safety. In case of
an emergency such as tripping, grab the handrails and stand on the plastic side rail on either side of the running

2
board. The handrail with pulse sensor plate is used to test your heart rate once resting your hand on it, or to
stabilize your body when you turn off the treadmill.
* Put the clamp of the safety key on your clothes and make sure that the safety key is connected to the console.
* Start the treadmill by standing on the plastic side rail instead of running belt.
* Start exercising after making sure running belt is located in the middle. If the running belt is tilted to one side, it
should be adjusted according to the equipment maintenance section before exercise.
* Don’t walk, jog, or run in opposite direction when the treadmill is turned on, and please pay high attention when
placing it on inclined conditions.
* Do not accelerate or decelerate without connecting to power and do not stop the machine abnormally.
* Keep your hands away from the bottom or sides of the machine while it is running.
* Don't let people interfere with the user or device while exercising.
* Wait until the running belt stops completely before stepping off the treadmill.
* Unplug the power cord after use and before cleaning.
* To turn off the treadmill, rst turn off the power switch and then pull out the power plug gently. Do not pull the
power cord to remove the power plug rudely.
* Only professional maintenance personnel is allowed to maintain the device.
* Move the treadmill from its back side by holding the two handrails, rather than from the front of console.
* Note : Noise under load is higher than without load.
DANGER - To avoid electric shock, turn off the device before cleaning and repairing.
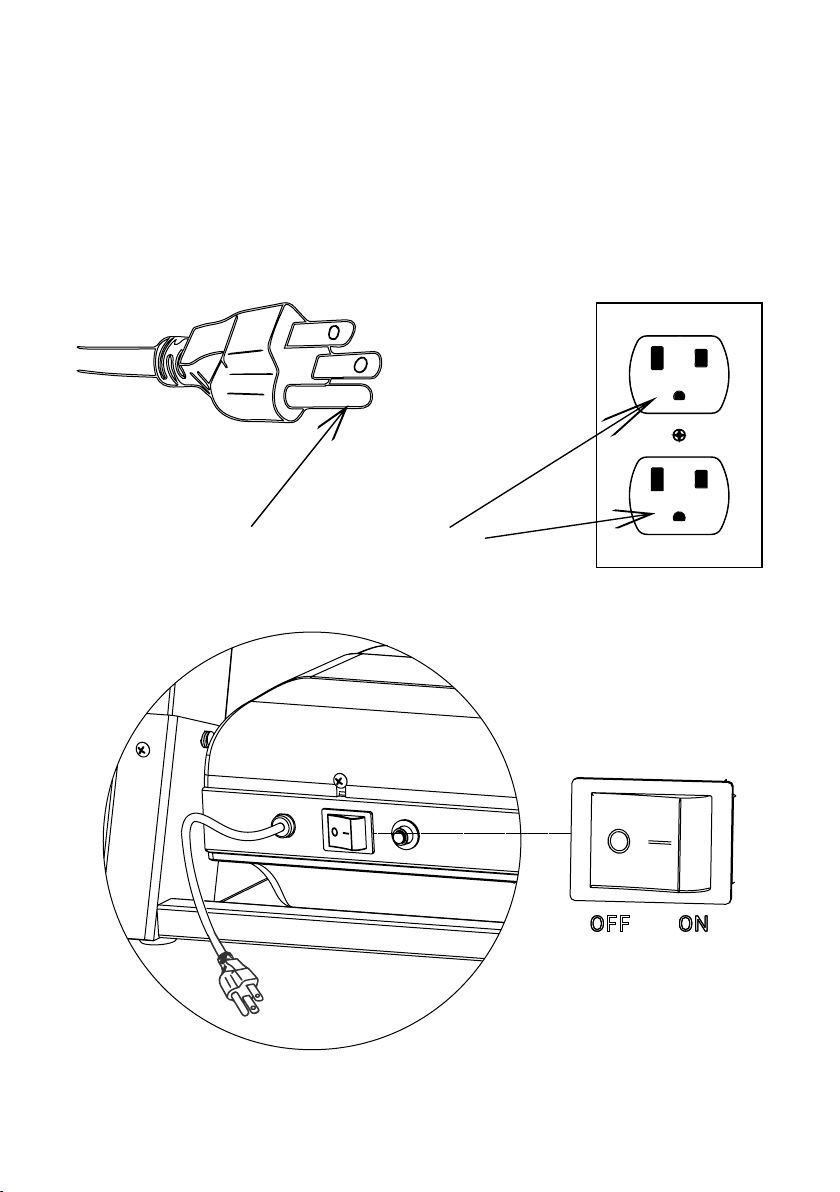
NOTE - To avoid functional problems, the treadmill should be plugged into a dedicated 15A circuit system
with appropriate grounding measures and a 3-pin AC power socket. For more details, please read the grounding
instructions section.
WARNING - Inspect the treadmill for incorrect, worn, or loose components before use, and tighten them prior to
use. If there is any worn or damaged component, contact the after-sales staff for replacements. Worn or damaged
components shall be replaced immediately and only manufacturer supplied or approved components shall be
used to maintain or repair the treadmill.
WARNING - To avoid fire and electric shock, do not expose the device to rain and humidity, and do not
assemble the treadmill outdoors or near a pool, sauna, or high humidity area. Only use the equipment in a room
temperature at 15°C ~ 35°C and humidity at 30%RH ~ 70%RH. Beyond this scope, the functions of the equipment
may be affected.
If you have any question like renting, using, or maintaining the treadmill, please contact customer service staff for
help.
WARNING- To reduce the risk of re, electric shock, and physical injuries:
Keep a space at the back of the treadmill: at least 2M/78” away from the front, and at least 1M/39” on either
side of the treadmill. Do not place the treadmill in a box or against a wall, furniture, or other objects. Ensure that
bystanders can touch the treadmill directly and can easily turn off the power of this machine.

3
2. GROUNDING INSTRUCTIONS
The grounding operations must be accurate. In the event of failure or damage, grounding protection will reduce
the risk of electric shock. This product is equipped with a grounding conductor and a grounding plug. The plug
must be inserted into a suitable power socket, and its user should install grounding in accordance with local laws
and regulations.
DANGER - Improperly connected grounding conductor may cause electric shock. If you have any question
about the grounding, please contact a qualified electrician or after-sales personnel. Do not use a plug that
doesn’t match the product. If the plug does not match the power socket, please ask an electrician to install a
suitable socket.
The 110V device is designed for users in the North American area.
3. RADIO FREQUENCY INTERFERENCE (RFI)
Under the FCC Regulation 15, tness devices must be tested to meet the limitations of class B digital devices.
These requirements are used to provide reasonable protection from radiated energy generated during residential
use or installation of the equipment. If the equipment is not installed in according to the user manual, it may
cause harmful interference to electrical frequency communications.
If the treadmill affects the radio or TV reception or they cause turning off/on of the treadmill, you can solve the
issue by:
* Redirecting or laying the TV, radio, VCR, DVR, etc.
* Isolating the treadmill from the receiver (TV, radio, VCR,DVR ,etc).
* Plugging the treadmill to a different dedicated power socket away from the receivers. Consult an experienced
radio/Television technician.
WARNING - Any modication to the product without approval by FCC regulations may make you unable to use
it again.
Clear Space
Grounding Methods
Grounded PIN Grounded Outlet

4
Canadian Department of Communications
This digital device cannot exceed the type B radio noise set by the Communications Commission of Canada for
radio interference.
4. STATIC ELECTRICITY
As a large energy machine that may generates static electricity, the treadmill may cause some users to suffer
from static shock. Excessive static electricity can damage electronic components too. The following steps are to
prevent static electricity. If you still can't solve the problem, please turn the treadmill over to a professional.
Environmental reasons
Static electricity may relate to some environmental factors. It is very common for a treadmill to generate static
electricity when it repeats some actions and comes into friction when it is directly placed on a rough carpet.
Dry and dusty environment can increase the intensity of static electricity. Cleaning your treadmill regularly can
decrease the risk or intensity of static electricity generated.
Mechanical reason
The treadmill motor clogged with dust and other debris will increase the risk of static electricity. Excessive friction
on the motor belt will generate static electricity. Check whether the power cord and plug is damaged. Failure to
plug the treadmill into a grounding socket equipped with a voltage protector may cause static electricity.
Several simple ways to reduce static electricity
In dry environment, place a humidier in the running room to help reduce static electricity. The recommended
humidication level is 45%. Place a rubber pad under the treadmill or use a ber softener and electrostatic spray
on the carpet where the treadmill is located. Wear clothes made from natural materials such as cotton. Synthetic
fibers, polyesters, and nylon material cloths tend to adhere to static electricity. Choose shoes made of non-
conductive materials and clean them before using the treadmill.
Treadmill maintenance suggestions
Keep your treadmill clean and lubricate it to reduce the risk of static electricity. For more maintenance information,
read the treadmill maintenance section of the user manual. If all above limiting static electricity ways don’t reduce
the incidence of static electricity, stop using the treadmill and submit it to a professional for repair.
5. USING THE EMERGENCY STOP SYSTEM
This product is equipped with an emergency stop system that is consisted of a safety clip and a safety switch.
The clip is connected to the switch through a wire, and you can pull the wire to open the switch and stop the
running treadmill in emergency.
Before starting an exercise program, follow the steps below to test if the system works properly.
Insert the safety key into the position on the console and clip the safety clip to your clothing.
NOTE: If the safety switch is not inserted into the correct position, all display windows will display "---" .
To start the treadmill, put your feet on the treadmill side rails and press the Start button. The running belt starts
running slowly at a speed of 0.6 MPH (1.0 km/h).
NOTE: Do not increase speed while testing.
Step on the running belt to start running, and make sure you're running in the middle of the running area. Stop
running and let the running belt take you to the rear part of the running area. As you approaching the rear of
the running belt, the safety switch wire will be pulled backward and the safety switch will be pulled off from the
console and treadmill will be stopped.
5
If you feel the distance is too far before the safety switch is pulled off, you can reduce the length of the safety clip
wire.
NOTE: For your safety, NEVER lengthen the safety clip wire. Always use a safety clip when running on a treadmill.
If the safety switch is pulled out, the running belt will stop suddenly and the treadmill will go into pause mode. You
need to properly insert the safety switch again and press the Start button to restart the treadmill.
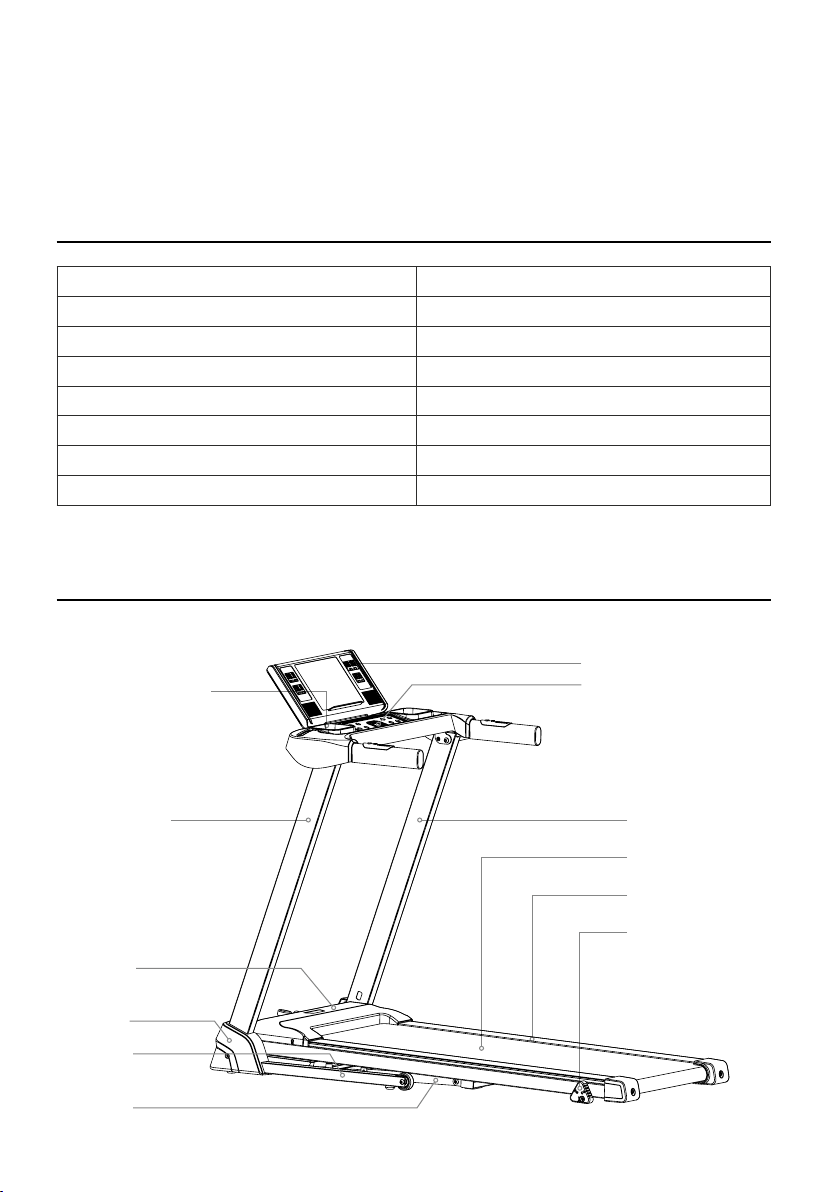
ASSEMBLY INSTRUCTIONS
1. Product Illustration
Console Plastiv Housing
Console
Left Upright Tube
Safety Key
Motor Cover
Right Upright Tube
Running Belt
Side Rail
3-Level Manual Incline
Base Cover
Base Frame
Main Frame
SPECIFICATIONS
Speed 0.6-7.5Mile/H
Net Weight 41 KGS / 90Lbs
Max User Weight 100 KGS / 220 Lbs
Rated Voltage 110 V
Assembly size Inch 559.05 × 267.72 × 47.24
Folding Size Inch 307 × 267.72 × 47.27
Frequency band 2.402GHz~2.480GHz
Maximum transmission power ≦4dbm

6
2. Open The Box And You Can Find All Parts Below.
STEP 1
Lay the master carton on a flat floor and cut off all straps as shown in the picture below:
1PC
Main Frame Console Console Frame
Base Cover L
1PC
Base Cover R
1PC
Button Head Hexagon socket screw
M8*15
2PCS
M10 Flat Washer
2PCS
Cross Socket Wrench
1PC
Wrench 5MM
1PC
1PC
Wrench 6MM
1PC
Lubrication Oil
Safety Key
1PC
M8 Flat Washer
2PCS
Adjusting Knob
1PC
Large Cross Flat Head Screw
M5*12
2PCS
Button Head Hexagon Socket Screw
M10*45
2PCS
Countsunk Head Hexagon Socket
Screw M8*15
2PCS
Upright Tube
7
STEP 2
Lift the master carton cover as shown in the picture and remove all the protective foams inside.
STEP 3
Take out the treadmill from the box, and lay it on a flat floor.
WARNING! Do not cut the straps before taking the product out of box. NOTICE: Be aware of the risk of hands
pinching when taking out the treadmill.
* Do not cut the zip ties before removing the
treadmill out of the carton!
* Do not cut the zip ties after you put the
treadmill base on the flat floor!
* Failure to do so could result in body injuries!
DANGER
8
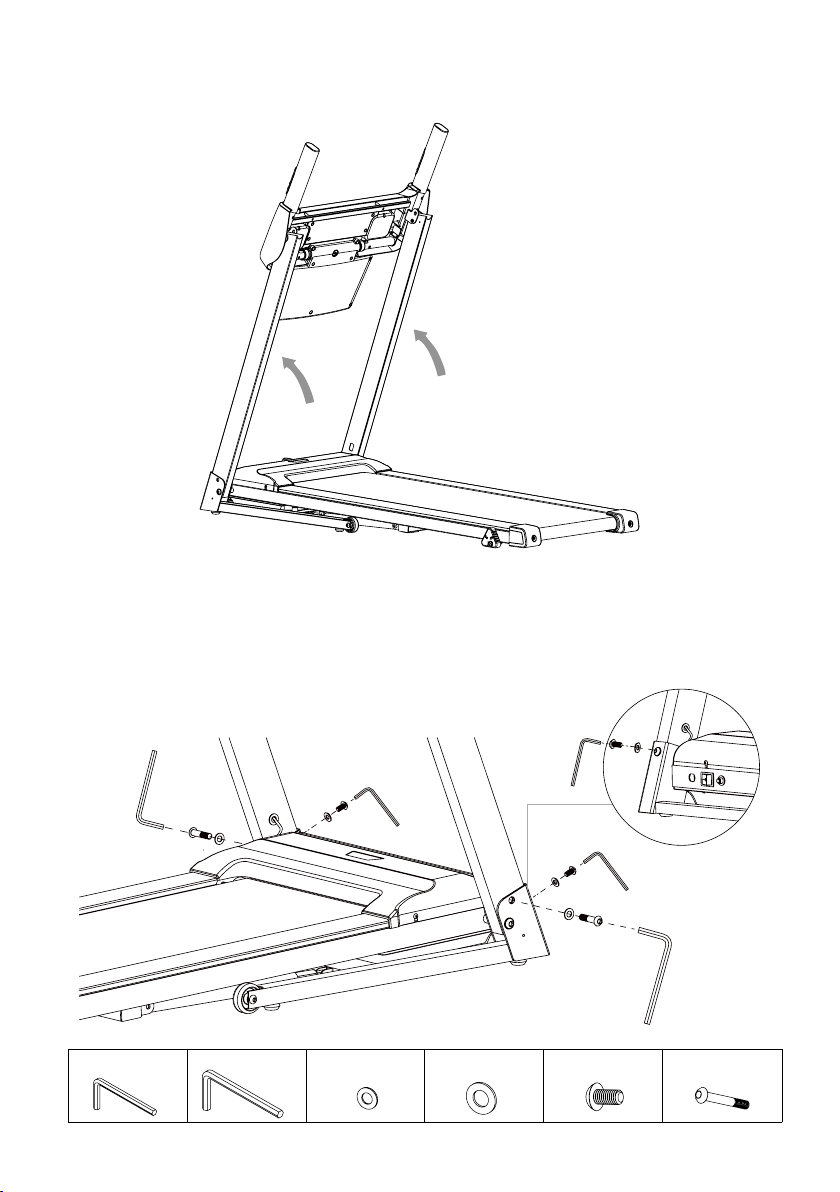
STEP 4.1
Lift the left and right upright tubes upward with both hands. Note: Do not place your hands in the bottom rotation
position to avoid being clamped.
STEP 4.2
* Use the 6mm wrench to fasten the L and R upright tubes onto both sides of the base frame with 2 M10*45 bolts
and 2 M10 flat washers.
* Use the 5mm wrench to fasten the L and R upright tubes onto both sides of the base frame with 2 M8*15 bolts
and 2 M8 flat washers.
M10 Flat Washer M10*45M8 Flat WasherWrench 5MM Wrench 6MM M8*15

9
STEP 5
Use the cross socket wrench to fasten the base cover-L and base cover-R with 2 M5*12 large cross flat head
screws onto both sides of the base frame.
STEP 5.1
Lift the console up as pictures below:
STEP 5.2
Use the 5mm wrench to install the console rack onto left upright tube and right upright tube with 2 M8*15
countersunk head screws.
M5*12 Cross Socket Wrench M5*12 Cross Socket Wrench
Wrench 5MM
M8*15
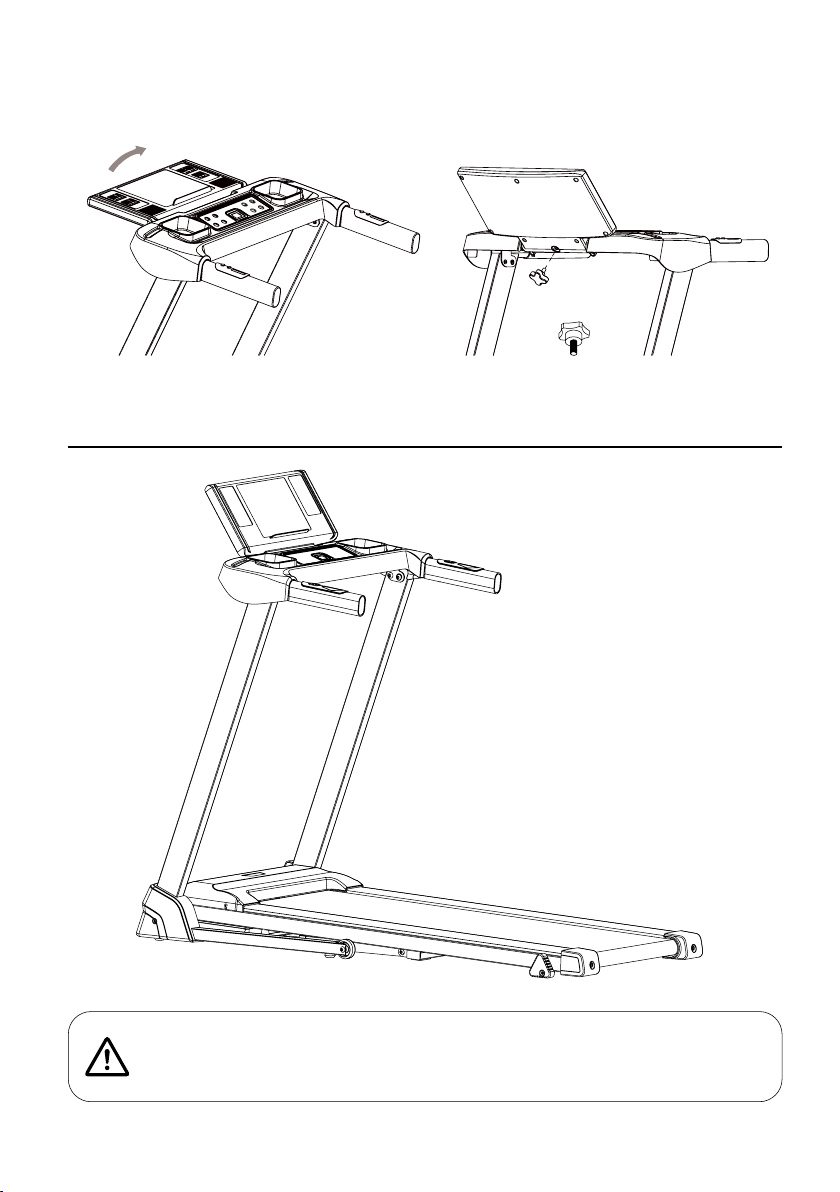
10
STEP 5.3
Turn the console upward slightly to expose the mounting hole, then use the adjusting knob bolt to x the console
onto the console rack.
NOTE:
For your safety and comfort, please check whether all screws are tightened. Congratulation! A brand
new motorized treadmill has been successfully assembled!
Adjusting Knob
OPERATION GUIDE
11
STEP 1
Before to start the treadmill, please check whether all screws are tightened, all cables are connected correctly, and
nothing blocks the movement of the running belt.
As shown in the picture, plug in the power cord and toggle the power switch to ON position.
Grounding Methods
Grounded PIN Grounded Outlet

12
STEP 2.
Manual Inclining Adjustment
There are 3 manual inclining levels available. You can adjust to the desired level number against the ground as
following pictures. (Note: You should adjust to the same level on both sides).
STEP 3
HOW TO SHIFT BETWEEN METRIC AND ENDLISH UNIT
Remove the safety key, and press P+M buttons for 3 seconds to shift between Metric and English Unit.
ENDLISH UNITMETRIC UNIT
KM/KM/HH
MPMP HHMPMP HH
KM/KM/HH
RemovRemov ee
ththe e safetsafet y y keykey, , anand d prespres s s P+P+M M buttonbuttons s tto o
shifshif t t betweebetwee n n MetriMetric c anand d EnglisEnglis h h UnitUnit..

13
GENERAL SAFETY TIPS
A. Practice assembling and disassembling your treadmill before starting your workout.
B. Attach one end of the safety key to the console (the treadmill will not run without the safety key) and clip its
other end onto your clothing before exercising to ensure the treadmill will stop if the user accidentally walks off
the treadmill.
NOTE: Without the safety key, the treadmill won’t work and the display screen will display “E7”.
Safety Key
STEP 4
Once clip the clamp of the safety key onto your clothes and put the other end of safety key to the xed position on
the console, the treadmill will enter “STANDBY” state.
KM/H
MP H MP H
KM/H

14
C. If the user falls off the treadmill, the safety key will come off the console and the treadmill will stop at once to
prevent further injuries.
D. Do not stand on the walking belt while starting the treadmill. Straddle the belt and stand on the plastic foot rails.
E. The treadmill will start at 0.6 Mile/H after countdown. If you are a green hand, stay at a slow speed and hold
onto the hand grips until you feel comfortable.
QUICK REFERENCE GUIDE
No. Part Name No. Part Name
A SPEED WINDOW H SPEED+ BUTTON
B APP CONNECTION I SPEED- BUTTON
C DISTANCE WINDOW J PROGRAM BUTTON
D TIME WINDOW K START BUTTON
E PHONE CONNECTION L QUICK SPEED BUTTON
F PULSE/CALORIE WINDOW M STOP BUTTON
G WIRELESS PHONE N MODE BUTTON
KJ L
G
M N
C F
B E
A D
KM/H
MP H MP H
KM/H
HI

15
DISPLAY FUNCTION
BUTTON FUNCTIONS
Part Name Function
SPEED Displays the current belt speed from starting ranging at 0.6 ~ 7.5 MPH.
DISTANCE Accumulates total workout distance from 1.0 to 99.0 kilometers by count-up.
TIME Accumulates total workout time from 0:00 to 99:00 minutes.
CALORIE Accumulates calorie consumption (Max. 990kcal) during exercise.
PULSE
When pulse signal is detected by grasping both stainless steel pick-ups on front handrails,
it will display your current heart rate in beats per minute from 50 to 200 (The data is for
reference only and it should not be regarded as medical data.).
PHONE When the treadmill is connected to your phone through wireless pairing, the “PHONE” will
be lighted and the treadmill can start to play music on your phone.
Wireless Phone
Charger
Put your wireless charging supportive device onto the console with charging icon, then
the device will be charged.
APP Activate the wireless pairing function and run the APP in your phone, the “APP” will be
lighted and you can control the treadmill through the app on your phone.
BUTTON Function
SPEED +
Each time you press this button, the speed will increase 0.1 MPH. If you hold the button for
more than 2s, the speed will increase continuously. During Time /Distance/Calorie setting
mode, press this button to increase setting value.
SPEED -
Each time you press this button, the speed will decrease 0. 1 MPH. If you hold the button for
more than 2s, the speed will decrease continuously. During Time /Distance/Calorie setting
mode, press this button to decrease setting value.
PROG
In standby mode, press this button to select programs from manual program to P01-P08,
U1/U2/U3/ BODY FAT. Manual mode is the default operating mode, with default lowest speed
0.6 MPH and the highest speed 7.5 MPH. Under any of P01~P08 program, press
key to select its sub-program L01~L08. The default running time for each sub-program is
30s. You can press speed +/- button to adjust the running time, and then press “START”
to start exercise.
MODE Press the button to select between 3 countdown training modes. Time countdown
→Calorie countdown →Distance countdown →Normal Mode
START Press this button to start the treadmill, and treadmill will count down 3s before running.
STOP
Short press this button to enable the treadmill to enter PAUSE status, then all data will be
kept. Press this button one more time, then the treadmill will stop and all data will be cleared.
- Press the button to switch the speed to 3MPH.
- Press the button to switch the speed to 5MPH.

16
GETTING STARTED
Simply press the button on the console to begin belt movement after count-down from 3 to 1. Press
/ buttons on the console to adjust the speed. Certainly, you may press and hold any of the two
buttons to continuously adjust the speed or or button on the console to quickly set the specied speed.
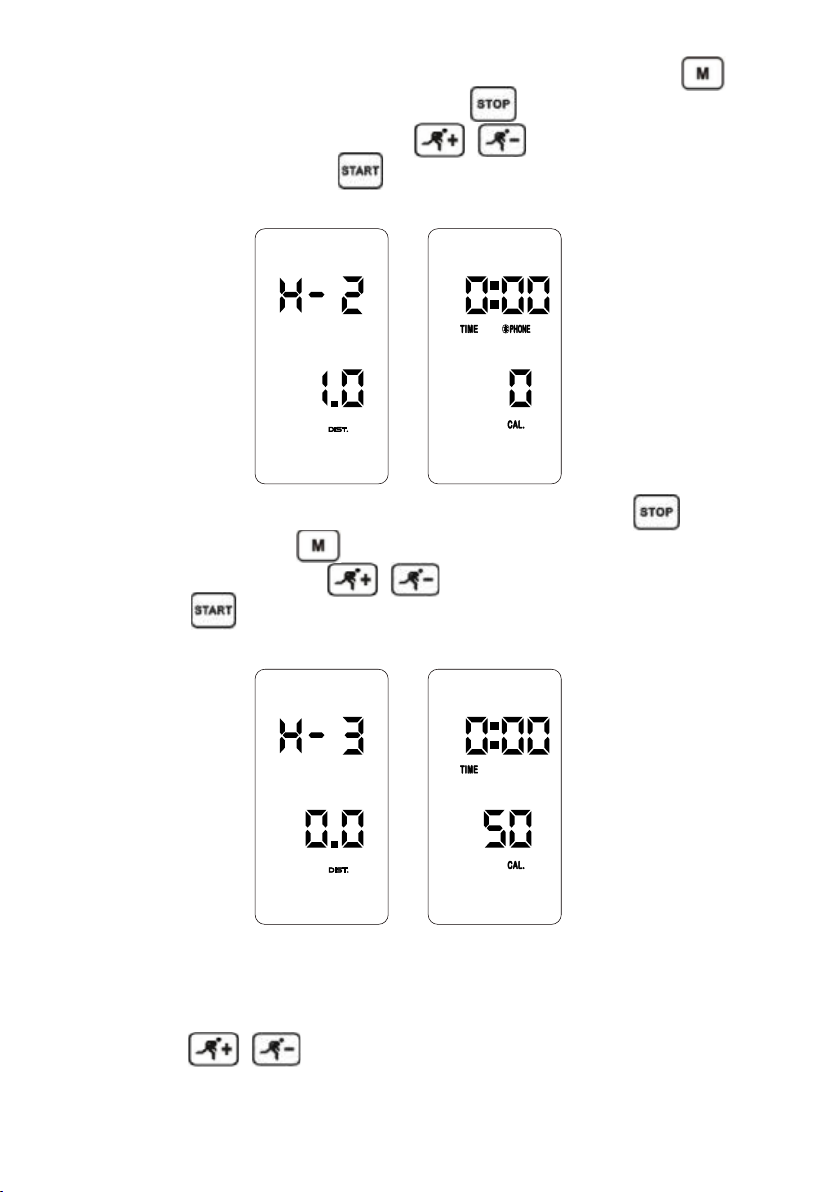
Count-down Modes
When you press the button, one of TIME, DIS(Distance), and CAL(Calorie) can be set to count down to
reach the particular tness goal, at the same time, the other two will count up during the workout. You can also
adjust the speed by pressing / button on the console.
Press the button, the TIME window will display the default workout time as 30:00. Press the /
button on the console to set count-down time from 5:00 to 99:00 minutes. Simply press the button on the
console to begin belt movement. Once the count-down reaches zero, the belt will stop moving.
START/
STOP SPEED
NO-LOAD STOP FUNCTION
When the user off the working running belt over 60 s , the treadmill will stop moving
automatically
KM/H
MP H MP H
KM/H
17
64 Preset Programs
Tip: Please kindly note that there are 64 preset programs to reach 8 different training goals, each goal with 8
different intensity levels. All the preset programs are made up of 18 time-based segments, with preset speed on
each segment. The default workout time of each program is 30 minutes, but it can be adjusted from 5:00 to 99:00
minutes by pressing / button on the console. The workout time of 18 segments on each program
will be automatically arranged according to the workout time you set. The speed you set will only be effective on
the ongoing segment. After the segment completes, the speed on the next segment will still process at preset
value.
To switch the mode to DIS (Distance) count-down when the belt is moving, please double press the button
on the console until the data is cleared and then double press the button until the DIS (Distance) icon is
blinking. The default distance was set as 1.0 Mile. Press / button on the console to set count-
down distance from 1.0-99 Miles. Press the button on the console to begin belt movement. Once the DIS
(Distance) count-down reaches zero, the belt will stop moving.
To switch the mode to CAL (Calorie) count-down when the belt is moving, double press the button until
the data is cleared and then press the button for three times until the CAL (Calorie) icon is blinking. The
default calorie was set as 50 KCAL. Press / button to set count-down distance from 20 KCAL to
990 KCAL. Press the button on the console to begin belt movement. Once the CAL (Calorie) count-down
reaches zero, the belt will stop moving.

18
PROG Mode PROG Mode
P1 WEIGHT-LOSS P5 INTERVAL
P2 CARDIO TRAINING P6 ROLLING
P3 FAT BURNING P7 MOUNTAIN CLIMBING
P4 POWER WALK P8 HILL RUN
STEP 1: Press the button to select a specic program among 8 preset options (from P1 to P8).
STEP 2: Press the button to select the intensity level from Level 1 to Level 8.
STEP 3: Press the / button on the console to adjust the workout time. It can be adjusted from 5:00
to 99:00 minutes.
STEP 4: Press the button on the console to begin belt movement.
TIP : To change the program, please double press the button on the console until the data is cleared and
then repeat the above-mentioned steps.
KM/H
MP H MP H
KM/H
Other manuals for P110M
1
Table of contents
Other Sportneer Treadmill manuals

Popular Treadmill manuals by other brands


Pro-Form
Pro-Form 5.2 Treadmill Manuel de l'utilisateur

Colorado time systems
Colorado time systems WaterFit quick start guide

Insportline
Insportline Gardian G12TF user manual

VIVA FITNESS
VIVA FITNESS T752 owner's manual

stex
stex S2ST Operation manual

Christopeit Sport
Christopeit Sport TM550S Assembly and exercise instructions


