Sportneer P110M User manual
Pleasereadallprecautionsandinstructionsinthemanualcarefully before using this
equipment and save it forfuture reference.
Sportneer MotorizedTreadmill
User Manual

Contents
1
SafetyCautions
2-5
AssemblyInstructions
6-10
OperationGuide
11-24
Howto FoldandMove
25
SuggestedStretching
26-27
Maintenance
28-29
ExplodedDrawing
30
Parts List
31
Troubleshooting
32
1
CONTENTS

IMPORTANTSAFETYINSTRUCTIONS
Warning –To ensure users can get the best performance from the treadmill, please read the user manual
carefullybeforeassembly and use, andkeepit forfuturereference.
* Userswithheart orother healthproblemsmaycatchseriousphysicalinjurieswhenusingthedevice.Pleaseconsult
a doctor before using the treadmill. If you feel dizziness or breathing difficulties, please stopexercisingimmediately.
* Please read, understand and carefully follow all warnings, instructions, and procedures on the treadmill and in
thisusermanualbeforeuse. Otherwise,damages or injuriesmayoccur.
* The treadmill is not suitable for people with physical, sensory or mental disabilities (including children) and thosewho lack of
experience and knowledge, unless he/she use use it under safe conditions and the supervision/guidanceofa special personnel.
* Place the treadmill on a flat and solid ground. Do unplug the power cord when the device is in no use.Before turning off the
treadmill, switch all controls to OFF position and then unplug the power cord from the connected outlet.
* Keep the power cord away from hot surfaces or hot ground.
*Keep the top surface of its moving partsclean and dry,especially keep the power cord away
frommovingparts,e.g.theinclinebracketandfrontwheels.
*Donotplacethepowercordunderoraroundthetreadmill.Donot use the device if its power cord is damaged or not long enough or
soaked by water. Please contact our customer service team orthe distributor toreplace thecord.
* Placethesafetykeyinasafeplaceawayfromchildren.
* Donotuseparts thatarenotrecommendedbythemanufacturer.
* Donotusethisdeviceinconfinedspaces.Ensurethattheventis unblockedbycottonfibersor hair.
*Do not drop anything in the cracks and openings of the treadmill. If it occurs, please turn off the device andunplug the power
cord. Remove the matters carefully to make sure there are no foreign objects any more.If you’re unable to remove it,
pleasecontacttheafter-salesteam.
*Treadmill is intended for use in cool,dry conditions only. Please avoid to store the device in extremely cold,hot or damp areas
asthismayleadtocorrosionandotherrelatedproblems. Its allowedworking temperatureis5 ~ 40 Celsius degrees.
* Donotusethetreadmillinpaintordrugsprayingenvironmentstoavoidexplosion.
* Donotplaceanyliquidneartheequipmentunlessitisplacedonbottlerackwith airtightlid.
* Donotexceedthemaximumbearing weight.Onlyonepersonis allowedtooperatetheequipment atatime.
* Thistreadmillisonlyintendedforconsumeruseonly.Donotplaceanimals onornearthemachine.
* Thismachineisonlyintendedforhouseholduse.
* Wear appropriate sports wear when using the treadmill. Do not wear loose clothes that may get caught in thetreadmill. Do not
operate the equipment with bare feet or socks. Athletic clothes are
recommended.Alwayswearathleticshoes&neverrunonthetreadmillwithbarefeet,onlystockingsorinslippersorsandals.
* Keeplooseclothing,shoelaces,towels, andotheritemsaway fromthemovingparts.
* Hold the hand rails when getting on and off the treadmill or exercising on the treadmill for your safety.In case of an
emergency such as tripping, grab the handrails and stand on the plastic side rail on eitherside of the running board.The handrail
with pulse sensor plate is used to test your heart rate onceresting your handonit,ortostabilizeyourbodywhen you turn
offthetreadmill.
* Puttheclampofthesafetykeyonyourclothes andmakesurethatthesafetykeyisconnectedtotheconsole.
* Startthetreadmillby standingontheplasticsiderailinsteadofrunningbelt.
* Startexercisingaftermakingsurerunningbeltislocatedinthe
middle.Iftherunningbeltistiltedtooneside,itshouldbeadjustedaccordingtotheequipmentmaintenancesectionbeforeexercise.
SAFETYCAUTIONS
2

* Don’t walk, jog, or run in opposite direction when the treadmill is turned on, and please pay high attention when placing it
on inclined conditions.
* Donotaccelerateordeceleratewithoutconnecting to poweranddonotstopthemachineabnormally.
* Keepyourhandsawayfromthebottomorsidesofthemachinewhileitisrunning.
* Don'tletpeopleinterferewiththeuserordevicewhileexercising.
* Waituntiltherunningbeltstopscompletelybeforesteppingoffthetreadmill.
* Unplugthepower cordafteruseandbeforecleaning.
* Toturnoffthetreadmill,first turnoffthepowerswitchandthenpulloutthepower pluggently.Donotpullthepowercordtoremove the
power plugrudely.
* Onlyprofessionalmaintenancepersonnelisallowedtomaintainthedevice.
* Movethetreadmillfromitsbacksidebyholdingthetwohandrails,rather thanfromthefrontofconsole.
* Note:Noiseunderloadishigherthanwithoutload.
Danger-Toavoidelectricshock,turnoffthedevicebeforecleaningandrepairing.
Note-Toavoidfunctionalproblems,thetreadmillshouldbepluggedintoadedicated15Acircuitsystemwithappropriate
groundingmeasures and a3-pin ACpower socket.For more details,pleaseread the grounding instructionssection.
Warning -Inspect the treadmill for incorrect,worn,or loose components before use, and tighten them prior to use.Ifthere is any
worn or damaged component, contact the after-sales staff forreplacements. Worn or
damagedcomponentsshallbereplacedimmediatelyandonlymanufacturersuppliedorapprovedcomponentsshallbeusedtomaintainorre
pairthetreadmill.
Warning - To avoid fire and electric shock, do not expose the device to rain and humidity, and do not assemble thetreadmill
outdoors or near a pool, sauna, or high humidity area.Only use the equipment in a room temperature at 15°C ~ 35°C and
humidity at30%RH ~ 70%RH.Beyond this scope, the functions oftheequipmentmaybe affected.
If you have any question like renting, using, or maintaining the treadmill, please contact customer service staff for help.
Warning-Toreducetheriskoffire,electricshock,andphysicalinjuries:
Keep a space at the back of the treadmill: at least 2M/78” away from the front, and at least 1M/39” on either side ofthe
treadmill.Do not place the treadmill in a box or against a wall, furniture, or other objects. Ensure that
bystanderscantouchthetreadmill directlyandcaneasily turnoffthepowerofthismachine.
3
SAFETYCAUTIONS

GROUNDINGINSTRUCTIONS
The grounding operations must be accurate.In the event of failure or damage, grounding protection will reducethe risk of electric
shock.This product is equipped with a grounding conductor and a grounding plug.The plug must beinserted into a suitable power
socket, andits user should install grounding in accordance with local laws and regulations.
Danger - Improperly connected grounding conductor may cause electric shock.If you have any question about
thegrounding,pleasecontactaqualifiedelectricianorafter-salespersonnel. Donotusea plugthatdoesn’tmatchtheproduct.If the plug
does notmatchthepower socket,pleaseask anelectriciantoinstall asuitable socket.
The120Vdeviceisdesignedforusers in the NorthAmerican area.
RADIOFREQUENCYINTERFERENCE(RFI)
Under the FCC Regulation 15, fitness devices must be tested to meet the limitations of class B digital devices.Theserequirements
are used to provide reasonable protection from radiated energy generated during residential use or installation of the equipment.
If the equipment is not installed in according to the usermanual, it may cause harmful interference to
electricalfrequencycommunications.
If the treadmill affects the radio or TV reception or they cause turning off/on of the treadmill, you can solve the issue by:
Redirecting or laying the TV, radio, VCR,DVR,etc.
Isolatingthetreadmillfromthereceiver(TV,radio,VCR,DVR,etc).
Plugging the treadmill to a different dedicated power socket away from the receivers.Consultanexperienced
radio/Televisiontechnician.
Warning--AnymodificationtotheproductwithoutapprovalbyFCCregulationsmaymake you unable to use it again.
4
SAFETYCAUTIONS

CanadianDepartmentofCommunications
This digital device cannot exceed the type B radio noise set by the Communications Commission of Canada for radiointerference.
STATICELECTRICITY
As a large energy machine that may generates static electricity, the treadmillmay cause some users to suffer from
staticshock.Excessive static electricity can damage electronic components too.The following steps are to prevent static
electricity.Ifyou stillcan'tsolve theproblem,please turnthetreadmillovertoaprofessional.
Environmentalreasons
Static electricity may relate to some environmental factors. It is very common for a treadmill to generate staticelectricity when it
repeats some actions and comes into frictionwhen it is directly placed on a rough carpet.Dry anddusty environment can increase
the intensity of static electricity.Cleaning your treadmill regularly can decrease theriskorintensityofstaticelectricitygenerated.
Mechanicalreason
The treadmill motor clogged with dust and other debris will increase the risk of static electricity. Excessive frictionon the motor
belt will generate static electricity.Check whether the power cord and plug is damaged. Failure to
plugthetreadmillintoagroundingsocketequipped withavoltageprotectormaycausestaticelectricity.
Severalsimplewaysto reducestaticelectricity
In dry environment, place a humidifier in the running room to help reduce static electricity.The recommendedhumidification
level is 45%.Place a rubber pad under the treadmill or use a fiber softener and electrostatic sprayon the carpet where the
treadmill is located.Wear clothes made from natural materials such as cotton.
Syntheticfibers,polyesters,andnylonmaterialclothstendtoadheretostaticelectricity.Chooseshoesmadeofnon-
conductivematerialsandcleanthembefore usingthetreadmill.
Treadmillmaintenancesuggestions
Keep your treadmill clean and lubricate it to reduce the risk of static electricity.For more maintenance information,read the
treadmill maintenance section of the user manual.If all above limiting static electricity ways
don’treducetheincidenceofstaticelectricity,stopusingthetreadmillandsubmitittoaprofessionalforrepair.
USINGTHEEMERGENCYSTOPSYSTEM
This product is equipped with an emergency stop system that is consisted of a safety clip and a safety switch.The clip
isconnected to the switch through a wire, and you can pull the wire to open the switch and stop the running treadmill in
emergency.
Before starting an exercise program, follow the steps below to test if the system works properly.
Insertthesafetykeyintothepositiononthe console andclipthesafetyclip toyourclothing.
Note:Ifthesafetyswitchisnotinsertedintothecorrectposition,all displaywindowswill display "---".
Tostartthetreadmill,putyourfeetonthetreadmillsiderailsandpresstheStartbutton.Therunningbeltstartsrunningslowlyata speedof0.6MPH
(1.0km/h).
Note:Donotincreasespeedwhiletesting.
Step on the running belt to start running, and make sure you're running in the middle of the running area.Stoprunning and let the
running belt take you to the rear part of the running area. As you approaching the rear of therunning belt, the safety switch wire
will be pulled backward and the safety switch will be pulled off from the consoleandtreadmillwillbe stopped.
If you feel the distance is too far before the safety switch is pulled off, you can reduce the length of the safety clipwire.
Note:Foryour safety,NEVERlengthenthesafetyclipwire.
Always use a safety clip when running on a treadmill.If the safety switch is pulled out, the running belt will
stopsuddenlyandthetreadmillwillgointopausemode.YouneedtoproperlyinsertthesafetyswitchagainandpresstheStartbutton
torestartthetreadmill.
5
SAFETYCAUTIONS
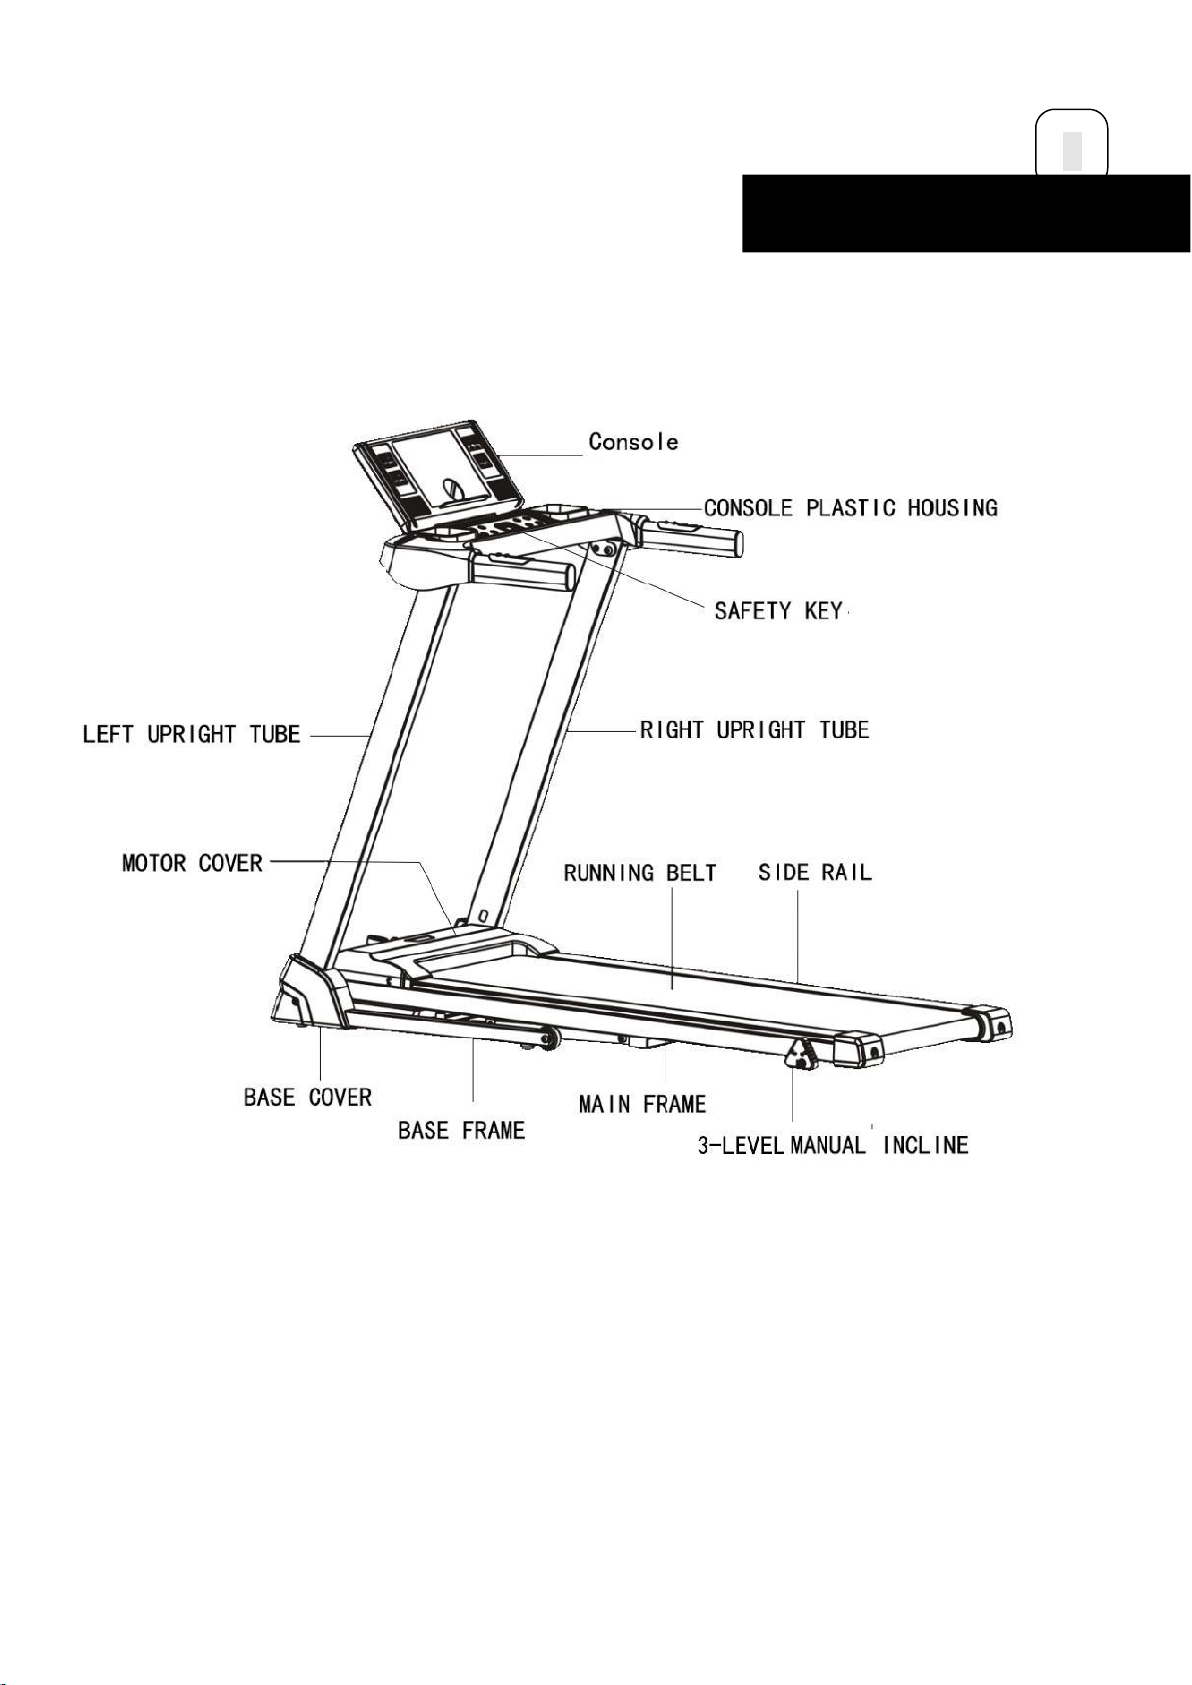
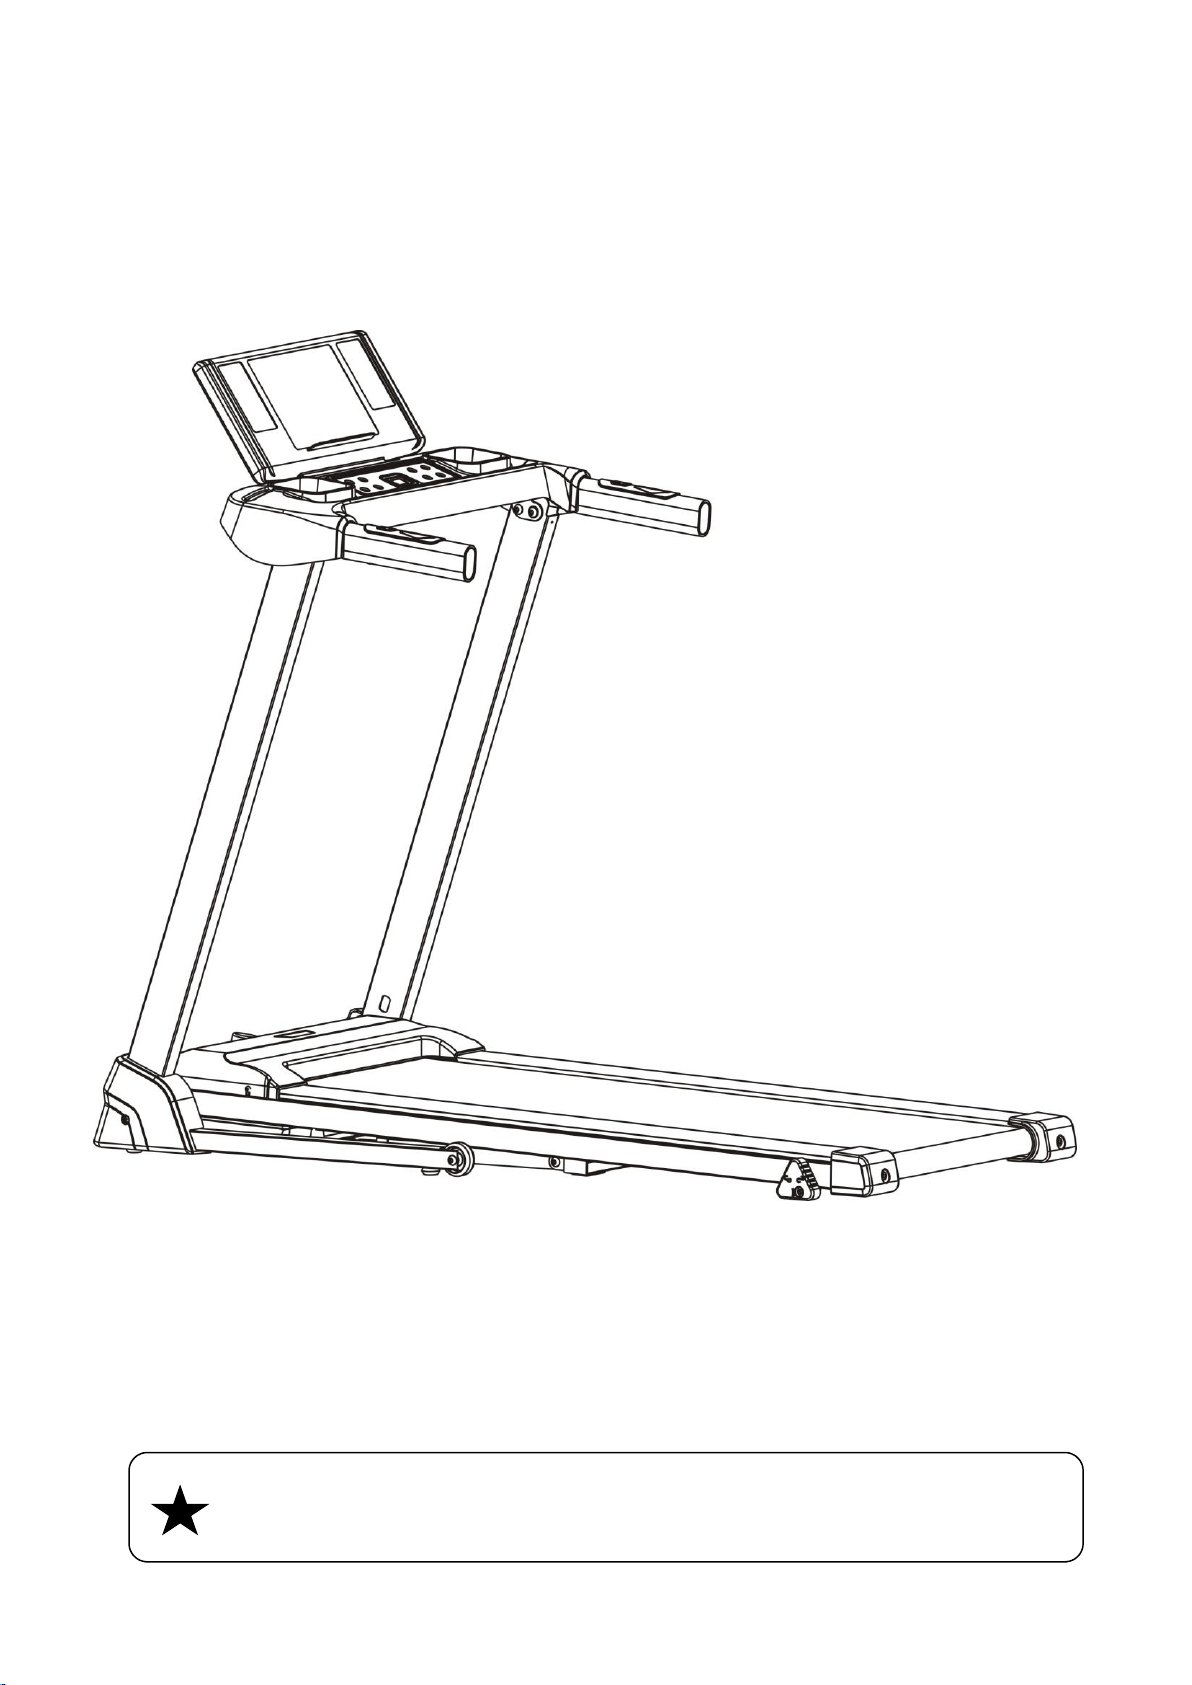
Product Illustration
6
ASSEMBLYINSTRUCTIONS

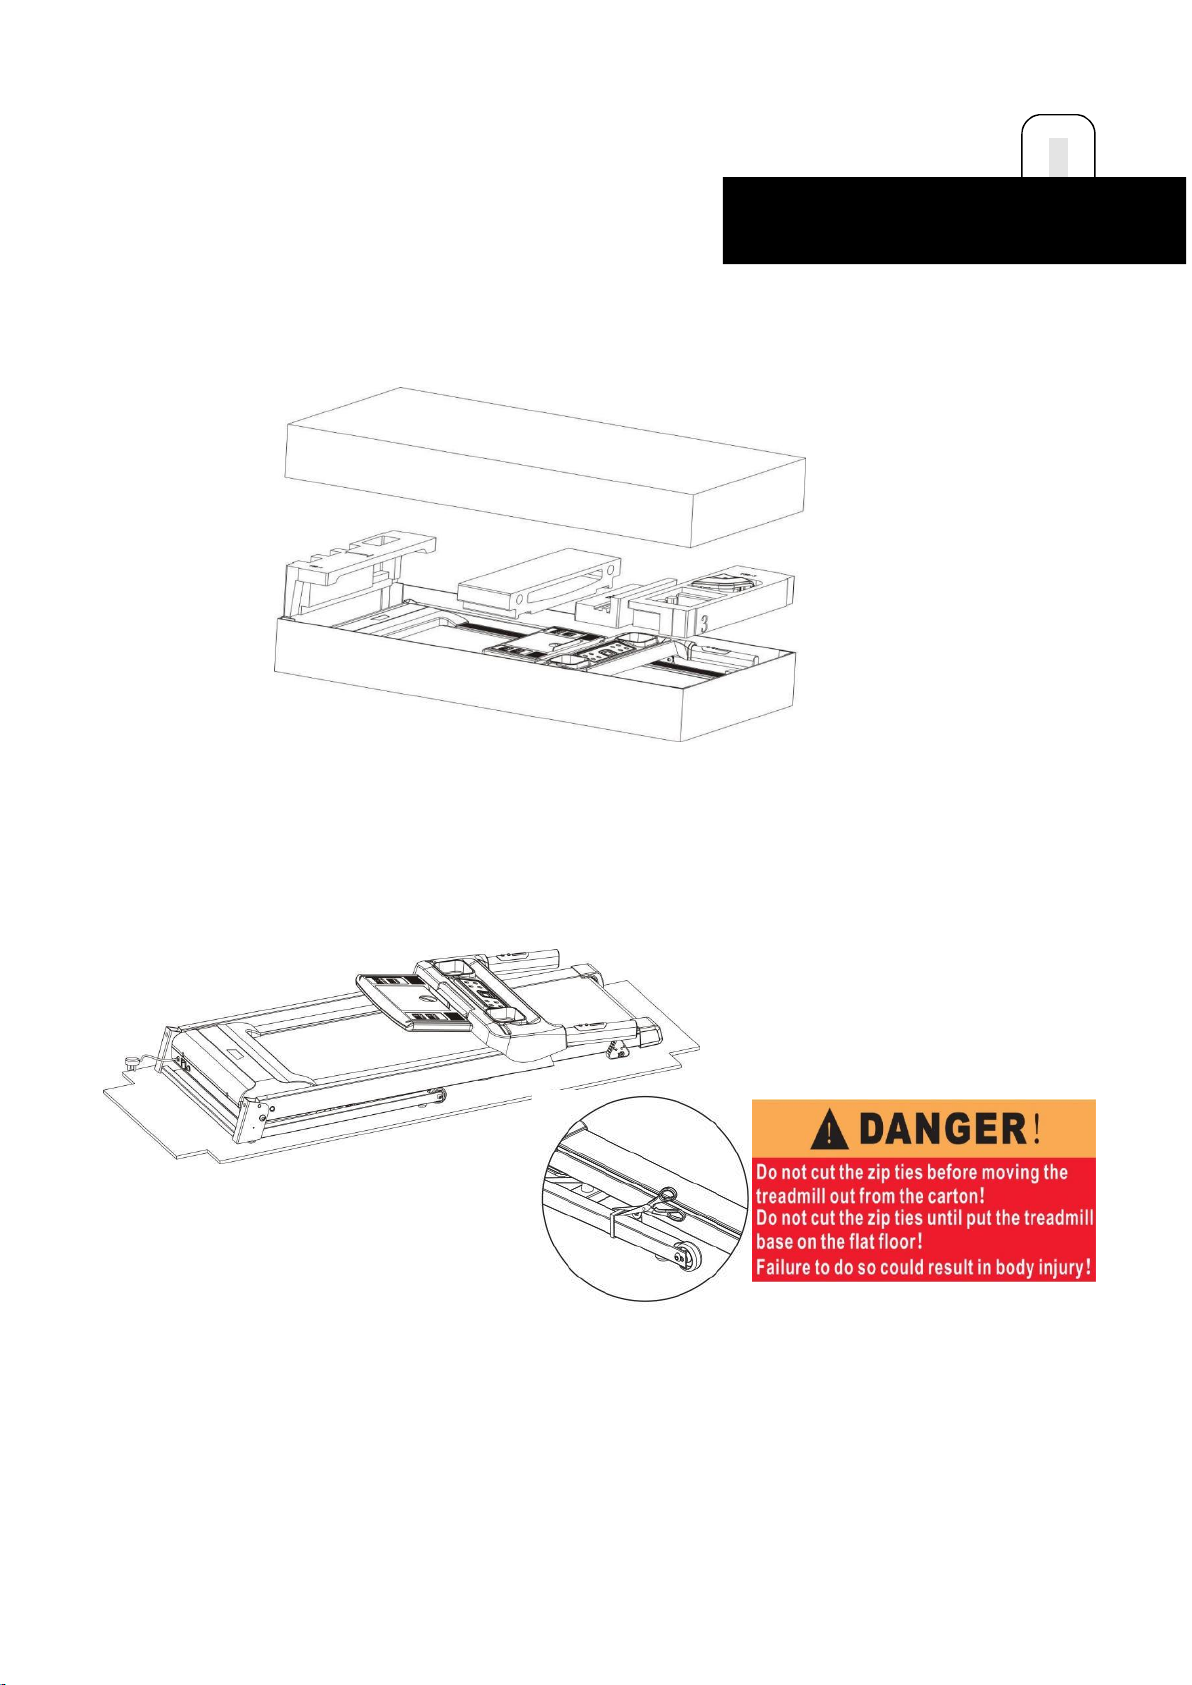
OPENTHEBOX ANDYOUCANFINDALLPARTSBELOW.
上图中所有的1PCS 去掉末尾的S
改成 COUNTERSUNK
STEP 1
Laythemastercartononaflatfloorandcutoffallstrapsasshowninthe picture below:
7
ASSEMBLYINSTRUCTIONS
STEP 2
Lift the master carton cover as shown in the pictureand remove all
theprotectivefoams inside.
STEP 3
Take outthetreadmillfromthebox, andlayitonaflatfloor.
WARNING! : Do not cut the straps before taking the product out of
box.NOTICE:Beawareoftheriskofhandspinchingwhentakingoutthetreadmill.
Danger (右上角小标)
Do not cut the zip ties before removing the treadmill out of the carton!
Do not cut the zip ties after you put the treadmill base on the flat floor!
Failure to do so could result in body injuries!
STEP 4.1
Lift the left and right upright tubes upward with both hands. Note: Do
notplaceyourhandsinthebottomrotationpositiontoavoidbeingclamped.
8
ASSEMBLYINSTRUCTIONS
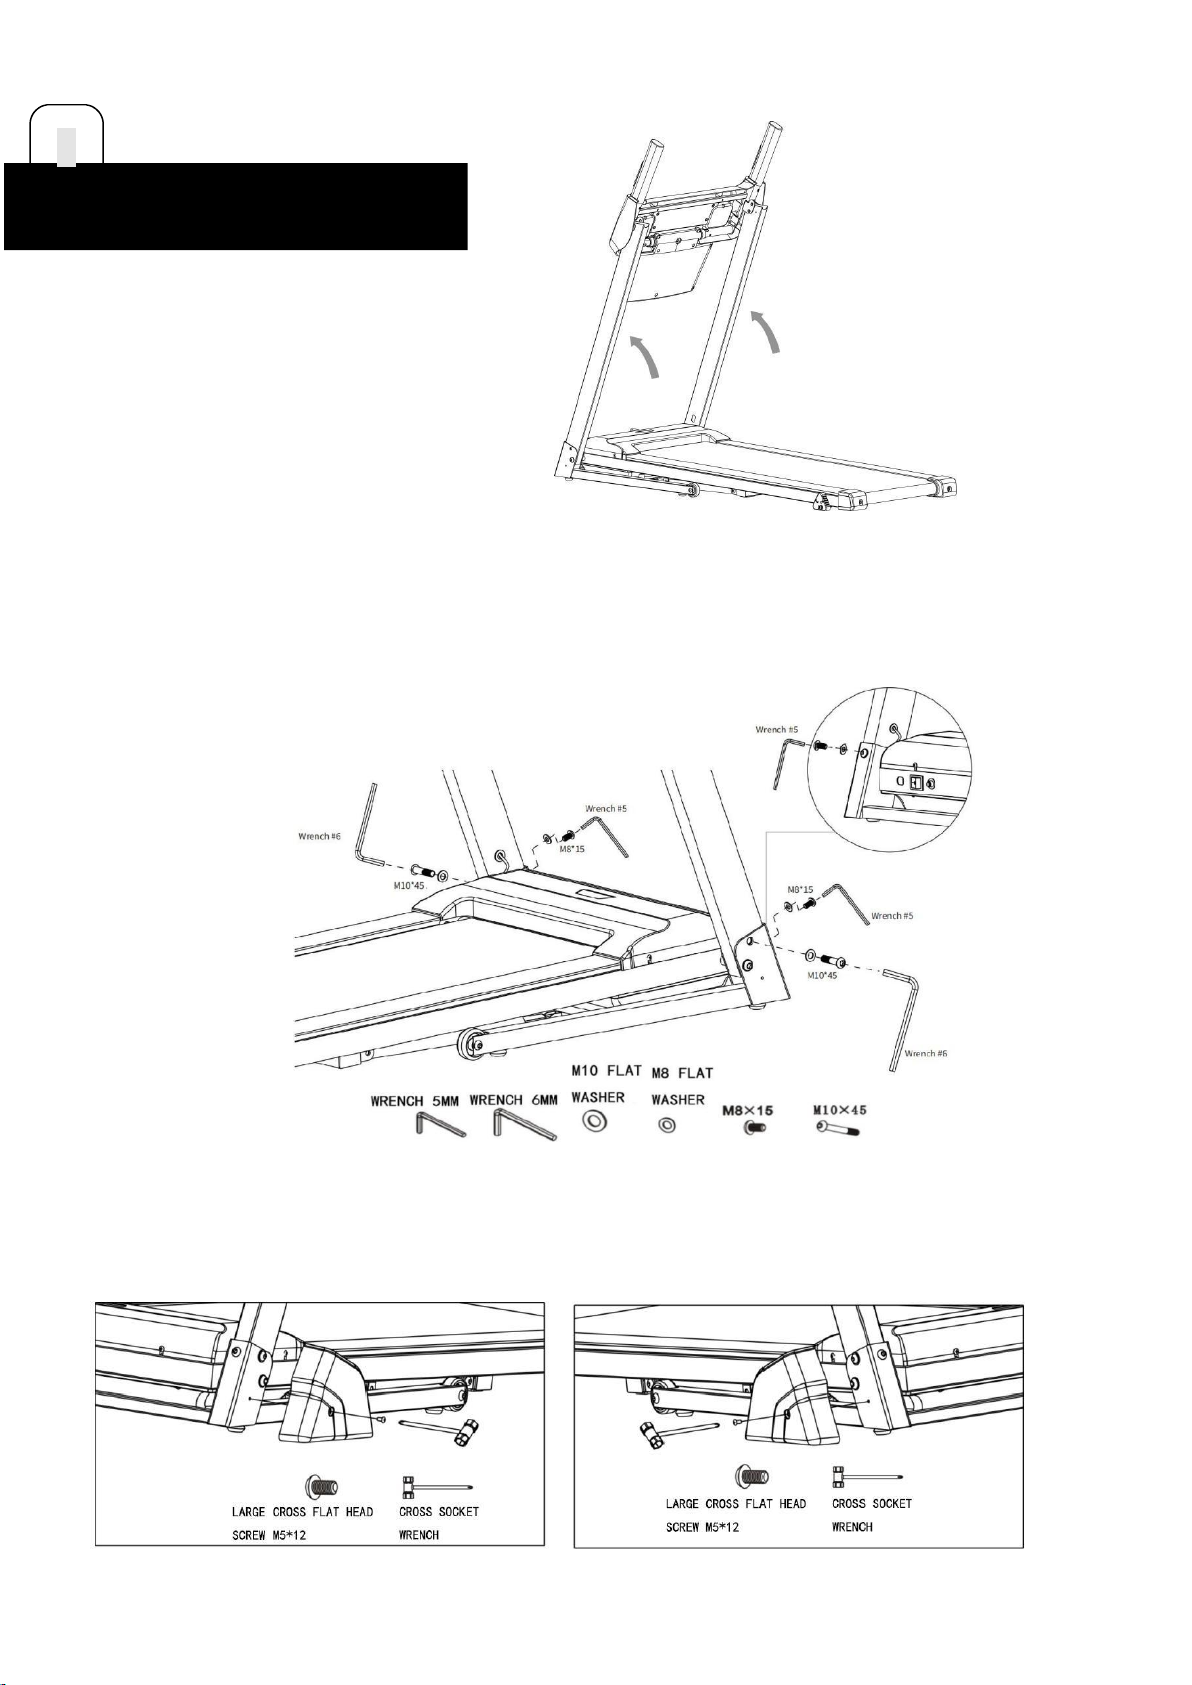
STEP4.2
Use the 6mm wrench to fasten the L and R upright tubes onto both sidesofthe
baseframewith2M10*45boltsand2M10flatwashers.
Use the 5mm wrench to fasten the L and R upright tubes onto both sidesofthe
baseframewith 2M8*15boltsand2 M8flatwashers.
STEP5
Use the cross socket wrench to fasten the base cover-L and base cover-Rwith 2
M5*12 large cross flat head screws ontoboth sides of thebaseframe.
9
ASSEMBLYINSTRUCTIONS
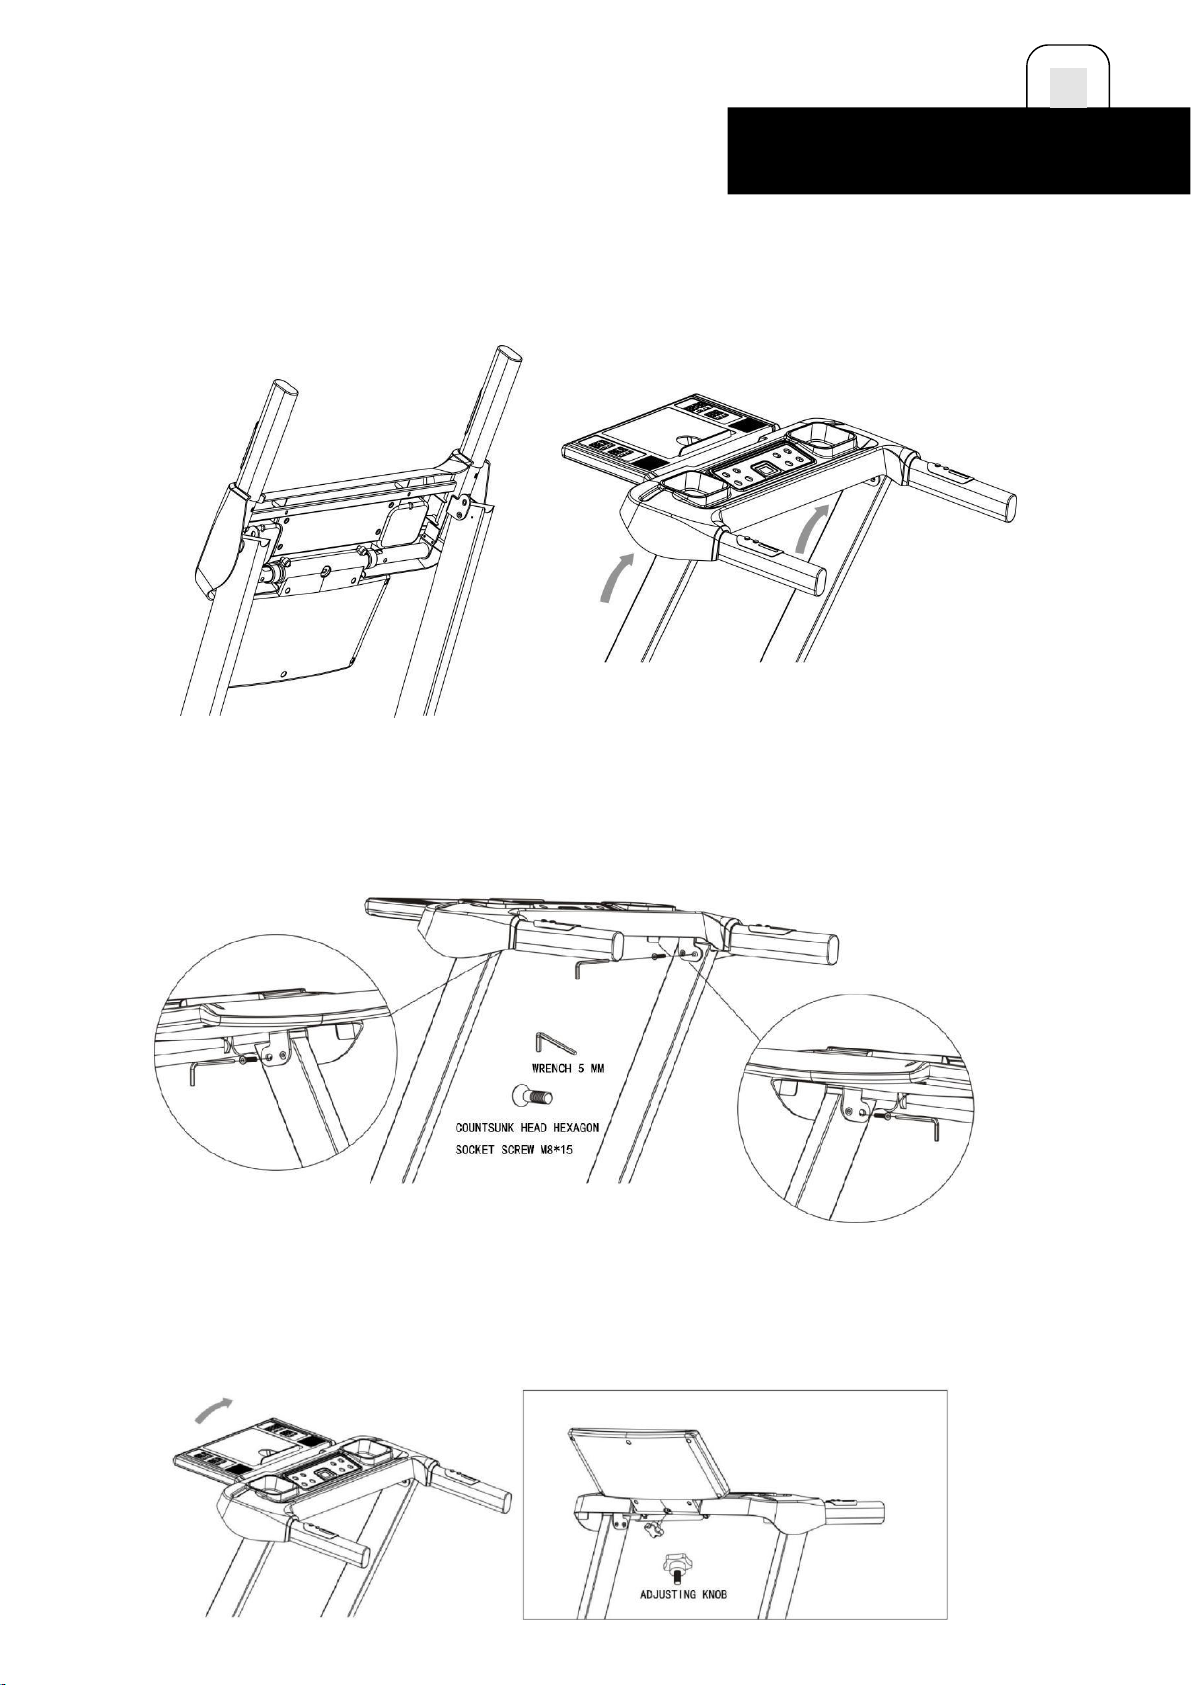
STEP 5.1
Lifttheconsoleup aspictures below:
STEP 5.2
usethe5mm wrenchtoinstall theconsolerackontoleftuprighttube andright uprighttube
with2M8*15 countersunkheadscrews.
.
STEP 5.3
Turntheconsoleupwardslightlytoexposethemountinghole,thenuse the
adjustingknobbolttofixtheconsoleontotheconsolerack.
10
ASSEMBLYINSTRUCTIONS

NOTE: For your safety and comfort, please check whether all screws are
tightened.Congratulation!Abrandnewmotorizedtreadmillhasbeensuccessfullyassembled!
STEP1.Before to start the treadmill, please check whether all screws
aretightened,all cablesareconnectedcorrectly,
andnothingblocksthemovementoftherunningbelt.
As shown in the picture, plug in the power cord and toggle the power switch to
ON position.
11
OPERATIONGUIDE
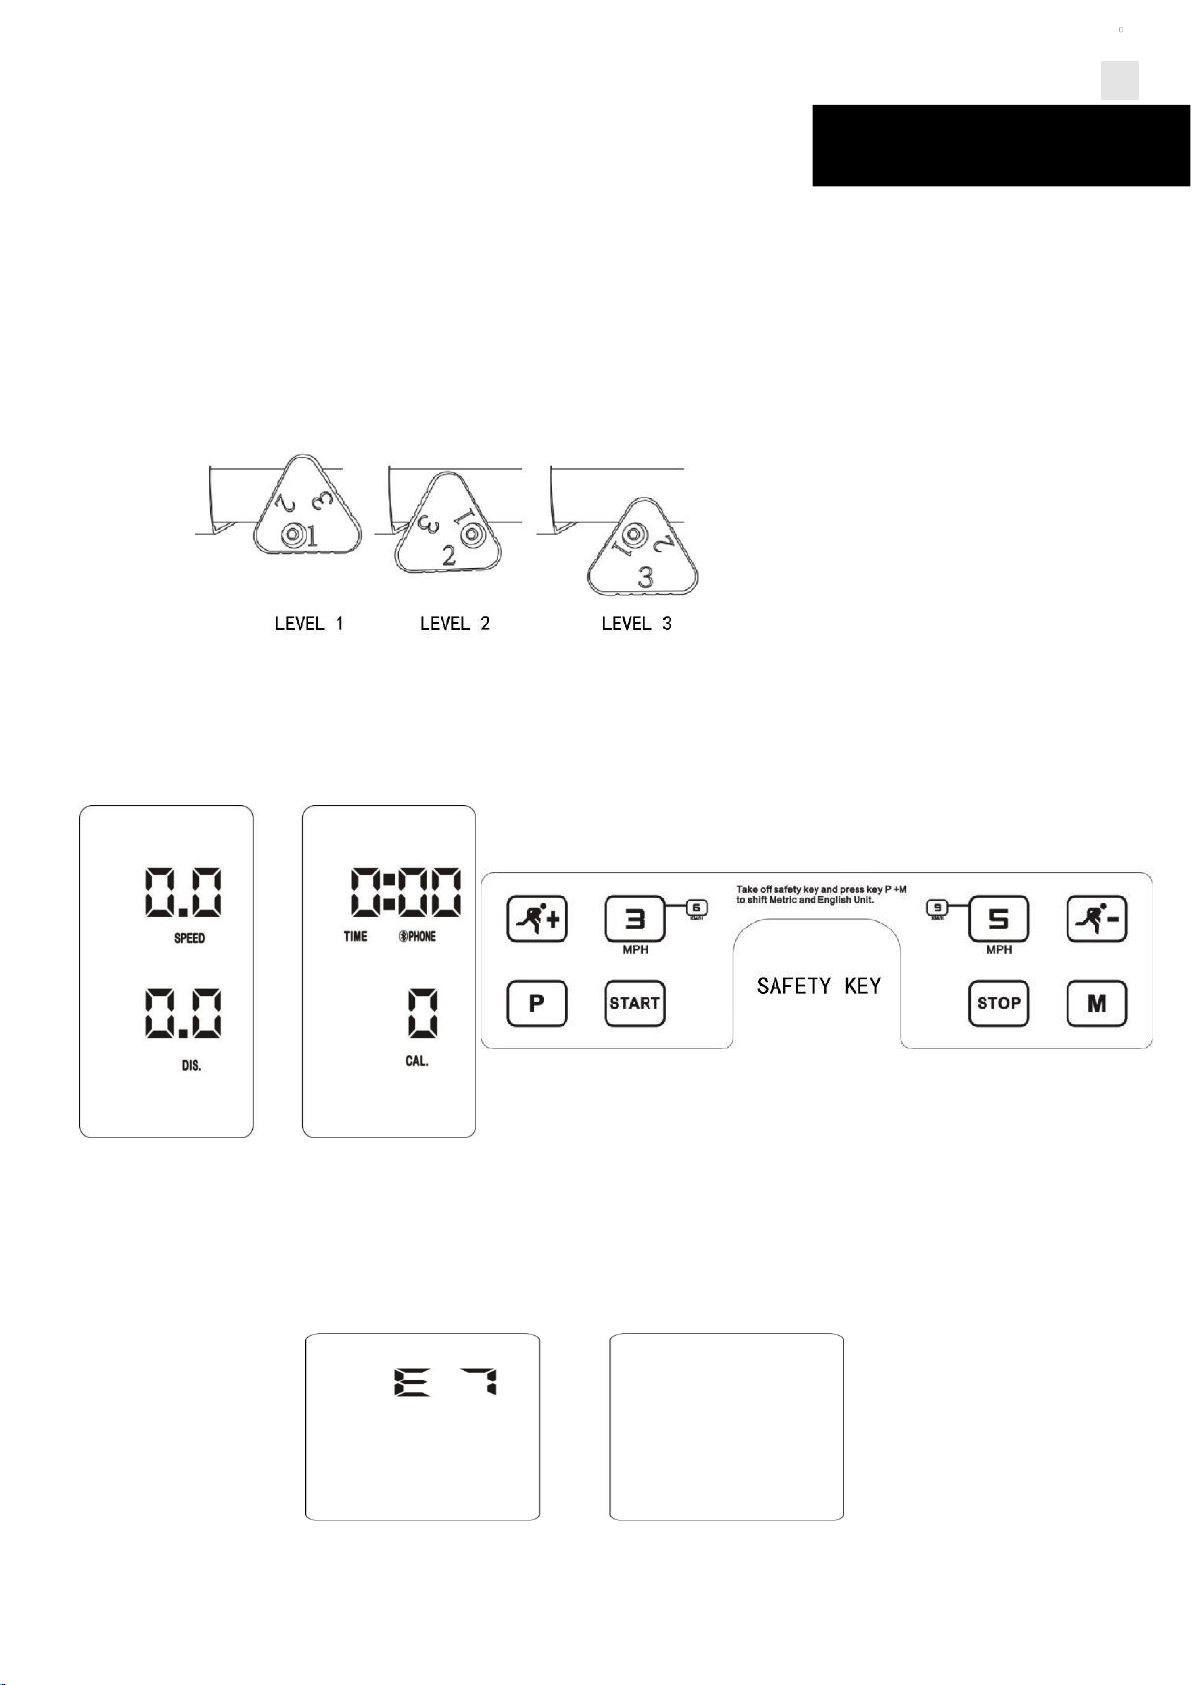
STEP2. ManualIncliningAdjustment
There are 3 manual inclining levels available.You can adjust to the desiredlevel
number against the ground as following pictures. (Note: You should adjust to
thesamelevelonbothsides).
STEP 3. Once clip the clamp of the safety key onto your clothes and put the
otherend of safety key to the fixed position on the console, the treadmill will
enter“STANDBY” state.
NOTE:Withoutthe safetykey,thetreadmillwon’tworkandthedisplayscreen willdisplay
“E7”.
12
OPERATION GUIDE

GENERALSAFETYTIPS
A. Practice assembling and disassembling your treadmill before starting your
workout.
B. Attach one end of the safety key to the console (the treadmill will not
runwithout the safety key) andclip its other end onto
yourclothingbeforeexercisingtoensurethetreadmillwillstopiftheuser accidentally
walksoffthetreadmill.
C. If the user falls off the treadmill, the safety key will come off
theconsoleandthetreadmillwill stopatoncetopreventfurther injuries.
D. Do not stand on the walking belt while starting the treadmill.
Straddlethebeltandstandontheplasticfootrails.
E. The treadmill will start at 1.0KM/H after countdown. If you are a green hand,
stay at a slow speed and hold onto the hand grips until you feelcomfortable.
QUICKREFERENCEGUIDE
A
SPEEDWINDOW
F
WIRELESSPHONE
K
STARTBUTTON
B
DISTANCEWINDOW
G
SPEED+BUTTON
L
STOPBUTTON
C
TIMEWINDOW
H
SPEED-BUTTON
M
QUICKSPEEDBUTTON
D
PULSE/CALORIEWINDOW
I
PROGRAMBUTTON
N
APPBLUETOOTH
E
PHONEBLUETOOTH
J
MODEBUTTON
DISPLAYFUNCTION
SPEED:Displaysthecurrentbeltspeedfromstartingranging at0.6 ~7.5MPH.
DISTANCE: Accumulatestotalworkoutdistancefrom1.0to99.9kilometersbycount-up.
TIME:Accumulates totalworkouttimefrom0:00to99:00minutes.
13
OPERATIONGUIDE
CALORIE:Accumulatescalorieconsumption(Max.990kcal) duringexercise.
PULSE:Whenpulsesignalisdetectedbygraspingbothstainlesssteelpick-upsonfronthandrails,it will display
your current heart rate in beats per minute from 50 to 200 (The data is for referenceonlyandit
shouldnotberegardedasmedicaldata.).
PHONE:Whenthe treadmill is connected to your phone through Bluetooth,the“PHONE”willbe lightedand the
treadmillcanstarttoplaymusic on your phone.
Wireless Phone Charger: Put your wireless charging supportive device onto the console
withchargingicon,then thedevicewillbecharged.
APP:Activate theBluetooth functionandruntheAPPinyourphone,the“APP”willbelighted
andyoucancontrolthetreadmillthroughtheapponyour phone.
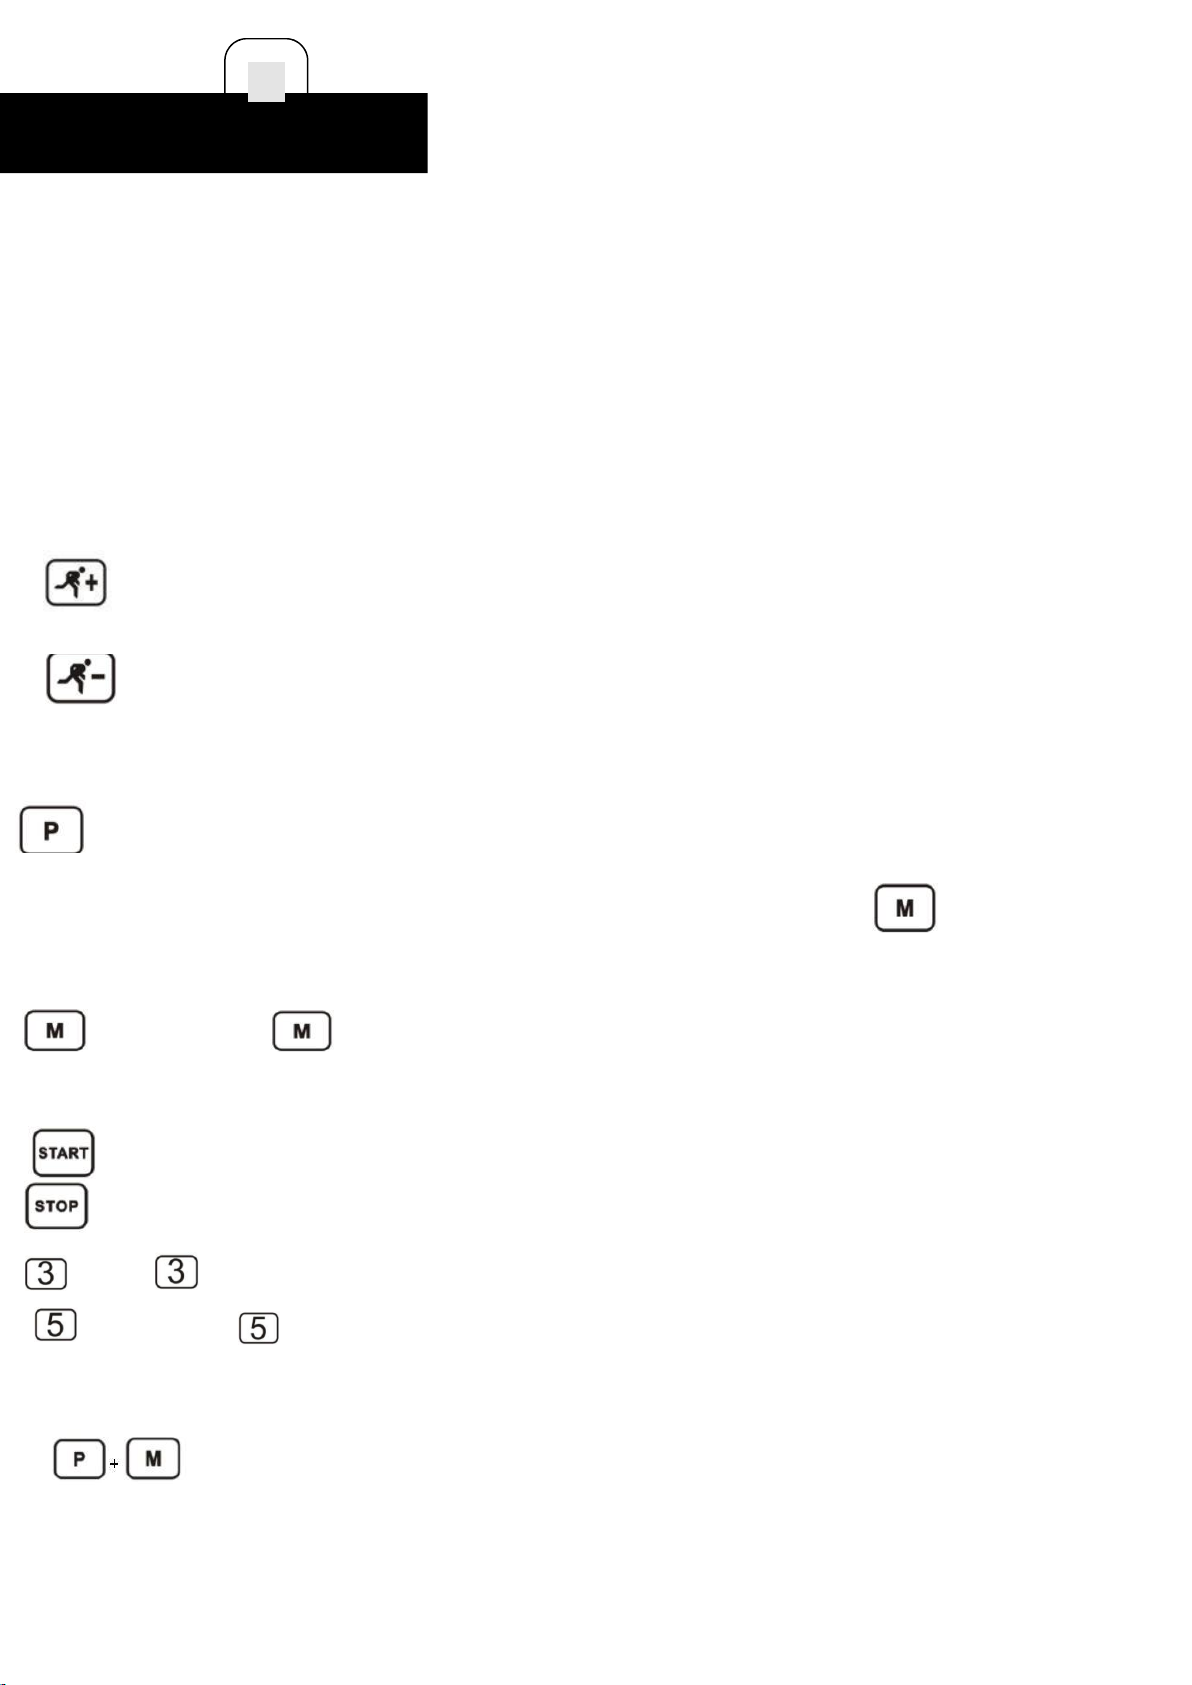
BUTTON FUNCTIONS
SPEED+:Each time you press thisbutton,thespeedwillincrease01.MPH.Ifyou holdthe button
formorethan2s,thespeedwillincreasecontinuously.DuringTime/Distance/Caloriesetting mode,press
this button to increase settingvalue.
SPEED--:Each time you pressthisbutton,thespeed willdecrease01.MPH. Ifyou holdthe button
formorethan2s,thespeedwilldecreasecontinuously.DuringTime/Distance/Calorie
setting mode,press this button todecreasesettingvalue.
PROG:Instandbymode,pressthisbutton toselectprogramsfrommanual
program to P01-P08,U1/U2/U3/ BODY FAT. Manual mode is the default operating mode, with defaultlowest
speed0.6MPH andthehighestspeed 7.5MPH.UnderanyofP01~P08program,press keytoselectitssub-
programL01~L08.Thedefaultrunningtimeforeachsub-programis30s. You can press speed +/-
buttontoadjusttherunning time,and thenpress“START”tostart exercise.
MODE: Press the button to select between 3 countdown training modes. Time
countdown→Caloriecountdown→Distancecountdown→NormalMode
START: Press this button to start the treadmill, and treadmill will countdown 3s before running.
STOP:Short pressthisbuttonto enable the treadmillto enterPAUSEstatus,then alldatawillbekept.
Pressthis button onemoretime,then the treadmillwillstopandalldatawillbecleared.
Pressthe buttonto switchthespeedto3MPH.
Pressthe buttontoswitchthespeedto5MPH.
NOTE:
1.
To shiftbetweenMetricandEnglishUnit:removethesafetykey,and you can press
buttonstoshift between them.
2.
Pressand hold the “STOP”button formorethan5sundermanualmodetoturn on or off the
NO-LOADSTOPfunction.
14
OPERATIONGUIDE
1
5
OPERATIONGUIDE
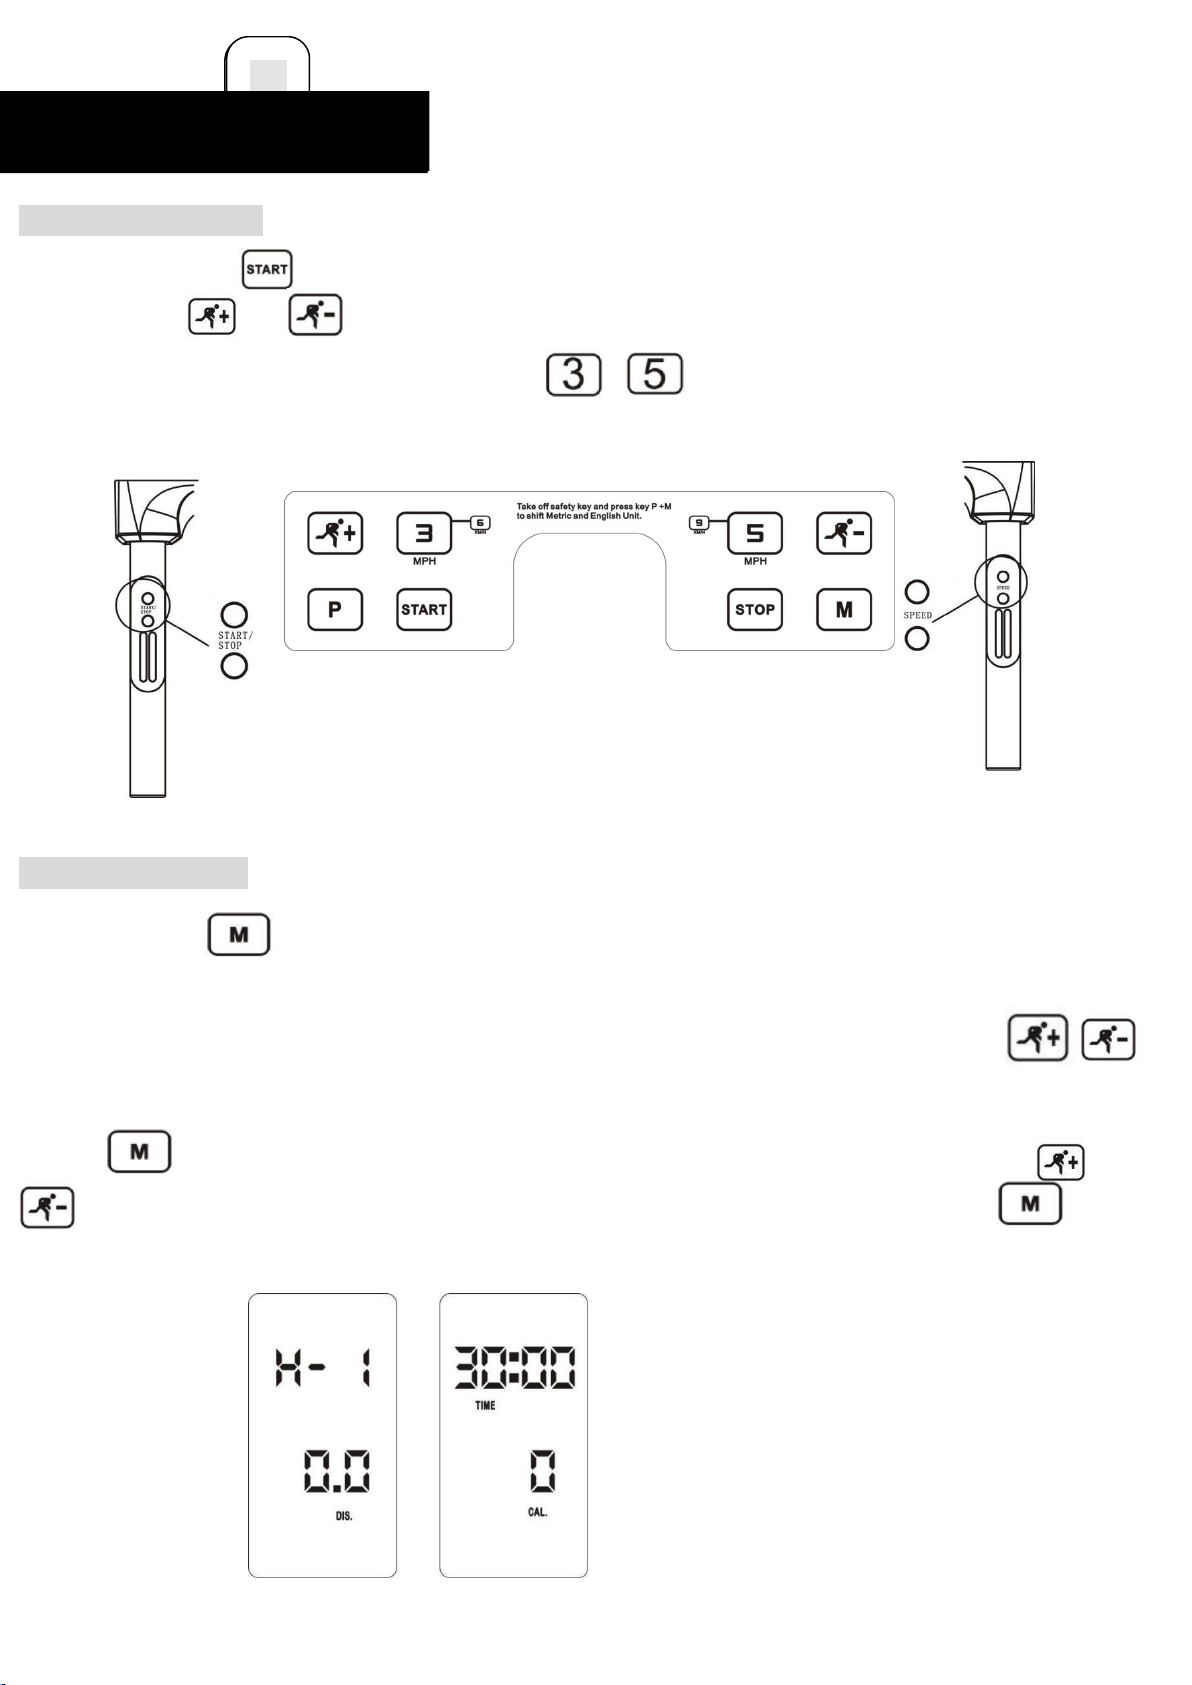
GETTINGSTARTED
Simplypressthe buttonontheconsoletobeginbeltmovementaftercount-downfrom 3 to 1.Press /
buttonsontheconsoletoadjustthespeed.Certainly,youmaypressand hold any of
thetwobuttons to continuously adjust the speed or or button ontheconsoletoquicklysetthespecified
speed.
Count-downModes
Whenyoupressthe button, one of TIME, DIS(Distance), and CAL(Calorie)
canbesettocountdowntoreachtheparticularfitness goal,
atthesametime,theothertwowillcountupduringtheworkout.Youcanalsoadjustthespeedbypressing
/
buttonontheconsole.
Pressthe button, the TIME window will display the default workout time as 30:00.Press the /
button on the console to set count-down time from 5:00 to99:00 minutes.Simplypressthe
buttonontheconsoletobeginbeltmovement.Oncethecount-downreacheszero,thebeltwill stop moving.
15
OPERATIONGUIDE
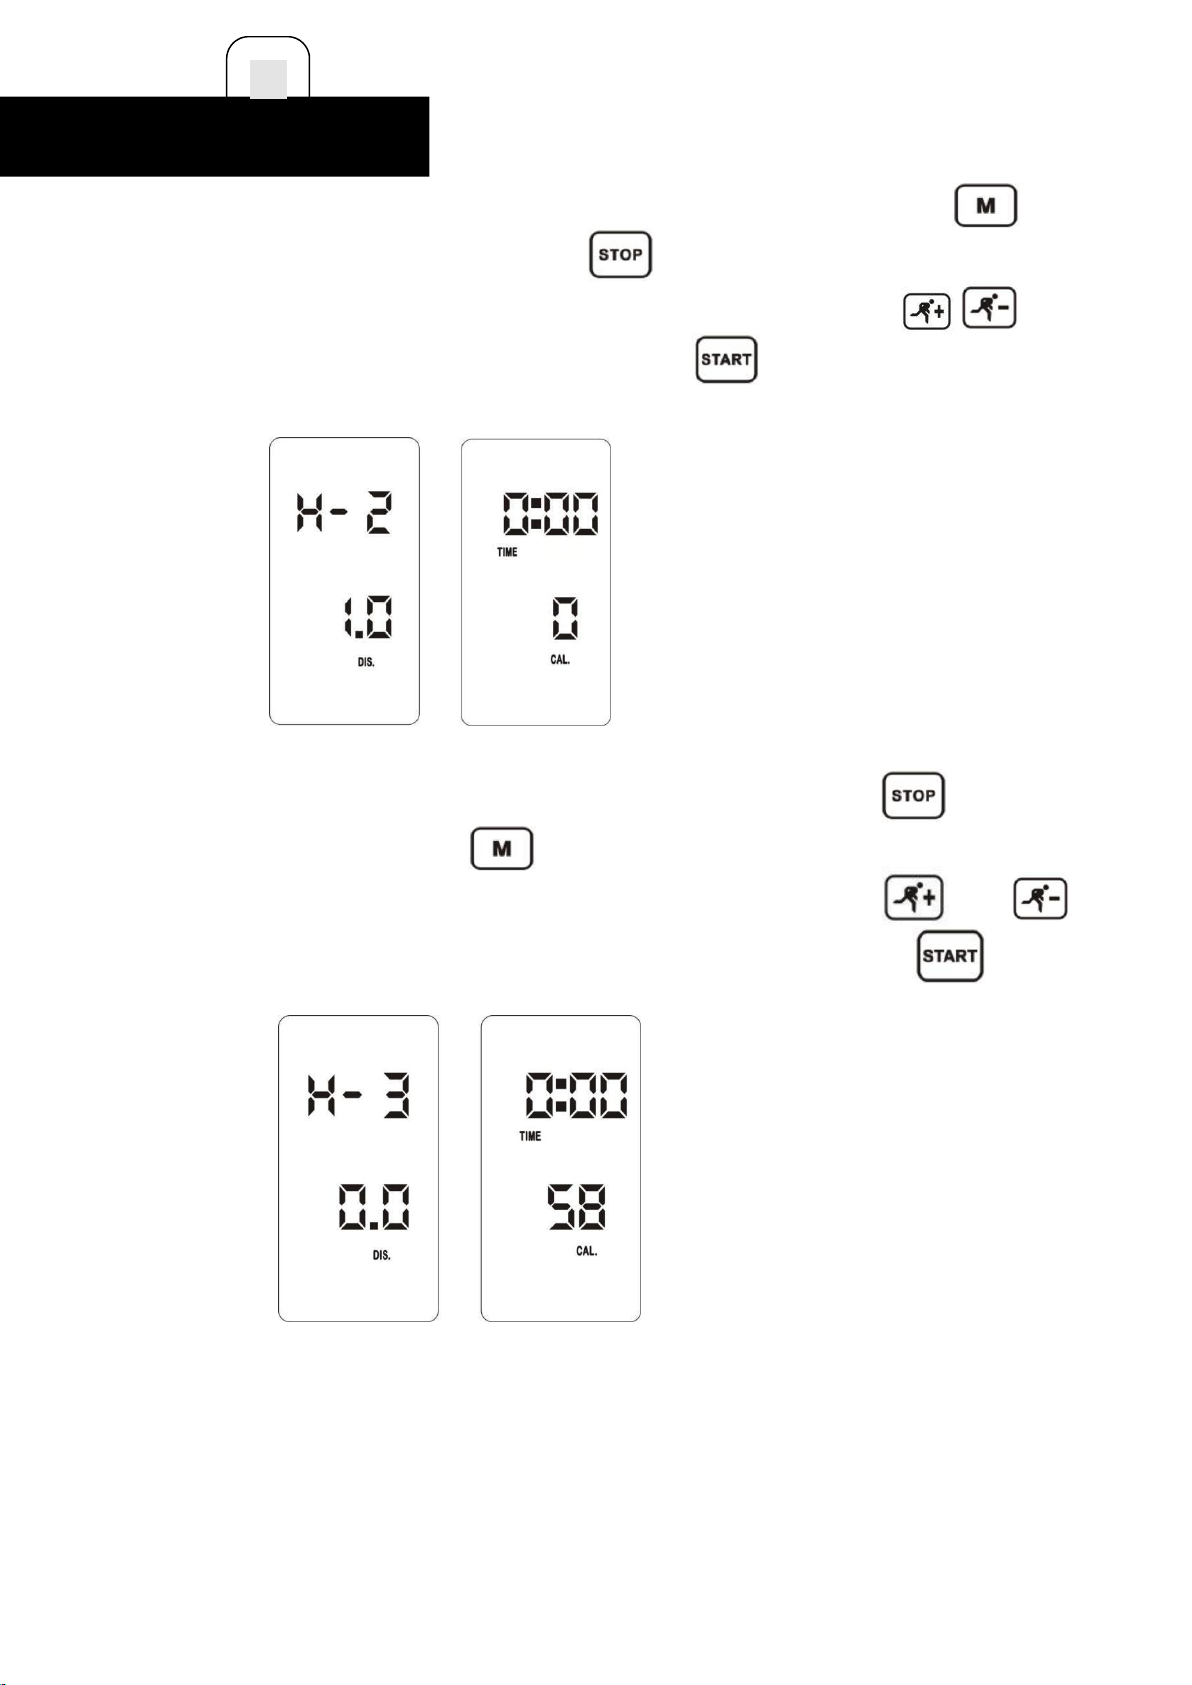
/
ToswitchthemodetoDIS(Distance)count-downwhenthebeltismoving,pleasedouble pressthe button on
theconsoleuntilthedataisclearedandthendouble pressthe
buttonuntiltheDIS(Distance)iconisblinking.Thedefaultdistancewassetas1.0Mile.Press
/
button
ontheconsoletosetcount-downdistancefrom1.0-99 Miles.Pressthe button on the console to begin belt
movement. Once the DIS (Distance) count-down reaches zero, thebeltwill stop moving.
ToswitchthemodetoCAL(Calorie)count-downwhenthebeltismoving,double pressthe
buttonuntilthedataisclearedandthenpressthe buttonfor
threetimesuntiltheCAL(Calorie)iconisblinking.Thedefaultcaloriewassetas50KCAL.Press
buttontosetcount-downdistancefrom20KCALto990KCAL.Pressthebuttononthe console to begin belt
movement. Once the CAL (Calorie) count-down reaches zero, the beltwill stop moving.
16
OPERATIONGUIDE

64PresetPrograms
Tip:Pleasekindlynotethatthereare64presetprogramsto reach 8differenttraininggoals, each goalwith 8 different
intensitylevels.Allthepreset programs are madeup of18time-basedsegments, with preset
speedoneachsegment.Thedefaultworkouttimeofeachprogramis30
minutes,butitcanbeadjustedfrom5:00to99:00minutesbypressing
/
button on the console.The workout
time of 18 segments on each program willbe automatically arranged according to the workout time you set.
The speed youset willonlybeeffectiveontheongoingsegment.After
thesegmentcompletes,thespeedonthenextsegmentwillstillprocessatpresetvalue.
上图文字改成 Remove the safety key, and press P+M buttons to shift between Metric and English Unit.
P1 WEIGHT-LOSS P5INTERVAL
P2 CARDIOTRAINING P6ROLLING
P3FATBURNING
P7MOUNTAINCLIMBING
P4POWERWALK P8 HILLRUN
17
OPERATIONGUIDE

Step1:Press the button to select a specific program among 8 preset options (from P1 to P8).
Step2:Press the button to select the intensity level from Level 1 to Level 8.
Step3:Press the
/
button on the console to adjust the workout time. It can be
adjustedfrom5:00to99:00minutes.
Step4:Press the buttonontheconsoletobeginbeltmovement.
Tip:Tochange the program,pleasedoublepressthe buttonontheconsoleuntilthedata is
clearedandthenrepeattheabove-mentionedsteps.
User-DefinedPrograms(U01-U02-U03)
Thereare3user-
definedprogramsaccordingtouser'straininggoals.Thedefaultworkouttimeofeachprogramis30minutes,butitcanbead
justedfrom5:00to99:00minutesbypressing
/
buttonontheconsole.Alltheuser-defined
programsarecomposedof18time-
basedsegments.Theworkouttimeof18segmentsoneachprogramwillbeautomaticallyarrangedaccordingtotheworkou
t timeyouset.Thedefaultspeedofeachsegmentis0.6MPHand it could also be adjusted from 0.6MPH to 7.5MPH by
pressing
/
button
ontheconsole.Thespeedyousetwillbesavedautomaticallyontheongoingsegment.After
finishingsettings,the data of allthe18segmentsineach user-defined programwill be saved and recorded
automatically untilyouresetallthedataagain.
18
OPERATIONGUIDE

BodyFatMeasurementFunction
This function is to estimate your body fat according to your physical information. Please kindly note this
estimateddatashouldnotbeusedformedicaldiagnosis.
STEP1:Keep the buttonpressed untiltheconsoledisplaysFAT.
STEP2
:
The left window will display F1 (representing GENDER) and the default data on the right window
will display 1 (representing MALE).
Press / button on the console to set gender from 1 to 2 (representing FEMALE)
if necessary. Then press button to go to next step.
STEP3: Press the button again,then theleftwindowwill
displayF2(representingAGE),andthedefaultdataontherightwindowwill display 25. You can press
/
button on the console to set the age from10-99. Then press
button to go tothenextstep.
STEP4:Press the button one more time, then the left window will display F3
(representingHEIGHT)andthedefaultdataontherightwindowwill show67.You can press
/
buttontosetthe heightfrom 39-87inches.Thenpress button togotonextstep.
19
OPERATIONGUIDE
Other manuals for P110M
1
Table of contents
Other Sportneer Treadmill manuals


