SPORTS ART 6200N User manual
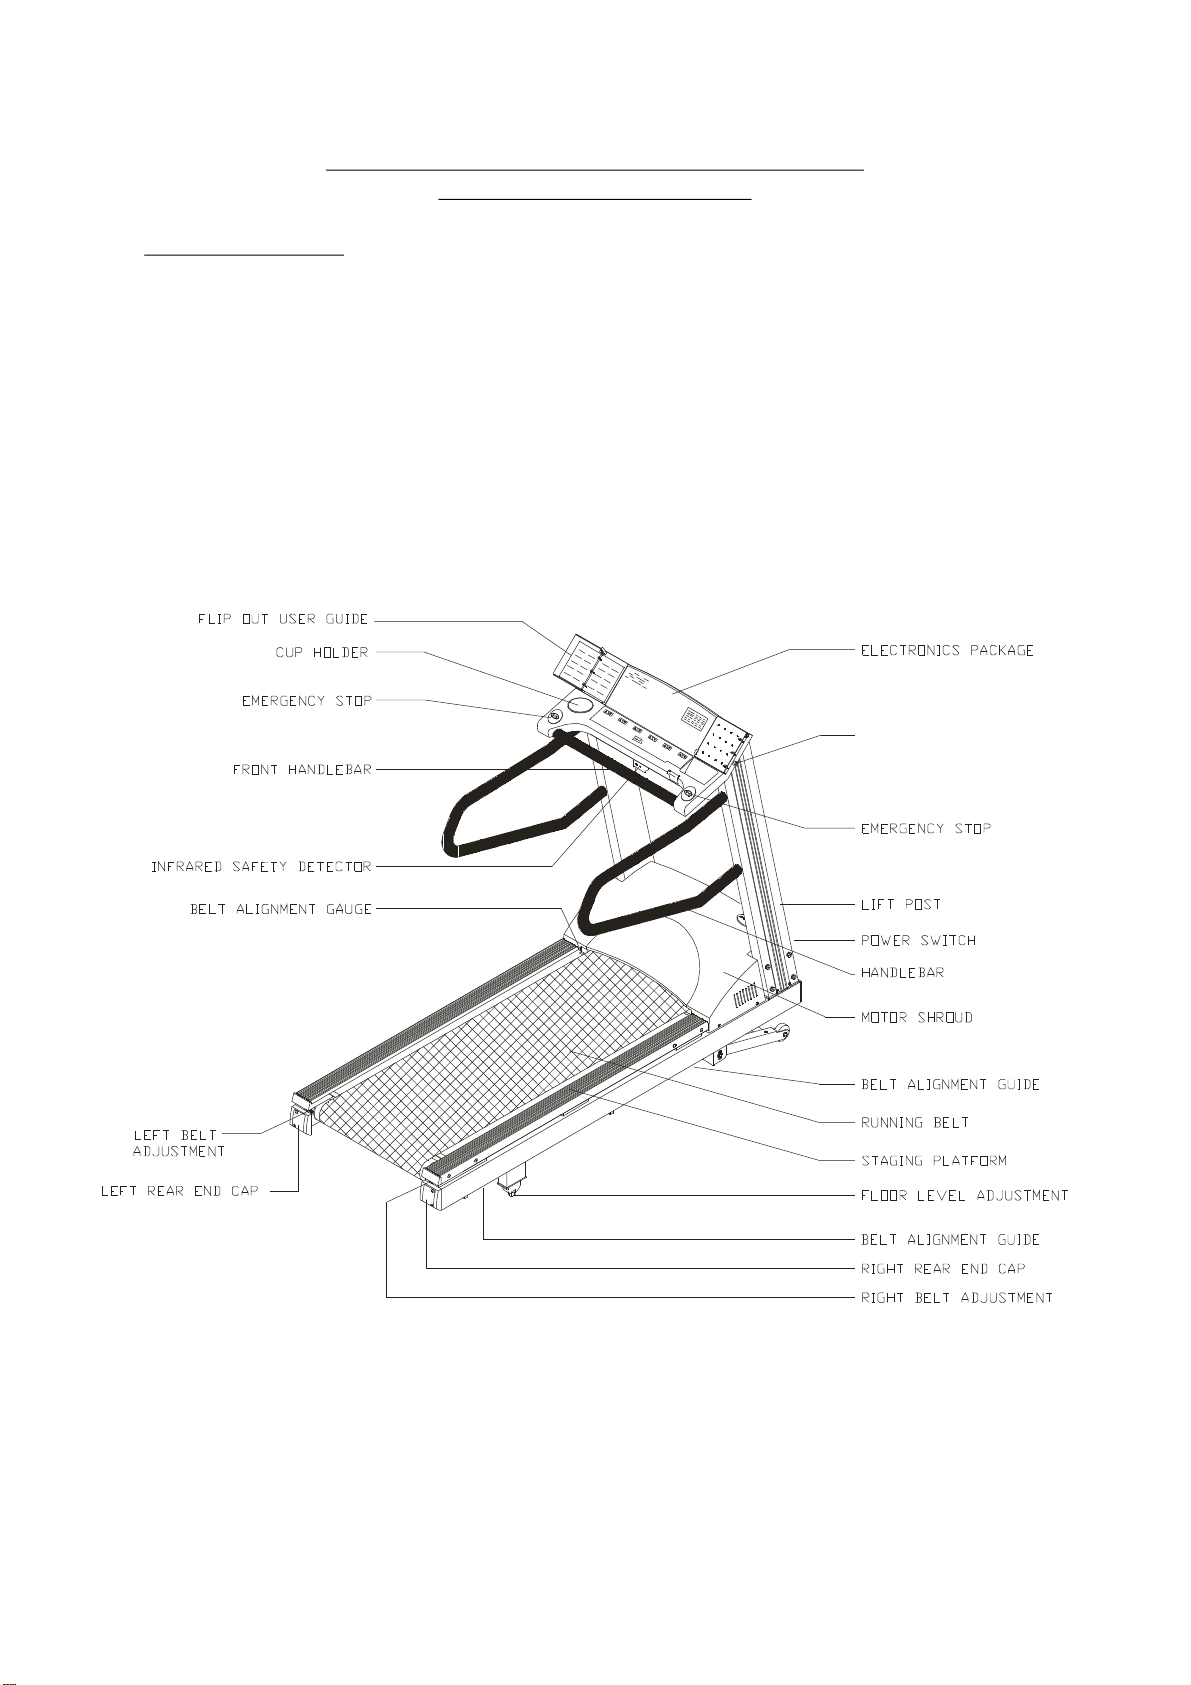
SPORTSARTCOMMERCIALGRADE6200N
MOTORIZEDTREADMILL
INTRODUCTION
Congratulationsonpurchasingoneofthefinestpieceofcommercialexercise
equipmentonthemarkettoday,theSportsArt6200NClubTreadmill.Constructedof
highqualitymaterialsanddesignedforyearsoftrouble-freeusage.Wehopethe
6200Nwillbeanintegralpartofyourfitnessregimen.
BeforeusingyourSportsArt6200NTreadmill,werecommendthatyoufamiliarize
yourselfwiththisOwner'sManual.Whetheryouareafirsttimeuserofatreadmillor
aseasoned"pro",understandingthecorrectuseoftheequipmentwillenhanceyour
abilitytoachieveyourexercisegoalssafelyandsuccessfully.
3
CARDIOTHEATER/CSAFESOCKET

SAFETYGUIDELINES:
Pleasereadandfollowthesesafetyguidelines:
Readthisowner'smanualandfollowtheinstructions
Assembleandoperatethetreadmillonasolid,levelsurface.
Neverallowchildrenonornearthetreadmill.
Checkthetreadmillbeforeeveryuse.Makesureallpartsareassembled,andall
nutsandboltsaretightened.DONOTusethetreadmilliftheunitisdisassembled
inanyway.
Keepyourhandsawayfrommovingparts.
Wearproperworkoutclothing:DONOTwearlooseclothing.DONOTwearshoes
withleathersolesorhighheels.Tiealllonghairback.
Don'trocktheunitfromsidetoside,andusecarewhenmountingand
dismountingtheunit.
DONOTuseanyaccessoriesthataren'tspecificallyrecommendedbythe
manufacturerthesemightcauseinjuriesorcausetheunittofail.Workwithinyour
recommendedexerciselevelDONOTworktoexhaustion.
Ifyoufeelanypainorabnormalsymptoms,STOPYOURWORKOUTandconsult
yourphysicianimmediately.
Toreducetheriskofburns,fire,electricshock,orinjurytopersons:
Atreadmillshouldneverbeleftunattendedwhenpluggedin.Unplugfromoutlet
whennotinuse,andbeforeputtingonortakingoffparts.
Closesupervisionisnecessarywhenthistreadmillisusedby,on,ornearchildren,
invalids,ordisabledpersons.
Usethistreadmillonlyforitsintendeduseasdescribedinthismanual.
Neveroperatethistreadmillifithasadamagedcordorplug,ifitisnotworking
properly,ifithasbeendroppedordamaged,ordroppedintowater.Returnthe
treadmilltoaservicecenterforexaminationandrepair.
Donotcarrythistreadmillbysupplycordorusecordasahandle.
Keepthecordawayfromheatedsurfaces.
Neveroperatethetreadmillwiththeairopeningsblocked.Keeptheairopenings
freeoflint,hair,andthelike.
─Warning
1

Neverdroporinsertanyobjectintoanyopening.
Donotuseoutdoors.
Donotoperatewhereaerosol(spray)productsarebeingusedorwhereoxygenis
beingadministered.
Todisconnect,turnallcontrolstotheoffposition,thanremoveplugfromoutlet.
Connectthistreadmilltoaproperlygroundedoutletonly.
Beforebeginninganyexerciseprogram,youshouldconsultwithyourdoctor.Itis
recommendedthatyouundergoacompletephysicalexamination.
CAUTION:
2

TABLEOFCONTENTS
1.INTRODUCTION..................................................................................................
2.ASSEMBLINGYOURTREADMILL......................................................................
InstallationRequirements.....................................................................................
Listofparts...........................................................................................................
Stepbystepinstructions......................................................................................
Floorleveladjustment..........................................................................................
3.HOWTOUSETHE6200TREADMILL...............................................................
Infraredsafetydetector......................................................................................
Whateachofthecategoriesmeans....................................................................
Settingtime,distanceorcalories.........................................................................
4.REVERSEMODE...............................................................................................
Warning...............................................................................................................
Access.................................................................................................................
5.RUNNINGONTHETREADMILL........................................................................
6.MAINTAININGYOURTREADMILL.....................................................................
Cleaningthetreadmill.........................................................................................
Adjustingtherunningbelt...................................................................................
7.GUILDLINESFOREXERCISE...........................................................................
HowlongshouldIexercise?..............................................................................
HowoftenshouldIexercise?.............................................................................
8.TROUBLESHOOTING.......................................................................................
ERRmessages...................................................................................................
MainFuseFailure...............................................................................................
Fusefailureforinclinesystem............................................................................
Fusefailurefordriveboard................................................................................
3
4
4
4
5
8
9
9
9
10
11
11
11
11
12
12
13
16
16
16
17
17
17
18
19

ASSEMBLINGYOURTREADMILL
3
InstallationRequirements
ListOfParts
Readthisowner'smanualandfollowtheinstructionscontainedherein.
Twopersonsarerecommendedtoassemblethetreadmill.Toavoidback
strain,andtoensuresafetytotheunitandyourself,wesuggestyouavoid
liftingtherunningbedassemblyfrombox.Insteadlaythetreadmilldown,
dropthesidesoftheboxandslidethetreadmillfromthecontainerrather
thanliftingit.
Thepackingforthistreadmillwasdesignedtoprotectitduring
shipment,pleasestoretheoriginalpackinginasafeplaceincaseyou
needtoshiptheunitinthefuture.
Beforeassemblingyourtreadmill,makesurethatyouhaveallfollowingitems:
Caution:
IMPORTANT:
1.Liftpost:
Twelve5/16"x3/4"bolts
Twelve5/16"washers
Twelve5/16"nylonwashers
2.Handlebars:
Four5/16"x4"bolts
Four5/16"washers
3.Fourliftpostdecorativecaps
4.OnesetInfraredsafetydetector
TwoPhilipscrewsxL5/16"
5.Rearendcaps:
TwoPhilipscrewsxL1/2"
6.Onecupholder
7.Onescrewdriver
8.OnehexAllenwrench
9.OnehexAllenwrenchwithhandle
10.Onecombinationwrench
11.Threefuses:
a.15A(100V/120V)or10A(200V/240V)-Electronicsandmotor
b.4A-Inclinesystem
c.3A(100V120Vuse)or2A(200V/240Vuse)-Driveboard
4
StepByStepInstructions
Whenyouremovethetreadmillfromitsbox,firstchecktomakesurealloftheparts
arepresent.Then,readthroughtheassemblyinstructionsbeforeyoubegin.
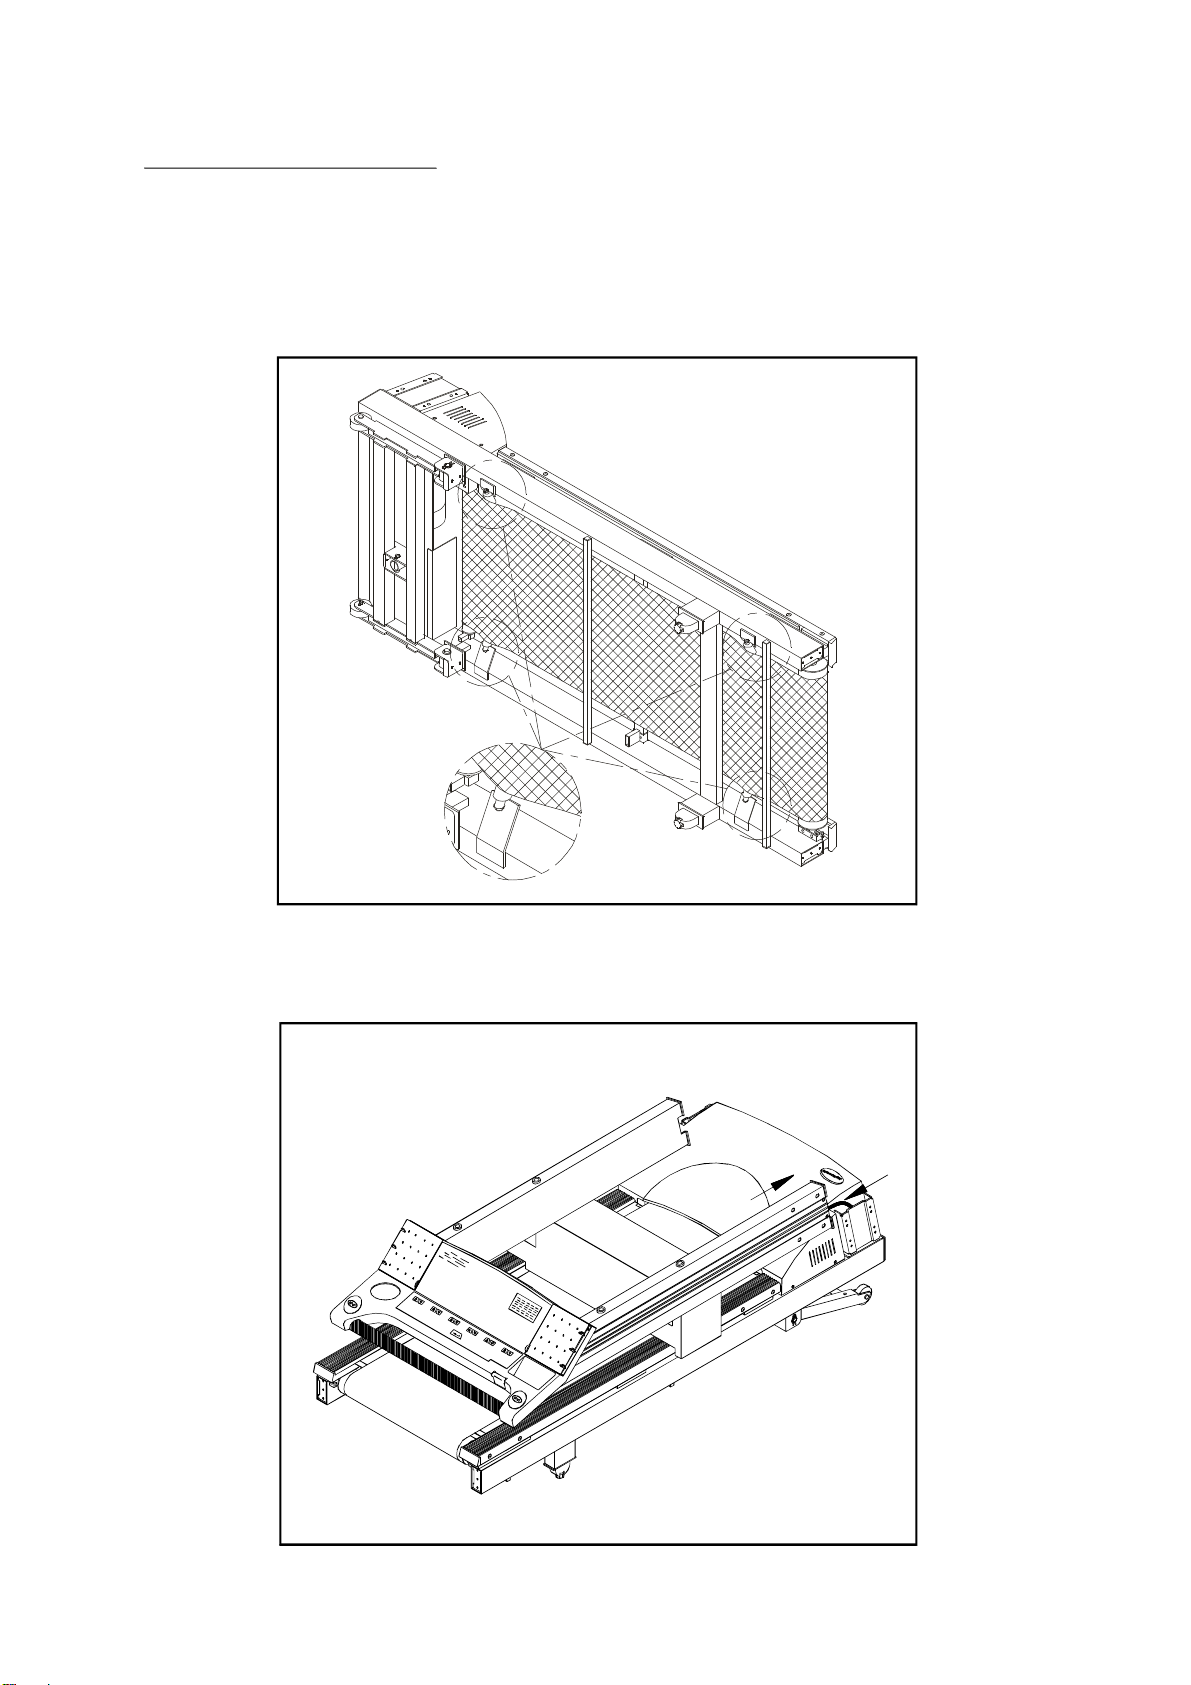
1.Laythetreadmillonitsside.Makesuretherunningbeltisinpositioninthetracks
oftheBeltAlignmentGuidesontheundersideofthemachine.(seeFig.1).
2.Pleasemovethefrontpostsforward.Beforeliftingtheposts,makesurethe16
pincableiscompletelyinsidetherightfrontpost.(seeFig.2-1)
FIG.1
FIG.2-1
5
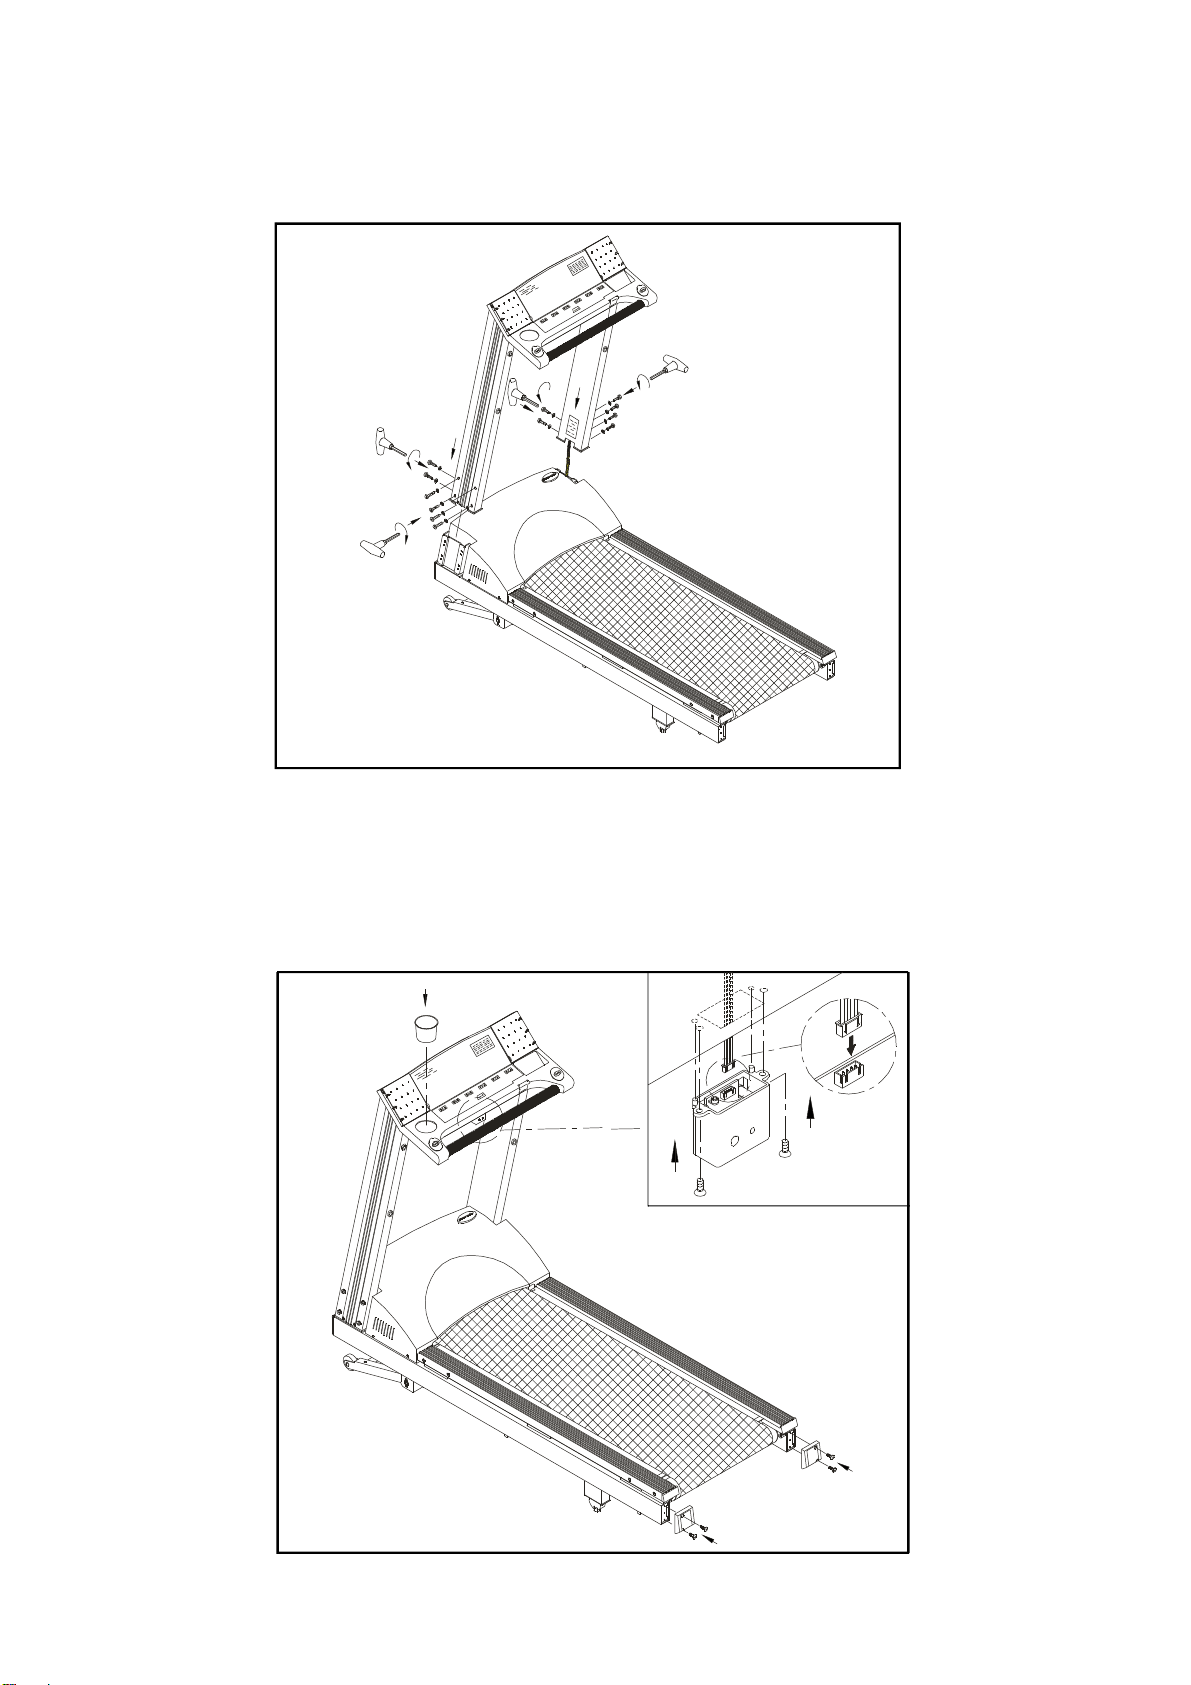
Lifttheconsoleup,slidethefrontpostsintotheirrespectiveplacesandsecure
withthe12boltsandwashersprovided.(seeFig.2-2)
3.Locatethe4pincableconnectorinsidetheelectronicspackageandinserttothe
infrareddetector,securewithtwoscrewsprovided.
Placethecupholderinpositionontheelectronicspackage(seeFig.3).
FIG.3
6
FIG.2-2
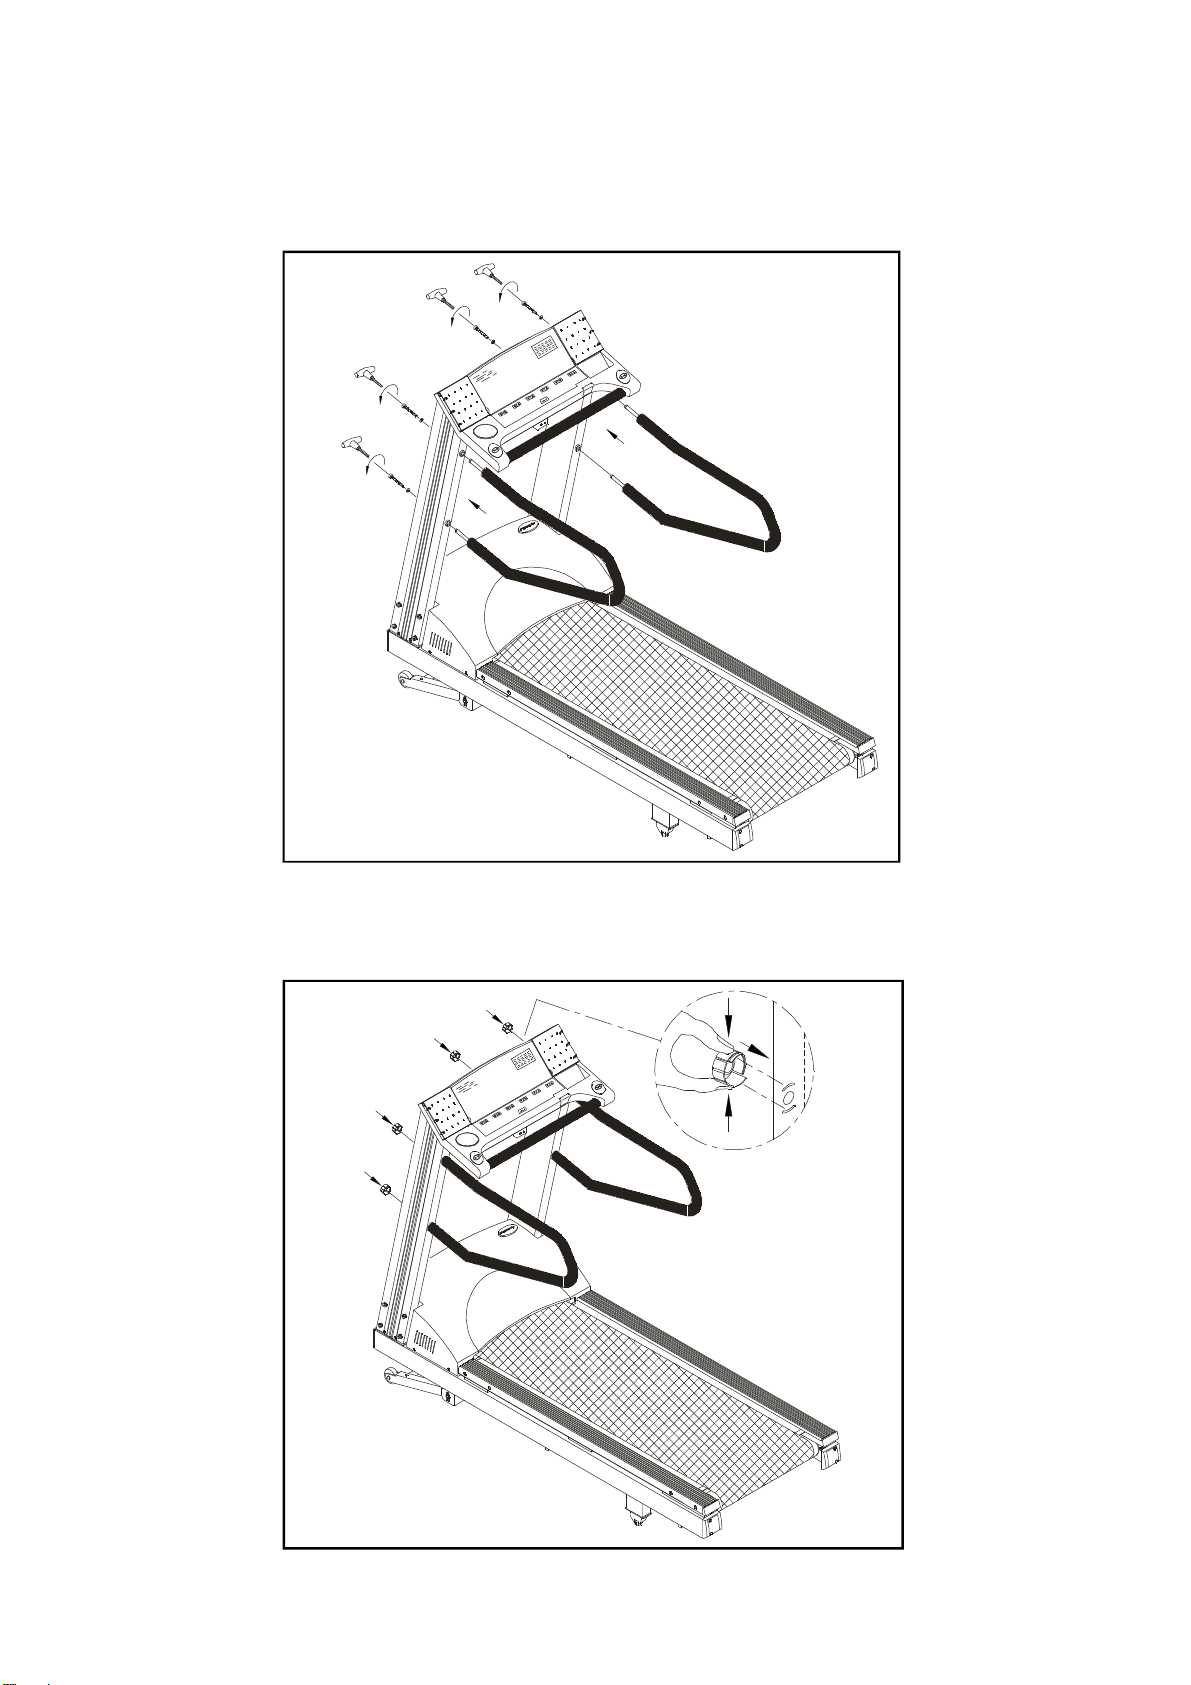
4.Insertthehandlebarsintotheholesinthefrontposts,andsecurewiththebolts
andwashersprovided.TightenwiththeAllenwrenchwithhandleprovided(see
Fig.4).
Aftertightening,inserttheliftpostdecorativecapsandsnapintoplace(seeFig.
4-1)
FIG.4-1
7
FIG.4

FloorLevelAdjustment
Ifthetreadmillisunsteadyonyourfloor,turnthefloorleveladjustmentontherear
feetofthetreadmill.Raiseorlowerthefloorleveladjustmenttosteadyyourtreadmill
(seeFig.5).
IMPORTANT:Beforeusingthetreadmill,theleftedgeoftherunningbeltmustbe
completelyinthegreenportionoftheBELTALIGNMENTGAUGE,
locatedontheleftsideofthemotorshroud.Pleaserefertothe
"Maintainingtreadmill"section"Adjustingtherunningbelt"forfurther
information(seeFig.6).
FIG.6
8
FIG.5

HOWTOUSETHE6200NTREADMILL
CAUTION:DONOTSTANDONTHEBELTWHENSTARTING.Straddlethebelt
withyourfeetontherightandleftstagingplatforms.
Assoonasyouturnonthemachine,thespeedLEDwillflash,simplypressthe
SPEEDkeystostartthetreadmill,andtheINCLINEkeystoraiseorlowerthe
treadmill.
Thistreadmillisequippedwithanautomaticinfraredsafetydetectorsystem.The
treadmillwillallowalloperationsoncethesensordetectsauseronthetreadmill.
Whenyouarefinishedwithyourworkout,steppingoffthetreadmillwillshuttheunit
offautomatically.
/(STOP/PAUSE):TheGoldStop/Pausebuttons,nomatterwhatMODEyouare
in,allyouhavetodoisjusttouch,andthetreadmillwill
slowlycometoastop.
NOTE:YoucandothesamebypressingtheSPEEDdownkeytobringthetreadmill
toastop.
Torestartthetreadmill,simplypresstheSPEEDupkey.
RESET:Usethiskeytoclearallworkoutinformation,allowingyoutostartagain.
INCLINE:Thesekeystoraiseorlowerthetreadmill.Theinclinerangeforthe
treadmillisfrom-3%~22%.
SPEED:Thesekeystoadjustyourdesiredspeed.Thespeedrangeforthe
treadmillisfrom0.1-12mph(0.2-20kph).
TIME:Thesekeystosetyourdesiredtime.Theelectronicspackagewillbeep
for3secondswhenyourdesiredtimeisreached,thenwillstarttocount
upifyourworkoutcontinues.
DISTANCE:Thesekeystosetthedesireddistance.Whenthatisreached,the
treadmillwillbeepfor3seconds.
CALORIE:Usethesekeytosetyourdesiredworkoutcalorieexpenditure.
Whenthatisreached,thetreadmillwillbeepfor3seconds.
Infraredsafetydetector
Whateachofthecategoriesmeans
▲▼
▲▼
▲▼
▲▼
▲▼
9

Settingtime,distanceorcalories
YoucanbaseyourcountdownonTIME,DISTANCEorCALORIESburned.
WhetheryoudesignyourworkouttocountdownfromTIME,DISTANCE,or
CALORIESburned,whenthatisreached,thetreadmillwillsoundanalarmfor3
seconds,afterwhichtheTIME,DISTANCEorCALORIEwillbegintocountup.
Ofcourse,youcanjustgetontheunitandbeginworkingout.Justpressthespeed
upandbegin.TheunitwillautomaticallybegincountingupTIME,CALORIEand
DISTANCE.
10

REVERSEMODE
RUNNINGONTHETREADMILL
Warning
Access
TakeextremecarewhenoperatinginReversemode.
ThistreadmillisdesignedtooperatebidirectionallybothForwardandReverse.
Whenswitchingfromforwardtoreverseorfromreversetoforward,itisimperative
thatthebeltfirstcomestoastop.Donotattempttoswitchbeltdirectionbefore
receivinginstructionfromanauthorizedSportsArtrepresentative.
Donotoperatetreadmillinreversewithoutthedirectsupervisionofahealthcare
professional.
1.Makesurethetreadmillisfullystopped.Ifyoudonotdothisstep,you
CANNOTaccesstheRESERVEmode.
2.PresstheDISTANCEandCALORIEkeysatthesametime.Thedisplaywill
beepforthreetimes.ThenpresstheDISTANCEandCALORIEkeysatthe
sametimeagain(twotimesinall),andthedisplaywillbeepforanotherthree
timesandspeedwindowwillshow-0.0.YouarenowinREVERSEMode.
Now,youhavebecomefamiliarwithyourtreadmill'soperationandarereadyto
exercise:
1.Plugthetreadmillintoastandardoutlet.Turnonthepowerswitchlocatedonthe
frontofthemachine.
2.Straddlethebeltwithyourfeetontherightandleftstagingplatforms.
3.IncreasethespeedofthetreadmillusingtheSPEEDcontrolkeyfoundonthe
electronicspackage.Balanceonehandonthehandlebar.Adjustspeed(keyuntil
youreach1.5-2.0mph/2.5-3.5kphoracomfortablewalkingspeed.Withboth
handsonthehandlebars,andwalkforafewminutestogetcomfortablewithyour
treadmill.
4.Afteryouarewalkinginaneasy,relaxed,andsteadyfashion,nowreleaseyour
griponthehandlebars,andletyourarmsswingfreelyandnaturally.
5.Whenyoufeelcomfortablewalking,youmaywishtojog.Holdthehandlebarwith
onehand,usetheotherhandtoincreasethespeedforjogging.
6.Remembertoholdthehandlebarwhenusingthecontrolpanelontheelectronics
package,oradjustingthespeed.Holdingthehandlebaronehandwillhelpto
maintainyourbalance,especiallywhenslowingdownorstopping.Also,
remembertoholdontothehandlebarwhendismounting.
7.Whenyouhavefinishedyourworkout,justfeathertouchthe/(STOP/PAUSE)
keylocatedonbothsidesofthefronthandlebar.Remembertodoacooldown
beforeyoubringthemachinetoacompletestop.
▼▼
▼▼
11

MAINTAININGYOURTREADMILL
Yourtreadmillreliesonlowfrictionforpeakperformance.Thetreadmill'slowfriction
operationisdependentonkeepingtheunitascleanaspossible.See"Cleaningthe
Treadmill"formoreinformation.
Properbeltalignmentisalsoimportantforproperoperationofthetreadmill.
See"AdjustingtheRunningBelt"formoreinformation.
TurnofftheunitanddisconnecttheACcordbeforecleaning.
Regularcleaningisrecommendedtokeepyourtreadmillrunningatpeak
performance.
Beforeyourworkout,useadryclothtocleanthelandingplatform,exposedslider
bed,andunderthebeltasfarasyoucaneasilyreach.Thisremovesanydirtordust
whichmightenterthesliderareaandcompromisetheunit'srunningefficiency.
Tocleantheplasticparts,useamilddetergentandmakesuretheunitiscompletely
drybeforeoperating.Ontherunningsurface,useasoftnylonscrubbrush.Donot
usewatertocleanthebeltorrunningsurface,ortocleantheelectronicspackage.
Shouldwater,forsomereason,getontheelectronicspackage,immediatelyblow
drytheelectronicspackage.
Itisrecommendedthatyoukeepallliquidsawayfromtheunitduringoperation.
Spillageofliquidsontoorintothemachinewillvoidthewarranty.
CleaningtheTreadmill
CAUTION:
12

AdjustingtheRunningBelt
Your6200Ntreadmillwithabeltalignmentgaugelocatedontheleftsideofthe
motorcover.Theedgeoftherunningbeltshouldbeinthemiddleofthegreen
portionofthegauge.Ifthebeltedgeisinthegreenarea,thebeltdoesnotneed
adjusting.Iftherightedgeisintheredportion,thebeltneedsadjustingimmediately
(seeFig.6).
Thebeltisproperlyalignedatthefactory.However,duringshippingandhandlingor
byuseonanunevensurface,thebeltmaymoveoffcenter.Therefore,itisimportant
thatyoucheckthebelt'salignmentbeforeusingthetreadmill.
Thecorrectalignmentoftherunningbeltiscriticalforthesmoothoperationofthe
treadmill.
DONOTALLOWANYONETOWALKONRUNNINGBELTDURING
THISPROCEDURE.
Failuretorealignthebeltcouldresultintearingorfrayingofthebelt,whichisnot
coveredinthewarranty.Pleasefollowtheadjustmentprocedurelistedbelow:
1.Turnonthepowerswitchlocatedonthefrontofmachine.
2.PresstheSPEEDkeytoincreasethespeeduntilthespeedregisters2.0mph/
3.2kphonthedigitaldisplay.
3.Whiletheunitisrunningat2mph/3.2kph,determinewherethebeltisinrelation
tothebeltalignmentgauge.
4.Shouldyourbeltbeinthewrongcolorrange,followthestepsbelowtoreturnthe
belttothe"safetyzone":
5.Ifthebeltisintheleftredzone:Turntheleftbeltadjustmentboltlocatedatthe
rearofthetreadmillclockwise1/4turnatatime,usingthehexAllenwrench.
Thenturntherightbeltadjustmentboltcounter-clockwise1/4turn.Letthe
treadmillrun30seconds,thencheckthepositionofthebeltinthecolorgauge.If
thebeltstillhasnotreturnedtothegreensafetyzone,repeatwithanother1/4
turnuntilthebelthasreturnedtothemiddleofthegreenarea.Donotturn
adjustingboltmorethan1/4turnatatime.
Ifthebeltisontheedgeofthegreencolor,pleaseadjustitsoitisinthe
middleofthegreencolor.Youmayturntheadjustmentnutlessthan1/4turnata
time.
CAUTION:
▲
13
6.Conversely,ifthebeltisintherightredzone,turntherightbeltadjustmentnut
clockwise1/4turn,thenturntheleftadjustmentboltcounterclockwise1/4turn.
Thenletthetreadmillrunatleast30seconds,checkthepositionofthebeltin
thecolorgauge.Ifitstillshasnotreturnedtothegreensafetyzone,repeatwith
another1/4turnuntilthebelthasreturntothemiddleofthegreenarea.Donot
turnadjustingboltmorethan1/4turnatatime.
7.Whenthebeltisbackinthegreen"safetyzone",youcancontinueyourregular
useofthetreadmill.Slowlyincreasethespeedoftheunitto5.5MPH(9KPH),
andletitrunforatleast45seconds.
8.Whenyouareusingthetreadmill,ifyoufeelapauseinthebeltwitheachfoot
plantthebeltistooloose.Stopthemachine,adjustbothrearrollerbolts
clockwise1/2turnatatime.Trythemachineagain,thenchecktheresult,ifmore
adjustingisrequired,givebothadjustingboltsanotherslightturn.Donotadjust
over2fullturns.
9.Ifthebeltistootight,thiswilladverselyeffectthelifeoftheunit.
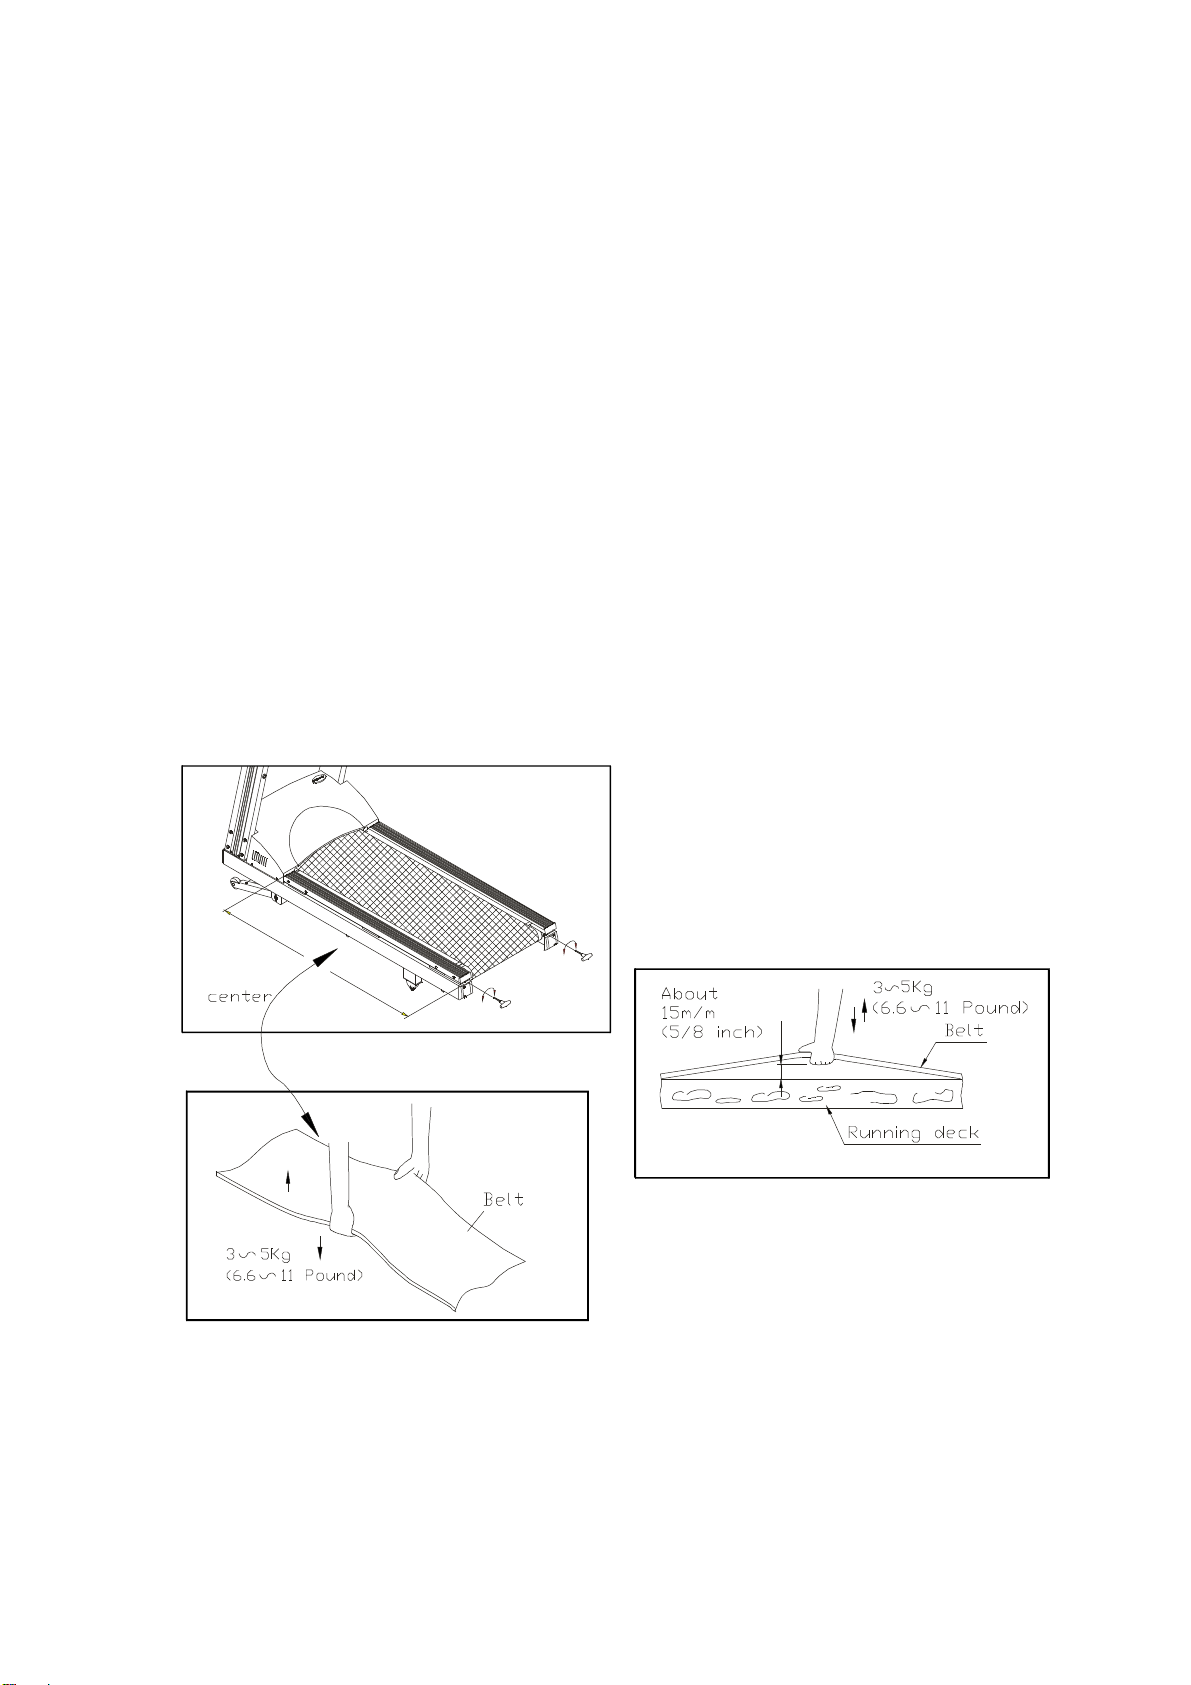
10.Tocheckthecorrecttensionofthebelt,grabthebeltinthemiddle,andliftup
about15m/m(5/8")or3-5kg(6.6-11pounds)offorce(seeFig.7,7-1,7-2).
11.Ifthereistooloose,youcantightenthebeltbyadjustbothrearrollerbolts
clockwise1/2turnatatime.Conversely,ifthebeltistootight,adjustbothrear
rollerboltscounterclockwise1/2turnatatime(seeFig.7-3).
14
FIG.7
FIG.7-2
FIG.7-1

Periodicallymonitorthepositionofthebelttoensurepeakperformance
CAUTION:Toavoidinjury,specialcaremustbetakenwhenadjustingtherunning
belt.Turnoffthetreadmillwhileadjustingorworkingneartherearrollers.
Removeanylooseclothingorshoeslaceandtiebackyourhair.Bevery
carefultokeepyourfingersoranyotherobjectsclearofthebeltand
rollers.
Thetreadmillisdesignedtocarryspecificweightsatspecificspeeds.
Thetreadmillwillnotstopimmediatelyifanyobjectbecomescaughtin
thebeltorrollers.
Overtighteningofthebeltcausesdamageandprematurefailureofthe
precisionbearingsinthefrontandrearrollers.
PleaseturnofftheinfraredsafetydetectorBEFOREadjustingthe
runningbelt.(seeFig.below)
TurntheinfraredsafetydetectorbackonAFTERrunningbeltadjustment
isfinished.
15
FIG.7-3

GUIDELINESFOREXERCISE
HowlongshouldIexercise?
HowoftenshouldIexercise?
Thedurationofyourexercisesessiondependsonyourfitnesslevel.Ingeneral,itis
recommendedthatyoumaintainyourheartrateinthetrainingzoneforatleast10
minutestorealizeanaerobicbenefit.Asyourfitnesslevel
Increases,youwillbeabletomaintainyourheartrateinthetrainingzoneforlonger
periods:Usuallybetween20and30minutes.
Whenfirststartingyourworkout,usethefirstseveralminutestowarmup,then
slowlyincreaseyourworkloadtobringyourheartrateintoyourspecifictrainingzone.
Attheendofyourworkout,graduallydeceaseyourworkload,thenexerciselightly
asa"cooldown".
Aerobicexercise,toachievethegreatestbenefits,shouldbeperformed3-5timesa
week.Itisimportanttoallowsufficienttime,atleast24hours,foryourbodyto
recoverafterexercise.
16

TROUBLESHOOTING
ERRMessages
MainFuseFailure
ERR1-Theopticalswitchmountedonthemotorisnotreceivingthesignalreflected
fromthetachometerwheel.Pleasecontactyourdealer.
ERR3-Treadmill speed doesn’t match the setting. Contact your local dealer for assistance.
ERR6-Theunit'sinclinesystemmaybedamaged,pleasecontactyourdealerfor
moreinformation.
ERR7-TheelectronicspackageisreceivingthesignalreflectedfromtheVR
incorrectly,whichmeanstheterminalwiresaredisconnected,ortheVRis
damaged.Pleasecontactyourdealerformoreinformation.
ERR11-Themotorisfunctioningincorrectly.Pleasecontactyourdealerformore
information.
ERR12-Theheartratesignalnotreflectedstably.Pleasegripthesensoragain.
Ifnothingisdisplayedontheelectronicspackage,pleasecheckthePOWERswitch
locatedonthefrontofthetreadmill.IfitisONandunlit,thenthefusemaybe
damagedandmustbereplaced.
MAKESURETHETREADMILLPLUGISREMOVEDFROMOUTLET
BEFOREREPLACINGTHEFUSE.
Therearetwofuseholderslocatedatthefrontofthetreadmillframe,theleft4amp
fuseholderisfortheINCLINESYSTEM,andtherightfuseholder15amp/100-120
volts(or10amp/220-240volts)isfortheMainPower(seeFig.8),pleasemakesure
tocheckyourstandardvoltagepriortofusereplacement.
CAUTION:
ERR10-Treadmill speed doesn’t match the setting. Contact your local dealer for assistance.
17
FIG.8
100V-120V=15A
200V-240V=10A

ToremovetheMainfuse,pushonthefuseholderthenturntheholder
counterclockwiseandthefuseholderwithfusewillprotrude.Removethedamaged
fuseandinsertanewone,pushthefuseandholderin,thenturnclockwisetosecure
thefuseholder(seeFig.8-18-3).
Iftheunitstillrefusestorespondafterchangingthefuse,pleasecontactyourdealer
formoreinformation.
Shouldtheinclinesystemrefusestorespond,andshows"ERR6"ondisplay,please
replacetheinclinesystemfuse.
The4ampfuseisfortheInclinesystem.Toremovetheinclinesystemfuse,pushon
thefuseholderthenturntheholdercounterclockwiseandthefuseholderwithfuse
willprotrude.Removethedamagedfuseandinsertanewone,pushthefuseand
holderin,thenturnclockwisetosecurethefuseholder(seeFig.8-18-3).
Iftheinclinesystemstillrefusestorespondafterchangingthefuse,pleasecontact
yourdealerformoreinformation.
~
~
FuseFailureForInclineSystem
18
FIG.8-1
FIG.8-2
FIG.8-3

FuseFailureForDriveBoard
NOTE:IfyouarenotatechnicianordonothaveexpertknowledgeofthisMachine.
Pleasedonotattempttoreplaceit.
Ifthereisnothingdisplayontheelectronicspackage,andthePOWERSWITCH
locatedonthefrontofthetreadmillislit,thenthefuseonthedriveboardmaybe
damagedandmustbereplaced.
Thefuseholder3A(100V/120V)or2A(220V/240V)forthedriveboardis
Locatedontheframeatthefrontofthetreadmill(seeFig.9).
FIG.9
19
Table of contents
Other SPORTS ART Treadmill manuals

SPORTS ART
SPORTS ART T655M User manual

SPORTS ART
SPORTS ART T635A User manual

SPORTS ART
SPORTS ART T615 User manual

SPORTS ART
SPORTS ART 3120 User manual

SPORTS ART
SPORTS ART T635M User manual

SPORTS ART
SPORTS ART T645L User manual

SPORTS ART
SPORTS ART 6100E User manual

SPORTS ART
SPORTS ART TR20 User manual

SPORTS ART
SPORTS ART 6310 User manual

SPORTS ART
SPORTS ART 3108 User manual


Popular Treadmill manuals by other brands


Smooth Fitness
Smooth Fitness EVO 3i user manual

NordicTrack
NordicTrack NETL81810.0 user manual

Schwinn
Schwinn 830/Journey 8.0 Assembly manual / owner's manual

Keys Fitness
Keys Fitness HealthTrainer HT-740T owner's manual

Spirit
Spirit XT8 Service manual

NordicTrack
NordicTrack T 14.0 Treadmill Manuel de l'utilisateur