Sports Vision Technologies P3Pro Swing User manual

Installation Instructions for the P3Pro Projector Impact Screen
Before installation begins, locate the area in which the Projector Impact Screen is to be installed. Keep
in mind that the Projector Impact Screen measures 9 feet tall by 10 feet wide and requires a minimum
room width of 13 feet. Also keep in mind that you must have adequate space after installation to swing
your clubs as well as suspend your projector from the ceiling. Depending on which projector you have
purchased, you will usually need between 12 to 20 feet from the installed Projector Impact Screen to
obtain the full maximum viewing size. The Projector Impact Screen is designed for ceiling heights
over 7 feet 6 inches. For any ceiling less than 7 feet 6 inches this screen should not be used. For any
ceiling over 9 feet tall the Projector Impact Screen needs to be suspended in some manner ensuring
that the top of the net is hung no more than 9 feet from the ground.
Contents:
1 Projector Impact Screen
4 Packages containing 2 each of ceiling hooks and hardware
1 Package of 4 short bungee cords
Tools Required for Installation:
Drill
Required drill bit sizes (see enclosed ceiling hook packages)
Tape measure
Pencil
Installation Notes:
•Remember to maintain the same distance from the back wall for all ceiling hook placements.
•You will need to make a total of at least 4 marks on the ceiling a minimum of 18 inches away
from the back wall to hang the projection part of the screen.
•The elastic bands sewn into the top of the Projector Impact Screen are spaced every 16 inches
to allow for attachment into wood supports in the ceiling if available. The enclosed hardware
allows for either attachment into wood or drywall. We have included extra elastic bands sewn
into the Projector Impact Screen in the event that 1 breaks or more support is required.
•If more ceiling hooks are required they can be purchased at your nearest Home Depot.
•Pulling the Projection Impact Screen from the sides can remove wrinkles in the screen to
provide a better image quality.
1
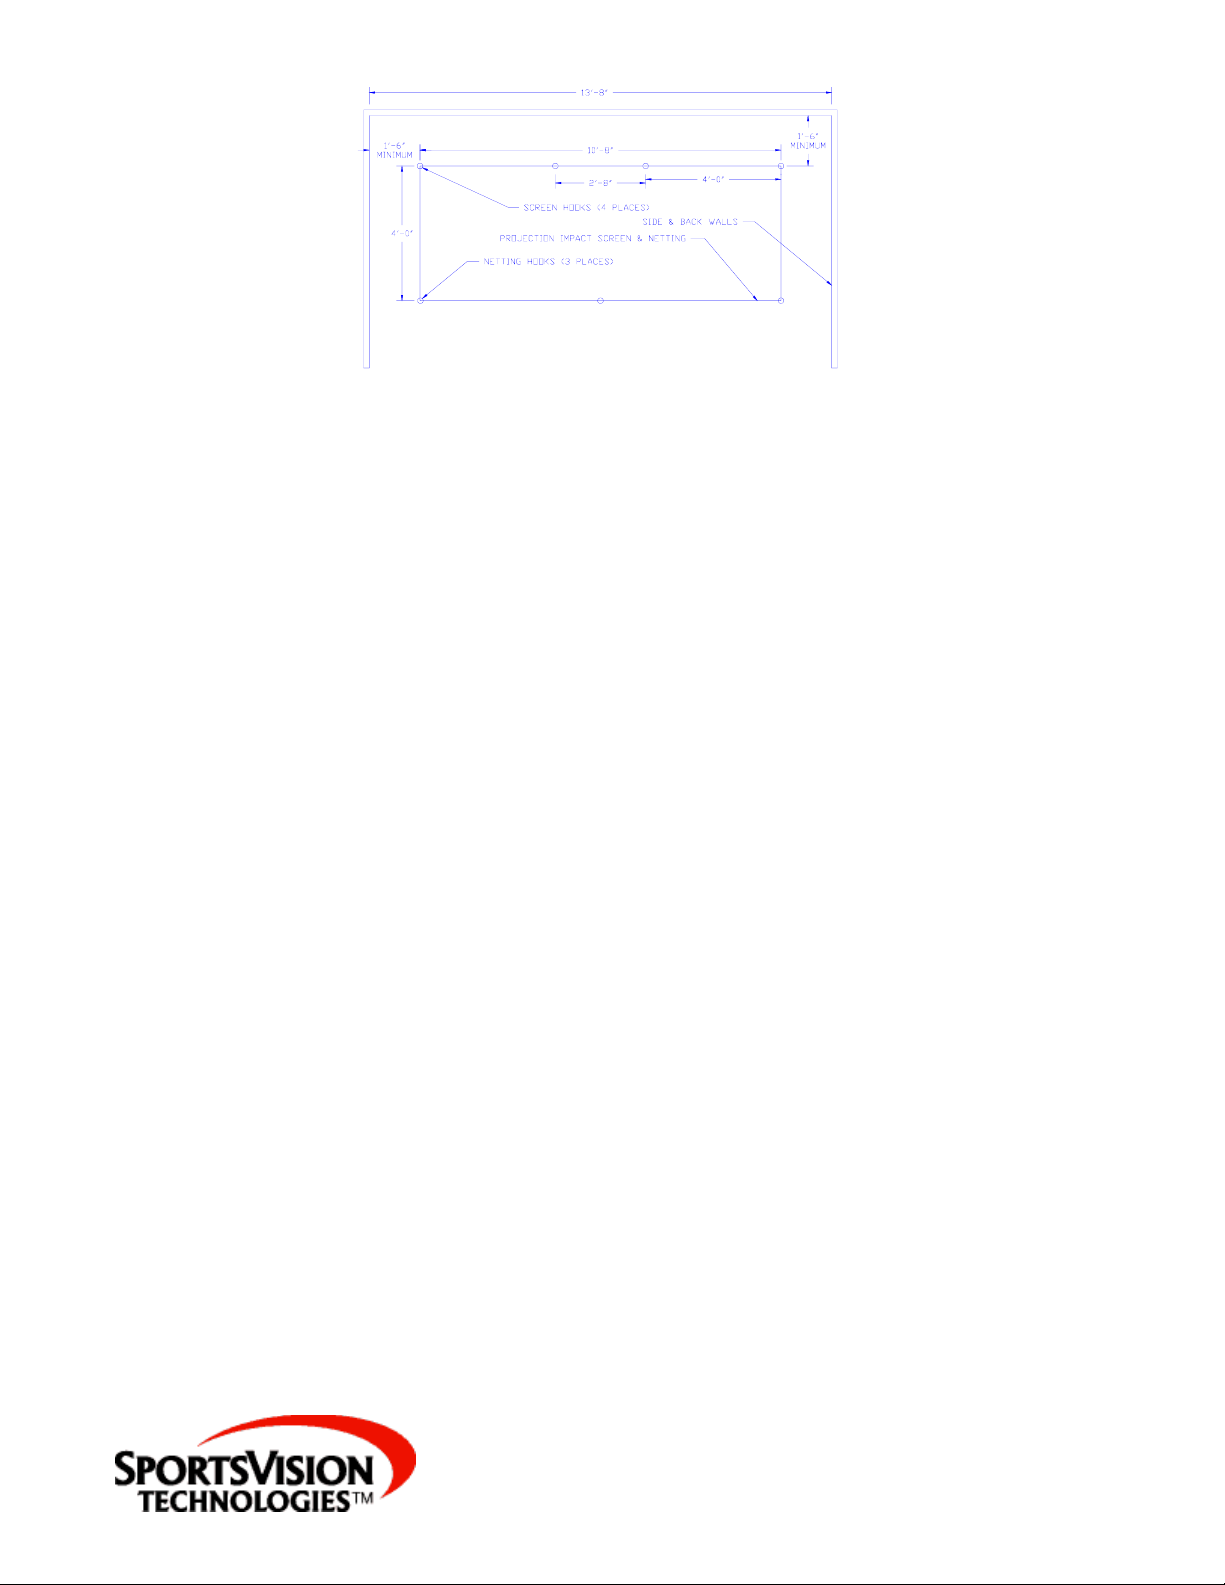
Projector Impact Screen Layout
Installation Instructions
•Locate the area where the Projector Impact Screen will be installed. It needs to be hung a
minimum of 18 inches from the back wall and a minimum of 18 inches from any side wall.
(Recommended distance of 2 feet from any wall)
•Start at one end of the installation area. Measure a minimum of 18 inches off the side wall
from where the Projector Impact Screen will hang and make a mark on the ceiling. Now
measure a minimum of 18 inches from the back wall where you are starting and make a mark.
Ensure that the 2 marks cross to allow for accurate installation.
•Measure 128 inches from the first mark on the ceiling, parallel to the back wall, and make a
mark. Now measure a minimum of 18 inches from the back wall and make a mark ensuring the
2 marks cross.
•Install these 2 white ceiling hooks per the instructions on the back of the enclosed package
using the marks on the ceiling as center points.
•Remove the Projector Impact Screen from the box and spread out on the floor. The front of the
Projector Impact Screen has the netting sewn to it.
•Take the upper corner of the Projector Impact Screen that matches the end from which you
installed the first ceiling hook and place the elastic band over the hook ensuring the front of the
Projection Impact Screen is facing into the room.
•Take the elastic band that lines up with the other upper corner of the Projector Impact Screen
and place the elastic band over the hook.
•Measure in about 48 inches from the center of each of the installed ceiling hooks on ends of the
Projector Impact Screen and look for the nearest elastic bands. Make marks on the ceiling
centered on those 2 elastic bands. Measure a minimum of 18 inches from the back wall and
make 2 marks ensuring the 2 marks cross.
•Install the next 2 white ceiling hooks per the instructions on the back of the package.
•Take the 2 elastic bands that line up with these ceiling hooks and place the elastic band over the
hooks.
2

•Note: If more support is required, install additional hooks as described in the previous
instructions.
Suspending the Netting
•To suspend the netting material you will need to install at least 3 more white ceiling hooks.
The best way to locate the position of these ceiling hooks is to attach 3 of the enclosed bungee
cord, 1 to each of the corners and 1 in the middle of the netting and pull each of the bungees out
1 at a time tight along the ceiling. Place a mark using the hook end of the bungee as a guide on
the ceiling when both the netting and bungee are tight. Do this for all three bungees.
•Install a white ceiling hook on each of these 3 marks per the instructions on the back of the
package.
•Hook the bungee cord over the white hooks.
3

The installation of the Projector Impact Screen is now complete and ready to use.
Safety Requirements:
When using the Projector Impact Screen follow these simple safety rules to reduce the chance of
personal injury or property damage. Failure to follow these warnings may result in serious injury or
damage.
•Ensure that the Projection Impact Screen is installed with the minimum distances from any
given wall.
•Ensure your surroundings are free and clear from obstructions.
•Ensure that the club path during a swing is unobstructed including ceiling height.
•Ensure the computer, monitor(s) and projector are free and clear of the swing path and from
any potential stray hit balls.
•Ensure that the cords connecting the projector to AC power, computer or accessories are
suspended and clear of the golfer’s swing path, participant(s) and observers.
•Stand behind the golfer at all times out of the way of the club and ball path.
4

•Ensure that the side netting and back screen hang loosely on the ground as shown to reduce the
chance of a ball getting under the Projection Impact Screen.
5
Table of contents


