Sportslife S001070 User manual

For more information on Sportslife products, visit our website www.sportslife.net.au
Action Sports Equipment Pty Ltd 72 Silverwater Rd, Silverwater NSW Australia 2128
Sportslife Parts & Service Enquiries: 1800 465 070 or email: service@actionspares.com.au
or as a stand alone product.
3. Do not attach additional load to the child carrier.
4. Do not modify the equipment.
5. Do not use the equipment if any part is broken.
6. Adult supervision is required at all times. This item should be assembled by an adult.
Nursery Swing
MODEL NUMBE S001070
SAFETY, INSTALLATION AND USE MANUAL.
WARNING
1. Safety Straps must always be fastened when infant is seated in the nursery swing.
2. The seat should only be used with the frame. Do not use it in other equipment

1.
2.
3.
4.
5.
6.
7.
8.
9.
10.
11.
12.
13.
14.
15.
16.
17.
18.
19.
20.
21.
22.
23.
24.
25.
26.
27.
28.
To prevent damage and accidents to persons and/or property, the following instructions and
advice must be followed:
Please retain complete instructions for future reference. Thoroughly read all parts of this
manual and strictly follow the instructions before using.
Do not use any accessories other than those provided and /or specified by the manufacturer.
Suitable for ages between 18 to 36 months. Not suitable for babies under 18 months.
Check all nuts and bolts for tightness and tighten when required.
Check all coverings and bolts for sharp edges and replace when required.
Leave all fittings, finger tight, until assembly is complete (for ease of construction) then tighten
firmly.
Failure to assemble this item as per the instruction may cause injury to the user.
DO NOT install this equipment over concrete, asphalt or any other hard surface.
SAFETY NOTES
Place this equipment on a level surface at least 1.5 meters from any structure or obstruction,
such as a fence, garage, house, overhanging branches, laundry line or electrical wires.
Regularly check the item for wear and damage, removing the item from use when necessary
until replacement parts are fitted.
This product is for home use only and has not been designed for commercial use in play
fitness centers, nurseries, etc.
For indoor and outdoor use.
This item is designed for a maximum of one infant not to exceed 20kg.
Make sure that the restraint system is not loose or able to become trapped.
Always use the restraint system and ensure that the child is restrained in the seat.
DO NOT allow infant to stand on the seat.
DO NOT allow infant to get off the seat until it has stopped moving.
DO NOT allow loose, baggy (or hooded) clothes to be worn, since children can get trapped
and may be unable to free themselves.
Do not put your hand near moving parts.
Other persons must never be allowed to stand within the range of action of the equipment
when in use.
Frequently check the security of fasteners, especially before use.
For the optimum comfort and safety of the child, please ensure that the seat does not slope
forwards, so that the child does not tend to slide out of it.
Make sure that there are no sharp objects which the child can touch.
This equipment must be assembled and checked by an adult.
Check any excessive temperature (e.g. due to direct exposure to sun) of the seat before
placing the child in it.
DO NOT allow infants to climb on the parts of this equipment not intended for this purpose.
Please keep these instruction in a safe place for future reference.
Please remove all packaging including shrunk-on film, polybag, carton etc before giving to a
child.

Part No. Qty
A 4
B 2
C 2
D 14
E 10
F 10
G 4
H 2
I 1
J 2
K 2
L 2
M 1
N 4
O 2
P 4
Q 1
R 4
Philips head screw driver
Combination Wrench
M6 60mm bolt
U screw
M6 washer
M6 spring washer
Description
Tools required for assembly
M6 Domenut
M6 steel nut
Plastic pin for baby seat
Top bar
Top leg tube #1
Top leg tube #2
Side stay bar
Spanner
Swing seat
Bottom leg
Illustration
Ground anchor
Plastic cap #1
Plastic cap #2
M6 40mm bolt
Assembly Instructions
PARTS LIST
Use the below Parts List to make sure all parts are present before the assembly of the equipment. Contact
Customer Service at 1800 465 070 if any parts are missing.
step 1
step 2 step 2
step 3 step 3
1.-1 Fix the top bar (part I) and top leg (part J and K) together using bolt set
(bolt Bx 1 + washer Dx 1 + spring washer Ex 1 + domenut Fx 1)
2.-1 Assemble top leg, bottom leg and side bar (part L) all together
(bolt Ax 1 + washer Dx 1 + spring washer Ex 1 + domenut Fx 1)
3.-1 Connect the top bar (part I) and seat set (part Q)
(bolt Cx 1 + nut Gx 2 + washer Dx 4 + spring washer Ex2 + domenut Fx 2)
After connecting, then assemble the plastic pin (H) to fasten the side of seat
Step 1 Assembling Leg and Top Bar
Step 2 Complete Side Bar Assembly
Step 3 Assembling Top Bar and Seat Set
Assembly Steps

4.-1
installed to prevent overturning or lifting of the support elements during normal or foreseeable misuse.
4.-2 While selecting a place to install the equipment, take into account the space requirement
for swinging. Allowing a margin of at least 1.5m on all sides. For this reason,
avoid positioning the equipment near protruding elements, walls, treescape, etc.
4.-3 Once the equipment has been assembled, make sure that it is placed safely
and completely stable, not least under conditons of maximum load.
4.-4 Do not install the equipment inside the sauna or any wet area, because it may cause rusty.
1. This equipment must be assembled and checked by an adult.
2. Regularly check all nuts and bolts for tightness before use and replace any worn,
defective or missing parts. DO NOT try to repaire broken parts.
3. Regularly check swing seat, ropes, steel tube and other parts are tightened completely
and replace worn & damaged parts when necessary.
4. Remove worn and damage parts from use when necessary until replacement parts are fitted.
5. At the beginning of each season, please oil all metallic move parts to maintain
and regularly oil when necessary during the usage season.
6. Baby Swing set placement:
(a) Place this equipment on a level surface at least 1.5 meters from any structure
or obstruction. Such as a fence, garage, house, overhanging branches, laundry
line or electrical wires.
(b) DO not install this equipment over concrete, asphalt or any other hard surface.
(c) Place this equipment on a well-lighted area.
(d) Do not use indoor.
7. Weather condition:
(a) Baby seat should be kept dry--do not use when these parts are wet.
(b) Wind or air movement shall be calm and gentle.
(c) Please do not use when face sun directly to affect visibility or change
orientation to leave sun behind.
(d) Store unit in a shaded area out of direct sunlight when not in use.
8. This item is not designed for adults. Maximum of one child and not to exceed 20kg.
9. Keep equipment clean at all times
10. Please keep these instruction in a safe place for future reference.
11. For any spare part or assembly enquiries, please contact
National Service Centre 1800 465 070
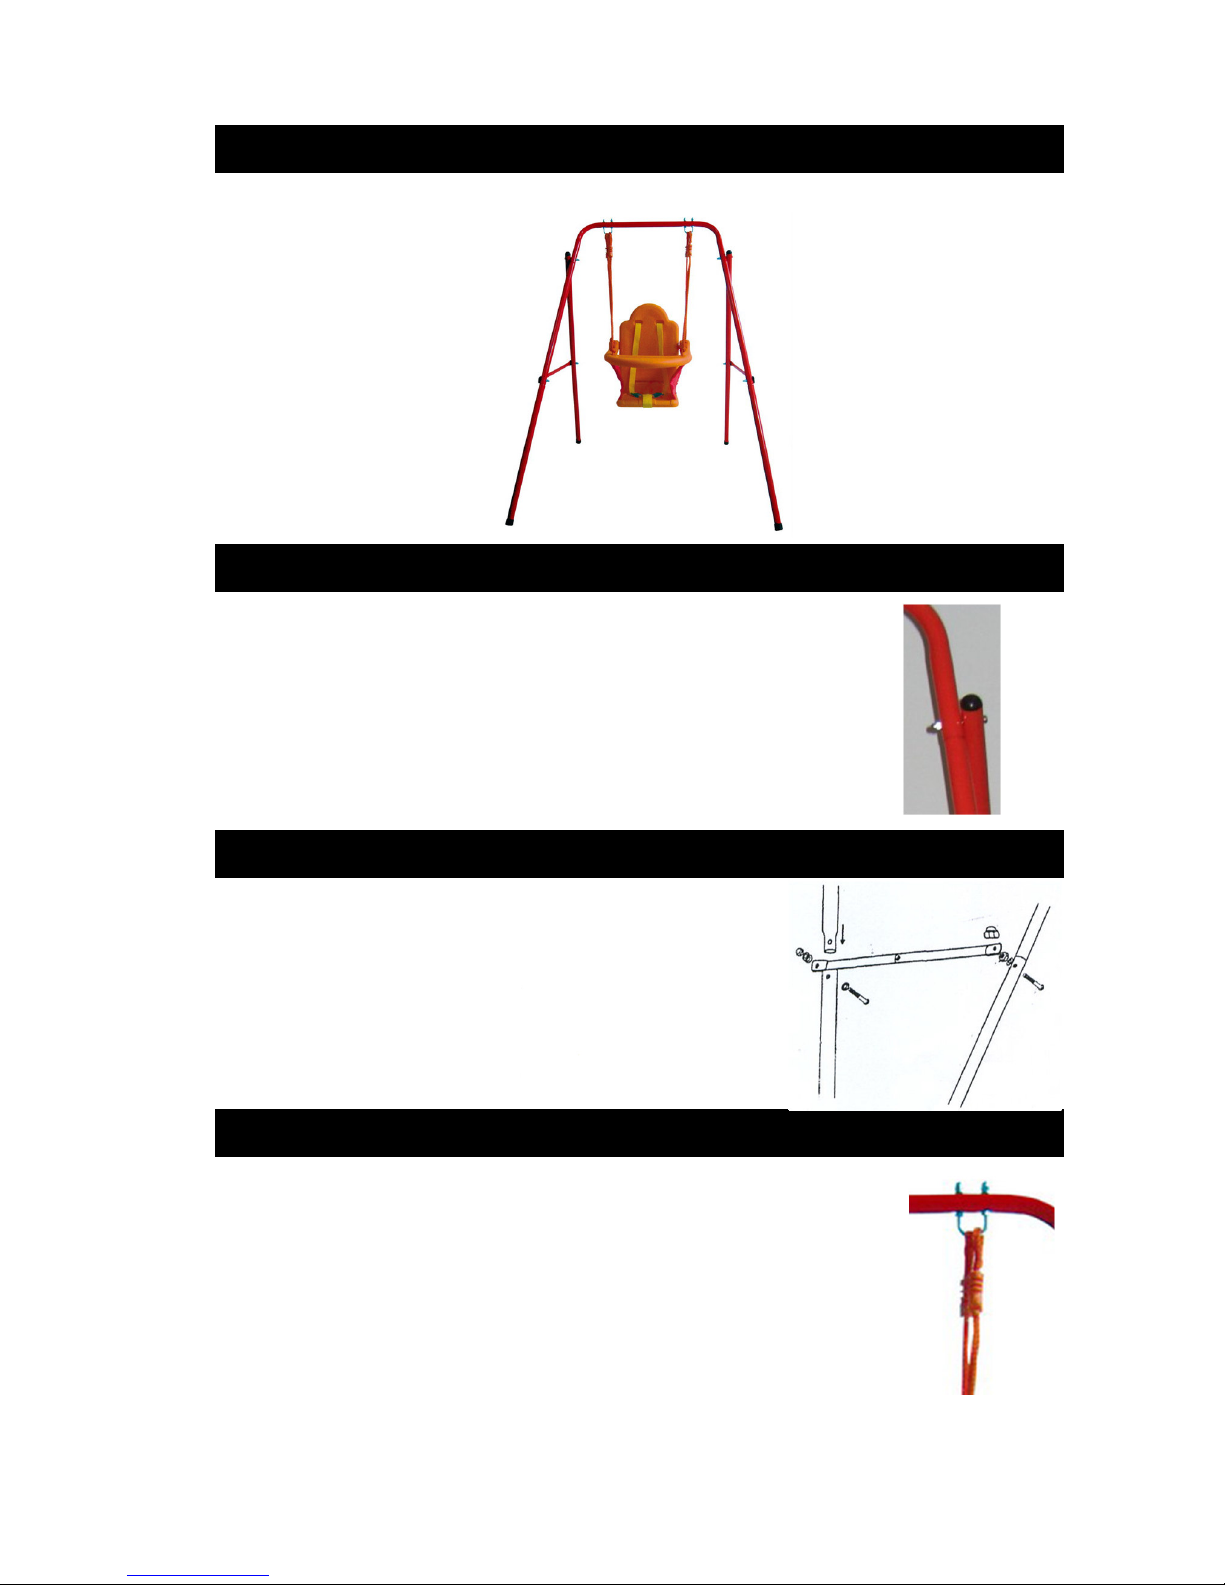
Step 4 Assembling The Ground Anchors
Care and Maintenance
Fix ground anchor Q into the bottom hole of each leg and make sure that the anchor is well
Table of contents
Popular Baby Swing manuals by other brands


TP active fun
TP active fun Single Instructions for assembly, maintenance and safe use

International Concepts
International Concepts SW-54212 Assembly instructions

Fisher-Price
Fisher-Price BMF34 instructions

Bright Starts
Bright Starts Bounce n Spring Deluxe manual

Fisher-Price
Fisher-Price CHM76 manual

Fisher-Price
Fisher-Price CMR54 instructions