manuals.online logo
Brands
  1. Home
  2. •
  3. Brands
  4. •
  5. Sportsman's Guide
  6. •
  7. Indoor Furnishing
  8. •
  9. Sportsman's Guide CASTLECREEK 235867 User manual

Sportsman's Guide CASTLECREEK 235867 User manual

Parts List
Important
Bag Contents
Required Tools
CASTLECREEK® Cedar Log and Cedar Diamond Log Beds
All log furniture is subject to a natural process called "checking." As wood
releases moisture, checking can occur across or through its annual growth
rings. This normal result of wood seasoning occurs only on the surface of
the wood, and does not affect the wood's structural performance or integrity.
Solid wood such as this has knots and cracking which are normal and should
be considered an enhancement to the natural beauty of this product.
Side rails
2 pcs
Short unperforated
cross-pieces
(From 6 to 12 pcs)
Long cross-pieces /
3 pcs
(may have 1 hole)
Brackets
4 pcs
Footboard Legs
2 pcs
Headboard Legs
2 pcs
Long perforated cross-pieces
(multiple holes)
4 pcs
Mattress Stoppers
(Not shown) 4 pcs
King Size Bed Only
Central leg (not shown) (1 pc)
Read, understand and follow all warnings and assembly instructions before
assembling or using this product. Failure to do so may result in serious injury, death
or damage to property.
WARNING: This package contains small parts and is a choking hazard, keep
away from children and pets during assembly.
At least two people are recommended for safe assembly and installation of this
product. Once assembled, make sure the product is placed on a firm, level surface.
Do not exceed the weight limits listed below:
Twin beds: Limit of 500 lbs (226 kgs)
Queen beds: Limit of 800 lbs (362 kgs)
Double/Full beds: Limit of 800 lbs (362 kgs)
King beds: Limit of 800 lbs (362 kgs)
Cedar Log Bed
Cedar Diamond Log Beds:
Side rails
2 pcs
Short unperforated
cross-pieces
(From 8 to 14 pcs)
Long cross-pieces /
3 pcs
(may have 1 hole)
Brackets
4 pcs
Footboard Legs
2 pcs
Headboard Les
2 pcs
Long perforated cross-pieces
(multiple holes)
4 pcs
Mattress Stoppers
(Not shown) 4 pcs
King Size Bed Only
Central leg (not shown) (1 pc)
Angle brace
(From 8 to 16)
Diamond Bed Design
Design of the headboard and footboard,
according to the size of your bed.
Twin Size Bed
297896
Double Size Bed
297897
Queen Size Bed
297898
King Size Bed
297899
Congratulations on your CASTLECREEK® purchase.
We’re proud to help you furnish and enhance the place you call
home. Whether indoors or outside, CASTLECREEK® is the perfect
choice for comfortable living at an exceptional value.
For assistance with your product, please contact Sportsman’s Guide customer
service at 1-800-888-3006 Mon.-Fri. 7:00am to 9:00pm, Sat.-Sun 8:00am to
8:00pm CST or go to
sportsmansguide.com/customerservice/contactus
Confirm all parts are present and undamaged before assembly.
Please contact Sportsman’s Guide customer service
for any part needs before assembly.
®
- Hammer - 1/2" Ratchet Wrench
CEDAR LOG BEDS:
- 2" nails:
20 nails - twin
24 nails - double/full
28 nails - queen
32 nails - king
- 2 1/2" nails:
18 nails - twin, double/full, queen
20 nails - king
- 8 washers
- 8 lag screws
- assembly guide
CEDAR DIAMOND LOG BEDS:
- 2" nails:
16 nails - twin
32 nails - double/full, queen, king
- 2 1/2" nails (headboard and
footboard posts):
16 nails - twin,
16 nails - double/full
20 nails - queen
28 nails - king
- 8 - 2" nails (stoppers)
- 19 - 2 1/2" nails
- 8 washers
- 8 lag screws
- assembly guide
235867 - Log Twin
235868 - Log Double
235869 - Log Queen
235870 - Log King
297896 - Diamond Twin
297897 - Diamond Double
297898 - Diamond Queen
297899 - Diamond King
A Note About Wood Furniture
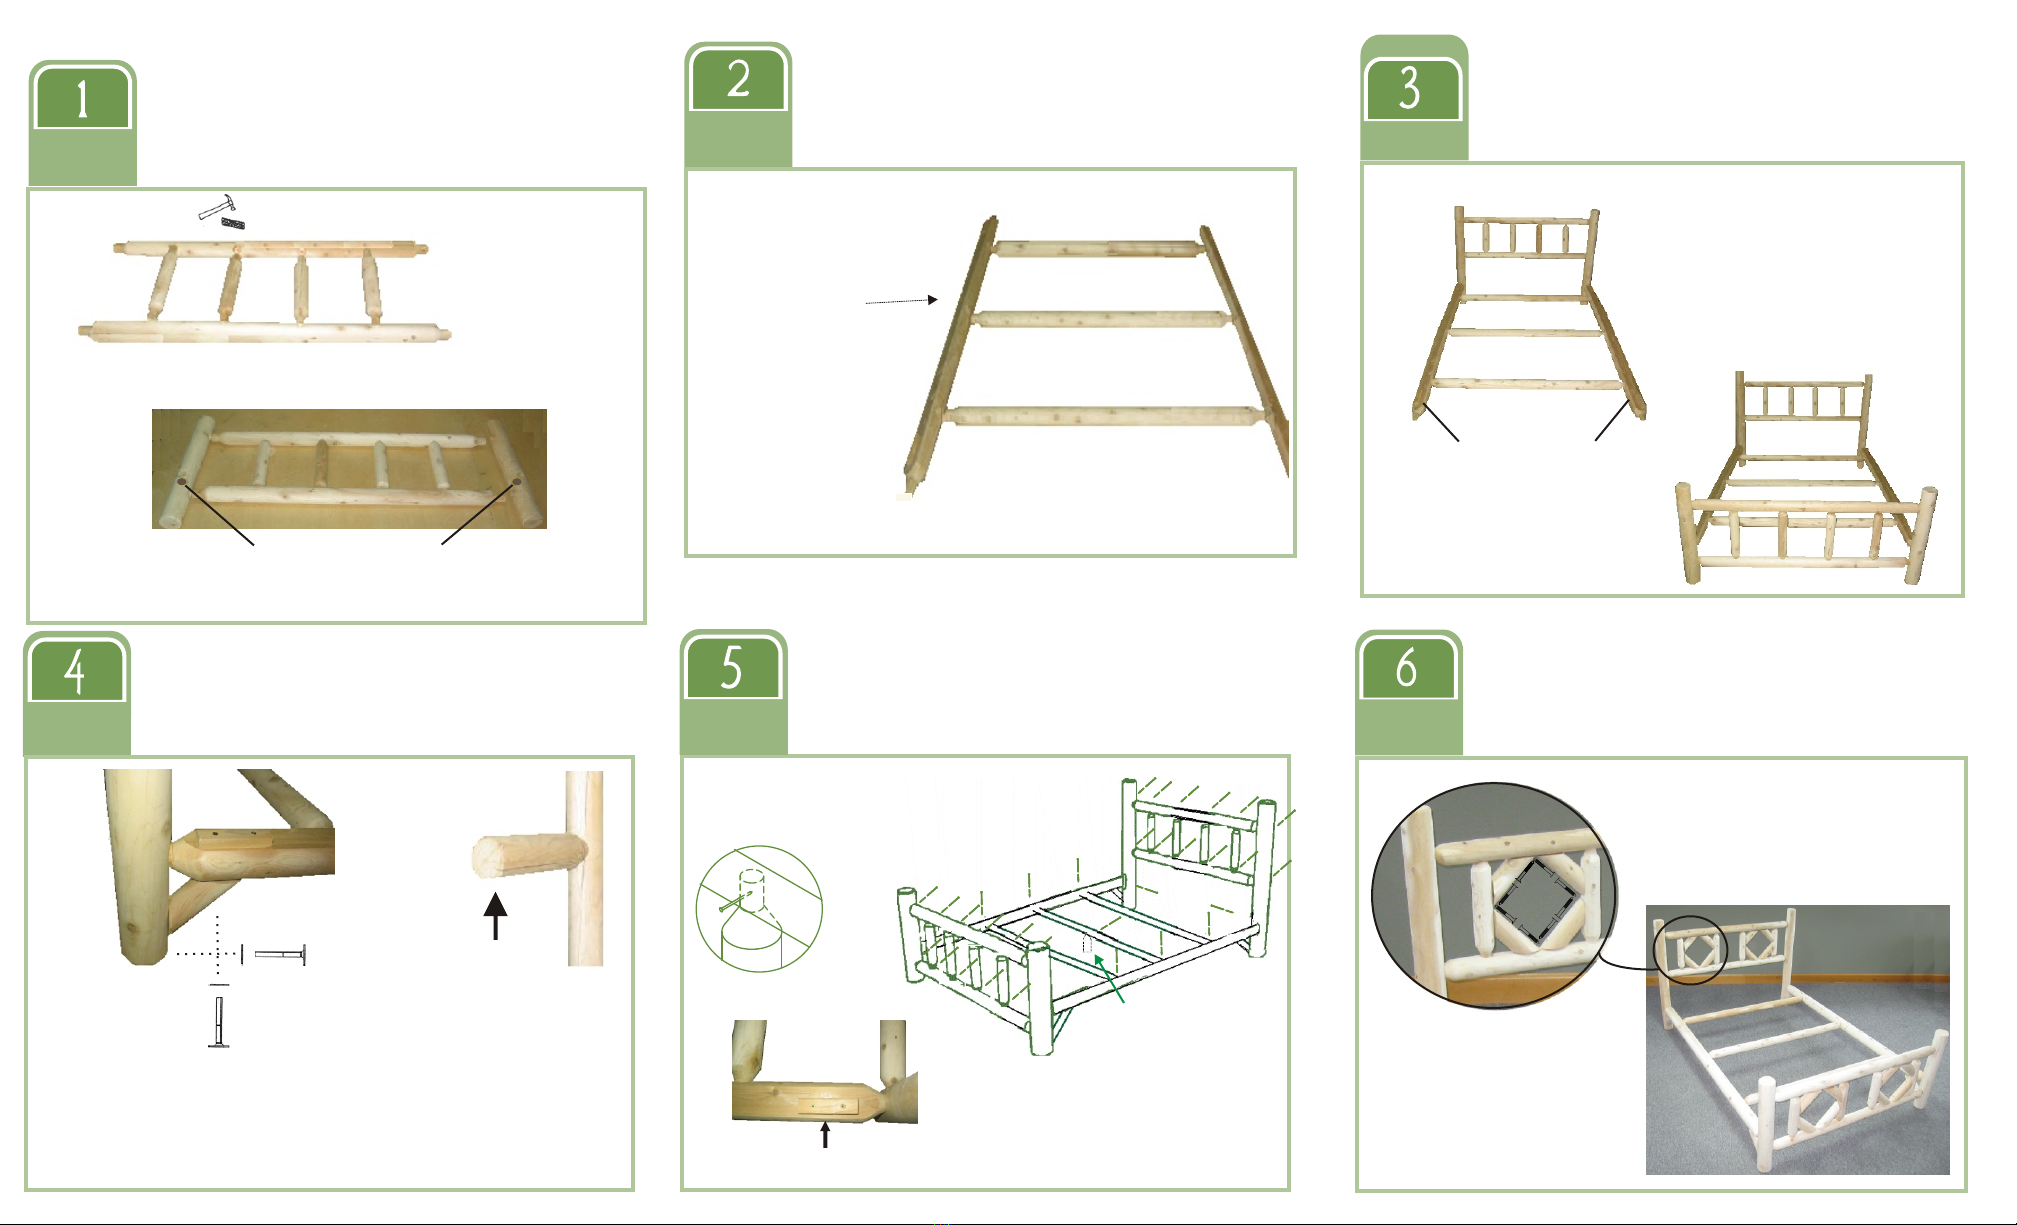
Join two long, perforated cross-pieces to the short, unperforated cross-
pieces. Lightly tap at the joints. Repeat this step to join the other two
long, perforated cross-pieces to the remaining short, unperforated cross-
pieces. Join the two footboard legs (shorter legs) to one of the preceding
assemblies as shown in image B. Lightly tap at the joints.
Repeat this to join the two headboard legs to the remaining preceding
assemblies.
Always place a piece
of wood (included in
packaging) or rubber
between the hammer
and the piece of
furniture to avoid
damaging it. Note for King Beds ONLY:
The long cross-piece that
has one hole in the middle
should be placed in the
middle of the two other long
cross-pieces and the hole
should face the ground.
A)
Flat sides should be directed
towards the top.
A)
The remaining hole of the legs should be
directed toward the top, as illustrated.
Lay the two side rails flat on the ground, making sure to place the
flat side directed towards the top. Join the three long cross-pieces
to a side rail. Lightly tap at the joint. Repeat to join the other side
rail.
Join the headboard assembly, created in step 1, to the
assembly created in step 2 as shown in image A. Lightly tap
at the joints. Repeat these operations to join the footboard
assembly as shown in image B.
A)
B)
Nailing
Nail joints at a perpendicular
angle only.
Central Log for King beds only
Mattress Stopper
B)
A)
Mattress this side
B)
Using 2" nails, nail the joints between the headboard and footboard
posts (short, unperforated cross-pieces. Using 2 1/2" nails, nails the
joints of the side rails, the long cross-pieces and the joints between
the headboard, the footboard and the legs.
(FOR KING SIZE ONLY: Use 2 1/2" nails, nail the joints of the
central leg to strengthen it, as shown in Image A.)
Once complete, lay the mattress on the frame and proceed to step B
in the box below to install the mattress stoppers.
sportsmansguide.com
Cedar Diamond Log Beds Only: Using 2" screws, screw the
angle brace at a perpendicular angle . Use two screws per angle
brace, total of 8 screws per assembly. Once complete, place the
bed on a firm, level surface for use.
B)
Central Leg
B) KING BEDS ONLY: While bed is on it's side,
join the central leg to the long cross-piece that
has a hole in the middle. Lightly tap at the joint.
Set the bed on its legs and make sure the
central leg is perpendicular to the ground. If
not, make adjustments by varying the depth of
insertion of the part or its orientation.
Lay the bed on the side. Assemble the brackets by joining 1 side
to 1 leg, using two lag screws and two washers per bracket,
according to the pre-drilled places as illustrated below in image A.
Using 2" nails, assemble the stoppers on the
sides, at the four corners of the bed, as shown
in image B. It will prevent your mattress from
moving.

This manual suits for next models

7

Popular Indoor Furnishing manuals by other brands

EKVIP 023760 operating instructions

EKVIP

EKVIP 023760 operating instructions

Manhattan Comfort Hampton Sideboard manual

Manhattan Comfort

Manhattan Comfort Hampton Sideboard manual

convenience concepts 151394 Assembly instructions

convenience concepts

convenience concepts 151394 Assembly instructions

Costway JZ10067CF user manual

Costway

Costway JZ10067CF user manual

Furniture of America CM7272-VN Assembly instructions

Furniture of America

Furniture of America CM7272-VN Assembly instructions

Blanco Precision MicroEdge 516202 Specification sheet

Blanco

Blanco Precision MicroEdge 516202 Specification sheet

Forte QTRK211 Assembling Instruction

Forte

Forte QTRK211 Assembling Instruction

BCE T-4 adjustable DESKING SYSTEM Assembly instructions

BCE

BCE T-4 adjustable DESKING SYSTEM Assembly instructions

Teknion B WPA Series installation guide

Teknion

Teknion B WPA Series installation guide

Furniture of America Silvia CM3803PC-2PK Assembly instructions

Furniture of America

Furniture of America Silvia CM3803PC-2PK Assembly instructions

Living Spaces JAXON 77094 owner's manual

Living Spaces

Living Spaces JAXON 77094 owner's manual

Noble House Home Furnishings Barstool Assembly instructions

Noble House Home Furnishings

Noble House Home Furnishings Barstool Assembly instructions

sweeek. DUNE IWDBUFFET manual

sweeek.

sweeek. DUNE IWDBUFFET manual

Forte HVNS823 Assembling Instruction

Forte

Forte HVNS823 Assembling Instruction

Sauder Harvest Mill 404958 manual

Sauder

Sauder Harvest Mill 404958 manual

Better Homes and Gardens GRAMERCY 61" Roll Arm Loveseat Assembly instructions

Better Homes and Gardens

Better Homes and Gardens GRAMERCY 61" Roll Arm Loveseat Assembly instructions

rgs REGENCY Prestige TVBC7236 Series quick start guide

rgs

rgs REGENCY Prestige TVBC7236 Series quick start guide

Newskill TAKAMIKURA Instruction guide

Newskill

Newskill TAKAMIKURA Instruction guide

manuals.online logo
manuals.online logoBrands
  • About & Mission
  • Contact us
  • Privacy Policy
  • Terms and Conditions

Copyright 2025 Manuals.Online. All Rights Reserved.