SprayEZ 4500 User manual

SprayEZ-4500 Users Guide
SPRAYEZ-4500 HYDRAULIC
PROPORTIONER USER MANUAL
Important Safety Instructions
Read all warnings and instructions in this manual. Save these
instructions.

SprayEZ-4500 Users Guide
2
Standard Technical Parameters,
Model SprayEZ – 4500 Hydraulic Spray Machine
The ratio of raw material 1:1
Max working pressure 3625psi
Single component output pressure 3770psi
Max fluid temperature 194°F
Max output 45lbs/min
Max heated hose length 300ft
Heated hose power 5000W
Heater power 9000W×2
Drive model Hydraulic
Whole power 24KW
Three-phase 240V 60Hz
Standard configuration of SprayEZ –4500 Hydraulic Spray Machine
Proportion Fixed Mainframe
Spray gun
2 Transfer pumps
Heated hose 50'
Transfer Lines
Whip hose 5'
Maintenance Tools
User Manual
READ ME FRIST, IT IS VERY IMPORTANT:
Never try to exchange ISO and POLY transfer pumps and hoses.
Add TSL into the TSL cup before use, can not run the machine without TSL.
After one day’s work, take apart the gun blocks and mixing chamber, clean
them and put them into the gun cleaning liquid.
CIRCULATE A-SIDE (ISO) WEEKLY.
Any questions, please contact us. 877.772.9629
Voltage

SprayEZ-4500 Users Guide
3
Contents
1. Warnings………………………………………………..…...........4
2. Important Two-Component Material Information….…...........…..8
3. Flow Charts of Raw Material…………………………..........…..10
4. System Installation.................................................……..........….11
5. System Operation……………………………………..........……16
6. Hydraulic System Maintenance......................................…...........22
7. Fluid Flow System and Equipment Troubleshooting....................23
8. Diagrams..........................................................................................25
SprayEZ-4500 Users Guide
4
1. Warnings
The following warnings are for setup, use, grounding, maintenance, and repair of this
equipment. The exclamation point symbol alerts you to a general warning
and the hazard symbol refers to procedure-specific risk. Refer back to these
warnings. Additional, product-specific warnings may be found throughout the
body of this manual where applicable.
WARNING
ELECTRIC SHOCK HAZARD
This equipment must be grounded. Improper grounding, setup, or
usage of the system can cause electric shock.
•Turn off and disconnect power at main switch before
disconnecting any cables and before servicing equipment.
•Connect only to grounded power source.
•All electrical wiring must be done by a qualified electrician and
comply with all local codes and regulations.
TOXIC FLUID OR FUMES HAZARD
Toxic fluids or fumes can cause serious injury or death if splashed in
the eyes or on skin, inhaled, or swallowed.
•Read MSDS to know the specific hazards of the fluids you are
using.
•Store hazardous fluid in approved containers, and dispose of it
according to applicable guidelines.
•Always wear chemically impermeable gloves when spraying,
dispensing, or cleaning equipment.
PERSONAL PROTECTIVE EQUIPMENT
You must wear appropriate protective equipment when operating,
servicing, or when in the operating area of the equipment to help
protect you from serious injury, including eye injury, inhalation of
toxic fumes, burns, and hearing loss. This equipment includes but not
limited to:
•Protective eyewear
•Clothing and respirator as recommended by the fluid and solvent
manufacturer
•Gloves
•Hearing protection
SprayEZ-4500 Users Guide
5
WARNING
SKIN INJECTION HAZARD
High-pressure fluid from spray gun, hose leak, or ruptured
components will pierce skin. This may look like just a cut, but it is a
serious injury that can result in amputation. Get immediate surgical treatment.
•Engage raw material valve lock when not spraying.
•Do not point gun at anyone or at any part of the body.
•Do not put your hand over the spray tip.
•Do not stop or deflect leaks with your hand, body, glove, or rag.
•Turn off the machine when you stop spraying and before
cleaning, checking, or servicing equipment.
•Tighten all fluid connections before operating the equipment.
•Check hoses and couplings daily. Replace worn or damaged
parts immediately.
FIREAND EXPLOSION HAZARD
Flammable fumes, such as solvent and paint fumes, in work area can
ignite or explode. To help prevent fire and explosion:
•Use equipment in well ventilated areas only.
•Eliminate all ignition sources; such as pilot lights, cigarettes,
plastic drop cloths, and portable electric lamps.
•Keep work area free of debris, including solvent, rags and
gasoline.
•Do not plug or unplug power cords.Do not turn power or light
switch on or off when flammable fumesare present.
•Ground all equipment in the work area.
•Hold spray gun firmly to side of grounded pail when
triggering into pail.
•If there is a static sparking or you feel a shock, stop operation
immediately. Do not use equipment until you identify and correct
the problem.
•Keep a working fire extinguisher in the work area.
THERMALEXPANSION HAZARD
Fluid subjected to heat in confined spaces, including hoses, can create
a rapid rise in pressure due to the thermal expansion.
Over-pressurization can result in equipment rupture and
serious injury.
•Open a valve to relieve the fluid expansion during heating.
•Replace hosesproactively at regular intervals based on your
operation conditions.

SprayEZ-4500 Users Guide
6
WARNING
PRESSURIZED ALUMINUM PARTS HAZARD
Use of fluids that are incompatible with aluminum in
pressurized equipment can cause serious chemical reactions
and equipment rupture. Failure to follow this warning can result
in death, serious injury, or property damage.
•Do not use 1,1,1-trichloroethane, methylene chloride, other
halogenated hydrocarbon solvents or fluids containing such
solvents.
•Many other fluids may contain chemicals that can react with
aluminum. Contact your material supplier for compatibility.
EQUIPMENT MISUSE HAZARD
Misuse can cause death or serious injury.
•This equipment is for Professional use only.
•Do no leave the work area while the equipment is energized or
under pressure. Turn off all equipment when the equipment is not
in use.
•Do not operate the unit when fatigued or under the influence of
drugs or alcohol.
•Do not exceed the maximum working pressure or temperature
rating of the lowest rated system component. See Technical Data
in all equipment manuals.
•Use fluids and solvents that are compatible with equipment
wetted parts. See Technical Datain all equipment manuals. Read
fluid and solvent manufacturer’s warnings. For complete
information about your material, request MSDS forms from
distributor or retailer.
•Check equipment daily. Repair or replace worn or damaged parts
immediately with genuine manufacturer’s replacement parts only.
•Do not alter or modify equipment.
•Use equipment only for its intended purpose. Call your
distributor for information.
•Route hoses and cables away from traffic areas, sharp edges,
moving parts, and hot surfaces.
•Do not kink or over bend hoses or use hoses to pull equipment.
•Keep children and animals away from work area.
•Comply with all applicable safety regulations.
SprayEZ-4500 Users Guide
7
WARNING
MOVING PARTS HAZARD
Moving parts can pinch or amputate fingers and other body parts.
•Keep clear of moving parts.
•Do not operate equipment with protective guards or covers
removed.
•Pressurized equipment can start without warning. Before
checking, moving, or servicing equipment, follow the Pressure
Relief Procedure in this manual. Disconnect power or air supply.
BURN HAZARD
Equipment surfaces and fluid that’s heated can become very hot
during operation. To avoid severe burns, do not touch hot fluid or
equipment. Wait until equipment/fluid has cooled completely.
THIS SECTION LEFT
INTENTIONALLY BLANK

SprayEZ-4500 Users Guide
8
2. Important Two-Component Material Information
Isocyanate Conditions
•Spraying or dispensing materials containing isocyanates creates
potentially harmful mists, vapors, and atomized particulates.
•Read material manufacturer’s warnings and material MSDS to
know specific hazards and precautions related to isocyanates.
•Prevent inhalation of isocyanate mists, vapors, and atomized
particulates by providing sufficient ventilation in the work area. If
sufficient ventilation is not available, a supplied-air respirator is
required for everyone in the work area.
•To prevent contact with isocyanates, use appropriate
personal protective equipment, including;chemically
impermeable gloves, boots, aprons, and goggles, is also
required for everyone in the work area.
Material Self-ignition
Some materials may become self-igniting if applied too thickly. Read
material manufacturer’s warnings and material MSDS.
Keep Components Aand B Separate
Cross-contamination can result in cured material in fluid lines which
could cause serious injury or damage equipment. To prevent
cross-contamination of the equipment’s wetted parts, never
interchange component A (isocyanate) and component B (resin) parts.

SprayEZ-4500 Users Guide
9
Moisture Sensitivity of Isocyanates
Isocyanates (ISO) are catalysts used in two component foam and polyurethane
coatings. ISO will react with moisture (such as humidity) to form small, hard,
abrasive crystals, which become suspended in the fluid. Eventually a film will form
on the surface and the ISO will begin to gel, increasing in viscosity. If used, this
partially cured ISO will reduce performance and the life of all wetted parts.
The amount of film formation and rate of crystallization varies depending on the
blend of ISO, the humidity, and the temperature.
To prevent exposing ISO to moisture:
•Always use a sealed container with a desiccant dryer in the vent, or a nitrogen
atmosphere. Never store ISO in an open container.
•Keep the ISO lube pump reservoir (if installed) filled with TSL. The lubricant
creates a barrier between the ISO and the atmosphere.
•Use moisture-proof hoses specifically designed for ISO, such as those supplied
with your system.
•Never use reclaimed solvents, which may contain moisture. Always keep solvent
containers closed when not in use.
•Never use solvent on one side if it has been contaminated from the other side.
•Always lubricate threaded parts with ISO pump oil or grease when reassembling.
Changing Materials
•When changing materials, flush the equipment multiple times to ensure it is
thoroughly clean.
•Always clean the fluid inlet strainers after flushing.
•Check with your material manufacturer for chemical compatibility.

SprayEZ-4500 Users Guide
10
3. Flow Charts of Raw Material
SprayEZ-4500 Users Guide
11
4.System Installation
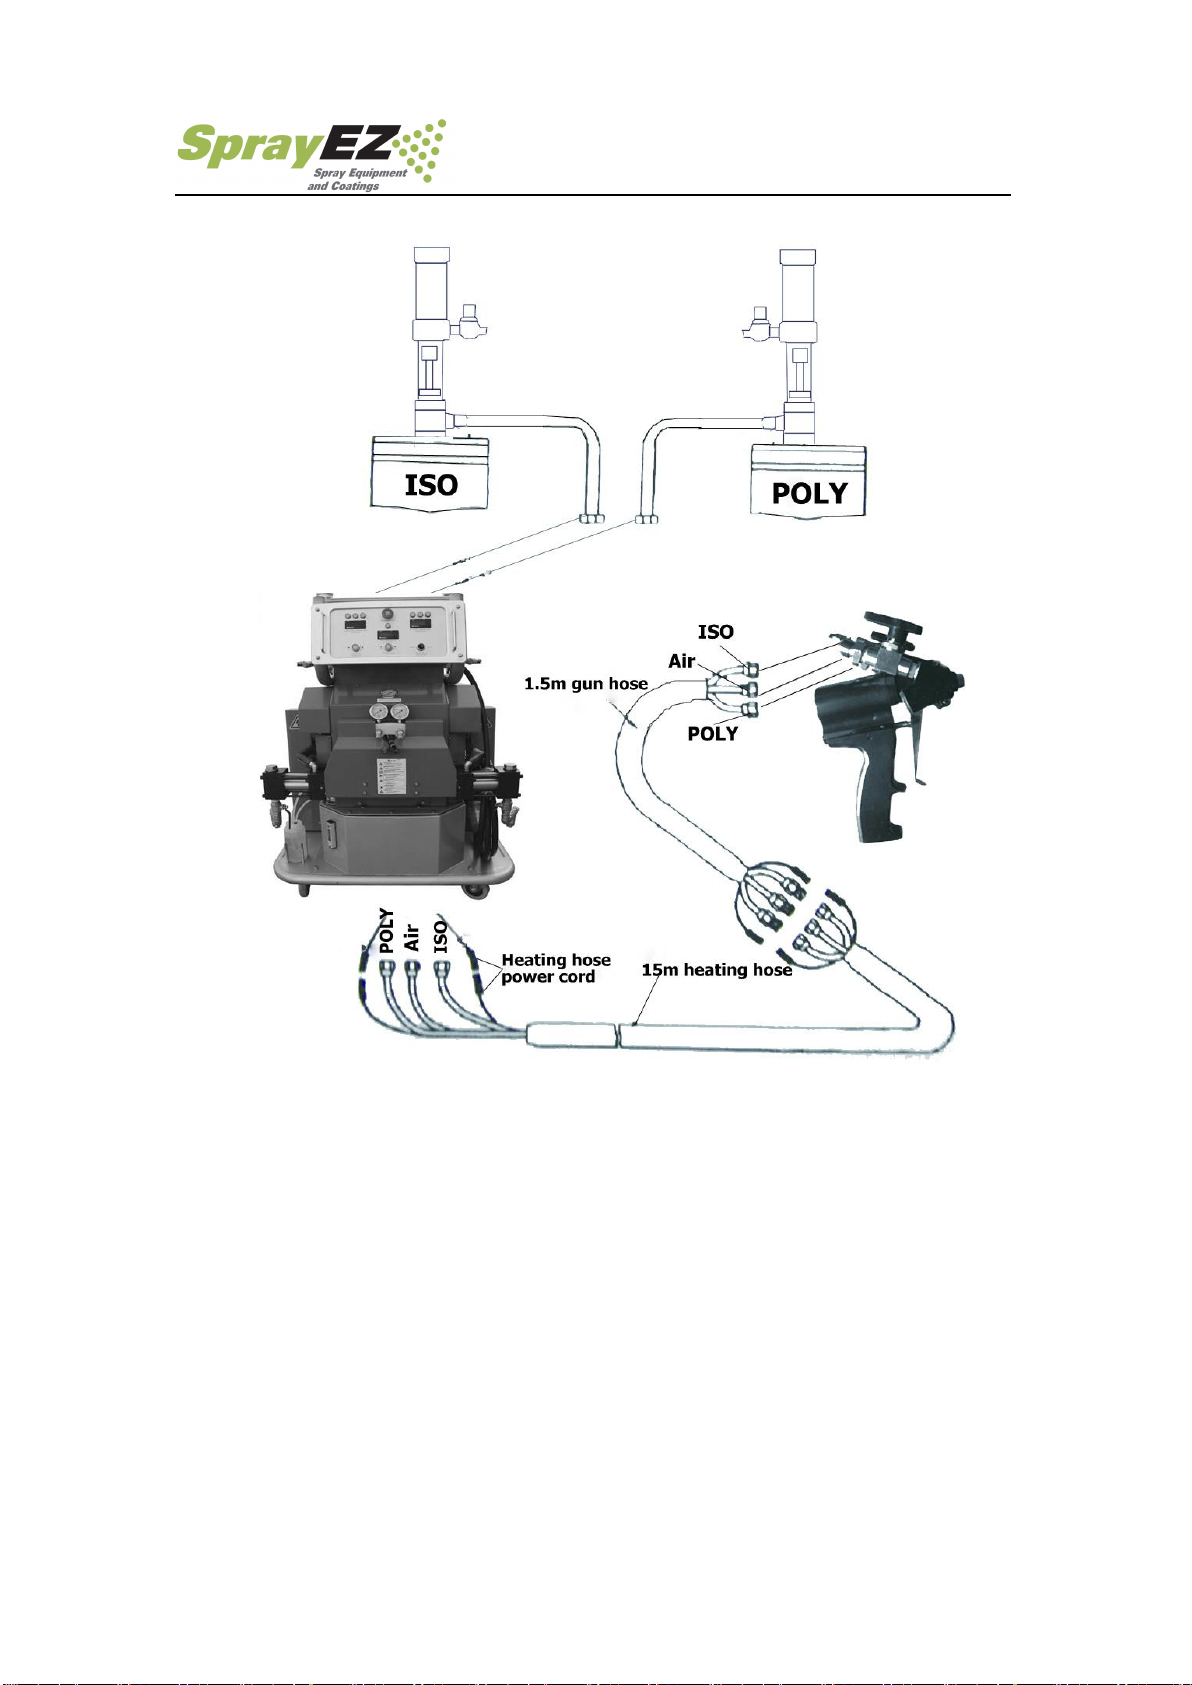
4.1 Installation of raw material pipe system:
Lead the POLY and ISO from material drum to the pump entrance of the
mainframe; connect hoses of chemical material and air to spray gun respectively.
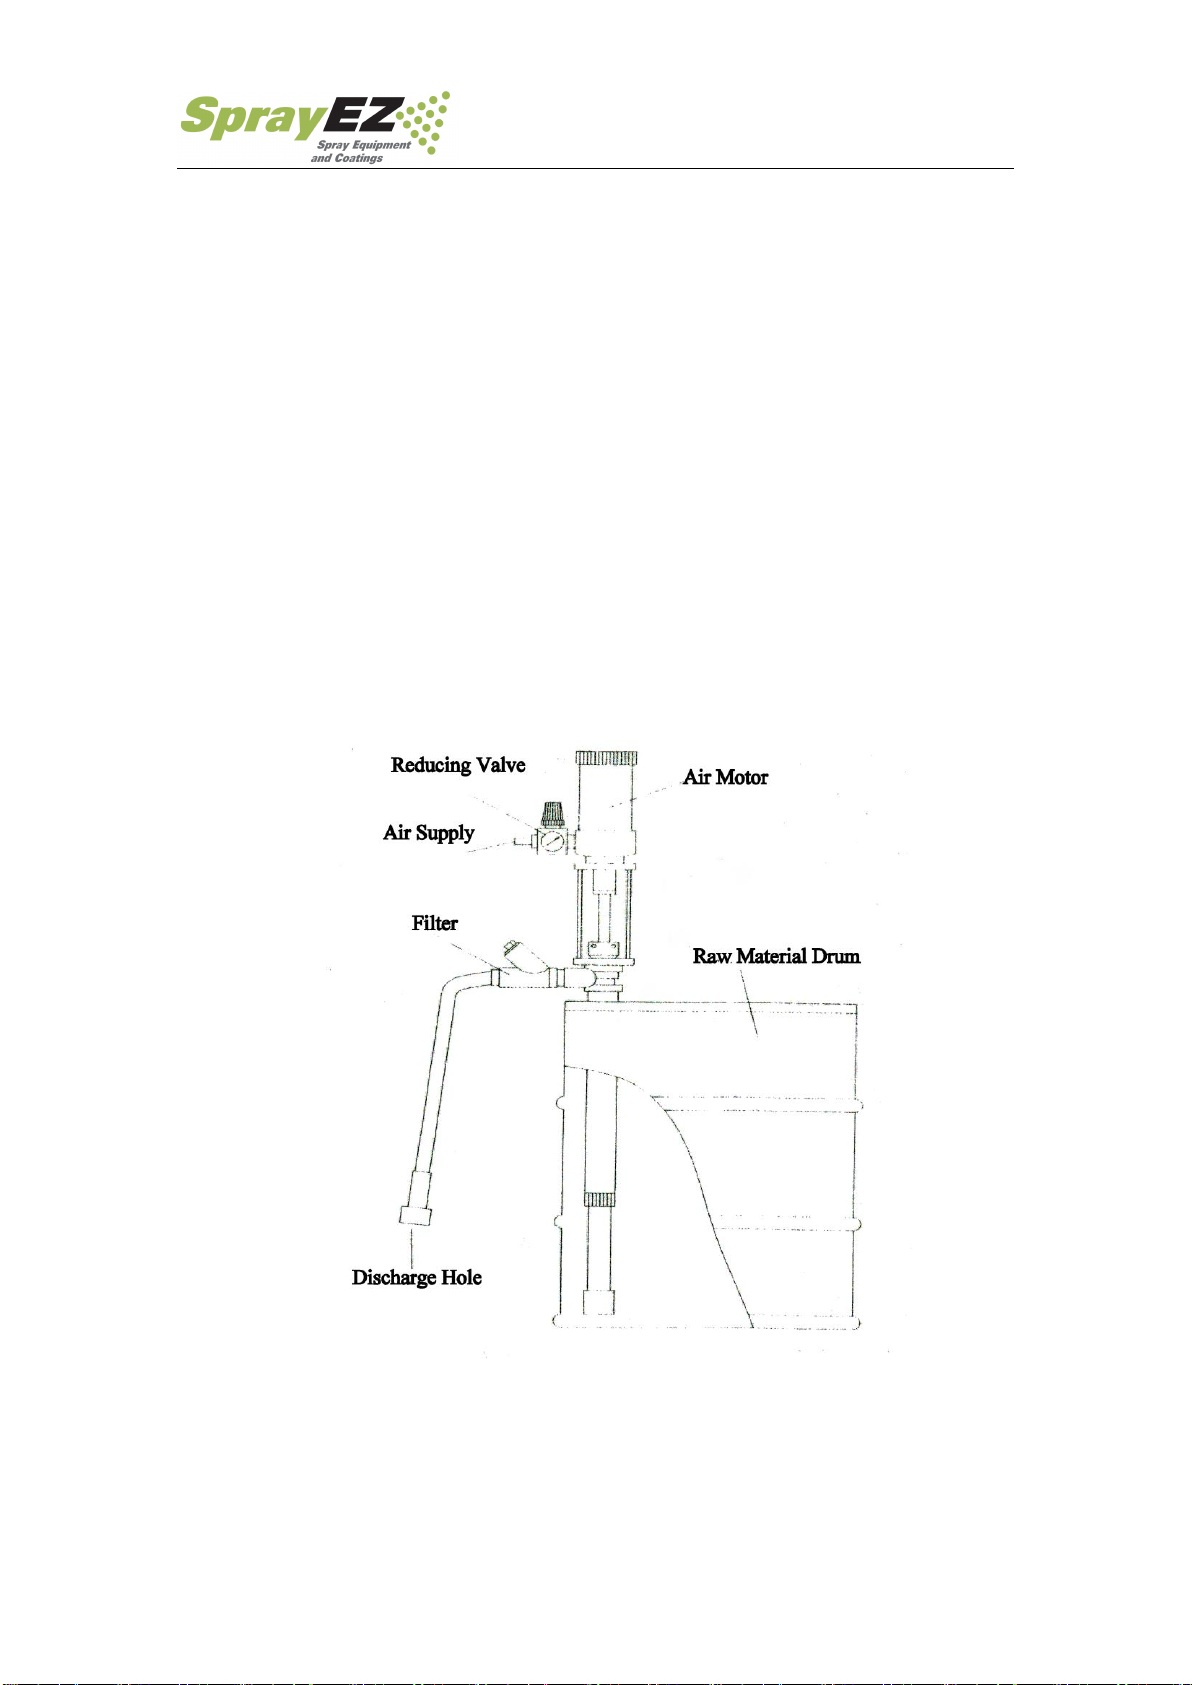
1. Installation of material feeding system:
1.1 Open the drum,put in the material transfer pump
Figure (2)
1.2 Connect the pump hose to discharge hole of transfer pump and the booster
pump entrance of the mainframe respectively. As seen in figure (3)
SprayEZ-4500 Users Guide
12
Figure (3)
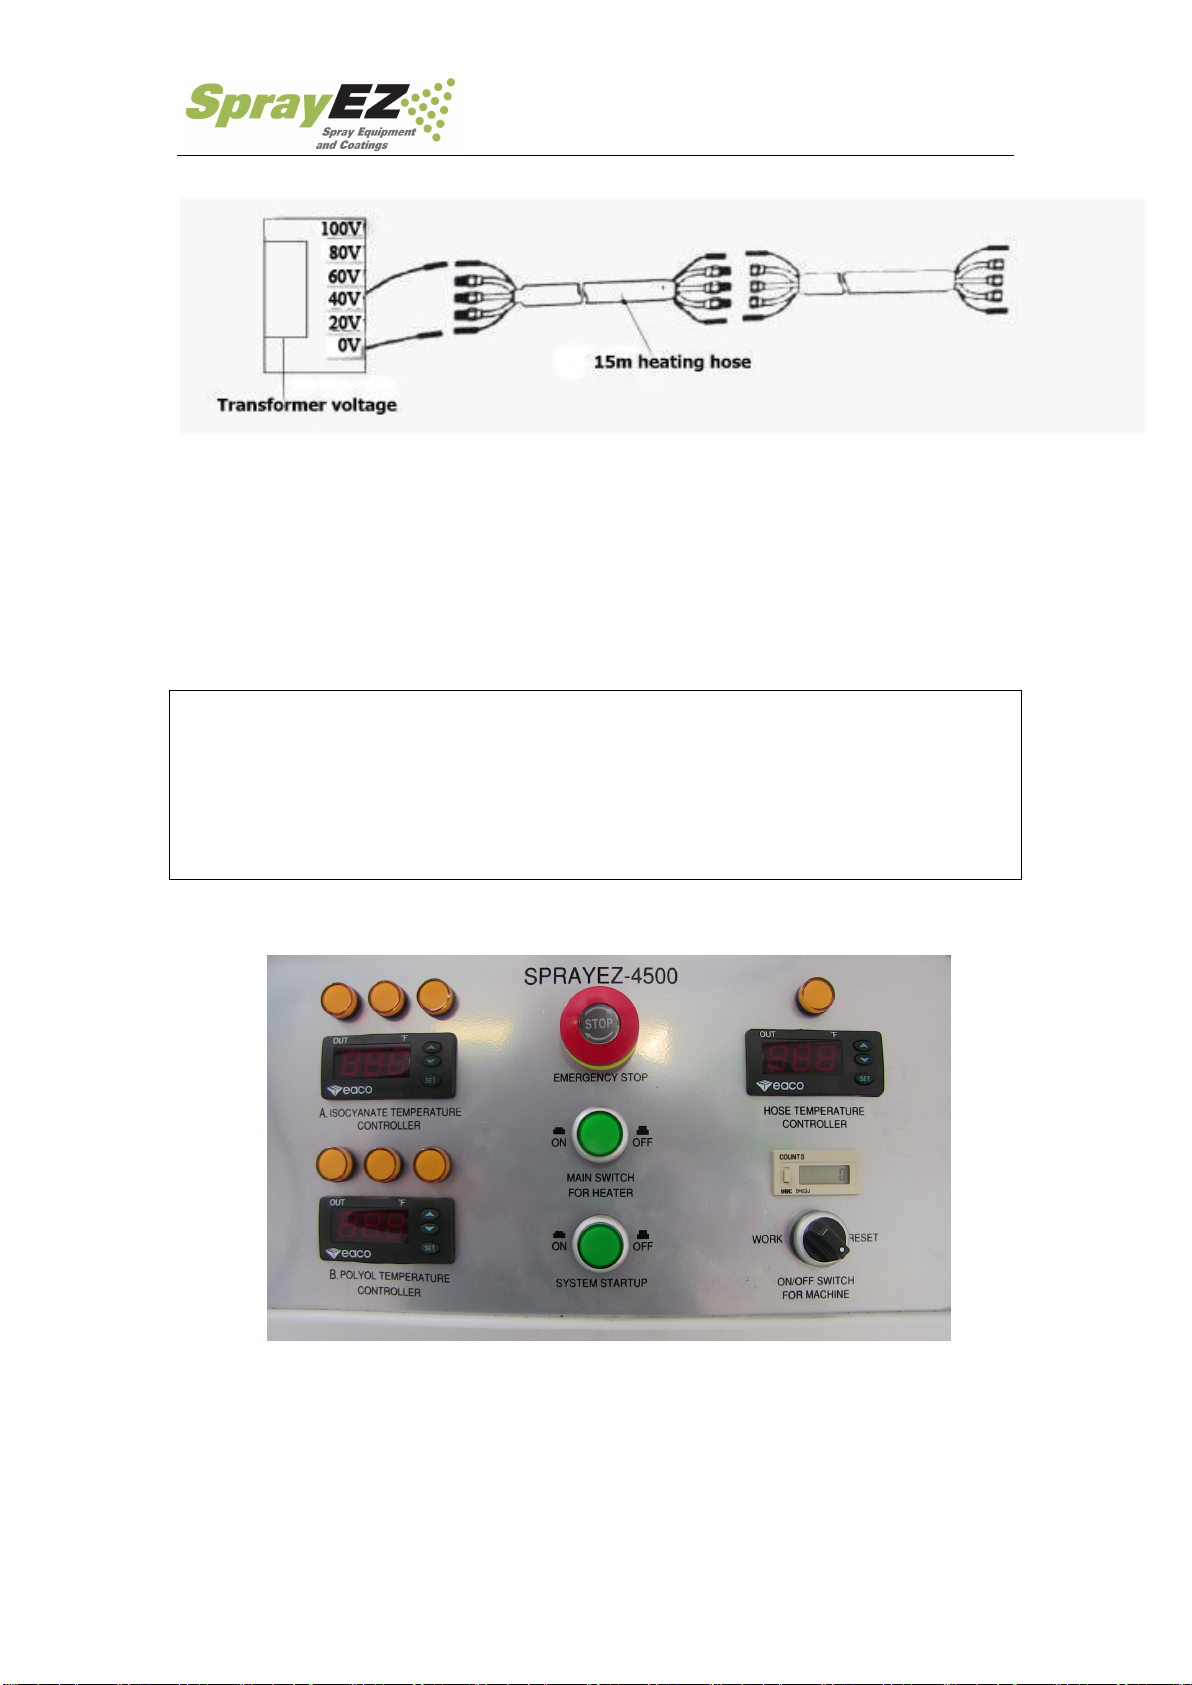
2. Installation of heated hose
Connect the hose to the mainframe and spray gun respectively.
Connect the power cord of the heated hose to the transformer output wire. <that
will give the heated hose 40 amps max power>
See figure (4).
SprayEZ-4500 Users Guide
13
Figure (4)
4.2. The connection and requirement of power source
Connect the power line from the mainframe to three-phase 240V 60Hz power which is
equipped with a breaker. The yellow/green line is a protective grounding wire.
WARNING
Installing this equipment requires access to parts which may cause electric shock
or other serious injury if work is not performed properly. Be sure your
installation complies with all national, state and local safety and fire codes.
The two wires of the instrument panel are charged when the main power is on.
Turn off the main power when maintaining the equipment
4.3 Control panel: as Figure (5)
Figure (5)
1. Emergency Stop
Press the stop switch in an emergency situation. The equipment is still electrified.
Be sure to cut off the main power when you want to maintain the equipment.
After finishing maintenance, turn the knob clockwise to reset the equipment to
working state.

SprayEZ-4500 Users Guide
14
2. Main Switch
The main power switch controls the heaterpower and heatedhose power. Press this
button, A, B and heated hose controller temperature will display.
3. System Startup
This switch controls the hydraulic system, pressing this button, the electrical motor
will start running, if not, swap any two of the power cords connection order.
4. Temperature Controller
A Isoyanate temperature controller for Aside heater temperature display and set,
B Polyol temperature controller for B side heater temperature display and set,
Hose temperature controller for heated hose temperature display and set.
How to set temperature
1. Press “MAIN SWITCH FOR HEATER”to “ON”position,
2. Press “SET”knob on the controller three times, the LED digital Continuous
flashing,
3. Press ▲or▼to set the temperature,
4. Press “SET”one time finish the setting.
5. Counts
For recording the booster pump runs, press button on counts, the number back to “0”.
6. ON/OFF Switch for Machine
This switch controls connection between hydraulic system and booster pump. It has
two positions, “WORK”and “RESET”, on “WORK”position, hydraulic system drive
the booster pump working, the chemical has high pressure inside, on “RESET”
position, the hydraulic system and booster pump disconnect, booster pump will
stop working.
4.3 Control panel -continued.
Figure (5)
SprayEZ-4500 Users Guide
15
NOTICE
All electrical appliances are only charged by the input power line and the black
and gray line from the input power line to the main switch. So, take apart or cut the
main power when maintaining the inside of the equipment, even if the switch is off.
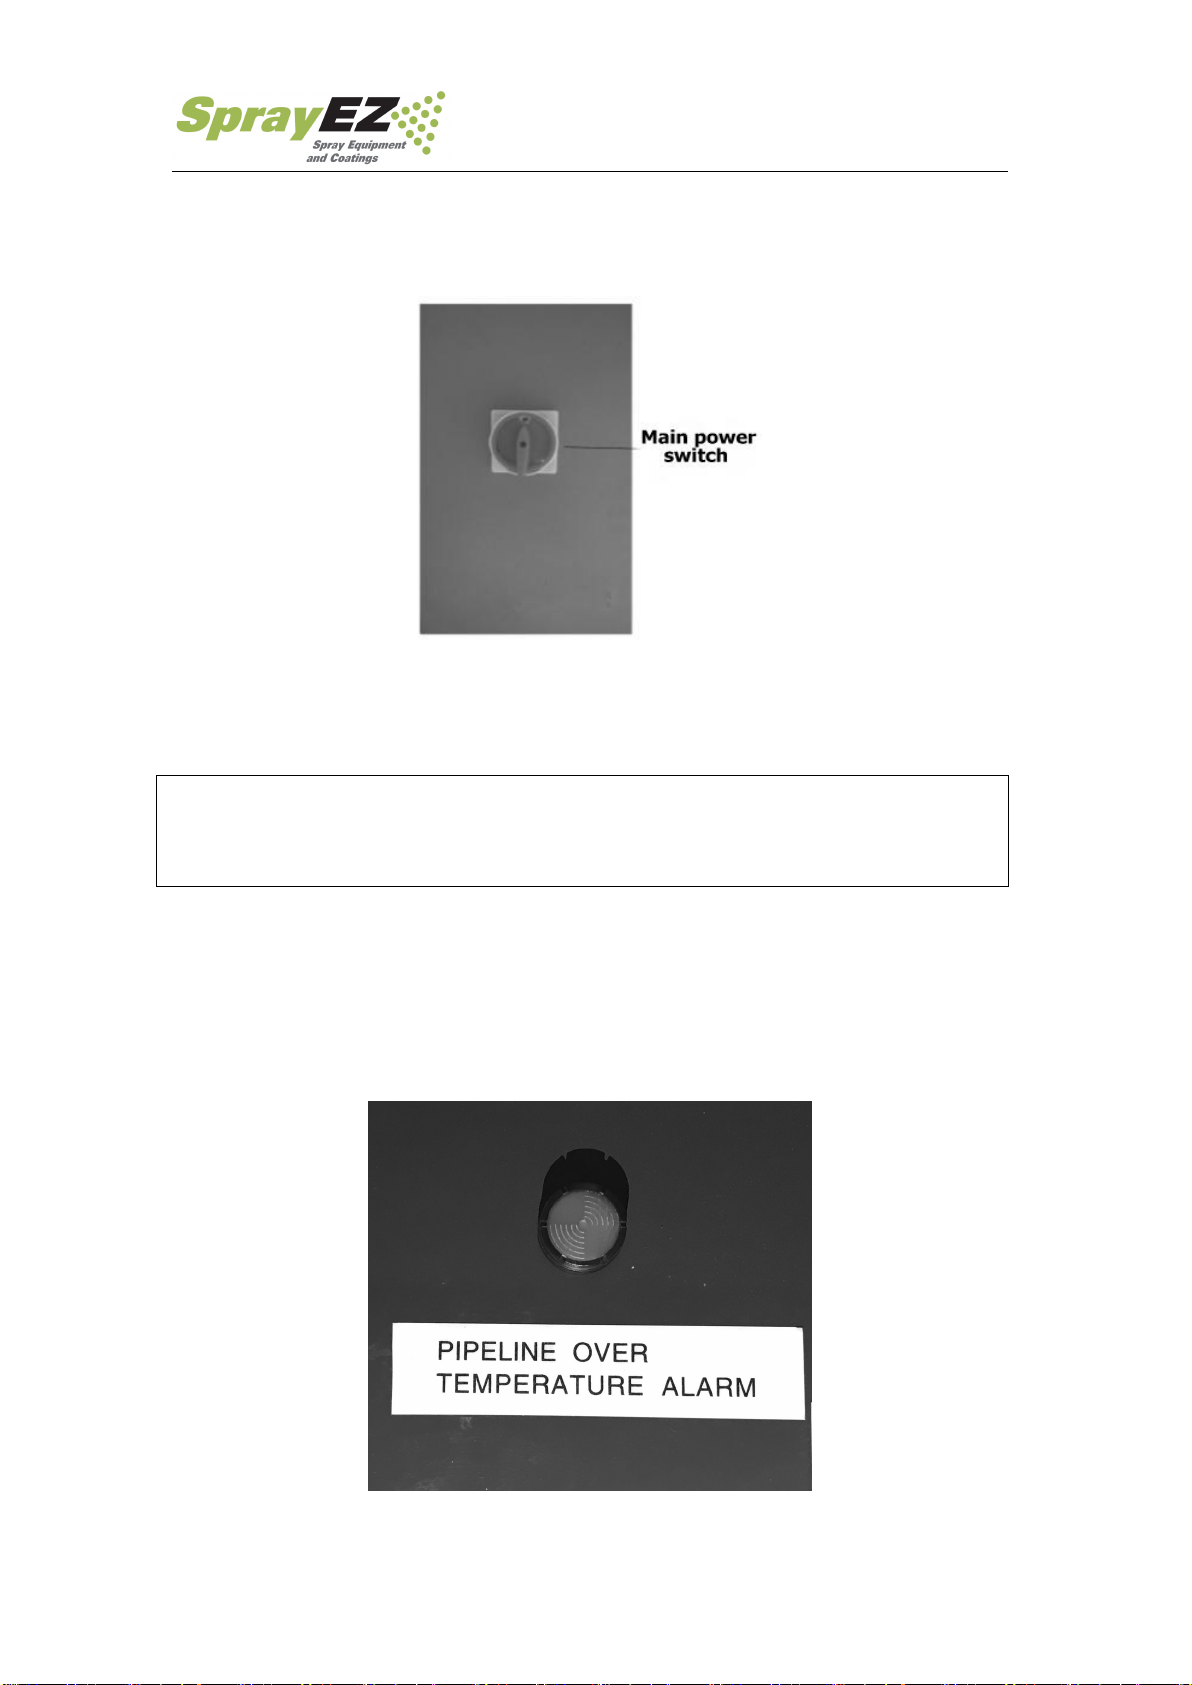
4.5 Over-temperatureAlarm
For protecting equipment, the device is equipped with over-temperature alarm.
(Figure 7)
When the alarms sounds it is indicating the temperature is too high, the heater will
stop working itself, please check the temperature and troubleshoot the problem.
Figure (7)
4.4 Main Power Switch
This switch controls whole machine power.
Figure (6)
SprayEZ-4500 Users Guide
16
5. System Operation
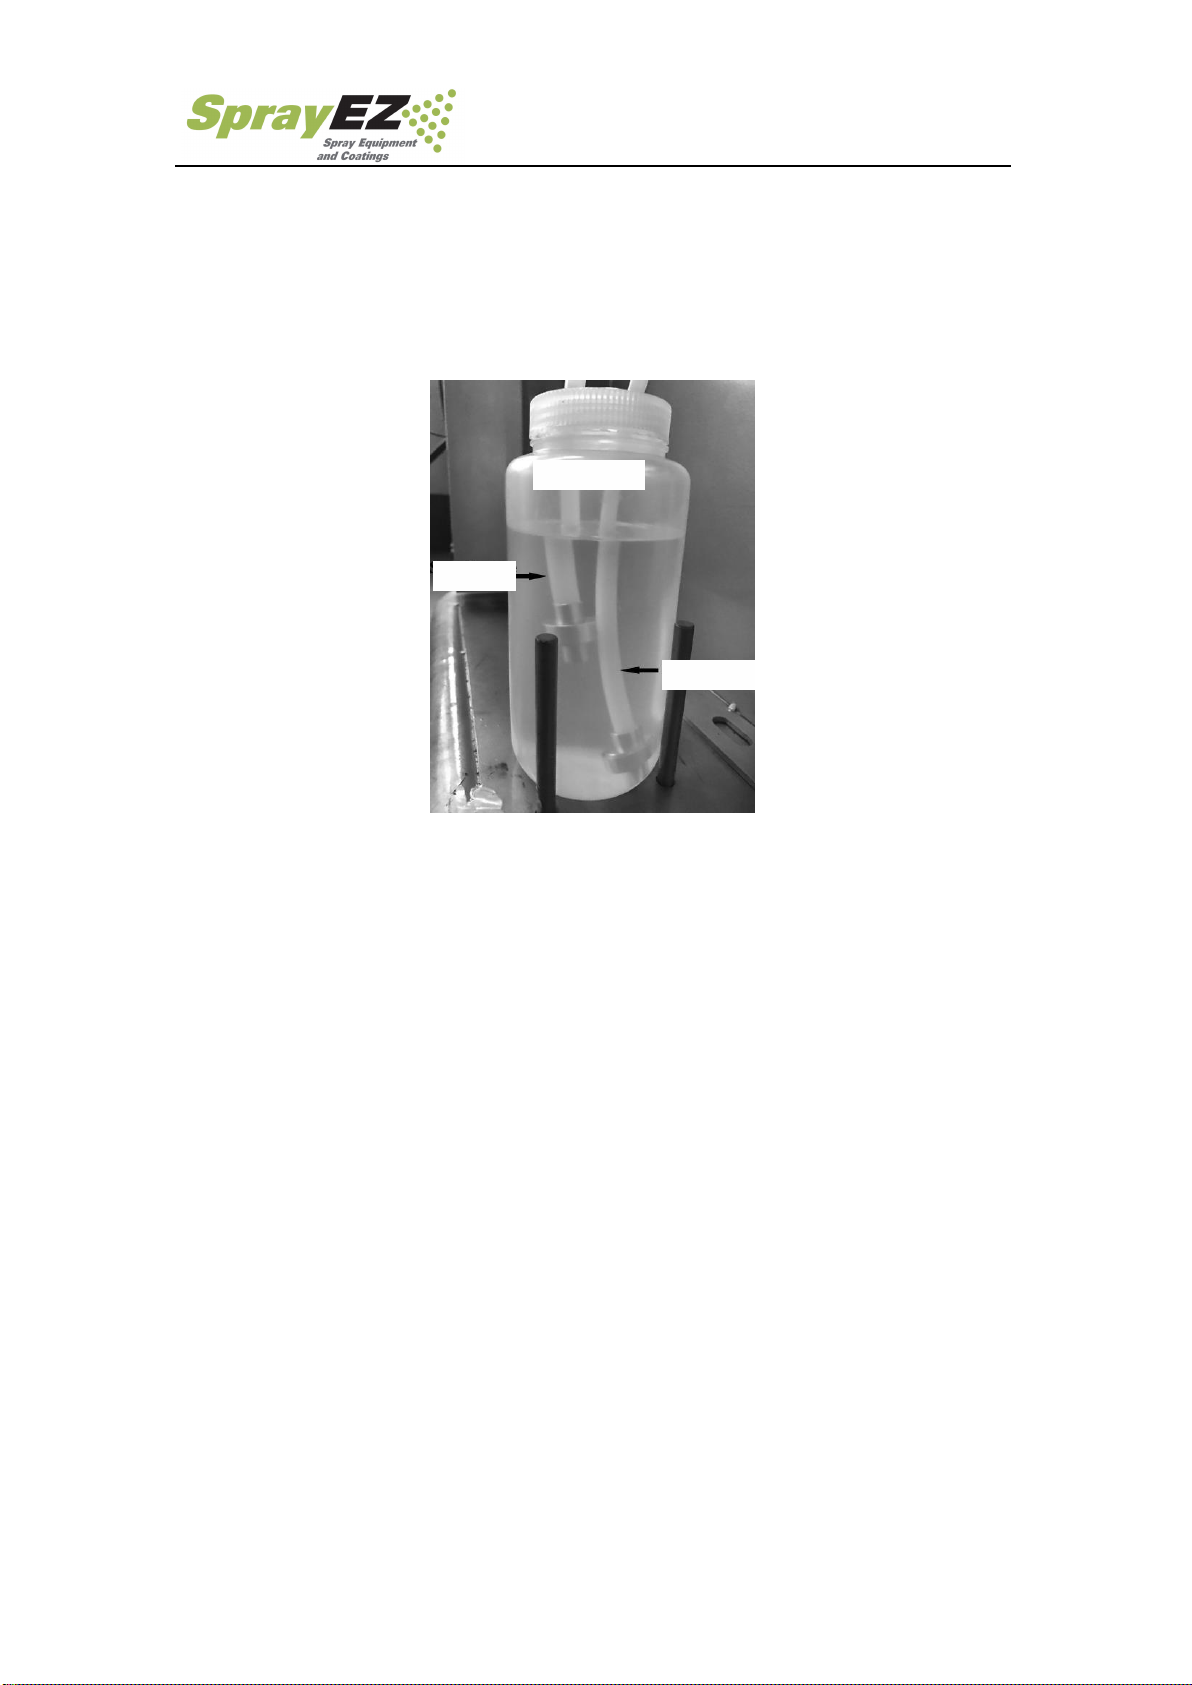
5.1. Check before operation
1. There is 4/5 TSL (Throat Seal Liquid) in the TSL cup on the machine. The
supply pipe (Coarser pipe) should be in the cup 1/3 of the way, and the return pipe
(Finer pipe) should be in the bottom of the cup. (Figure 8).
Figure (8)
2. Make sure all the connections are tight.
3. Make sure the connection of power line is connected correctly, and that
protective grounding wire is in place.
4. Ensure all the switches on the control panel are in the OFF position.
**Don't spray any body parts.
**Don’t let the gun point at anyone.
**Don’t look into the hole of the gun mixing
chamber.
It is required for all persons involved with
spraying foam to wear PPE (Personal Protection
Equipment) I.E. - Proper eye, ear, and face
protection, respirator or fresh air supply device,
and both gloves and protective outer wear.
TSL CUP
Supply
Return

SprayEZ-4500 Users Guide
17
WARNING
The direction of rotation of the electrical motor should be consistent with the
direction of the arrow, otherwise it will cause no pressure and damage the system. See
Figure 9.
NOTICE
Proper system setup, startup, and shutdown procedures are critical to electrical
equipment reliability. Failure to follow safety procedures will cause voltage
fluctuations that can damage electrical equipment and void the warranty.
WARNING
Do not operate this machine without all covers and shrouds in place.
Before starting the system you must make sure all fluid flow lines, air supply lines
and power cords are connected correctly. The operator must fully understand every
part on the control panel.
1. Turn on the Main Power Switch, switch System Startup to “ON”position,
turn ON/OFF Switch for Machine to “WORK”position, the pump will begin
transferring fluid to the hoses. Adjust the hydraulic pressure to 2Mpa-5Mpa. The
system,heater and heated hose will fill with raw material. Once filled up, the
machine will stop working automatically.
5.2. Initial start (The first use of the new machine)
Figure (9)
SprayEZ-4500 Users Guide
18
Figure (10) Figure (11)
NOTICE
In the hydraulic system there is a relief valve, the relief valve set pressure is 9Mpa.
The role is to limit the working pressure of the hydraulic system.
If the pressure rises above 9Mpa the pressure relief valve will activate and reduce the
pressure. Do not operate the machine in under overpressure or overflow conditions
as this may damage the machine and void the warranty.
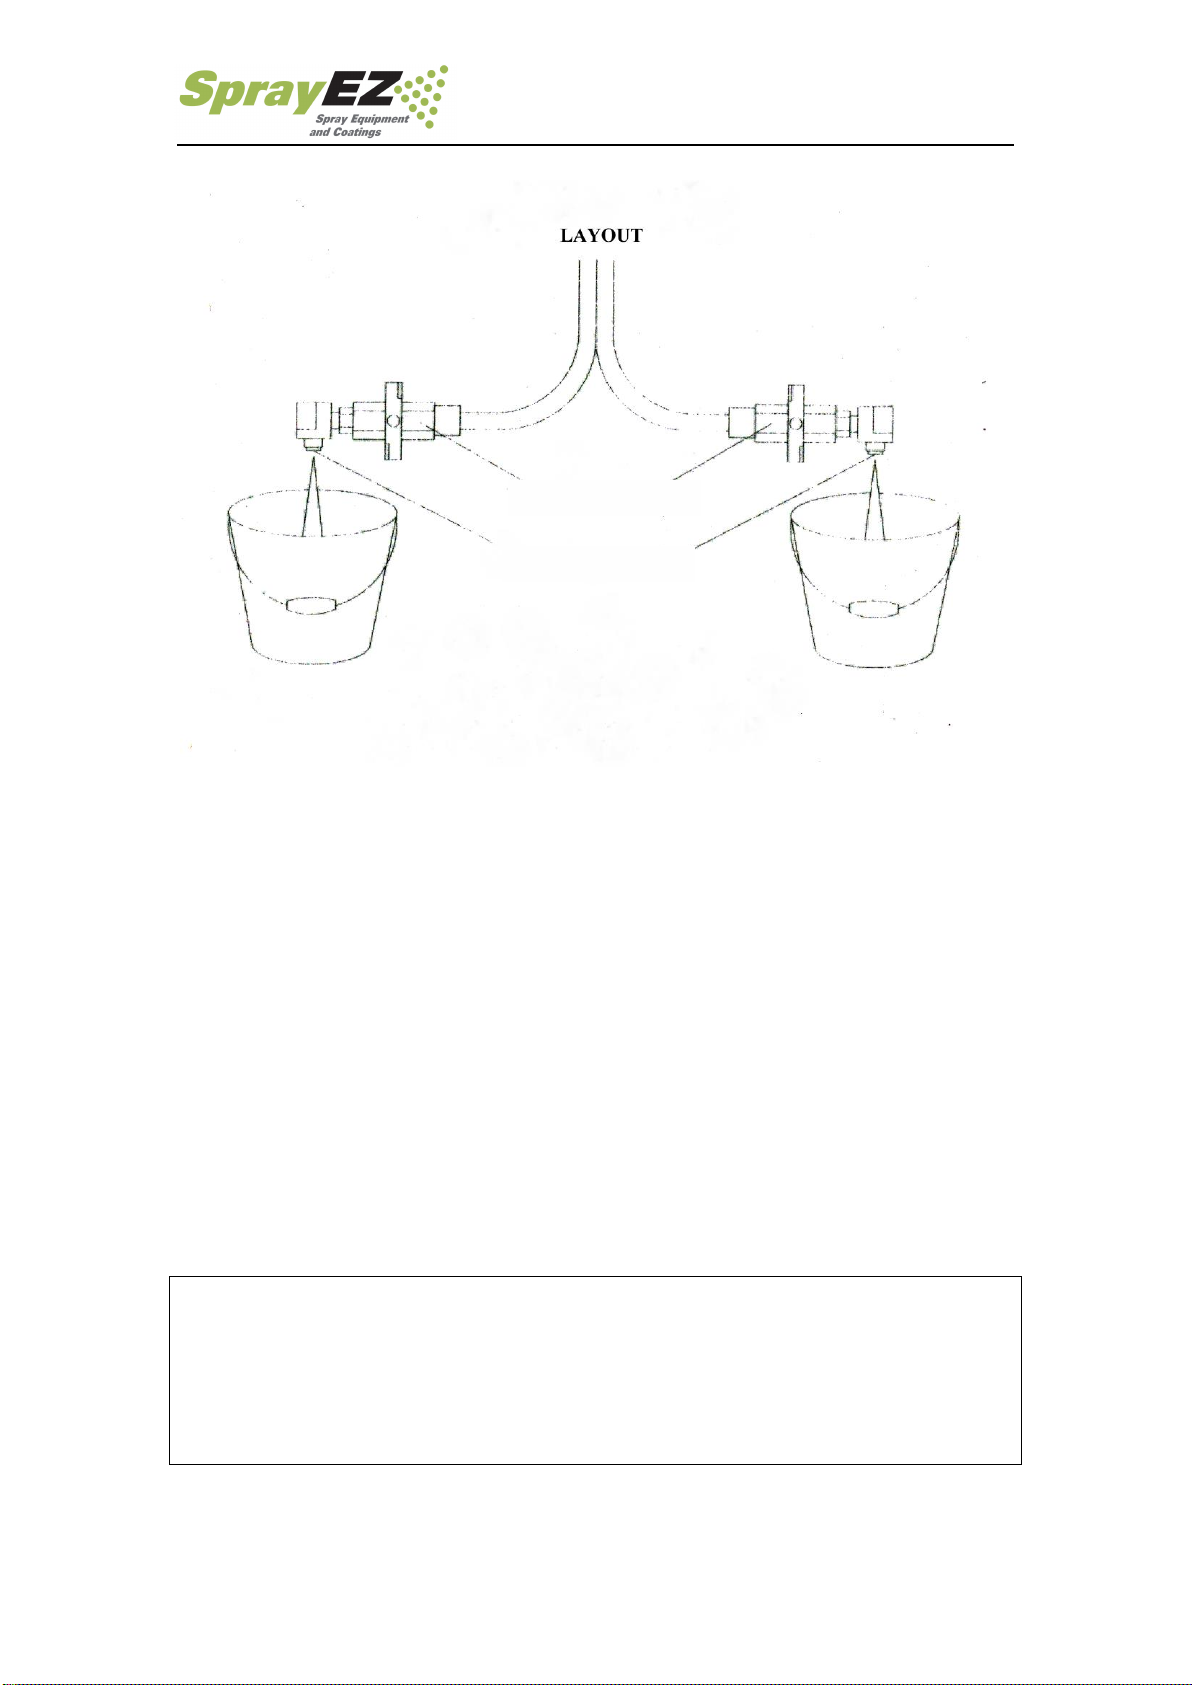
2. Remove the two fluid blocks beside the tip of the gun.
3. Place clean containers under two fluid blocksrespectively. At the same time, turn
on the raw material valve of the two fluid blocksslowly, let all air in the fluid
line out, until the fluid flows smoothly. See figure (12)
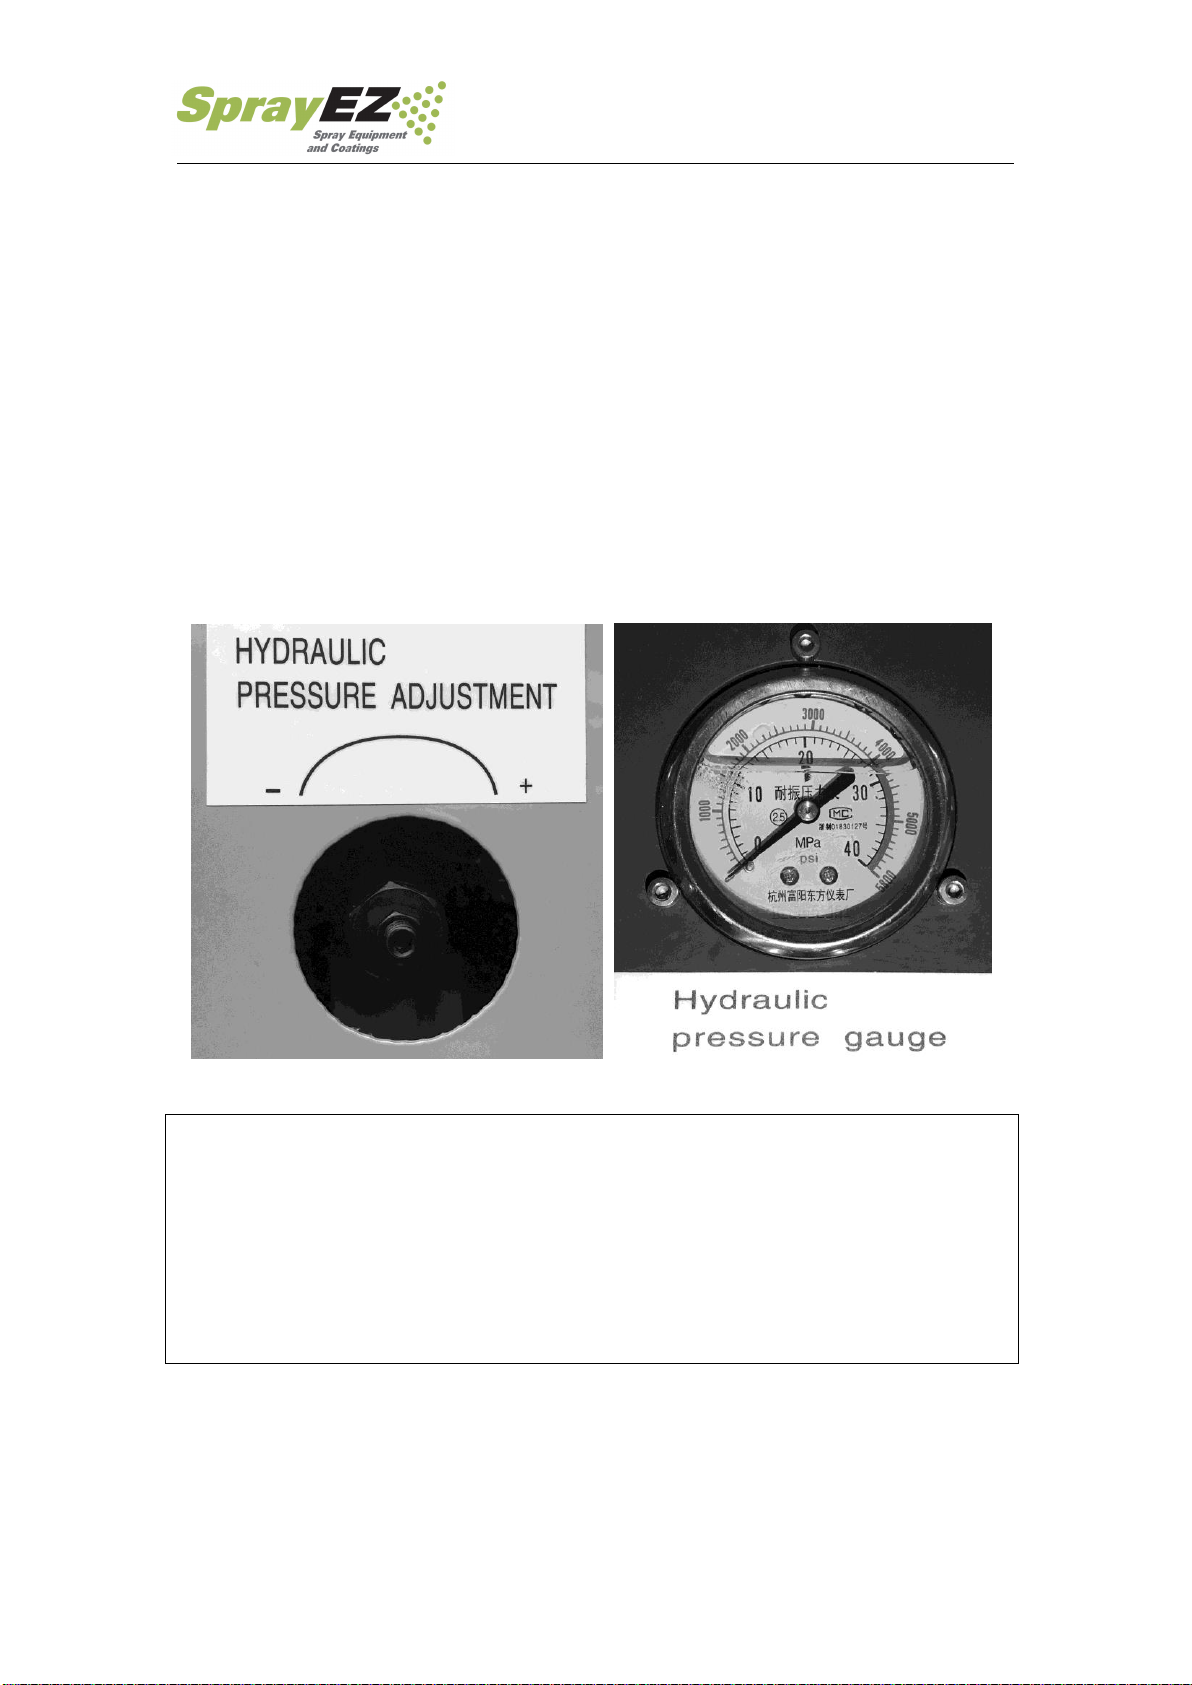
How to adjust the hydraulic system pressure:
Loosen the locking nut of the pressure adjustment screw with a wrench,
(Figure 10)
Rotate the pressure adjustment screw, clockwise to increase the pressure,
counterclockwise to reduce the pressure (The general working pressure is
5Mpa-7Mpa), (Figure 11)
When the pressure adjustment is completed, lock the lock nut of the pressure
adjustment screw with the wrench.
SprayEZ-4500 Users Guide
19
Figure (12)
4. Close the raw material valve at the same time, the pressure value shown on
the pressure gauge of raw material should be approximately equal. If one of them
is higher, turn the raw material valve slightly on higher side, let raw material flow out,
until the two pressures equalize.
5. Clean the traces of raw materials on fluid block, coated with white grease,
install the fluid block to the gun again. Tighten the screws, let two fluid blocksclosely
contact with the gun tip, and make sure there is no air/material leakage.
6. Straighten the fluid line to avoid uneven Heating and Damage to the internal
heating wire. Set the heating temperature to appropriate setting. After the temperature
is up to the setting value, then improve the hydraulic system pressure to the
working pressure (5Mpa-8Mpa).
WARNING
1. Before spraying, do not set the hydraulic pressure at the value of working pressure
to avoid damaging pressure gauge for high pressure, and even explosion, because the
raw material will expand when heated.
2. Make sure to turn on/off two valves of raw material at the same time.
7. Turn on the inlet switch of the gun first, then the raw material valve on the two
fluid blocks.
Raw Material Valves
Fluid Blocks

SprayEZ-4500 Users Guide
20
8. At the moment, the whole system is prepared, and it can spray as long as you
pull the trigger.
NOTICE
Make sure to turn off the raw material valve at the same time on the two fluid
blockswhen you stop working to avoid unintended discharge.
5.3. Daily Shutdown Steps
NOTICE
Put the reset/work switch to the reset position every time when you shutdown.
1. Press Main Switch for Heater button, shut down the heated system.
2. Press System Startup button, shut down the hydraulic system.
3. Turn off the Main Power Switch.
4. Close two valves on the gun fluid blocks.
5. Close the air supply off to the system.
6. Disconnect the power cord of whole system.
7. Clean up the site, confirm the daily shutdown steps are completed.
5.4. Long-time Shutdown Steps
This step is for long-term shutdown or storage of the machine. Please follow the
steps to operate: (mainly for the isocyanate)
1. Close the air supply and the Main Power Switch, take transfer pumps out from the
raw material drums, use the solvent to clean the outside of transfer pumps,
2. Place transfer pumps in a container with clean solvent, ISO and POLY transfer
pumps should be placed in separate containers,
3. Open the air pressure valve on transfer pump, adjust air pressure to
0.1Mpa-0.2Mpa,
4. Turn on the Main Power Switch,
5. Press the System Starup button, start hydraulic system, adjust the hydraulic system
to 2Mpa-3Mpa,
6. Make sure gun valves close, take off gun valves,
7. Open gun valves, spill the equipment chemical into suitable containers until a clean
solvent appears,
Table of contents
Other SprayEZ Paint Sprayer manuals


