SprintRay ProWash S User manual
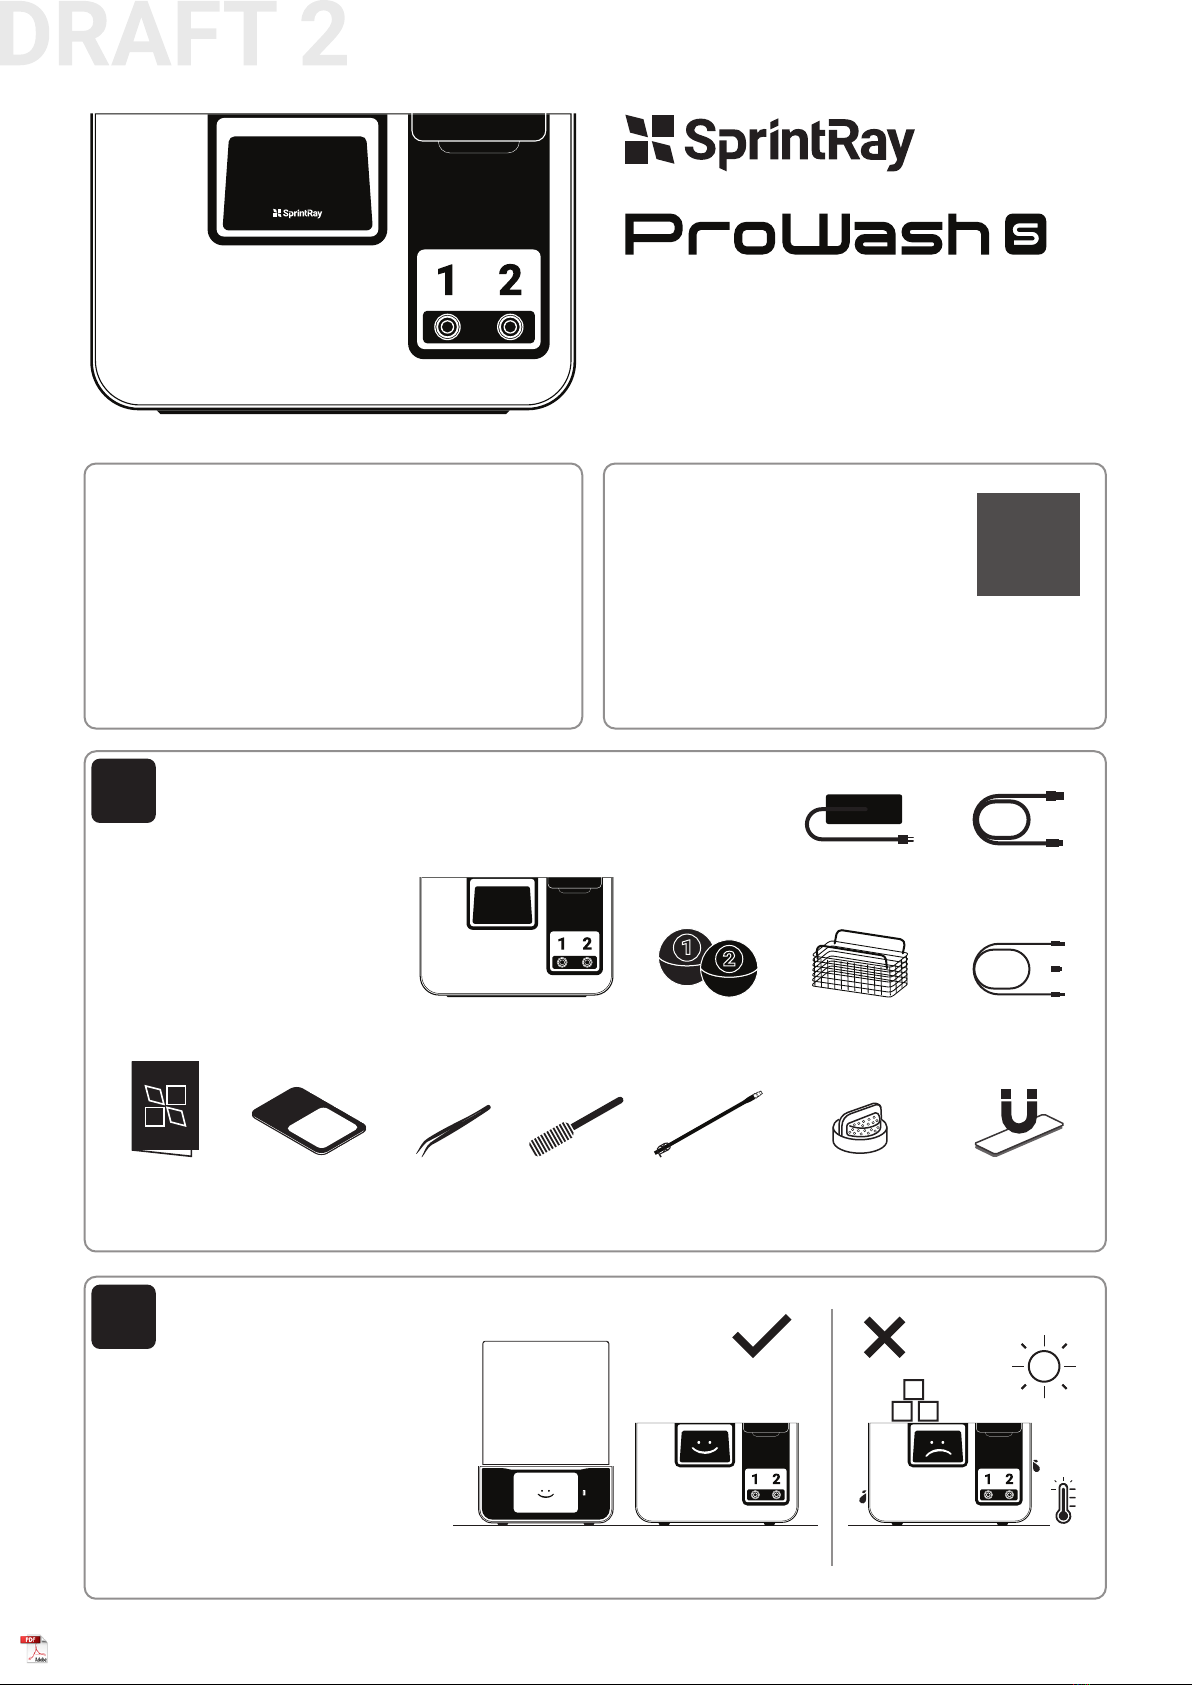
1In the Box
2Where to Set Up
Level surface away from light and heat.
A C
B
Congratulations!
Your new ProWash S is the world’s most advanced system
for cleaning 3D printed parts. Featuring improvements to
our patented Mechanical JettingTM technology and an
all-new, cloud-connected onboard computer, your digital
workflow just got a little simpler.
In this guide, you’ll find everything you need to get started
using ProWash S.
Training and Support
ProWash S comes with complimentary
phone and email support. If you have
questions, please get in touch:
Visit
Call
Email
support.sprintray.com
800-914-8004
ProWash S Device
Drain Hose
Pre-installed
(Section 8)
Cleaning
Brush
(Section 9)
Basket
(Section 7)
Hydrometers
Pre-installed
(Section 4)
Power Cable
USB Cable
(Section 12)
Wash Filter
(Sections 2 & 9)
Metal
Tweezers
(Section 10)
Power Adaptor
Magnet Sticker
(Section 6)
Build Platform
Adaptor
(Section 6)
Onboarding
Card
Set up ProWash S in a well-ventilated area on
a level surface in a temperature-controlled
room. Keep it away from windows and bright
light sources.
Never place anything on ProWash S.
If possible, set ProWash S near your 3D
printer and curing device for optimal
workflow efficiency.
ProWash S comes out of the box
with most parts preinstalled.
The hydrometers are precalibrated
for each chamber and will float when
it’s time to replace IPA. Read more
about hydrometers in section 4.
Automated Multistage Cleaning System
Designed for Digital Dentistry
Quick Start Guide
Version 2 - Updated on 06/28/22
Model SRP2208A
QR Code
Hello Akash :)

3Plug in and Connect to Network
4The Basics
MAX
Use the provided power adaptor and cable to plug your
ProWash S into a surge protector or uninterrupted power
supply. Flip the switch on the back to the ‘On’ position.
On startup, ProWash S will prompt you to connect to a
network. You can join an existing Wi-Fi network using the
touchscreen or use an ethernet cable. Maintaining an
internet connection will allow ProWash S to receive updates.
If you need to reset your ProWash S, switch it off and then
unplug the power cable, wait 30 seconds, then plug it back in.
Wash Chamber
This chamber is where parts are
cleaned and dried. You can wash
parts directly on the SprintRay build
platform or remove and wash them
in the basket. IPA will automatically
pump in and out of the wash
chamber from the IPA tanks.
Never pour IPA directly into
this chamber; it should only
be poured into the tanks
Failure to replace IPA when a hydrometer
floats will void your warranty
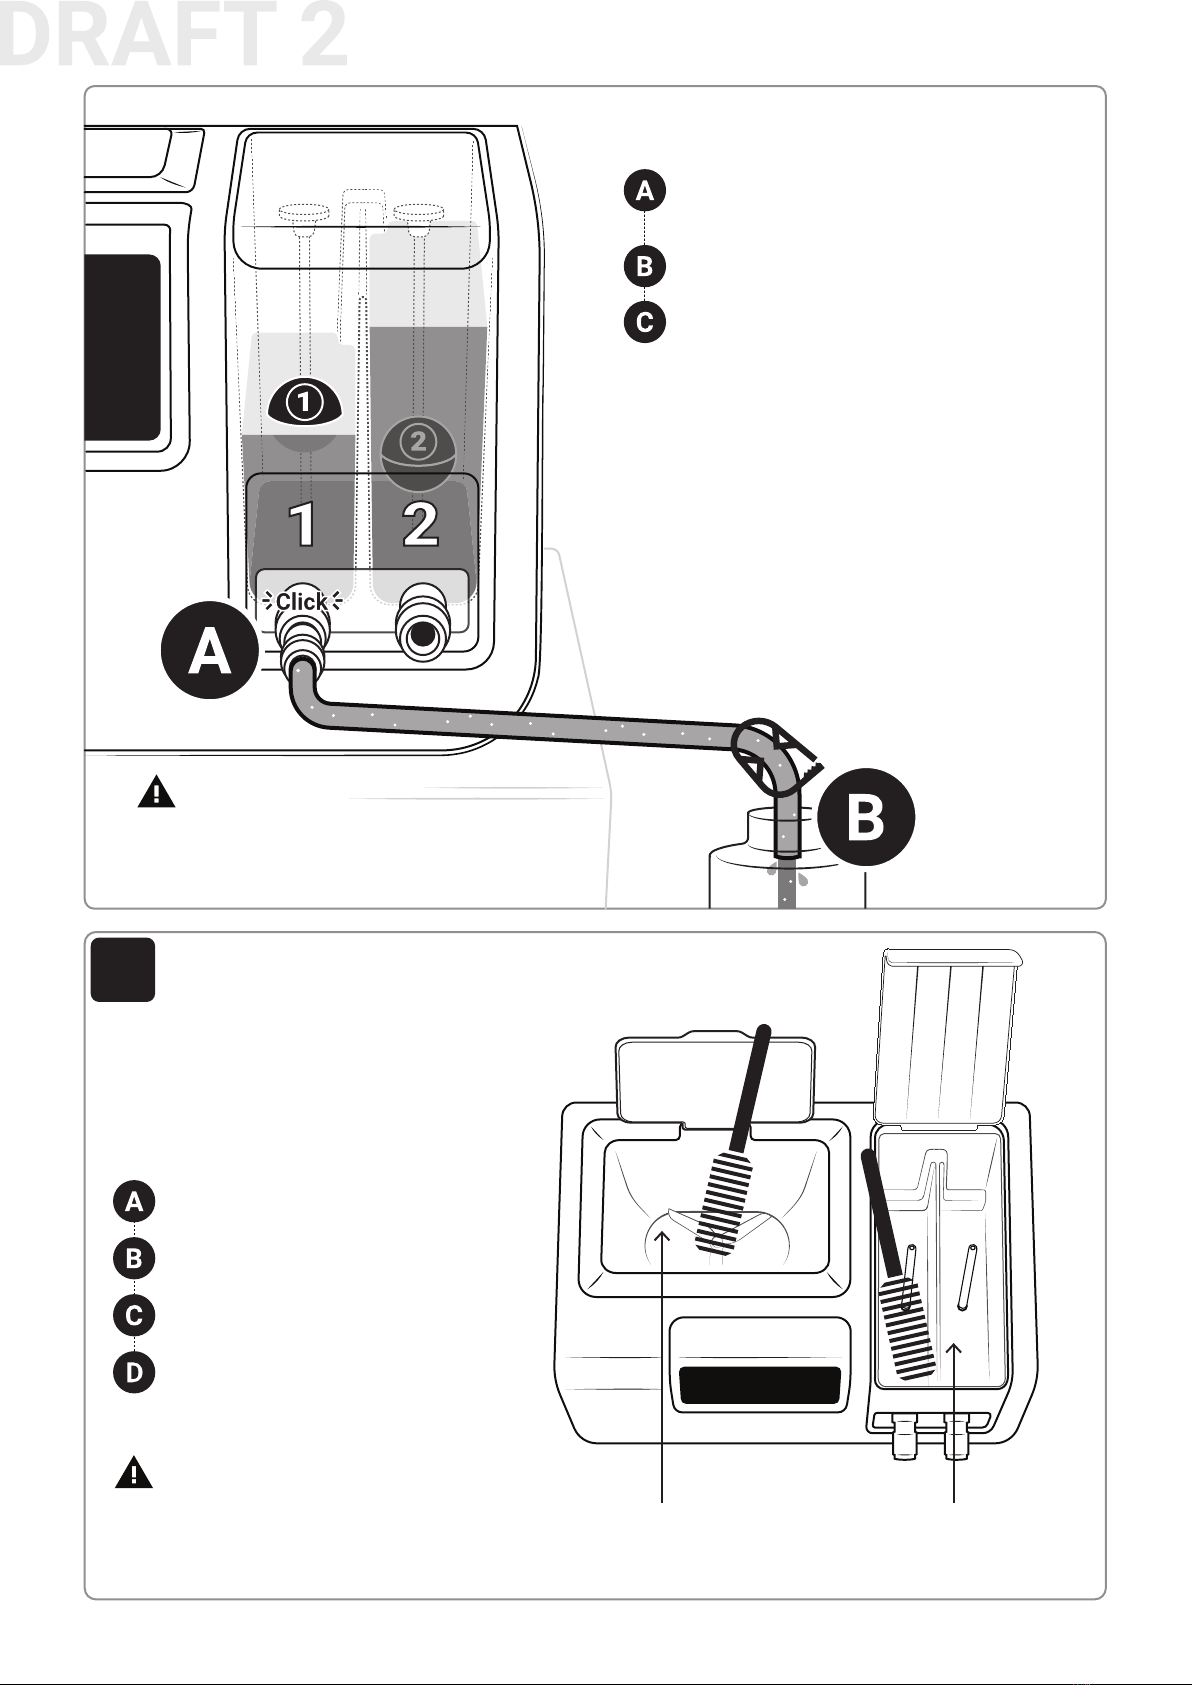
IPA Tanks
Pour IPA directly into these tanks. Each tank
has a maximum capacity of 2 liters.
Tank 1
The IPA in this tank is used for the bulk wash,
so it will need to be changed more often.
Tank 2
The IPA in this tank is used for rinsing, so it
will not need to be replaced as often. It can be
recycled into tank 1 for extended life.
Drain Ports
Each tank has a drain port designed to mate with the drain
hose attached to the back of the machine. Refer to Section 8
for instructions on how to drain.
Hydrometers
Over time, the IPA in ProWash S will become saturated
with uncured resin and lose its cleaning effectiveness.
The hydrometers are precalibrated to measure resin
saturation and will float when it is time to replace IPA.
Submerged Hydrometer = IPA Okay
When a hydrometer is submerged, the IPA in the
tank is acceptable and ready for use.
Floating Hydrometer = Replace IPA
A floating hydrometer indicates that IPA has
become saturated with resin and will no longer
effectively wash your prints. Drain the tank, clean,
and fill with clean IPA.
Power Switch
Power Port
Drain Ports
Drain Hose
Touchscreen

5How to Add IPA
6Build Platform Information
MAX
MIN 500 mL
12
Minimum
500 mL
Required per tank
Maximum
2 Liters
Required per tank
Isopropyl
Alcohol 91%
Recommended
Always wear gloves and
proper eye protection.
Build Platform Adaptor
Compatible with Pro 55 and Pro 55s
Open the tank lid and add at least 500mL of IPA 91% or greater
to each tank. IPA 99% and ethanol may also be used depending
on preference, availability, and material requirements.
If the volume of IPA is insufficient to run a cleaning cycle, the
onboard computer will detect this and notify you.
Keep the tank lid closed to prevent the evaporation and
contamination of IPA.
When new IPA is added, hydrometers may float
for a few minutes before sinking
Depending on which SprintRay 3D printer you have, you may
need to attach a magnet and/or use a fitment adaptor when
using ProWash S.
How to Install the Magnet
If using Pro95 or Pro55, you’ll need to install the provided
magnet to enable the platform wash. Thoroughly clean the side
of the build platform before attaching the magnet sticker.
Using the Build Platform Adaptor
If using a Pro55 or Pro55 S, you’ll need to use the
included adaptor to enable the platform wash. Place the
adaptor atop the wash chamber so that the opening is
on the right and run a cleaning cycle as normal.
1/4 inch
1/2 inch
Center
Magnet
Pro55
Print Platform
Place magnet on the right side
Pro95
Print Platform
Place magnet on the right side
Label
Center
Magnet
Right Side
Right Side
Printer Model
Pro95
Pro55
Pro95 S
Pro55 S
Install Magnet
Yes
Yes
No, It is embedded
No, It is embedded
Use Adaptor
No
Yes
No
Yes

8How to Drain IPA from the Tanks
7How to Wash with ProWash S
Print Platform Wash
Remove the basket and place the Pro95/S build platform in the
wash chamber. If using Pro55/S, use the provided adaptor (see
Section 7). Use the touchscreen to select a cleaning cycle.
The system will not start until a platform is detected.
Combination Wash
To perform a combination wash, perform a full cleaning cycle
with the build platform. Remove the models and place them in
the basket. Select ‘Extra Rinse’ from the onboard computer, or
run a second cleaning cycle from the home screen.
Basket Wash
To use the basket, place models inside and close the lid.
Use the touchscreen to select a cleaning cycle.
The system will not start if the lid is open.
Recommended for:
- Models taller than 4”
- Hollow/shell models
Recommended for:
- Highly viscous resins
- Large print batches
- Dense supports
- Complex geometries
Recommended for:
- Models shorter than 4”
- Solid models
- Models for aligners
- Surgical guides
- Night guards
Do not stack models or crowd
them together, as this can
greatly reduce wash efficiency
When washing with the build
platform, remove the basket
from the wash chamber
Drain Hose
Clipped to the back
WARNING! WARNING!
Consult your materials IFU to
determine if a combination
wash is recommended
WARNING!
Unlocked
Solvent will flow
through the hose.
Locked
Solvent will not flow
through the hose.
ProWash S comes out of the box with the drain hose clipped
to the back.
To drain a tank, press the metal inlet tip into the drain port
until it firmly clicks into place. Once connected, IPA will run
through the hose. To disconnect, firmly slide the outer ring of
the drain port away from you.
Safety Clamp
When closed, this clamp stops the flow of
IPA to prevent accidental drainage.
Metal Inlet Tip
This metal tip is designed to quickly connect to
the drain ports on the front of ProWash S.
MAX 4”
9How to Clean ProWash S
MAX
MAX
Unlocked
Draining an IPA Tank
How to Dispose of IPA
ProWash S extracts the maximum life out of IPA so that you
generate less waste. But IPA and other solvents are hazardous
and should be treated with care.
Keep the original packaging on hand for storing drained IPA
after it has become saturated. Never flush IPA down the drain.
Used IPA should be properly disposed of through a hazardous
materials collection as required by local laws and regulations.
Consult your local environmental agency or the EPA office to
find the nearest hazardous materials collection facility.
Clean Wash Chamber
Scrub the inside and walls of the chamber and remove
debris. When prompted by the onboard software, follow
the procedure in Section 11 to clean the filter.
Clean an IPA Tank
Never flush IPA down the drain. Used IPA should be
properly disposed of through a hazardous materials
collection as required by local laws and regulations.
WARNING!
For best results, clean the tanks every time
you refresh IPA. The wash chamber should be
cleaned periodically as well.
WARNING!
Retrieve the drain hose from the back of the device,
then press the metal tip into the drainage port until it
clicks into place
Point the end of the hose into a disposal container,
then unlock the safety clamp to start the flow
Once the tank is empty, eject the drain hose by sliding
the outer ring of the drain port away from you
Remove the rubber stop, then slide the
hydrometer out of the tank
Use the provided brush to scrub the inside
of the tank, including the walls
Flush the tank by pouring in a small
volume of IPA or water, then draining
Replace the hydrometer into its
corresponding tank
Clean Wash Chamber
Clean all resin and residue
buildup from the surfaces.
Clean IPA Tank
Thoroughly scrub and clean the
walls and floor of the tanks.

10 How to Clean the Wash Filter
Care for Environment
SprintRay ProWash S uses patented technology to improve the efficiency of the
washing and drying processes. It’s better for your pocketbook and better for the
environment.
Here are three easy tips to help you go the extra environmental mile with your
used isopropyl alcohol (IPA):
For additional information, visit support.sprintray.com
Never flush IPA down the drain
Keep all IPA packaging for storing used IPA
Set up IPA recycling with a materials disposal company
The secondary mesh below the removable
filter should never be removed
WARNING!
ProWash S has a mesh filter that protects the plumbing from
resin and other debris. The filter should be cleaned when
prompted by the onboard software. If the filter is damaged or
cannot be cleaned, it should be replaced.
Remove
Clear the area around the filter to ensure
no debris falls into the plumbing when it
is removed. Turn counter-clockwise by
hand to unscrew.
Clean
Flush the filter with IPA to remove
resin debris. Use the provided
tweezers to remove any additional
debris from the mesh.
Reinstall
Replace the filter and turn it
clockwise to hand tighten.
Start by Locating the Filter
In the wash chamber near the propeller

FCC Warning:
This transmitter must not be co-located or operating in conjunction with any other antenna or transmitter.
Any Changes or modifications not expressly approved by the party responsible for compliance could void the user's authority to operate the equipment.
This device complies with part 15 of the FCC Rules. Operation is subject to the following two conditions: (1) This device may not cause harmful interference, and (2)
this device must accept any interference received, including interference that may cause undesired operation.
Note: This equipment has been tested and found to comply with the limits for a Class B digital device, pursuant to part 15 of the FCC Rules. These limits are
designed to provide reasonable protection against harmful interference in a residential installation. This equipment generates, uses and can radiate radio frequency
energy and, if not installed and used in accordance with the instructions, may cause harmful interference to radio communications. However, there is no guarantee
that interference will not occur in a particular installation. If this equipment does cause harmful interference to radio or television reception, which can be
determined by turning the equipment off and on, the user is encouraged to try to correct the interference by one or more of the following measures:
—Reorient or relocate the receiving antenna.
—Increase the separation between the equipment and receiver.
—Connect the equipment into an outlet on a circuit different from that to which the receiver is connected.
—Consult the dealer or an experienced radio/TV technician for help.
RF Exposure Statement:
This equipment complies with FCC radiation exposure limits set forth for an uncontrolled environment.
This equipment should be installed and operated with minimum distance 20cm between the radiator & your body.
FCC ID:2A78L-SRP2210A


