SPROLINK NeoLIVE R2 User manual

User Manual www.sprolink.com

Quick Start
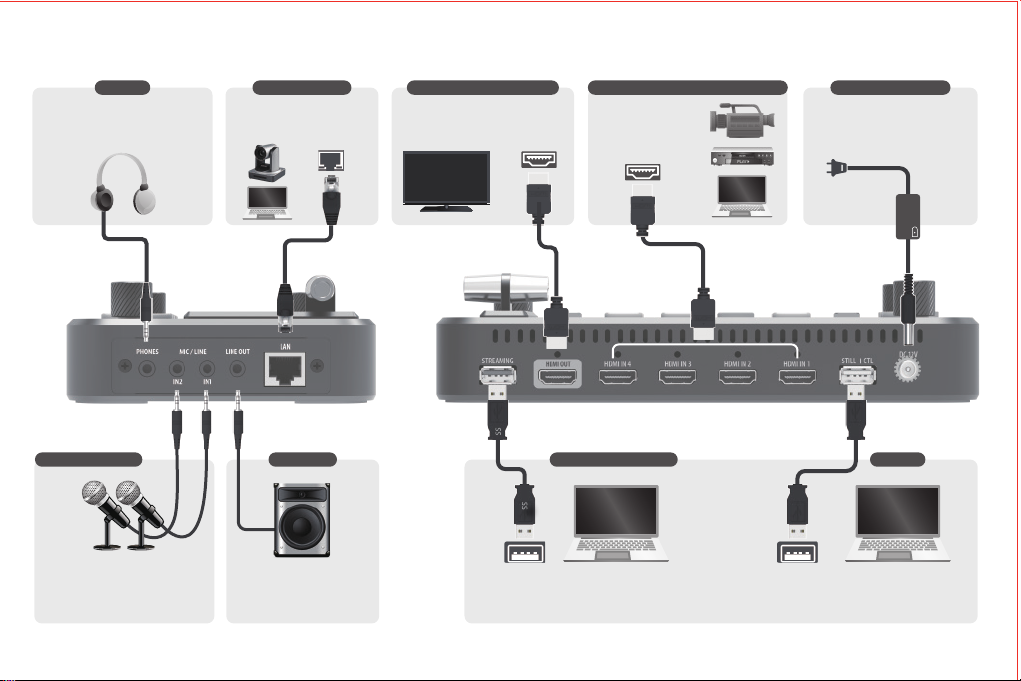
Neolive R2 is a professional live streaming switcher. It can mix video & audio source and feed to your computer via USB3.0 port. When doing
live streaming, Neolive R2 will be detected as high quality webcam in both MJPEG and YUY2 format in 60 frame rate. Neolive R2 has built-in 5.5
inch screen for input & output monitoring and onboard operation. With handy features like PTZ camera control,scenes preset,chroma key,
transition effects,audio mixing and monitoring, Neolive R2 helps you to handle all kinds of live streaming necessities, easily creating
streaming content like a pro.
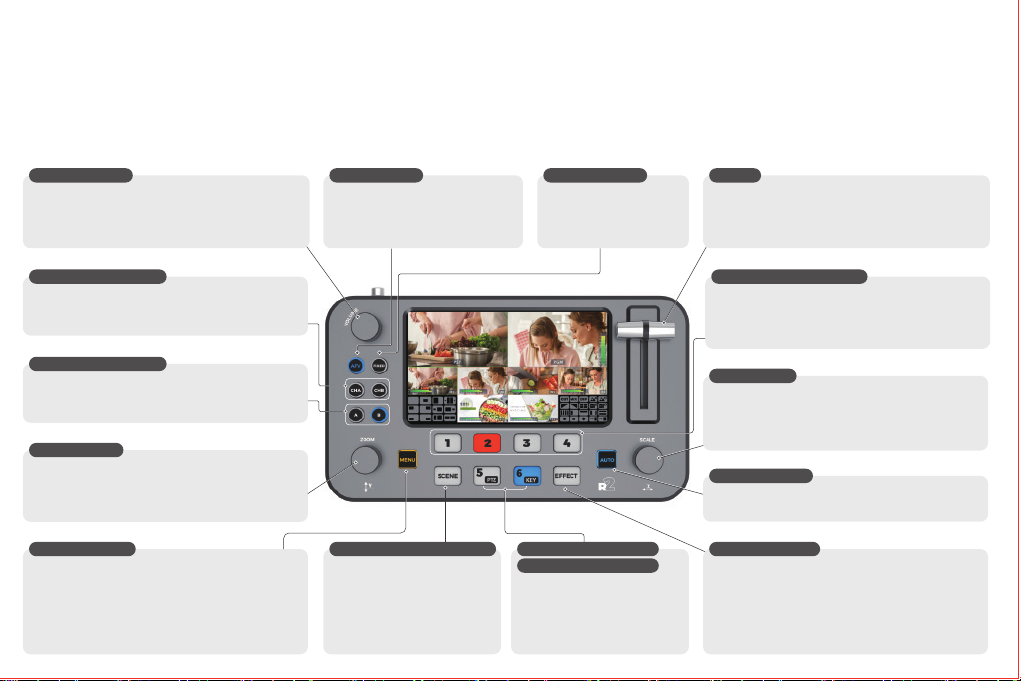
Panel Descriptions
VOLUME KNOB
1) Turn the knob to adjust the volume of the output audio.
2) Long press CHA/CHB button until
button lit white(Channel Editting).
Turn the knob to adjust the volume of mixing channel.
AFV BUTTON
1) Push AFV button, then the output audio
will switch along with video switching.
* The attached audio is selectable between
HDMI internal or external.
FIXED BUTTON
1) Push FIXED button, then
the output audio will be fixed
in current audio input channel.
SCENE SWITCHING BUTTON
1) Recall scenes that you have
configured.
When scene button lit white, push
1/2/3/4/5/6 to recall preset scenes.
*Scenes with configured layer lit
white.
STILL1 & PTZ BUTTON
STILL2 & KEY BUTTON
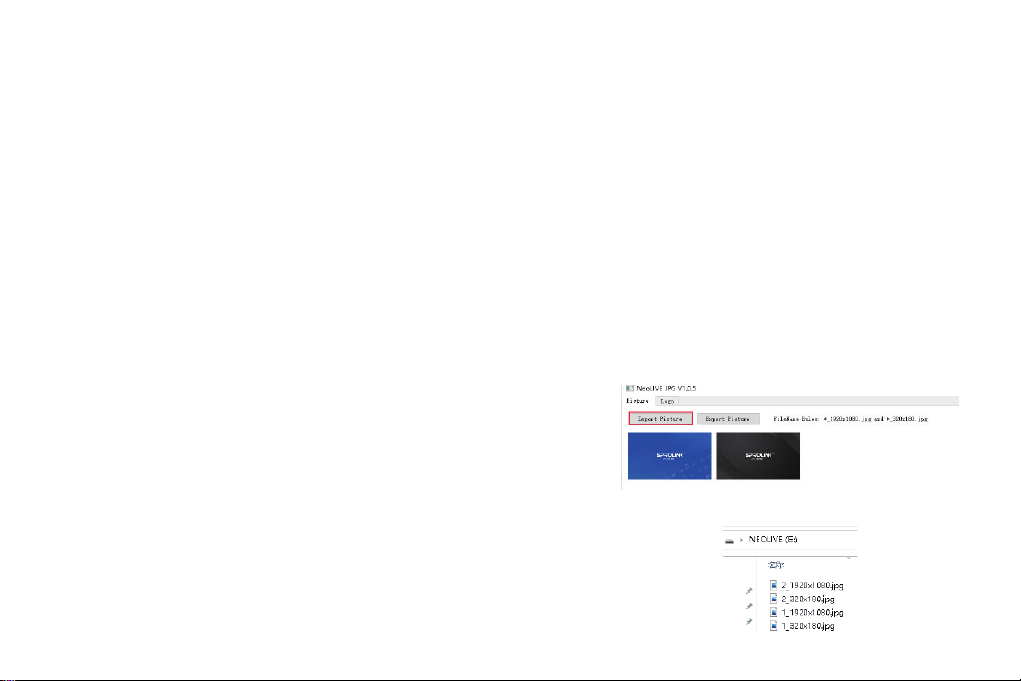
1) Push 5/6 to switch background still image.
2) Long pressing 5 button to enable PTZ
control function.*Button lit white.
3) Long pressing 6 button to enable KEY
function.*Button lit white.
CHA & CHB BUTTON
1) Push button to turn ON/OFF audio channel.
2) Long press button until button lit white to editing audio.
In fixed mode, Press 1/2/3/4/5/6 to swtich audio input channel.
1) Push button to turn on layer and standby for editing.
(button blinking)
2) Push button again to turn off layer.
LAYER A & B BUTTON
Switch the input source that feed to HDMI1/2/3/4 connector.
*Source detected lit green.
*Source on PGM lit red.
*Source on PST blinking.
INPUT 1/2/3/4 BUTTONS
1) Rotate knob for menu navigation.
2) Push knob to enter submenu or enter menu item for config.
3) Choose layer A/ B, rotate knob for layer vertical position.
4) Turn the knob while pressing for layer zoom.
ZOOM KNOB
1) Push menu button,the menu will appear on built-in screen.
2) MENU+ INPUT 1/2/3/4 BUTTON to swtich source
directly on PGM.
3) MENU + ZOOM knob to adjust zoom content vertically.
4) MENU + SCALE knob to adjust zoom content
horizontally.
MENU BUTTON
T BAR
1) Manually switch between PGM and PST.When push T
bar to the limitation the PST content will fully display on
the final output.
SCALE KNOB
1) Rotate knob for menu navigation.
2) Push knob to enter submenu or enter menu item for config.
3) Choose layer A/ B, rotate knob for layer horizontal position.
4) Turn the knob while pressing for layer scale.
1) Push auto button to enable transition.
* The auto button will keep lit during the transition.
AUTO BUTTON
1) Push EFFECT button to enable effects selection menu.
2) Turn the knob to navigate effects.
*Effect button lit blue means in effects selection. After
finish selection remember to push effect button again
to disable before promote other operation.
EFFECT BUTTON

Connection Diagram
PHONE
Support all input channel &
output channel monitoring.
Connect this port to headphones.
LAN CONTROL
Support third party control
Support PTZ control
Default IP:192.168.1.150
LINE IN / MIC IN
Support 2 channel external audio.
Connect this port to mic or
external audio mixer.Choose mic in
level / line in level accordingly.
LINE OUT
Connect this port to amp or
speaker. This audio output
the result of audio mixing.
USB3.0 STREAMING USB2.0
Connect this to your PC with USB3.0 port.Neolive R2 will be
detected by PC as high quality webcam and microphone.You
can use this to live-stream you video and audio content.
Still image upload
System update
MONITOR CONNECTOR
Connect this to display.
This output can be set as
Preview/ Program/ Multi-view
VIDEO INPUT 1-4 CONNECTORS
Connect this to video
devices such as
camera, PC, or media
player.
POWER ADAPTOR
Connect the attached AC power
adaptor to this jack. Make sure
the screw has been fasten.

Video Operations
1. Push [SCENE] button and rotate knob to choose a proper default layout for your content.
*If there are no proper default layout, push [A] / [B] button to create layers on PST and do customized configuration. Button lit blue means
Layer ON.
2. Choose signal source and turn the knob to set layer in proper size and position.
*You can also go to menu to do detailed layer configuration.
3. If the layout is complicated please push [MENU] ->[SCENES]->[SAVE TO SCENE] to save current configuration in scene.
*SCENE [1/2/3/4/5/6] button will lit white after saved success.
*You can push [SCENE] button and choose the proper scene number to load preset.
4. After finished the layer configuration, push [EFFECT] button and turn the knob to choose the proper transition effects for current content.
5. Push [AUTO] button to enable switching. The content will display on PGM with transition effects.
Audio Operations
Volume Adjustment
1. Go to [MENU]->[Audio Setting]->[Volume]->[Audio Input Volume] to adjust volume of all input channel volume.
2. You can also adjust the volume of main output channel and headphone monitoring.
Headphone Monitoring
1. Go to [MENU]->[Audio Setting]->[Audio Monitoring], turn the knob to monitor the audio of input channel or main output channel.
AFV Mode
1. When [AFV] button lit blue, the current audio mode is Audio Follow Video.
2. Push CH1/CH2 to turn on the audio for Layer A or Layer B. The button will lit blue when audio is ON.
3. The audio will be switched along with layer content switching.
FIXED Mode
1. When [FIXED] button lit red, the current audio mode is Fixed. The audio channel will not switch along with the switching of video content.
2. Push CH1/CH2 to turn on the audio. The button will lit blue when audio is ON.
3. Long press CH1/CH2 button until button lit white.
4. Push the proper numeric button to arrange input audio for CH1/CH2. You can also turn the volume knob to adjust the volume of
CH1/CH2.

Advanced Features Operation
1. Fast Switching Mode/ T-Bar Switching Mode
Use MENU+SCENE button to enable Fast Switching Mode/ T-Bar Mode.
Fast Swtiching Mode: The transisiton will enabled every time the input channel switched.
T-Bar Switching Mode: The transition will enabled only when AUTO button pushed or T-Bar moved.
2. PTZ Control Operation (eg. PTZ camera IP is 192.168.5.163)
Set R2 and PTZ camera in same network. The default IP of R2 is 192.168.1.150.
a) Push MENU->SYSTEM->NETWORK SETTING->change IP address as 192.168.5.150. Then click Apply to confirm. After change IP need reboot R2.
b) Change PTZ control IP. Push MENU->ADVANCED->PTZ->PTZ IP LIST->DEVICE 1.
Set device 1 IP as 192.168.5.163. and click save.
c) Connect R2 and PTZ camera by lan.
d) You can also connect R2 with router or switcher to connect multiple PTZ cameras.
e) Push PTZ button on R2. Then use knob to control PTZ camera.
f) Left Knob for vertical tilt. Right knob for horizontal pan. Push and rotate left knob for optical zoom.
3. BK Content Upload
R2 have built-in storage for picture. To upload picture need use USB cable to connect PC with R2 in STILL | CTL port.
a) Use Neolive-JPG tool to create BK file. Import the JPG file to Neolive-JPG tool.
You can double click the picture to delete.
b) After finish import click export the gererated file to load disk or R2 virtual disk directly.
c) Click MENU->Picture Pool->BK1/BK2 to choose the picture file.
Table of contents
Popular TV Tuner manuals by other brands

PrimeDTV Technologies
PrimeDTV Technologies PHD-208 Operation guide

tbs electronics
tbs electronics DVB-T/T2 Series user guide

Asus
Asus My Cinema U-3000 product manual

Pioneer
Pioneer GEX-P5700TVP Operation manual

Eminent
Eminent EM7680 manual

ATI Technologies
ATI Technologies ATI-TV WONDER VE Getting started and user's guide