manuals.online logo
Brands
  1. Home
  2. •
  3. Brands
  4. •
  5. SPT
  6. •
  7. Dehumidifier
  8. •
  9. SPT SD-31E User manual

SPT SD-31E User manual

DEHUMIDIFIER
MODELS SD-31E /SD-41E /SD-61E /
SD-71E
INSTRUCTION MANUAL
Please read these instructions thoroughly and
keep it in a safe place for future reference.
CONTENTS
SAFETY PRECAUTUIONS ........................................................................... 2
ELECTRICAL INFORMATION ...................................................................... 2
CONTROL PANEL ..................................................................................... 4
FEATURES ............................................................................................... 5
IDENTIFICATION OF PARTS ....................................................................... 6
OPERATING THE UNIT ............................................................................... 6
IDENTIFICATION OF PARTS ....................................................................... 6
CONTINUOUS DRAINAGE .......................................................................... 7
CARE AND MAINTENANCE ........................................................................ 8
TECHNICAL SPECIFICATIONS ................................................................... 9
TROUBLE SHOOTING ................................................................................ 9
SOCIABLE REMARK
DISPOSAL: Do not dispose this product as unsorted municipal waste. Collection of
such waste separately for special treatment is necessary.
It is prohibited to dispose of this appliance in domestic household waste.
For disposal, there are several possibilities:
A) The municipality has established collection systems, where electronic waste can
be disposed of at free of charge to the user.
B) The manufacturer will take back the old appliance for disposal at free of charge
to the user.
C) As old products contain valuable resources, they may be sold to scrap metal
dealers.
Wild disposal of waste in forest and landscapes endangers your health when hazardous
substances leak into the ground-water and find their way into the food chain.
BEFORE YOU USEYOUR DEHUMIDIFIER, PLEASE READTHIS INSTRUCTION
MANUAL CAREFULLY.
To prevent injury and property damage, the following instructions must be followed.
Incorrectoperation due to ignoring of instructions may cause harm or damages.
The seriousness isclassified by the following indications:
WARNING: This symbol indicates the possibility of death or serious injury.
CAUTION" This symbol indicates the possibilityof injury or damage to property.
WARNING
1. Do not exceedthe rating of the poweroutlet or connection device.
2. Do not operate or stopthe unit by means of the power plug.
3. Do not use unit with damaged cord or connect unit to damaged electrical socket.
4. Do not modify powercord length or share outlets with other appliances.
5. Do not insert or remove plugwith wet hands.
6. Do not use inthe following locations:
• Next to or near a heat source (radiator, heater, dryer, etc.)
• Area where oil or water is likely to splash.
• Under direct sunlight.
• Near a bath,shower or swimming pool.
• Ina greenhouse.
• Near flammable gas or combustibles, such as gasoline, benzene, thinner, etc.
• Where chemicals are handled.
7. Disconnect power if strange sound, smell or smoke emitsfrom the unit.
8. Never try to take apart or repair the unit byyourself. There are no user serviceable
parts.
9. Always poweroff and unplugthe unit before cleaning and maintenance.
10.Do not drink or use thewater drained from the unit
11.Do not remove water bucket during operation.
CAUTION
1. Do not use the unit in small spaces for lack of air ventilation.
2. Place the unit on a level, sturdy ground.
3. Do not cover the units and its air inlets/outlets.
4. Care should be taken when using the unit in a room with the following: infants,
children, elderly people, and people not sensitive to humidity.
5. Never insert your finger or other foreign objects into grills or openings. Take special
care to warn children of these dangers.
6. Do not place heavy objects on the power cord and be sure cord is not compressed.
7. Do not climb on or sit on the unit.
8. Always operate with filters properly installed. Notes: Clean filter once every two
weeks.
9. If water enters the unit, turn unit off immediately and contact Sunpentown.
10. Do not place flower vases or other water container on top of the unit.
Electrical Information
. The manufacture's rating label is located on the back panel of the unit and contains
electrical and other technical data specific to this unit.
. Be sure the unit is properly grounded. To minimize shock and fire hazards, proper
grounding is important. The power cord is equipped with a three-prong grounding
plug for protection against shock. Never remove the grounding prong.
°Your unit must be used in a properly grounded wall receptacle, if the wall receptacle
you intend to use is not adequately grounded or protected by a time delay fuse or
circuit breaker, have a qualified electrician install the proper receptacle.
=Ensure the receptacle is accessible after the unit installation.
=Do not use extension cords or an adapter plugs with this unit. However, if it is
necessary to use an extension cord, use an approved Dehumidifier extension cord
only (available at most local hardware stores).
. To avoid the possibility of personal injury, always disconnect the power supply to the
unit, before installing and/or servicing.
0-
Bucket full
indicator light
Continuous drain
indicator light
Clean filter
indicator light
/
_n{_ On Off Auto de#_
Timer On/Off
indicator liahts
High fan indicator
Auto defrost
indicator light
Low fan
indicator light
Control Buttons: whenever a button is pressed, the unit will make a beep sound to indicate that
it is changing modes.
OCONT: Press to activate continuous dehumidifying mode.
O FILTER: The check filter feature is a reminder to clean the air filter for more efficient
operation. The Filter Indicator Light will illuminate after 250 hours of operation. To reset
after cleaning the filter, press the Filter button to turn off indicator light.
O FAN: Controls the fan speed. Press to select Turbo (high) or Normal fan speed. Set the
fan to Turbo for maximum moisture removal. When the humidity has reduced or when
quiet operation is preferred, set the fan speed to Normal.
POWER: Press to turn the dehumidifier on and off.
UP(+) /DOWN(-):
•Set humidity level: Press to increase or decrease set humidity level. Range of
adjustment is from 35% to 85% RH, in 5% increments.
• Set timer: Press to set timer, from 0 to 24 hours.
O TIMER: Press to initiate auto-start and auto-stop feature, works with + and - buttons.
DISPLAY PANEL
• Displays the set humidity level (from 35% to 85%) or auto-start/stop time (0-24) while
setting, then returns to display actual room humidity level (+5% accuracy), in a range of 30%
RH to 90%RH (relative humidity).
• Displays error codes and protection codes:
o AS - Humidity sensor error. Unplug and plug back in. If error repeats, call for service.
o ES - Temperature sensor error. Unplug and plug back in. If error repeats, call for
service.
o P2 - Bucket is full or bucket not properly seated. Empty bucket and replace in correct
position.
o EC - Unit malfunction. Please make sure the environment temperature is suitable for
operation.
Other Features
•Bucket Full Light: Illuminates when the bucket is full and needs to be emptied; or when
bucket is removed or not properly seated.
• Auto Shut Off: The unit shuts off after 30 seconds when bucket becomes full or when
bucket is removed /not properly seated; or when set humidity is reached (the fan motor will
continue to run for additional 3 minutes then stop).
• Auto Defrost: When frost builds up on the evaporator coils, the compressor will cycle off
and the fan will continue to run until the frost disappears.
• 3 Minute Delay: After the unit has stopped (or powered off), there will be a 3-minute delay
before it will resume operation again. This is to protect the compressor. Operation will
automatically start after 3 minutes.
• Check Filter Feature: The system begins calculating the time once fan motor begins
operation. The check filter feature will be activated when operation time achieves 250 hours
or more - the clean filter indicator light will begin to flash. After filter has been cleaned and
replaced, press the Filter button to reset and the clean filter indicator will go off.
• Auto-Restart: If the unit breaks off unexpectedly due to power cut, unit will resume at
previous setting when power returns.
• Timer On and Timer Off: Unit can be set to auto-start/stop, up to 24 hours:
o When unit is on: press of the Timer button and the Timer-Off indicator will illuminate
(indicating auto-stop is initiated). Press Timer button again and the Timer-On indicator
will illuminate (indicating auto-start is initiated).
o When the unit if off: press of the Timer button and the Timer-On indicator will illuminate
(indicating auto-start is initiated). Press Timer button again and the Timer-Off indicator
will illuminate (indicating auto-stop is initiated).
o Press or hold the +/- buttons to change the set time in 0.5-hour increments, up to 10
hours; then in 1-hour increments, up to 24 hours.
o The selected time will register after 5 seconds and the panel will revert back to
displaying ambient humidity.
o When both auto-start and auto-stop times are set, both Timer On and Off indicator lights
are illuminated, identifying both On and Off timers are now programmed.
o Turning the unit on or off at any time or adjusting the timer setting to 0.0 will cancel any
timer programs.
o Timer program is also cancelled when LED displays P2 error code.
o The control will count down the remaining time.
FRONT
1. Control panel
2. Air intake grille
3. Air outlet grille
4. Air filter (behind the grille)
5. Water bucket
6. Handle (both sides)
REAR
1. Drain hose outlet
2. Caster
3. Power cord and plug
4. Band (for use when storing the unit)
ACCESSORIES
Drain hose{ 1pc) adaptor:A(1 pc) sc_ew!2pc }
Note: all pictures in this manual are for explanation purposes only. The actual product may differ slightly, but the
operations and functions are the same.
Positioning the unit
A dehumidifier will have little or no effect in drying an adjacent ,"_0
enclosed area, such as a closet, unless there is adequate _,_,_., 8
circulation of air in and out of the area. J
•Do not use outdoors. ,_._,_ 8_
This dehumidifier is intended for indoor residential Casters
applications only. This dehumidifier should not be used for - Allow unit to move freely
commercial or industrial applications. - Do not force casters to move over carpet
Place the dehumidifier on a smooth, level floor strong - Do not move unit with water in the bucket as
unit may tip over and spill water
enough to support the unit with a full bucket of water.
Allow at least 8 inches of space around the unit and 16 inches above the unit.
Place the unit in an area where temperature will not fall below 5°C/411 = or the coils may
become covered with frost, which may reduce performance.
Place the unit away from the clothes dryer, heater or radiator.
Use the unit to prevent moisture damage where books or valuables are stored.
Use the unit in a basement to help prevent moisture damage.
The dehumidifier must operate in an enclosed area to be most effective.
Close all doors, windows and other outside openings to the room.
Before using the unit
• Whenrunningtheunitforthefirsttime,operatetheunitcontinuouslyfor24 hours.
• Thisunitisdesignedto operatewithinambienttemperatureof5_C/411=to 35°C/951=.
• Iftheunithasbeenswitchedoffandneedsto beswitchedonagain,pleaseallow3 minutes
protectiontimedelay.
• Do notconnectthedehumidifierto amultiplesocketthatissharedwith otherappliances.
• Selectasuitablelocation,makingsureyouhaveeasyaccesstoan electricaloutlet.
• Plugtheunitintoanelectricaloutletwithgroundconnection.
• Makesurewaterbucketisproperlyseatedortheunitwillnotoperate.
Removing collected water
• When the bucket becomes full, compressor will shut off (fan continues to run for 30 seconds
to dry off water on the condenser) and unit will beep 8 times. The Full indicator light will
flash and digital panel will display P2.
• Hold the left and right handles securely and slowly pull bucket straight outwards. Do not put
down the bucket, its bottom is uneven and will tip over, causing water to spill.
• Dump out water and replace the bucket. The bucket must be replaced properly for the unit
to operate.
• The dehumidifier will re-start when the bucket is restored in its correct position.
NOTES:
• When you remove the bucket, do not touch any parts inside the unit. Doing so may damage
the product.
• Gently push the bucket all the way in.
• When the bucket is removed and you notice water in the unit, you must dry up the water.
Continuous Drainage
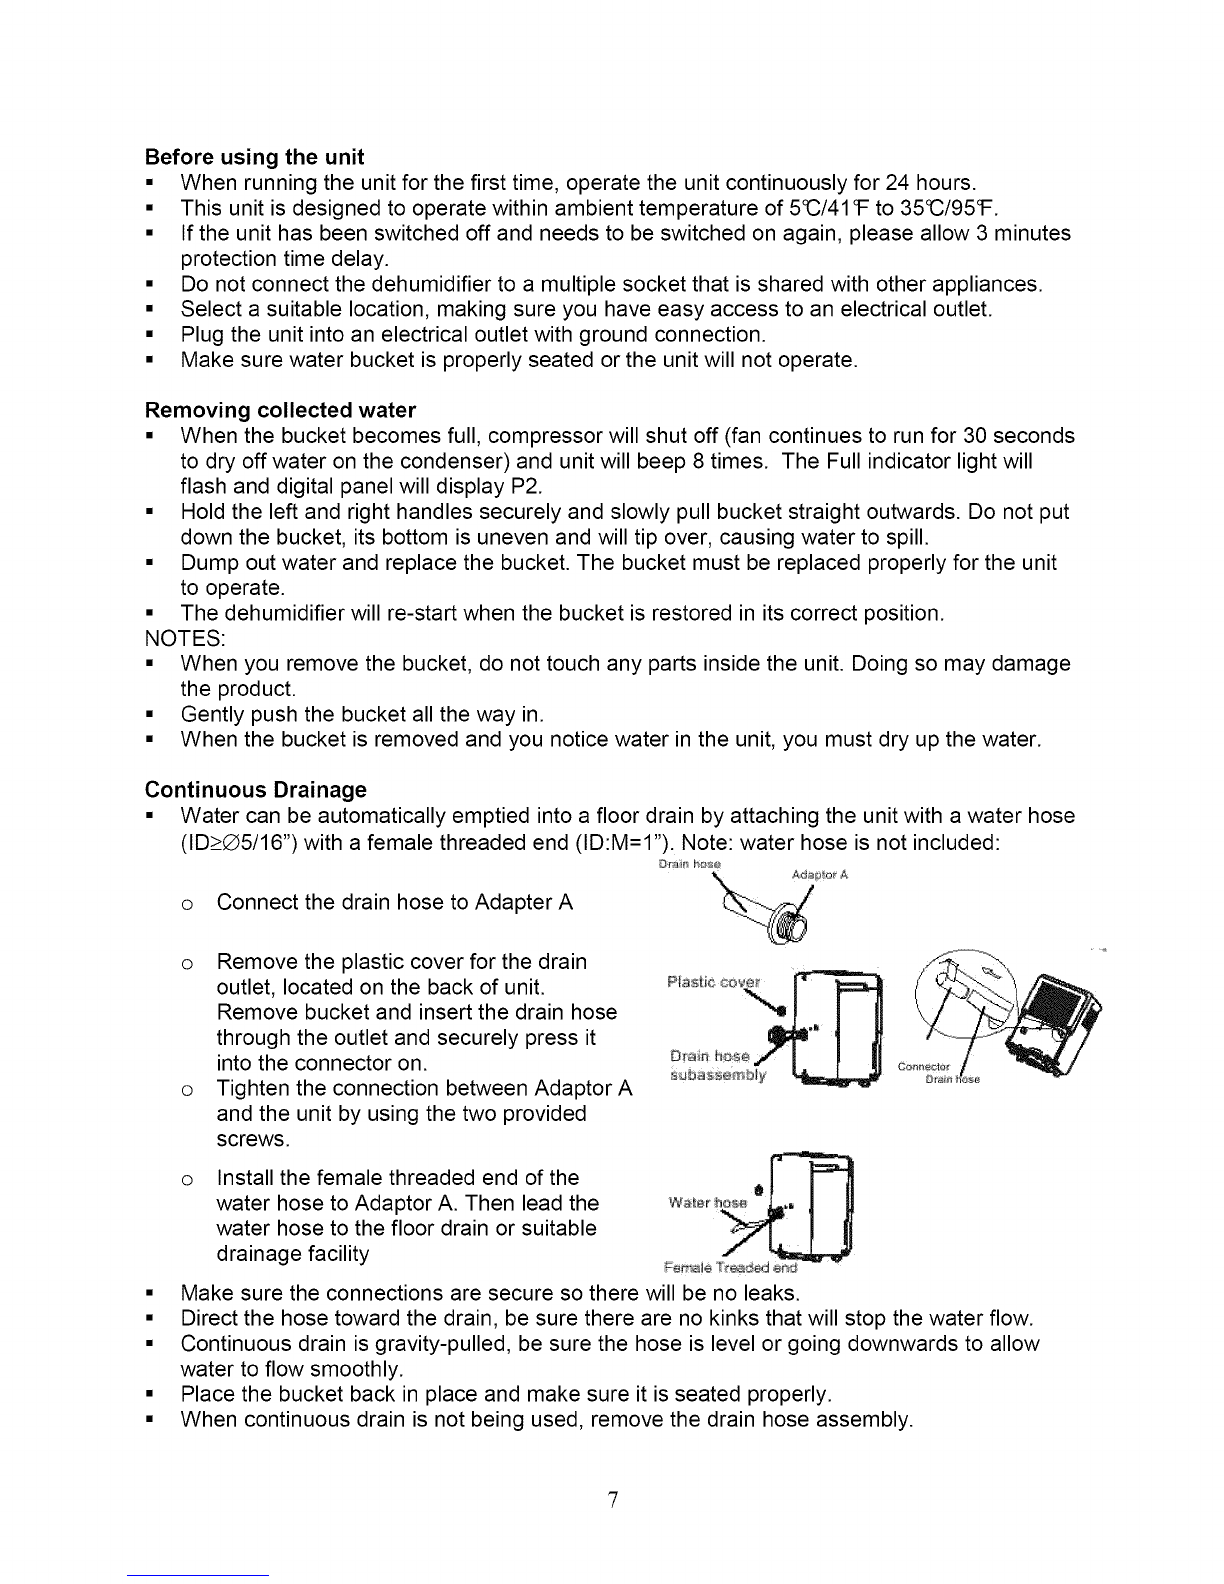
• Water can be automatically emptied into a floor drain by attaching the unit with a water hose
(ID_>®5/16") with a female threaded end (ID:M=I"). Note: water hose is not included:
o Connect the drain hose to Adapter A
o Remove the plastic cover for the drain
outlet, located on the back of unit.
Remove bucket and insert the drain hose
through the outlet and securely press it
into the connector on.
o Tighten the connection between Adaptor A
and the unit by using the two provided
screws.
o Install the female threaded end of the
water hose to Adaptor A. Then lead the
water hose to the floor drain or suitable
dra inag e facility _iG _'_d _
• Make sure the connections are secure so there will be no leaks.
• Direct the hose toward the drain, be sure there are no kinks that will stop the water flow.
• Continuous drain is gravity-pulled, be sure the hose is level or going downwards to allow
water to flow smoothly.
• Place the bucket back in place and make sure it is seated properly.
• When continuous drain is not being used, remove the drain hose assembly.
Alwaysturnthedehumidifieroff andunplugfrompowersourcebeforecleaning.
Cleanthe Grille and Housing
• Use water and a mild detergent. Do not use bleach or abrasives
• Do not splash water directly onto the unit. Doing so may cause electric shock, cause the
insulation to deteriorate or cause the unit to rust.
• The air intake and outlet grilles get dirty easily, use a vacuum attachment or brush to clean.
Clean the Water Bucket
• Every few weeks, clean the bucket to prevent mold growth, mildew and bacteria.
• Partially fill the bucket with clean water and add a little mild detergent. Swish it around,
empty and rinse.
Note: Do not place bucket in the dishwasher. After cleaning, make sure outside of bucket is
dried off before replacing to its seat.
Clean the Air Filter
•Remove the filter from top of unit; or first remove bucket then pull
filter downward to remove.
•Wash the filter with clean water and allow to air dry completely.
•Re-install the filter and replace bucket.
Caution: DO NOT operate the dehumidifier without a filter as dirt and lint will clog the
compressor and reduce performance.
Storage
• After powering off and unplugging the unit, wait one day before emptying the bucket.
• Clean the unit, water bucket and air filter thoroughly.
• Allow to dry completely and replace filter and bucket.
• Wrap the cord and bundle with the band.
• Cover the unit with a plastic bag.
• Store the unit upright in a dry, well-ventilated place.
MODEL
Moisture Removal **
Power Supply
Current
Power Consumption
Energy Factor (EEV)
Starting Current
Working Environment
Water Tank Capacity
Air Flow (High//Low)
Noise Level (High)
Dimension
Net/Gross Weight
SD-31E
30 pints per day
3.0A
310W
SD-41E SD-61E
40 pints per day 60 pints per day
115V /60Hz
4.5A 4.9A
450W 550W
1.85 L/kWh
SD-71 E
70 pints per day
6.9A
720W
14A 21A 28A 33A
3L
245/210 m3/h
56 dB(A)
41 ~ 95°F
35%to 85%RH
14.17(W) x 10.24(D)x 19.88(H)in.
29/31 Ibs 30/32 Ibs
6L
320/280 m3/h
58.5 dB(A)
15.35(W) x 10.98(D) x 23.15(H) in.
40/42 Ibs
** Capacity will vary according to actual room ambient temperature and humidity conditions.
BEFORE COTACTING THE MANUFACTURER, PLEASE CHECK THE FOLLOWING
POSSIBILITIES.
PROBLEM CHECK
•Power is OFF or power cord is unplugged/not securely fitted.
•Water bucket is not placed properly
Unit fails to start •Water bucket is full or set humidity has been reached
•Check power to the outlet, fuse/circuit breaker box
•Blocked air filter
• Room windows and doors are open
•Obstacles in air outlet or inlet
Performance decreased •Not enough time allowed to remove the moisture
•Humidity setting may be set too high
•Ambient temperature is too cold, below 411=
•Unstable setting of unit or floor surface is not level
Unit is noisy • Blocked filter
Frost appears on coils • This is normal. The dehumidifier has Auto-Defrost feature
•Hose connection for continuous drainage is loose
Water on floor •Intend to use the bucket for water collection, but the drain plug is removed.
ES, AS P2 and EC •Refer to error codes on page 4.
appears in display
Unit is not collecting as • When temperature is low, absolute humidity level will drop as well, even
much water during the when relative humidity is at the same percentage. There is less water
winter months vapor in the air when temperature is low
Difficulty inserting the • Soak the plastic white connector in hot water for a few minutes will soften
continuous drain tube the plastic and make it easier to connect.
If you still cannot solve the problem after trying the above, unplug unit and contact Sunpentown Int'l Inc.
Your Guarantee
If this product is found to be faulty as a result of faulty materials or workmanship within
one year from date of purchase, it will be repaired free of charge.
This guarantee is subject to the following terms:
• Sunpentown must be notified of the fault.
• Proof of purchase must be presented to Sunpentown's nominated representative.
• The warranty will be void if the product if modified, misused or repaired by an
unauthorized person.
• The warranty after repair will not be extended beyond the original one-year
period.
• All replacement parts will be new or reconditioned.
• Parts, which are replaced, become the property of Sunpentown.
• The warranty applies for the use of the product in the USA only.
What is NOT COVERED:
. Warranty does not include freight charges.
. Incidental or consequential damage caused by possible defects with this product.
. Damage to product caused by improper power supply voltage, accident, fire,
floods or acts of nature.
. Failure of product resulting from unauthorized modifications to the product.
. Improper installation or failure to perform the necessary maintenance.
This GUARANTEE is in addition to your Statutory Rights
SUNPENTOWN INTERNATIONAL INC.
14625 Clark Ave, City of Industry, CA 91745
Tel: 1-800-330-0388
[email protected]
www.sunpentown.com
]0

Other manuals for SD-31E

1

This manual suits for next models

3

Other SPT Dehumidifier manuals

SPT SD-65E User manual

SPT

SPT SD-65E User manual

SPT SD-014V User manual

SPT

SPT SD-014V User manual

SPT SD-30E User manual

SPT

SPT SD-30E User manual

SPT SD-30E User manual

SPT

SPT SD-30E User manual

SPT SD-46 User manual

SPT

SPT SD-46 User manual

SPT SD-014V User manual

SPT

SPT SD-014V User manual

SPT SD-46 User manual

SPT

SPT SD-46 User manual

SPT SD-31E User manual

SPT

SPT SD-31E User manual

SPT SD-350TI User manual

SPT

SPT SD-350TI User manual

Popular Dehumidifier manuals by other brands

Master DH 752 User and Maintenance Book

Master

Master DH 752 User and Maintenance Book

Abestorm Guardian SNS90 user manual

Abestorm

Abestorm Guardian SNS90 user manual

REMKO AMT 45-E manual

REMKO

REMKO AMT 45-E manual

Mitsubishi MDC20W-H user manual

Mitsubishi

Mitsubishi MDC20W-H user manual

Suntec Wellness Klimatronic DryFix 12 EQ manual

Suntec Wellness

Suntec Wellness Klimatronic DryFix 12 EQ manual

ALORAIR STORM PRO user manual

ALORAIR

ALORAIR STORM PRO user manual

Wood’s M10G user manual

Wood’s

Wood’s M10G user manual

Garden Air FAI-150-0151 user manual

Garden Air

Garden Air FAI-150-0151 user manual

DELLA 0DH-DH30 user manual

DELLA

DELLA 0DH-DH30 user manual

iGenix IG9801 user manual

iGenix

iGenix IG9801 user manual

Toyotomi REIKO Series user manual

Toyotomi

Toyotomi REIKO Series user manual

Dimplex GDDEKD9 instruction manual

Dimplex

Dimplex GDDEKD9 instruction manual

Breville the Smart Dry Instruction book

Breville

Breville the Smart Dry Instruction book

Fantech GD55S owner's manual

Fantech

Fantech GD55S owner's manual

Denco C14-1 Operation manual

Denco

Denco C14-1 Operation manual

EIP Ebac K100 owner's manual

EIP

EIP Ebac K100 owner's manual

Tack life TKD250 user manual

Tack life

Tack life TKD250 user manual

Drieaz F413-115V owner's manual

Drieaz

Drieaz F413-115V owner's manual

manuals.online logo
manuals.online logoBrands
  • About & Mission
  • Contact us
  • Privacy Policy
  • Terms and Conditions

Copyright 2025 Manuals.Online. All Rights Reserved.