Spygeargadgets SG-HC400 User manual

02
Introduction
Congratulations on your purchase of the SpygearGadgets 1080P
Full HD AC Adapter USB Charger Hidden Camera (HC400). This
easy to use unique device provides covert video surveillance for
any situation. Please read through this manual in its entirety and
keep it handy as it explains the operations of the camera.
Getting Started
The HC400 is a self recording camera that records video to a
micro SD card up to 128GB in capacity. For best performance, we
recommend using a name brand Class 10 rated or above memory
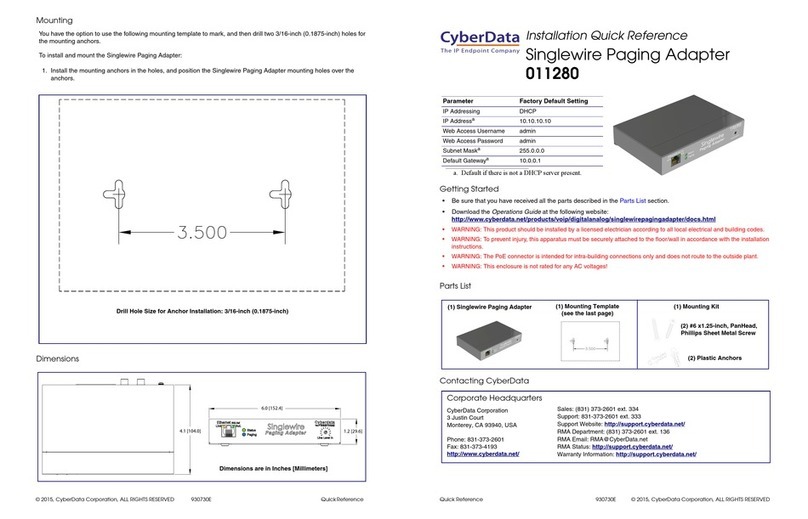
card. To get started, first slide off the back cover, and insert the
micro SD card into the hidden card slot until it snaps into place.
Then replace the back cover, and the camera is ready to go.
Recording Video
To turn the camera on, make sure a memory card is inserted, and
plug the adapter into any standard 110v or 240v outlet. Next,
press the Power Button (”A”) on the remote. The device will beep
once, which indicates that the device is now powered on and in
motion detection mode. Whenever motion is detected nearby, the
camera will start recording. In motion detection mode, video clips
are 3 minutes long. One motion stops, the camera will return to
standby mode, waiting to detect motion to occur again.
To turn the camera off, press the Power Button (”A”) again, the
device will beep twice, and then is powered off. Be sure to turn the
camera off using the remote before disconnecting the camera
from power so that the last video file is saved properly.
Product Diagram
Micro SD Card Slot
Reset
Power On/Off (”A”)
Motion Record (”D”)
Continuous
Record (”C”)
USB Port
01
QUICK START GUIDE
Model #SG-HC400
SpygearGadgets®
1080P Full HD AC Adapter
USB Charger Hidden Camera

05
800-380-5848 (930-430 EST M-F)
http://support.spygeargadgets.com
www.spygeargadgets.com
Phone:
Email:
Support Portal:
Live Chat:
For support or troubleshooting, contact our product experts at:
Product Support
Product Specifications
Troubleshooting/FAQs
Q. The time/date stamp setting process isn’t working.
A. Be sure to enter the time and date exactly as described in the
instructions. You can also download and use a sample time set file
from our support portal (http://support.spygeargadgets.com). Our
support portal also has a detailed step by step guide.
Q. The videos aren’t playing or are playing all black.
A. Your video drivers may be out of date. Download and play back your
files back with VLC Media Player, a free download available at
www.videolan.org/vlc.
Q. The camera is frozen/locked up or doesn’t respond to remote.
A. This can happen if the device receives too many commands quickly.
Insert a paper clip into the reset hole and hold for 2-3 seconds while
camera is plugged into power to reset the device to original settings.
SG-HC400
1080P HD (1920x1080) or 720P HD
30fps (1080P) or 60fps (720P)
80 Degrees Wide Angle Lens
AC Power
Motion Activated or Continuous Recording
Micro SD Card (Up to 128GB)
60min = 6GB (@1080P HD)
PC and Mac Compatible
Yes
Yes
Model Number:
Video Resolution:
Frame Rate:
Viewing Angle:
Power Supply:
Recording Mode:
Memory Type:
File Size:
OS Compatibility:
Time/Date Stamp:
Auto Overwrite:
04
NOTE: The default media player on your computer may not have
the latest video codecs and drivers built in to play back the videos
from this camera. For best performance, we recommend using
VLC Media Player to play back your video files. VLC is a free
media player for both PC and Mac computers, and is available to
download at http://www.videolan.org/vlc.
Adjusting the Video Time/Date Stamp
YYYY-MM-DD HH:MM:SS Y1
The time/date stamp displayed on the video allows you to see
exactly when your video files are recorded. To set the time and
date stamp, simply create a .txt file with the name “time”, and
save it to the root/main directory of your camera’s memory card.
For your convenience, we have a sample time set file you can
download and edit available at http://spyg.co/hc400time.
Once you have created the time file (or have downloaded the
sample file above), type out (or edit) the time and date using the
following format. Hours must be in 24-hour/military format:
In addition to setting the time, you can also adjust the video
resolution. Y1 = 1080P 30fps, Y2 = 720P 30fps, Y3 = 720P 60fps.
Save and close the time file, remove the memory card, and insert
it into the camera. The new time/date settings will be applied to
new recorded videos. NOTE: If the time set process is completed
successfully, the “time” file will be deleted from the memory card.
Second
Minute
Year Day
Month (SPACE)
Hour Y1 =
1080P HD
@ 30fps
(SPACE)
03
Continuous Video Recording
To view your recorded videos, first remove the memory card from
the card slot on the back of the adapter. Next, insert the micro SD
card into a card reader in your PC or Mac computer. If your
computer doesn’t have a built in card reader slot, you will need a
USB SD card reader (sold separately) to view the files on the card.
Please note the camera cannot be connected directly to a
computer (such as with a USB cable) to view the files.
Once you have the memory card inserted into a card reader or
card reader slot, browse to the directory that corresponds with
the memory card. On Windows computers, a “Removable Disk”
dialog box may pop up, if not, browse to your My Computer icon,
and open the drive that corresponds with the camera. On Mac
computers, the removable disk should appear on your desktop,
or you can find it under the Finder menu.
Once you have opened the drive, open the DCIM folder, and your
video files will be displayed. Double click on video files to play.
Viewing Recorded Videos
In addition to motion activated recording (the default recording
mode), the HC400 can also record continuously. In continuous
recording mode, the camera will record continuously regardless if
there is motion or not. To record in continuous mode, plug the
adapter into an outlet, and press the Power Button (”A”) to turn the
camera on, and it will “long” beep once. Next press the
Continuous Recording Button (”C”) once and the camera will
“short beep” twice, and then press the Continuous Recording
Button (”C”) again, and the camera will “short beep” once. The
device is now recording continuously, and files will save every 5
minutes. To save current file and turn the camera off, press the
Power Button (”A”), the camera will “long beep” once and turn off.
Table of contents

