SQ Professional BLITZ 5673 User manual

INSTRUCTION MANUAL
PLEASE READ THESE INSTRUCTIONS CAREFULLY BEFORE USE
SQIM 5673-5674-5675 29-07-2022 V7 | SQ Professional Ltd © 2022 All rights reserved
ELECTRIC MEAT GRINDER

2
Due to sharp parts and potential hazards, this appliance should not be used by children
under 16 years old unless supervised by an adult.
Please keep the appliance and mains cable out of the reach of children. This is not a toy!
If used by persons with reduced physical, sensory or mental capabilities, instruction and
supervision must be given to understand the use of the appliance and the hazards involved.
Always disconnect the appliance from the power socket if it is left unattended and before
assembling, disassembling or cleaning.
If the mains cable is damaged, it must be replaced by qualified persons
in order to avoid any hazards.
3
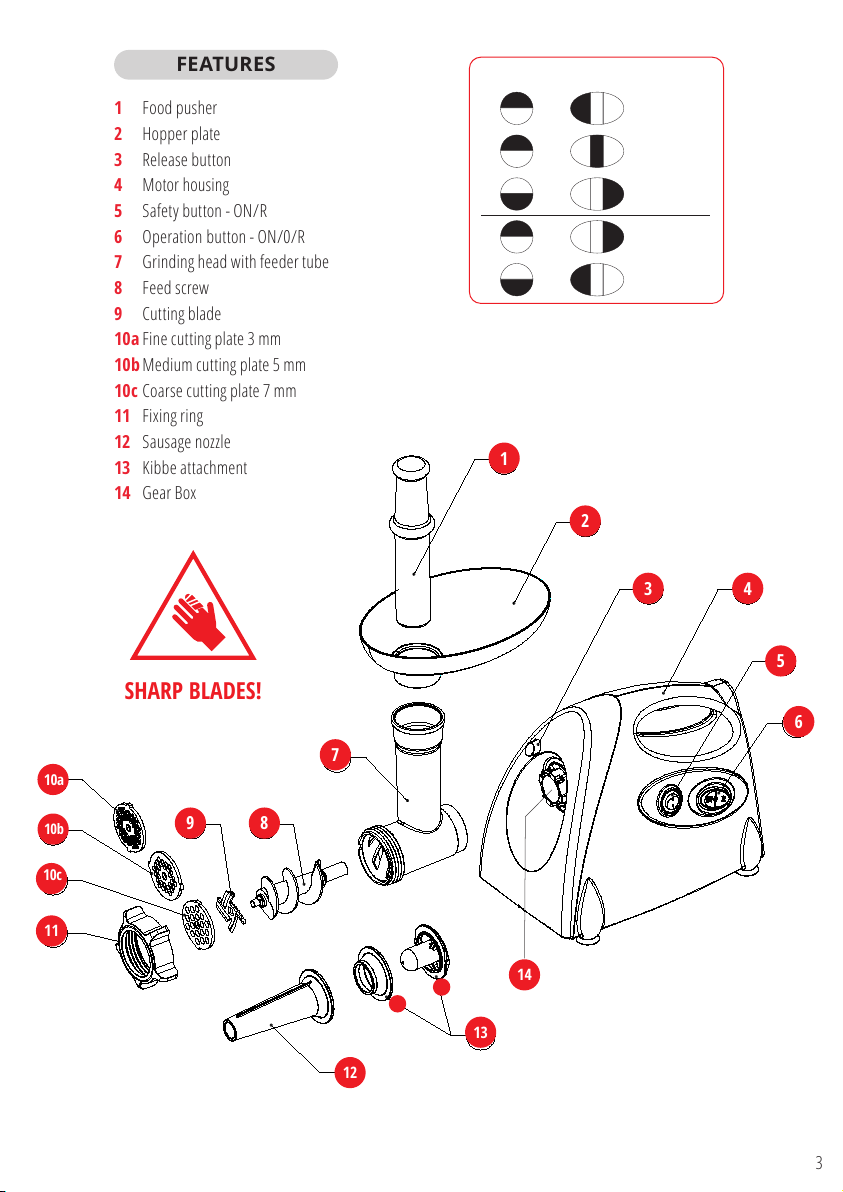
SHARP BLADES!
FEATURES
1 Food pusher
2 Hopper plate
3 Release button
4 Motor housing
5 Safety button - ON/R
6 Operation button - ON/0/R
7 Grinding head with feeder tube
8 Feed screw
9 Cutting blade
10a Fine cutting plate 3 mm
10b Medium cutting plate 5 mm
10c Coarse cutting plate 7 mm
11 Fixing ring
12 Sausage nozzle
13 Kibbe attachment
14 Gear Box
3
2
1
4
5
6
7
8
10
11
12
13
9
14
15
1
2
3 4
5
6
7
89
10a
10b
10c
11
12
13
14
A
B
ON 0 R
ON 0 R
ON 0R
ON 0 R
ON 0 R
ON
R
ON
R
ON
R
ON
R
ON
R
OPERATION BUTTONSAFETY BUTTON
START OPERATION
SWITCHED OFF
REVERSE FUNCTION
NO OPERATION
NO OPERATION

4
IMPORTANT SAFEGUARDS
Do not use the appliance in a bathroom, near water,
or outdoors. Do not operate the appliance with wet
hands or bare feet.
Do not immerse any of the parts (appliance, mains
cable, plug) in water or other liquids during use to
protect from fire, electric shock and personal injury.
Do not use the appliance if it is damaged or
malfunctioning.
Do not leave the appliance unattended whilst in use.
Use and store it out of reach of children.
Before attaching or removing any parts, make sure
the mains cable is unplugged from the electric
socket and operation Button is on ‘0’.
• This appliance is intended for household use only.
• Ensure that the appliance is always placed on a firm and
flat surface, away from any edges of the worktop. Do not
place the appliance onto a metal tray or metal surface
whilst in use. Do not place the appliance on, or near, a
hot gas or electric burner or in a heated oven.
• Keep the appliance and mains cable away from the
edges of worktops and out of reach of children. Route
the mains cable so it does not overhang, and cannot be
tripped over or caught.
• Do not let the mains cable run across an open space,
such as between a low power socket and a table, or
across any hot area, such as a cooker. Heat may damage
the mains cable.
• The connections on both sides of the mains cable
(the appliance and the power socket) should never
be strained. If the mains cable is damaged it must be
replaced by a qualified person or service to avoid any
hazards.
• Switch off the appliance and unplug from the socket
before changing attachments, or approaching parts that
move while in use. Only remove the attachments when
the appliance has come to a complete stop. Unplug the
appliance when not in use.
• Ensure that the appliance has come to a complete stop
before cleaning and storing away. Keep the attachments,
motor housing , cable, and plug away from sources of
heat. Store in a dry place.
• Do not use the meat grinder for any purpose aside from
its intended use.
• The cutting blade has very sharp edges. Take extreme
care when handling or cleaning it.
• The use of attachments not recommended by the
manufacturer may carry a risk of injury to persons.
• When carrying the unit be sure to hold the motor
housing with both hands. Do not carry the appliance
by holding only the hopper plate wor grinder head .
• Do not place your fingers into the feeder tube of the
grinding head while the meat grinder is in operation.
• Ensure that there is ample space around the appliance
and that the air passage at the bottom of the motor
housing is kept free of any blockages.
• Never attempt to grind bones, nuts or other hard foods.
Do not grind ginger or other foods with hard fibres.
• Do not operate the meat grinder without meat inside the
grinding head as this can result in a severe damage to
the appliance.
• Always use the supplied food pusher to push food
down the feeder tube on the grinding head . Never
use your fingers, a fork, a spoon, a knife or other
utensils.
• Before using the kibbe attachment fremove the cutting
blade and cutting plate a.
• The use of excessive pressure to push the meat into the
feeder tube on the grinding head may cause jamming.
• Reverse function is prohibited while the appliance is
operating. Wait at least one minute until grinder has
come to a complete stop to change function.
• Do not use any meat debris left in the grinding head
for consumption after you have finished using the
appliance. Clean the grinding head and throw any
meat debris away.
• Do not operate the appliance continuously with heavy
loads for more than 10 minutes. Allow the motor to rest
for 15 minutes between each use.
• Read all operating instructions before using the
appliance.
SAVE THESE INSTRUCTIONS FOR FUTURE REFERENCE
BEFORE FIRST USE
Wipe the motor housing
4
with a damp cloth and dry with
a soft cloth. All parts that come in touch with food are to be
thoroughly cleaned before being used for the first time (see
section on Cleaning).
When operating the meat grinder for the first time, there
may be a slight smell of burning. This presents no danger to
the user and does not indicate a defect in your meat grinder.
The odour will soon disappear.
5
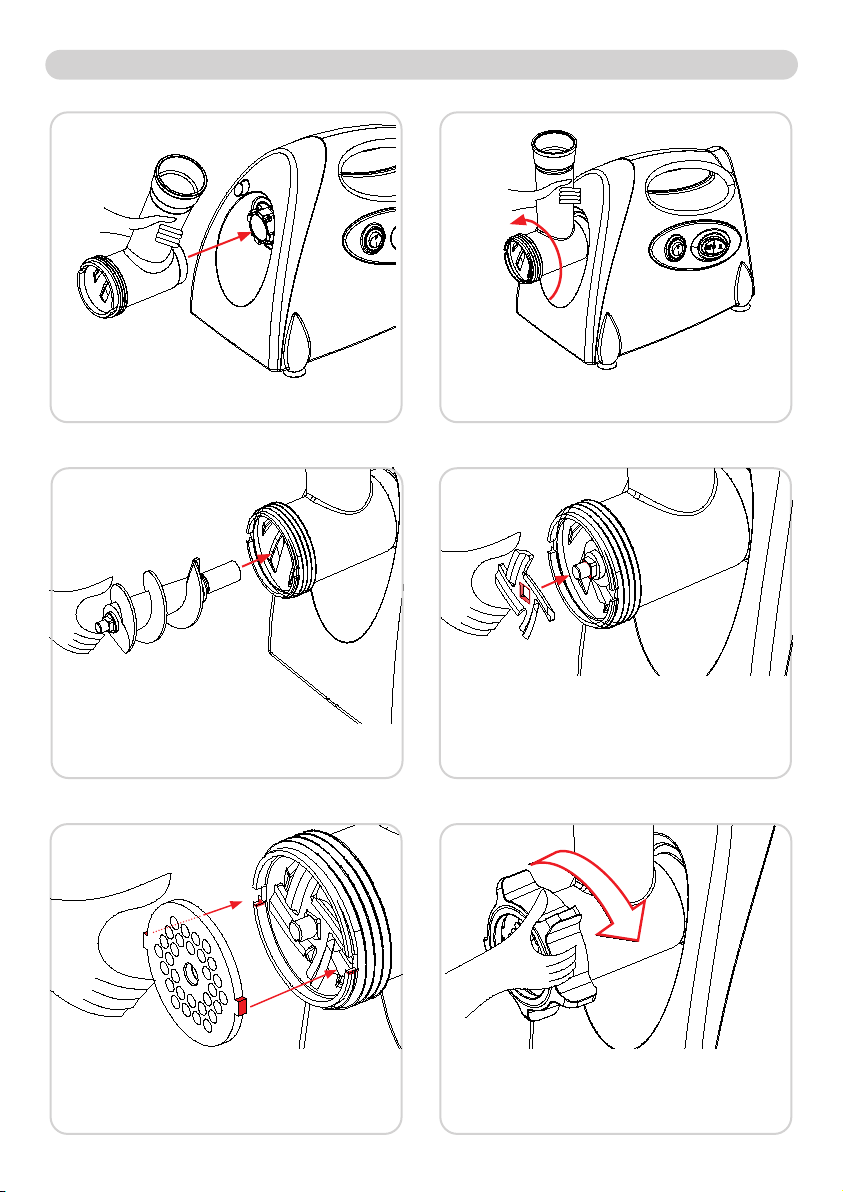
ASSEMBLY DIAGRAMS
Holding the feeder tube insert the grinding head
into the gear box g, under a slight angle (clock-wise).
B
Rotate the grinding head counter-clockwise until it
clicks into place.
Insert the feed screw into the grinding head ,
long end first. Turn it slightly until it sets into place.
Position the desired cutting plate aonto the shaft of
the feed screw . Fit the protrusions on either side of
the cutting plate ainto the two slots on each side on
the rim of the grinding head .
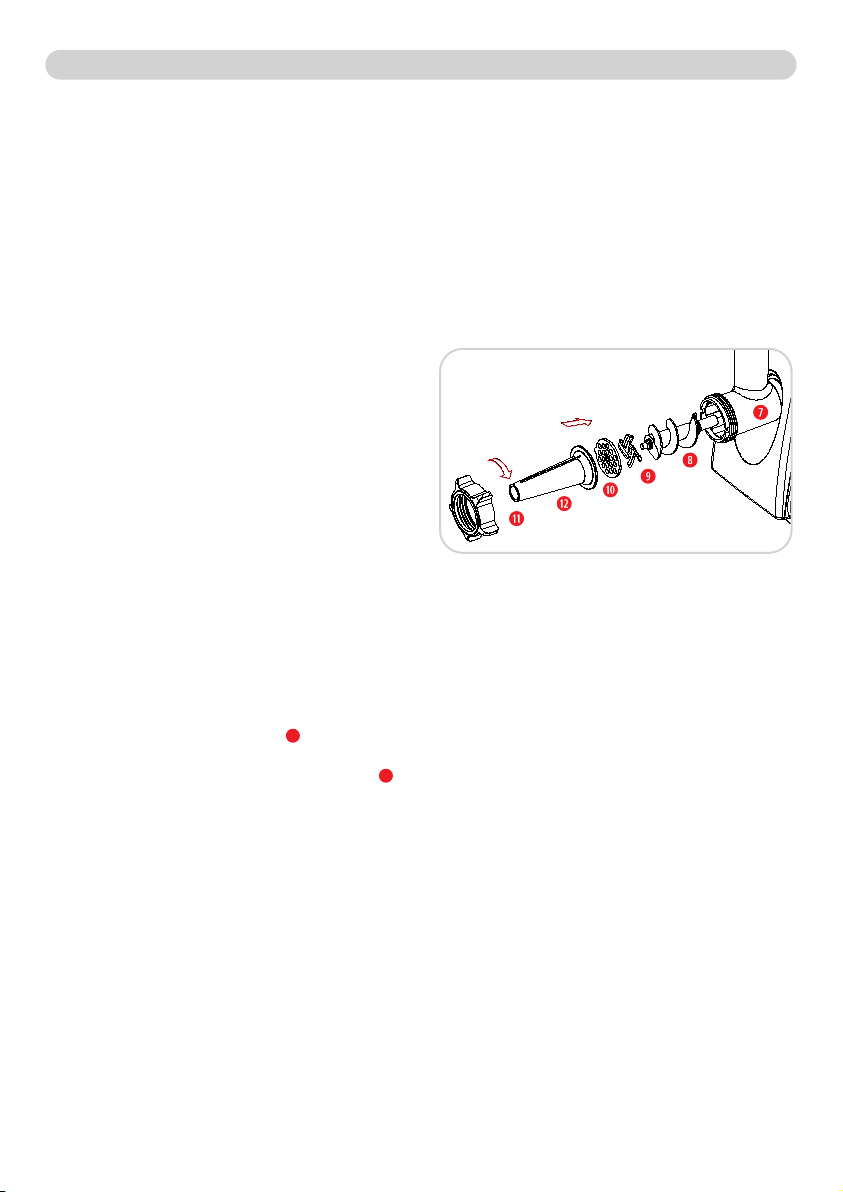
Screw the fixing ring sfirmly onto the grinding
head . Do not overtighten. Slot the hopper plate w
onto the feeder tube of the grinding head and insert
the food pusher .
Position the square hole on the cutting blade onto
the square end of the feed screw . The sharpened
side of the cutting blade must face outwards (away
from the feed screw ).
Handle carefully, the blades are very sharp!
DC
A B
E F
6
OPERATING INSTRUCTIONS
MEAT MINCING
Always ensure that the meat is fully thawed and
remove any bones, tendons and fat before mincing.
• Fit the grinding head with the desired cutting plate a
as described in assembly diagrams on page 5.
• Cut the meat into pieces, approximately 2 x 2 x 6 cm so that
they fit easily into the feeder tube on the grinding head .
• Plug the mains cable into the electric socket, ensure that
the safety button tis switched to ON, then switch the
operation button yto ON to start mincing.
• Place a suitable clean container under the grinding head
to catch the minced meat.
• Place the diced meat onto the hopper plate wand use
the food pusher to gently feed the meat into the
grinding head . Do not force the meat down the feeder
tube of the grinding head as this may cause jamming.
• Once the mincing is finished, switch the appliance off by
switching the operation button yto 0. Unplug from the
electric socket and clean all the attachments.
MAKING KIBBE
• Prepare your preferred kibbe stuffing in advance.
• Mince the meat and season before mixing to incorporate
all the ingredients and grinding the mixture again.
Repeat mincing to achieve your desired consistency.
• Remove the cutting plate aand the cutting blade
by following steps Fto C in reverse as shown in assembly
diagrams.
• Attach the kibbe attachment fpart
A
and align the
protrusions with the slots on the rim of the grinder head
as shown in assembly diagram E, then attach part
B
.
• Screw on the fixing ring sas in assembly diagram F, but
do not overtighten.
• Place a clean container under the grinding head
before putting the mixture on the hopper plate wand
switching the appliance on. Using the food pusher gently
feed the mixture into the grinding head through the
feeder tube.
• When a sufficient length is pushed out, switch the
operation button to 0and detach the kibbe with a knife.
• Press together one end of the kibbe to close it and
carefully fill it with the stuffing from the other side, then
close the open end.
MAKING SAUSAGES
• Follow the steps Ato Ein assembly diagrams to assemble
the meat grinder. Attach the sausage nozzle before
screwing on the fixing ring s. assembly diagram g
• Place a clean container under the grinder head .
• Place the meat on the hopper plate wand use the food
pusher to push the meat gently down the feeder tube.
• When a sufficient length of sausage is pushed out, switch
the the operation button yto 0to stop the appliance
and detach the sausage with a knife.
SAUSAGE CASINGS
• To stuff sausage casings, first cut them into
approximately 60-120cm lengths and prick the casing
with a pin to allow air to escape while stuffing. Gather
all of the casing over the sausage nozzle except for the
last 10cm and tie it securely at the end. Place the minced
meat onto the hopper plate w, then switch the safety
button tand operation button yto ON. Gently push
into the feeder tube using the food pusher .
• Stuff the casing loosely as the sausages may expand
during cooking. Distribute the meat through the casing
and twist into links as it fills to obtain the desired size
and shape.
REVERSE FUNCTION
If the meat grinder stops or slows down, this may be due to
jammed food. In case of jamming, switch the appliance off
immediately. Switch the safety button tto Rthen press and
hold the operation button yon R to reverse the rotation of
the feed screw , which should empty the grinding head .
If this does not work, switch the appliance off and clean it.
G

7
USEFUL TIPS
• Raw meat and fish will preserve more moisture if
thoroughly chilled before grinding. When grinding larger
quantities, it is important to note that fats can build up
inside the grinding head , decreasing your grinder’s
efficiency. If this occurs, dismantle the appliance, wash
all attachments in hot soapy water and reassemble.
• Handle meat lightly to prevent compacting.
• Refrigerate ground meat immediately and cook within 24
hours. If freezing, use within a maximum of 2 months.
• Always clean the meat grinder and the attachments
thoroughly between consecutive uses and before storing.
CLEANING
Always unplug the appliance from the electric socket
before cleaning. Never immerse the motor housing
in water or any other liquid. Exercise extreme care
when handling the cutting blade as it is very sharp.
• Dismantle the appliance in reverse steps shown in the
assembly diagrams Eto A.
• If the cutting plate ais stuck, insert a flat screwdriver
between its protrusions and the slot on rim of the
grinding head , and carefully detach.
• Press the release button eto release the grinding head
and remove it from the motor housing .
• Wipe the motor housing clean with a damp cloth and
then dry immediately with a soft cloth to avoid scratches
and water marks on the surface.
• Rinse used attachments with clean warm water to
remove larger debris. Use a brush and warm soapy water
(maximum 50°C) to clean thoroughly then rinse well
with clean, warm water again. Leave to air dry. Ensure all
the parts are completely dry before reassembling.
• Wipe all cutting plates aand the cutting blade with
a cloth moistened with vegetable oil after each use, and
before use if the appliance was not used for long periods.
• Meat grinder attachments are not dishwasher safe.
• Do not use harsh detergents, bleach or bleach solutions.
ENVIRONMENTAL
To reduce environmental and health problems
due to hazardous substances in electrical and
electronic goods, appliances marked with
the symbol below must not be disposed of
with unsorted municipal waste. Please repair,
reuse or recycle appropriately.
SPECIFICATIONS
Rated Voltage: 220-240V~
Frequency: 50/60Hz
Rated Power: 500W
ELECTRICAL
The product must not be used without the fuse
cover fitted.
Should the power cable or the power plug become
damaged, arrange for these to be replaced by Customer
Service or a qualified person before continuing to use the
appliance. The appliance is fitted with a 13A fuse (BS1362) in
a 13A plug (BS1363).
SERVICE
The product is not user-serviceable. If it is not working, read
the instructions, check the plug fuse and main fuse/circuit
breaker. If it is still not working, consult your retailer.
If that does not solve the problem ring Customer Service –
they may be able to offer technical advice. Please have the
Model Number to hand, as they will not be able to help you
without it.
If you are advised to return the product to us, pack it
carefully, include a note with your name, address, day
phone number, and description of the problem. If under
a guarantee, say where and when it was purchased and
include a valid VAT receipt. Send it to SQ Professional Ltd.
GUARANTEE
The guarantee for this product is covered by SQ Professional
Limited. Any faults with this product arising through a
manufacturer defect will be covered for 1 year from the date
of purchase, subject to a valid vat receipt being presented.
This does not include faults or damage caused by misuse of
general wear and tear. SQ Professional Ltd will not be held
liable for general wear and tear, or eventual damages to
persons, animals or objects caused by incorrect installation
or deriving from improper, erroneous or unreasonable use.
Please contact customer services on 01992 716 070 or send
an e-mail to info@sqprofessional.com, Monday to Friday
from 09:30 - 17:30. This does not affect your statutory rights.
All images are for illustration purposes only. Actual products may vary.

SCAN THE QR CODE TO EXPLORE
OUR FULL PRODUCT RANGE.
Voltage Business Centre, Units 1 - 3
6 Mollison Avenue, Eneld, EN3 7XQ
T: 01992 716 070 | F: 01992 700 538
WWW.SQPROFESSIONAL.COM
This manual suits for next models
2
Table of contents
Other SQ Professional Meat Grinder manuals


