Squiggle LME-BB1 User manual

User/ Product Manual
PRODUCT USE AND CARE INSTRUCTIONS
SQUIGGLE BIKE
ITEM NO.: LME-BB1
Before riding, please read this Product Manual carefully and abide by
all Security Warnings and Precautions. It is important to understand
the use of this product and maintain LME-BB1 in accordance with this
manual.

1
Squiggle LME-BB1 is an electric balance bike for children ONLY
Squiggle LME-BB1 must be assembled by an adult
In order to avoid dangers that are caused by collisions, falls and loss of control, please learn how to ride
the Squiggle electric balance bike safely.
You can learn riding skills by reading this product manual.
This manual includes all operating instructions and precautions. Users must read carefully and follow
the instructions. All users are responsible for any consequences that are caused by violating warning
contents or prompt operations. We shall not be liable for incidental and consequential damages.
This Instruction sheet has to be kept since it contains important information about your product.
To reduce the risk of injury, adult supervision is required at all times. Never use in roadways, near
motor vehicles, on or near steep inclines or steps, swimming pools or other bodies of water; always
wear shoes, and never allow more than 1 rider.
Only use the battery specified by the manufacturer
The Squiggle Electric bike should be used with caution since skill is required to avoid falls or
collisions causing injury to the user or third parties
Content
1. BEFORE USING.......................................................................................................................................................................... 2
1.1 Riding Risk....................................................................................................................................................................... 2
1.2 Preparation Before Riding...............................................................................................................................................2
1.2.1 Prepare install the electric balance bike............................................................................................................. 2
1.2.2 Product specification........................................................................................................................................... 3
1.2.3 Description of parts............................................................................................................................................. 4
2. SAFE-USING OF ELECTRIC BALANCE BIKE................................................................................................................................. 9
2.1 Weight Limit....................................................................................................................................................................9
2.2 Maximum Riding Range..................................................................................................................................................9
2.3 Speed Limited............................................................................................................................................................... 10
3. USAGE OF BATTERY.................................................................................................................................................................10
3.1 Battery power............................................................................................................................................................... 10
3.2 Charging process...........................................................................................................................................................11
3.3 Description of battery...................................................................................................................................................12
3.4 Shipping Notes..............................................................................................................................................................12
4. USAGUE OF BIKE..................................................................................................................................................................... 12
5. MAINTENANCE........................................................................................................................................................................13
Turn power “OFF”before beginning repair or maintenance:..................................................................................... 13
Cleaning Electric balance bike............................................................................................................................................ 13
Storing Electric balance bike...............................................................................................................................................13
Battery Care and Disposal...................................................................................................................................................13
Charger................................................................................................................................................................................14
Wheels................................................................................................................................................................................ 14
Replacement Parts..............................................................................................................................................................14
6. TROUBLESHOOTING................................................................................................................................................................15
7. SERVICE................................................................................................................................................................................... 16

2
1. BEFORE USING
1.1 Riding Risk
Squiggle electric balance bikes are a personal electric vehicle toy, our technology and production
processes have strict testing for every electric balance bike. Riding without attention to contents of this
manual may cause injury.
* Falling, losing control, collision, or failure to follow e-balance bike manual, may cause injury even death.
In order to minimize the risk of riding, ensure that you read manual.
* Protective equipment should be worn.
* Never use in roadways, near motor vehicles, on or near steep inclines or steps, swimming pools or other
bodies of water; always wear shoes, and never allow more than 1 rider
1.2 Preparation Before Riding
When you first open your Squiggle box, the following items below can be found
inside.
Main product
Charger with tools
Battery
Manual

3
1.2.2 Product specification
E-balance bike
Net weight
10kgs
Size
980*510*568mm
Running time
6~15km
Operating temperature range
0℃-40℃
Max climbing angle
6~9°
Max weight capacity
50KG
Battery
Capacity
4.0Ah
Types
18650 high rate discharge battery
Charging duration
3~6 hours
Charging times
300 times
Motor
Type
Brush motor
Highest speed
15KM/H
Size
104*98*100mm
Power
100W
Charger
Input
AC 100V-240V
Charging temperature range
0℃-40℃
DC dual output
L/R simultaneous output 20.8V/0.8A
4
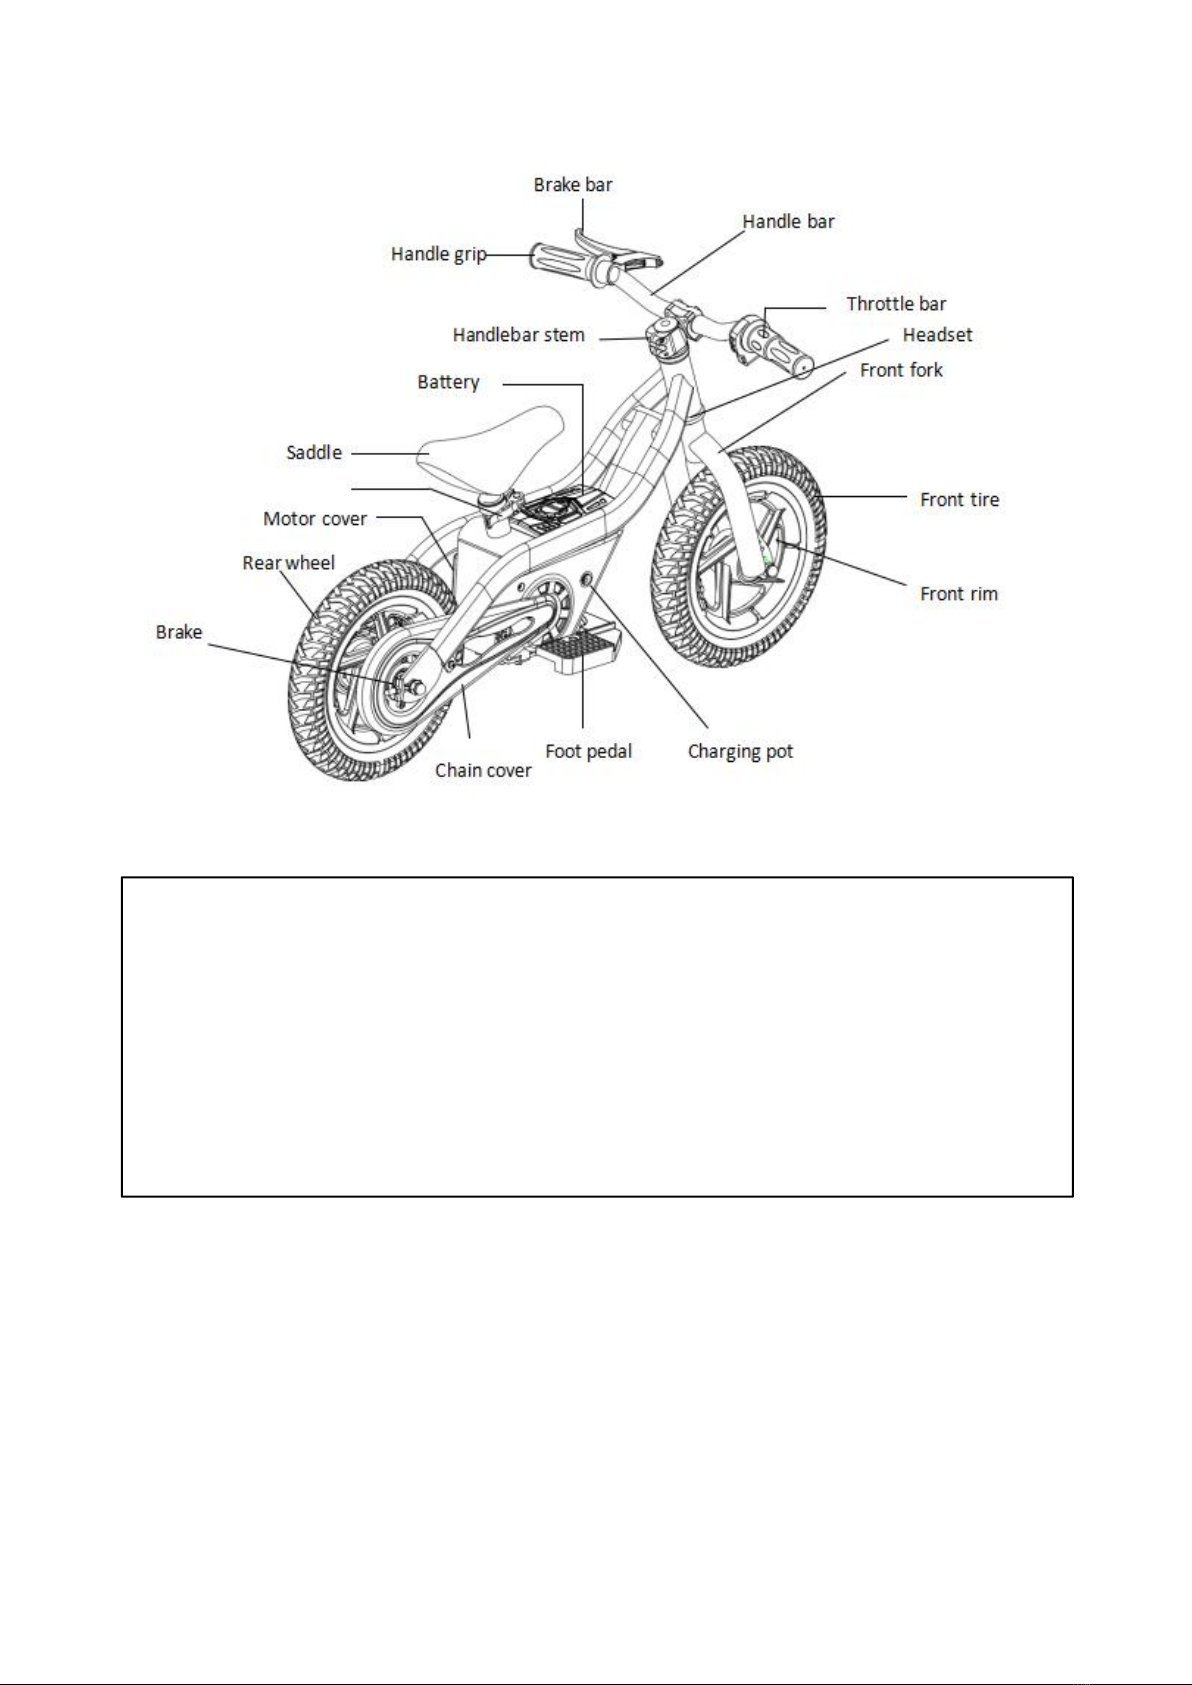
1.2.3 Description of parts
Estimated Assembly and Set-Up Time
The product should be assembled by an adult.
Allow up to 10 minutes for assembly, not including initial charge time.
Allow up to 4 hours for charge (see charging information page).
WARNING:
ONLY USE THE PARTS SUPPLIED WITH YOUR ELECTRIC BALANCE BIKE.
The bike has been built to certain design specifications. The original equipment supplied at the
time of sale was selected on the basis of its compatibility with the frame, fork and all other
parts. Certain aftermarket products may not be compatible and will void the warranty.
5
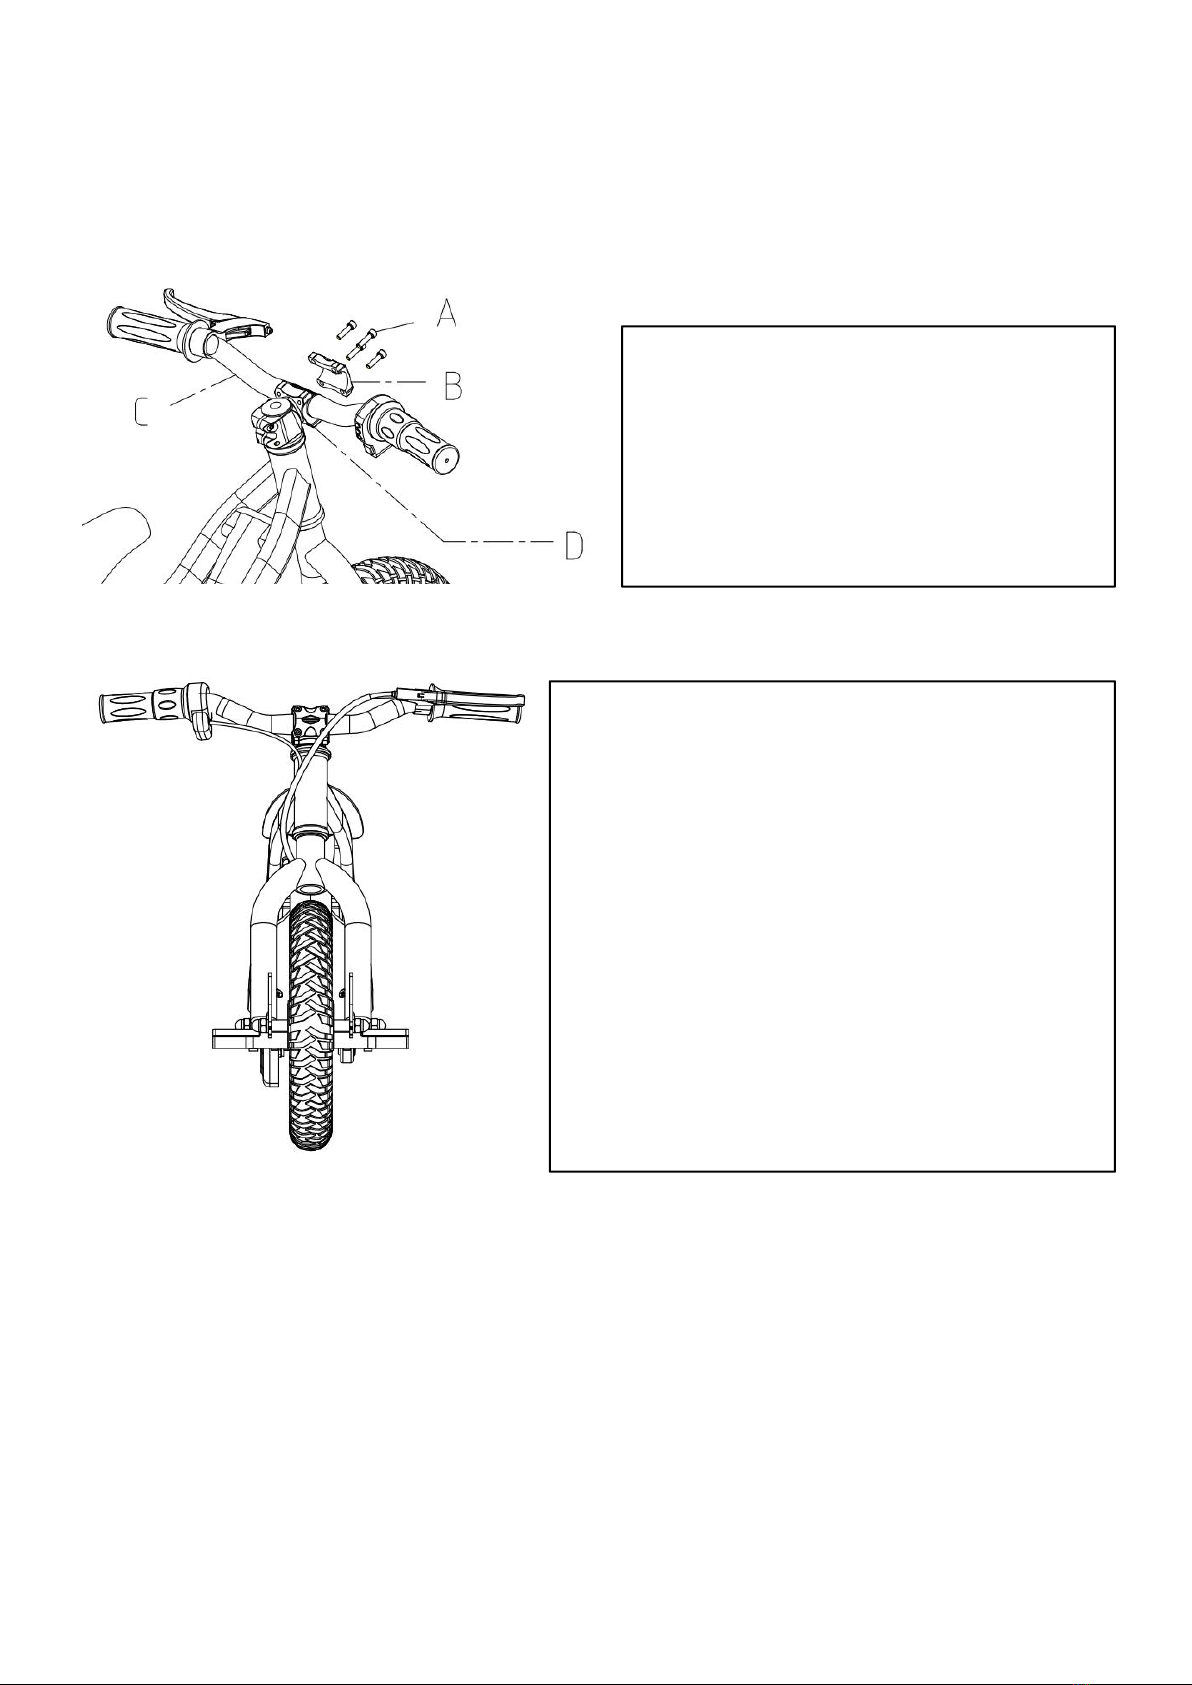
1.2.4 How to assemble the LME-BB1
STEP 1: Assemble the handle bars
A: Size: M5X20 Socket head bolt
B: Upper block
C: Handle bar
D: Down block
1. Put(C)in to location(D), then cover(B)
2. Put(A)into(B), then use the tools screw to(D)
Note: Make sure any cables/wires are in the
rightt position (as seen in photo to the left)
before assembling the handlebars.
WARNING: Failure to properly tighten the collar clamp
screws may allow the handlebar to dislodge while
riding and may cause you to lose control and fall.
When correctly tightened, the handlebar will not
rotate out of alignment with the front handlebar stem
under normal circumstances.
Note: The cable and wire assembly from the
handlebars must not wrap around the steering tube
or handlebars itself. Sharp bends or twisting of the
brake cables can cause the brakes to malfunction.

6
STEP 2: Assemble the front wheel
Loosen the screws
and nuts.
Put the front wheel
into the front fork and
ensure it is locked.
Tighten the screws and nuts
(as seen in left photo).
Make sure the front wheel
is in the middle of the front
fork.
7
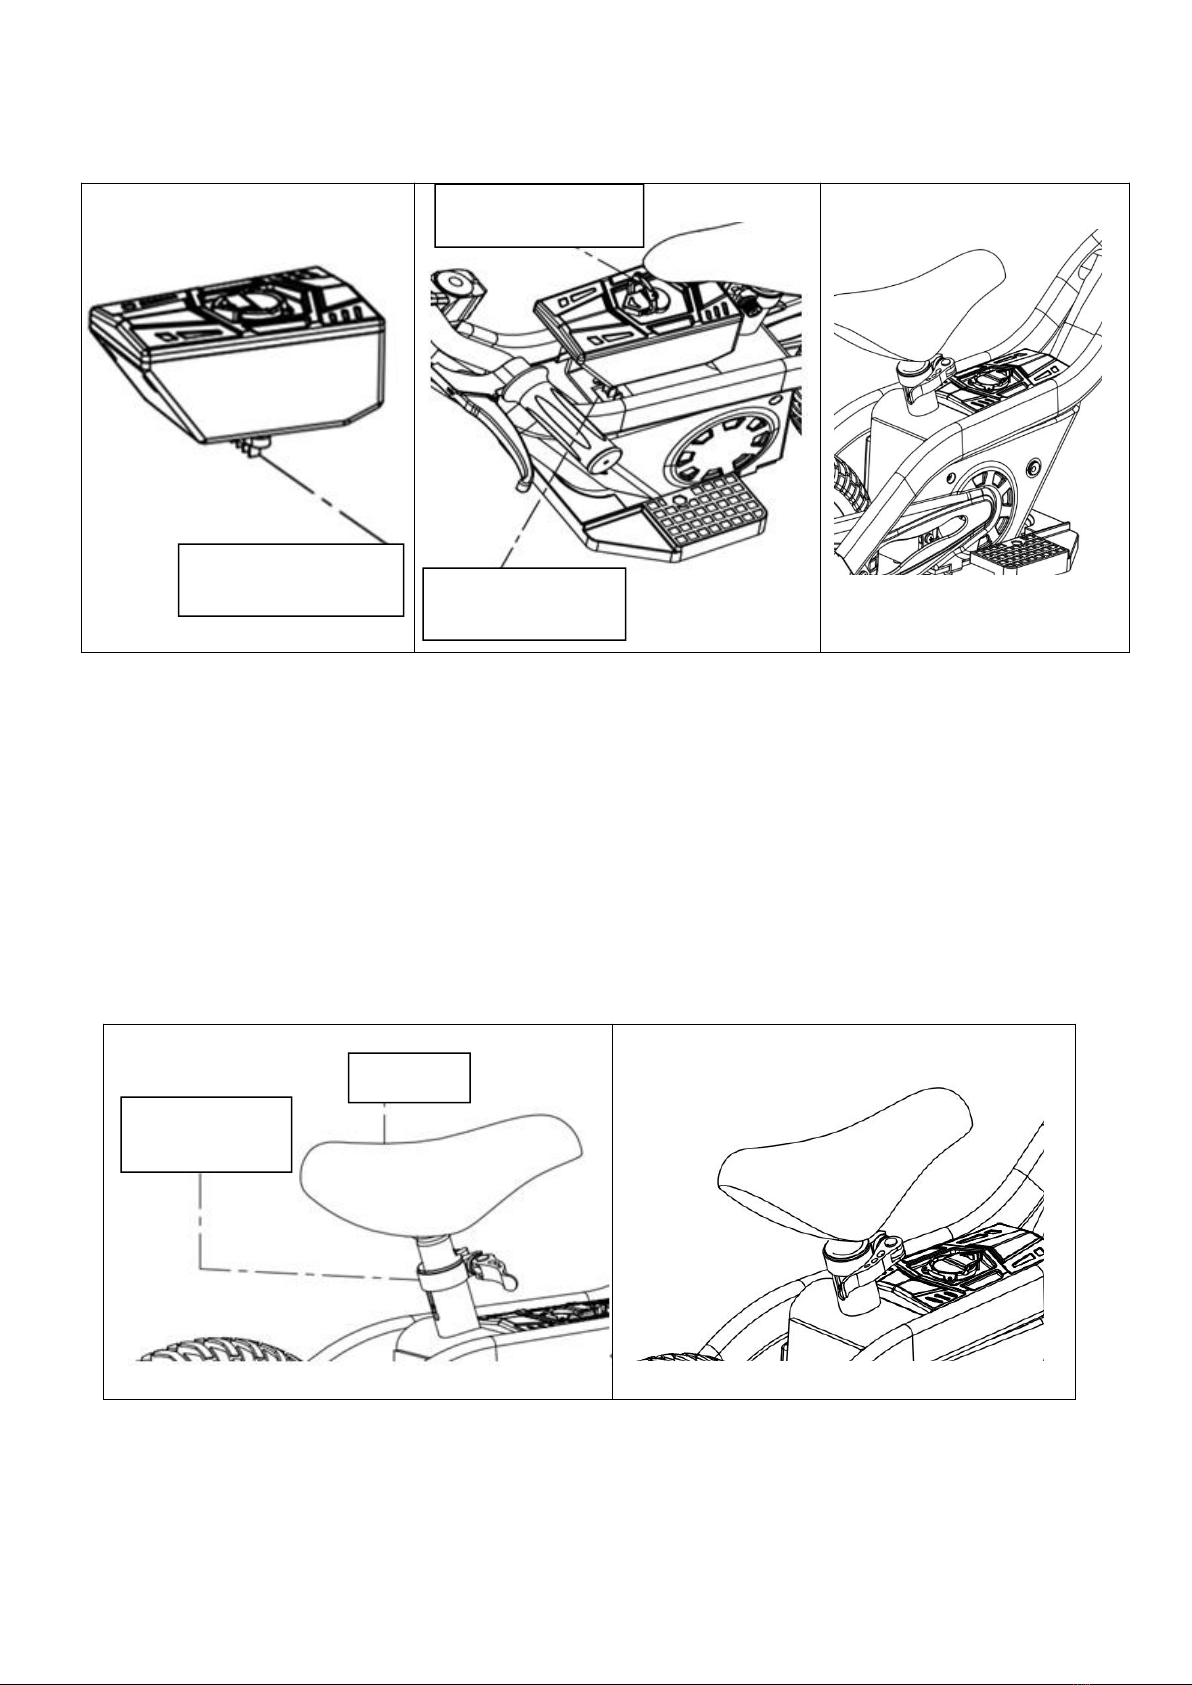
STEP 3: Install the battery
A. Install the battery:Take the battery out and you will see the female plug in the battery and the male plug
in the bike. Match the female plug to the male plug, then press the battery case until the two plugs are
completely locked. (Move the battery slowly, if it is a movable battery, it means the plugs are not locked
completely. Press the front part of battery case heavily to make sure the battery is installed. )
B. Remove the battery: With your left hand holding the bike, put the index finger of right hand into the
battery handle, whilst your thumb and middle finger hold the battery case, then pull the whole battery case
out.
Step 4: Adjust the saddle
Release the lock, adjust the saddle into the right position, then lock it.
WARNING: Failure to properly tighten the collar clamp may allow the saddle to drop down while riding and
may cause you to lose control and fall. When correctly tightened, the saddle will not drop down under
normal circumstances.
female plug
male plug
battery handle
Quick release
Locker
Saddle

8
Step 5: Check the battery capacity
Step 6: Inflating the Tire
Always inflate tires to the correct PSI before first time use.
Lower air pressure can result in a shorter ride time.
Periodically check the tires. Re-inflate when needed.
Using a bicycle-style tire pump equipped for a Schrader-type valve, inflate the front tire to the correct PSI
indicated on the sidewall of the tire.
Battery capacity display
After installing all the above steps, press
the red button to check the battery
capacity.
1). Full battery capacity:
Green,Yellow and Red light on
2). Half battery capacity:
Yellow and Red light on; Green light off
3). Low battery capacity:
Red light on, green and yellow light off
WARNING:
Do not use the electric balance bike for the first
time until you have inflated the tires to the
correct PSI. Failure to do so may damage your
electric bike and void your warranty.
WARNING:
Do not over inflate, as this could damage the
tire or wheel.

9
2. SAFE-USING OF ELECTRIC BALANCE BIKE
We hope every user can ride our electric balance bikes safely and enjoy the fun. You can recall the
memories of learning how to ride a balance bike, electric toy car, bicycle; all these experiences can be
applied.
1. Please follow the related content in the "product Manual" before riding electric balance bike for the first
time. Check whether battery power is enough, tires are damaged or parts are loose before driving,
make sure to use the hand brake level while at high speeds downhills etc. If there is any abnormal
situation, please contact the local Squiggle reseller for servicing and repair.
2. Please carefully read the "Product Manual", this will help to get a lot of important safety information
such as speed limited, vibration alert and safety shutdown, etc.
3. Do not use balance bike incorrectly to endanger the safety of persons or property.
4. Do not modify the parts of electric balance bike, it will affect the performance, and can cause serious
injury.
5. Children should not be allowed to ride the electric balance bike on their own. Children should be
given supervision or instructions around the use of the appliance by a person responsible for their
safety
6. When the user is riding, make sure to wear protectors, such as: helmet, knee pads, elbow pads and other
protective gear.
7. Not to be used in traffic. In order to avoid dangers that are caused by collisions, falls and loss of control,
you can ride it in the park, garden and other roads far away from road traffc. Do not ride on obstacles,
such as twigs, litter or small stones, etc. Avoid riding in narrow spaces. Avoid riding on a steep slope.
8. Please be alert to things in front or far away from children, keeping good vision will keep children safe.
9. Do not ride on slippery and wet surfaces or on rainy days. Do not ride in dark place.
10. To avoid degradation of battery performance by heat, electric balance bikes should be stored in
cool dry places out of direct sunlight.
2.1 Weight Limit
To ensure safety and reduce damage, users must follow minimum and maximum load:
Maximum Load: 50kgs
Overweight may increase possibility of injury
2.2 Maximum Riding Range
There are a lot of factors that will affect riding range& performance, such as:
Grade: A smooth, flat surface will increase the riding speed, while an incline or hilly terrain will reduce the
speed.
Weight: The weight of the user can affect riding speed and riding range.
Ambient temperature: Please be mindful of product usage in hot weather conditions where the battery
cannot cool down.
Maintenance: Reasonable battery charging and maintenance will increase the product lifetime.
Speed and riding style: Maintaining a moderate speed will increase distance, on the contrary, frequent
starting, stopping, acceleration will reduce the product life time

10
2.3 Speed Limited
Electric balance bike top speed is around 12KM/H
When it is close to the max speed, the electric balance bike will ensure that the speed does not continue to
increase. When the user feels discomfort or loss control with the speed, they must hit the brakes to slow
the speed of the bike.
3. USAGE OF BATTERY
This section mainly describes the charging method of the Squiggle electric balance bike, how to
maintain the battery, some security issues, and battery specifications. For users' safety, maximum
extent of prolonging the battery life, and improve battery performance, please follow the instructions.
3.1 Battery power
You must stop riding if the electric balance bike displays low power, or it may affect battery lifetime.
Don't use the battery if it emits odor or overheats.
If the electric balance bike is not used for a long time, the battery must be charged every 2-3 months.
Don't touch any leaking material.
Keep battery away from children when not riding.
The charger must be unplugged from the charging port before riding.
Battery contains dangerous substances. Do not open the battery and do not insert anything into the battery.
The battery must be removed from the appliance before it is scrapped.
The appliance must be disconnected from the mains supply when removing the battery.
Please use the original charger provided with electric balance bike.
Don't overcharge the battery.
The battery is to be disposed of safely.
This appliance must only be supplied by our distributors.
For the purposes of recharging the battery, only use the detachable charger provided with this appliance.
Always charge the battery immediately after riding.
Fully charge battery before storing for extended periods of time.
Unplug charger from the wall outlet when not in use.
Failure to recharge battery periodically may result in a battery that will not accept a charge.
Make sure the power is turned off when product is not in use. If the ON/OFF switch is left on for an extended period
of time, the battery may reach a stage at which it will no longer hold a charge.
To ensure long battery life, never store the product in freezing or below freezing temperatures. Freezing will
permanently damage the battery.
Run time may vary depending on riding conditions, rider weight, climate, and/or proper maintenance and usage of
the product.
Constant starting and stopping may shorten ride time.
Battery life can vary depending on proper maintenance and usage of the product.
Non-rechargeable batteries are not to be recharged.
The supply terminals are not to be short-circuited.
Rechargeable battery is only to be charged by adults or by children at least 8 years old. The battery should never be
placed on the charger and left. The battery should always be charged with someone in attendance.

11
3.2 Charging process
Your electric balance bike may not have a fully charged battery, therefore you must charge the battery prior to use.
When the Led light turns red on your bike, it means low power. The battery needs to be charged.
Ensure the charging port is dry. Keep the charging environment clean and dry.
Switch off the electric balance bike in "off " position.
The charging time is about 3-4 hours.
NOTE: Make sure power is turned OFF when product is not in use. If the ON/OFF switch is left on for an extended period of
time, the battery may reach a stage at which it will no longer hold a charge.
Step1: Plug the charger cable into the electric balance bike charge port. Make sure the power is in the OFF position. The
red light on the charger should turn on during charging. The light will turn green again when charging is complete.
Step2: Plug the charger into wall outlet. The light on the charger should be green. Note: If green light doesn’t turn on, try a
different outlet.
WARNING: Battery charge can deplete over time. Periodically recharge battery when not in use.
WARNING: Use ONLY with the
recommended charger. Batteries are
only to be charged under adult
supervision. The charger is not a toy.
Always disconnect the charger before
wiping down and/or cleaning the
electric scooter with a damp cloth.
The charger supplied with the electric
bike should be regularly examined for
damage to the cord, plug, enclosure and
other parts. In the event of such
damage, the electric bike must not be
charged until it has been repaired or
replaced.
Note: If the charger gets warm during
regular use, this is normal response and
is no cause for concern. If your charger
does not get warm during use, it does
not mean that it is not working properly.
Wall outlet-Green (stand by)
Wall outlet and unit-Red (charging)
Wall outlet and unit- Green (charged)
Note:
Charge design
may vary from
one shown
12
3.3 Description of battery
Contents
Parameters
Battery
Lithium battery
Charging time
2~3h
Voltage
24V
Initial Capacity
4Ah
Working Temperature
-15℃~50℃
Charging Temperature
10℃~40℃
Storage Time(-20℃~ 35℃)
12 months(Charge every 2~3 months)
Storage Humidity
~65%
3.4 Shipping Notes
Lithium battery contains dangerous articles. Ship lithium only according to local law.
4. USAGE OF BIKE
Starting the electric balance bike
Turn power “ON”, place both hands on the handlebars and feet on the ground.
Place the feet on the foot rest deck while twisting throttle to engage the motor.
Stopping the electric balance bike
Note:
Handlebar
design may vary
from one shown
Note:
Handlebar
design may vary
from one shown
To stop, release the
throttle and apply the
brake until the product
comes to a complete
stop. Then turn off the
power.

13
5. MAINTENANCE
Electric balance bike requires the user to do routine maintenance.
This chapter describes maintenance steps and important operating tips.
Before you perform the following operations, ensure the power and charging cable are disconnected. If the
battery is charging, the operation is not allowed.
Turn power “OFF”before beginning repair or maintenance:
Read the instructions
Remove charge plug
Turn the power off
Secure the product under repair
Exercise caution around exposed parts
Contact distributor customer service if unsure about any repair or maintenance
Cleaning Electric balance bike
Disconnect the charger and turn off Electric balance bike
Wipe the cover
Avoid using water or other liquids on the Electric balance bike for cleaning. If water or other liquids seep
into Electric balance bike, it will cause permanent damage to the internal electronics.
Storing Electric balance bike
Fully charge your battery before storing
Charge products at least every two to three months.
If the storage ambient temperature is below 0 degree, please do not charge. You can bring the Electric
balance bike into a warm environment (about 10 degree) for charging.
To prevent dust from entering, you should cover Electric balance bike. Do not connect the power.
Store Electric balance bike indoors in a dry and suitable temperature. If you do not use it for a long time,
please do not connect the power.
Do not disassemble Electric balance bike. Users who try to disassemble Electric balance bike lose their right
for guaranty.
Battery Care and Disposal
Do not store in freezing or below freezing temperatures. To properly maintain your battery and ensure
maximum battery life, carefully read the “Charging the Battery”section of this owner’s manual.

14
Correct Disposal of this product
This marking indicates that this product should not be disposed of with other
household wastes throughout the EU. To prevent possible harm to the
environment or human health from uncontrolled waste disposal, recycle it
responsibly to promote the sustainable reuse of material resources. To return
your used device, please use the return and collection systems or contact the
retailer where the product was purchased. They can take this product for
environmentally safe recycling.
Charger
The charger supplied with the electric balance bike should be regularly examined for damage to the cord,
plug, enclosure and other parts and in the event of such damage, the product must not be charged until it
has been repaired or replaced.
Use ONLY with the recommended charger.
Wheels
Wheels and drive system are subject to normal wear and tear. It is the responsibility of the user to
periodically inspect wheels for excess wear and replace tires as required.
Replacement Parts
The most frequently requested replacement parts are available for purchase at some retail partners.
Please contact your retailer for more information.

15
6. TROUBLESHOOTING
Problem
Possible Cause
Solution
Bike does not run
Battery needs a charge
Charge the battery until the charger indicator light turns
from red to green.
Check all connectors. Make sure the charger connector is
securely plugged into the charging port, and that the
charger is plugged into the wall outlet.
Charger is not working
Make sure power flow to the wall outlet is on.
Bike is overloaded
An excessive overload, such as too heavy a rider or too
steep a hill, could impact bike performance.
Bike suddenly stops
working while in use
Tripped circuit breaker
Check all wires and connectors to make sure they are
tight.
Bike runs sluggishly
Riding conditions are too extreme
Use only on solid, flat, clean and dry surfaces such as
pavement or level ground.
Tire is not properly inflated
The tire is inflated when shipped, but it invariably will lose
some pressure between the point of manufacturing and
your purchase.
Bike is overloaded
Make sure you do not overload the bike by allowing more
than one rider at a time, exceeding the electric balance
bike 50 kg maximum weight limit, going up a hill or towing
objects behind the bike. If the bike is overloaded, the bike
runs sluggishly.
Short run time(less than
15 minutes per charge)
Undercharged battery
Charge the battery until the charger's indicate light turns
red into green.
Check all wires and connectors. Make sure the battery
connector is tightly plugged into the charger connector,
and that the charger is plugged into the wall outlet.
Battery is old and will not accept full
charge
Make sure power flow to the wall outlet is on.
Even with proper care, a rechargeable battery does not
last forever. Average battery life is 1 to 2 years depending
on bike use and conditions. Replace only with a
replacement battery.
Working intermittently
Loose wires or connectors
Check all wires around the motors and all connectors to
make sure they are secure.
Motor or electrical switch damage
Contact your local authorized service center for diagnosis
and repair.
Bike makes loud noises
or grinding sounds
Chain is too dry
Apply a lubricant to the chain.
Brake doesn’t work
Brake is too loose
Adjust brake cable play, thread the brake lever adjuster in
or out ¼ to ½ turn until the desired brake adjustment is
achieved. Most adjustments are complete at this step.
If brake still needs further adjustment, contact authorized
repair centers.

16
7. SERVICE & WARRANTY
Thank you again for your purchasing Electric balance bike Squiggle BB1. We would like to provide you with
good after-sale services by offering a 12 month Warranty on your bike, and 6 months on your battery.
For All Warranty and Repair enquiries:
HillTop Imports Group Pty Ltd
7B Wellington Park Way, Sale, Victoria. 3850
Phone: 03 51433451
The warranty period is consistent with the national and local warranty policy.
The warranty period is calculated from original date of purchase by the user.
A proof of purchase must be given when claiming this warranty; the original sales receipt is considered
such proof.
EXCLUSIONS:
This warranty does not apply to:
Damage caused by misuse, accident or abuse.
Damage caused by service performed by any third part.
A product or part that has been modified without the written permission.
WARRANTY DOES NOT COVER:
Product repair and/or part replacement because of improper installation, connections to improper voltage
supply abuse, neglect, accident, unauthorized repair or other cause not within control of our company.
Damage or claims for products not being available for use, or for lost data or lost software.
Damage occurring to product during shipping.
Failure to operate per Owner's Manual.
Table of contents


