Elite CROSSTOWN User manual

OWNER’S MANUAL
CROSSTOWN
48v 500w System

________________________________________________________________________
P a g e | 2
TABLE OF CONTENTS
SECTION PAGE
1 INTRODUCTION 3
2 IMPORTANT SAFETY INSTRUCTIONS 4
3 PARTS LIST 5
4 ASSEMBLY 6
5 SPECIFICATIONS 7
6 MAINTENANCE INSTRUCTIONS 8
7 BATTERY CHARGING, CARE AND USE 9
8 5 SPEED PEDAL ASSIST SYSTEM (PAS) 1
9 WARRANTY 17
1 INTRODUCTION

________________________________________________________________________
P a g e | 3
Congratulations on your new Electric Assist Bicycle and thank you for purchasing our
product.
To get you started, begin by charging your battery while you read your owner’s manual.
Carefully read the contents of your owner’s manual to make yourself familiar with the
operation of your Electric Assist Bicycle (EAB).
EAB’s are operated the same way as a regular bicycle and are not classified as a motor
vehicle. Check the laws of your country for any variation on operating requirements and
comply with all laws pertaining to the operation of bicycles and EAB’s.
We work diligently to ensure the quality of all of our products. With proper care, use,
and maintenance, your EAB will give you years of enjoyment.
BEFORE YOU BEGIN
It is very important to become familiar with the IMPORTANT SAFETY INSTRUCTIONS for
your EAB.
QUICK START GUIDE
1. Charge your battery.
2. Check your front and rear tires and brakes, secure handlebar, and saddle.
3. Check all nuts and bolts for tightness.
4. Install the charged battery, mount your bike and power up the electrical system. The
battery level meter will show your battery capacity.
5. Pedal or use the electronics (pedal assist system or twist throttle) to accelerate the
bike.
CAUTION! Once power is on, if the throttle is twisted, the bike will move forward
Releasing the throttle or squeezing the brake will automatically cut power to the motor.
The battery has an integrated battery management system which prevents damage to
the cells if the battery is fully discharged during use. The battery level meter is to be
used as a guide when to charge the battery. The bike will operate just like a non-electric
bike when electrical power is not used Turn off the power and remove the key
whenever you park your bike.
2 IMPORTANT SAFETY INSTRUCTIONS

________________________________________________________________________
P a g e | 4
Read all instructions before using your EAB
We recommend assembly by a reputable bike shop specializing in EAB’s.
CAUTION!
A. Consult a physician prior to using any exercise equipment.
B. There is a possibility of serious injury if your EAB is used improperly.
C. Read and understand all warnings and instructions prior to using.
1. Before operating your EAB, inspect it carefully to ensure it is in good working
condition.
2. Don’t dismantle, repair or modify any electrical component. (interference with the
electrical components will invalidate the warranty)
3. Safeguard your battery to ensure continued high performance. Normal full cycle
battery life is 8 charge cycles, after which the storage capacity of your battery will
gradually decline. See section 7. BATTERY CHARGING, CARE AND USE for more
information.
CAUTION! Fully charge your battery before the first use!
4. Use the charger supplied with your EAB to charge the battery.
5. Keep the power off until you are on your EAB and ready to ride.
6. Care should be taken in mounting or dismounting the EAB.
7. Care should be taken when first operating under full power. The twist throttle is
designed for immediate response. When you twist the throttle toward you, your
EAB will move forward.
8. This EAB should not be used by minors without adult supervision.
9. Obey all traffic laws pertaining to the operation of bicycles and EAB’s.
1 . Your EAB can be operated in the rain and snow, just like a regular bicycle. However
never allow the wheel containing the hub motor or any other electrical component
to become submerged in water. This can cause the motor to short circuit and fail.
11. Do not wear loose or dangling clothing while riding on your EAB.
12. Keep both hands on the handlebars at all times.
13. Don’t brake suddenly in rain or on slippery or wet surfaces.
14. Maximum user weight: 136 kg (3 lbs)
15. This EAB is designed for one person use.
16. Do not use if it is not working correctly.
17. Follow all applicable laws for the operation of EAB’S
3 PARTS LIST

________________________________________________________________________
P a g e | 5
1
2
4
3
6
5
789111121314
16
17
18
19
15
2 21 22 23 2524
1. Brake Cables
2. Front LED Light
3. RST Suspension Forks
4. Tektro Hydraulic Disc Brakes
5. Heavy Gauge Spokes
6. Kenda Puncture Resistant Tires
7. 5 W Bafang Geared Motor
8. Aircraft Grade 6 61 Aluminum Frame
9. Pedals
1 . 48 Teeth Chainwheel and Crank
11. Chain Guard
12. Pedal Assist Sensor
13. Chain
14. Reflector
15. Mudguard
16. Carrier Integrated into Frame
17. LiMg2 4 Battery with USB and LED Light
18. Luggage Rack
19. Controller, Battery Lock, Ignition
2 . Seat
21. Seat Suspension
22. Handlebars
23. Brake Levers
24. Twist Throttle
25. 5 Speed PAS with Battery Level Meter
26. Gear Shifter
4 ASSEMBLY

________________________________________________________________________
P a g e | 6
1. Carefully remove your bike from the
box and the protective wrapping from
the bike to ensure you do not damage
the paint work.
2. Fit the front wheel into the wheel
drop-outs. Insert the quick release
assembly into the front wheel. Note the
correct orientation of the springs.
3. Remove the handlebar clamp from
the handlebar stem. Fit the handle into
the clamp on the stem, ensuring that the
splined section of the handlebar is
central in the clamp. Tightened the
bolts in the clamp until the handlebar
cannot be rotated.
4. Fit the front mud guard and the front
light onto the front fork. Connect the
two wires to the light. The black wire is
connected to the back of the light and
the black wire with a white stripe is
connected to the front connection.
5. Fit the seat to the bike. Note the
orientation of the seat clamp.
6. Fit the pedals to the cranks. Note
that the pedals have left and right hand
threads so if the pedal does not screw
into the crank it is for the opposite side.
ENSURE YOU CHECK ALL NUTS AND
BOLTS FOR TIGHTNESS
5 SPECIFICATIONS
Frame Specially designed aircraft grade lightweight aluminum 6 61 frame

________________________________________________________________________
P a g e | 7
Battery 48 volt, 12 amp hour Lithium Manganese (LiMg2 4)
Battery has USB connection, is lockable, removable, built in rear LED light
Weight: 4. kg (8.8lbs)
Battery Life: Minimum 48, km’s (3 , miles) from 8 charges
Charging time: 6 minutes to 8 % capacity, 18 to fully charge
Battery is recyclable
Motor 5 watt brushless, geared Bafang front hub motor
Top Speed 32 km/h (2 mph) contingent on rider, load, and terrain
Range 6 km (37 miles) contingent on rider, load, and terrain
Controller High Quality Mosfet
Throttle Twist throttle for quick acceleration
Drive Train Shimano Alivio Premium gears
Gears 8
Brakes Tektro Hydraulic Disc Brakes with motor shut-off sensors
Wheels 7 C
Tires Kenda puncture resistant tires
Forks RST adjustable suspension
Carrier Built in panier rack protects the battery. 5 kg (11 lbs) load capacity
Lights Front and rear LED lights work off the battery
Seat Velo padded comfort seat with seat post suspension
Charger 11 -24 smart charger with built-in Battery Management System
Total weight 27 kilograms (59 lbs)
6 MAINTENANCE INSTRUCTIONS

________________________________________________________________________
P a g e | 8
Maintaining your EAB will ensure you get the best out of your bike each and every time you ride
it. There is not much more to maintaining an EAB compared to a regular bike. You can have
your bike serviced at a dealer or do it yourself.
Before Every Ride
Conduct a visual inspection for mechanical integrity as well as any wear or damage. Check to
ensure your battery is fully charged and your front and rear lights are operable.
.
Every 150kms (100 miles)
Clean your EAB. Clean and lightly oil the chain and gears. Do not use a steady direct stream of
water on any of the electronic components. Use a cloth to avoid short-circuiting your motor,
battery, controller or any other electrical components. Your EAB comes with a factory paint
finish and can be cleaned with a mild detergent.
Repairing a Punctured Tire on the Motor Wheel
If you need to remove the wheel containing the motor housing, follow these steps:
1. Unplug the quick connects.
2. Loosen the wheel nuts enough to slide the wheel out of the wheel drop-outs.
3. Remove the chain from the gear cassette as you remove the wheel.
4. Be careful not to rest the wheel against the electric input cable.
5. Be mindful of the tightening assembly sequence of washers, nuts and spacers.
Hub Motor and General Maintenance
Although the motor is maintenance free, we recommend a thorough inspection of your bicycle
after 5, km (3, miles) of cycling by a reputable bike shop specializing in EAB’s.
7 BATTERY CHARGING, CARE AND USE

________________________________________________________________________
P a g e | 9
About Lithium Batteries
At Elite Bikes we want you to use our products with confidence. Your new Elite Bikes LiMG2 4
battery uses the safest and most reliable chemistry available today. Although your new battery
is equipped with an advanced battery management system (BMS) to protect and maintain its
performance, we still suggest the following precautions be maintained.
Battery Care Precautions
Do not put the battery into fire, or heat the battery; do not store the battery in high temperature
environment.
Do not let the battery terminals (+ and -) contact a wire or any metal (like a metal necklace or a hairpin)
with which it carried or stored together, may cause short-circuit.
If struck or damaged, return to Elite Bikes dealer for inspection.
Do not disassemble or alter the batteries' outside structure as this will void the warranty.
Do not submerge battery in water, or store in a wet environment.
Battery should be charged with supplied charger only, in compliance with correct operation contents.
Do not use the battery with other maker's batteries, different types and /or models of batteries such as
dry batteries, nickel-metal hydride batteries, or nickel-cadmium batteries, or new and old lithium
batteries together.
Do not leave the battery in a charger or equipment if it generates an odour and/or heat, changes color
and/or shape, leaks electrolyte, or cause any other abnormality.
When not in use we recommend that you charge your battery at monthly intervals.
Use the battery level meter as a guide. The battery should be charged when it reaches low voltage.
The battery can be used in temperatures ranging from -2
o
C to 7
o
C (-4
o
F to 158
o
F).
A fully discharged battery will take 3 to 4 hours to recharge to 1 % or 6 minutes to reach 8 %.
Lift the carrying handle on the battery to reveal the battery charging point on the side. Connect the
charger to the battery before plugging into the main supply. This will prevent “sparking” at the battery
connection and protect the battery charger from damage. Unplug from the mains before disconnecting
the charger from the battery. The charger is a “smart charger” and will automatically power off when
the battery is fully charged.
8 5 SPEED PEDAL ASSIST SYSTEM (PAS)
________________________________________________________________________
P a g e | 10
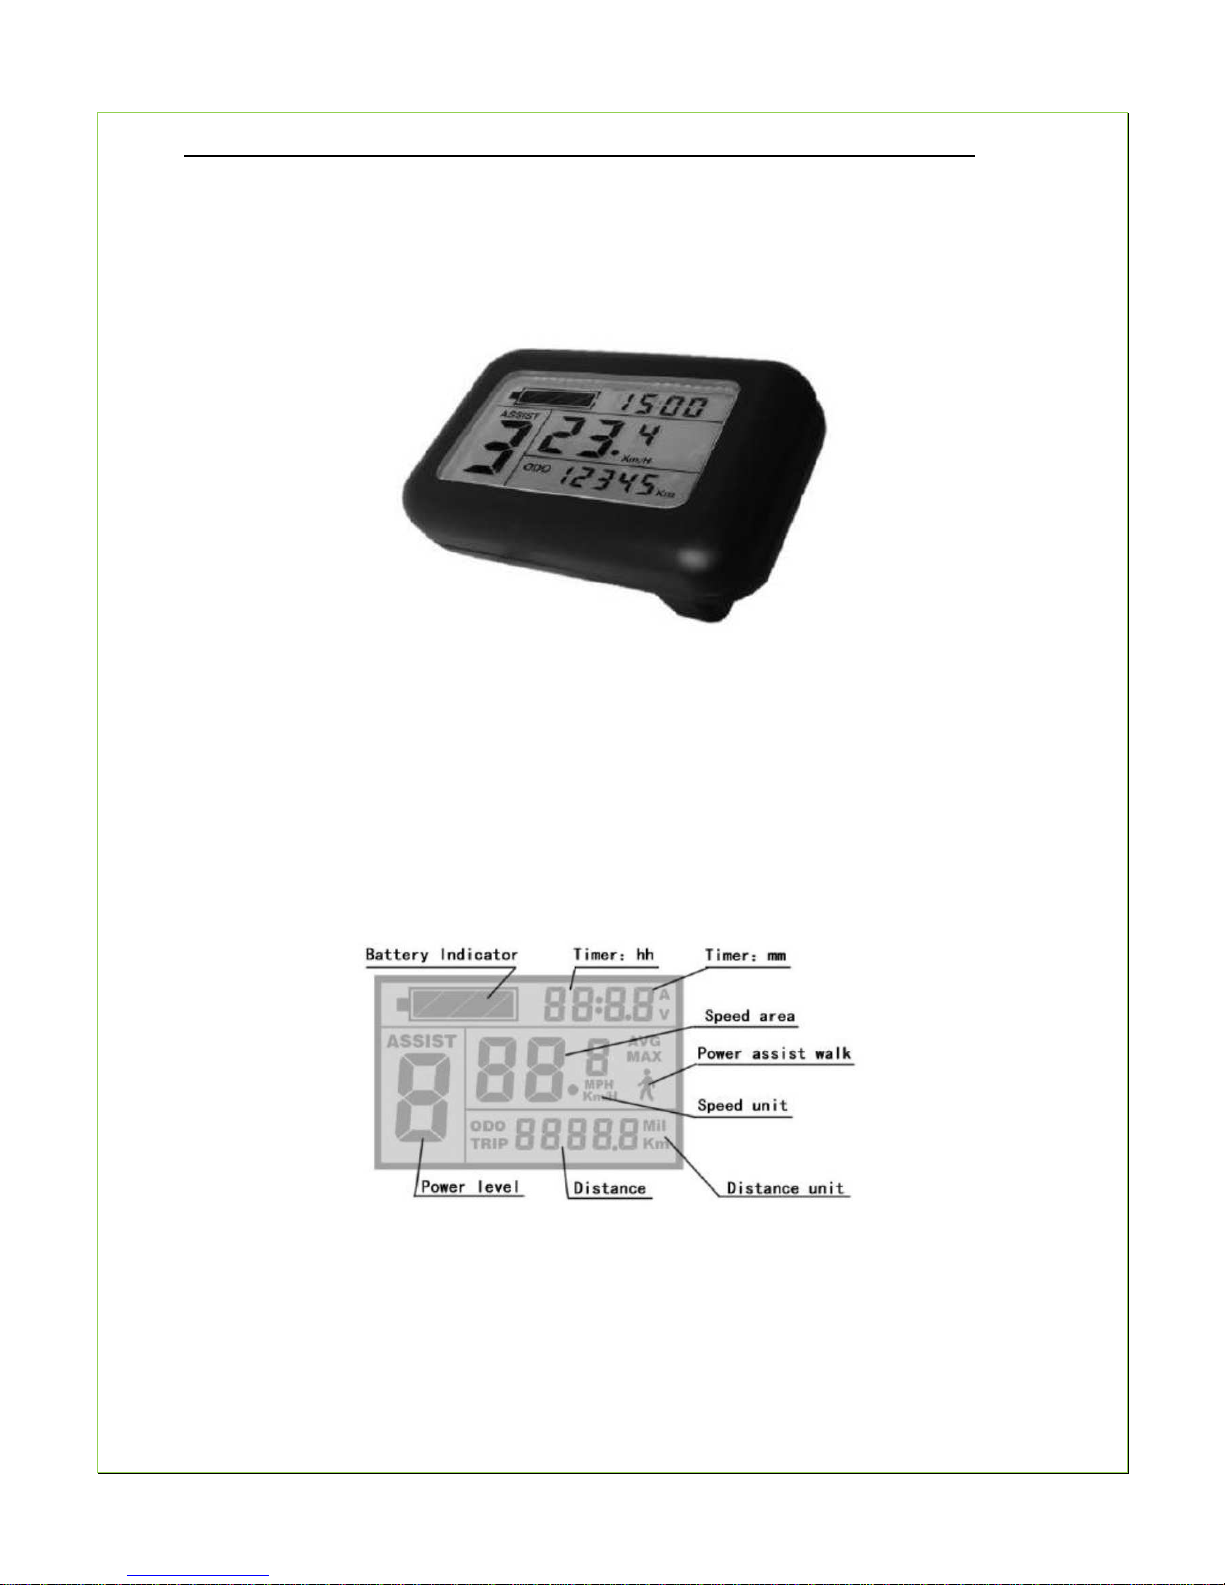
Your EAB comes with a state-of- the-art Pedal Assist System made by King Meter, your 5- level
PAS has an integrated battery level Indicator, odometer, speed Indicator and other functionality
described in this section.
Screen Function and User Settings
Settings include local time, top riding speed, metric or imperial setting, (Km/h or mph), wheel
size setting (18—28inch), LCD backlight brightness setting.
LCD screen displays battery capacity, time, motor power ratio, riding speed, riding distance,
6Km/h power assist walk, and malfunction code monitoring of the electronic control system.
Table of contents
Other Elite Bicycle manuals


