SSP TurnPro User manual
Indexing Tube Bender
Pocket Guide

NOTICE: This publication is an uncontrolled copy of a controlled docu-
ment. SSP has made every reasonable effort to ensure the accuracy
of the information contained in this publication, and is not to be held
liable in any manner for any mistakes, omissions, typographical and/
or printing errors.
IMPROPER SELECTION OR IMPROPER USE OF THE
PRODUCTS DESCRIBED HEREIN OR RELATED ITEMS
CAN CAUSE PERSONAL INJURY AND PROPERTY
DAMAGE.
It is the sole responsibility of the system designers and users to properly select
and use products for their specific applications. This document has been print-
ed for users with technical expertise as a reference for further investigation to
determine specific product needs relative to design requirements.
WARNING

1
Table of Contents
Table of Contents
Tube Bender Features ............................2
Selecng Tubing .....................................2
Tube Fing Installaon ..........................3
Sequenal Bend Method........................4
Oset Bends ...........................................6
Calculang Gain......................................7
Adjustment Gain Method.......................7
Using the Tube Bender ...........................9
Le Reference Bends..............................9
Right Reference Bends.........................12
Bends greater than 90°.........................10
Change in Plane and Direcon .............12
Troubleshoong ...................................14
2
TurnPro indexing tube benders are available in sizes to bend
1/4, 3/8, and 1/2 in. and 6, 8, 10, and 12 mm OD tubing. The
size of the tube bender is indicated on the face of the tube
bender near the alignment marks.
Selecng Tubing
Leak-ght connecons require high-quality tubing which
meets requirements for material hardness, roundness/
ovality, and wall thickness. The tables #1, 2, and 3 contain
suggested specicaons for fraconal and metric tubing.
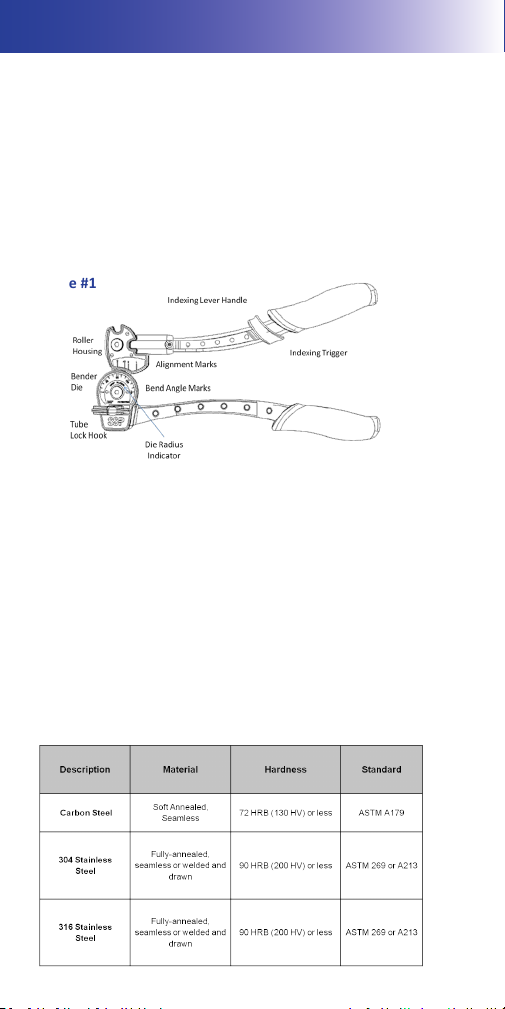
Tubing Hardness
Read this manual before using the
TurnPro Tube Bender.
Tube Bender Components
TurnPro Indexing Handle Tube Benders provide consistent,
high-quality bends in stainless steel, carbon steel, nickel al-
loys, and other tubing materials used with SSP tube ngs.
The components of the tube bender are named in Figure #1.
Figure #1
Table #1

3
Metric Tubing Wall Thickness
Tubing Installaon
When bending tubing, it is important to allow a sucient
length of straight tubing between the shoulder of the tube
ng and the bend. ( See Figure 2)
Tables #4 and #5 specify the minimum required lengths for
straight tubing leading into a tube ng for each tubing OD
and bend radius.
Figure #2
Table #2
Fraconal Tubing Wall Thickness
Table #3

4
Bend Allowance Tables
Bend Layouts
In this secon, you will learn methods to plan, measure, and
mark tubing.
Sequenal Bending Method
In this method, users measure, mark, then bend each leg of
the fabricaon in a sequence unl the project is completed.
The steps are:
1. Add the lengths or all secon together to calculate the
overall length of tubing required for the job.
2. Mark the starng point (reference mark) for your project.
Hint: Remember to make all marks completely around the
tube.
3. Measure from the reference mark to the vertex of the
rst bend. The vertex is the point where the center lines
of the two legs of the angle meet. (See Figure 3)
4. Bend the tube using the direcons on page 9.
Table #4
Table #5

5
5. Using the vertex of this bend as the reference market for
the next bend, repeat steps 3 and 4 to complete the next
bend.
6. For addional bends, use the vertex of the previous bend
as the reference mark, repeat steps 3 and 4 for the next
bend.
Example
A 90° bend 4 inches from the reference mark followed by a
45° bend with 4 inches between bends .
Example Steps (see Figure #3 above)
1. Place a reference mark at the start of the tube.
2. Make the bend mark 4 inches from the reference mark.
3. Bend the tube 90° (See the instrucons on page 9).
4. Make a second bend mark 4 in . from the center line of
the rst leg.
5. Mark a point on the reference mark indicang the outside
of the bend. (See Figure #4)
6. Using the direcons on page 11, bend the tubing 45°.
Figure #3
6
Tip
Mark the outside of the
bend to make the next bend
easier to align.
Figure #4
Figure #5
Table #6
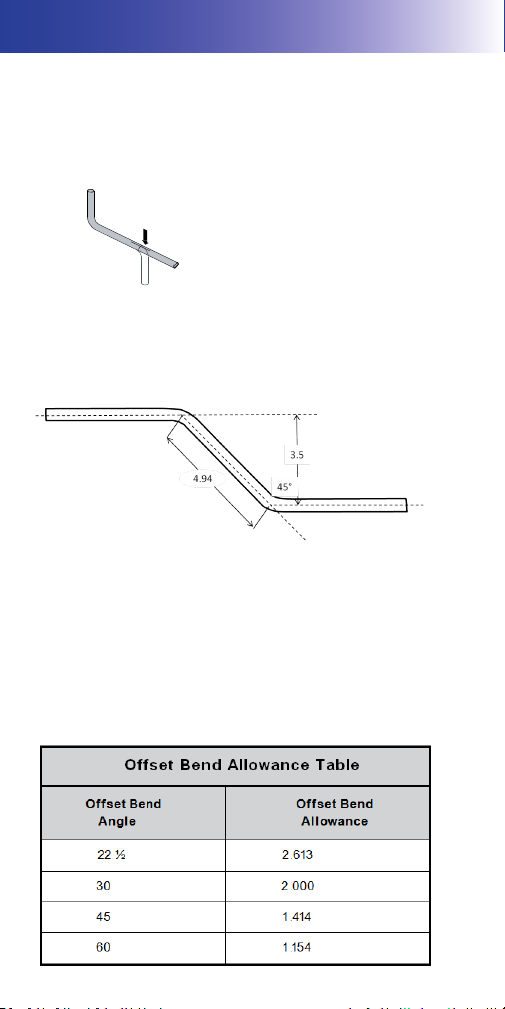
Laying Out Oset Bends
Oset bends change the centerline of the tubing run to
avoid an obstrucon.
To determine the distand between bend marks in an oset:
1. Determine the oset angle and locate it in table #6.
2. Mulply the oset bend allowance from table #6 by the
oset amount.
3. Use the oset calculaon as the distance between the
marks.
7
Example
Calucate the vertexes for the diagram below for 1/4 in. tube
bender with a 9/16 in. bend radius.
Figure #7
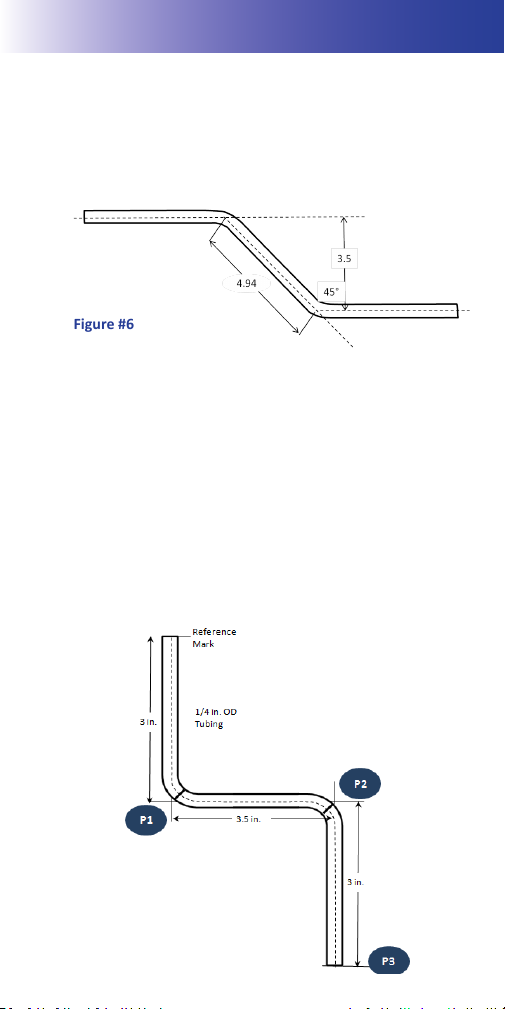
Figure #6
Example
Oset bend angle (E) 45°
Oset Dimension (O) 3.50 in .
3.5 x1 .414 = 4.94 in. or approximately 5 in.
Adjustment (Gain) Method
The Adjustment or Gain Method measures and marks the
enre layout for a project prior to bending using adjustment
or gain factors. Gain is the amount that tubing stretches as it
bends. See the adjustment tables to determine the amount
of gain for each tube OD, bend radius and bend angle.

8
Adjust Method Example Steps (refer to Figure #7)
1. Mark the tubing for the rst vertex
P1= 3 in.
2. Calculate the second vertex mark by adding the second
leg to the rst then subtracng gain factor for the rst
bend. Use Table #7 and 8 to nd the gain factor. At the
top of the table locate the tube OD and bend radius, then
read down to the bend angle to nd the gain factor.
P2 = P1 + 3.5 in. – 5/16 in. adjustment = 6 3/16 in.
3. Follow the same procedure to caluclate and mark the
second bend.
P3 = P2 + 3 in. – 5/16 in. adjustment = 8 7/8 in.
8 7/8 in. is the total length of tube needed.
Fraconal Gain Adjustments
Table #7

9
Metric Adjustment Calculaons
Using the Tube Bender
Le Reference Bends
90° Bends
1. Swing the indexing handle up so it is above the die.
2. Open the tube lock hook.
3. Place the tube in the groove of the bender die with the
reference mark to the le of the tube lock hook.
4. Close the tube lock hook over the tube just enough to
hold the tube in place. This restricts movement of the
tube during inial posioning, but allows for addional
alignment
5. Carefully lower the indexing handle unl the rollers rest
gently on the tube.
6. Align the zero alignment mark with the zero angle
mark.
Table #8
10
Bend Angles Greater Than 90°
1. Follow the procedure above to create a 90° bend.
2. Pull the red indexing trigger toward the grip unl the
handle releases then swing the handle up unl it locks
into the new posion. (See Figure# 11)
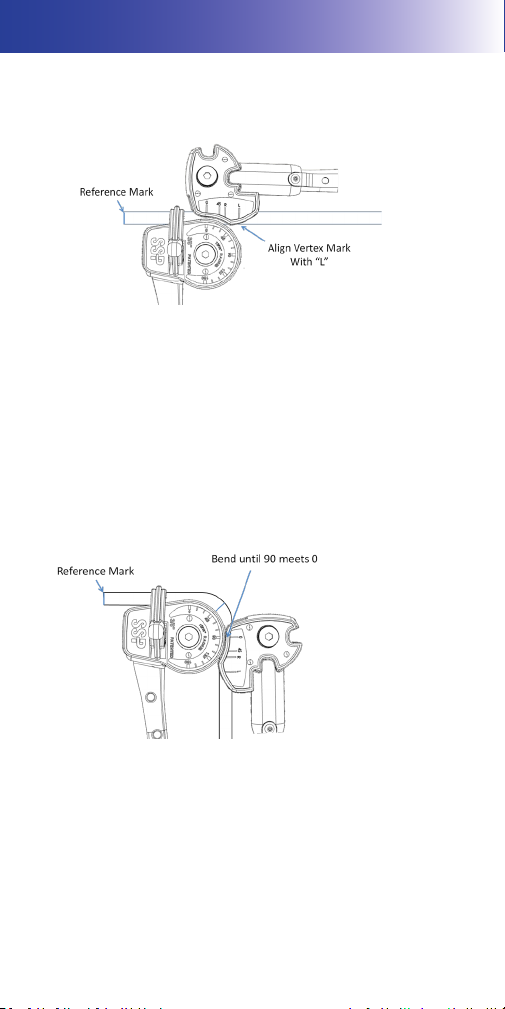
7. Align the vertex mark with the alignment mark that
corresponds to the bend angle. For 90° bends align the
vertex mark under the "L" as shown in Figure #8.
8. Push the tube latch rmly over the tube to secure the
tube in the bender die. Note: Excessive pressure on the
tube latch may damage so tubing.
9. Pull the indexing handle down unl the 0 reaches the
desired bend angle. Relax the pressure on the handle and
check the angle. In many cases, the tubing will spring
back 2-3 degrees. It might be necessary to bend the tube
slightly past the planned angle to compensate for spring
back.
Figure #8
Figure #9

11
3. Pull the handle down unl the 0 alignment mark meets
the desired angle mark. Note: You might have to press 2
or 3 degrees past your target angle to compensate for
spring back. (See Figure# 12)
Bend Angles Less than 90°
Making bends less than 90° is smililar to making 90° bends
except for the setup. For example, when making a 45° bend,
the vertex is aligned under the 45° alignment mark.
Figure #10
Figure #11
Figure #12

12
Right Reference Bends
Right reference bend are made with the reference mark to
the right of the bender die. The process is similar to making
left reference bends, except that the "R" alignment mark is
used instead of the "L" for 90° bends. (Figure #14)
Figure #14
For other angles less than 90° estimate where the alignment
mark should be then align the vertex mark on the tubing
under that alignment mark. For example, an arrow in Figure
13 indicate where the vertex is aligned for a 30° bend.
Figure #13

13
To make the bend on a new plane, rotate the tubing to angle
for the new plane. (Figure #16)
Once it is aligned, bend the tube to the desired angle. (Figure
#17)
Figure #16
Figure #17
Changes In Plane and Direcon
When making a bend on a new plane or a new direcon, it is
helpful to think of a protractor mounted on the tube bender
with the 0° at the straight up posion as shown. To make
our bend, set the tube in the bender such that the previous
leg is at the 0° posion. (Figure #15)
Figure #15

14
Troubleshooting


AUTHORIZED DISTRIBUTOR:
SSPTBPG-001-13A
©2013, SSP Fittings Corp.
8250 Boyle Pkwy
Twinsburg, OH 44087-2200
P: +1 330.425.4250
F: +1 330.425.8116
8
Table of contents
Other SSP Construction Equipment manuals


