St George 8500100 Series Installation guide

9 Function Electric Wall Ovens
Model No’s
8500100, 8500200 Series Single Oven With Pull Down Door
8600100, 8600200 Series Single Oven
8700100, 8700200 Series Double Oven
8800100, 8800200 Series Wide Oven
Operating and Care Instructions
oven_inb_care.indd 1 25/02/2008 15:22:01

2
Contents
Safety Notes 3
First Time Use And Quick Start Guide 4-5
Set The Clock To Manual Mode
Using The Mechanical Timer
Initial Heating
Clean The Oven
Basic Cooking
Oven Functions 6-8
Defrost
Normal Oven
Classic Bake
Fan Assist
Fan Forced
High Bake
Fan Grill
Grill
Using The Programmable Clock 9-12
A Quick Tour Of The Programmable Clock
Set The Time Of Day
Using The Timer
How to Set the Oven to Stop Automatically
How to Start And Stop The Oven Automatically
Using The Oven 13-14
Positioning The Shelves
The Roast Probe
Maintenance 15-24
Cleaning The Exterior
Maintaining The Shelf Guides
Cleaning The Inside Walls Of Your Oven and 'Steam Clean'
Removing And Replacing The Door Glass - Side Opening Doors
Removing And Replacing The Door Glass - Pull Down Doors
Removing And Replacing The Door - Pull Down Doors Only
Changing The Light Bulb
Cleaning The Roast Probe
Recipes 25-28
Beef Bourguignonne
Rich Christmas Cake
Quiche Lorraine
Roast Leg Of Lamb With Vegetables
Apple Tart
Pizza Crust
To Grill Fish
Grilled Chicken
Fluffy Omelette
Temperature Guide 29
Temperature Guide For Meats
Temperature Guide For Other Foods
Technical Specifications & Installation 30-31
Wiring Diagrams 32-35
oven_inb_care.indd 2 25/02/2008 15:22:17

3
Safety Notes
This appliance is not intended for use by young children or infirm persons unless they are
being adequately supervised by a responsible person to ensure that they can use the
appliance safely.
Young children should be supervised to ensure they do not play with the appliance.
During use the appliance becomes hot. Care should be taken to avoid touching heating
elements inside the oven.
WARNING: Accessible parts may become hot during use. The oven becomes very hot
and retains its heat for some time after it has been switched off. To avoid burns and scalds
children should be kept away.
Children should never be allowed to sit or stand on any part of the appliance.
Children should never be left alone or unattended in the area where the appliance is in use.
Use this appliance only for its intended use. Never use this appliance for warming or heating
the surrounding room, for drying clothes, textiles or other items.
Do not place combustible materials or products on or near the appliance. Do not use or
store aerosol cans near your oven.
Use only dry, heat resistant oven mitts when handling items in the oven. Do not allow oven
mitts to touch hot heating elements. Using moist or damp mitts may result in burns from
steam. The use of a towel or other bulky cloth when handling hot cooking utensils, is not
recommended.
Loose fitting, hanging or highly flammable garments should never be worn whilst using the
appliance. Wear appropriate apparel.
The oven must be switched off before removing the fan guard. After cleaning, the guard
must be replaced in accordance with these instructions.
Only use the temperature probe supplied with this oven.
A steam cleaner is not to be used for cleaning this oven.
Do not use water on grease or oil fires. Smother the flames using a foam or dry chemical
The images in this manual are for illustrative purposes only. Due to constant improvement,
SGA wish to advise that at any time there may be changes to the product that may not be
reflected in this booklet.
•
•
•
•
•
•
•
•
•
•
•
•
•
•
!
Recipes on pages 23-26 are all © The Margaret Fulton Cookbook.
Colour photographs are © Geoff Lung, 2004
extinguisher.

4
First Time Use And Quick Start Guide
The purpose of this section is to get you using your oven to cook a meal with minimal delay. More
detailed instructions that will give you greater control of your oven are contained later.
It is important to clean your oven before preparing food for the first time. To avoid electrical
shock or burns, make sure the oven is turned off, and the oven has cooled down.
Use a damp cloth with warm water and a little detergent to wipe down all the internal surfaces
of the oven. Next, thoroughly wipe down the cleaned surfaces with a soft cloth and cold water
and then dry them with a clean, soft cloth to remove any remaining residue.
Clean The Oven
Before placing food in your oven for the first time, you will need to do an initial heating. The
elements in your oven have a fine oil film on them, applied to help protect the appliance during
shipping. You now need to burn off this fine oil film. You may notice some smoke and/or smell
when you do this, which is perfectly normal.
Ensure the oven is set for Manual operation, as explained above.
Select “High Bake” by turning the Mode control knob in either direction.
Turn the oven Temperature control in a clockwise direction to 180°C.
Keep the oven door closed and leave the oven on for about 1 hour, or until any smoke has
disappeared.
Now using the Mode control knob, select “Fan Grill”. Keep the oven door closed and leave
for a further 20 minutes or until any smoke has disappeared.
Turn oven off by returning the Temperature control and Mode control to the off position.
Wait till the oven has cooled down before proceeding.
1.
2.
3.
4.
5.
6.
7.
Initial Heating
When power is first connected to your oven: The time of day “(0:00)” and
“AUTO” will flash in the display. Simply press the “Reset” button under the
clock to automatically place the unit in manual mode so that you can
continue to use the oven.
Although not necessary at this stage, you may set the time of day. Refer to
“Using The Programmable Clock” for instructions on how to do this.
NOTE: With double oven models, the clock controls the upper oven only. The
lower oven must be turned on and off manually.
Set The Clock To Manual Mode (Electronic Timer Models Only)
12:05
To time your cooking: Turn the Timer knob in a clockwise direction to the
desired number of minutes, up to a maximum of 120 minutes (2 hours). You
should hear a faint ticking sound as the timer proceeds to wind itself back to
zero. When the timer reaches zero, the oven switches itself off. You can still
switch the oven off before the timer reaches zero by simply setting the Mode
and Temperature Controls to “OFF”.
Note: When using any mechanical timer, it is more accurate if you turn the
control knob slightly past the required number of minutes, and then turn it
back again to the desired setting.
The timer can be set to Manual: Turn the Timer knob to the Manual setting.
The timer will be deactivated, allowing you to turn the oven on and off as
you need.
Using The Mechanical Timer (Mechanical Timer Models Only)
10
100
90
120
TIMER
110
40
60
70
80
20
50
30
Manual
oven_inb_care.indd 4 25/02/2008 15:22:17

5
Basic Cooking
First Time Use And Quick Start Guide
Set The Temperature
Turn the Temperature control clockwise to the required temperature. Typical cooking
temperatures are:
Fruit cakes 130ºC - 150ºC
Meat 170ºC - 200ºC
Pastries 200ºC - 230ºC
Of course there are many exceptions, so you should consult specific recipes for actual
temperatures and times. A more complete time and temperature guide is included on
page 26 of this booklet for further reference.
•
•
•
Set The Cooking Mode
Light No heat or fan. Light only.
Defrost No heat, fan only.
Normal Oven Concealed bottom element plus outer top
element
Classic Bake Concealed bottom element only
Fan Assist Concealed bottom element, plus outer top
element, plus fan to circulate heat
Fan Forced Circular rear element, plus fan to circulate heat
High Bake Concealed bottom element plus circular rear
element plus fan
Fan Grill Inner top element plus rear fan to circulate heat.
Grill Inner top element
Where To Place Food In The Oven
Position food near the centre of the oven as much as possible.
When cooking several dishes at once, prevent dishes from touching each other or the
sides of the oven.
To allow heat to circulate, do not place dishes directly underneath each other - stagger
their positions if possible.
•
•
•
Grill
Defrost
Classic
Bake
Fan
Normal
Oven
Light
Grill
Fan
Fan
Forced
High
Bake
MODE
Assist
In all cooking modes, the light remains on.
General Hints
Some foods require the oven to be preheated. You should consult your own recipe references
Always place food as close to the centre of the oven as possible.
When cooking on more than one level, stagger the positions of the trays to allow for as much
free circulation of heat as possible.
Once cooking is finished and the oven is turned off, a good amount of heat will be retained
for a period of time. This heat can be used to dry foods such as bread crumbs or herbs, or to
keep food warm prior to serving.
WARNING: USE OF ALUMINIUM FOIL IN OVEN:Do NOT use aluminium foil on the floor or walls of
oven and do NOT place cookware on oven floor. This WILL cause damage to the oven due to
heat concentration. Damage resulting from such use is not covered under your warranty.
•
•
•
•
•
!
Steam Clean Automatic Steam Cleaning Cycle
before deciding whether or not to preheat your oven.

6
When To Use This Function
This function can be used to hygienically and effectively defrost all frozen
foods.
Food is defrosted effectively by the circulation of air, not by heat. The risk of
growing bacteria and over thawing is reduced. Foods will not start to cook as
sometimes happens when using a microwave to defrost.
Helpful Hints
This method of defrosting can be used for any type of food, but works best
for meat, sh llets and delicate foods such as, cream cheesecakes, cakes
with cream lling and icing or frosting.
The volume and weight of the food will determine the time it will take for
foods to defrost. As a general rule, the approximate time for defrosting
meat is 15-20 minutes per kilogramme.
Place the food towards the centre of the oven. This will speed up the
defrosting time.
Be sure to check your food whilst it is defrosting. Leaving the food in the
oven for longer than is needed may cause the food to spoil. Once the
food is defrosted, remove it from the oven and place it into the refrigerator
until needed.
•
•
•
•
Oven Cooking Functions
Defrost
No heat is
applied in this
mode. The rear
fan is switched
on
Your St George oven has a number of different cooking functions. On these pages are the basic
functions contained in all models in this range. These cover the majority of cooking needs.
All functions are simple to use and can be set by turning the Mode control to the desired
setting.
Normal Oven
When To Use This Function
This function is most suitable when cooking a single item on one rack only, or for
foods that require long slow cooking.
Helpful Hints
• Best results will be achieved if the food is placed towards the centre of the oven.
•
Condensation: Cooking food which contains a good deal of moisture may
cause condensation to escape and run down the front of your oven. If this
happens simply wipe away the condensation from the front of your oven using
a soft cloth. Built up steam in the oven can be dangerous so stand clear and
take care when opening the oven door.
• When using water in your cooking, it is best to select “Fan Oven” mode which
allows the excess moisture to be circulated and evaporated during cooking.
Heat is provided
by the outer top
element and
the concealed
bottom element.
oven_inb_care.indd 6 25/02/2008 15:22:17

7
Fan Forced
When To Use This Function
This function is especially useful when cooking several trays of foods on
different shelves.
The fan distributes heat around the oven more evenly. Although cooking
temperatures are the same as in a conventional oven, cooking times tend to
be shorter, saving time and energy. Food also tends to cook more evenly.
Helpful Hints
It is a good idea to pre-heat the oven when cooking more than one dish
at a time.
When cooking on more than one level, stagger the positions of the trays to
allow for as much free circulation of heat as possible.
•
•
Heat comes from
the rear circular
element. The rear
fan operates to
circulate heat.
Oven Functions
Fan Assist
When To Use This Function
This function is most useful when cooking multiple dishes at the same time.
Heat will be evenly distributed throughout the oven. For example this mode will
allow one dish to have a well cooked base and the other to be well browned.
Helpful Hints
It is a good idea to pre-heat the oven when cooking more than one dish at a
time.
•
Heat is provided
by the outer top
element and the
concealed bottom
element. The rear
fan operates to
circulate heat.
Classic Bake
When To Use This Function
Choose this function when you want a well cooked base and minimal browning.
Helpful Hints
It is a good idea to pre-heat the oven when cooking more than one dish at a
time.
•
Heat is provided
by the concealed
bottom element
only.
oven_inb_care.indd 7 25/02/2008 15:22:18

8
High Bake
When To Use This Function
This function is most suitable when cooking foods that require a high heat
and a crisp base. High bake is also good for reheating.
Quick and consistent heat is evenly distributed throughout the oven. This
function is especially successful for pastry foods and pizza. Food retains a
crisp, dry texture on the outside.
Helpful Hints
It is a good idea to pre-heat the oven when cooking more than one dish
at a time.
•
Heat is provided
by the rear
element and
concealed bottom
element. The rear
fan operates to
circulate heat.
Oven Functions
Grill
Fan Grill
Heat comes from
the inner top
element. The rear
fan operates to
circulate heat.
Heat comes from
the inner top
element only.
When To Use This Function
Ideal for toasting or for grilling foods that only require 5 minutes or less cooking
time. When cooking foods which require longer cooking times or have a high
fat content, use the “Fan Grill” mode of cooking.
Helpful Hints
Grilling should be commenced from a cold oven only.
Close the oven door and be sure to keep it closed whilst cooking in “Grill”
mode. If the door is left open, discolouration of the panels may occur.
•
•
When To Use This Function
Suitable for grilling foods that require longer than 5 minutes, or for foods with a
high fat content.
A combination of direct heat from the grill element and circulated hot air by
the fan gives excellent cooking results. Food generally stays moist and has a
rotisserie style avour with a crunchy exterior and succulent centre. Cooking is
also more even, since all parts of the food receive similar heat energy.
Helpful Hints
Close the oven door and be sure to keep it closed whilst using “Fan Grill”. If
the door is left open, discolouration of the panels may occur.
Food should be placed as close as possible to the centre of the oven.
The use of large grill pans or roasting dishes can reduce the circulation
of air and cause moisture to condense in the lower sections of the oven.
Pre heating the oven for about 10 minutes using “Normal Oven” or “High
Bake” modes prior to fan grilling will help prevent this from happening.
•
•
•
oven_inb_care.indd 8 25/02/2008 15:22:19

9
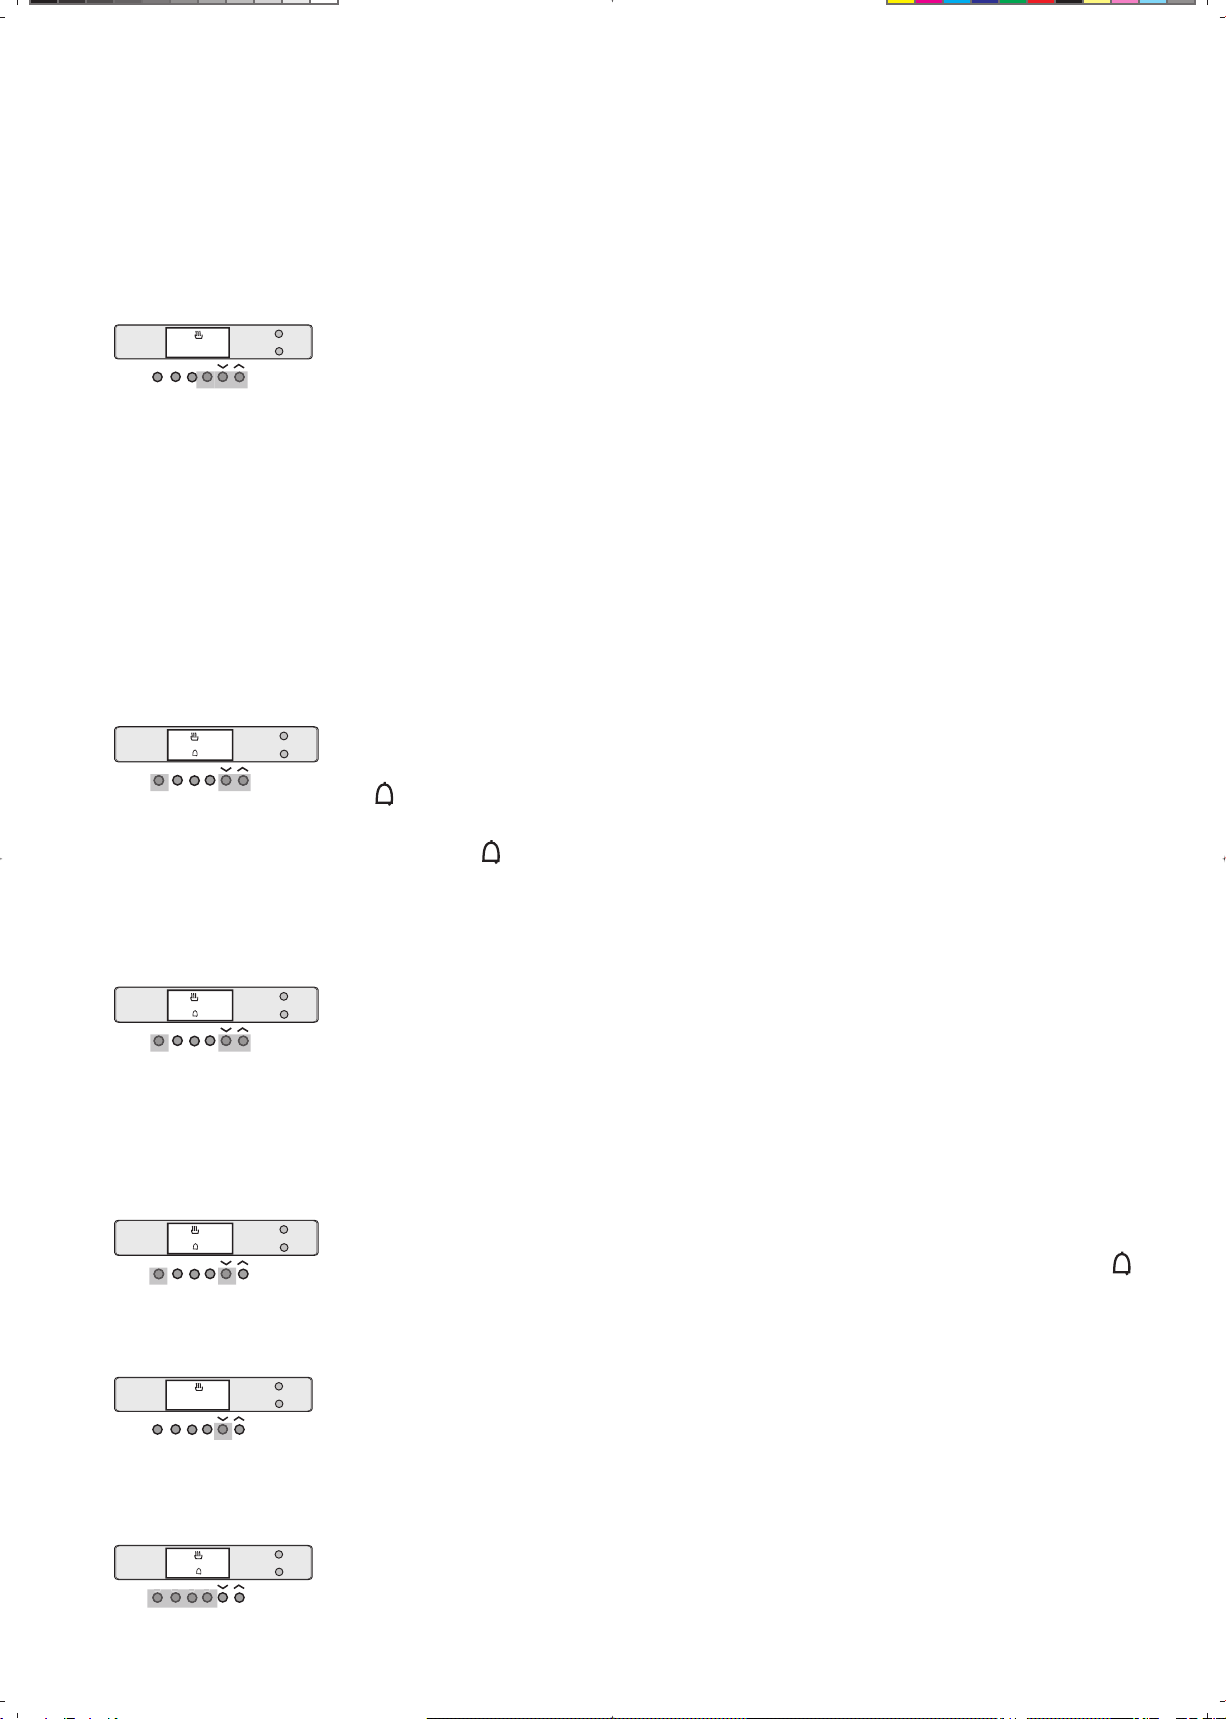
Using The Programmable Clock
Not only does the clock allow you to read the time of the day but it also allows you to
automatically time cooking. Other features include an alarm and a timer which can also be
used for other household activities.
A Quick Tour Of The Programmable Clock
Timer This is a normal kitchen timer. It sounds an alarm after a preset
number of minutes, but does not turn the oven on or off.
Cook This gives cooking duration in minutes.
Stop This button allows you to set the time of day that the oven
automatically switches off.
Reset Reset button clears any setting on the Cook or Stop buttons. It
does not clear the timer.
v and ^ These change the time or number of minutes either up or down.
Timer Cook Stop Reset
12 45
A
U
T
O.
Oven Indicates the oven is heating up. When the oven reaches its
preset temperature, the indicator light and the heating element
both switch off. As the oven loses heat, the elements and
indicator light switch on again until the temperature is restored.
Grill The lower light Indicates that the grill or fan grill is on.
Indicates that the oven has been set to automatically switch itself
off, using the Cook mode.
Indicates the timer is active.
Indicates the oven is set to work manually.
A
U
T
O
Mode Buttons
Indicator Lights - Single Oven Models
Clock Symbols
Mode Buttons
Indicator Lights
Oven Indicates the top oven is heating up. When the oven reaches its
preset temperature, the indicator light and the heating element
both switch off. As the oven loses heat, the elements and
indicator light switch on again until the temperature is restored.
Oven II The lower light performs an identical function for the lower oven.
Indicator Lights - Double Oven Models
10
Set The Time Of Day
Press the Reset button.
Immediately (within 5-10 seconds) press the “^” or “v” buttons until the
correct time is displayed.
When these buttons are pressed and released the time will change in 1
minute steps,
If you hold the buttons down, the time will change more rapidly.
When you complete this step, the new time setting takes effect after
approximately 5-10 seconds.
1.
2.
•
•
TCSR
12 45
Using The Timer
Using The Programmable Clock
This is an independent alarm that allows you to time various household activities. It does not affect the
operation of the oven. The timer sounds an alarm after the selected number of minutes.
Press the Timer button. The clock will display zero’s.
Press the “^” or “v” buttons till the desired number of minutes is displayed. The
symbol appears.
After about 5-10 seconds, the display will revert back to showing the time of day.
However, the symbol will remain to show that the timer is working.
After the preset number of minutes has elapsed, the alarm sounds. NOTE: this alarm
is to make you aware that time has elapsed. It does not switch the oven off.
1.
2.
To Set The Timer
TCSR
0 00
.
.
To Look At Or Change The Timer
If the timer is running and you wish to see how much time is left, or if you want to
increase or decrease the time remaining, you use a similar procedure to setting the
timer:
Press the Timer button. The clock will display the number of minutes remaining.
Press the “^” or “v” buttons till the desired number of minutes is displayed.
Once this is done, the display reverts back to showing the time of day,
1.
2.
TCSR
0 20
.
To Clear The Timer
Follow the steps above to change the timer setting down to zero.
Once this is done, the display reverts back to showing the time of day, and the
symbol will disappear.
TCS
R
0 00
.
To Change The Alarm Tone
You have a choice of 3 different alarm tones.
Make sure no other function is selected (such as Cook or Stop). Press the “v” button
to allow the different alarms to sound in turn. When you hear the alarm tone you
want, stop pressing the button. The last alarm you hear will be the one selected.
TCS
R
12 45
.
To Stop The Alarm
Press any of the 4 left hand buttons to stop the alarm. If you do not manually
cancel the alarm, it will automatically stop after approximately 1 hour.
TCSR
T
C
S
R
12 45
.
oven_inb_care.indd 10 25/02/2008 15:22:22

11
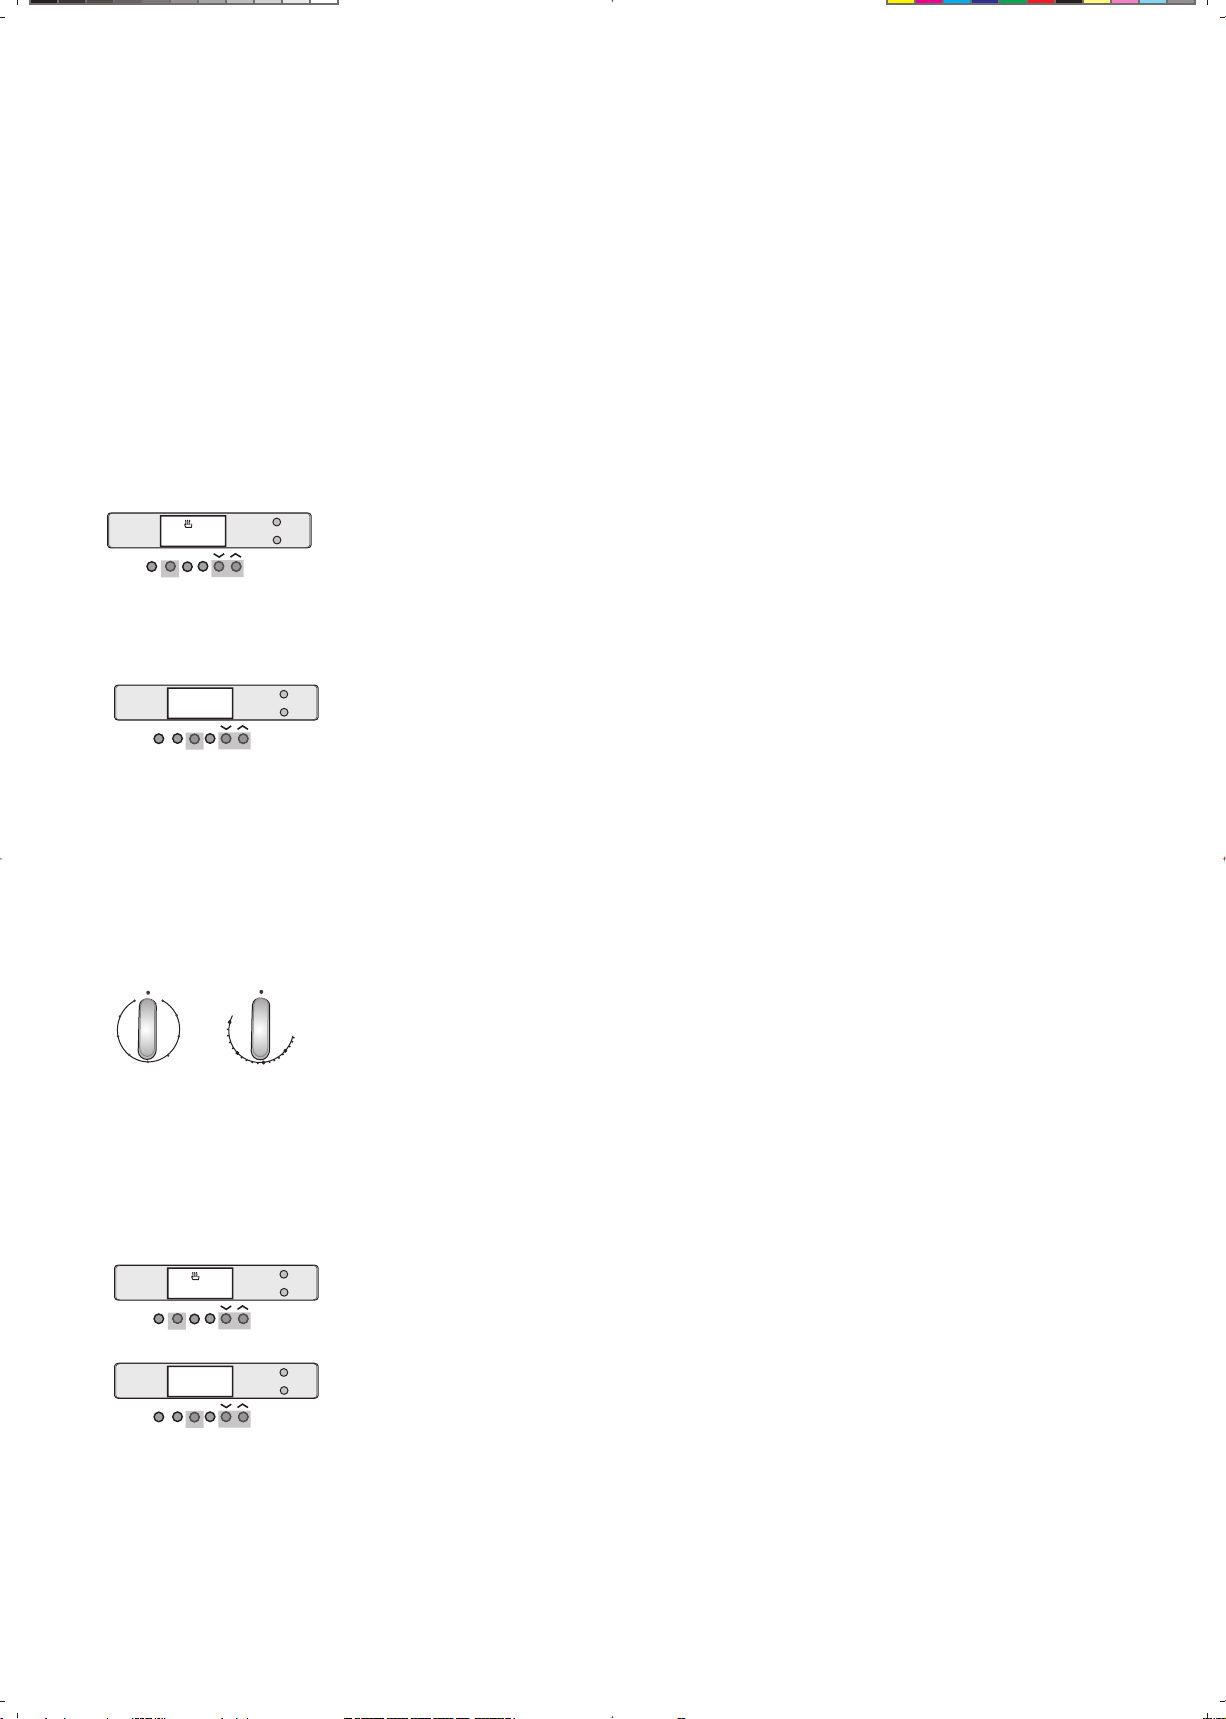
How to Set the Oven to Stop Automatically
Here you switch the oven on to your required function and temperature so that cooking starts
immediately, and then set the clock to switch off automatically after a preset number of
minutes.
NOTE: With double oven models, the clock controls the upper oven only. The lower oven must
be turned on and off manually.
Select the oven temperature and function. The oven will begin
working immediately.
Press the Cook button. The display will normally show 0.00.
Press the “^” or “v” buttons to select the number of minutes you want
the oven to stay on for.
The oven will continue working until the number of minutes has passed.
When the time has elapsed, the oven will switch itself off, and the
alarm will sound.
To Switch The Oven On
When The Time Has Elapsed...
Clear the alarm by pressing any of the 4 left hand buttons.
The auto indicator will start ashing. To clear the indicator, press
Reset. This returns the oven to manual operation.
The Auto indicator comes on, and will remain on until the oven
switches itself off.
The display will revert back to the time of day. If you wish to check
how many minutes are left, press the Cook button to display remaining
cooking time.
Return the temperature control and oven function selector to their off
positions.
Using The Programmable Clock
TCSR
T C S R
0 00
A
U
T
O
TCSR
12 45
TCS
R
0 40
A
U
T
O.
.
.
OVEN
MODE
Grill
Defrost
Classic
Bake
Fan
Normal
Oven
Light
Grill
Fan
Fan
Forced
High
Bake
Assist
250
200
150
100
70
OVEN
MODE
Grill
Defrost
Classic
Bake
Fan
Normal
Oven
Light
Grill
Fan
Fan
Forced
High
Bake
Assist
250
200
150
100
70
oven_inb_care.indd 11 25/02/2008 15:22:24if a
Note that the unit will not work in any cooking mode if a temperature
is not selected.
12
Using The Programmable Clock
How to Start And Stop The Oven Automatically
Here you set the cooking duration and the time which cooking must stop, so the oven automatically
calculates when to switch on and when to switch off.
NOTE: With double oven models, the clock controls the upper oven only. The lower oven must be
turned on and off manually.
Select the oven temperature and function.
Press the Cook button to select the cooking time. As soon as you press the
Cook button the display will show 0.00.
Press the “^” or “v” buttons to select the number of minutes you want the
oven to stay on for. The Auto indicator light will come on.
To Set The Start And Stop Time
Press the Stop button to give the time of day when you want cooking to stop.
As soon as you press the Stop button the display will show a time equal to the
current time plus cooking duration. (For example, if the current time of day is
9:40, and cooking duration is 40 minutes, the display will read 10:20.)
Press the “^” and “v” buttons to give the time of day that you want cooking
to finish.
For example, if you want cooking to finish at 12:30 instead of 10:20, press the
“^” button till 12:30 is chosen.
NOTE: if you try to set a time that is less than the current time plus cooking
duration, the alarm will sound.
The oven will calculate the proper time to switch on and off. In our example,
the oven will switch on at 11:50, stay on for 40 minutes and switch off at 12:30.
The alarm will also sound at this time. Clear the alarm and reset the oven to
manual mode as explained in previous sections.
TCSR
0 40
A
U
T
O.
TCSR
10 20
A
U
T
O.
You cannot set a longer cooking time than the switch off time will allow. This is a
common sense rule.
For example, if the time is now 9:15, and you set a switch off time of 9:45, the
longest possible cooking duration is 30 minutes. If you try to set a time longer than
this, the alarm will sound. To fix the problem, either reduce the cooking duration, or
set a later switch off time.
To Change The Settings
It is possible to change the settings during cooking or while the oven is waiting to switch on.
To change the cooking duration, press the Cook button. The display will show
the remaining number of minutes to cook. Use the “^” and “v” buttons to make
changes.
To change the switch off time, press the Stop button. The display should show the
time that the oven is currently set to switch off. Use the “^” and “v” buttons to
make changes.
TCSR
0 35
A
U
T
O.
TCSR
12.45
A
U
T
O.
OVEN
MODE
Grill
Defrost
Classic
Bake
Fan
Normal
Oven
Light
Grill
Fan
Fan
Forced
High
Bake
Assist
250
200
150
100
70
oven_inb_care.indd 12 25/02/2008 15:22:25

13
The baking trays provided are
removed and replaced similarly
to shelves. The tray is positioned
between the two wire guides
and slide all the way into the
oven cavity. The tray also has
two notches or bumps on the
side edges to prevent the tray
from accidentally being pulled
out too far. Orient the tray so
that the notches are closer to
the back of the oven.
Some models also have a wire roast rack which fits into the enamel tray. This allows food to rest
on the wire, and for cooking juices to collect in the tray below.
Insert the shelves into the shelf guides with the raised rear wire rail towards the back of the
oven as shown in the illustration.
The shelves slide neatly between the wire guide rails. The wire prong hooks underneath the
lower guide rail.
There is a bump underneath both sides of the shelves towards the back. This helps to prevent
the shelf from being accidentally pulled out too far. When replacing the shelves, you need
to ease the bumps over the guides.
Positioning The Shelves
Using The Oven
Baking Trays
prong goes
under shelf
guide rail
Wire Shelves
Telescopic Sliders
This range of St George ovens come fitted with telescopic
Sliders. The baking tray sits on the sliding arms, allowing
the tray to be pulled forward more easily.
When placing the tray on the slider arms, ensure the tray
sits securely between the vertical tabs.
oven_inb_care.indd 13 25/02/2008 15:22:25

14
Using The Oven
The Roast Probe
The roast probe is inserted into the fleshiest part of a meat joint and plugged
into the socket in the oven compartment. The oven automatically turns off
when the temperature of the meat joint reaches your pre-set temperature
providing a carefree and simple method of cooking roasts.
WARNING: This mode of cooking is suitable only for Normal Oven,
Classic Bake, Fan Assist, Fan Forced or High Bake modes. Use of
the probe sensor in either Grill or Fan Grill modes may damage
the probe.
WARNING: DO NOT immerse the probe in water.
Using The Roast Probe
Plug The Roast Probe Into The Oven Socket
Insert the probe into the socket on the left hand wall. Once the
probe is plugged in, the timer will stop displaying current time.
Instead, the display will show two temperatures:
The left hand reading is the current probe temperature
The right hand reading is the pre-set temperature. When you
plug the probe into the socket, this automatically sets itself to
80ºC.
To Change The Preset Temperature
Use the v and ^ buttons to vary the temperature up and down. Although you can set the
temperature anywhere between 0ºC and 99ºC, the probe is accurate only up to 85ºC.
Insert The Probe Into The Roast
The tip of the probe must be placed into the fleshiest part of the meat joint to accurately sense the
meat temperature. Take note of the following:
The probe should not be allowed to touch or rest against bone or fat as these will reach different
temperatures than the flesh of the meat and may give inaccurate results.
When cooking loin or leg roasts, insert the probe from the round bone end.
If cooking thin or small roasts, insert the probe at an angle so that the meat supports it, with the tip
in the centre of the meat.
Do not remove the probe from the meat until the cooking process is complete.
When The Pre-Set Temperature Is Reached
When the roast probe senses the internal temperature of the meat has reached the pre-set
temperature, the alarm will sound and the oven will automatically turn off.
The alarm can be cancelled by pressing any of the 4 left-hand buttons. The alarm will also self cancel
after a few minutes.
Check the food. If cooking is complete, remove the probe from its socket and turn all controls off.
The digital display will revert to showing the time of day.
To Interrupt Roast Probe Cooking
To cancel the roast probe function, simply remove the roast probe from its socket (taking care if the
oven is hot).
Cleaning The Roast Probe
The probe should be cleaned after each use. See the Maintenance section later in this manual.
•
•
•
•
•
•
oven_inb_care.indd 14 25/02/2008 15:22:35

15
Using a warm, damp, non abrasive cloth, wipe down the control
panel, handles, glass, stainless steel and enamel surfaces.
Normal stains can be removed by wiping them with a clean cloth
soaked in soapy water before the spill becomes cold or dries up.
More stubborn stains can be removed by soaking them in hot
soapy water. Mild detergents may be used safely on all the
exterior surfaces. Never use oven cleaners, caustic or abrasive
cleaners on any exterior surfaces.
When cleaning surfaces which have a brushed stainless steel finish, take care to wipe in the
same direction as the grain.
After cleaning make sure that all surfaces are rinsed and wiped down with a clean soft cloth.
•
•
•
•
•
Maintenance
Cleaning The Exterior
Maintaining The Shelf Guides
Undo the shelf locking
screw as shown in the
magnified inset.
Remove the shelf guide
by carefully pulling the
guide out of the two
holes in the side wall
first, and then out of the
two holes in the back
wall.
The two shelf guides on the side walls are easily removable for cleaning.
To replace the guide, push the two prongs back
into the holes in the rear wall, then the two holes
in the side wall. To replace the locking screw, you
may need to lift the shelf guide and catalytic liner
slightly up to align with the hole in the side wall.
First undo
locking screw
Pull out from
side wall
Pull out from
rear wall
Changing The Telescopic Slide Position
You can change the level of the telescopic sliders to allow
for deeper baking dishes.
First remove the shelf guides as explained above. Looking
at the rear of the shelf guide, you will see two small brackets
which secure the sliders. Lay the shelf guide down, undo
the nuts to remove the brackets. The telescopic slider will be
released.
Move the slider to a different level, then replace the
brackets and nuts. Ensure when replacing the slider that the
end of the slider is flush with the shelf guide, and the vertical
tabs point upwards when the shelf guide is back rack is in
position.
Slider ush
with shelf
guide
To maintain telescopic slides operating smoothly they must be periodically lubricated with a “food
safe” grease such as ‘HUSKEY HVS-100 Silicone Grease’ or equivalent. Siezed slides will not be
covered under the manufacturer’s warranty.
oven_inb_care.indd 15 25/02/2008 15:22:38

61
ecnan
et
n
iaM
nevOruoYfOsllaWe
d
isnIehT
gn
i
n
a
elC
noit
c
n
uFnaelC
ma
e
tS
e
hTgni
s
U
0020088
,0
0
2007
8
,
0
0200
68
,
00
2
0
0
58:sledoM
e
lCma
e
t
S na uFasi ll corpcitamotuAy se as ll uoygn
i
wo
u
ot es wopeht re elcrofmaetsfo na ogni ev tnin re oi .sr
elC
m
aetS
Ana o ev si
n er lbasi
ng
oc eni
a
mow
t
yb
utaef e
r elCmaetS“:s na plortnocehtnoedoM” na le
lnwohs( fe ,)t na laicepsd erg uoloc
y er ma
e
tsd er esael
h
t
n
o
l
e
mane e disni e llaw s h
tfo e o ev .n
o
r
uoyfI ev
nah elCmaetSehts na uf cn wuoy,noit li l
nie
b
fo
e
saee
ht
yo
j
n
egelcotel
b
a na nie
ht
is awe
d ll s
oe
ht
f
oev u
nis wopehtgn re a
etSfo .
msi
s
ih
T c
a ieh e
vd
taw
g
ni
t
aer
c
y
b re o
e
ht
e
disn
i
r
uo
p
a
v ev i
hw
nhc
n
e
h
t
ni
st
s
iss
a p
es doofgni
t
ara ser awnevomorfeudi ll s.nO ce
uo
pa
v
e
ht sr er a hc anelaice
p
seh
tot
h
guo
r
ht e
m t
i,l
a,e
u
d
i
s
e
reht
n
o
d
loh
s
ti
s
e
s
a
e
lery
l
l
a
re
t
il
neht ll misarof
g
n
i
wo lp we ipi evaelotssecorpffogn
aw
nev
ol
l es
i
hT
.
nae
lcs il ro
fdee
n
eh
t
s
e
tanim a
h h
sr u
r
c
s b
bg
ni na d hc me i ac n
ik
a
m,
sl g
e
l
c na a
cisyhp
gn
ill y e
re
isa na u
md hc m
o oriv
n
eer e
matn ll y rf .yldnei
To :nevo
r
uo
y
na
e
l
C
m
ae
t
S
t
k
c
e
hC a
h l
otelba
e
ra
u
o
yt oo htnes s
eerc rot
s
w vome eh
t
e hs le rf oirpskca r
m
aetSot
e
l
Cn
ad
lo
c
eblli
w
nevoehtsag
n
i na d fas atsujsisihT.hcuotote hc k
c
e. tonoD
kca
r
ehtevomer as .egatssih
t
t
Flli na e
lc
it
pece
ref
a
s
nevo ht
iw r
t
a
re
t
awfo
L1
–
L½ oo t
m m
epre u
t
ae
r
dna lp c
ae
no
n
e
vo
e
htf
o
flehs
e
ld
d
i
m
eht .o
e
G.tSeht
esu
y
a
m
u
o
Y g
ri
y
ar
t
g
ni
kab
ecn hti
w
d
e
d
ul
o
ru
o
y e
v e
lc
e
ht
sA.reta
weht
n
i
atno
co
t
n na u
f
gni c
nt
u
noit il
i len
afe
h
t
s
e
s e
me s
i
t
itn
tropm
ina lp
ot
tc
ahtn
o
re
n
i
at
no
c
e
ht
e e dronifle
hs
elddi
m r
e b
n
ia
tb
oot se
tse
rlu st .
i
w
s
i
h
T ll a l
lid
ssap
otria
gn
ita
l
u
cric
e
h
t
w
o er o
yl
t
cre
vtaw
e
ht re n
is
i
mi
x
am
suht, g
v
e pa .
noitaro
t
e
r
u
snE a
h
eras
ya
r
t
g
n
i
ka
brehto
l
la
te
rwyehtsad
e
vom lli mi
s
lp dni
hy re e
rf e
o
n
o
ita
luc
r
ic f
r
ia n
a n
im
aetsd i
s oe
h
te
de
v.n
roodnevoehteso
l
C na M“eht
nrutd DO tiws”E hc elCmaetS“ehtotbonk na ”
u
fc
n.
n
o
it
wereh
T
:
etoN l
li tfayal
ed
d
no
c
e
s3-2t
hgi
ls
a
e
b r
et
f
A
.b
onkeh
t
n
ru
t
u
oy re eht
,
siht
nevo i
lnonrutlliwthg na 1ehtd -uFruoh ll iwelcyccit
a
motuAy ll b ge ehttahtetoN.ni
ire
m
it i
s
lan
r
etn n
aacd nn oneese
b
to r
.
draeh
MORFD
E
TRATS
EBT
S
UME
L
CYCNAEL
C
MAETS:ETON H
WREVEN.DLOCSINEVOEHTNE
.
T
OHSINEVO
EHTFIGNINAELCMA
E
TSTRATS
!

71
e
c
n
an
et
n
i
a
M
wnevoehT lli itamot
u
awon a
c ocehtotetalugeryll rr ttce mre p re uta er cen se otyras
cer ”NEVO“ehtnr
u
totdeenonsie
r
e
hT.maetseht
e
ta nk atabo ll wti, lli ah ev o
n
.er
ut
are
pme
tehtn
o
tce
f
fe
a
retfA p
piwel
c
ycg
nim
aet
s
e
ht
,ru
oh
1
y
letamix
o
rl
l w
uo
Y.e
te
lpm
oceb li
n
eh
w
wo
n
k
l
ebete
lpm
oc
s
it
ia
c u e
s
n
e
v
oeht i
liw
t
hg ll i
t
amo
t
uaffo
nru
t
ac l
lA
.
y l
l h
to re p
o
r
e
s
noita
a
e
c
lliw ae
s.em
i
tem
a
seht
t
tiws”EDOM“eh
t
nru
Thc b
kca i
t
re
v
eh
t
ot ac FFO“l p” .noit
i
so
tu
ni
m01woll
Ase oehtrof
e
v c
otn oo
l ls dnaroodnevoehtnep
o
neht,ylth
gi omer ev
.
re
taw
htiwel
ci
tpecer
eh
t
R me o e
v ht s
e ard
n
a
fl
e
h kc t
os
s a
hwuoy
tlli be a lb e ot e yl
i
sa c
ca s
e h
t
s ee i
tn ser u f
reca
t
ninev
o
f
ore ehtee
S
.r
o
ier roflaunamehtfonoi
t
ces
tn
ave
l o
m ateder li odot
w
ohnos
.si
h
t
ypa
o
s
m
r
a
wem
osgnisU w
nar
e
ta d h
t
olc
tfos
a,c
or
pe
e w
o
t
d pi eh
t e
e d
i
sn
ieri
tn e
llaw
onevoehtfo f na ud
i
s
er
y e id
r
o tr .
rcsror
e
ruo
c
saesureveN pa w
s
i
h
tsare lli ser amadnitlu eg aneeh
t
ot em
l na
n
ad
ni rref e
l
croi na
gni ser elC
“
noi
t
ceseh
t
e
e
S.e
ru
tufehtni
t
l
una a
W
e
di
s
nI
ehTg
n
i ll s fO
u
o
Y Or ev n” bnoi
t
c
u
rtsniruoyni oo htruf
r
of
k re ated li .s
c
o
r
pg
n
imaets
eh
t
tlah
o
tediceduoyfI:etoN s
e t
a
s na mis,tniopy lp M“ehtnruty DO bonk”E
b kca uo
y
nehW.noitis
o
pffoeht
ot er -les ce elCmaetS“ehtt na uf” cn tnieht,noit re 1lan -ruoh
w
re
m
it l
l
i u
o
y
fI.tr
a
ts
eh
t
m
orfni
aga
n
ige
b
ah ev n
a
c ec ll de elCm
a
e
t
S
e
ht na a
,
elcyc
ll a
w
o
u
mini
m 1
m r
ofeb
e
tunim s
en
t
icele g gat
i i
aht
te
l
ot
n t
e i r
e
m.teser
o
eht,st
l
usertsebroF ev e
lc
e
b
tsumn na de er wsihT.yl
r
alug l
l
i usne er t a
hyalehtt re fo
a,nih
t
sni
a
me
r
e
udiser ll g
n
iw
o h
t ae
otmaetse is hguorhte
t
artene
p
y
lna c
der
e
hte
t
a
.le
manee
hth
tiwtc
ef
fe
gnisael
er
elc
m
a
ets
ehT na uf c
n e
lc
ro
f
yle
rup
si
n
o
i
tn
a soprupgni se n
d
luohstI.yln
o
eve suebr de
ae
t
sot m .sdo
o
fkooc
ro
TNATRO
P
MI –EHT
N
EP
O
TONOD O LIHWNEV TS EHT TS SIEL
C
YC
N
AELCMAE UR GNINN
w
re
taw
e
hT
:N
O
IT
UAC l
it
o
s
tohe
b
lk
ae ac e
r e
h
tot
no
roni
ks
ru
o
y
n
o
ti
l
l
ips
o
t
t
o
n
t
et
oN
.roodnevoe
h
tfossalg ah t eve r o
ynwo
r
iehtsahe
nse
rtsi cna taehote
n
ah o
eh
t
f
I
.
gnild ev sin t
sll
i eef t
sl oo
,hc
u
o
t
otuoyr
o
f
toh
l
p ti
l
itnu
t
i
a
wesae ah
s
co
old
e.
uoyro
fhg
u
o
n
e
T
N
A
T
RO
PM
I–E
L
BU
O
DA
F
O
ESACE
HT
N
I O
ANU
R
R
EVEN
,NEV T
SN
IEL
C
YCN
A
ELCM
A
E
EHTNIGNIK
O
OC
T
SL
IH
W
N
E
V
OE
NO O .RE
H
T
MORF
TITCETORPOTROSNESLAMREHTAHTIWDEPPIU
QE
SI
T
IUCRICREMITEH
T
-TNAT
R
OPMI
SAHRUOHENOEHTEROFEBFFOGNIHCTIWSTH
G
IL
NE
V
OEH
T
ECITON
U
OY
FI.EGAMADTAE
H
.T
NE
G
AECI
VR
E
SR
U
O
YTC
AT
N
O
C
,
D
E
S
PAL
E
*
*
*
*
!
!
!
!
!

18
(Note above the separate directions for catalytic panels)
The high quality vitreous enamel used in your St George oven has a hard durable finish which
is resistant to wear and discolouration and makes cleaning easy. However, to maintain the
appearance and durability of the finish, it is best to wipe off any spills or spatters immediately.
This can be done while the oven is still warm. Thoroughly wipe out your oven after each use.
Commercial oven cleaners may be used in a cool oven, but choose only the non-caustic
types and follow manufacturer’s instructions. Always avoid contact with elements, rubber
door seals and exterior surfaces. After cleaning be sure to thoroughly rinse and wipe down all
surfaces with a clean, soft cloth.
Remove any residue from the oven cleaner thoroughly to avoid corrosion of metal fifnishes.
Never use the oven to dry out oven cleaners as they can produce a highly corrosive
chemical reaction that will attack the enamel. Never allow any element or burner on the
appliance to be turned on (except the oven light) while there is oven cleaner in the oven
compartment.
For easier cleaning and access, the shelves and shelf guides can be lifted out as explained
earlier in this section. They can then be washed by hand or placed into a dishwasher for
cleaning.
Pull down doors only: When necessary the oven door may be removed for better access
while cleaning. (Refer to the relevant section for directions on the correct way to remove the
oven door.)
•
•
•
•
•
Cleaning Standard Enamel
Self cleaning panels cover the rear and side walls
and top of the oven cavity. They are coated in
a special, micro-porous catalytic enamel which
oxidises and gradually vapourises splashes of
grease and oil at cooking temperatures above
200°C. If the oven is not clean after cooking fatty
foods, operate the empty oven for 60 minutes
(max.) at maximum temperature to allow the
liners to vapourise any residue.
Occasionally the panels may need cleaning, or
you may need to access the side walls of the
oven. Never wash or clean self cleaning panels
with abrasive, acid, or alkaline products.
Removing And Replacing The Self-Cleaning
Catalytic Panels
Maintenance
IMPORTANT - SWITCH THE OVEN OFF COMPLETELY
BEFORE REMOVING THE REAR FAN GUARD.
To remove the panels, first remove the shelf guides
as explained earlier. Undo the panel locking screws from the rear fan cover, as shown. The
panels should now slide out quite readily.
To replace the panels, it will be easiest if you follow this procedure:
Put the side panels into position
Put the shelf guides into the holes in the rear panel. You will need to lift the side panels off
the floor of the oven for the holes to line up.
With the side panels already off the oven floor, put the rear fan cover in position, line up all
the holes and replace the two locking screws.
1.
2.
3.
!

19
Removing And Replacing The Door Glass
- SIDE OPENING DOORS
Maintenance
Your St George oven has a quadruple glazed door to keep the front surface as cool as possible.
The inside glass panels can be easily removed for quick and convenient cleaning. Once the
three removable glass panels have been removed, the remaining glass panel can be cleaned
on both sides.
Open the door and push in the two side
tabs, then lift the top trim.
1) Remove The Top Trim
2) Removing And Replacing The First Glass Panel
The first glass panel will simply slide up and out of the stainless steel brackets.
When replacing the glass panel, ensure the glass slides behind the middle bracket (which holds
the door latch) and into the two lower brackets. Note that the painted surface faces the front
of the oven, and the smooth glass surface faces the inside of the oven.
Push in the two
tabs
Glass slips behind
lower bracket
View from inside
of door
oven_inb_care.indd 17 25/02/2008 15:22:44

20
Maintenance
3) Removing And Replacing The Door Handle
Using a phillips head screwdriver, undo the two screws that hold the door handle in place.
Hold the glass while the handle is being removed to prevent it from dropping.
To replace the handle, remember to place the rubber washer closest to the glass panel, then
the large steel washer closest to the head of the screw.
The second and third glass panel can now be removed by easing the panels upwards.
When replacing the wider glass panel, Ease the panel behind the tabs on the side of the door.
The curved cutouts on the vertical edges of the glass panel line up with the large holes in the
door. Two of these holes are used for the black plastic door handle sleeves.
When replacing the narrower glass panel, ensure the glass sits neatly between the tabs on both
sides, top and bottom.
Cutouts in glass panel line up
with large holes in door
Removing And Replacing The Door Glass
- SIDE OPENING DOORS (continued)
4) Removing And Replacing The Inside Glass Panels
oven_inb_care.indd 18 25/02/2008 15:22:50
This manual suits for next models
7
Table of contents
Other St George Oven manuals


Popular Oven manuals by other brands


AEG
AEG BE2000000 user manual

Wolf
Wolf L Series SO30F Design guide

BALAY
BALAY 3HB568XP instruction manual

Smeg
Smeg ALFA341XM Instructions for installation and use

Whirlpool
Whirlpool AKG 65901 IX Instructions for use

VERDER
VERDER CARBOLITE GERO HTCR 4/28 Installation, operation and maintenance instructions