St George UEOM7 A User manual

Electric
MODEL:
UEOM7
A
&
WEOM7
A
Appliance
Operation
Manual
-
INCLUDING
INSTALLATION
AND
CLEANING
WELCOME
TO
ST
GEORGE
St George
is
a
proud
Australian
company
with
a
heritage
of
innovation
and
quality that
spans
almost
50
years.
Our
success
now
extends
to
markets
abroad
as
well
as
at
home,
confirming
our
reputation
at
the
forefront
of
appliance
excellence.
The
elegant
simplicity
of
St
George
designs,
combined
with
high
performance
features,
will
remain
contemporary
for
many years
to
come.
In
the
interests
of
product
innovation,
consumer
safety
and
continual
improvement, St
George
reserves the
right
to
change
accessories
and inclusions
and
alter
specificat
ions
without
notice.
I~~~~~~~~~
Electric
MODEL: UEOM7
A
&
WEOM7
A
Appliance
Operation
Manual
INCLUDING
INSTALLATION
AND
CLEANING

CONTENTS
1.
KNOWING YOUR
St
George
ELECTRIC
OVEN.........................................................................
4
1.1
Features
&
Benefits
of the
Appliance................................................................................
4
1.2
Cleaning Made
Simple.................................................................................................
4
1.3
Oven
Function
Modes.................................................................................................
4
1.4
Manual
&
Automatic
Settings.........................................................................................
4
1.5
Accessories..............................................................................................................
5
2.
USING
THE
APPLIANCE
FOR
THE
FIRST
TIME.........................................................................
6
3.
CONTROL
PANEL
OPERATION............................................................................................
7
Diagram
.......................................................................................................................
7
3.1
Setting
Up
...............................................................................................................
7
3.2
Setting
the
Time
of
Day................................................................................................
7
3.3
Manual
Operation
......................................................................................................
7
3.4
Setting
the
Alarm
Timer................................................................................................
8
3.5
Mode
Switch
............................................................................................................
9
3.6
Oven
Temperature
Control.............................................................................................
9
3.7
Grill
Control
.............................................................................................................
10

CONTENTS
4.
DESCRIPTION
OF
COOKING
MODES.....................................
..............................................
11
4.1
Defrost...................................................................................................................
11
4.2
Fan
Oven
................................................................................................................
11
4.3 Normal
Oven............................................................................................................1
1
4.4
Fan
Grill..
...............................................................................................................
11
4.5
Grill
.......................................................................................................................
11
4.6
Grilling
in
Lower
Compartment.......................................................................................
11
4.7
Automatic
Programmed
Cooking
....................................................................................
11
5.
COOKING
INSTRUCTIONS.................................................................................................
12
5.1
Preheating
...............................................................................................................
12
5.2
Defrost...................................................................................................................
13
5.3
Fan
Oven................................................................................................................
14
5.4
Normal
Oven
............................................................................................................
15
5.5
Fan
Grill
................................................................
........................... .....................
16
5.6
Grill
.......................................................................................................................
17
5.7
Grilling
in
Lower
Compartment
..........................
......................................
.....................
18
5.8
Automatic
Programmed Cooking
..........- ..........-
............................................................
19
5.8.1
Setting
a
Cooking
Duration Time
.................................................................................
20
5.8.2
Setting
Oven
to
Stop Automatically
..............................................................................
21
5.8.3
Setting
Oven
to Start
and
Stop
Automatically...
...........................................................
22
6.
TEMPERATURE
GUIDES............................................................................................
23,
24,
25
7.
HINTS
&
WARNING..........................................................................................................
26

CONTENTS
8.
CLEANING
&
MAINTENANCE
............................................................................................
27
8.1
Self
Clean
Oven
Liners..............................................................................................
27
8.2
Recommended
Cleansers...........................................................................................
27
8.3
Routine
.................................................................................................................
28
8.4
Heavy
Build-Up.......................................................................................................
30
8.5
Removing
Oven
Door
..............................................................................................
30,
31
8.6
Changing
the Light
Globe...........................................................................................
32
9.
TROUBLE SHOOTERS
&
SERVICE
CALL
CHECK.....................................................................
33
10.
INSTALLATION
DIAGRAMS
&
INSTRUCTIONS.........................................................................
34
10.1
Warnings...............................................................................................................
34
10.2
Measurement
Charts
(see
diagrams)
..............................................................................
34
10.3
Preparing
Cupboard Cavity
.........................................................................................
34
10.4
Providing
a
Suitable
Flue............................................................................................
40
10.5
Securing the
Appliance..............................................................................................
40
11.
ELECTRICAL
WIRING DIAGRAMS
&
INSTRUCTIONS
................................................................
41
1
1.1
Wiring Rules&
Warnings
............................................................................................
41
11.2
Electrical
Loads.......................................................................................................
41
11.3
Voltage
Supply Connection
.........................................................................................
41
11.4 Diagrams
..............................................................................................................
42
KNOWING
YOUR
ST
GEORGE
SINGLE
OVEN
AND/OR
WALL
OVEN
St
George
UEOM7
Single
Oven
&
WEOM7
Oven
with
Grill
1
KNOWING
YOUR
ST
GEORGE
SINGLE
OVEN
AND/OR
WALL
OVEN
Your
new
St
George
Appliance
will
serve
you
for
many years
if
you
follow
the
guidelines within
this
booklet.
The
guidelines
assist
you
in
achieving
the
"Best
Cooking
Results"
from
your
appliance
together
with
simple
cleaning
recommendations.
1.1
Features
&
Benefits
of
the
Appliance
Sleek
styling
and
a
range
of
cooking options
is
combined
in
your
St
George
Single
and
Wall
Oven.
The
extra
large
-
93
litre
-
oven
allows you to
cook
complete
meals
for
the
whole
family.
The
control
panel
features
a
24
hour
electronic
clock
and
an
independent
timer,
useful
for timing household
activities.
There
is a
sensor
in
the
rear
wall
of
the
ovens.
If
overheating
occurs
(at
approx.
300'C),
the
safety shut
down
mechanism
switches
off
the
element.
1.2
Cleaning Made
Simple
Cleaning the
oven
is
made
simple
with the
St
George
high
quality
vitreous
enamel oven
interior
liner.
The
oven
and
grill
doors
easily
lift
off
for better
access
while cleaning,
as
do
the
shelves
and
shelf
side
assemblies.
In
addition
an
Optional
Self Clean Oven
Liner
Kit
is
available
as an
accessory
which
catalyses
the
fats
so
that
it
burns
and
flakes
to
the
oven
floor.
A
quick
brush
out
when
the oven
is
cool
is
all
that's
required.
1.3
Oven
Function
Modes
The
Multifunction
modes
offered
with
this
Oven
are:-
Normal
Cooking
Fan
Forced
Fan
Grilling
Grilling
Def
rost
The
Lower
compartment
of
the
WEOM
model offers
a
dual
zone
variable
heat
Grilling
facility.
1.4
Manual
and
Automatic Settings
The
oven
offers
a
24
hour
electronic
programmable
clock
which allows
for
manual
operation
or
allows
the
user
to
pre-select cooking
times,
giving
you
freedom
to
"cook
from
a
distance".
(NB:
The
automatic
programmed
cooking
operates the
Oven
only).
4

KNOWING
YOUR
ST
GEORGE
SINGLE
OVEN
1.5
Accessories
Shelf
Levels
Grill
Pan
&
Rack
(The
6
shelf
levels assure
the
(Acts
as
an
extra
shelf
and
the
pan
is
coated
with
vitreous
enamel
for
optimal
use
of
the
93
litre
oven)
long
life and
easy
cleaning)
Separate
Grill
Compartment
(WEOM
only)
Self
Clean Oven
Liners
(Optional
Extra
-
great
to
alleviate
extra cleaning
requirements).
5
USING THE
APPLIANCE
FOR
THE
FIRST
TIME
2.
USING
THE
APPLIANCE
FOR
THE FIRST
TIME
After
installation
all
adhesive
labels
(other
than
grill
warning
labels),
advertising,
tape,
etc.,
should
be
immediately
removed.
A
quick diluted
wash
with Ammonia
and
water should
rinse
away
any
adhesive
residue.
After
cleaning
make
sure
cleaned surfaces
are
thoroughly
rinsed.
Before
cooking
in
the
appliance
an
initial
pre-heat
is
required. The
first
time
you
heat up
the
oven
(or
grill)
a
fine
oil
film
on
the
elements
and
surface
will
be
given
off
as
smoke.
This
is
a
normal
action
and
the
oil
may
be
removed
by
the
following
procedure:-
1.
Set
the
Clock
Timer
for
manual
operation
of
the
oven
(see
section
3
for
control
panel
operation
instructions).
2.
Set
the
oven
temperature
to
1
8000.
3.
With
the
oven
door
closed,
leave
the
oven
on
for
approximately
one
hour
or
until
the smoke
has
disappeared.
4.
For
the
WE01M
model,
with
the grill
door
open, set
the
grill
control
to Hi
for
the
full grill range and
leave
on
for
at
least
20
minutes
or until
the smoke
has
disappeared.
After
completing the
above
make
sure
all
controls
are
set
to
off. The
oven
is
now
ready
for cooking
and
grilling.
6
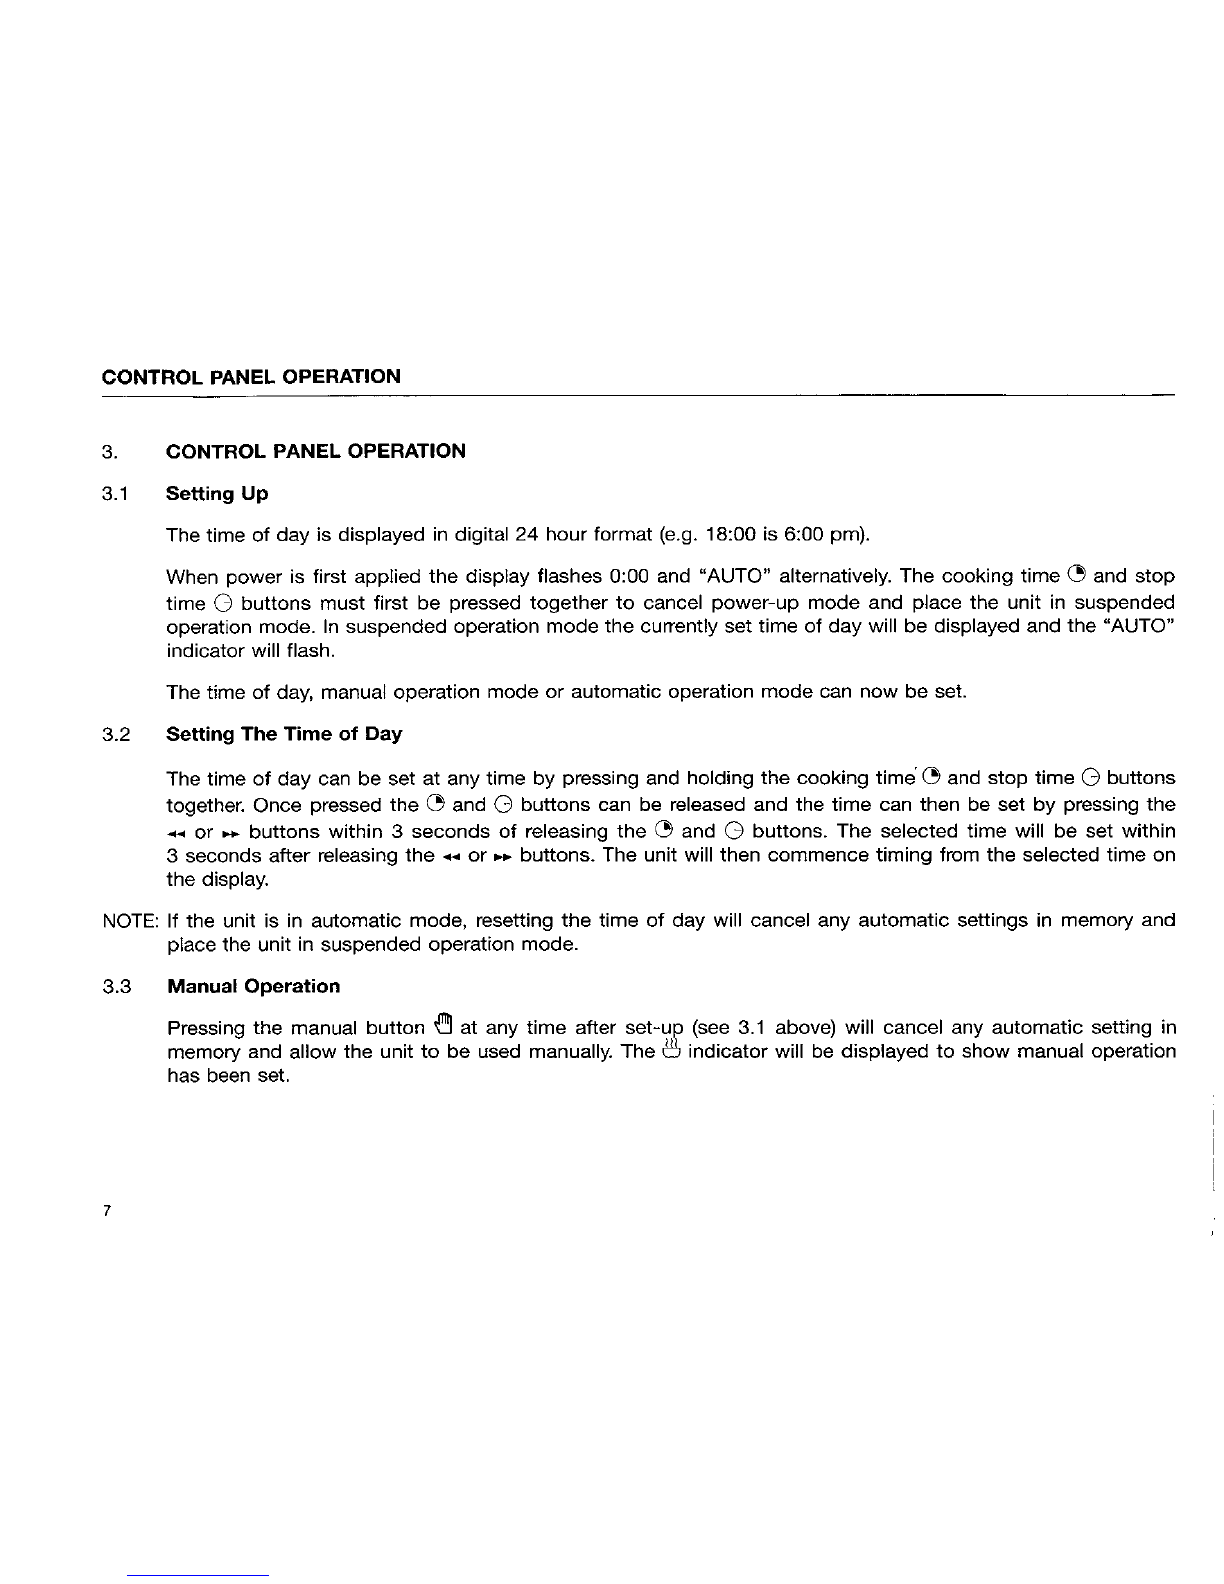
CONTROL
PANEL
OPERATION
3.
CONTROL
PANEL
OPERATION
3.1
Setting
Up
The
time of day
is
displayed
in
digital
24
hour
format
(e.g.
18:00
is
6:00
pm).
When
power
is
first
applied
the
display
flashes
0:00
and
"AUTO"
alternatively.
The
cooking
time
C~
and
stop
time
0
buttons
must
first
be
pressed
together to
cancel
power-up
mode
and
place
the
unit
in
suspended
operation
mode.
In
suspended
operation
mode the currently
set
time
of
day
will
be
displayed
and
the
"AUTO"
indicator
will
flash.
The
time
of
day,
manual
operation
mode
or
automatic
operation mode
can
now
be set.
3.2
Setting
The
Time of
Day
The
time
of
day
can
be
set
at
any
time
by
pressing
and
holding the
cooking
time
E~
and
stop
time
03
buttons
together.
Once
pressed
the
C~
and
03
buttons
can
be
released and
the
time
can
then
be
set
by
pressing
the
-
or
.buttons
within
3
seconds
of
releasing
the
E.~
and
0
buttons.
The
selected
time will
be
set
within
3
seconds
after
releasing
the
-
or
..
buttons.
The
unit
will
then
commence
timing
from
the
selected
time
on
the
display.
NOTE:
If
the unit
is
in
automatic
mode,
resetting
the
time of day
will
cancel
any
automatic
settings
in
memory
and
place the unit
in
suspended operation
mode.
3.3
Manual
Operation
Pressing
the
manual
button
'0
at
any
time
after
set-up
(see
3.1
above) will
cancel
any
automatic
setting
in
memory
and
allow
the
unit
to
be
used
manually. The
8
indicator
will
be
displayed
to
show
manual
operation
has
been
set.
7

CONTROL
PANEL
OPERATION
3.4
Setting
The
Alarm
Timer
The
alarm
timer
can
be
used
independently
of
other
clock
functions.
Very
handy
for
letting
you
know
when
to
turn
food,
when
basting
is
required or when
a
batch
of
food
(when
cooking
multiple
batches)
is
ready
without
interrupting
the
oven
operation.
The alarm
timer
is
also
very
useful
for
timing
other
household
activities.
The
alarm
timer
can
be
set
by
pressing
and
holding
the
alarm
timer
Cy
button.
Once
pressed
the
display
will
change
to
0:00 and
the
alarm
time
can
then
be
set
by
pressing the
..
or
.buttons.
The
'a
symbol
will
be
displayed
to
show
an
alarm
time
has
been
set.
The
selected
alarm
time
will
be
set
within
4
seconds
after
last
releasing
all
buttons
and
the
time
of
day
will
be
displayed.
The
alarm
timer
can
be
cancelled
by
re-setting
the
alarm
time
to
0:00.
The
Z
symbol
will
no
longer
be
displayed
and
the
display
will
revert
back
to
the
time
of
day.
Pressing the
alarm
timer
button during
timing
will
display
the
remaining
time
for
3
seconds
after
which
the
display
will
revert
back
to the time
of
day.
Once
the
alarm
time
has
elapsed the
alarm
will
sound.
Pressing
any of
the
four
left
hand
buttons
will
cancel
the
alarm
and
the
LI
indicator
will
no
longer
be
displayed.
if
not
manually
cancelled
the
alarm
will
automatically
cancel after
5
minutes.
NOTE:
Whilst
the
alarm
time
is
displayed,
pressing
the
-~
or
.
buttons
will
change
the
alarm
time setting.
If
the
manual
button
is
pressed
to
cancel
any alarms,
any
automatic settings
in
memory
will
be
cancelled
and
the
unit
will
be set
for
manual
operation.
CONTROL
PANEL
OPERATION
ELECTRIC
CLOCK
MODEL
WEOM-7
2
2
Timer
Start
Stop
Reset
-
Fan Fan
-4
4
0 0 0 0
0 0
Grilnou
a
Oven
20*0
Normal
~~~I~~o~~~I00
Hi
Hi
Oven
150
Mode
Oven
0G
Grill
3.5
Mode
Switch
This
switch
selects
the
mode
of cooking
you
require
and
may
be
turned
in
either
direction to give
you
the
following
selections:
Off
Defrost
Fan
Oven
Normal
Oven
(conventional
oven)
Fan
Grill
Grill
The
oven
illumination
lamp
-
positioned
in
the
left hand
side of the
oven will
remain
on
at
all
times
while
the
oven
is
in
operation.
This
provides
an
extra
safety
precaution
to
indicate
that
the oven
has
been
left
on.
3.6
Oven
Temperature
Control
This
control
allows
you
to
select
your
required
cooking
temperature
which
will
be
maintained
during
operation.
Turn
the
control
clockwise
to
switch
power
on
and
select your
required
temperature.
An
indicator
light
will show
when
the oven
is
heating
and will
cycle
on
and
off
with the
control
as
the
temperature
is
maintained.
The
indicator
light
will
operate
when any
oven
mode with
temperature
control
is
used
(i.e.
Fan
Oven,
Normal
Oven
and
Fan
Grill).
Turning
the
control
anti-clockwise
to the
off
position
switches
each
oven
off.
9

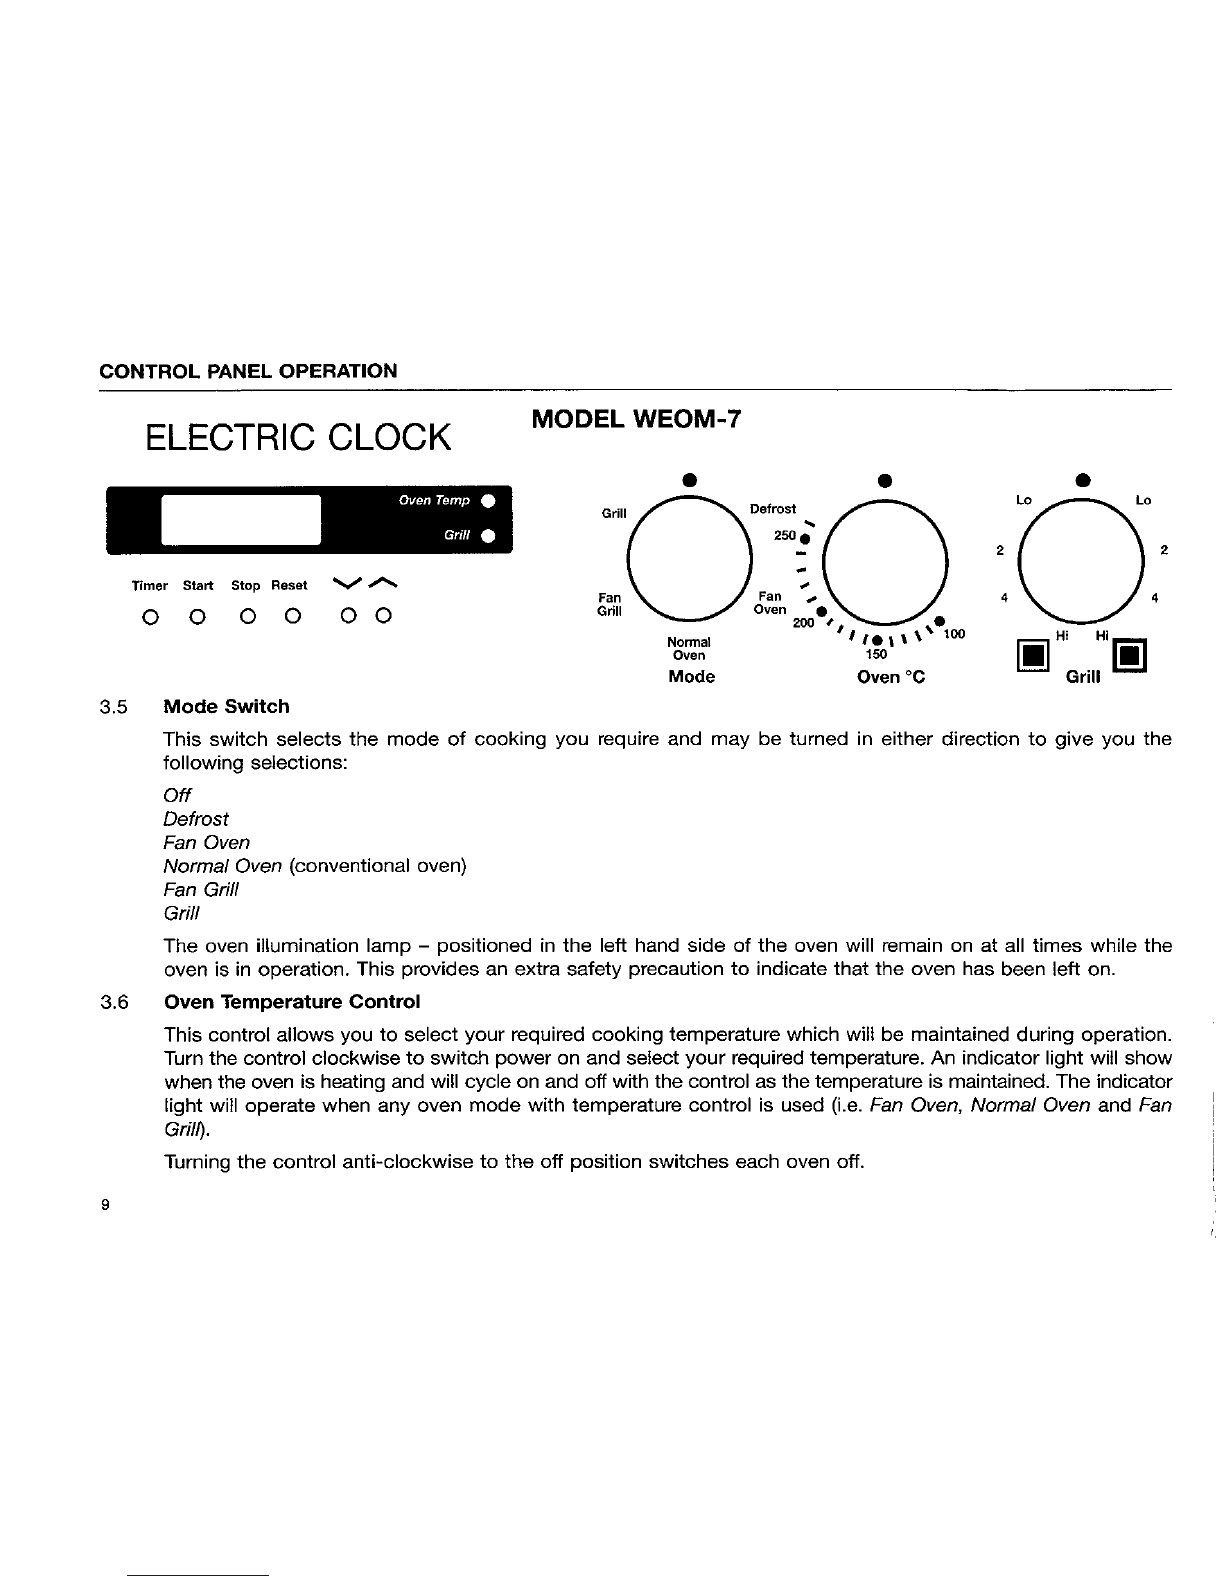
CONTROL
PANEL
OPERATION
MODEL
UEOM-7
250
Tinmer
Start
Stop
Reset
%
W~
FanFa
* *
Grill
Oe
Normnal
I
100
6
4
Oven
150
Mode
Oven
'C
Grill
3.7
Grill
Control
UEOM
With
the mode
switch
set
to
Grill,
this control
selects
the
heat
desired
for
grilling.
The
control
may
be
turned
in
either
direction
to
your
required
setting.
WEOM
Grilling
in
the
oven
is
controlled
by
setting
the
mode
switch
to
Grill.
The
speed
of
cooking
may
be
varied
by
altering
the
grill
pan
and
rack
positions.
The
separate
grill
control
is
used
to
select
the
heat
desired
for grilling
in
the
grill
compartment
only.
The
control
may be
turned
in
either
direction
to your
required
setting.
The
separate
grill has
two
heating
zones,
an
inner
zone
which
can be
used
independently,
or
the
full
settings
which
operate
the
entire
grilling
area.
10

DESCRIPTION
OF
COOKING
MODES
4.
DESCRIPTION
OF
COOKING MODES
4.1
Defrost
This
mode
offers
a
healthy
and
clean
means of
defrosting
frozen
foods.
Rather
than
leaving
foods
in
the
open
air
the food
can
be
placed
in
the
oven and
defrosted
without
heat,
reducing
the
likelihood of
growing
bacteria.
4.2
Fan
Oven
In
this
mode
the
oven
fan
circulates
heat
from
an
element
concealed
behind
the
fan
cover
to
give
a
more
even
temperature
throughout
the
oven.
This
allows
more
than
one
tray
of
food
to
be
cooked
at
the same
time
with
similar
cooking
results.
4.3
Normal
Oven
In
this
traditional
mode
the
oven
heat
is
provided
by
the
outside
ring
of
the
top
oven element
and
a
concealed
element
under
the
oven base and
is
most suitable
when
cooking
on
one
rack
only.
4.4
Fan
Grill
In
this
mode
the
direct
infrared
heat
from
the
grill
element
is
combined
with
heat
being circulated
by
the
fan
to
cook
the
food
which
should
be
positioned
near
the
centre
of the
oven. This
gives the
appearance
and
flavour
similar
to
food
cooked
in
a
rotisserie.
4.5
Grill
(in
oven)
This
mode uses
the
infrared
heat
of
the
top
inner
element
to
grill
foods
to
your
requirement.
For
the
WEOM
model,
this
oven
grilling
facility
is
additional
to
the
separate
grill
in
the
lower
compartment.
4.6
Grill
in
Lower
Compartment
(1VEOM
model
only)
In
this
mode
the
heat
is
supplied
by
a
Full
or Half
grill
facility.
This
compartment
allows
for
variable
heat
control.
4.7
Automatic
Programmed
Cooking
Only
the oven can
be
set
to
turn
on
and
off
automatically.
The
automatic settings
mode
is
generally
used
when
cooking
is
left
unattended.
NOTE:
Automatic cooking
is
available
in
the
oven
only
and
is
suitable
only
for
Defrost,
Fan
Oven
and
Normal
Oven
modes.
COOKING
INSTRUCTIONS
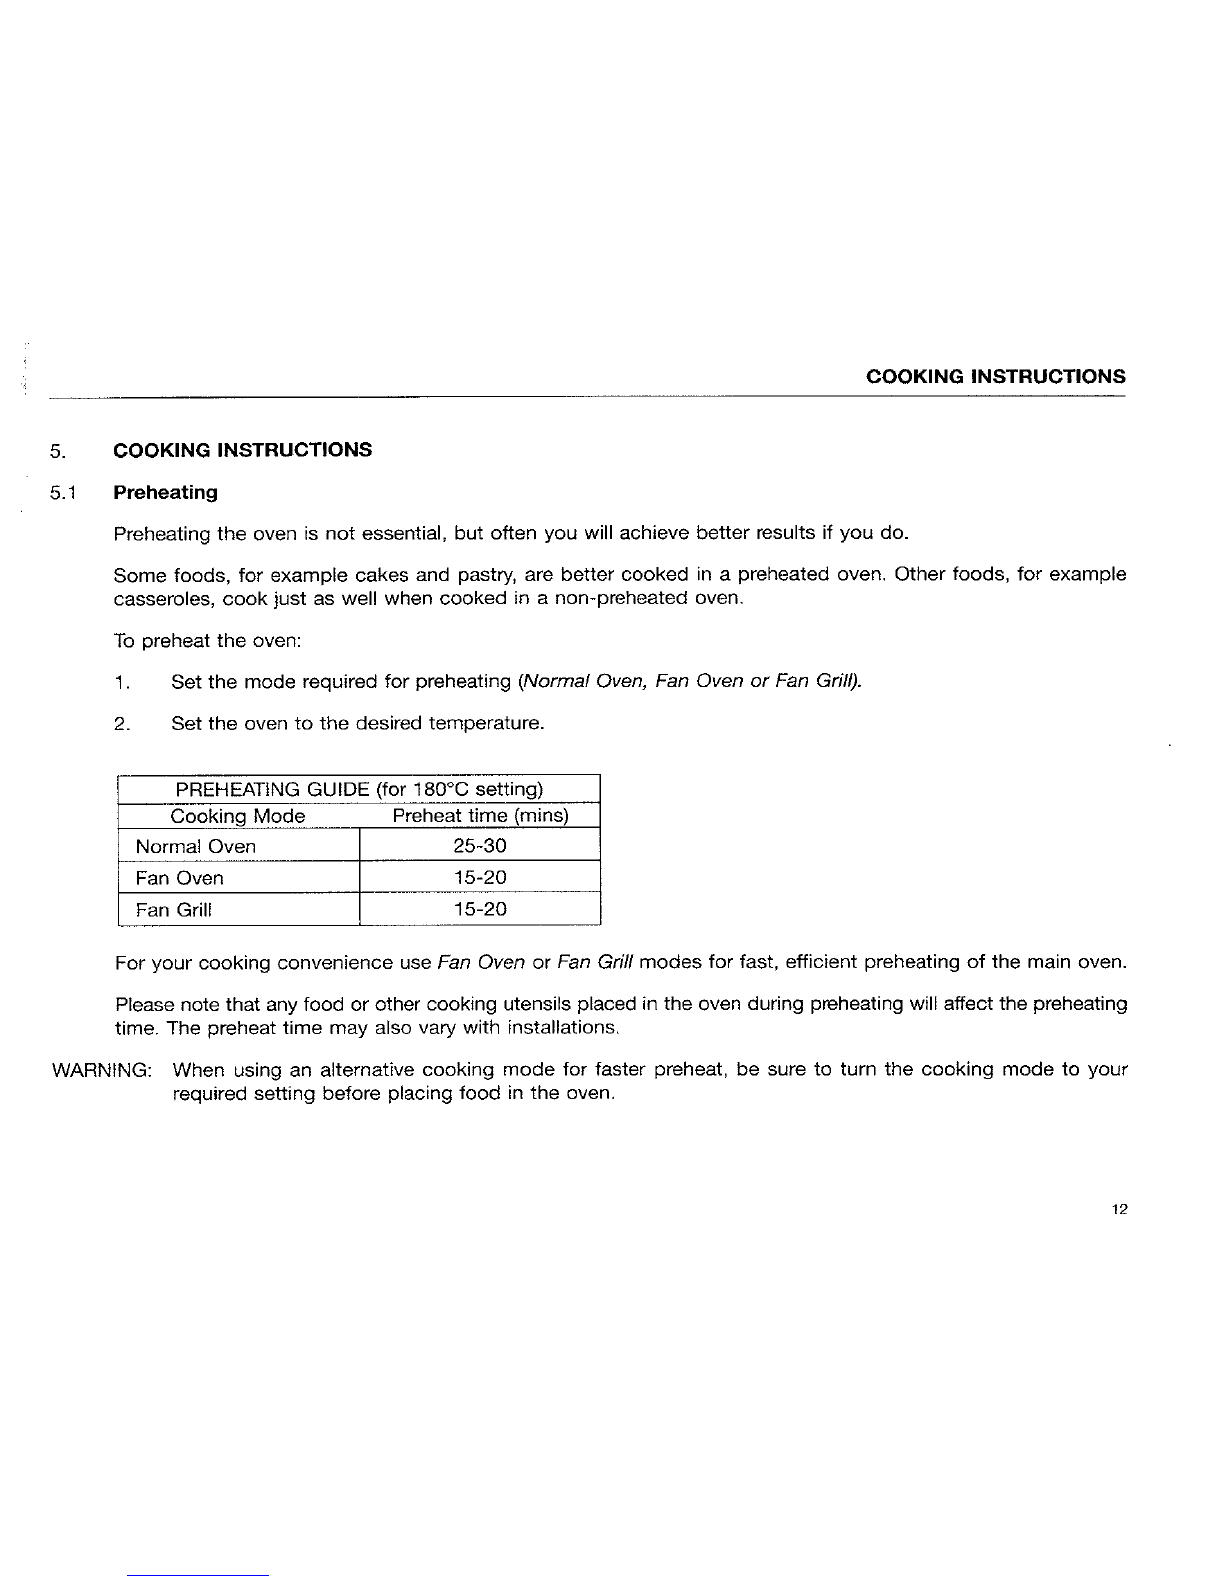
5.
COOKING
INSTRUCTIONS
5.1
Preheating
Preheating
the
oven
is
not essential,
but
often
you will
achieve
better
results
if
you
do.
Some
foods,
for
example
cakes
and
pastry,
are
better
cooked
in a
preheated
oven.
Other
foods,
for
example
casseroles,
cook
just
as
well
when
cooked
in
a
non-preheated
oven.
To
preheat
the
oven:
1.
Set
the
mode
required
for
preheating (Normal
Oven,
Fan
Oven
or
Fan
Grill).
2.
Set
the
oven
to
the
desired
temperature.
PREHEATING GUIDE
(for
18000
setting)
Cooking
Mode
Preheat
time
(mins)
Normal
Oven
25-30
Fan
Oven
15-20
Fan
Grill
15-20
For
your
cooking
convenience
use
Fan
Oven
or
Fan
Grill
modes
for
fast,
efficient
preheating
of
the
main
oven.
Please
note
that
any
food
or
other
cooking
utensils
placed
in
the
oven
during
preheating
will
affect
the preheating
time.
The
preheat
time
may also
vary
with
installations.
WARNING:
When
using
an
alternative
cooking
mode
for
faster
preheat,
be
sure
to
turn
the
cooking
mode
to
your
required
setting
before
placing
food
in
the
oven.
12
COOKING INSTRUCTIONS
5.2
Defrost
This
mode offers
a
healthy
and
clean means
of
defrosting
frozen
foods
which
reduces the
likelihood of
growing
bacteria.
Thawing
is
achieved
by
the
circulation
of air
in
the
oven. The oven
does not
provide
any
heat
on
this
setting.
All
foods
may
be
defrosted
using
this
method
but
it
is
especially
good for
meat
and
fish
fillets
and
delicate
frozen
foods
such
as
cream
cheesecakes,
gateaux
and
cakes
with
icing
or
frosting.
Using
Defrost
Mode
1.
Adjust
oven
shelves to
correct position
(this mode
is
most
effective
when
food
is
placed
near
the
centre
of
the
oven.
2.
Select
Defrost
on
the
mode
switch.
3.
When
defrosting
is
complete, turn
the
mode
switch
to
the
off
position
to
turn
the
oven
off.
NOTE:
A
temperature
cannot
be
set when
Defrost
mode
is
selected.
13

COOKING INSTRUCTIONS
5.3
Fan
Oven
Fan
forced
ovens
are
designed
to
circulate
heat
to provide
more even
temperatures
throughout
the
oven.
Although temperatures for
cooking
foods
in
this
type of
oven
are
generally the
same
as
required by
a
conventional
oven,
when
cooking
foods
that
require
lengthy
cooking
cycles
a
fan
forced
oven
normally
cooks
more
quickly
thus providing
a
means
of
saving
energy
(e.g.
rich
fruit cakes
and
large
meat
joints).
This
mode
is an
exceptional
method
of
cooking
and
provides
more
even
cooking throughout
each
portion
of
food,
whether
using
one
shelf
or
multiple
shelves.
Recommendation
of
fan
cooking
with
fan
filter
in
place
A
filter
is
provided to fit over
the
fan
cover
at
the
back
of
the
oven.
This
filter assists
in
keeping
the
blades
of
the
fan
clear
of
excess fats
whilst cooking
-
particularly when
fan
grilling
or
roasting
in
fan
oven
mode.
The
filter
can
simply
be
removed
after
use
for easy cleaning.
The
fan
blades should
be
periodically cleaned
to
ensure
the
fan
operates
efficiently.
When
the
filter
is
positioned
over
the
fan,
the
air
movement
of
the
fan
is
altered and may
produce slightly
different
cooking
results.
If
you
are
familiar
with
other
ovens,
especially
those
with
conventional
cooking
only,
be
prepared
to
alter
cooking
times
as
your
St
George
oven
may
cook differently
to
what
you
may
be
accustomed.
Using Fan Oven
Mode
1.~
Adjust
oven
shelves
to
desired
position/s.
2.
Select
Fan
Oven
on
mode
switch.
3.
Set
the
Oven
Temperature Control to
the desired
temperature,
4.
When
cooking
is
complete
turn
the
oven
temperature
control
and
mode
switch to the
off
positions
to
turn
the
oven
off.
14

COOKING
INSTRUCTIONS
5.4 Normal
Oven
The general
rule
for
baking
positions
in
the electric
oven
is
to arrange the shelves
so
the
top
of
the
food
is in
the
centre
of
the
oven.
This
is
usually
the
second
or
third shelf
position
from
the
bottom.
The normal
cooking
mode
is
most
suitable
for
cooking
on
one
rack
at
a
time.
If
cooking
more
than
one
item,
stagger
the
positioning
to
allow
for
as
much
free
circulation
of
heat
within
the
oven
as
possible.
Using
Normal
Oven
Mode
1.
Adjust
oven
shelves
to
desired
position/s.
2.
Seiect
Normal
Oven
on
mode switch.
3.
Set
the
Oven
Temperature
Control
to
the
desired
temperature.
4.
When
cooking
is
complete
turn
off
the
oven
temperature
control
and
mode
switch
to
the off
positions
to
turn the
oven off.
HINT:
If
water
is
used
in
your
cooking
(such
as
water
placed
in a
baking
dish)
the water
will
evaporate
in
the
oven
in
the
form
of
steam
which
may
cause
condensation
to
escape
and
run
down
the
front
of
your
appliance.
This
should
not
cause
any
problem
to
your
appliance (electrical
or
otherwise) however
it is
advisable
to
wipe
away
the
condensation
from
the
exterior of
the
oven
with
a
warm
damp
cloth
during
cooking.
15

COOKING INSTRUCTIONS
5.5
Fan
Grill
Fan
grilling
is
a
combination
of
direct
heat
and
circulated
hot
air
which
gives the
appearance
and
flavour
similar
to
rotisserie
cooking.
The
heat
comes
from
the
grill
element
in
the
top
of
the
oven and
circulated
air
from
the
fan.
With
the
benefit
of
the
circulated
air,
more even
cooking
can be
achieved giving
excellent
results.
The
Fan
Grill mode
has
been
developed to
replace
grilling
with
the
door
open.
This
method of
cooking
has
the
following advantages
over
conventional
grilling:-
1.
Food
is
generally
more
moist.
2.
Improved rotisserie
style
flavour,
3.
Cooking
fumes
from
grilling
pass
through
oven
vent.
For
improved
cooking
results,
St
George
recommend turning
food
once
only.
Using
Fan
Grill
Mode
1.
OVEN
DOOR
MUST
BE
CLOSED
IN
Fan
Grill
MODE.
2.
Place
food
on
grill
rack
and
pan
supplied
(ensure
grill
rack
is
inverted
to
the
high
position
to
allow
best
circulation
of
air).
3.
Place grill
pan
on
shelf
carrier
such
that
the food
is
positioned
as
close
as
possible
to
the
centre
of
the
oven.
4.
Select
Fan
Grill
on
mode
switch.
5.
Set Oven
Temperature
Control
to
desired
temperature.
6.
When
cooking
is
complete
turn
the
oven
temperature
control
and
mode
switch
to the
off
positions
to
turn
the
oven
off.
WARNING: The
grill
pan
handle
provided
should
only
be
used
to
assist
in
sliding
the
grill
pan
in
and
out of
the oven
compartments.
AT
NO
TIME
MAY
IT
BE
USED
FOR
LIFTING
THE
GRILL
PAN,
ESPECIALLY
WHEN
THE
PAN
IS
LADEN WITH
FOOD.
16

COOKING
INSTRUCTIONS
5.6
Grill
(in
oven)
This
mode
of
cooking
uses the infrared
heat
of
the
top
element
to
cook
foods
to
your
requirements.
For
the
WEOM
model,
the
cooking
can
be
varied
by
lowering
or
raising
the
grill
pan
and
rack position
in
the oven.
This
method
of
grilling
in
the
oven
is
recommended
for
short durations
(5
minutes
of
less)
grilling
only
which
is
ideal
for
toasting
(see
note
below).
Foods
with
higher
fat
content
or
foods
which
require
more
than
5 minutes
grilling
time
must
be
grilled
using
the
Fan
Grill
mode. The
Fan
Grill
mode
has
been
developed
to
generally
replace
grilling
with
the
door
open
(see 5.5
for
details
on Fan
Grill mode.)
When
in
Grill
mode
the
oven
door
should
be
closed.
If
the
door
is
not
closed,
discolouration
may
occur
to
the
control
panel.
IT IS
RECOMMENDED
THAT
THE
OVEN
Grill
MODE
IS
NOT
OPERATED
WHEN RESIDUAL
HEAT
REMAINS
IN
THE
OVEN.
Using
Oven
Grill
Mode
1.
Commence
grilling
from
a
cold
oven
only.
2.
Place
food
on
grill
rack
and
pan
supplied
(use
grill
rack
in
low
position).
3.
Place
grill
pan
on
shelf
carrier
position
of
your
preference.
4.
Select
Grill
on
mode
switch.
5.
For
the
UEOM
model,
select
the
heat desired
for
grilling
using
the
Grill
control.
For
the
WEOM
model,
the
oven
has
a
preset
temperature
for
the
Grill
mode.
The oven
and
grill
controls
cannot
override
this
preset
temperature.
6.
When
cooking
is
complete:-
For
the
UEOM
model
turn mode
switch
and grill
control
to the
off
position
to
turn
the
grill
off.
For
the
WEOM
model
turn
the
mode
switch
to
the
off
position
to
turn the grill
off.
NOTE:
The
grill
element
has
a
safety
shutdown
at
approximately
200
0
C.
Once the
temperature
in
the
oven
has
reached
this
limit
the element will
switch
off until
the
oven
cools
slightly
at
which
time the
elements
will
resume
heating.
(This
temperature
is
generally
reached
after
approximately
10
minutes).
WARNING:
The
grill
pan
handle
provided
should only
be
used
to assist
in
sliding
the
grill
pan
in
and
out
of
the
oven
compartments.
AT
NO
TIME
MAY
IT
BE
USED
FOR
LIFTING
THE
GRILL
PAN,
ESPECIALLY WHEN
THE
PAN
IS
LADEN
WITH
FOOD.
17
This manual suits for next models
1
Table of contents
Other St George Oven manuals


Popular Oven manuals by other brands

Whirlpool
Whirlpool GY398LXPB02 parts list

Bosch
Bosch HBF134EB K Series User manual and installation instructions

AEG
AEG COMPETENCE 53080 B operating instructions

Gaggenau
Gaggenau BS 250/251 instruction manual

Fulgor Milano
Fulgor Milano SUPREME Instructions for installation and use

Bakers Pride
Bakers Pride EP series Operation manual


cecotec
cecotec HORNO BOLERO HEXA C126000 INOX A instruction manual
 SINGLE OVEN Use & care guide")
KitchenAid
KitchenAid (KESO-176S BL) SINGLE OVEN Use & care guide

Hotpoint
Hotpoint FE8 S832 DSH BLG user manual

Siemens
Siemens Oven installation instructions

Bosch
Bosch HBN43B250B instruction manual

Siemens
Siemens HB30S50U use and care manual