Star Progetti STAR BRUMA User manual

STAR BRUMA
MISTING FAN
NEW WITH UV DEVICE FOR WATER STERILIZATION

Read the instructions contained in this booklet carefully before using this misting fan. Star Progetti cannot
assume any responsibility for damage to property or personal injury resulting from failure to abide by the
instructions given in this booklet. Following these instructions will ensure a long service life and overall
electrical and mechanical reliability. Keep this instruction booklet in a safe place.
Important information for environmentally friendly disposal
IN SOME EU COUNTRIES THIS PRODUCT DOES NOT FALL INTO THE SCOPE OF APPLICATION OF THE
ITALIAN DOMESTIC LAW ACKNOWLEDGING THE RAEE DIRECTIVE AND THEREFORE THERE IS NO
OBLIGATION IN FORCE TO SEPARATE MATERIALS AT THE END OF THEIR USEFUL LIFE.
This product complies with Directive 2012/19/UE. The symbol of a dustbin with a cross, which is shown on the appliance,
indicates that the product, because it must be treated separately from household waste, must be taken, at the end of its
useful life, to a collection center for electrical and electronic equipment or redelivered to the retailer on purchase of a new
equivalent appliance. The user is responsible for delivering the appliance to the appropriate collection structure at the end
of its life, on penalty of the measures provided for by current legislation on waste. The proper separate collection for
subsequent transfer of the appliance for recycling, treatment and environmentally friendly disposal contributes to avoiding
any possible harmful effects on the environment and health and promotes recycling of the materials that make up the
product. For more detailed information on the available collection systems, contact the local refuse disposal service or the
shop where the purchase was made. The producers and importers meet their responsibilities for recycling, treatment and
environmentally friendly disposal either directly or through participating in a collective system.
2

Brown
Blue
Brown
capacitor
Black
Communal winding(Black)
Secondary winding(Blue)
Primary winding(Brown)
Black
Blue
Primary winding
Secondary winding (Black)
Low speed(White)
Middle speed(Blue)
High speed(Yellow)
Earth wire(Yellow/Green)
1
4
3
Speed adjust switch
2Misting switch
N
White
Blue
Yellow
Blue
Fan motor
Misting
motor
Pump
capacitor
Thermal protector
Thermal protector
Purple
Yellow/Green(Earth wire)
Brown
Purple
Brown
N
L
UV lamp switch
UV
Yellow/Green(Earth wire)
Yellow BrownBrown
Blue
White
Yellow/Green(Earth wire)
Blue
Brown N
L
lamp
N
220-240V~
50Hz
1. CARATTERISTICHE TECNICHE - CARACTÉRISTIQUES TECHNIQUES - TECHNICAL DATAS
MODELLO
VELOCITA' 1
VELOCITA' 2
VELOCITA' 3
Nebulizza-
zione (max)
L/H
Velocità
rpm
Vol.aria
m3/min
Rumore
dB
Potenza
W
Velocità
rpm
Vol.aria
m3/min
Rumore
dB
Potenza
W
Velocità
rpm
Vol.aria
m3/min
Rumore
dB
Potenza
W
FRE326N
1100
143
55
210
1250
174
60
220
1400
220
68
240
5
MODELE
VITESSE 1
VITESSE 2
VITESSE 3
Volume de
brume
(max) L/H
Vitesse
rpm
Volume
d'air
m3/min
Bruit
dB
Puissan
ce
W
Vitesse
rpm
Volume
d'air
m3/min
Bruit
dB
Puissan
ce
W
Vitesse
rpm
Volume
d'air
m3/min
Bruit
dB
Puissan
ce
W
FRE326N
1100
143
55
210
1250
174
60
220
1400
220
68
240
5
MODEL
SPEED 1
SPEED 2
SPEED 3
Mist volume
(max) L/H
Speed
rpm
Air
volume
m3/min
Noise
dB
Power
W
Speed
rpm
Air
volume
m3/min
Noise
dB
Power
W
Speed
rpm
Air
volume
m3/min
Noise
dB
Power
W
FRE326N
1100
143
55
210
1250
174
60
220
1400
220
68
240
5
Attenzione: le caratteristiche tecniche sono soggette a variazioni
Remarque: Aucune indication supplémentaire n'est fournie si les indices ci-dessus sont modifiés.
Specifications are subject to alter without prior notice due to continuous product improvement.
SCHEMA ELETTRICO / SCHÉMA ÉLECTRIQUE / WIRING DIAGRAM
3

WARNINGS
1) Don't place fingers or foreign objects through guards into blade and don't let children
close the fan when the fan is running.
2) Bare-body children, weakling and elder should not stay in front of the running fan
for a long time.
3) Don't place the running fan near being opened window or flower or tree or the
curtain, portiere curtain places, also don't place the fan in some unplaned place.
4) Close power supply before removing the fan.
5) Don't allow the fan become wet or corrosive, forbid to use in bathroom.
6) Don't pull the wire forcibly to avoid breaking it.
7) To ensure your safety, pls don't replace the wire yourself, if do need replacing, send
the fan to maintenance station or our factory.
8) Besides our stating maintenances, non-professional is forbidden to disassemble the
fan.
9) This appliance is not intended for use by persons (including children) with reduced
physical, sensory or mental capabilities, or lack of experience and knowledge, unless
they have been given supervision or instruction concerning use of the appliance by a
person responsible for their safety.
10) Children should be supervised to ensure that they do not play with the appliance.
11) Damaged supply cords to be replaced by the manufacturer, service agent or
similarly qualified person to avoid hazard.
12) Unplug the appliance during filling and cleaning.
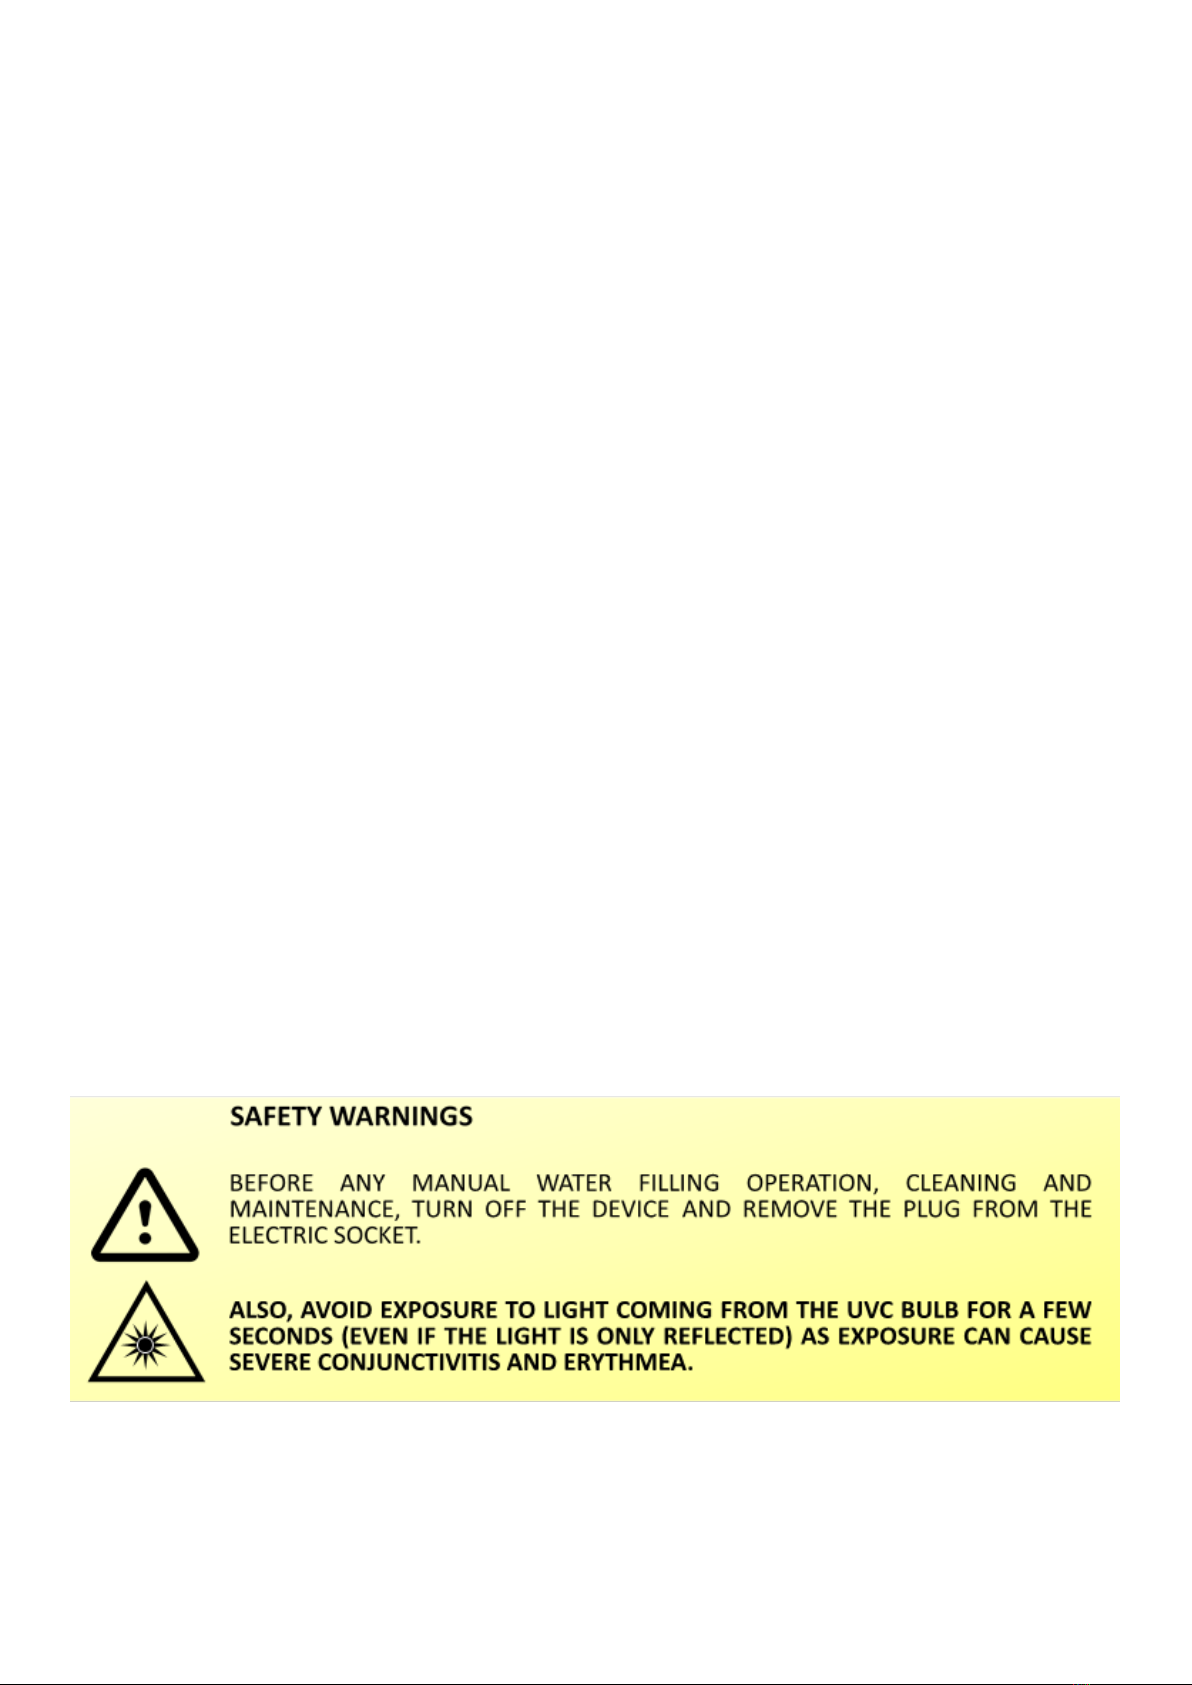
13)Before any manual water filling operation, cleaning and maintenance, turn off the
device and remove the plug from the electric socket.also, avoid exposure to light
coming from the uvc bulb for a few seconds (even if the light is only reflected) as
exposure can cause severe conjunctivitis and erythmea.
ENGLISH
ANTIBACTERIAL UV WATER STERILISATION DEVICE
The STAR BRUMA misting fan you have purchased has a distinctive feature to aid personal
health.
It is equipped with a UV lamp, located in the tank, to sterilise water and prevent the formation
of bacteria (such as legionella, for instance) and mould.
When in use, our STAR BRUMA misting fan prevents the development of pathogens
caused by stagnant or contaminated water.
Star Progetti is the first to adopt this solution, which is part of our corporate strategy
aimed at offering customers the best possible product with a full guarantee of well-being and
health. The UV lamp lasts for an average of 7000 hours, equivalent to several years of use
during the summer.
4
2. MAINTENANCE
1) Clean the fan periodically to keep it tidy and durable.
2) Cut off the power and make sure the blade stay still before cleaning, open the grill
clips and loo se the screws, remove the front grill and blade, use a soft cloth and a mild
soap to clean the fan's exterior. Do not use gasoline or any other corrosive liquid which
can damage the misting fan.
3)Thoroughly dry all of the fan's parts with a soft cloth after cleaning and install the fan
by contrary steps.(Remark: Do not knock down the misting system).
4) Keep the motor and electrical components away from water when cleaning.Do not
knock against the blade or change its angle.
5) Clean the water tank and water collection plate to keep water clean.
6) If the misting fan will not be in use for an extended period of time, cover the unit
and keep it stored in a clean, dry place.
3. CAUTION
1) Follow the diagram to take out the fan body when open the packing carton of fan.
2) Do not insert objects or let fingers to enter to the fan guard.
3) Adjust the pitch angle of the fan within a predetermined range.
4) Do not place the fan to unsteady floor or near curtains, drapes, or any other
materials easily to be involved in the misting fan's grills.
5) Children, elders and weak people cannot stand in front of the machine for a long
time.
6) If the power cord is damaged, in order to avoid a hazard, it must be replaced by the
manufacturers and their maintenance departments or similar sector professionals.
7) Immediately cut off the power supply in the presence of abnormal noise, smoke,
blade does not turn, and send it back to the factory or professionals with relevant
qualifications to check and maintain.
8) In addition to this specification of maintenance allows, non-professionals can not
disassemble, repair and reconstruct the misting fan.
9) Take away moisture-proof things when starting mist function to avoid moisture.
5

4. FEATURES AND APPLICATIONS
1) Use CAD optimized design with artistic looking.
2) The fan misting system adoptsthe centrifugal atomization optimized design, without
nozzle and water filtration, reasonable structure, easy maintenance.
3) Fan surface is epoxy resin coated,anti-rust and durable.The fan has water proof
electrical design, safety,with tank cart, easy to move.
4) Misting and air supply driven by different motors, motors use high quality rolling
bearings, with stable performance, low temperature rise, long life, low noise, strong
overload.
5) Misting volume adjustable, pumps take full insulation enclosed protective structure
for safe operation.
6) The fan with the function of oscillation and adjustable angle. easy to use, suitable for
factories, residential areas, shopping malls, sports grounds cooling, dedusting, odor
removal, and also can be used in livestock farms, greenhouses, mushroom farms and
special places.
5. PRODUCT BENEFITS
1) Centrifugal misting system means there is no clogged nozzles and no need to use
filtered water.
2) It is equipped with a UV lamp, located in the tank, to sterilise water and prevent the
formation of bacteria (such as legionella, for instance) and mould.
3) Fan surface is epoxy resin coated, anti-rust and durable.
4) The fan electrical components are designed to be waterproof.
5) Safe to use, with tank cart, easy to move.
6) Air supplying and misting functions are driven by different motors. Motors adopt
high quality ball bearings, with advantages of stable, low temperature-rise, long
service life, low noise, and strong overloading ability.
7) Misting volume adjustable, the pump adopts full insulation enclosed protective
structure for safe operation.
8) It has three adjustable speed and the function of left and right oscillation, easy to
use.
9) Designed for cooling large areas such as patios, factories, manufacturing facilities,
garages, athletic fields, greenhouses, live stock breeding farms and more.
6. OPERATION INSTRUCTIONS
1) Use the fan under the voltage and frequency shown on the rating label, do not use
in corrosive environment.
2) Do not install this machine in places where the altitude is higher than 1,000 meters
or temperature is over 40℃.
3) When socket is used in power supply, the socket should meet the IEC335-1 standard;
when power liner is from direct power supply, a polarity switch should be installed
with contact gap not less than 3mm on the fixation wiring.
4) Oscillating angle adjustment: Loosen the oscillation screw and move it to the desired
position (the more outward the more bigger oscillation angle), tighten this oscillation
screw after adjustment.
5) Tilting angle adjustment: Loosen the fixing nut and move the motor to the desired
position and tighten this fixing nut.
6
6) Speed adjustment: low speed, medium speed and high speed can be achieved by
turning the switch knob on the motor.
7) If the machine is selected to operate by misting mode, its misting magnitude can be
adjusted optionally between"OFF"and "ON".
8) The tank must be full filled with water before using the misting mode. The fan can
operate continually for 4 hours with the maximum misting volume. Re-fill the tank
to achieve the misting effect when it is short of water. Release the water after
cleaning the tank by unscrewing the knob on the bottom.
9) When using the handcart, please skid the front cartwheel to avoid glide naturally.
When moving the handcart, please loosen the front cartwheel lock. Before loosening
the front cartwheel lock, and please do not move it to avoid damage.
10)Please clean the water tank before using. Please take out the water pump before
cleaning the water tank .
7. ASSEMBLY INSTRUCTIONS
DO NOT plug in the fan before assembly. This misting fan comes in 3 boxes. Carefully remove
all packing materials and retain for future storage/use. Make sure there is no residual foam
left in any of the components. Check all the components to avoid any parts missing, scratching,
or damaging during transportation. A screwdriver and a wrench will be required to assemble
this misting fan.
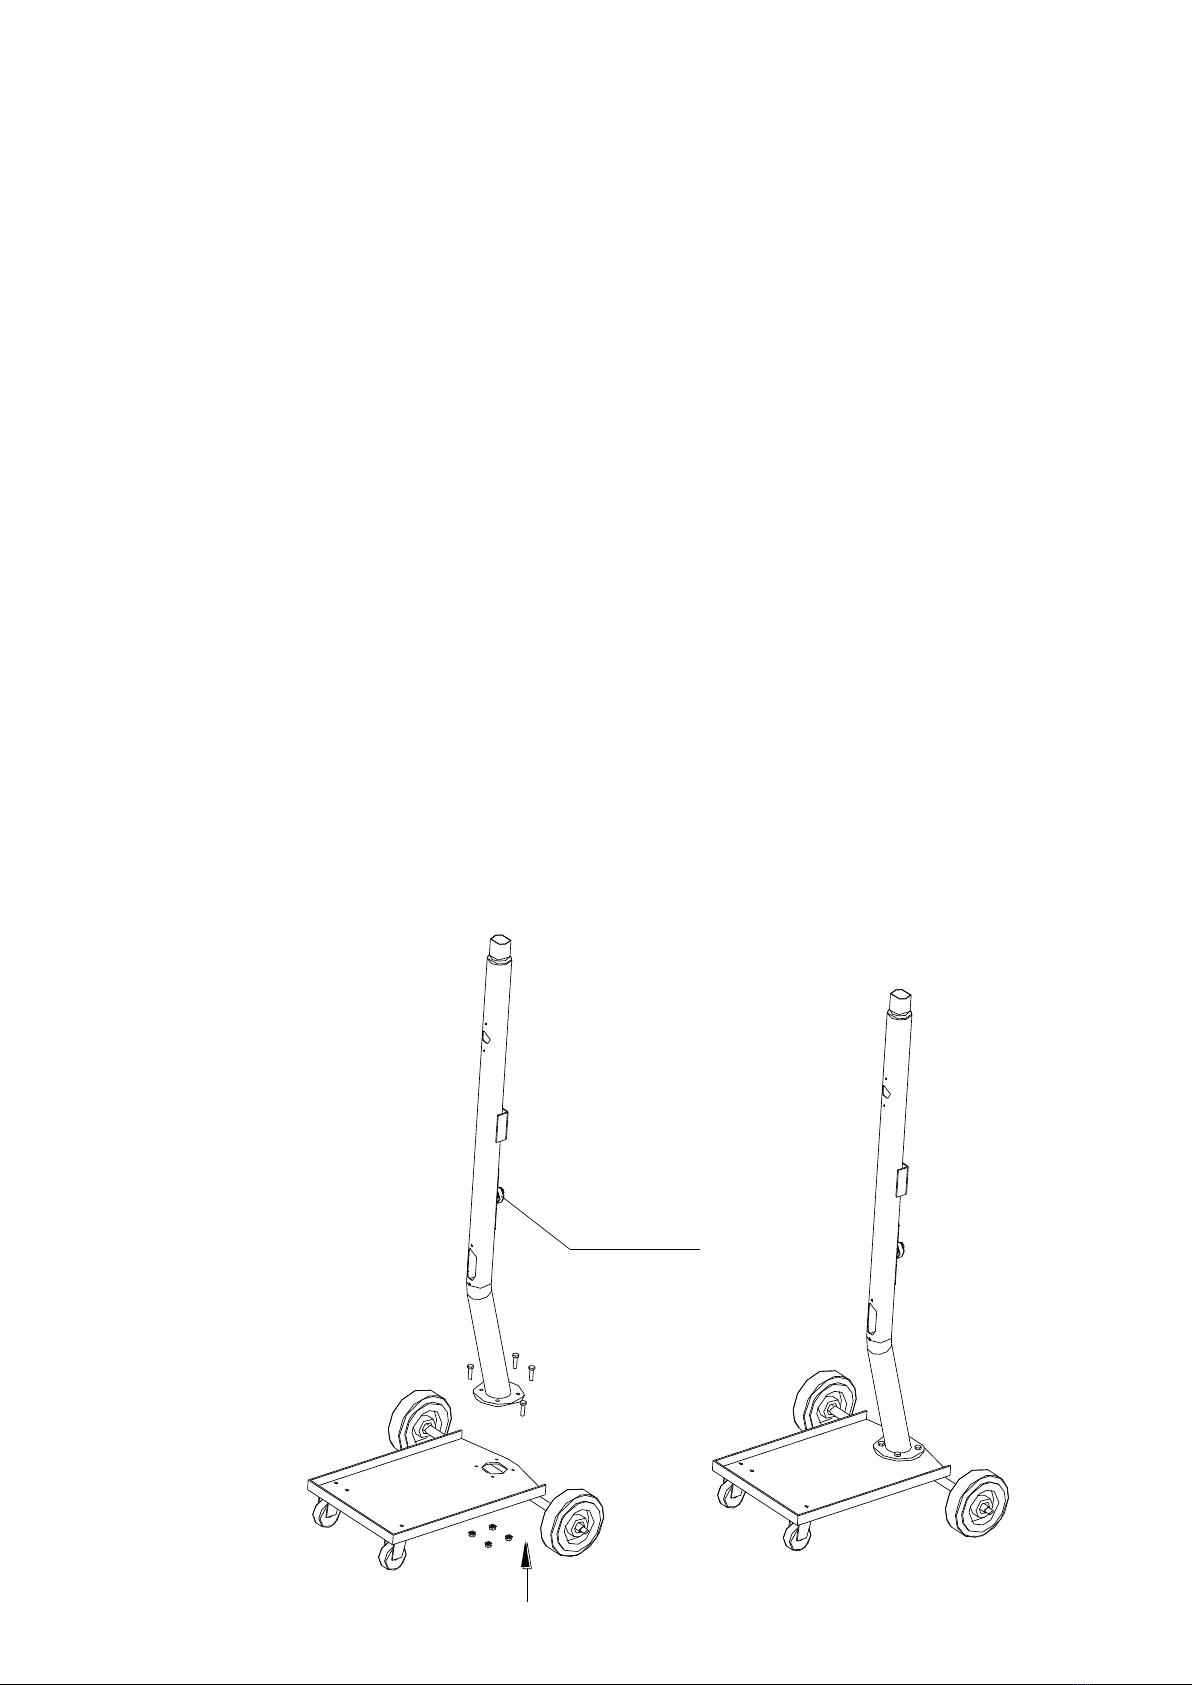
Diagram 1
Ball valve
Step 1: Assembling the Stand Pole
a.Refer to diagram 1. Locate the tank cart and stand pole. Remove the four M8X25 bolts,
spring washer, flat washer, and nuts from the tank cart.
b.Position the stand pole on the tank cart and make the ball valve switch face the back. Align
the holes on the pole with the four holes on the cart.
c.Using the bolts, washers, and nuts removed in step a, screw the stand pole into the tank
cart. Make sure the stand pole is securely screwed onto the cart before proceeding to the
next step.
DIAGRAM 1
7

Step 2: Fan Head and Tubes Assembly
a. Refer to diagram 2. Align the stand pole and the bottom of the fan head and connect the
two pieces. Fasten the screw to secure the two pieces together.
b. Insert the three-pin plug into U-groove hole in front of the stand pole. Plug the three-pin
plug into the three-pin socket.
c. Connect the two tubes. Make sure each tube connected with it's same color tube.
d. Plug the six-pin plug into the six-pin socket. Mount the side panel and connector.
Tube
connector
Tube connector
Side panel
Three-pin plug
Six-pin plug
Misting Switch
UV Lamp Switch
Diagram 2
DIAGRAM 2
8

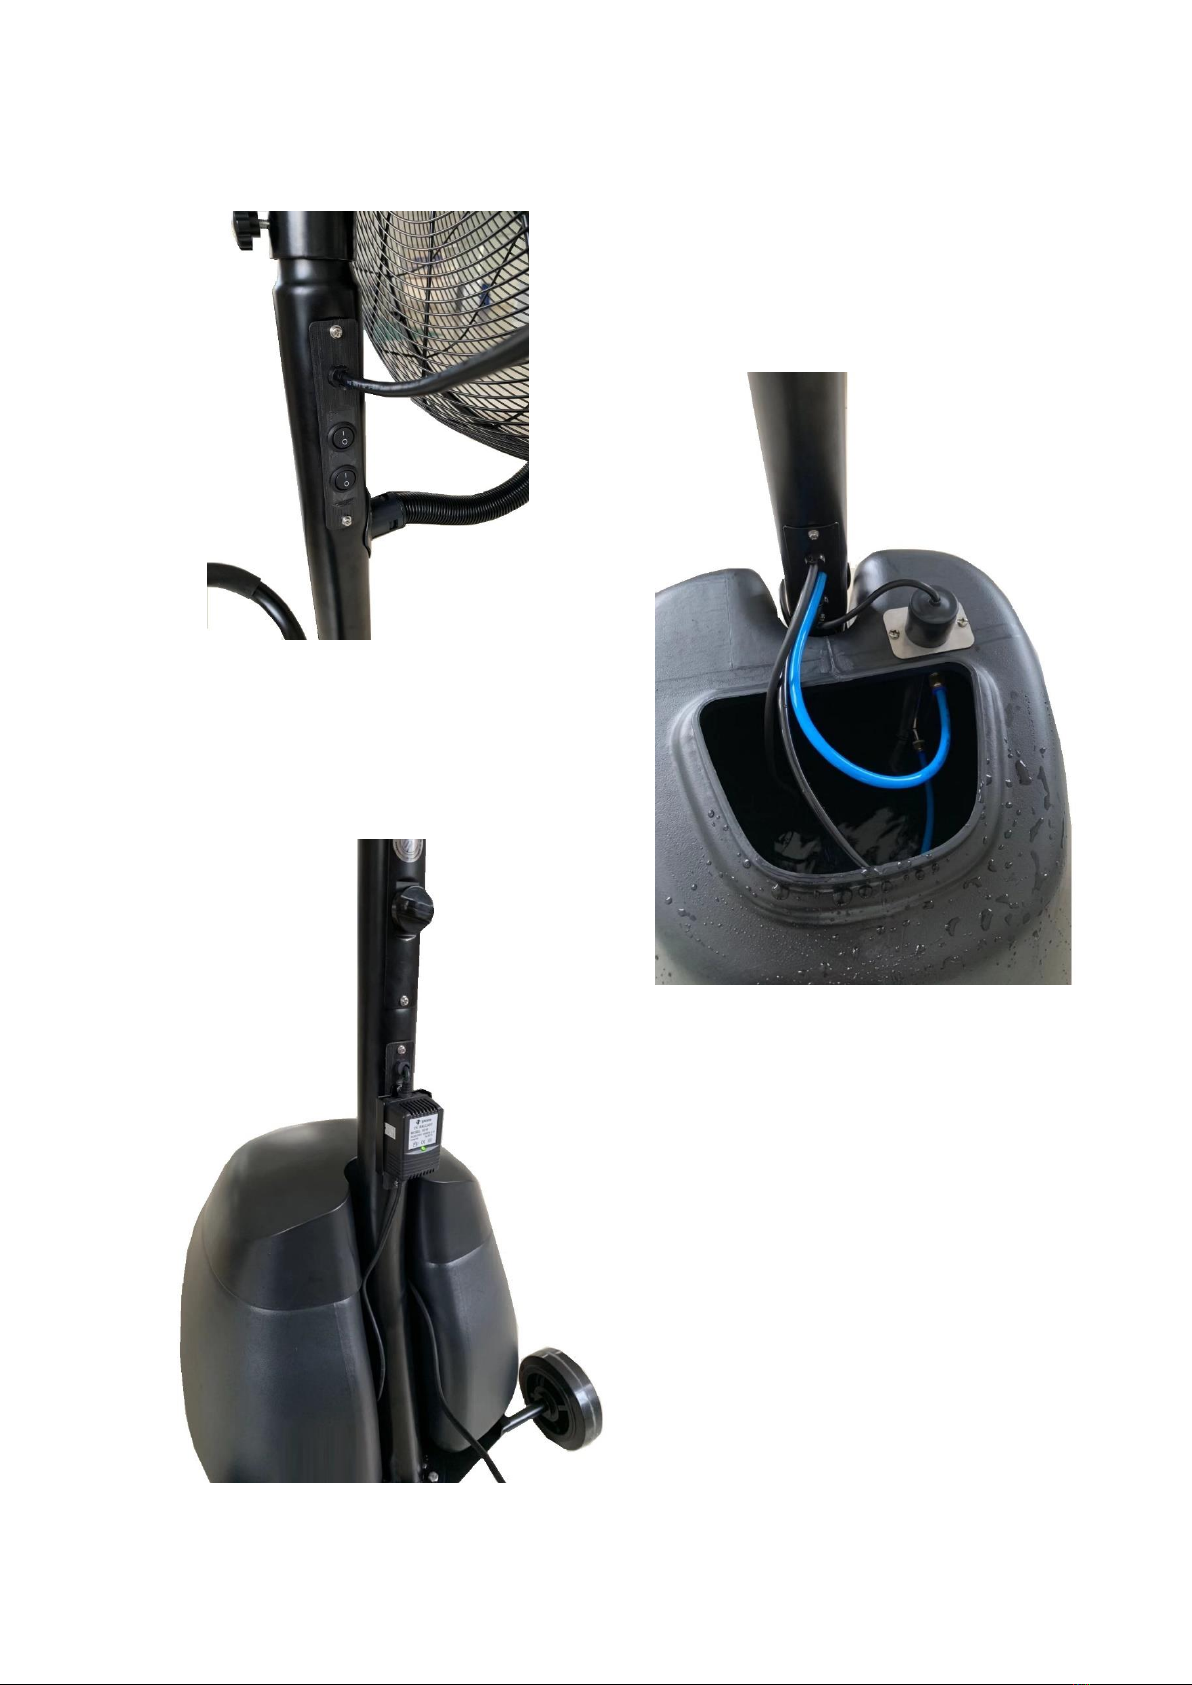
Step 3: Circuit and waterways connecting
a. Refer to diagram 3. Plug the four-pin plug of power cord into four-pin socket on the lower
part of the stand pole. And locate them into the stand pole after connection.
b. Insert the blue tube and black tube into the round hole of the front cover. Insert the blue
tube into the connector of the water pump. Ensure the tubes in the stand pole not bend.
c. Mount the front board onto the stand pole and fix with screws.
Black tube
Caution: The water pump
power cord should be
located at the top of the
fan power plug.
Water pump
connector
Blue tube
Front cover
Water pump connector
Blue tube
Front cover
Four-pin plug
Diagram 5
Step 4: Water Tank Assembly
a. Refer to diagram 4. Position the tank on the tank cart; use the two hems to fix the tank.
b. Connect the UV lamp to the socket at the end of the ballast lead, then insert the UV lamp
into the hole of the UV lamp device and cover the plastic cap.
c. Put the water pump into U-groove inside water tank.
d. Lid tank cover, ensure pump tube, water recycling tube and pump power cord get through
U-groove of tank cover.
e. Pull the power cord of the fan out of the tank bottom.
f. Mount the handle on the stand pole.
Handle
Diagram 4 U-groove
In order to prevent the spread of
UV light, it is necessary to cover
the plastic cap during installation
DIAGRAM 3
DIAGRAM 4
9
Step 5: Misting Testing
a. Full fill the water tank with clean water, and cover the tank lid.
b. Keep the ball valve from "on " to "off ", and turn power on. Turn the switch knob, and
check if the motor and blade operate normally.
c. Press misting button, run misting motor and water pump, and check if the misting motor,
misting plate and water pump operate smoothly.
d. Turn ball valve from " on" to "off", and observe the misting adjustment function.
e. Press the button of the UV lamp switch to turn on the UV sterilization device,
the ballast indicator is green color.
f. Adjust the plastic screw, and check if the oscillation function work smoothly.
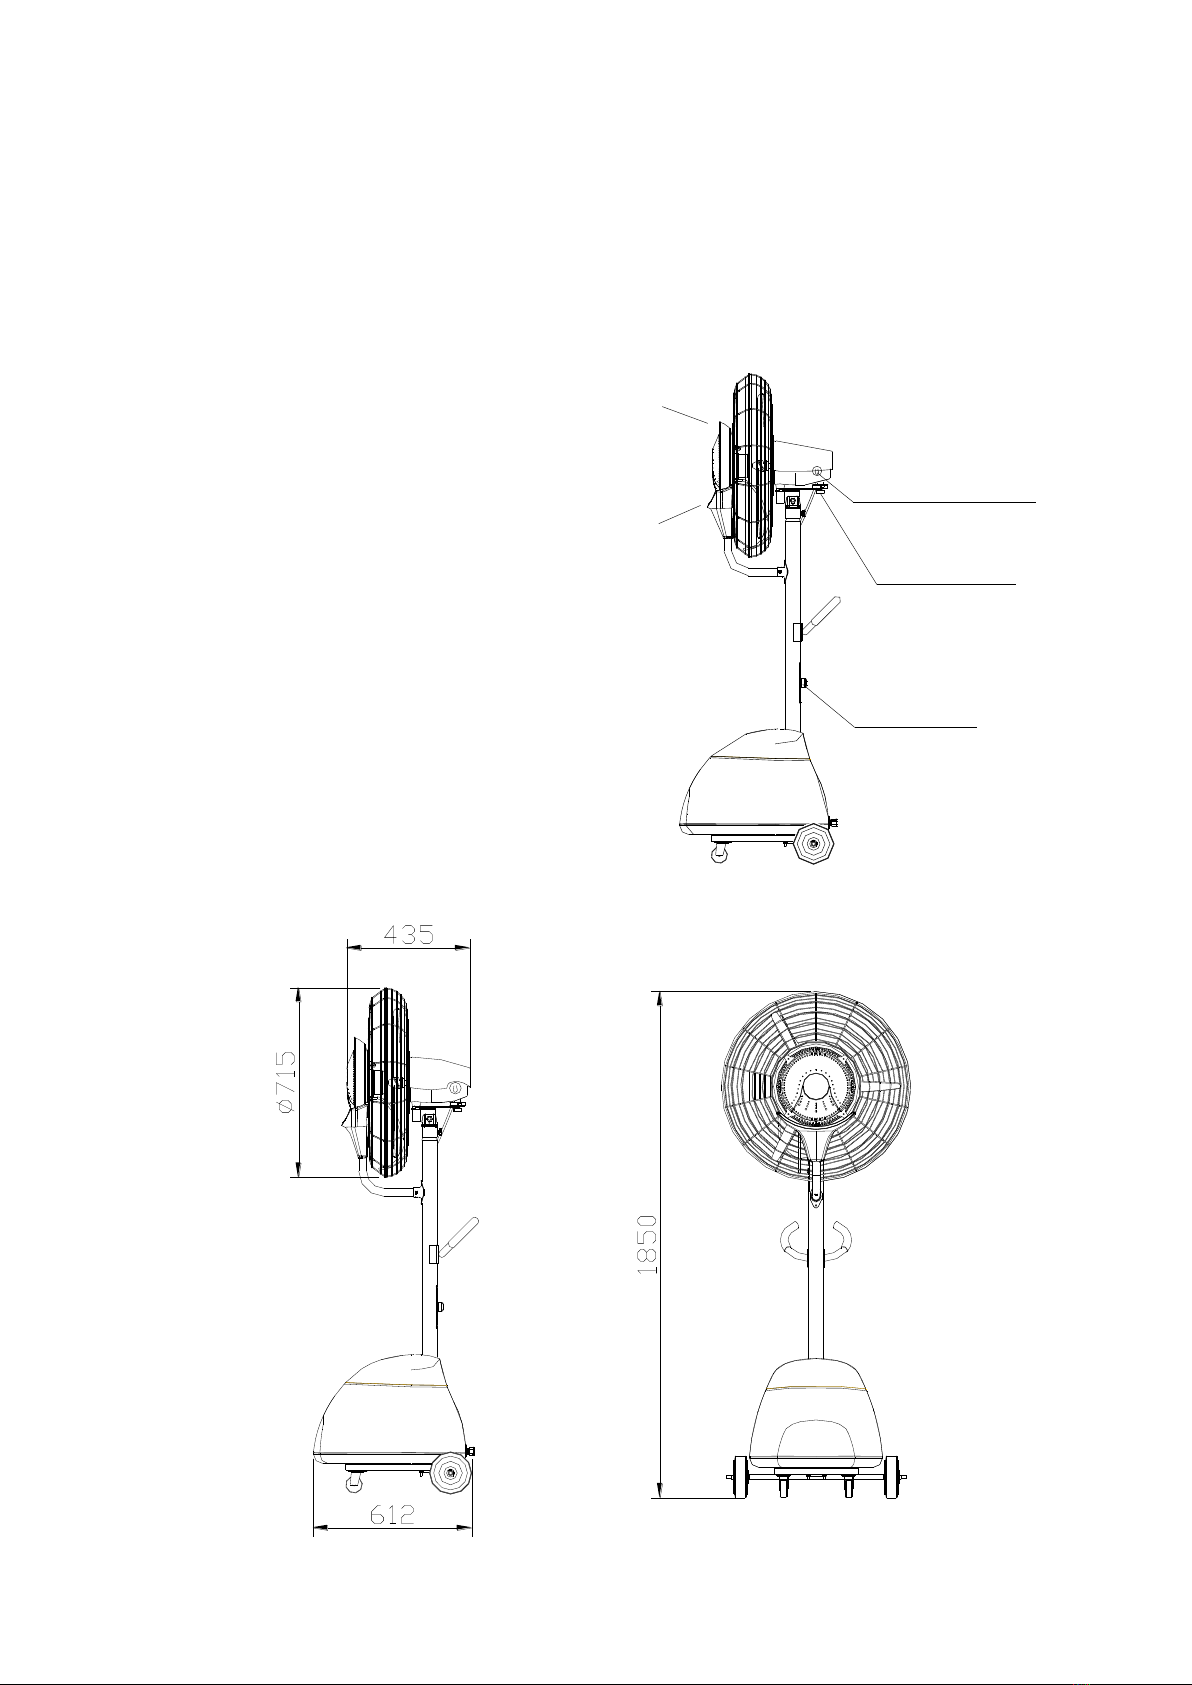
Product Dimension.
Securing scew
Ball valve
Speed-adjusting
switch
Diagram 7
DIAGRAM 5
10

Structure Diagram
1. safety cover
2. safety grill
3. misting plate
4. water outlet
5. whorl bent connector
6. water receiving plate
7. water receiving plate cover
8. flexible tube
9. plug
10. misting motor
11. front grill
12. blade
13. rear grill
14. fan motor
15. motor cover
16. motor protective cover
17. oscillating structure
18. tube connector for stand pole
19. stand pole
20. handle
21. ball valve
22. ballast
23. water tank cover
24. tank cart
25. Wheel
26. Caster
27. UV lamp
28. water pump
29. water tank
11

12
13

CERTIFICATE OF GUARANTEE
We congratulate you on the purchase of our FRE326N Validity 12 months from date of purchase of the appliance: the guarantee
expires after this period. The invoice, receipt or hire purchase agreement shall prove the duration of the guarantee period.
Replacements and repairs caused by faulty materials or manufacture are guaranteed. Replacements and repairs to those parts of
the appliance subject to normal wear are excluded form this guarantee. The guarantee shall immediately cease and become void
should the appliance be dismantled or repaired by unauthorized people, or in case of negligence, or accidental damage during
transport or elsewhere, or in case of misuse, failure to comply with the instructions for use, maintenance carried out by
unauthorized people, faulty installation not in conformity with the laws in force. Replacement of the appliance is excluded from
this guarantee. The eventual repairs recognized in guarantee will be carried out free of charge for those appliances returned free
STAR PROGETTI’s factory or to one of the authorized distributor. All transport costs are to be paid by the customer.
N. SERIE / N. SERIE / APPLIANCE No.
DATA ACQUISTO / DATE D'ACHAT / DATA OF PURCHASE
FATTURA N. / FACTURE N. / INVOICE No.
RIVENDITORE / REVENDEUR / DEALER
14
This manual suits for next models
1
Table of contents
Other Star Progetti Fan manuals

Popular Fan manuals by other brands


Ribimex
Ribimex PRBAT20/VENSB User and maintenance manual

ALPATEC
ALPATEC VLO 312 manual

Monte Carlo Fan Company
Monte Carlo Fan Company 3CNHSM52 Series Owner's guide and installation manual

Fanimation
Fanimation Air Shadow FP810AM Specification sheet

Tommy Bahama
Tommy Bahama BAHAMA BREEZES owner's manual

Ruskin
Ruskin RRS Rooftop Systems P28 Series installation instructions


