Star Tec PRODUCTS ST 081 User manual
D
Ein federleichter und ergonomisch geformter Niedervolt-Lötkolben, der dennoch robust ist
und bei dem sich der Wärmefluß auf die Lötspitze konzentriert (somit den Griff ”kalt” läßt),
war Vorraussetzung für diese Neuentwicklung. Arbeiten mit Potentialausgleich und
Vollwellenlogik (schaltet im Nulldurchgang) sind als selbstverständlich gegeben.
Mit diesem kompakten Gerät können Sie auch bei den heutigen Anforderungen – immer
kleinere Bauteile, höhere Packungsdichten, getrennt von gefährlicher Netzspannung –
noch problemlos löten. Durch die stufenlose Temperatureinstellung wird schnell die
gewünschte Löttemperatur erreicht, die durch das leistungsfähige Heizelement und die
Schaltung kontrolliert nachgeführt wird.
Eine wirklich preiswerte Alternative, bei welcher der Einsatz neuester Technologien, unter
Berücksichtigung ökologischer Gesichtspunkte, nicht zu kurz gekommen ist.
Betriebsspannung: primär AC 230 V / 50 Hz
sekundär 12 V für Lötkolben
Leistung: max. 10 W
Sicherung: 0,08 A träge
Temperatureinstellbereich: 100 – 400 °C stufenlos
Heizkontrolle: durch LED
1. Lötspitze am Lötkolben befestigen.
2. Lötkolben auf die Ablage legen.
3. Stecker des Lötkolbens anschließen an Buchse.
4. Netzstecker mit der Steckdose verbinden (230 V).
5. Gerät einschalten.
6. Mit dem Potentiometerknopf die gewünschte Temperatur einstellen.
7. Beim Löten hochempfindlicher Bauteile kann über die Potentialausgleichsbuchse die
Lötspitze geerdet werden.
1. Nach erreichen der eingestellten Temperatur, Lötkolben von der Ablage nehmen.
2. Lötspitze an die Lötstelle führen und Lötzinn hinzugeben.
3. Lötkolben entfernen wenn das Zinn geschmolzen und die Verbindung zwischen den
Metallen hergestellt ist.
4. Lötspitze stets mit Lötzinn benetzt halten, da sie sonst "blind" wird und das Lötzinn
nicht mehr annimmt.
Das Wechseln der Lötspitze ist recht einfach, sollte aber nicht erfolgen, solange der
Lötkolben heiß ist (Verbrennungsgefahr!).
Die Lötspitze vom Lötkolben herunterziehen und durch eine neue Spitze ersetzen.
1. Schließen Sie das Gerät nur an eine Spannung entsprechend den Typenschild-
Angaben an.
2. Der Lötkolben muß auf der Ablage abgelegt werden.
3. Schalten Sie das Gerät beim Wechseln der Spitzen aus.
4. Beim Verlassen des Raumes, Gerät ausschalten bzw. Lötkolben nie unbeaufsichtigt
lassen (Brandgefahr!).
5. Den aufgeheizten Lötkolben nicht in Reichweite von Kindern gelangen lassen
(Verbrennungsgefahr!).
6. Halten Sie unbefugte Personen von dem Gerät fern.
7. Kinder über die Verbrennungsgefahr aufklären.
8. Der Lötkolben darf nicht zweckentfremdet werden.
9. Ziehen Sie beim Arbeiten am Gerät immer den Stecker.
10. Verwenden Sie das Gerät nur in trockenen Räumen.
11. Beachten Sie die vorhandenen hohen Temperaturen am Gerät und verhalten Sie
sich entsprechend vorsichtig.
12. Arbeiten Sie nicht in unmittelbarer Nähe von leicht entzündlichen Materialien.
13. Sorgen Sie für ausreichende Belüftung am Arbeitsplatz.
14. Reparaturen am Gerät dürfen nur von einer Elektrofachkraft vorgenommen werden,
die mit den damit verbundenen Gefahren bzw. den einschlägigen Vorschriften dafür
(VDE-0100, VDE-0701, VDE-0683) vertraut ist.
Inhalt: Lötstation
Lötkolben 12 V / 7,5 W
Lötspitze
Lötkolbenablage
Bedienungsanleitung
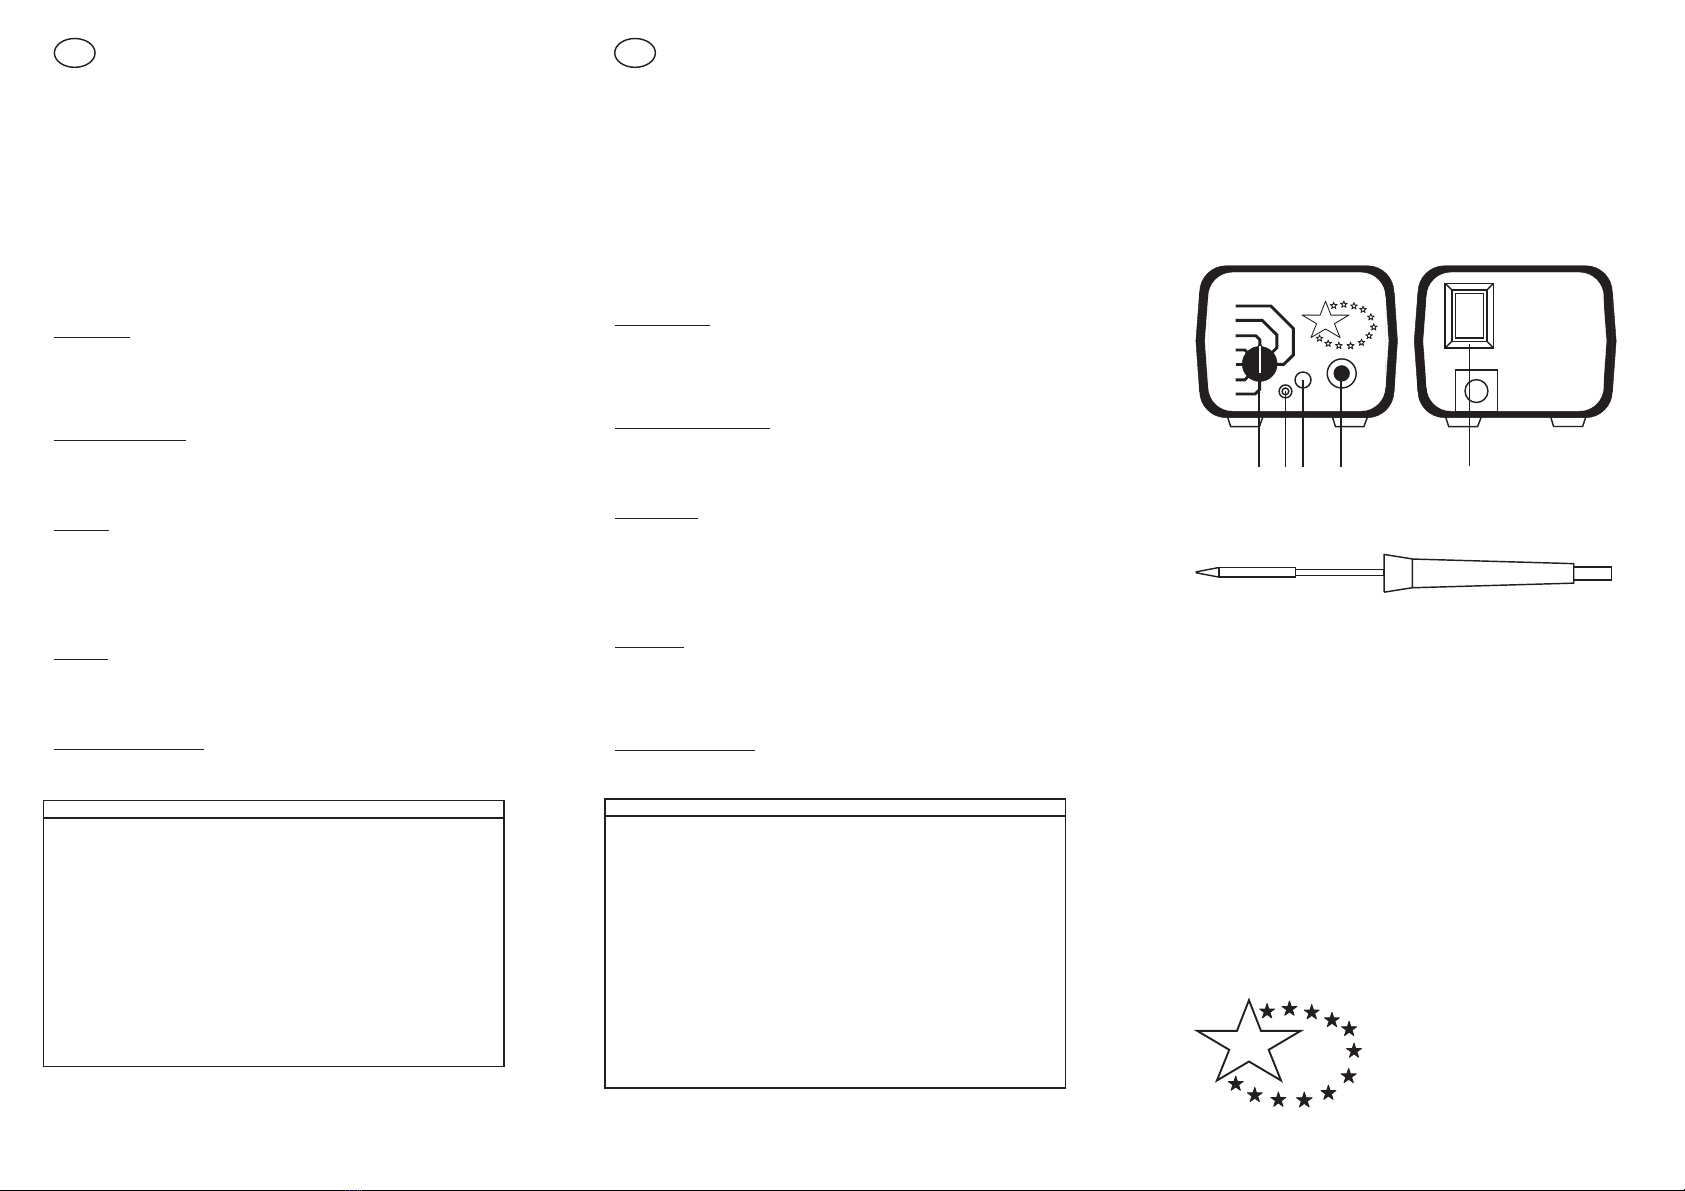
1 = Temperatureinstellung
2 = Potentialausgleichsbuchse
3 = LED Heizkontrolle
4 = Buchse für Lötkolben
5 = Netzschalter
Funkentstört nach EN 55014.
Technische Änderungen vorbehalten.
Technische Daten:
Inbetriebnahme:
Handhabung:
Auswechseln der Lötspitze:
Abbildung auf der Titelseite:
Sicherheitshinweise:
BEDIENUNGSANLEITUNG SOLDER - UNIT ST 081
250
200
150
SI
350 STAR TEC
Made in Germany
SOLDER - UNIT ST 081
300
100 C HEATER
400
oPOTTEMP
1 2 3 4 5
I
O
GB
A featherweight and ergonomically formed low voltage soldering iron, robustly built, with
heat flow concentration on the soldering tip, leaving the handle ”cold” – these where the
challenges for this new development. Working with equipotential bonding as well as full
wave logic (switching is done at zero crossing) are features which are given as a matter of
fact.
Even having to cope with modern demands –ever smaller construction parts, higher
packing density, separation of dangerous mains voltage –you work at your ease with this
compact unit. The required temperature will be reached quickly by the infinitely variable
temperature adjustment, with constant control given by the efficient heating element and
designed circuit.
A real low cost alternative, where implementation of latest technologies in connection of
ecological aspects have been taken into consideration.
Operating voltage: primaryAC 230 V / 50 Hz
secondary 12 V for soldering iron
Power: max. 10 W
Fuse: 0,08Atime lag
Temperature adjustment range: 100 –400 °C continuously
Heating indication: by LED
1. Insert soldering tip to soldering iron.
2. The soldering iron has to be placed on the iron stand.
3. Put the plug of the soldering iron into the socket.
4. Connect the mains plug to the mains socket (230 V).
5. Switch on the unit.
6. Adjust the required temperature with the potentiometer.
7. When soldering sensitive device, the soldering tip may be grounded by using the
equipotentialization socket.
1. Take the soldering iron from the stand after reaching the required temperature.
2. Lead the soldering tip to the piece of work and add soldering tin.
3. Remove soldering iron when tin is smelt and compound between metals is given.
4. Keep the soldering tip covered with tin at all times, this prevents the tip of getting
"blind" (in this case the tin would not stuck onto the tip).
Exchanging the soldering tip is quite easy, but should not be done as long as the
soldering iron is hot (danger of severe burning!).
Pull the soldering tip from the soldering iron and replace the tip by a new one.
1. Connect the unit only to a grid voltage as indicated on the type plate.
2. Always place the soldering iron on the iron stand.
3. Switch off the unit when exchanging soldering tips.
4. Always switch off the unit when leaving the work place, never leave the soldering
iron unattended (danger of fire!).
5. Keep the soldering iron out of reach of children (danger of severe burning!).
6. Never let unauthorised person in the reach of the unit.
7. Explain children all possible danger (burning).
8. Use the soldering iron only appropriate.
9. When opening the unit always pull off the mains plug.
10. Use the unit only in dry inside places.
11. Remember the danger of the high temperatures of the soldering iron, please work
carefully.
12. Do not use this unit near inflammable materials.
13. Always provide adequate ventilation at the working place.
14. Repairs at the device may only be carried out by electronic professionals who are
familiar with involved risks respectively with relevant rules (VDE-0100, VDE-0701,
VDE-0683).
Contents: Soldering station
Soldering iron 12 V / 7.5 W
Soldering tip
Soldering iron stand
Operating manual
1 = Temperature adjustment
2 = Equipotentialization socket
3 = LED heating-up control
4 = Socket for soldering iron
5 = Mains switch
Radio dejammed according to EN 55014.
Technical changes reserved.
Technical data:
First steps:
Operating:
Changing of the soldering tip:
Picture at the front page:
Safety instructions:
OPERATING MANUAL
b
STAR
TEC
PRODUCTS
HÜTZELSTRASSE 18 / 20
28 329 BREMEN / GERMANY
TEL.: 0049-(0)421 / 467 6934
FAX: 0049-(0)421 / 467 5517
mail: [email protected]
web: www.startecproducts.de
STAR TEC PRODUCTS
b

I
Questo elettrosaldatore a basso voltaggio di nuovo sviluppo è leggerissimo e con forma
ergonomica, ma allo stesso tempo robusto e con il flusso del calore concentrato sulla
punta (così l’impugnatura rimane fredda). Evidentemente si lavora con il compenso del
potenziale e la logica delle onde piene (cioè, commuta nel passaggio per lo zero).
Con questa apparecchiatura compatta potete effettuare senza problemi i Vostri lavori di
saldatura soddisfacendo tutte le attuali esigenze –componenti sempre più piccoli e più
densamente sistemati - stando lontano dalla tensione di rete che può essere fonte di
pericolo. Mediante la regolazione continua della temperatura si arriva velocemente alla
temperatura di lavoro desiderata, che viene mantenuta attraverso l’elemento riscaldante
potente ed il suo controllo.
Si tratta di un’alternativa veramente economica nella quale sono state impiegate le
tecnologie più avanzate tenendo conto delle esigenze di avere un basso impatto
ambientale.
Tensione di funzionamento: primaria AC 230 V / 50 Hz
secondaria 12 V per il saldatore
Prestazioni: 10 W max.
Fusibile di sicurezza: 0,08 A ritardato
Campo di regolazione temperatura: 100 –400 °C continua
Controllo del riscaldo: con LED
1. Fissare la punta al saldatore
2. Mettere il saldatore sul supporto
3. Inserire la spina del saldatore nella presa.
4. Collegare la spina di rete con la presa (230 V)
5. Accendere l’apparecchiatura.
6. Regolare con la manopola del potenziometro la temperatura desiderata.
7. Durante la brasatura di componenti molto sensibili la punta di saldatura può venire
messa a terra mediante la presa di compenso potenziale.
1. Dopo il raggiungimento della temperatura desiderata, togliere il saldatore dal
supporto.
2. Portare la punta di saldatura al punto da saldare ed aggiungere dello stagno.
3. Togliere il saldatore quando lo stagno si è sciolto e si è creato il collegamento tra i
due metalli.
4. Tenere la punta sempre bagnata con stagno, altrimenti diventa ”cieca”e non accetta
più lo stagno.
La sostituzione della punta di saldatura è assai semplice, ma non dovrebbe essere
effettuata quando il saldatore è ancora caldo (pericolo di bruciature!).
Tiri la punta di saldatura dal saldatore e sostituire la punta con una nuova.
1. Collegate l’apparecchiatura solo ad una tensione che corrisponde a quella indicata
sulla targhetta.
2. Il saldatore deve essere appoggiato sul proprio supporto.
3. Spegnete l’apparecchiatura durante la sostituzione delle punte.
4. Spegnete l’apparecchiatura quando lasciate il posto di lavoro, e non lasciatela mai
inosservata (pericolo di incendio!).
5. Tenete il saldatore caldo fuori dalla portata dei bambini (pericolo di bruciature).
6. Tenete lontano le persone non autorizzate.
7. Spiegate ai bambini che possono bruciarsi.
8. Non utilizzate il saldatore per scopi diversi della saldatura.
9. Togliete sempre la spina dalla rete se effettuate dei lavori all’apparecchiatura.
10. Utilizzate l’apparecchiatura solo in ambienti asciutti.
11. Tenete conto delle temperature elevate che l’apparecchiatura può raggiungere e
comportatevi di conseguenza.
12. Non lavorate nelle immediate vicinanze di materiali facilmente infiammabili.
13. Verificate che il posto di lavoro sia sufficientemente ventilato.
14. Le riparazioni dell’apparecchiatura devono essere effettuate solo da tecnici
elettricisti abituati ai pericoli connessi e che conoscono le relative normative
(VDE-0100, VDE-0701, VDE-0683).
Contenuto: Stazione di saldatura
Saldatore 12V / 7.5 W
Punta di saldatura
Supporto per il saldatore
Istruzioni per l’uso
1 =
2 =
3 = LED controllo riscaldo
4 = Presa per saldatore
5 =
Schermato contro i radiodisturbi secondo EN 55014.
Ci riserviamo di effettuare delle modifiche tecniche.
Dati tecnici:
Messa in funzione:
Impiego:
Cambio della punta di saldatura:
Figura in prima pagina:
Regolazione temperatura
Presa di compenso potenziale
Interruttore generale
Indicazioni per la sicurezza:
ISTRUZIONI PER L’USO F
Ce fer à souder basse tension, très léger et ergonomique, mais aussi très robuste, où
la chaleur se concentre sur la pointe à souder (le manche reste "froid"), est un
appareil d'une conception nouvelle qui permet, bien sûr, de travailler avec
compensation de potentiel et logique ondes pleines (commutation au passage par
zéro).
Avec cet appareil compact, vous pouvez effectuer sans problème vos travaux de
brasage en répondant aux exigences actuelles - composants toujours plus petits,
densités toujours plus élevées –tout en étant séparé de la tension de réseau
dangereuse. Grâce au réglage progressif de la température, vous atteignez
rapidement la température souhaitée, qui est contrôlée par le puissant élément de
chauffage et l'unité de commande.
Une alternative vraiment bon marché, d'une technique avancée et respectueuse de
l'environnement.
Tension de service: primaireAC 230 V / 50 Hz
secondaire 12 V pour fer à souder
Puissance: 10 W max.
Fusible: 0,08 Aà action retardée
Plage de température: 100 - 400 °C, réglage progressif
Contrôle de la température: par DEL
1. Fixer la pointe à souder sur le fer à souder.
2. Poser le fer à souder sur le support.
3. Branchez la fiche du fer à souder dans la prise.
4. Branchez la fiche secteur dans la prise (230 V).
5. Allumez l'appareil.
6. Réglez la température souhaitée à l'aide du bouton du potentiomètre.
7. Pour le soudage de composants très sensibles, la pointe à souder peut être
mise à la terre par le biais de la prise de compensation de potentiel.
1. Lorsque la température souhaitée est atteinte, enlevez le fer à souder de son
support.
2. Dirigez la pointe à souder vers la partie à souder et appliquez l'étain.
3. Eloignez le fer à souder lorsque l'étain a fondu et que la connexion entre les
métaux est établie.
4. La pointe à souder doit toujours être imprégnée d'étain à souder, sinon elle se
ternit et n'absorbe plus l'étain.
Il est très facile de remplacer la pointe à souder, mais il ne faut pas le faire tant
que le fer à souder est encore chaud (risque de brûlures!).
Tirez la pointe à souder du fer souder et remplacez la pointe par une neuve.
1. Ne raccordez l'appareil qu'à la tension indiquée sur la plaque signalétique.
2. Le fer à souder doit reposer sur le support spécial.
3. Eteignez l'appareil pour changer la pointe.
4. Lorsque vous quittez votre poste de travail, éteignez l'appareil et ne le laissez
jamais sans surveillance (risque d'incendie).
5. Ne laissez jamais le fer à souder allumé à la portée des enfants (risque de
brûlures).
6. Ne laissez pas l'appareil à la portée de personnes non autorisées.
7. Expliquez aux enfants qu'ils risquent de se brûler.
8. N'utilisez pas le fer à souder à d'autres fins que celles pour lesquelles il est
prévu.
9. Retirez toujours la fiche de la prise lorsque vous travaillez sur l'appareil.
10. N'utilisez l'appareil que dans des locaux secs.
11. Attention aux températures élevées atteintes par l'appareil! Soyez prudent!
12. Ne travaillez pas à proximité directe de matériaux facilement inflammables.
13. Veillez à ce que les locaux où vous travaillez soient suffisamment aérés.
14. L'appareil ne peut être réparé que par un électricien qui connaît les dangers et
les prescriptions de sécurité à respecter (VDE-0100, VDE-0701, VDE-0683).
Contenu: Station de soudage
Fer à souder 12 V / 7.5 W
Pointe à souder
Support du fer à souder
Mode d'emploi
1 =
2 =
3 = Contrôle de température DEL
4 = Prise pour fer à souder
5 =
Antiparasité selon EN 55014.
Sous réserve de modifications techniques.
Caractéristiques techniques:
Mise en service:
Utilisation
Remplacement de la pointe à souder:
Illustration de la première page:
Réglage de la température
Prise de compensation de potentiel
Interrupteur principal de marche-arrê
:
à
Prescriptions de sécurité:
MODE D’EMPLOI
Empfohlenes Zubehör / Recommended accessories:
"bleistiftform" / "pencil-shaped" ORDER - NO: 08160
"keilform" / "wedge-shaped" ORDER - NO: 08161
"meisselform" / "chisel-shaped" ORDER - NO: 08162
Kolben 7,5W (Langes Rohr) / Iron 7.5W (Long tube) ORDER - NO: 08131
Spitze (Bohrung 2mm) / Tip (drill 2mm)
"Modellierahle" / "Modelling awl" ORDER - NO: 08171
"Modellierklinge" / "Modelling blade" ORDER - NO: 08172
"Modellierspatel" / "Modelling spatula" ORDER - NO: 08173
"Modelliermesser" / "Modelling knife" ORDER - NO: 08174
Kolben 7,5W (Kurzes Rohr) / Iron 7.5W (Short tube) ORDER - NO: 08132
This manual suits for next models
1


