Starbelle ESWT SC User manual

ESWT SC System
ShockWave Therapy System
OPERATOR’S MANUAL
Warning!!!
Before attempting to use or operate the system, operator should read this manual and
become thoroughly familiar with all its safety requirements and operating procedures.

Contents
Chapter 1 System Overview
Chapter 2 General Precautions and Cautions
Chapter 3 Operating Instructions
Chapter 4 Treatment Process and Application
Chapter 5 After Sale Service

Chapter 1 System Overview
Before the System leaving factory, the Company will do the best to protect the
equipment during transportation
System transportation is carried out by third party, not by Technology Co., Ltd
NOTE
Any damage to the packaging or to the system found prior to opening the
package should be reported to Company by photos and to the insurance carrier.
Equipment List
Please carefully check the following illustration showing that the ESWT SC
System should include:
1. Main Unit
2. Applicators
3. Operator’s Manual
4. Power Cable
5. Applicator support
6. Extra Fuse
Operation handles
1. ShockWave Handle with 4 different sizes tips.

Chapter 2 General Precautions and Warnings
The following precautions, cautions and warnings must be observed for the safe use of the system.
Precautions
Operator should read this manual thoroughly before attempting to operate the system.
Probes must be kept clean at all times.
The system is heavy and may cause injury if proper care is not used when moving it. The
system is well balanced and is designed to be moved, but should always be moved
carefully and slowly. Never pull the system by the probes.
Cautions
Only after HEMS’ authorization, then may service the system. This includes making
internal adjustments to the power supply,LipoShock system, probes, etc.
Maintenance performed by the operator must only take place when the system is shut
down and disconnected from the electrical power source. Performing maintenance
procedures with the system powered-up can be hazardous to the operator and/or
destructive to the system.
Always turn off the system when it is not in use.
Never leave the system in Pause Mode and Start Mode unattended.
Never press the Start Softkey unless the probe is safely oriented at a specific and
intended target.
The probes must always be visually inspected before treating the patient. If any damage
is apparent, do not use the probes.
Never leave the system turned on, open or unattended during system maintenance.
NOTE
Please adjust the emitting energy step by step as per the communication with client.
Explosion and Fire Hazards
The system is not suitable for use in the presence of flammable mixtures with air or
oxygen.
Do not operate in the presence of volatile solvents such as alcohol, gasoline or other
solvents.
Do not use any flammable substances such as alcohol or acetone in the preparation of the
skin for treatment. If necessary, use soap and water to clean skin before treatment.
If alcohol is used to clean and disinfect any probe, allow it to dry thoroughly before
operating the system.
Flammable materials must be kept at a safe distance from the system.

Chapter 3 Operating Instructions
Prepare the System for Operation
To prepare the system for operation:
1. Check the connection of the system and the AC mains power.
2. Ensure that the applicators are connected correctly.
Operating the System
Turn on the system and the screen is on.
A. Touch PROTOCOLS icron and enter the protocols pages,
B. Touch ENTER icon and enter into handle operation interface
C. Touch chip iron and enter the system page.
A. PROTOCOLS page

B. ShockWave Operation Interface
1. Energy icon : Touch and to set the shock wave
power from 0MJ to 180MJ (It has six different energy: 0MJ, 60MJ , 90MJ, 120MJ,
150MJ, 180MJ ).
2. Frequency icon : Touch and to set the frequency
from 1Hz to 16Hz.
3. Shocks icon : Touch and to adjust the pulse of
shock wave from 0 to 5000.
4. Start icon : Start the treatment.
5. Pause icon : Pause the treatment.
6. Return icon : Return to the main function interface.
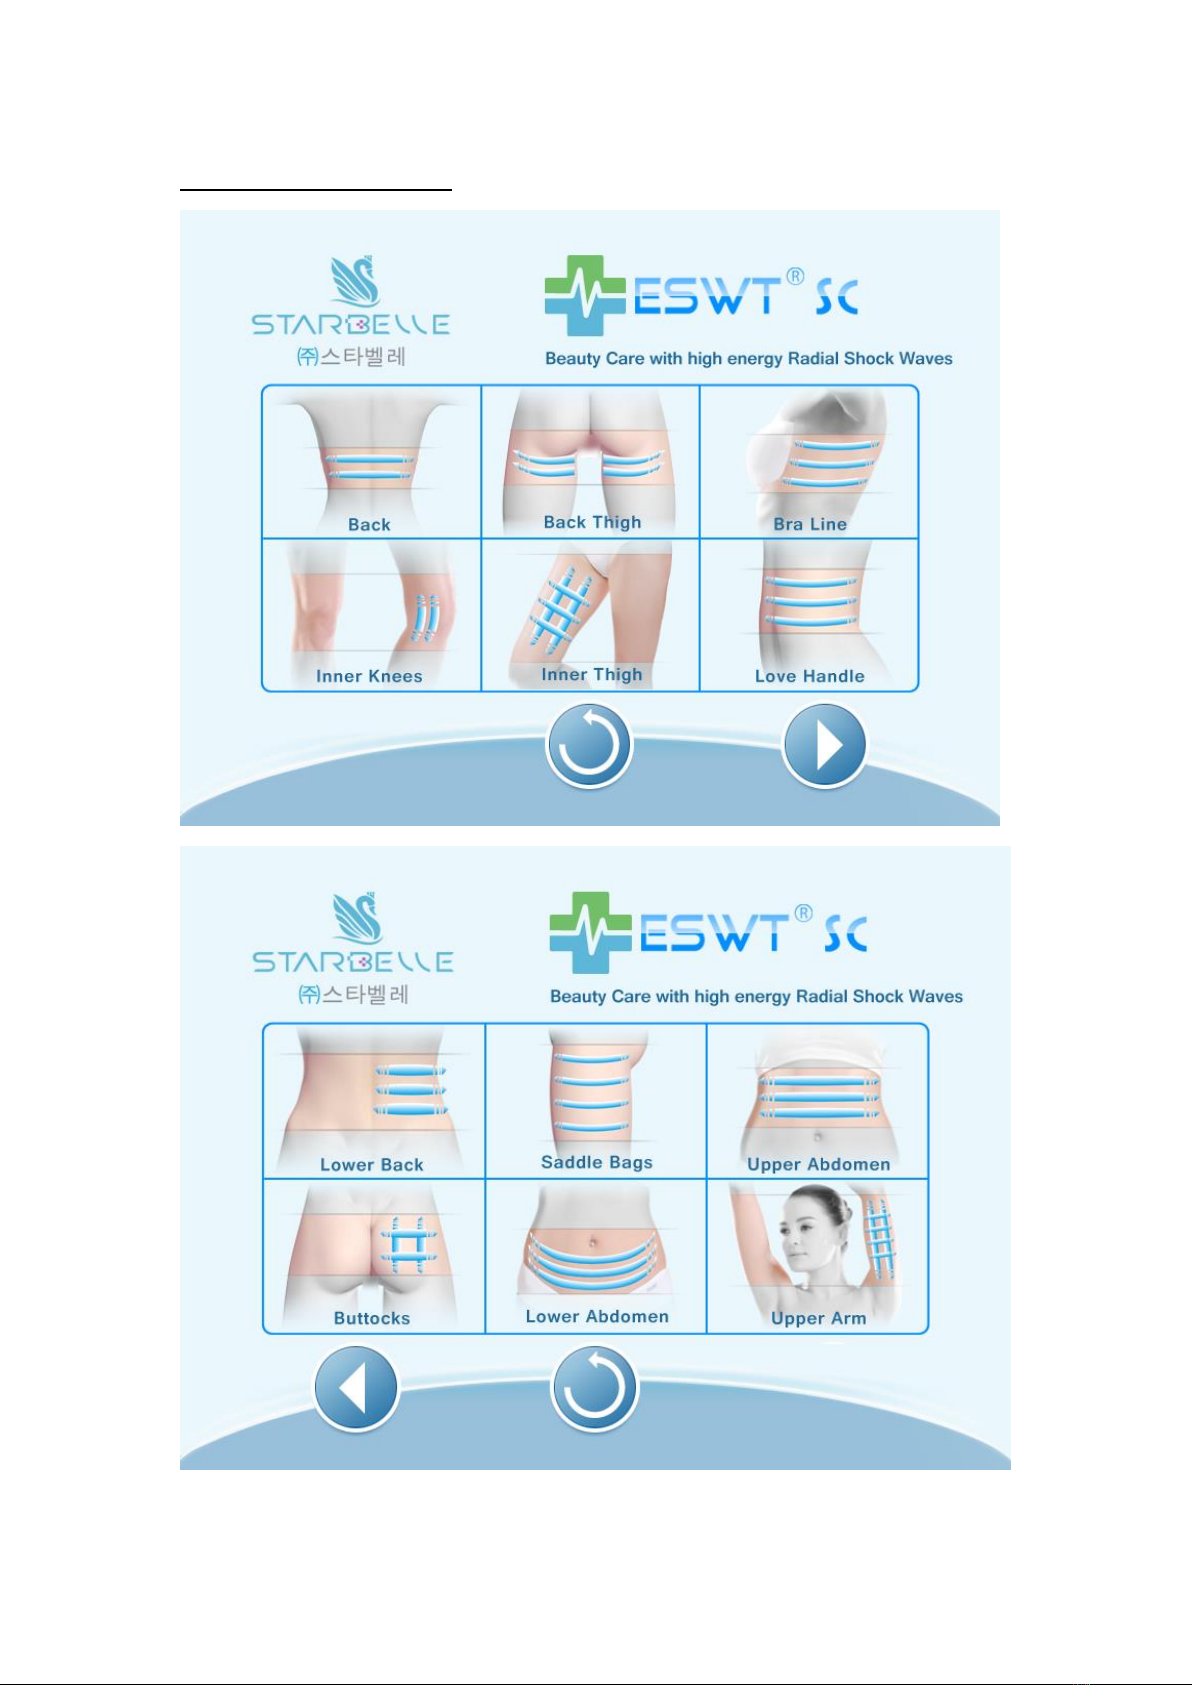
7. Information icon : Press it to see the shockwave treatment area

For ShockWave treatment, we need to press the foot pedal.
C. System page
It shows the total shot number for shockwave therapy handle.

Technique Data
Display
10 inch Color touch screen
RSWT Power
Max 180mJ
RSWT Frequency
Max 16Hz
RSWT tips
6mm, 15mm, 25mm, 39mm
Input Voltage
220V240V/50-60Hz
Mark
CE
Chapter 5 After Sale Service
Warranty Coverage
HEMS warrants defects in materials and workmanship for a period of 1 year
from the date of original purchase.
HEMS will repair these products at no charge or refurnish the parts if it has
any abnormal condition.
Exclusions
This warranty is void and invalid in case of ;
Damage caused by accident, abuse, misuse or misapplication, it will be
repaired with repair fee
Damage caused by service performed by anyone who is not technician or
qualified by manufacturer.
A product or part that has been modified without any permission of
manufacturer.
A Product that has no serial number.
Maintenance
HEMS provides lifetime maintenance. Only charge the cost price for replacing the
component.
NOTE
1. After treatment, keep the power on about 3 minutes to make inner board cooling.
2. Please keep equipment in the shade, avoiding direct lay of light.
3. Don’t drop the equipment & keep it out of any shock.
4. Clean probes after use.
5. Moving the equipment, be careful not to drop applicators

Chapter 6 Engineering Drawing
The Engineering Drawing guides to check and repair the system.
When the system meets problem, please take the photos and give the feedback to
Hermes Technology by email, Artemis will handle the problems as soon as possible.
Fuse Replacement
To replace burnt fuses:
1. Turn off the system and disconnect the power cable from the outlet.
2. Unplug the power cable from the power cable connection port on the service
panel.
3. Remove the fuse housing as shown in Figure .
4. Remove the burnt fuses from the housing and replace them with the new ones.
5. Make sure that the fuses fit snugly within the fuse housing.
6. Insert the fuse housing into its receptacle and push it in until it snaps into
place.
7. Connect the power cable to the system and to the mains outlet.
8. Turn on the system and verify that it is functioning properly.
Caution
Make sure that the type and rating of the new and the replaced fuses match.
Always replace both fuses at the same time.


