Starkey Galaxy RIC User manual

Galaxy Standard Products
Operations Manual
RIC (Receive-In-Canal) Rechargeable
mRIC (Micro Receive-In-Canal) Rechargeable

INTRODUCTION TO YOUR STARKEY HEARING AID
Hearing aid models covered in this user guide:
RIC RT (include image)
mRIC R (include image)
Charging accessories covered in this user guide:
StarLink Mini Charger (include image)
StarLink Premium Mini Charger* (include image)
StarLink Charger (include image)
*The Premium Charger contains an on-board, non-removable, rechargeable lithium-ion battery. This charger is
available as a portable charger for standard-style rechargeable hearing aids.

TABLE OF CONTENTS (header)
Overview
Genesis RIC RT
Genesis mRIC R
StarLink Mini Charger
StarLink Premium Mini Charger
StarLink Charger
Preparation
Charging Your Hearing Aids
StarLink and Starlink Mini Charger
StarLink Premium Mini Charger
Charging Your Charger
StarLink Premium Mini Charger
Hearing Aid Insertion and Removal
Operation
Power On & Off
Auto On/Off
User Controls
Telephone Use
Mobile Phone Use
Pairing with an iOS Device
Pairing with an Android Device
Accessories
Hearing Aid Care
Hearing Aid Charger Care
Service and Repair
Troubleshooting Guide
Tips for Better Communication
Regulatory Information
Safety Information
FDA Information
FCC Information

RIC RT Overview (header)
Features, Controls, and
Identification
1. Hearing Aid
2. Cable
3. Receiver
4. Microphones
5. Rocker Switch
6. Location of left/right side hearing aid indicator
Red is for Right Ear / Blue is for Left Ear
7. Retention Lock
8. Location of manufacturer’s name and model
name
9. Location of left/right side receiver indicator
10. Charging contacts
11. Location of serial number
12. Instant fit earbud
13. Custom earmold (optional)
14. RIC custom power earmold (optional)
FIGURE 1RIC-RT

mRIC Overview (header)
Features, Controls, and Identification
1. Hearing Aid
2. Cable
3. Receiver
4. Microphones
5. Switch
6. Location of left/right side hearing aid indicator
Red is for Right Ear / Blue is for Left Ear
7. Retention Lock
8. Location of manufacturer’s name and model name
9. Location of left/right side receiver indicator
10. Charging contacts
11. Location of serial number
12. Instant fit earbud
13. Custom earmold (optional)
14. mRIC custom power earmold (optional)
FIGURE 2MRIC-R

StarLink Mini Charger Overview* (header)
Features, Controls, and Identification
1. Cleaning brush
2. Earbud/earmold reservoir
3. Charging ports
4. Hearing aid charging LEDs
5. USB-C port
*StarLink Mini Charger requires external power source (i.e. wall outlet) to charger hearing aids.

StarLink Premium Mini Charger Overview (header)
Features, Controls, and Identification
1. Cleaning brush
2. Earbud/earmold reservoir
3. Charging ports
4. Hearing aid charging LEDs
5. USB-C port

StarLink Charger Overview* (header)
Features, Controls, and Identification
1. Cleaning brush
2. Earbud/earmold reservoir
3. Charging ports
4. Hearing aid charging LEDs
5. USB-C port
*StarLink Charger requires external power source (i.e. wall outlet) to charge hearing aids.

Preparation (header)
Charging Your Hearing Aids –StarLink and StarLink Mini Charger
•An indicator will sound when the battery voltage in your hearing aids is low. You have approximately 30
minutes* of battery life remaining.
oAn indicator may also sound just before the battery stops working.
•Place your hearing aids in the charging port with the earbuds resting inside the reservoir.
•Your hearing aids will turn off automatically and begin to charge:
oStarLink and StarLink Mini Charger must be connected to an external power source (i.e. wall
outlet)
•Your hearing aids will automatically power on when removed from the charger.
•Various fault states can result in LED blinking scenarios. Remove hearing aids from charger, wait until LED
turns off and reinsert aids. If fault state continues, reach out to your hearing professional.
•Charing occurs whether the charger lid is open or closed.
•Your hearing aids will be completely charged in under 3 ½ hours.
•It is safe to keep your hearing aids in the charger after they are fully charged and any time you are not
wearing them.
•If you will not be wearing your hearing aids for an extended period of time (i.e. weeks):
oRemove the USB-C from the charger and/or external power source (i.e. wall outlet) OR
oRemove the hearing aids from the charger and turn them off (i.e. press and hold the switch for 3
seconds or consult with your hearing professional regarding your hearing aid controls) OR
oPlace the hearing aids in the charger reservoir for storage.
▪Do not place the hearing aids back on the charging ports.
*Actual time between low battery indicator and shut down will vary depending on environmental noise levels and
your use of the product.
Number of Solid White Lights
HA Battery Level
•
25% < X < 50%
••
50% < X < 75%
•••
75% < X < 100%
••••
100%

Preparation (header)
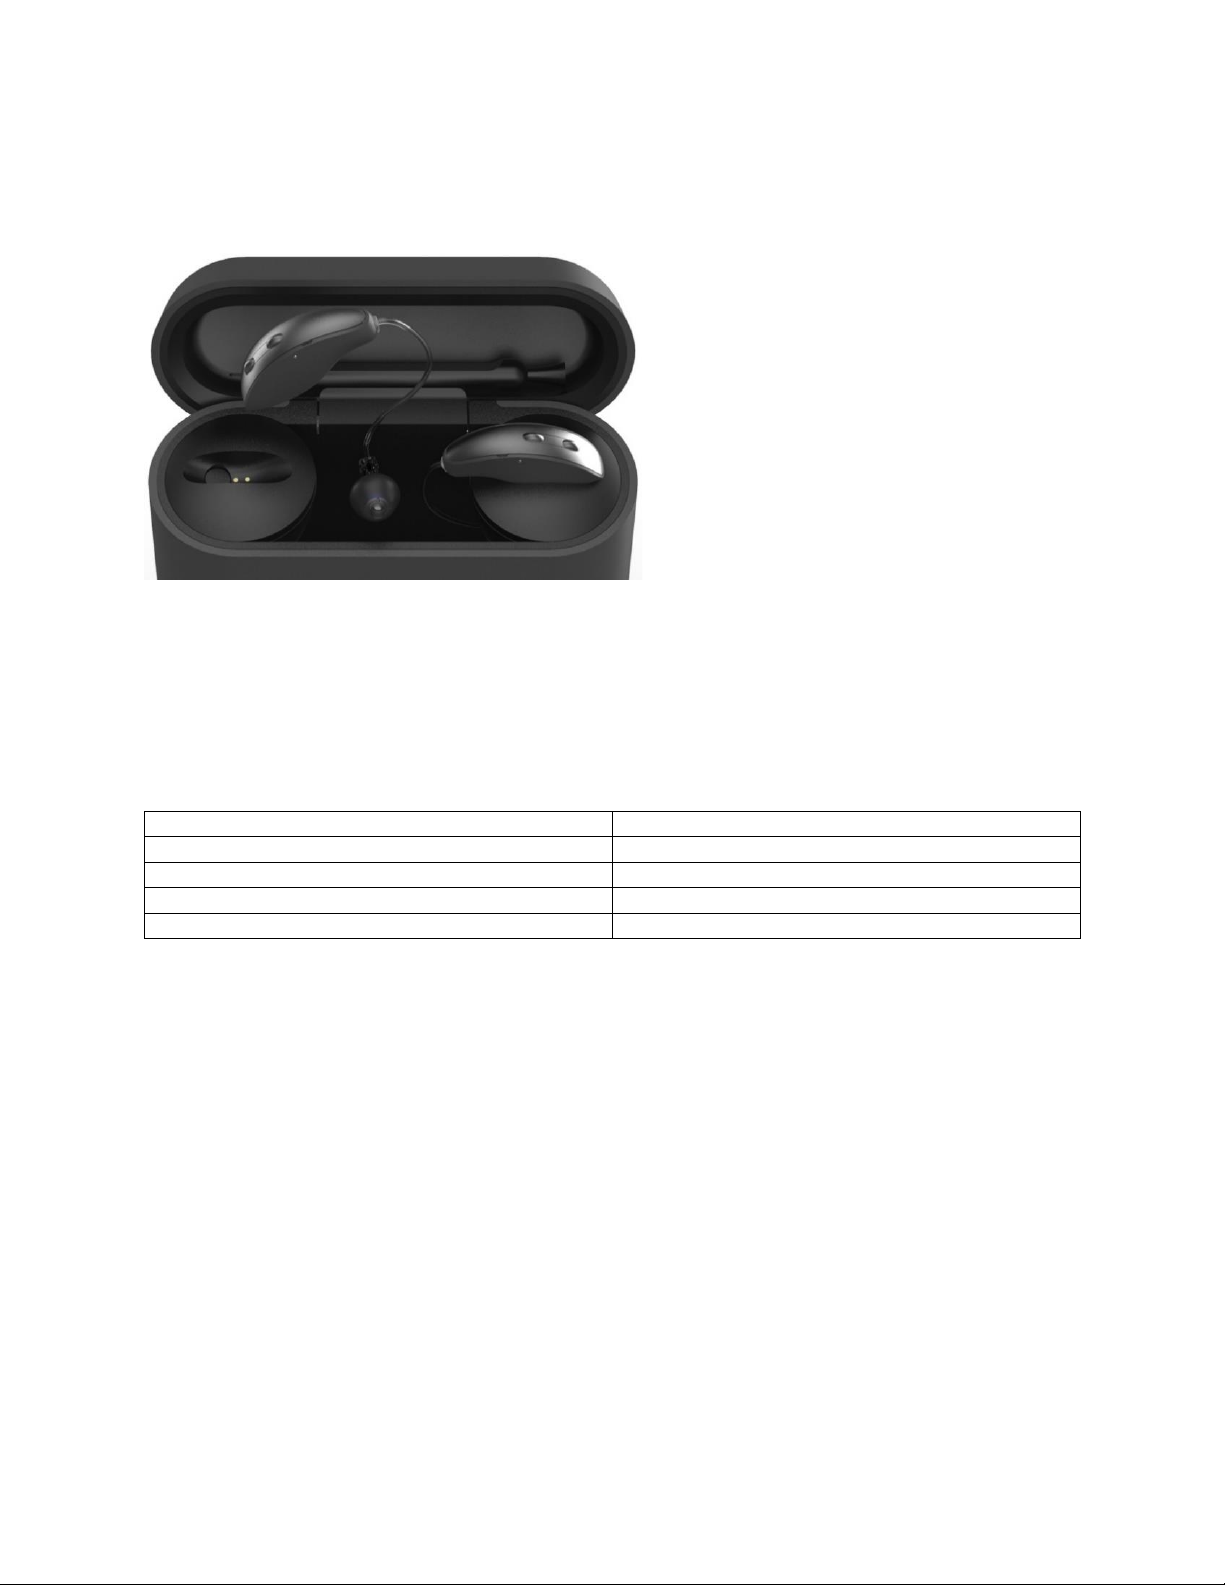
Charging Your Hearing Aids –StarLink Premium Mini Charger
•An indicator will sound when the battery voltage in your hearing aids is low. You have approximately 30
minutes* of battery life remaining.
oAn indicator may also sound just before the battery stops working.
•Place your hearing aids in the charging port with the earbuds resting inside the reservoir.
•Your hearing aids will turn off automatically and begin to charge:
oStarLink Premium Mini Charger’s onboard battery must be charger, otherwise charger must be
connected to an external power source (i.e. wall outlet).
•Your hearing aids will automatically power on when removed from the charger.
•Various fault states can result in LED blinking scenarios. Remove hearing aids from charger, wait until LED
turns off and reinsert aids. If fault state continues, reach out to your hearing professional.
•Charing occurs whether the charger lid is open or closed.
•Your hearing aids will be completely charged in under 3 ½ hours.
•It is safe to keep your hearing aids in the charger after they are fully charged and any time you are not
wearing them.
•If you will not be wearing your hearing aids for an extended period of time (i.e. weeks):
oRemove the USB-C from the charger and/or external power source (i.e. wall outlet) OR
oRemove the hearing aids from the charger and turn them off (i.e. press and hold the switch for 3
seconds or consult with your hearing professional regarding your hearing aid controls) OR
oPlace the hearing aids in the charger reservoir for storage.
▪Do not place the hearing aids back on the charging ports.
•When charging without the charger USB-C, the LEDs will turn off when the hearings aids are fully charged.
•To refresh the charger LEDs when the charger is not plugged-into an external power source (i.e. wall
outlet), remove the hearing aids from the charging port for 3 seconds and then replace them in the
charger. Refresh lasts 10 seconds only, then LEDs will turn off again.
*Actual time between low battery indicator and shut down will vary depending on environmental noise levels and
your use of the product.
Number of Solid White Lights
HA Battery Level
•
25% < X < 50%
••
50% < X < 75%
•••
75% < X < 100%
••••
100%

Preparation (header)
Charging Your Charger –StarLink Premium Mini Charger
Charging the StarLink Premium onboard battery
•Connect USB-C cord to external power source (i.e. wall outlet)
Number of Solid White Lights
Charger Onboard Battery Level
•
25% < X < 50%
••
50% < X < 75%
•••
75% < X < 100%
••••
100%

2
3
3
2
Preparation (header)
Hearing Aid Insertion and Removal
To insert the earbud or earmold:
1.
Hold
the cable at the
bend
in front of the receiver with your
thumb
and
for
efinger
�
Gently insert the
receiver into your
ear
canal
.
2. Wrap the hearing aid over the top of your ear, carefully placing
it
behind
your
ear
.
3.
Place
the
r
etention
lock inside the
bowl
of
your
ear
.
To remove the earbud or earmold:
1.
Remove
the
r
etention
lock from the bowl of your ear
2.
Remove
the hearing aid fr
om behind
your
ear
3.
Grasp
the
receiver
with
your
thumb
and
for
efinger
�
Gently
pull
out
of
your
ear
canal.
Do not pull with the hearing aid case, as this may damage the connection
�

Preparation (header)
Hearing Aid Helpful Hints
•Minor irritation and/or inflammation may occur as your ear becomes accustomed to having an object in
it; if so, please contact your hearing professional.There are several different sizes of earbuds and custom
earmolds that may be more comfortable.
•If an actual allergic reaction occurs, alternative earmold materials are available; contact your hearing
professional.
•Severe swelling, discharge from the ear, excessive wax or other unusual conditions warrant immediate
consultation with a physician.

Operation (header)
Hearing Aid On & Off
On –The hearing aids will power on automatically after removing them from the charger ports. The hearing aid
will delay in powering on, allowing enough time to insert the hearing aid into the ear.
On –If the hearing aid is manually powered off, pressing the switch will power it on. The hearing aid will delay in
powering on, allowing enough time to insert the hearing aid into the ear.
OFF –The hearing aids will power off automatically when placed on the charger ports.
-The StarLink and StarLink Mini Charger will require an external power source (i.e. wall outlet) to
charge the hearing aids.
-StarLink Premium Mini Charger’s onboard battery must be charged, otherwise charger must be
connected to an external power source (i.e. wall outlet).
OFF –The hearing aids can be powered off manually by pressing the switch for 3 seconds.
Auto On/Off
Your hearing aidmay support the ability to automatically go into a low-poweredstate to conserve battery*. This control
can be configured by your hearing professional or via the My Starkey app. Placeyour hearing aid on a flat, stablesurface
(i.e. a table) with your earmold or earbud facing upwards and it will go into a low-powered state after about 15 minutes.
To resume normal hearing aid function, pick upyourhearing aid and place it in your ear. Your hearing aid will detect this
motion and switch back on again. You may hear a tone indicating that your hearing aid is powered on.
*Going into a low-powered state helps conserve battery consumption when used with rechargeable hearing
User Controls
Ask your hearing professional how your hearing aid’s user control can be personally customized.
User Control Actions
-Short Press: Press and release the control
-Long Press: Press and hold the control for 3 seconds or greater
-Tap Gesture: Firmly tap twice on your hearing aid*
User Control Functions
-BiCROS Balance Control: Fine-tune the balance between your hearing aid and transmitter (CROS/BiCROS).
-Edge Mode+:Identify and create a temporary, real-time adjustment tailored for challenging environments.
-Manual Alert: Initiate analert text message by the My Starkey app onyour smartphone.
-Program Control: Configure multiple memories within hearing aid.
-Multiflex Tinnitus Level: Adjust tinnitus stimulus played through hearing aid.
-Mute: Silence the hearing aid while wearing.
-Power On/Off:
-Program Change: Cycle through programs optimized for specific environments
-Start/Stop Accessory Streaming: Control streamed audio from a 2.4GHz accessory.
-Volume: Regulate thevolume of environment sounds, or accessory stream ifan accessory streamis present

Operation (header)
Assigned User Control Settings
Short Press
(1 second)
Long Press
(3 seconds)
Tap Gesture*
Balance Control
Edge Mode
Manual Alert
Multiflex Tinnitus Level
Mute
Power On/Off
Program Change
Start/Stop Accessory
Streaming
Volume Control
*Hearing aid model dependent
Telephone Use
Your hearing aids are designed to work with a smartphone for telephone calls (see page X).
If you prefer to use a landline phone, your hearing care professional can provide instructions and customize your
hearing aids to a particular telephone setting.
Mobile Phone Use
The My Starkey app lets you easily connect your Galaxy hearing aids to Apple and Android devices.
Smartphone Compatibility
(insert QR code: https://www.starkey.com/hearing-aids/apps/thrive-hearing-control/compatibility)
When the hearing aid is paired and powered on, incoming phone
calls will route automatically to your hearing aid.When your hearing
aid is not powered on, incoming calls route only to your
smartphone.

Operation (header)
Pairing Your Hearing Aid with an iOS Device
To adjust your hearing aid with your iOS device, you must pair the two together so they can communicate.Please
follow the instructions to pair your iOS device and your hearing aid.
1. Ensure Bluetooth is enabled on your iOS device.Within the Settings menu go to Bluetooth and toggle to
On.
2. Turn your hearing aids off and back on.This puts the hearing aids in pairing mode.
3. Within the Settings menu go to Accessibility > Hearing Devices.
•You will see your hearing aid name (i.e. “Chris Hearing Aids”) when the iOS device first discovers
your hearing aids.
•If your name does not appear in the “Devices” list within 5-7 seconds, tap Accessibility in the
upper left corner, then tap Hearing Devices.
4. Tap on the hearing aid name to connect your hearing aids to the iOS device.
5. You will see two pairing requests (one for each hearing aid).Select Pair for each request.These requests
may be several seconds apart.
6. When pairing is complete, your hearing aid name will change from black to blue.
You can now adjust your hearing aids with your iOS device with either the native iOS controls or the My Starkey
app.
•To access the native iOS hearing aid controls, triple- click the Home button (iPhone 8 or earlier) or the side
button (iPhone X and newer) on your iOS device.
•From this screen you can adjust the volume, select memory or use your iOS device as a remote
microphone.
•Select Start Live Listen to stream the iOS device microphone input directly into your hearing aid.Point the
iOS device microphone toward the audio source.
•To minimize background noise and provide the best signal, place the iOS device as close to the source as
possible.
•For additional configuration options, please consult Apple support.
Right Volume/Left Volume allows you to increase and decrease volume for each hearing aid individually.
Turn off Adjust Independently to make changes to both hearing aids simultaneously.
Normal indicates the name of a memory setting in the hearing aid.You can select from any memories shown in
the list to change the hearing aid to that memory setting.
Pairing Your Hearing Aid with an Android Device
To adjust your hearing aid with your Android device, you must pair the two together so they can communicate.
Please follow the instructions to pair your device and your hearing aid.
1. Tap the Settings icon on your device.
2. Ensure Bluetooth is On.
3. Turn your hearing aids off and back on.This puts the hearing aids in pairing mode.
4. When the hearing aids are discovered, you will see your first name followed by Hearing Aid (“Michelle’s
Hearing Aid”) under Available Devices.You will see this for each device.
5. Tap the hearing aid name to connect each hearing aid to the device.
Operation (header)

Accessories (header)
Accessories
There are several accessories that allow you to control and maximize the full potential of your hearing aids.
(insert QR code: https://www.starkey.com/hearing-aids/accessories)
Consult with your hearing professional to determine which accessories may be best for you.

Hearing Aid Care (header)
Hearing Aid Care
Keep your hearing aids clean.Heat, moisture and foreign substances can result in poor performance.
•Use a cleaning brush or soft cloth to clean debris from around the user control and microphone; inspect
the receiver, earbud and wax guard regularly.
•Never use water, solvents, cleaning fluids or oil to clean your hearing aid.
Your hearing professional can provide further information on additional maintenance procedures for your hearing
aid, if needed.
Hear Clear Receiver Wax Guards
RIC hearing aids integrate disposable Hear Clear earwax protection.The innovative wax guards prevent earwax
accumulation in the hearing aid receiver.When you need to replace your wax guards, please follow these
instructions:
1. Insert empty end of the application stick straight into used wax guard in hearing aid.
2. Pull straight out (do not twist) on stick to remove used wax guard.
3. Use opposite end of stick to firmly insert clean wax guard straight into hearing aid.
4. Pull straight out (do not twist) to remove stick and discard.
Helpful Hints
Do not take apart your hearing aids or insert the cleaning tools inside them (doing so will void the warranty).
When not in use, remove the batteries completely, please store your hearing aid in the storage container:
•In a dry, safe place
•Away from direct sunlight and heat to avoid extreme temperatures
•Where you can easily find them
•Safely out of reach from children and pets

Hearing Aid Charger Care (header)
Charger Care
Keep your charger clean. Heat, moisture, and foreign materials can result in poor performance.
•Using the provided cleaning brush keeps the charging ports clear of debris.
•Do not sue water, solvents, or cleaning fluids to clean the charging ports.
•Keep lid closed as much as possible to avoid dust and debris build up.
•Store your charger in a clean and dry location, such as a dresser or shelf rather than the bathroom or
kitchen.to ensure the longest life of your rechargeable hearing aid batteries and the onboard battery for
the StarLink Premium Mini Charger:
oFully charge hearing aid batteries every night.
oDo not expose to excess heat (i.e. do not store on a window sill or in a hot car).

Service and Repair (header)
Service and Repair
If, for any reason, your hearing aid and/or charger does not operate properly, do NOT attempt to fix it yourself.
Not only are you likely to violate any applicable warranties or insurance, you could easily cause further damage.
Should your hearing aid and/or charger fail or perform poorly, check the guide on the next page for possible
solutions.If problems continue, contact your hearing professional for advice and assistance.Many common
problems may be solved right in your hearing professional’s office or clinic.
This manual suits for next models
1
Table of contents
Other Starkey Headphones manuals