Starmix HFXW 20 User manual

Typ: HF
Modell: HF, HFT, HFS, HFX
TFC, TFCT
WH, WHR, WHS
Typ: TFC18
Typ: HFXW 20
Bedienungsanleitung (original) Bruksanvisning Navadila za uporabo
Operating Instructions Käyttöohje Pъководство на потребителя
Notice d‘utilisation Οδηγίες χειρισμού Kasutusjuhend
Instrucciones para el manejo Kullanım kılavuzu Pуководство по зксплуатации
Instruções de utilização Instrukcja obslug
Istruzioni d’uso Kezelési Utasítás
Gebruiksaanwijzing Návod k obsluze
Betjeningsveiledning Instructiuni de utilizare
l 0
l 0
0
0
Für späteren Gebrauch bitte aufbewahren
Hand-Haar-Trockner HF

2

3
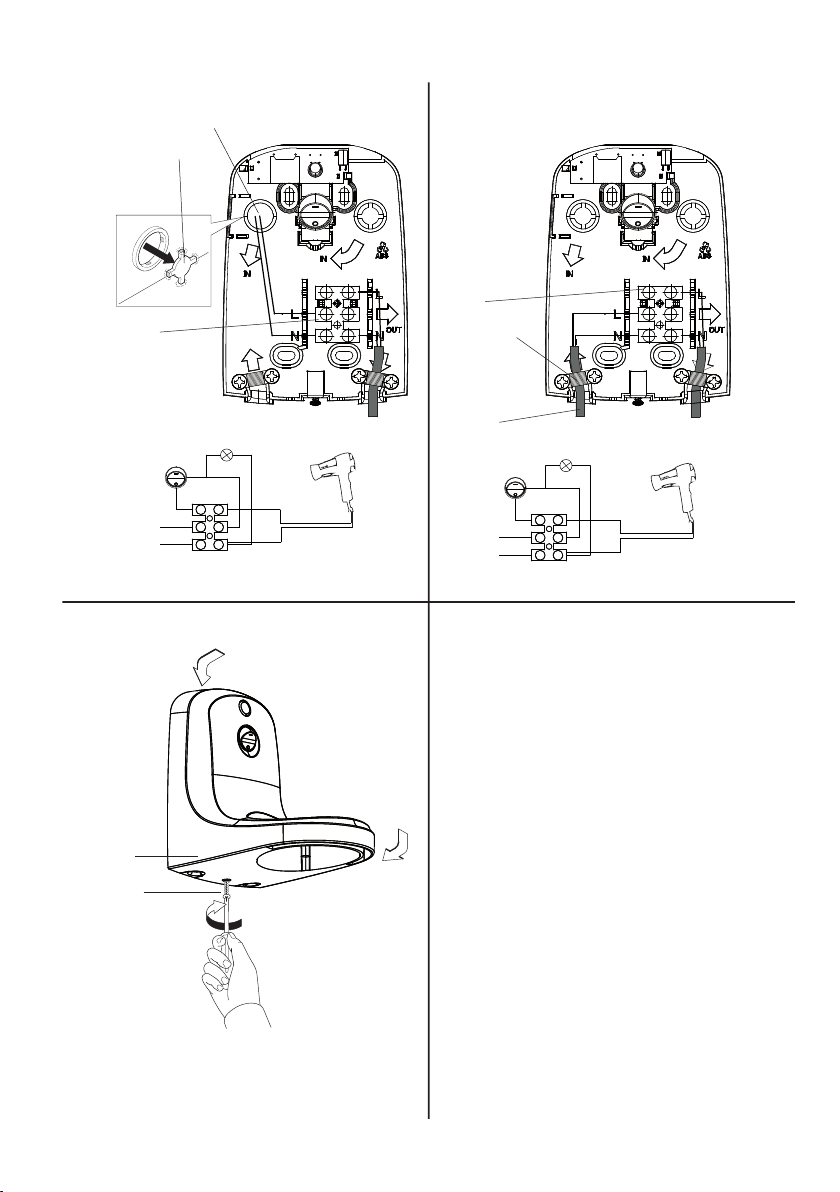
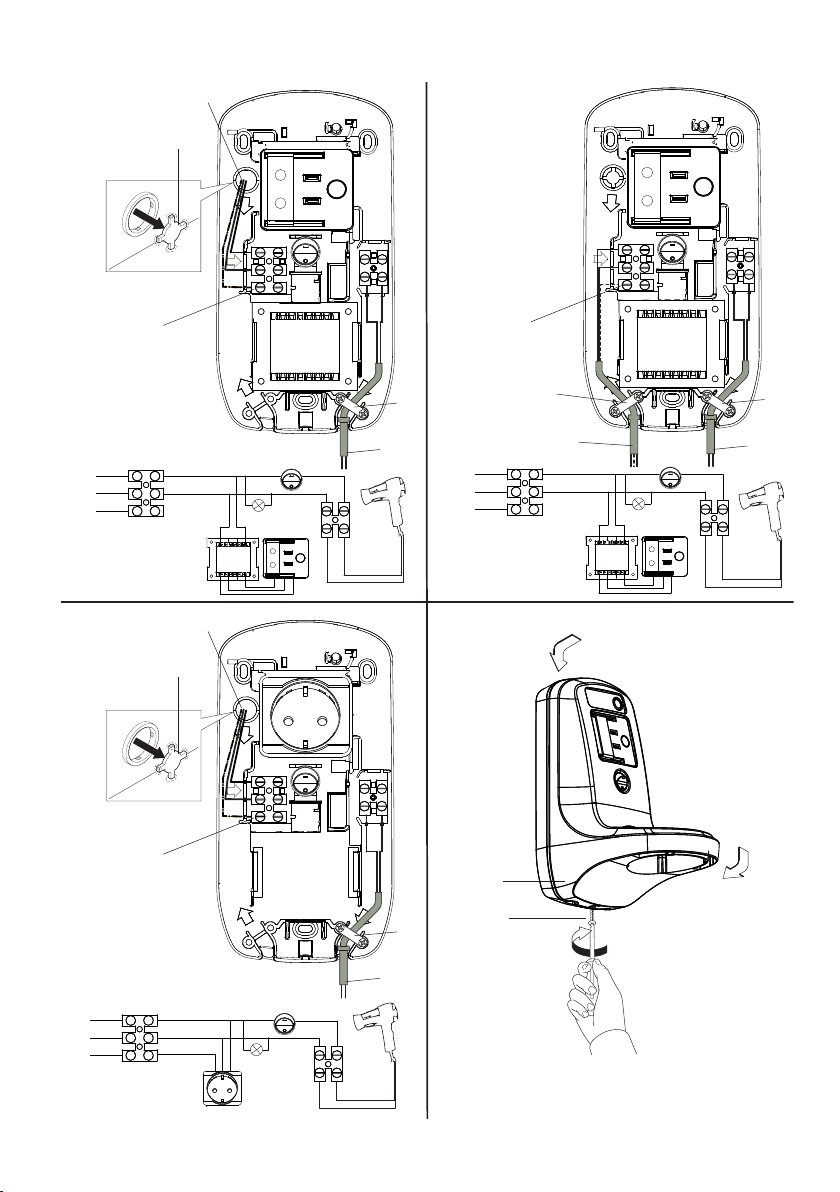
Übersicht Wandhalter/ product summary wall bracket .................................................. 4
Tabelle Schaltstufen/ table switching stages................................................................. 7
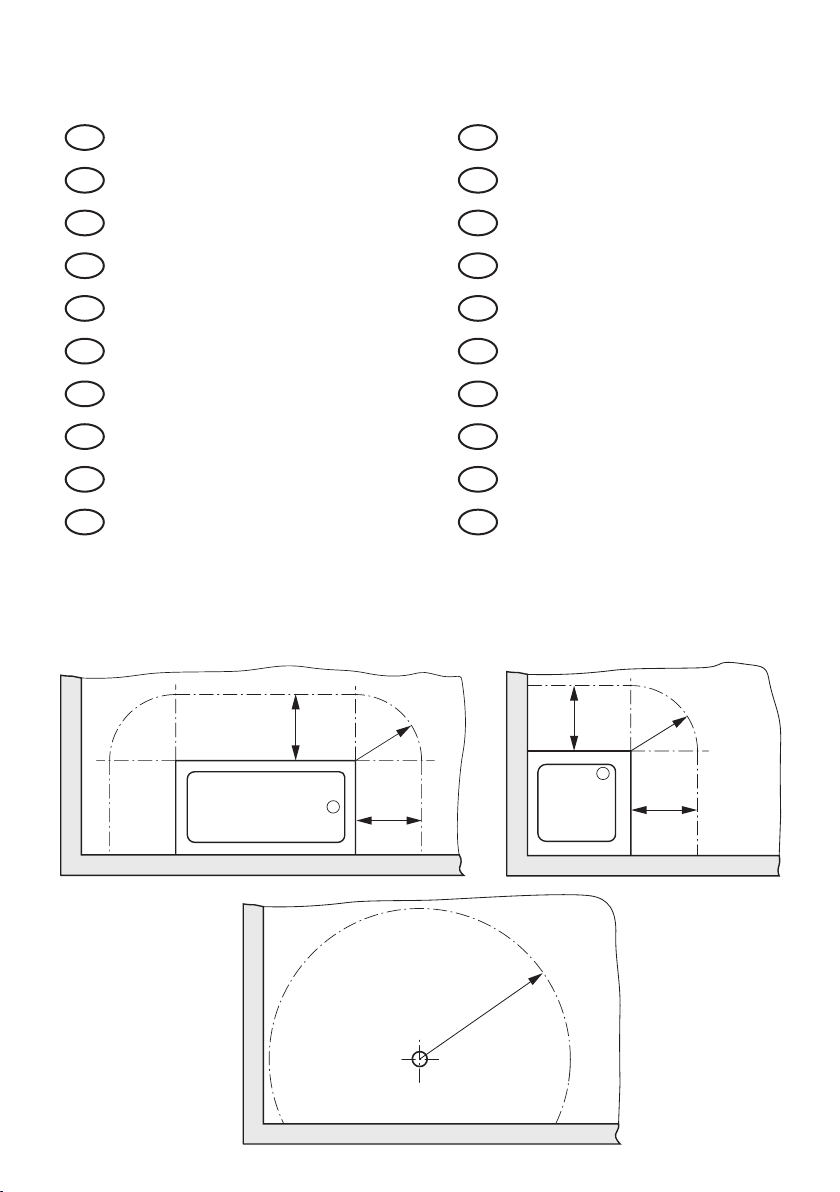
Sicherheitsabstände / minimum distances.................................................................... 8
D Original-Bedienungsanleitung.................................................................................... 9
GB Original operatin instructions in German ............................................................... 13
F Instructions de service d'origine allemande.............................................................. 17
E Manual de instrucciones original en alemán ............................................................ 21
P Manual de instruções original em alemão................................................................ 25
I Istruzioni d'uso originali in tedesco ............................................................................ 29
NL Originele gebruiksaanwijzing in het Duits .............................................................. 33
DK Original betjeningsvejledning på tysk .................................................................... 37
S Original-bruksanvisning på tyska ............................................................................. 41
N Original bruksanvisning på tysk ............................................................................... 45
FIN alkuperäiskäyttöohje Saksan ................................................................................ 49
GR Αυθεντικές οδηγίες χρήσης στα γερμανικά ............................................................ 53
TR Almanca orijinal kullanım kılavuzu ......................................................................... 57
PL Oryginalna instrukcja obsługi w języku niemieckim................................................ 61
H Eredeti kezelési útmutató német.............................................................................. 65
CZ Originální návod k obsluze v němčině ................................................................... 69
SK Originálny návod na obsluhu v nemčine................................................................ 73
SLO Izvirna navodila za uporabo v nemščini............................................................... 77
EST Originaalkasutusjuhend saksa............................................................................. 81
RUS Оригинальное руководство по эксплуатации на немецком языке ................ 85
Montageschablone WHR/WHS / Mounting Plate WHR/WHS ..................................... 89
Montageschablone WH / Mounting Plate WH ............................................................. 90

4
L
L'
NN
.
L
L'
NN
.
1
14
Modell: WH
a
b
c
2
3
4
4
10
13
Ⓐ Ⓑ

5
IN OUT
IN
L
L
i
N
N
.
L
i
N
.
..
IN OUT
IN
L
L
i
N
N
L
i
N
.
.
.
.
IN OUT
IN
L
L
i
N
N
L
i
N
.
.
.
.
.
1
14
Modell: WHR
Modell: WHS
4
7
5
2
3
4
7
5
2
3
4
7
5
10
13
a
b
c
Ⓐ
Ⓐ
Ⓑ

6
A
B
Modell: W

7
on/off
cool
0
600 W
1200 W
800 W
1600 W
900 Watt
1800 Watt
850 - 1000 Watt
1700 - 2000 Watt
cool - 1 - 2
1 - 2 - 3
0 - 1 - 2
HFS ... 12 ... X
HFS ... 16 ... X
HFT ... 12 ... X X X X
HFT ... 16 ... X X X X
HF ... 12 ... X X X X
HF ... 16 ... X X X X
TFC ... 12 ... X X X X
TFC ... 16 ... X X X X
TFC ... 18 ... X X X X
TFCT ... 12 ... X X X
TFCT ... 16 ... X X X
HFX ... 12 ... X X
HFX ...20 ... X X X X X
Schaltstufen
D
Schaltstufen
FIN
Kytkentäasteet
GB
Switching stages
GR
Αποστάσεις ασφαλείας
F
Niveaux de commutation
TR
Emniyet Aralıkları
E
Niveles de commutatción
PL
Odstępy bezpieczeństwa
P
Niveis de comutação
H
Biztonsági távolságok
I
Livelli di comando
CZ
Bezpečné vzdálenosti
NL
Schakeltrappen
SK
Bezpečné vzdialenosti
DK
Indstillingstrin
SLO
Varnostne razdalje
S
Kopplingssteg
EST
Ohutusvahemaad
N
Sikkerhetsavstand
RUS
Параметры расстояния безопасности

8
0,6m
0,6m
R0,6m
0,6m
0,6m
R0,6m
R1,2m
Sicherheitsabstände
D
Sicherheitsabstände
FIN
Turvaväli
GB
Minimum distances
GR
Αποστάσεις ασφαλείας
F
Intervalles de sécurité
TR
Emniyet Aralıkları
E
Distancias de seguridad
PL
Odstępy bezpieczeństwa
P
Distâncias de segurança
H
Biztonsági távolságok
I
Distanze di sicurezza
CZ
Bezpečné vzdálenosti
NL
Veiligheidsafstande
SK
Bezpečné vzdialenosti
DK
Sikkerhedsafstand
SLO
Varnostne razdalje
S
Säkerhetsavstånd
EST
Ohutusvahemaad
N
Sikkerhetsavstand
RUS
Параметры расстояния безопасности

D - 9
Original-Bedienungsanleitung
Deutsch (Original)
Sicherheitshinweise
LWarnung
▶Dieses Gerät kann von Kindern ab 8 Jahren aufwärts und Personen mit
eingeschränkten körperlichen, geistigen oder sensorischen Fähigkeiten
oder ohne ausreichende Erfahrungen und Kenntnisse verwendet werden,
wenn sie beaufsichtigt werden oder in die sichere Verwendung eingewiesen
und über die verbundenen Gefahren unterrichtet wurden. Kinder dürfen mit
diesem Gerät nicht spielen. Reinigung und Wartung darf von Kindern nur
unter Aufsicht ausgeführt werden.
▶Verwenden Sie zur Reinigung keine Dampfstrahlgeräte oder Hochdruckrei-
niger.
▶Warnung: Verwenden Sie dieses Gerät nicht in der Nähe von
Badewannen, Duschen, Becken oder anderen Wasserbehältern.
LGefahr
▶Erstickungsgefahr: Verpackungsmaterial, wie Folienbeutel, gehören nicht
in die Kinderhände.
▶Bei Zweckentfremdung, unsachgemäßer Bedienung oder nicht fachge-
rechter Reparatur übernimmt der Hersteller keine Haftung für Schäden.
▶Die Spannung auf dem Typenschild muss mit der Netzspannung überein-
stimmen.
▶Nur am Netzstecker, nie an der Anschlussleitung ziehen.
▶Netzstecker nie mit nassen Händen einstecken oder ausziehen.
▶Stromversorgung muss über eine Sicherung mit geeigneter Stromstärke
abgesichert sein
▶Reparaturen nur von Fachkräften, z.B. Kundendienst, ausführen lassen.
Nur Original-Ersatzteile verwenden.
▶Nicht fachgerecht reparierte Geräte stellen eine Gefahr für den Benutzer
dar.

10 - D Original-Bedienungsanleitung
▶Als zusätzlicher Schutz wird die Installation eines Fehlerstrom-Schutzschal-
ters mit einem Bemessungsfehlerstrom von nicht über 30 mA im Stromkreis
des Nassraums empfohlen. Bei Fragen wenden Sie sich an Ihren Installa-
teur.
▶Die Geräte sind grundsätzlich ohne Beeinträchtigung des Ansaug- und
Ausblasluftstromes zu betreiben.
▶Schalten Sie grundsätzlich vor allen Eingriffen und Reinigung die Netzzu-
leitung allpolig ab. Keinen Wasserstrahl, nassen Schwamm oder sonstige
Reinigungsarten anwenden, deren Reinigungsüssigkeit in das Gerät
eindringen kann oder die Gehäuseoberäche angreift. Bei Eindringen von
Flüssigkeit besteht Stromschlaggefahr und möglicher Geräteschaden.
▶Sollte das Stromkabel beschädigt sein, darf es nur von einem befugten
Kundendienst ersetzt werden.
▶Wird der Haartrockner in einem Badezimmer verwendet, stecken Sie ihn
nach der Benutzung aus, da die Nähe von Wasser auch dann ein Risiko
darstellen kann, wenn der Haartrockner ausgeschaltet ist.
Mit Wandhalter
LWarnung
▶Stellen Sie sicher, dass im elektrischen System eine Vorrichtung vorhanden
ist, die unter Bedingungen der Überspannungskategorie 3 alle Pole der
Stromversorgung frei schaltet.
▶Der Haartrockner muss außerhalb der Reichweite einer Person angebracht
werden, die badet oder duscht.
▶Das Gerät muss so befestigt sein, dass sich der Handgriff, wenn es ganz
ausgezogen ist, außerhalb der Reichweite einer Person bendet, die badet
oder duscht.

D - 11
Original-Bedienungsanleitung
1 Vor dem Gebrauch
Wir haben diese Gebrauchsanleitung erstellt, damit Sie Ihr neues
Gerät schnell und umfassend kennenlernen.
Der Hersteller behält sich Konstruktions- und Ausstattungsände-
rungen vor.
Andere Arbeiten, als in dieser Bedienungsanleitung beschrieben,
dürfen Sie nicht ausführen.
Dieses Gerät ist dazu bestimmt von Laien in einer häuslichen
Umgebung oder in ähnlichen Anwendungen verwendet zu werden
wie in Geschäften, Büros und in anderen Arbeitsumgebungen, in
landwirtschaftlichen Betrieben, in Frühstückspensionen und von
Kunden in Hotels, Motels und anderen typischen Wohnumgebun-
gen.
▶Achten Sie beim Auspacken auf Vollständigkeit und Transport-
schäden.
▶Bitte lesen Sie vor Inbetriebnahme des Gerätes diese Anleitung
aufmerksam durch. Sie gibt wichtige Hinweise für die Sicherheit,
den Gebrauch, die Wartung und Entsorgung.
▶Machen Sie sich in der Reihenfolge dieser Gebrauchsanleitung
mit Ihrem neuen Gerät und seinen verschiedenen Funktionen
vertraut.
▶Beachten Sie alle Hinweise und Erklärungen, die sich auf die
richtige Bedienung und Behandlung beziehen. Damit erreichen
Sie ständige Einsatzbereitschaft und eine lange Lebensdauer
Ihres Gerätes.
▶Besonders sind die Hinweise zu berücksichtigen, die die Sicher-
heit betreffen. Sie helfen, Unfälle zu verhüten und Ihr Gerät vor
Schaden zu schützen.
▶Bewahren Sie die Gebrauchsanleitung auf, sie kann Ihnen auch
später noch in manchen Fällen ein nützlicher Helfer sein.
2 Montageanweisung für Wandhalter
Die Montage ist vom Fachmann unter Berücksichtigung der beste-
henden nationalen Sicherheitsvorschriften durchzuführen.
In Räumen mit Duschen und Badewannen darf der Wandhalter
nicht innerhalb der in der Vorschrift 0100 Teil 701 festgelegten
Sicherheitsbereichen angebracht werden.
Die Montagehöhe über dem Fußboden sollte mindestens 150 cm
betragen. (→ Sicherheitsabstände)
A = Bei Unterputz-Zuleitung: Diese Montageart ist für Wandhalter
WH-S und WH-R gestattet
B = Bei Aufputz-Zuleitung: Diese Montageart ist nur für Wandhal-
ter WH-R gestattet
2.1 Montagereihenfolge bei fester
Anschlußleitung (A)
Die Zuleitung für die Wandhalter WHS muß min. 3x1,5 mm2
sein.
Die Zuleitung für die Wandhalter WH;WHR muß min. 2x 1,0
mm2sein.
1. Schraube ⑭lockern und Gehäuse von der Rückwand des
Wandhalters abnehmen.
2. Die sich in der Rückwand des Wandhalters bendliche Leitungs-
durchführung ②durchbrechen.
3. Die aus der Wand heraustretenden Leitungsdrähte ③durch die
durchbrochene Durchführung ②ziehen.
4. Rückwand mit den mitgelieferten Dübeln und Schrauben an der
Wand befestigen.
5. Zuleitung ③gemäss Anschlusschema an der Klemme ④
anschließen.
6. Modell WHR / WH ist doppelt schutzisoliert und deshalb ohne
Schutzleiteranschluss.
Modell WHS (mit Schukosteckdose): der Schutzleiter muss
an der Schutzleiterklemme ④angeschlossen werden. Die
Zuleitung muss für mindestens 16A vorgesehen werden.
7. Wandhaltergehäuse aufsetzen.
8. Gehäuse mit Schraube ⑭befestigen.
9. Hauptnetzschalter einschalten. Der Haartrockner ist betriebs-
bereit.
2.2 Montagereihenfolge bei beweglicher
Anschlußleitung (B)
WH; WHR: Die Zuleitung muß min. H05VV-F 2x1 mm2sein.
LDiese Montageart ist für Modell WHS (mit Schukosteck-
dose) nicht gestattet !
1. Schraube ⑭lockern und Gehäuse ①von der Rückwand des
Wandhalters abnehmen.
2. Rückwand mit den mitgelieferten Dübeln und Schrauben an der
Wand befestigen.
3. Zuleitung ③gemäss Anschlusschema an der Klemme ④
anschließen.
4. Kabelzugentlastungen ⑤und ⑩befestigen
5. Wandhaltergehäuse ①aufsetzen.
6. Gehäuse mit Schraube ⑭befestigen.
7. Hauptnetzschalter einschalten. Der Haartrockner ist betriebs-
bereit.

12 - D Original-Bedienungsanleitung
2.3 Überhitzungsschutz
•Bei thermischer Überlastung schaltet das Gerät selbsttätig
ab. Sollte dieser Fall eintreten, Schalter auf O stellen bzw.
Druckraster loslassen und äußere Ursachen der Überhitzung
beseitigen.
•In einigen Minuten ist das abgekühlte Gerät wieder betriebs-
bereit.
3 Wartung
1. Versorgungskabel immer auf Schäden wie Risse oder Alterser-
scheinungen kontrollieren. Kabel vor einer weiteren Benutzung
ersetzen.
2. Wenn das Versorgungskabel beschädigt ist, ist es vom Herstel-
ler oder seinem technischen Service oder auf jeden Fall von
einer ähnlichen, qualizierten Person zu ersetzen, sodass jeder
Gefahr vorgebeugt wird.
3. Bei der Benutzung elektrischer Verlängerungskabel ist zu
prüfen, dass diese auf trockenen Flächen auiegen und vor
eventuellen Wasserspritzern geschützt sind.
4. Wartungen und Reparaturen müssen immer von Fachpersonal
ausgeführt werden; eventuell beschädigte Teile sind nur durch
Originalersatzteile zu ersetzen
5. Das Flusensieb muss in regelmäßigen Abständen gereinigt
werden! Dazu vorher den Haartrockner vom Netz trennen!
Beim HFXW 20 das Lüftungsgitter mit einer Drehbewegung
abnehmen und Sieb reinigen. Bei den anderen Modellen das
Lüftungsgitter von außen absaugen.
ACHTUNG: jede Veränderung des Geräts ist verboten. Die Än-
derung kann neben dem Verfall der Garantie Brände und Verletzun-
gen, auch tödliche, für den Benutzer zur Folge haben.
Der Hersteller übernimmt keine Haftung für Schäden, die als eine
Folge der Nichtbeachtung dieser Anleitungen oder bei einem
Missbrauch des Geräts Schäden an Gegenständen oder Personen
verursachen.
4 Technische Daten
Geräteaus-
ausführung
Spannung [V~]
Frequenz [Hz]
Nennleistung [W]
Typischer Schalldruckpegel
(DIN EN 60704-1) [dB(A)]
Gewicht [kg]
HFS ... 12 ...
220-240 50/60 1200 63 0,5
HFS ... 16 ...
220-240 50/60 1600 64 0,5
HFT ... 12 ...
220-240 50/60 1200 63 0,5
HFT ... 16 ...
220-240 50/60 1600 64 0,5
HF ... 12 ...
220-240 50/60 1200 63 0,5
HF ... 16 ...
220-240 50/60 1600 64 0,5
TFC ... 12 ...
220-240 50/60 1200 63 0,5
TFC ... 16 ...
220-240 50/60 1600 64 0,5
TFC... 18 ...
220-240 50/60 1800 64 0,5
TFCT ... 16 ...
220-240 50/60 1600 64 0,5
TFCT ... 12 ...
220-240 50/60 1200 63 0,5
HFX ... 12 ...
220-240 50/60 1200 62 0,6
HFX ... 20 ...
220-240 50/60 1700-2000 64 0,9
Geräteaus-
ausführung
Spannung [V~]
Frequenz [Hz]
Nennleistung [W]
Typischer Schalldruckpegel
(DIN EN 60704-1) [dB(A)]
Gewicht [kg]
W
--- --- --- --- 0,05
WH
220-240 50/60 --- --- 0,28
WHS
220-240 50/60 max.1800 --- 0,3
WHR
220-240 50/60 max. 20VA --- 0,75
Modell WHS: Modell mit Schukosteckdose 16A und Ein/Aus-
Schalter für den Haartrockner.
Modell WHR: Modell mit universal Rasiersteckdose und Ein/Aus-
Schalter für den Haartrockner. Ein Kurzschlussfester Sicherheits-
Trenntrafo isoliert die Rasiersteckdose vom Netz und verhindert
die Benutzung von angeschlossenen Geräte mit einer Leistung von
mehr als 20VA.
Wir erklären in alleiniger Verantwortung, dass dieses
Produkt mit den EG-Richtlinien und maßgebenden
Normen übereinstimmt. 0
Dieses Gerät erfüllt die Bestimmungen der europäischen
Richtlinien 2014/30/EU, 2014/35/EU, 2011/65/EC,
2009/125/EC und der Verordnung (EC) Nr. 1275/2008
Altgeräte enthalten wertvolle Materialien,
die zur Wiederaufarbeitung geeignet sind.
Gerät nicht dem normalen Hausmüll
beifügen, sondern über geeignete
Sammelsysteme fachgerecht entsorgen,
z.B. über Ihre kommunale
Entsorgungsstelle.
Der HFXW 20 ist geeignet für öffentliche Einrichtungen, z.B.
Schwimm-und Sporthallen, Spas, Wellness-und Fitness-Clubs.
Die Gewährleistung bei gewerblicher Nutzung beträgt innerhalb
der EU 1 Jahr

GB - 13
Original operatin instructions in German
English
Safety advice
LWarning
▶This appliance can be used by children aged from 8 years and above and
persons with reduced physical, sensory or mental capabilities or lack of ex-
perience and knowledge if they have been given supervision or instruction
concerning use of the appliance in a safe way and understand the hazards
involved. Children shall not play with the appliance. Cleaning and user
maintenance shall not be made by children without supervision
▶Do not use any steam jets or high-pressure cleaners for cleaning.
▶Warning: Do not use this appliance near bathtubs, showers,
basins or other vessels containing water.
LDanger
▶choking hazard: Keep packaging material such as plastic bags away from
children.
▶In case of any inappropriate usage, improper operation or repair, the produ-
cer shall be exempt from liability.
▶The voltage on the type sign must correspond to the grid voltage.
▶Pull on the plug only, not on the line.
▶Never plug or pull the power plug with wet hands.
▶The socket must be secured via a household fuse with a suitable current
rating.
▶Have repairs been made only by experts, e. g. the producer’s service. Use
original spare parts only.
▶Improperly repaired devices pose a hazard for the user.
▶For additional protection, the installation of a residual current device (RCD)
having a rated residual operating current not exceeding 30 mA is advisable
in the electrical circuit supplying the bathroom. Ask your installer for advice

14 - GB Original operatin instructions in German
▶When operating the appliance it must be ensured that the intake and outlet
are not restricted in any manner.
▶Always completely disconnect the appliance from the mains prior to care,
maintenance and repairs. Do not use a water jet, wet sponge or other forms
of cleaning in which cleaning uid could enter the appliance or attack the
case surface. Liquid entering the appliance will create a dangerous electric
shock hazard and could damage the appliance.
▶If the supply cord is damage it shall be replaced only by the authorized
customer service
▶When the hairdryer is used in a bathroom, unplug it after use since the pro-
ximity of water presents a hazard even when the hairdryer is switched off
With wall bracket.
LDanger
▶Make sure that a device that ensures all-pole disconnection from the power
supply under the conditions of overvoltage category III is inserted on the
electrical system.
▶This hairdryer must be xed out of reach of a person taking a bath or shower
▶The appliance must be xed so that the hand-held part, when fully exten-
ded, is out of reach of a person taking a bath or shower

GB - 15
Original operatin instructions in German
1 Before use
We have compiled these operating instructions so that you become
familiar with your new appliance quickly and comprehensively.
The manufacturer reserves the right to carry out modications to
the design and equipment.
Any other work not covered by this operating manual must not be
carried out.
THIS MACHINE IS PERFECT FOR VARIOUS USES, FOR
EXAMPLE IN HOTELS, SCHOOLS, HOSPITALS, FACTORIES,
SHOPS AND LIVING QUARTERS.
•Please read these instructions carefully before using this appli-
ance. It provides you with important information on its safety,
operation, maintenance and disposal.
•Familiarise yourself with your new appliance and its various
•functions following the sequence of the instructions.
•Follow all notes and explanations referring to the correct operati-
on and handling. This will ensure the continuous availability and
a long life for your appliance.
•The safety notes, in particular, must be followed. They help
you to prevent accidents and to protect your appliance from
damage..
•Please keep these instructions for future reference.
2 Instructions for the wall brackets
To be tted by a qualied expert taking due consideration of
existing national safety regulations. In rooms containing showers
or baths, the wall bracket may not be tted within the safety zone
stipulated in regulation 0100 part 701. The wall bracket should be
tted at a height of at least 150 cm above the oor.. (→ Minimum
distances)
A = connection to wall mains wiring.
B = connection to surface mains wiring.
2.1 Installation sequence;
for xed connection lead (A)
The connection wiring from the mains must be at least
3x1,5 mm2for wall holder model WHS
The connection wiring from the mains must be at least
2x1,0 mm2for wall holder models WH, WHR
1. Separate the cover (1) of the wall holder from the back plate by
loosening the screw (14).
2. Remove the knockout (2) provided in the back plate of the wall
holder.
3. Feed the mains supply cable (3) coming out of the wall into the
hole in the back plate left after removing the knockout (2).
4. Secure the back plate of the wall holder to the wall using the
plugs and screws provided.
5. Remove the terminal connector (4), connect the mains supply
cable (3) to the terminal connector (4), as shown in the picture,
and then secure again the terminal connector (4).
6. Model WH. WHR is double insulated and no earth connection
is provided..
Model WH-S the earth cable from the wall must be connected to
the terminal connector. The cables shall withstand 16A.
7. Fit the front cover of the wall holder, taking care to locate the
cable sleeve (6) properly.
8. Secure the front cover with the screw (14).
9. Switch on the general switch of your mains electricity. The
hairdryer is ready for use.
2.2 Installation sequence
for mobile connection lead (B)
WH; WHR: The connection wiring must be at least type
H05VV-F 2x1,0 mm2
Lthis method is not allowed for wall holder model WH-S!
1. Separate the cover (1) of the wall holder from the back plate by
loosening the screw (14).
2. Secure the back plate of the wall holder to the wall using the
plugs and screws provided.
3. Remove the terminal connector (4), connect the mains supply
cable (3) to the terminal connector (4), as shown in the picture,
and then secure again the terminal connector (4).
4. Fit the strain relieves (5) and (10)
5. Fit the front cover of the wall holder..
6. Secure the front cover with the screw (14).
7. Switch on the general switch of your mains electricity. The
hairdryer is ready for use.
2.3 Overheating protection
The appliance switches off automatically in the case of thermal
overload. When this happens, switch the switch to 0 or release
the push button and eliminate the external causes of overheating.
Once the appliance has cooled down it will be ready to use again in
a few minutes. Defect hairdryers may only be repaired by qualied
experts.

16 - GB Original operatin instructions in German
3 Maintenance
1. Regularly control the feeding cable looking for damages, cracks
or ageing. Substitute the cable before using it further.
2. If the feeding cable is damaged it must be substituted by the
manufacturer or by its after sales service or in any case by a
similarly qualied person, thus preventing any possible risk.
3. When using extension electric wires ensure that they are lying
on dry surfaces and protected against possible water jets.
4. Specialized personnel must always carry out maintenance and
repairs; any damaged part must be substituted with original
spare parts.
5. The lint lter must be cleaned at regular intervals! To do this, rst
disconnect the hairdryer from the mains! With the HFXW 20,
remove the ventilation grille with a twisting motion and clean the
sieve. For the other models, vacuum the ventilation grille from
the outside.
ATTENTION: it is forbidden to carry out changes to the apparatus.
Tampering could cause res and damages even lethal to the user
and the forfeiture of the guarantee.
The manufacturer declines any responsibility for damages caused
to people or things due to non-compliance with these instructions or
if the apparatus is unreasonably used.
4 Technical data
Appliance
version
Voltage [V~]
Frequency [Hz]
Rated capacity [W]
Typical sound level
(acc. to DIN EN 60704-1) [dB(A)]
Weight [kg]
HFS ... 12 ...
220-240 50/60 1200 63 0,5
HFS ... 16 ...
220-240 50/60 1600 64 0,5
HFT ... 12 ...
220-240 50/60 1200 63 0,5
HFT ... 16 ...
220-240 50/60 1600 64 0,5
HF ... 12 ...
220-240 50/60 1200 63 0,5
HF ... 16 ...
220-240 50/60 1600 64 0,5
TFC ... 12 ...
220-240 50/60 1200 63 0,5
TFC ... 16 ...
220-240 50/60 1600 64 0,5
TFC... 18 ...
220-240 50/60 1800 64 0,5
TFCT ... 16 ...
220-240 50/60 1600 64 0,5
TFCT ... 12 ...
220-240 50/60 1200 63 0,5
HFX ... 12 ...
220-240 50/60 1200 62 0,6
HFX ... 20 ...
220-240 50/60 1700-2000 64 0,9
Appliance
version
Voltage [V~]
Frequency [Hz]
Rated capacity [W]
Typical sound level
(acc. to DIN EN 60704-1) [dB(A)]
Weight [kg]
W
--- --- --- --- 0,05
WH
220-240 50/60 --- --- 0,28
WHS
220-240 50/60 max.1800 --- 0,3
WHR
220-240 50/60 max. 20VA --- 0,75
Model WH-S: model with standard European socket 2P + earthing
16A and hairdryer on/off switch
Model WH-R: model with universal razor socket and hairdryer on/
off. A safety transformer insulates the razor
socket from the mains and a protection device inhibits the operation
of appliances with a load
higher than 20VA.
We declare, with exclusive responsibility, that this prod-
uct complies with the EU Directive and the relevant
standards. 0
This appliance conforms to European Directives 2014/30/EU,
2014/35/EU, 2011/65/EC, 2009/125/EC, and Regulation (EC)
No. 1275/2008.
Old appliances contain valuable materials
that can be recycled. Do not dispose of
such appliance with the normal domestic
waste but rather by way of appropriate
collecting points.
The HFXW 20 is suitable for public facilities, e.g. Swimming and
sports halls, spas, spa and tness clubs. The warranty for
commercial use within the EU is 1 year

F - 17
Instructions de service d‘origine allemande
Français
Consignes de sécurité
LAvertissement !
▶Cet appareil peut être utilisé par des enfants de 8 ans et plus et des per-
sonnes avec des capacités physiques, sensorielles ou mentales réduites ou
un manque d’expérience et de connaissances s’ils ont bénécié d’une su-
pervision ou d’une instruction à propos de l’utilisation sécurisée de l’appareil
et s’ils comprennent les risques encourus. Les enfants ne doivent pas jouer
avec l’appareil. Le nettoyage et l’entretien par l’utilisateur ne doivent pas
être réalisés par des enfants sans supervision.
▶Ne jamais utiliser d’appareils à jet vapeur ni de nettoyeurs haute pression
pour le nettoyage.
▶Avertissement : Ne pas utiliser cet appareil à proximité de
baignoires, de douches, de bassins ou de récipients contenant de
l‘eau.
LDanger
▶Risque d’asphyxie: Tenir le matériel d’emballage, tel que le sachet
plastique, à l’écart des enfants.
▶Le fabricant décline toute responsabilité pour d’éventuels dégâts résultant
de changement d’affectation, de maniement incorrect ou de réparation
incompétente.
▶La tension sur la plaque signalétique doit concorder avec la tension du
réseau.
▶Toujours tirer sur la che secteur et jamais sur le câble d’alimentation.
▶Ne jamais brancher ni débrancher la che secteur avec des mains humides.
▶L’alimentation en courant doit être protégée au moyen d’un fusible à inten-
sité de courant appropriée.
▶Ne faire exécuter des travaux de réparation que par du personnel spécia-
lisé, tel que par exemple le service après-vente. N’utiliser que des pièces de
rechange d’origine.

18 - F Instructions de service d‘origine allemande
▶Des appareils réparés de manière incompétente présentent des dangers
pour l’utilisateur.
▶Pour une protection supplémentaire, l‘installation d‘un appareil de courant
résiduel ayant un courant de fonctionnement résiduel ne dépassant pas
30 mA est recommandée dans le circuit électrique qui alimente la salle de
bains. Demandez conseil à votre installateur.
▶Les appareils doivent dans tous les cas être utilisés sans entraver le ux
d’air d’aspiration et le ux d’air soufé.
▶Avant toute intervention sur l’appareil et nettoyage, il est indispensable de
toujours déconnecter la ligne d’alimentation du secteur sur tous les pôles.
Ne jamais utiliser de jet d’eau, d’éponge mouillée ou d’autres modes de
nettoyage dont le liquide nettoyant risquerait de pénétrer dans l’appareil
ou d’attaquer la surface de son boîtier. En effet, en cas de pénétration de
liquide, il y a risque d’électrocution et l’appareil risque d’être endommagé.
▶Si le cordon d‘alimentation est endommagé, il doit uniquement être rempla-
cé par le service à la clientèle autorisé.
▶Lorsque le sèche-cheveux est utilisé dans une salle de bains, débranchez-
le après son utilisation étant donné que la proximité d‘eau représente un
danger même lorsque le sèche-cheveux est éteint.
Avec support mural
LDanger
▶Assurez-vous qu‘un appareil qui garantit la déconnexion de toutes les
prises de l‘alimentation électrique en vertu des conditions de la catégorie de
survoltage III est insérée sur le système électrique..
▶Le sèche-cheveux doit être xé hors de portée des personnes qui prennent
un bain ou une douche
▶L‘appareil doit être xé an que la partie portable, lorsqu‘elle est entière-
ment étendue, soit hors de portée d‘une personne qui prend un bain ou une
douche.

F - 19
Instructions de service d‘origine allemande
1 Avant l’utilisation
Nous avons conçu le présent manuel d’utilisation an que vous
puissiez apprendre à connaître votre nouvel appareil de manière
rapide et détaillée.
Le fabricant se réserve le droit de modier la construction et
l’équipement.
Il est interdit d’effectuer d’autres travaux que ceux décrits dans ces
instructions de service.
CET APPAREIL PEUT ÊTRE UTILISÉ DANS DES ENDROITS
PUBLICS, PAR EXEMPLE DES HÔTELS, DES ÉCOLES, DES
USINES, DES MAGASINS, DES BUREAUX ET DES
▶Veuillez lire attentivement le présent manuel d’utilisation avant
la mise en service de l’appareil. Il vous donnera des conseils
importants relatifs à la sécurité, à l’utilisation, à l’entretien et à la
mise au rebut de l’appareil.l.
▶Familiarisez-vous, par la lecture du présent manuel d’utilisation,
avec votre nouvel appareil et les différentes fonctions qu’il
propose
▶Respectez toutes les remarques et explications qui concernent
la manipulation et l’utilisation adaptées de l’appareil. An, vous
vous préparerez de manière optimale à utiliser l’appareil et
garantirez à ce dernier une durée de vie prolongée
▶Nous vous recommandons de respecter tout particulièrement
les consignes relatives à la sécurité. Elles vous aideront à
prévenir tout accident possible et à protéger votre appareil de
tout endommagement.
▶Conservez le manuel d’utilisation dans un endroit sûr où vous
pourrez vous y référer facilement à une date ultérieure.
2 Instructions de montage du support mural
Le montage doit être coné à un spécialiste qui devra
strictement observer les consignes de sécurité nationales en
vigueur. Dans les locaux où se trouvent des douches et des
baignoires, le support mural n’a pas le droit d’être posé au
sein des zones de sécurité xées par la prescription 0100,
partie 701. La hauteur de montage au-dessus du sol devrait
être de 150 cm au minimum. (→ Intervalles de sécurité)
A = connexion directe au secteur.
B = connexion au secteur au moyen d’un câble extérieur.
2.1 Suite des opérations de montage; en
présence dùn câble de raccordement xe (A)
Les câbles d’alimentation pour le support mural (version
WHS) doivent être au moins 3 x 1,5 mm2.
Les câbles d’alimentation pour le support de paroi WH,WHR
doivent être au moins 2 x 1,0 mm2.
1. Retirez le cache (1) du support mural par la partie avant, en
desserrant la vis (14).
2. Percez la membrane en plastique (2) qui se trouve sur la partie
avant du support mural.
3. Introduisez le câble principal d’alimentation qui sort du mur (3)
dans le perçage ainsi obtenu dans la membrane (2).
4. Fixez au mur la partie arrière du support en utilisant les tampons
et les vis fournies.
5. Retirez la borne (4), connectez le câble d’alimentation (3) à la
borne (4), tel que l’illustre le dessin et remettez la borne (4) en
place par la suite.
6. Le modèle WH,WHR est équipés de double isolation et ne
nécessite pas de mise à la terre.
Dans le modèle WH-S avec prise europeenne standard, le l
conducteur de terre de l’installation doit être connecté à la borne
(4). Dans ce cas, vériez également que l’installation convient à
une charge de 16A.
7. Appliquez le couvercle du support mural.
8. Fixez le courvecle à l’aide de la vis (14).
9. Actionnez l’interrupteur d’alimentation: le sèche-cheveux est
désormais prêt pour l’utilisation.
2.2 Suite des opérations de montage; en présenc
dùn câble de raccordement mobile (B)
WH; WHR: Le câble d’alimentation doit être au moins du
type H05VV-F2x1 mm2.
LCe montage est pour WHS modèle (avec prise) pas le
droit! Ce montage est pour WHS modèle (avec prise) pas
le droit!
1. Retirez le cache (1) du support mural par la partie avant en
desserrant la vis (14).
2. Fixez au mur la partie arrière du support en utilisant les tampons
et les vis fournies.
3. Retirez la borne (4), connectez le câble d’alimentation (3) à la
borne (4), tel que l’illustre le dessin et remettez la borne (4) en
place par la suite.
4. Fixez les gaines des câble (5) et (10).
5. Positionnez le couvercle du support mural.
6. Fixez le couvercle à l’aide de la vis (14).
7. Actionnez l’interrupteur d’alimentation: le sèche-cheveux est
ainsi prêt pour l’utilisation.

20 - F Instructions de service d‘origine allemande
2.3 Protection contre les surchauffes
En cas de sollicitation thermique, l’appareil se met automatique-
ment hors marche. Au cas où une telle inactivation aurait lieu,
positionnez l’interrupteur sur 0 ou laissez revenir le bouton-poussoir
et éliminez les causes externes du dépassement de température.
Au bout de quelques minutes, l’appareil refroidi pourra être remis
en marche. La réparation de tout sèche-cheveux défectueux devra
être conée à un spécialiste.
3 ENTRETIEN
1. Contrôler régulièrement le câble d’alimentation pour rechercher
des dommages comme les craquelures ou l’usure. Substituer le
câble avant de l’utiliser de nouveau.
2. Si le câble d’alimentation est endommagé, il doit être substitué
par le constructeur ou par son service d’assistance technique ou
de toute façon par une personne ayant une qualication sembla-
ble, de façon à prévenir tout risque.
3. Lors de l’utilisation de rallonges électriques, s’assurer qu’elles
reposent sur des surfaces sèches et qu’elles soient protégées
d’éventuelles éclaboussures d’eau.
4. Les entretiens et les réparations doivent toujours être effectués
par un personnel spécialisé: les pièces éventuellement en
panne doivent être substituées seulement avec des pièces de
rechange originales
5. Le ltre à peluches doit être nettoyé à intervalles réguliers! Pour
ce faire, débranchez d‘abord le sèche-cheveux du secteur!
Avec le HFXW 20, retirez la grille de ventilation en effectuant
un mouvement de torsion et nettoyez le tamis. Pour les autres
modèles, aspirez la grille de ventilation de l‘extérieur.
ATTENTION : toute modication à l’appareil est interdite.
L’altération de l’appareil peut provoquer des incendies, des
blessures même mortelles à l’utilisateur, en plus de l’annulation de
la garantie.
Le fabricant décline toute responsabilité pour des dommages cau-
sés à des personnes ou à des choses suit au non respect de ces
instructions ou si l’appareil est utilisé de manière non raisonnable.
4 Caractéristiques techniques
Modèle
d’appareil
Tension [V~]
Fréquence [Hz]
Puissance nominale [W]
Niveau de pression acoustique
typique (selon DIN EN 60704-1)
[dB(A)]
Poids [kg]
HFS ... 12 ...
220-240 50/60 1200 63 0,5
HFS ... 16 ...
220-240 50/60 1600 64 0,5
HFT ... 12 ...
220-240 50/60 1200 63 0,5
HFT ... 16 ...
220-240 50/60 1600 64 0,5
HF ... 12 ...
220-240 50/60 1200 63 0,5
HF ... 16 ...
220-240 50/60 1600 64 0,5
TFC ... 12 ...
220-240 50/60 1200 63 0,5
TFC ... 16 ...
220-240 50/60 1600 64 0,5
TFC... 18 ...
220-240 50/60 1800 64 0,5
TFCT ... 16 ...
220-240 50/60 1600 64 0,5
TFCT ... 12 ...
220-240 50/60 1200 63 0,5
HFX ... 12 ...
220-240 50/60 1200 62 0,6
HFX ... 20 ...
220-240 50/60 1700-2000 64 0,9
Modèle
d’appareil
Tension [V~]
Fréquence [Hz]
Puissance nominale [W]
Niveau de pression acoustique
typique (selon DIN EN 60704-1)
[dB(A)]
Poids [kg]
W
--- --- --- --- 0,05
WH
220-240 50/60 --- --- 0,28
WHS
220-240 50/60 max.1800 --- 0,3
WHR
220-240 50/60 max. 20VA --- 0,75
Modèle WHS: modèle avec prise standard européenne 16A et
interrupteur pour sèche-cheveux
Modèle WHR: modèle avec prise rasoir universelle et interrupteur
pour le sèche-cheveux. Un transformateur de sécurité isole la
prise rasoir de l’installation électrique du secteur et une protection
empêche l’utilisation d’appareils de puissance supérieure à 20 VA.
Nous déclarons sous notre responsabilité exclusive que
ce produit concorde avec les directives CE et les nor-
mes applicables. 0
Cet appareil est conforme aux directives européennes
2014/30/EU, 2014/35/EU, 2011/65/EC, 2009/125/EC et au
règlement (EC) N. 1275/2008.
Les anciens appareils contiennent des
matériaux de valeur, qui sont bien
appropriés au recyclage. Ne pas jeter
l’appareil avec les ordures ménagères,
mais au contraire les éliminer comme il se
doit par des systèmes de collecte bien
appropriés.
Le HFXW 20 convient aux installations publiques, p. Ex. Salles
de natation et de sport, spas, spa et clubs de tness. La
garantie pour une utilisation commerciale dans l‘UE est de 1 an
This manual suits for next models
10
Table of contents
Languages:
Other Starmix Hair Dryer manuals