Status BV500 User manual

STATUS BV500
VACUUM PACKING MACHINE
USER MANUAL
EN
innovations
izvirni pripomočki
www.status.si
innovations
izvirni pripomočki
www.status.si
innovations
izvirni pripomočki
www.status.si


3
1.1. OPERATING CONDITIONS
Maximum ambient temperature in
normal use is +40°C; the average of
temperatures over a 24-hour period
should not exceed +35°C. Minimum
ambient temperature allowed is -5°C.
Surrounding air should be clean; rela-
tive humidity should not exceed 50% at
the maximum temperature of +40°C.
Higher relative humidity is allowed at
lower ambient temperature (e.g. 90 %
at +20°C).
1.2. IMPORTANT SAFETY INSTRUCTIONS
a.) Working surface must be dry,
normal temperature (not hot) and
clear from obstructions.
b.) Check the power cable and elec-
trical outlet before you plug in the
machine.
c.) Machine should be cleaned only
with a dry or slightly damp cloth.
d.) Never touch the Sealing Strip when
using the machine (Item 6 in Figure
1) – it may be hot.
e.) Use the machine only for the purpo-
ses described in the User Manual.
f.) If the power cord is damaged, it
must be replaced by the manufactu-
rer, their service dealer or any other
similarly qualied person in order to
avoid dangerous situations.
g.) The machine is not to be used
by physically and mentally
unt persons, persons with spe-
cial needs or children under
the age of 12. They can use the
machine only in the presence of
people qualied to work with per-
sons with special needs, parents or
guardians.
h.) Children must be kept under super-
vision, so they do not play with the
machine.
i.) Warranty is invalid if:
• the machine has been tampered
with.
• you use the machine for uninten-
ded purposes.
• you do not respect safety regulati-
ons and do not follow the instructi-
ons in the User Manual.
The manufacturer will not accept
responsibility for any damage that may
occur as a result of not following the
User Manual or improper use.
1. SAFETY INSTRUCTIONS AND INTRODUCTION

4
1.3. TIME INTERVALS FOR USING STATUS BV500
For the machine to work properly allow
120 seconds between each vacuum
packing operation. This prevents the
machine from overheating.
1.4. MAINTENANCE AND CLEANING
a.) Unplug the machine.
b.) Use a soft, damp cloth to clean
the machine. Do not use anything
which could scratch or damage
the surface. Never submerge the
machine in water or place it
under running water. Never squirt
detergent directly onto or into the
machine.
c.) Before using the machine make
sure that it is completely dry.
d.) The Sealing Strip is covered with
Teon. Remove any plastic residu-
es using a soft cloth.
e.) You can only clean the Sealing
Strip when the machine has cooled
down. Never try to clean the sea-
ling strip using a sharp object.
f.) If the black foam seals become
contaminated with grease or liquid,
then you can wash them in soapy
water, rinse and dry them before
replacing them. This will increase
the lifespan of the foam seals.

5
Status BV500 Vacuum Sealer is a household machi-
ne intended for long term food storage in a vacuum
and is designed to vacuum pack and seal bags and
vacuum containers. It has been developed and ma-
nufactured by the Status d.o.o. Metlika company
from Metlika, Slovenia.
The most important advantages of vacuum packing:
• Vitamins, minerals, nutrients and avour are
preserved.
• Multiplication of moulds and bacteria is supres-
sed, which extends food shelf life.
• Storage in vacuum prevents mixing of odours in
the refrigerator or freezer.
Products for extending freshness of foods also
include Status' vacuum containers, lids, stoppers
and a jug, which are vacuum packed with a manual
or electric vacuum pump. STATUS BV500 includes
an adjustable hose for vacuum packing all of the
mentioned products.
1.5. GENERAL INFORMATION
Two sets of premade vacuum bags and two sets of
foil rolls are packed with the product. You can deter-
mine the length of the bags according to your needs.
Before using the machine for the rst time, read the
User Manual carefully and follow the instructions. If
you have any questions, opinions or comments then
please call or email us.
For more detailed instructions watch the video about
the correct use of a vacuum packing machine at
http://innovations.status.si.
STATUS BV500 is simple to use and efcient. You
will be able to store food in a completely natural and
healthier way. It will stay fresh longer and you will
save time and money.
Dimensions Width: 390 mm
Depth: 182 mm
Height: 88 mm
Max Bag Width 280 mm
Weight Approx. 2.5 kg
Material ABS plastic (outer casing)
Pump Single-piston pump (self-oiling – no maintenance necessary)
Vacuum pressure -650 mbar
Motor 12 V DC,
Automatic cut-off in case of overheating.
Max RPM 3900
Transformer 230V AC - 50 Hz/24 V AC – 1,0 A
/12 V AC - 1,75 A
Pump volume 12 litres/min
Controls Electronic
Machine rated power 180 W
1.6. TECHNICAL DATA

6
The gure below shows the vacuum packing machine.
Important points are marked with numbers and
explained in the table.
Figure 1: Status BV500 – components are marked with numbers.
1.7. COMPONENTS AND FUNCTION BUTTONS
6
7
5
12
3
13
4
10
8
12
11
9

7
1.
Bag
• Seal Button – Starts the sealing process (without vacuum packing). You can use this to seal the
open end of a roll.
• Vacuum Packing of Bags Button (Vacuum) – Start of vacuum packing and sealing process. The
bag will rst be vacuum packed and then automatically sealed.
• Start/Stop –Starting and Stopping of vacuum packing process when storing sensitive foods.
2.
Container
• Vacuum Packing of Containers Button – Vacuum packing of containers with Accessory Port and
Hose. Vacuum packing process automatically stops when the correct vacuum is reached.
3.
On/Off Indicator – When the machine is connected to electric mains, indicator light turns on. During
the sealing process, the light illuminates.
4.
Valve – After completed vacuum packing and sealing of Bags, push Valve slightly to move it aside.
5.
Accessory Port used for vacuum packing of Containers
6.
Sealing Strip covered with Teon foil
7.
Silicon Gasket – When sealing, place bag only as far as to Silicon Gasket.
8.
Vacuum Compartment - When vacuum packing, the bag must be set to the point in the middle of
the compartment.
9.
Continuous Roll Compartment
10.
Vacuum Gasket on the upper part of Lid
11.
Channel for manual Roll Cutter, intended for cutting Foil.
12.
Space for Lock
13.
Lock for Securing the Lid (manual operation or transportation)
a.) When taking the machine out of its packaging
check that all components are included and
undamaged.
2.1. GENERAL INSTRUCTIONS
2. USAGE
b.) Read the User Manual before you use the
machine for the rst time.
Use the machine according to the following instructions:
2.2.1. PLUG IN THE MACHINE
AND PREPARE IT FOR OPERATION
Every time you start working with the Status BV500
you should warm up the machine. Close the lid, press
the Seal button (Item 1 in Figure 1) and press down
on the lid. This rst cycle will warm the sealing strip.
When using vacuum bags skip paragraph 2 and
continue with instructions in paragraph 3.
2.2. INSTRUCTIONS FOR USE
2.2.2. FIRST, MAKE A BAG FROM
THE ROLL
a.) Determine the length needed. A bag should be
about 5 cm longer than the item to be vacuum
packed. To reuse the bag leave additional 2.5 cm
of bag material for each time you plan to reuse it
or next time use the bag for smaller items.
b.) Cut off the desired length with the included cutter
(Figure 2). Use Channel (Item 11 in Figure 1) to
cut off bag evenly.

8
c.) Place the roll on the Sealing Strip and extend it
to the black Silicon Gasket (Item 7 in Figure 1,
see Figure 3). Make sure that the edge is straight
and level.
d.) Close the lid.
e.) Press the Bag/Start/Stop button (Item 1 in
Figure 1) and press down on lid with your hand
and hold it. The lid will automatically stick down
and seal the bag. If the Lid can be opened during
the process, you didn’t press down hard enough,
so repeat the procedure. During sealing, the light
(On/Off) will be illuminated 100%.
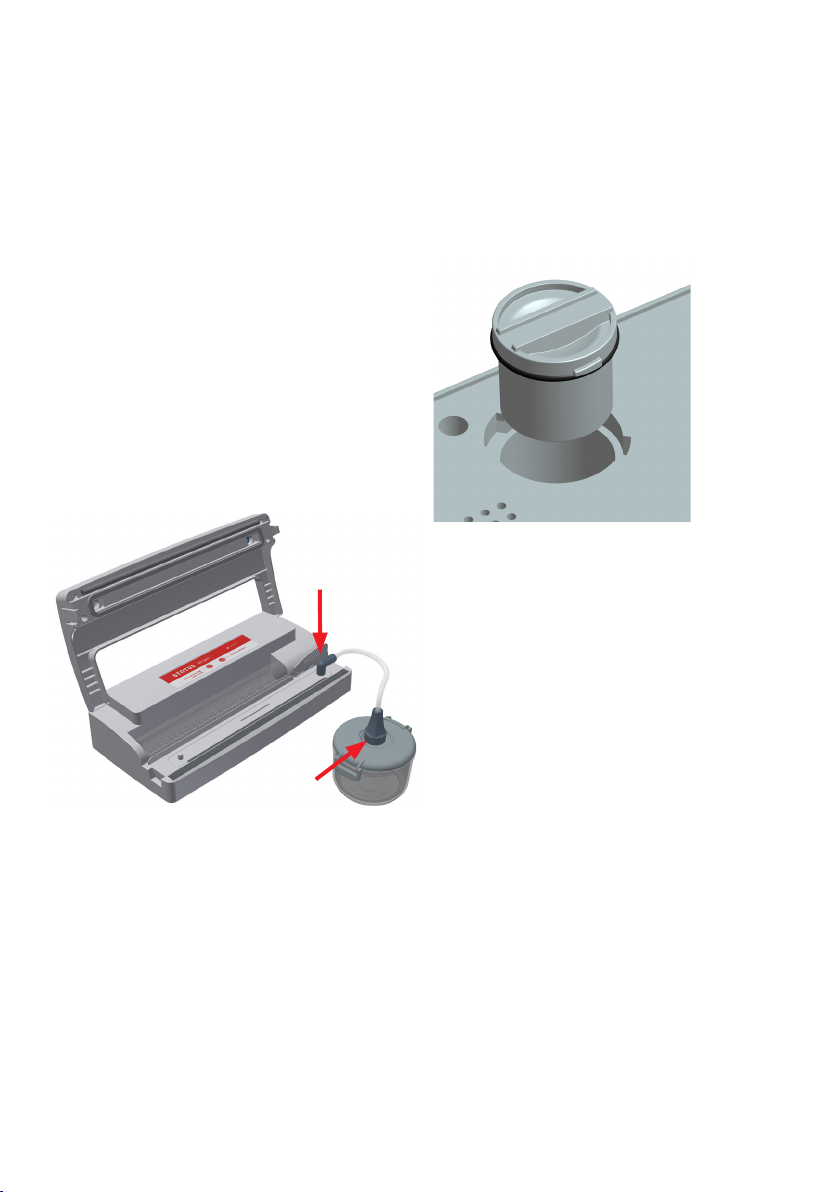
f.) When the sealing process is completed, push
Valve (Item 4 in Figure 1) lightly to move it asi-
de. Open the lid and check the seal. It should be
smooth and transparent over its whole width.
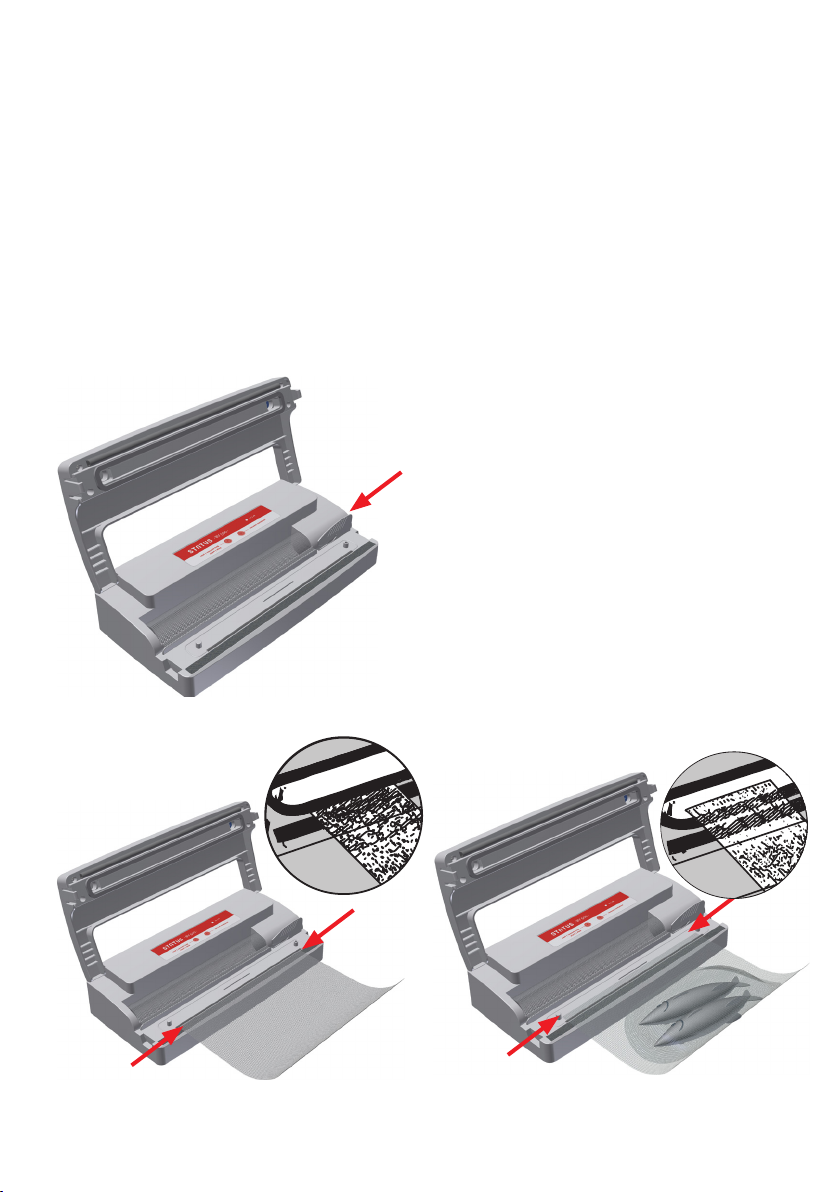
Figure 2: Cut the roll with the included cutter.
Figure 3: Place the roll on the Sealing Strip and extend
it to the black Silicon Gasket to seal (see arrows).
2.2.3. WHEN THE BAG IS MADE,
PLACE FOOD IN IT AND
VACUUM PACK
The bag should be at least 5 cm longer than the
space, occupied by the item to be vacuum packed.
a.) Place the items to be vacuum packed in the bag.
b.) Make sure that inner surfaces (for the sealing
edge) are clean, dry and free from food materials.*
c.) Place the lled bag on the work surface in front
of the machine and pull it to the middle of the
Vacuum Compartment (see Figure 4 and Item 8
in Figure 1).
d.) Make sure that the bag placed on the Sealing
Strip is completely smooth (not creased).
e.) Close the machine, press on the lid and hold it
down.
f.) Activate the Bag/Start/Stop button (Item 1 in
Figure 1). Hold lid pressed until indicator light
begins to shine with its full power. The bag will be
vacuum packed and sealed automatically. Due to
high vacuum pressure the lid stays closed while
the machine operates. If the lid opens during this
process then press the lid down rmly.
g.) When the sealing process is complete, push valve
(Item 4 in Figure 1) lightly to move it aside for lid
to relax. Check the seal - it should be smooth and
transparent over its whole width.
*RECOMMENDATION: When vacuum packing greasy
products (especially bacon) it is strongly recommen-
ded to reverse the outside edges of bag, put the item
inside and reverse the edges back again. This keeps
the area to be sealed free of grease.
Figure 4: Place the lled bag in the middle of the
Vacuum Compartment (between salient circle line -
see arrows).

9
WARNING: If the machine starts sucking liquid when
an item is vacuum packed, interrupt the vacuum
packing process immediately by pressing the Stop
button (Item 7 in Figure 1). You should then use the
“manual vacuum packing” function to vacuum pack
the item at a lower vacuum so that the liquid is not
drawn into the machine.
2.2.4. VACUUM PACKING
OF FOODS WHICH ARE EASILY
CRUSHED
When vacuum packing foods which are easily
crushed or contain a lot of water (fresh fruit, salads,
mushrooms, bread, pastry) less vacuum should be
used (from 0 to -300 mbar).
With the “manual vacuum packing” function you
can interrupt the automatic process and initiate the
sealing of the bag at reduced pressure.
a.) Place the items to be vacuum packed in the bag.
b.) Make sure that inner surfaces to be sealed are
clean, dry and free from food materials.
c.) Place the lled bag on the work surface in front of
the machine and pull it to the middle of Vacuum
Compartment (Item 8 in Figure 1).
d.) Make sure that the bag placed on the Sealing
Strip is completely smooth (not creased).
e.) Close the lid and secure it with side locks (Items
12 and 13 in Figure 1): press on one of the Lid
edges and push the lock horizontally to set it in
the allotted space (see the gures below).
f.) Activate the Bag/Start/Stop button and press on
the Lid.
Figure 5: Lock the machine: press on the lid edges
(simultaneously or individually) and push side locks
inwards.
Figure 6: Unlocked vacuum sealer.
g.) When you are satised with the amount of the
air removed, or when the liquid starts pouring
towards machine, press the same Bag/Start/
Stop button (Item 1 in Figure 1). The pump stops
immediately and the sealing process begins.
h.) During sealing, the light (On/Off) illuminates
100%.
i.) Unlock the machine: press on the lid edges to
open the lock. You can press both edges simul-
taneously or individually. Push valve (Item 4 in
Figure 1) lightly to move it aside for lid to relax.
j.) Check the seal, it should be transparent and uni-
form. If it is not, repeat the sealing process only
on the rim of the bag (as in the procedure for
making a bag from a foil roll). It is recommen-
ded to follow these instructions each time you
vacuum package manually.
For instructions on vacuum packing of various types
of food see Item 3.
Figure 7: Locked vacuum sealer.

10
2.2.5. VACUUM PACKING
USING VACUUM CONTAINERS
AND LIDS
The Status BV500 also includes an Accessory Hose
and Port which can be used for vacuum packing of
Status’ vacuum containers and lids.
a.) Insert the opening of the Accessory Hose into the
Accessory Port (see Figure 8) on the right side of
the Vacuum Compartment.
b.) Attach the Accessory Hose and Port to the valve
of the chosen vacuum container.
c.) Press the Container button (Item 2 in Figure 1) to
vacuum the container. When the correct negative
pressure is reached, the process stops automa-
tically.
When vacuum packing liquid foods (soups, sauces,
etc.) there should be at least 1.5 cm between the
surface of the liquid and the lid.
Figure 8: Vacuum packing using containers.
2.2.6.
TROUBLESHOOTING:
HAVE YOU VACUUM PACKAGED
AN ITEM CONTAINING A LOT
OF LIQUID?
A liquid trap is incorporated in the machine. Its task
is to prevent serious damages when the liquid from
foods enters the machine. The liquid trap can be
emptied if necessary.
Figure 9: Container for excess liquid.
This small container is designed to collect small
amounts of excess liquid from foods. The liquid trap
is located on the bottom of the machine. If you need
to empty it, follow the instructions below.
a.) Unplug the machine.
b.) Remove the container by twisting it anticlockwise,
and pulling out.
c.) Drain liquid, clean the container, clean the lter
thoroughly (dark pad) and dry it.
d.) Insert the container back into the machine and
make sure you twist fully clockwise.
WARNING: The container is only intended for collec-
ting a small quantity of liquid (a few drops). If a larger
quantity of liquid enters the machine then switch the
machine off immediately and consult an authorised
repair service.

11
3. VACUUM PACKING DIFFERENT TYPES OF FOOD
Vacuum packing is not a substitute for freezing or
refrigeration. Despite being vacuum packed foods
still have to be stored in the refrigerator or freezer or
in a cool place (e.g. dried meat products in a cellar).
Do not use bags or rolls for packing foods which
contain a lot of liquid.
Soups, sauces and liquids should be either
pre-frozen before packing in a vacuum bag or
vacuum packed in a vacuum container.
Boiled meat, raw meat and sh: For best results we
recommend you to pre-freeze meat and sh for 1-2
hours prior to vacuum packing to ensure the retenti-
on of juices and shape, and to help guarantee a good
seal. If pre-freezing is not possible, place a folded
paper towel between the meat and the top of the bag,
avoiding the area to be sealed. Leave the paper towel
in the bag when vacuum packing to absorb excess
moisture and juices.
Note: Beef may appear darker after vacuum packing
due to the removal of oxygen. However, this does not
indicate it is spoiled.
Vegetables: When storing in the refrigera-
tor vegetables should be blanched prior to
vacuum packing. When freezing the blan-
ching is optional. The process of blanching
stops the enzyme action and preserves avour,
colour and texture. One to two minutes in boiling
water is enough for fresh leaf vegetables or beans.
For chopped zucchini or broccoli and other cruci-
ferous vegetables allow 3 to 4 minutes, for carrots
allow 5 minutes. After blanching, submerge the
vegetables in cold water to stop the process then dry
them with a paper towel prior to vacuum packing.
Werecommend youtostoreleafvegetables in vacuum
containers. They should rst be washed and dried with
a paper towel, and then stored in a vacuum container.
This way spinach and lettuce will stay fresh up to 2
weeks when refrigerated.
Herbs: Herbs containing a high portion of essential
oils, such as sage, thyme, rosemary or peppermint are
not suitable for vacuum packing but only for drying.
Basil,tarragon,gardendill,parsleyandchiveshouldbe
frozen. If dried, they lose too much avour.
Mushrooms, raw garlic and raw potatoes: We
strongly recommend the "manual vacuum packing"
function. Only hard, meaty and fresh mushrooms
are suitable for vacuum packing and freezing. First
wash and dry the mushrooms, then chop them
with a ne knife and store them in small quantities.
Almost all types of mushrooms should be blanched.
We recommend that you put them in the freezer for
half an hour before vacuum packing. Do not thaw
the mushrooms before preparing them. Boil frozen
mushrooms in hot salty water or add them to sauces.
Coffee: If you want to properly vacuum package
coffee or other ground food with BV500, leave the
items in their original packaging and place them
into the Status' bag. If you do not have the original
packaging, use a regular bag and insert it in the
Status' bag. This way you can prevent beans or
ground items from being sucked into the machine.
Thawing of vacuum packaged foods: Foods should
always be thawed in the refrigerator to preserve
quality.
4. BENEFITS OF VACUUM PACKING
4.1. WHAT IS VACUUM?
Oxygen provokes a chemical change on food and is
an important factor in the formation of moulds and
bacteria. As a consequence, grease can go rancid,
food colour changes, moulds and bacteria
multiply, and avour, vitamins, aroma and minerals
are lost. Vacuum packing holds up such undesired
effects, prolongs shelf life and preserves food quality.
Only with the help of vacuum packing, i.e. removing
air from packing using manual or pump, a suitable
environment required to extend food freshness can
be established. The process of vacuum packing in
containers or bags creates negative pressure.

12
The advantage of storing deep frozen food is in
preserving its essence – vitamins, minerals and
taste. Freeze food as quickly as possible.
Reason: When you are freezing food slowly, big ice
crystals are formed on the surface. They overgrow
food cells and subsequently damage their structure.
When you are freezing food quickly, small ice cry-
stals are formed, which do not damage the food to
such an extent. If possible, freeze food at constant
temperature (–18 °C at the most). Only food of the
highest quality should be frozen. Some foods have
to be blanched (scalded) in order to avoid unwan-
ted changes when freezing or deeply refrigerating
(enzyme activation, ceased germination). Blanched
or in any other way heat treated foods must be
chilled before freezing. Otherwise, already stored
food can start thawing and become damaged or
vacuum can be lost when storing food in vacuum con-
tainers. To ensure better quality of stored fruit, use
sugar as additive. This also preserves aroma and
colours. In the freezer, containers should be kept
together as close as possible. The rest of them can
be kept in the refrigerator.
Signs of freezer burn are rancid meat, rotten
vegetables and tasteless fruit. Freezer burn appears,
when the packaging is permeable to air (common 1
ply PE bags) and frozen food comes into contact with
oxygen. Consequently, water evaporates and the
surface of frozen food dries out. Oxygen penetrates
through the porous cracks and initiates oxidation.
As a consequence, food loses its aroma and fresh
taste. We can recognize freezer burn by the white
and dun stains on the food.
4.3. DEEP FROZEN OR CHILLED
Thawing should be a slow (the most suitable way
of thawing is in the refrigerator) and natural pro-
cess. It should not be forced (as it is when putting
a bag into hot water or thawing food in the micro-
wave). Once the food is defrosted, it should not be
refrozen. When refreezing, mechanical damages
occur and food can perish more quickly. Taste,
colour and aroma are decomposed. Micro-organi-
sms (bacteria, mould) multiply much faster. These
consequences cannot be eliminated by refree-
zing. It is therefore recommended that once the
foods are thawed, they should be used as soon as
possible.
4.4. THAWING
Vacuum packing is also suitable for picnics,
sailing and camping. Food, equipment and
documents stay dry and protected. Batteries,
mobile phones and cameras can also be
vacuum packaged to keep them from getting wet.
Vacuum packing prevents mixing of odours and
keeps food from perishing due to moisture. This is
particularly important in small spaces.
4.6. SAILING, CAMPING AND PICNICKING
4.2. WHAT IS FREEZER BURN?
Cooking Sous Vide is a modern cooking technique
where we cook food in vacuum packed bags immer-
sed in hot water. The Sous Vide technique provides a
superior avour of your home-cooked food, where
foods optimally retain their natural taste, colour and
texture.
The best Sous Vide vacuum bags on the market
are the ones that have the perfect combination of
materials (airtight polyamide and food-grade polye-
thylene) and where the thickness of materials is just
right. Status' bags perfectly fulll both of this cha-
racteristics.
Food for Sous Vide cooking can also be prepared in
advance before freezing, for example adding spices
and herbs into the vacuum bag together with meat.
4.5. SOUS VIDE COOKING

13
Foil roll 4 ply foil (PA/PE)
• length 3000 mm x width 200 mm, 4-piece set
• length 3000 mm x width 280 mm, 3-piece set
• length 3000 mm x width 120 mm (for salami), 5-piece set
Bags for vacuum
packing
4 ply foil (PA/PE)
• length 280 mm x width 200 mm, 40-piece set and 100-piece set
• length 360 mm x width 280 mm, 25-piece set and 100-piece set
• length 550 mm x width 120 mm (for salami), 30-piece set and 100-piece set
Thickness of the foil 100 μm (smooth, unribbed part) and 130 μm (structured ribbed part of the foil)
Quality of the foil Impermeable, two-ply, food-grade, neutral in taste and smell, reusable, microwave
safe, appropriate for Sous Vide cooking.
5. WHY USE STATUS’ BAGS AND FOIL ROLLS?
Status vacuum bags are impermeable, food safe,
neutral in taste and smell, reusable, BPA free and
suitable for Sous Vide cooking. The foodstuffs sto-
red in them will remain the same at least half a year
after you have stored it.
The quality of a bag and a foil roll is determined by
the thickness of the bag, the combination of materi-
als and the height of the ribbed prole.
The thickness of the bag Status’ bags are characteri-
zed by a 100 μm thick smooth foil and a 130 μm thick
ribbed foil. Their embossed criss-cross pattern helps
that the air is removed more effectively during the
vacuum sealing process.
The combination of materials of polyamide and
polyethylene, affects the (im)permeability of the
bag. Polyamide is the material that affects the per-
meability of a bag the most, while the passage of
oxygen through the bag affects the quality of sto-
red food. Compared to competing brands Status’
bags and foils boast the thickest layer of polyamide
(30 μm) which makes them the most quality option
for storing food.
The height of the ribbed prole determines the qua-
lity of vacuum packing. Status’ bags feature at least
0.2 mm high ribbed layer which enables them all to
be vacuum sealed uniformly whether it be the rst of
the 50th vacuum cycle. Thinner bags can be vacuum
sealed well during the initial few cycles (maximum of
10 bags) but later even the quality vacuum packing
machines cannot establish vacuum or generate
enough negative pressure.
Bags and foil rolls are compatible with all brands of
vacuum packing machines.
BAG STRUCTURE
VACUUM BAGS AND FOIL ROLL SETS
outer impermeable layer, polyamide - thickness 30 µm
inner layer, polyethylene - thickness 70 µm
inner ribbed layer, polyethylene - thickness 100 µm

14
6.1. COMPARATIVE TABLE OF FOOD STORAGE
IN THE REFRIGERATOR
6. COMPARATIVE STORAGE TABLES
Source: Status' Development Dept. manufacturer
Type of food Regular storage Vacuum storage
Boiled food 2 days 10 days
Fresh meat 2 days 6 days
Fresh poultry 2 days 6 days
Boiled meat 4-5 days 8-10 days
Fresh sh 2 days 4-5 days
Cold meats 3 days 6-8 days
Smoked sausages 90 days 365 days
Hard cheeses 12-15 days 50-55 days
Soft cheeses 5-7 days 13-15 days
Fresh vegetables 5 days 18-20 days
Fresh herbs 2-3 days 7-14 days
Washed lettuce 3 days 6-8 days
Fresh fruit 3-7 days 8-20 days
Desserts 5 days 10-15 days
Tip: Before vacuum packing properly chill the food.
6.2. COMPARATIVE TABLE OF FOOD STORAGE
IN CUPBOARDS AND ON SHELVES
Type of food Regular storage Vacuum storage
Bread/rolls 2-3 days 7-8 days
Pastry 120 days 300 days
Dried food 10-30 days 30-90 days
Raw rice/pasta 180 days 365 days
Coffee/tea 30-60 days 365 days
Wine 2-3 days 20-25 days
Non-alcoholic drink (sealed) 7-10 days 20-25 days
Non-alcoholic drink in a vacuum jar 2-3 days 7-10 days
Baking goods 2-3 days 7-10 days
Hazelnuts, walnuts etc. 30-60 days 120-180 days
Crackers/potato chips 5-10 days 20-30 days

15
6.3. COMPARATIVE TABLE OF FOOD STORAGE
IN THE FREEZER
Type of food Regular storage Vacuum storage
Fresh meat 6 months 18 months
Ground meat 4 months 12 months
Poultry 6 months 18 months
Fish 6 months 18 months
Fresh vegetables 8 months 24 months
Mushrooms 8 months 24 months
Herbs 3-4 months 8-12 months
Fruit 6-10 months 18-30 months
Cold meats 2 months 4-6 months
Baking goods 6-12 months 18 months
Coffee beans 6-9 months 18-27 months
Ground coffee 6 months 12-34 months
Bread/rolls 6-12 months 18-36 months
Only approximate time of duration is indicated in the tables, as it depends on the initial state (freshness)
and way of preparing food. We have considered storage of food at +3 °C / +5°C in the refrigerator and
at –18 °C in the freezer.
PROBLEM: WHAT TO DO:
Status BV500 does
not respond when
I press the buttons.
• Make sure the machine is plugged in.
• If socket is on but you have no power, check the socket with another machine that you
know works.
• Check the power cord for any damage – cracks or splitting.
• Your machine may switch off automatically to avoid overheating. Allow it to cool down
for a few minutes and then carry on as normal. We strongly recommend you take into
account 120 seconds between each vacuum packing.
Air remains
in the bag.
• Make sure you have fully placed open end of the bag in the middle of Vacuum
Compartment.
• Ensure that the lid of the machine is rmly pressed down to make certain a vacuum is
established. If you can open it, you didn’t press hard enough and the vacuum couldn’t
have been established. Repeat the procedure.
• Check your bag for any damage – splits, perforations or bubbles.
Test: Seal bag and submerge it in water. On the places where bag is damaged, bubbles
will appear.
• When using continuous rolls make sure that the rst sealing edge is rmly sealed.
7. TROUBLESHOOTING

16
8. WARRANTY
This warranty is valid for two years from the date of
purchase. Evidence of original purchase is required
for warranty services, so it is important to keep your
sales receipt.
This warranty only covers breakdown caused by elec-
trical or mechanical failure. It does not cover damage
caused by liquid entering the machine or breakdown
caused by failure to follow the manufacturers instruc-
tions.
If you have any comments or questions concerning
the functioning of the machine or warranty, please
contact us:
STATUS d.o.o. Metlika
Ulica Belokranjskega odreda 19,
8330 Metlika, Slovenia
e-mail: [email protected]
For more information visit our website
http://innovations.status.si.
PROBLEM: WHAT TO DO:
The vacuum doesn’t
hold on the bags.
• Check the sealing areas of the lid are free from any dirt, grease or food particles, and
that they are rmly in place.
• Ensure that the bag is totally clean on the edges – thoroughly remove any food parti-
cles or liquid and ensure the bag is completely dry.
• If you are sealing anything with sharp edges (e.g. bones) make sure they cannot pier-
ce the bag during the vacuum process.
• Note: Cover sharp edges with a paper towel or similar, prior to sealing.
Liquid has been
sucked up when
sealing.
•Stop the vacuum packing process immediately. Check the special container which
is located on the lower part of the machine for any liquid which may have collected
there. Follow the instructions on paragraph number 2.2.7 to clean this container.
Bag melts or
cannot be sealed
completely.
• Make sure you are using bags that are at least 100/130 µ thickness and 2 ply.
• Before sealing ensure that the edges of the bag are clean and dry.
The vacuum doesn’t
hold when using a
container.
• Ensure that your Hose is correctly inserted as shown in Figure 8.
• Make sure your container lid is clean and dry and in the correct position.
• Make certain that your container valve is clean and dry.
I’ve sealed several
bags (up to 5) and it
stopped working.
•Make sure you are using bags that are at least 100/130 µ thickness and 2 ply.
• Before sealing ensure that the edges of the bag are clean and dry.
• Check the lid seals are rmly in place all the way around.
Status BV500 sealed
several bags (up to 5
items) and it seems
it is not working
anymore.
Important note
about vacuum bags:
• We strongly recommend vacuum bags of thickness at least 100/130 µ. There
are many different types of vacuum bags available on the market so put special
attention on quality. Our recommendation is to use original vacuum bags from
Status, which are 2 ply and thickness of 100/130 µ.

17
9. DECLARATION OF CONFORMITY
The machine complies with all European directives:
a.) Rules on Electrical Equipment Designed for Use
within Certain Voltage Limits
(Ofcial Journal of RS, Nos. 27/2004, 17/2011,
71/2011)
LVD Directive 2014/35, 2006/95/EC
b.) Rules on Electromagnetic Compatibility
(Ofcial Journal of RS, Nos. 84/2001, 32/2002,
132/2006)
EMC Directive 2014/30, 2004/108/EC
EC declaration of conformity guarantees that the
machine is safe and has been inspected and tested
to meet all the requirements specied in the applica-
ble standards, directives and regulations.
EC Declaration of conformity for CE marking is loca-
ted at the seller and can be provided per customer’s
request.
10. CORRECT DISPOSAL OF YOUR
VACUUM MACHINE
When the equipment or parts of the device are no
longer t for use they must be disposed of at the
industrial waste landll in accordance with applicable
regulations:
• Decree on the Management of Waste Electrical and
Electronic Equipment (WEEE) (Ofcial Journal of RS,
no. 107/2006)
Directive 2012/19/EU on Waste Electrical and Elec-
tronic Equipment (WEEE)
• Rules on the Restriction of the Use of Certain
Hazardous Substances in Electrical and Electron-
ic Equipment (RoHS) (Ofcal Journal of RS, no.
102/2012)
• Rules amending the Rules on the Restriction
of the Use of Certain Hazardous Substances
in Electrical and Electronic Equipment (Ofcial
Journal of RS, no. 20/2014)
Directive 2011/65/EU on the Restriction of the Use
of Certain Hazardous Substances in Electrical and
Electronic Equipment
Environmentally hazardous components and parts that
were built into the device have to be disposed of at spe-
cialized sites.
The symbol on the product or
its packaging indicates that at
the end of its life, the product
may not be treated as ordinary
household waste and must
be disposed of in accordance
with your local authority’s
instructions and at properly
designated sites. You can also
use an ofcial WEEE collection service provider in
accordance with directive 2002/96/EC.
Separate collection of individual components of EE
equipment prevents negative effects of environmen-
tal pollution and minimizes danger to human health,
which may occur as a result of improper product
disposal. In addition, it enables reuse and recov-
ery of the material, thus saving energy and raw
materials. For detailed information on collecting,
sorting, reuse and recycling of the product contact the
provider of WEEE collection services or the shop where
you bought the equipment.
The date of manufacture can be found on the
warranty sheet which you received at purchase.

18
The set includes:
a.) 1 Status BV500 Vacuum Sealer
b.) 1 Foil roll – 200 mm (W) X 1500 mm (L)
c.) 1 Foil roll – 280 mm (W) X 1500 mm (L)
d.) 3 Small bags – 200 mm (W) x 280 mm (L)
e.) 3 Large bags – 280 mm (W) x 360 mm (L)
f.) 1 Connector used for vacuum packing of containers
g.) 1 Manual Cutter used for cutting foil
h.) 1 User Manual
11. STATUS BV500 SET


Table of contents
Other Status Food Saver manuals