STC Ecomposter Guide

Assembly Manual and User Guide
Ecomposter Sphere, Standard Base and Optional Base
Shown With Optional Base
System Trading Corporation
450 7th Avenue, Suite 2809, New York NY 10123

www.ecomposter.net
TABLE OF CONTENTS
2
3
4
5-6
7
7
8
9
10
11
12
12-13
14
14-15
16
16
16
16
17
17
17
18
18
18
Ecomposter Assembly
Step 1: Unpack
Ecomposter Sphere ...................................................................................
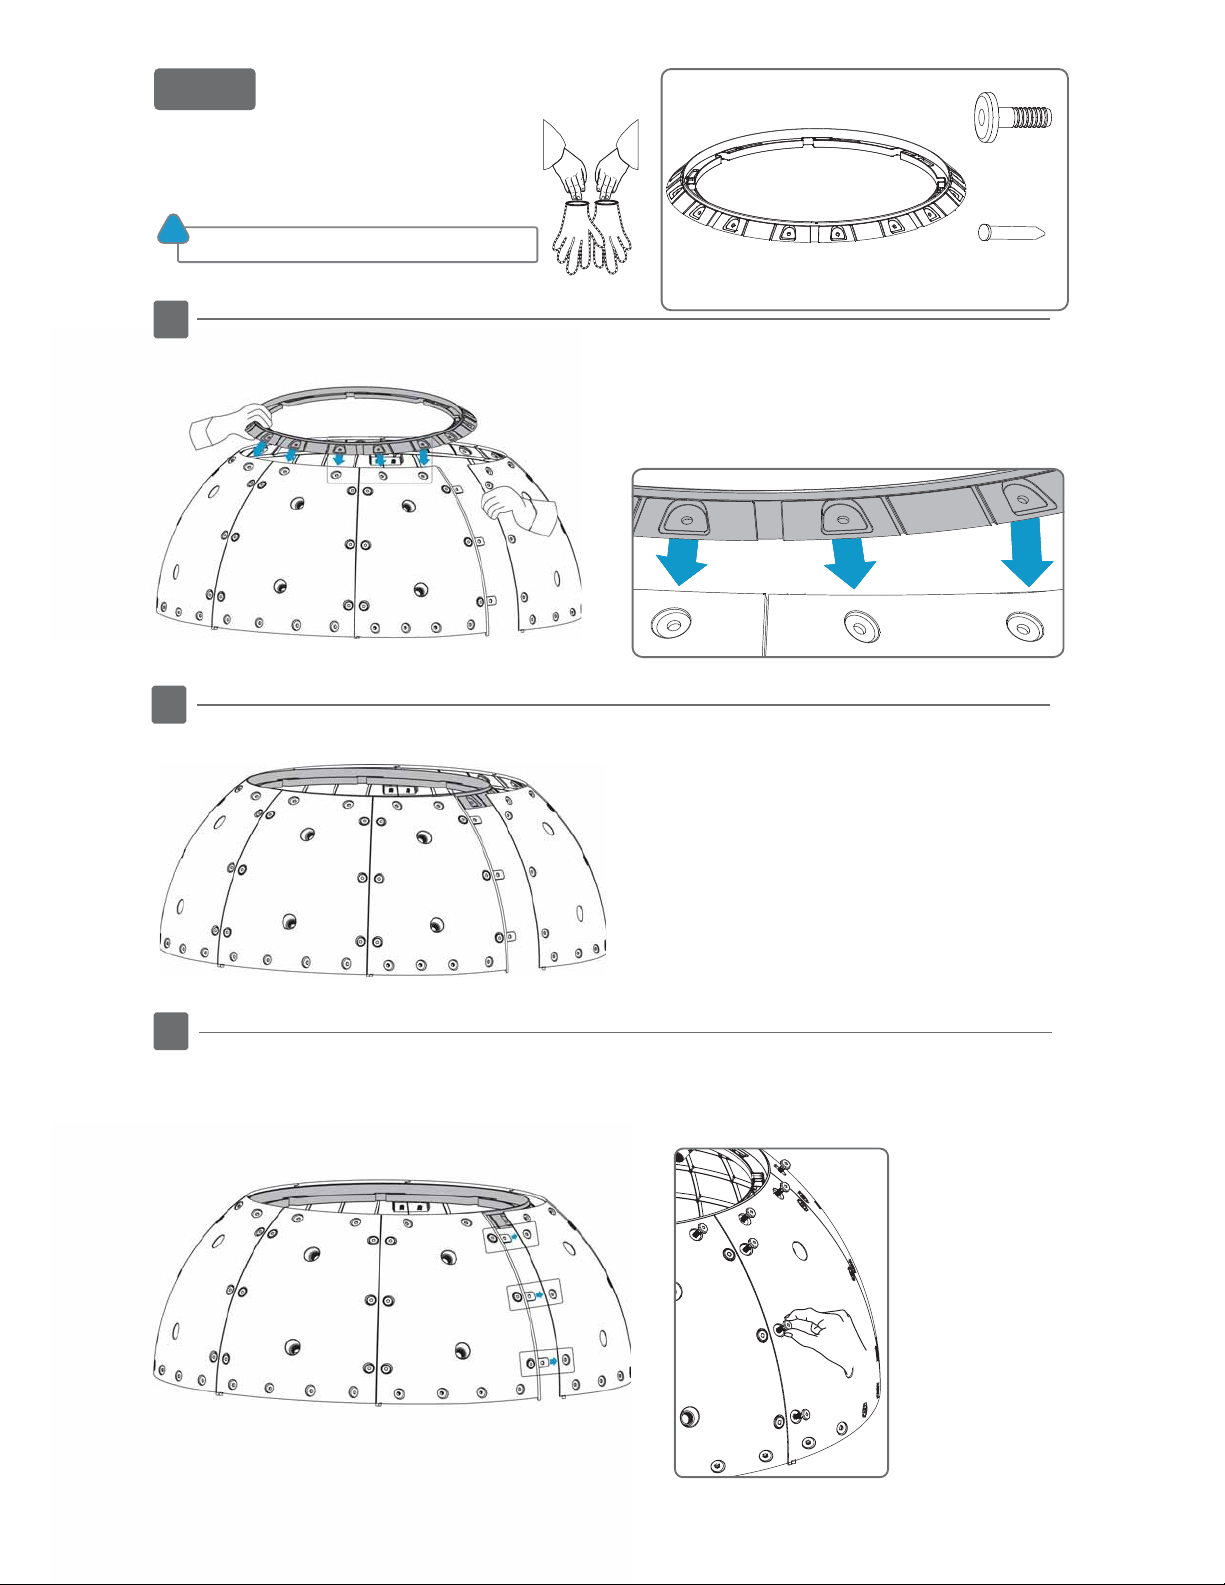
Step 2: Prepare One Sphere Panel ......................................................................................
Step 3: Prepare One Half Sphere .......................................................................................
Step 4: Assemble One Half Sphere ...............................................................................
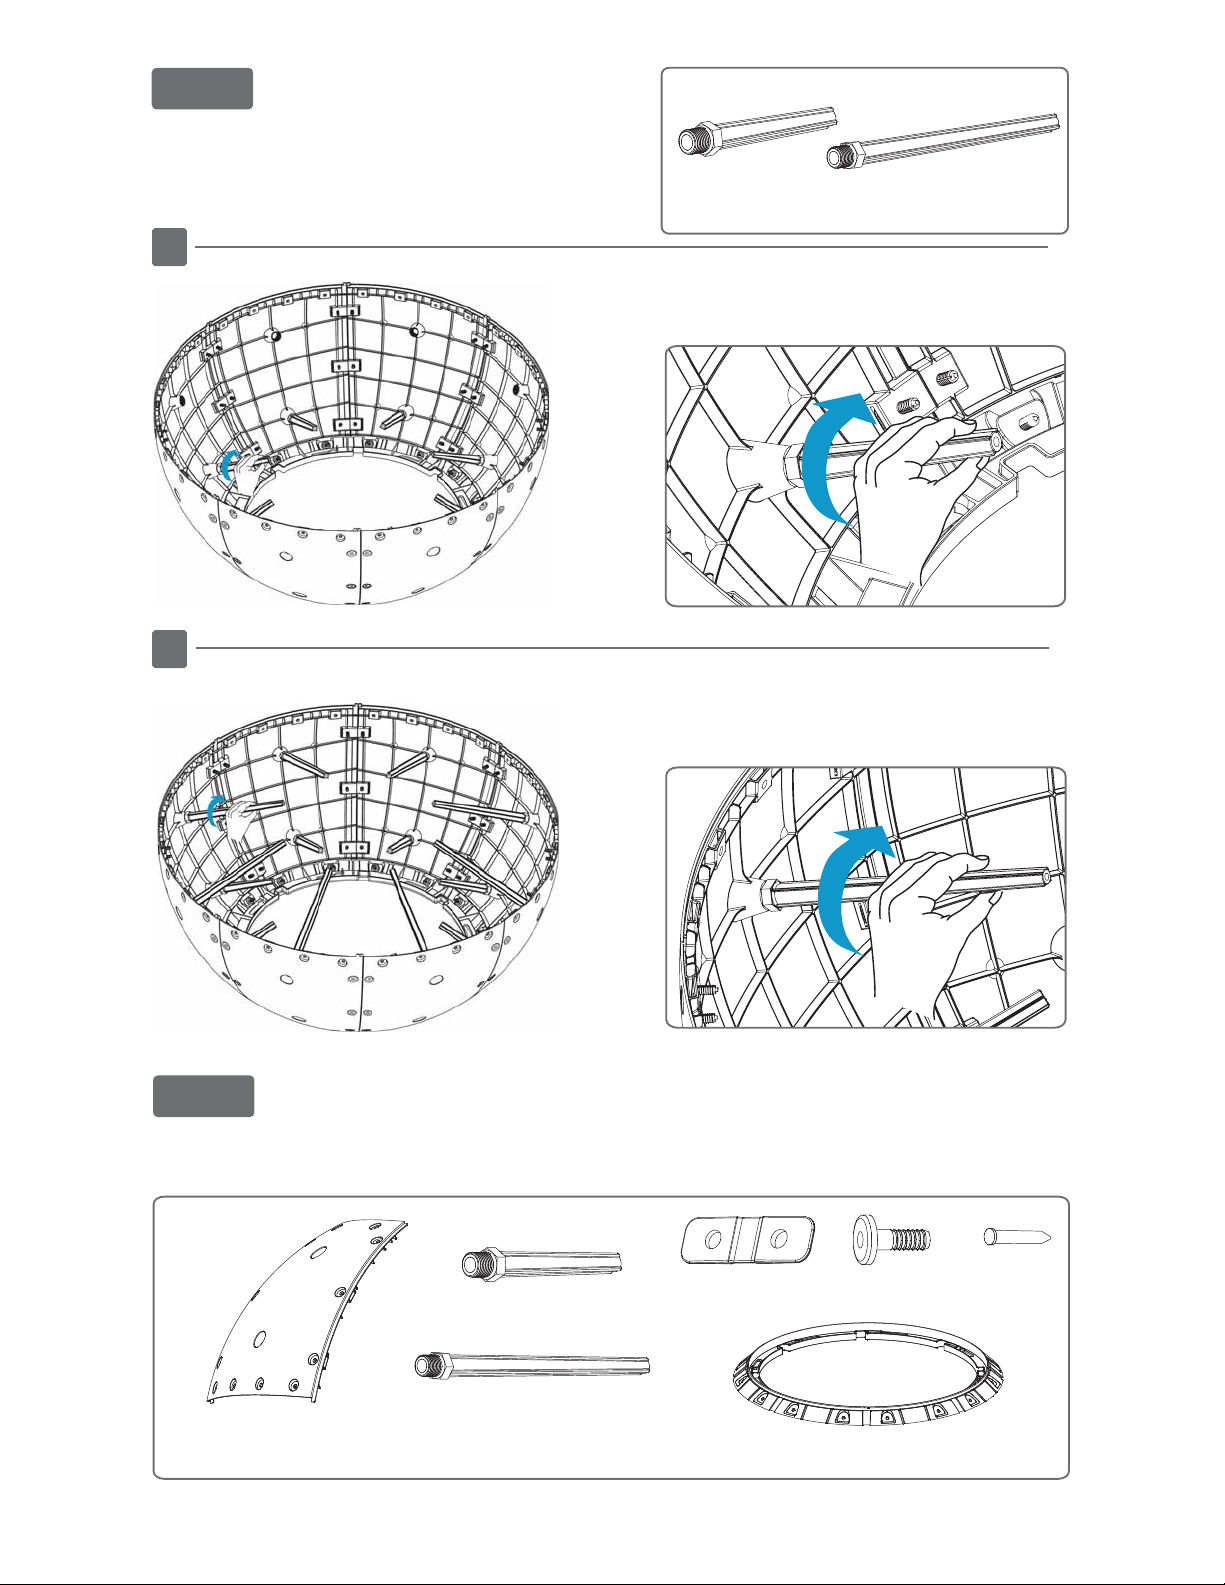
Step 5: Install Air Tubes .......................................................................................................
Step 6: Assemble Other Half Sphere ..................................................................................
Step 7: Assemble Center Ring ............................................................................................
Step 8: Install Center Ring ..................................................................................................
Step 9: Attach Top Sphere ..................................................................................................
Step 10: Install Lids .............................................................................................................
Standard Base Assembly
Step 1: Unpack Standard Base ............................................................................................
Step 2: Assemble Standard Base ...................................................................................
Optional Base Assembly
Step 1: Unpack Optional Base ............................................................................................
Step 2: Assemble Optional Base ...................................................................................
Ecomposter User Guide
About the Ecomposter Design ...........................................................................................
How the Ecomposter Works ...............................................................................................
How to Use the Ecomposter.................................................................................................
Before You Begin .................................................................................................................
Filling Your Ecomposter........................................................................................................
What Materials to Compost ...............................................................................................
Monitor Your Compost ......................................................................................................
When the Compost is Done ...............................................................................................
Composting Tips .................................................................................................................
Warranty ..............................................................................................................................
BEFORE YOU BEGIN, MAKE SURE YOU CAREFULLY READ
AND UNDERSTAND THE INSTRUCTIONS IN THIS MANUAL.
Please follow the instructions in the order presented in this
manual and be sure to observe all warnings and cautions.
Allow at least two hours to assemble the Ecomposter. If you
have any questions or problems, please contact Customer
Service at (800) 293-2923 or customerservice@ecomposter.net.
!
1 of 18

S1 x 16
Sphere Panel
S4 x 48 (+2)
Green Side Tabs
S2 x 192 (+12)
Rivets S8 x 192 (+12)
Pins
www.ecomposter.net 2 of 18
Unpack Ecomopster Sphere
Step 1:
S5 x 2
Collar
S7 x 16
LG Air Tube
S6 x 16
SM Air Tube
CR1 x 4
Center Ring
CR2 x 4
M5 Screw CR3 x 4
M5 Nut
S3 x 32 (+2)
White Mid Tabs
L1 x 2
Outer Lid
L2 x 2
Inner Lid
L3 x 1
Key
Unpack your Ecomposter and make sure you have the following components to assemble the sphere.
If you are missing any components, please contact Customer Service at (800) 293-2923.
Phillips Screwdriver
COMPONENTS:
TOOLS NEEDED: RECOMMENDED TOOLS:
Hammer Gloves Rubber Mallet
NOTE: We have included extra pieces for some of the smaller parts.

Components:
S1 x 1
Sphere Panel
S4 x 3
Green Side Tabs
S2 x 3
Rivets S8 x 3
Pins
www.ecomposter.net
view from outside
With inside panel facing down, insert
three green S4 side tabs into slots on
the right side.
Place three S2 rivets into the holes in the
panel and the side tabs to hold in place.
Place an S8 pin into the hole in the center
of each rivet. The pin will slide half way
into the rivet. Insert the other two S8 pins.
Use a rubber mallet (or block of wood)
to create a brace. Hammer pin into each
rivet until ush.
Adjust mallet and hammer the other pins
into rivets until ush.
Prepare One Sphere Panel
NOTE: Green S4 side tabs are the same on both sides.
A
B
C
D
E
Inside of rivet expands
when pin is inserted.
view from inside
NOTE: Hammer pin until it is ush with the top of the
rivet and the rivet is ush with the hole in the panel.
Step 2:
3 of 18

Fit the side tabs of the rst panel into the
slots on the left hand side of a second panel.
Repeat Step 2 to prepare seven more sphere
panels. You now have eight sphere panels
with three side tabs attached to the right sides.
Prepare One Half Sphere
A
B
C
D
NOTE: You will hammer pins
into all the rivets in Step 4E.
Step 3:
Place three S2 rivets into the holes in the
panel and the side tabs to hold in place.
Repeat steps B and C to connect the next six
panels.
Components:
S1 x 7
Sphere Panel
S4 x 21
Green Side Tabs
S2 x 21
Rivets S8 x 21
Pins
IMPORTANT: DO NOT connect the rst panel
to the last panel. LEAVE ONE SIDE OPEN.
!
www.ecomposter.net
Do NOT connect the rst panel
to the last panel. Leave one side
open. You will connect it in Step 4C.
4 of 18

The collar ts on the inside of the top of the sphere.
Gently pull the sphere apart to t the collar UNDER
the top of the panel.
Assemble One Half Sphere
A
B
C
Step 4:
S5 x 1
Collar
Components:
S2 x 19
Rivets
S8 x 40
Pins
Starting with an open panel, place S2 rivets into
holes in the top panel and collar to hold in place.
Line up the holes in the collar with
the holes in the top of the panels.
Continue to line up the holes in the panels
with the holes in the collar and place rivets
to hold in place. ONLY attach half of the
panels to the collar in this step.
Go back to the sides and slide the side tabs into the
slots in the last panel and hold in place with three
rivets. Finish lining up the holes in the panels with the
collar and placing rivets to hold in place.
Wear gloves. The edges of the collar are sharp.
!
www.ecomposter.net 5 of 18

Place two S8 pins in the center of the two rivets in
the top of each panel. Hammer the pins until ush
and the collar is secured to the panels.
Place S8 pins in the center of the three rivets along
the left side of each panel and hammer until ush.
Turn the half sphere over.
Assemble One Half Sphere (Continued)
D
E
F
NOTE: Hammer pin until it is ush with the top of the
rivet and the rivet is ush with the hole in the panel.
NOTE: Hammer pin until it is ush with the top of the
rivet and the rivet is ush with the hole in the panel.
Step 4:
www.ecomposter.net 6 of 18

Screw eight S7 LG air tubes along the inside.
With the large opening of the half sphere
up, screw eight S6 SM air tubes along the
inside near the collar.
Repeat Steps 2 through 5 to assemble the other half sphere.
Install Air Tubes
A
B
Step 5:
Assemble Other Half Sphere
Step 6:
Components:
S7 x 8
LG Air Tube
S6 x 8
SM Air Tube
S7 x 8
LG Air Tube
S6 x 8
SM Air Tube
Components:
S1 x 8
Sphere Panel
S4 x 24
Green Side Tabs
S2 x 64
Rivets
S5 x 1
Collar
S8 x 64
Pins
www.ecomposter.net 7 of 18

B
Fit the ends of each piece together, lining up the holes. Using a Phillips screwdriver, secure
the pieces together with a CR2 screw and a CR3 nut.
Lay the four CR1 center ring pieces in position.
A
Assemble Center Ring
Step 7:
CR1 x 4
Center Ring
CR2 x 4
M5 Screw
CR3 x 4
M5 Nut
Components:
www.ecomposter.netwww.ecomposter.net 8 of 18

Place white mid tabs into slots
in panels in one half sphere.
Place rivets into holes in mid tabs
and panels to hold tabs in place.
Install Center Ring
A
Step 8:
S3 x 32
White Mid Tabs S2 x 32
Rivet
Components:
When placing center ring, turn ring so that
all indents on the side line up with the seam
where two panels are joined.
All white mid tabs t through openings in
the center ring.
B
Position the center ring so the indents on the side line up with
the seams where the panels are joined together. Make sure
the white mid tabs fit through the openings in the center ring.
!
www.ecomposter.net
NOTE: You will hammer S8
pins into rivets in Step 9C.
9 of 18

www.ecomposter.net
B
C
Place top half of sphere so the seams match
up with the indents in the center ring.
Hold in place with rivets.
Secure all rivets by hammering pins into
place. Make sure you hammer the pins
until they are ush with the top of the rivets.
A
Attach Top Sphere
Step 9: Components:
S2 x 32
Rivets S8 x 64
Pins
Position top half sphere so the indents on side of center ring align with the seams where the panels are
joined together. Make sure white mid tabs t into slots in the panels along lower edge of half sphere.
!
10 of 18

www.ecomposter.net
B
C
You MUST lift the handles on each side of the outer lid to
install to the sphere. Lining up pegs inside the lid with large
hole in the openings in the collar, set the lid into the collar
and turn clockwise until the pegs reach the end of the
openings. Lower the handles to lock in place.
Turn the sphere over and repeat step A and B to install the cover
on the other end. Use the included key or your hand to turn the
inner lid counter-clockwise and lift to open.
A
Install Lids
Step 10: Components:
L1 x 2
Outer Lid
L2 x 2
Inner Lid
L3 x 1
Key
You MUST lift the handles on the outer lid to install
to sphere. DO NOT LIFT sphere using the handles.
!
NOTE: If the cover does not turn easily, use a Phillips
screwdriver to loosen the screws on the pegs inside.
Lining up pegs inside the inner lid with large holes
in the outer lid, lower the lid into place. Use three
ngers to turn clockwise to close the lid.
11 of 18
View from Inside
Pegs on outer lid slide to the
end of the opening in collar.
To remove rubber plug in the center of the inner lid to
drain liquids, remove inner lid from outer lid. From inside,
pinch rubber plug together and push through the hole
in center of inner lid. Keep the rubber plug in a safe place,
until you are ready to insert back in.

www.ecomposter.net
Unpack Standard Base
Standard Base Assembly
Step 1:
Step 2: Assemble Standard Base
SB4 x 3
M5 Screw with washer
SB1 x 4
Base
SB2 x 1
Pin
SB3 x 4
Spike SB5 x 3
M5 Nut
Unpack the standard base for your Ecomposter and make sure you have the following components. If
you are missing any components, please contact Customer Service at (800) 293-2923.
The standard base had been designed to easily open and close, allowing the Ecomposter sphere
to roll inside. Place the four SB1 base parts next to each other. Fit the left side of one piece into
the right side of the piece to the left of it.
Phillips Screwdriver
COMPONENTS:
TOOLS NEEDED:
A
NOTE: Do not tighten the screws completely. Tighten the screws only enough
so that base pieces are held together but the position can still be adjusted.
12 of 18
Use a SB4 screw with washer and SB5 nut to connect the base pieces at three sides. Tighten using a
Phillips screwdriver.
B

www.ecomposter.net
Assemble Standard Base (Continued)
Step 2:
Find a place in your yard to set up the base. Position the four base pieces so the last two pieces t
together forming a circle. Use the SB2 pin instead of a screw to hold the base closed. Push two SB3
spikes into holes in outside rim of the back two base pieces securing the base to the ground.
C
D
13 of 18
To use the base, remove the SB2 pin that holds the base closed. Move the front base pieces away
from each other, creating an opening to roll the Ecomposter into the center of the base. Close the
base and replace SB2 pin to secure. Place the remaining two SB3 spikes into the holes in outside
rim of the front base pieces to hold the base rmly in place with the Ecomposter sphere inside.

www.ecomposter.net
Unpack Optional Base
Optional Base Assembly
Step 1:
Step 2: Assemble Optional Base
CR2 x 36 (+4)
M5 Screw
B1 x 6
Leg
B2 x 12
Leg Connector
B3 x 6
Foot
B4 x 6
Wheel Bracket
B5 x 6
Wheel
CR3 x 36 (+4)
M5 Nut
B7 x 24 (+4)
M6 Nut
B6 x 24 (+4)
M6 Bolt
Unpack the optional base for your Ecomposter and make sure you have the following components. If
you are missing any components, please contact Customer Service at (800) 293-2923.
Find a rm, level place to work. Lay two B1 legs next to each other with the OUTSIDE FACING UP.
Phillips Screwdriver Tape Measure
COMPONENTS:
TOOLS NEEDED:
NOTE: We have included extra pieces for some of the smaller parts.
A
DO NOT TIGHTEN the screws until AFTER
you have t the legs into the feet in Step 2B.
IMPORTANT: Check the label on top of each leg. Make sure OUTSIDE of legs are facing YOU.
!
14 of 18
Place one B2 leg connector under the legs and another leg connector in line with it above the legs.
Loosely screw six CR2 screws into six CR3 nuts to hold in place. Continue adding legs until all six
legs are connected.
OUT
OUT
OUT
OUT
2
1

www.ecomposter.net
Assemble Optional Base (Continued)
Step 2:
Fit bottom of two legs into a B3 foot, working around until all six legs are rmly set into the feet. The
base will form a hexagonal shape.
B
Measure the distance between the legs. Adjust the legs slightly until the distances are equal. Tighten
the screws on the leg connectors so the connectors sit rmly in place.
C
Attach the wheels to the top of each leg. The B5 wheel sits on top of the leg and the B4 wheel bracket
sits under the leg. Line up the holes in both pieces and secure with four B6 bolts and four B7 nuts. Use
a Phillips screwdriver to rmly tighten so the brackets stay in place. Repeat to install all six wheels.
The Ecomposter sphere rests on top of the base.
D
Tighten bolts so the wheels are rmly attached. DO NOT OVER TIGHTEN.
Over tightening can damage bolts, greatly reducing holding power.
!
15 of 18
2
1

www.ecomposter.net 16 of 18
USER GUIDE
Using Your Ecomposter
About the Ecomposter Design
How the Ecomposter Works
How to Use the Ecomposter
IMPORTANT: When full, the Ecomposter sphere is heavy. Place the sphere on the optional
base to prevent it from moving. Place the base on smooth, level ground. The Ecomposter is
not a toy. Make sure the lids are secure before rotating the sphere. DO NOT LIFT the sphere
using the handles. Place your ngers in the holes in the sides of the sphere to lift. The handles
are used to lock the outer lid into place.
!
Thank you for purchasing your Ecomposter and optional base. We hope it provides you with many
years of enjoyment. Please read this User Guide to get the most out of your Ecomposter.
The unique Ecomposter sphere and patented air induction system is designed to speed up the
composting process. The Ecomposter design optimizes the four key components of composting:
heat, moisture, mixing and time.
The sphere, with the lowest surface/volume of any shape, prevents heat loss while the dark
green color attracts heat, promoting faster decomposition. The 360 degree rotation randomly
blends material, keeping the compost moist and improves the mixing, aeration and
decomposition process.
The large and patented air induction tubes provide a supply of oxygen into the center of the
compost material, maintaining an optimal moisture level. As the sphere rotates, the air tubes
break up and mix newly added materials with older materials.
Before You Begin
Select a site for your Ecomposter and optional base on level ground, with good airow,
access to water and partial shade in the summer and good sun in the winter.
The basic makeup of your initial material will determine both the speed and effectiveness
of the decomposition process. These materials also establish the nutrient content of the nished
compost. Do not try to make compost with one ingredient.
You will be adding materials in percentages. We recommend nding a bucket or cup to use as
a measuring gauge. The composting process will take between 4 to 6 weeks depending on the
ratio of materials, the moisture, heat and mixing schedule. Plants lose between 50 and 75 percent
of their volume in composting, so a great deal of plant material can be processed effectively.
The Ecomposter sphere is designed with a large outer lid to add or remove larger materials and
an inner lid for smaller amounts. Both use secure locking systems. Use the handles on the outer
lid to lock it in place. Use the key to tighten the small inner lid. A rubber plug in the center of the
inner lid can be easily removed to drain leachate, the liquid that forms during the decomposition
process, to use for your garden. Both lids are on either axis of the sphere for easy access. Before
rotating the sphere, make sure all the lids are closed tightly and the rubber plug is rmly in place.
See Step 10 in the assembly manual for more detail.

www.ecomposter.net
What Materials to Compost
DO NOT CompostGreen Materials Brown Materials
Monitor Your Compost
Aeration
Moisture
Temperature
Place your hand in the center of the compost to test the temperature. If the center is warm or
hot the process is working well. At temperatures of 140-160°F most pathogens and weed seeds
are destroyed.
Both moisture and nitrogen will affect the temperature. If your mixture is dry, add some water
to raise the temperature. If the materials are moist, add an activator, blood meal or farm manure.
Rotate your Ecomposter any direction daily to ensure proper aeration. The microorganisms
need oxygen to breakdown the compost materials.
The microorganisms work best with approximately 50 percent moisture. Too much moisture
means organic waste won't decompose. Too little moisture will kill the bacteria. Compost should
feel moist, but not soaking wet, like a wrung out sponge. If the compost is wet, or smells like
ammonia, add some dry material. If the mixture is dry, lightly spray it with water from a garden hose.
Add a combination of materials. The ratio of fresh green to dead brown materials will affect the
amount of time it takes to make compost. Although adding more green material may speed up
the time, you will need at least 25 percent brown material. We recommend beginning by adding
50 percent brown to 50 percent green. If you are adding large amounts of material at once, add
part of it, close the lid and turn the sphere. Open it again to add more.
It is important to maintain a balance of green and dry materials, monitor the temperature, smell,
moisture level of your materials and to turn the sphere a quarter turn daily.
Uncooked fruit and vegetable waste
Coffee grounds and tea bags
Egg shells
(rinsed and crushed)
Peanut shells
Garden Waste
Plant trimmings
Fresh grass clippings
(cut within 24 hours)
Hair trimmings
Fresh farm manure
Dead leaves
Dead garden waste
Sawdust and wood shavings
Black and white newspaper
Tissue paper
Shredded paper and cartons
Wood ashes
Pet waste
Cooked food
Bones
Meat, Fish or Dairy
Sauces, Oil or Fat
Diseased plants
Chemicals or pesticides
Branches, twigs, redwood,
Pine needles or treated wood
(Carbon)
(Nitrogen)
17 of 18
Filling Your Ecomposter
It is important to balance the mixture of brown and green materials. Use equal parts by volume
of dry and green plant materials in the overall mix. Mix grass clippings with other materials before
adding. Grass mats easily and prevents water from moving through the mass. When adding easily
compacted materials (such as ashes, fresh cut grass or sawdust) mix in coarser materials rst.
Breaking up or shredding materials you plan to add to your compost will decompose more
quickly. Adding more volume at once will also speed up the process. If you are adding material
gradually, be sure to stop adding materials to the Ecomposter to give the material time to nish
decomposing.

www.ecomposter.net 18 of 18
When the Compost Is Done
Composting Tips
Finished compost should look, feel and smell like rich, dark soil. You should not be able to
recognize any of the items you put in there. Finished compost is usually less than half the
volume of the materials you started with, only much denser.
Apply nished compost to your garden about 2-4 weeks before you plant, giving the compost
time to integrate and stabilize within the soil.
Help start a new compost pile with blood meal, cottonseed meal, well-aged manure that are
rich in nitrogen and help "re-up" the microbes responsible for breaking down organic matter
into compost.
If you are lling your Ecomposter every two or three weeks, we recommend getting a second
Ecomposter.
Establish a composting bucket in your kitchen. This will help limit the number of trips needed to
the Ecomposter.
The use of activators can get slow compost heated up faster.
Visit www.ecomposter.net for more tips.
One Year Warranty
System Trading Corporation,STC, warrants the
Ecomposter
and optional base against defective
materials and workmanship, while under normal
use and service, to the original purchaser, for one
(1) year from the date of delivery. This warranty is
not transferable.
STC will replace any defective part, or the entire
unit if necessary.
This warranty does not apply to damage caused
by misuse, improper use, assembly, application
or neglect.
This warranty gives you specic rights and you
may have other rights which vary from state to
state.
Keep this information with your important records.
Please go to www.ecomposter.net to register
your
Ecomposter
today.

Copyright © 2008, Systems Trading Corporation, All rights reserved. V4
System Trading Corporation
450 7th Avenue, Suite 2809, New York NY 10123
Ecomposter Sphere, Standard Base and Optional Base
Table of contents