Steak Locker SL100 STUDIO EDITION User manual
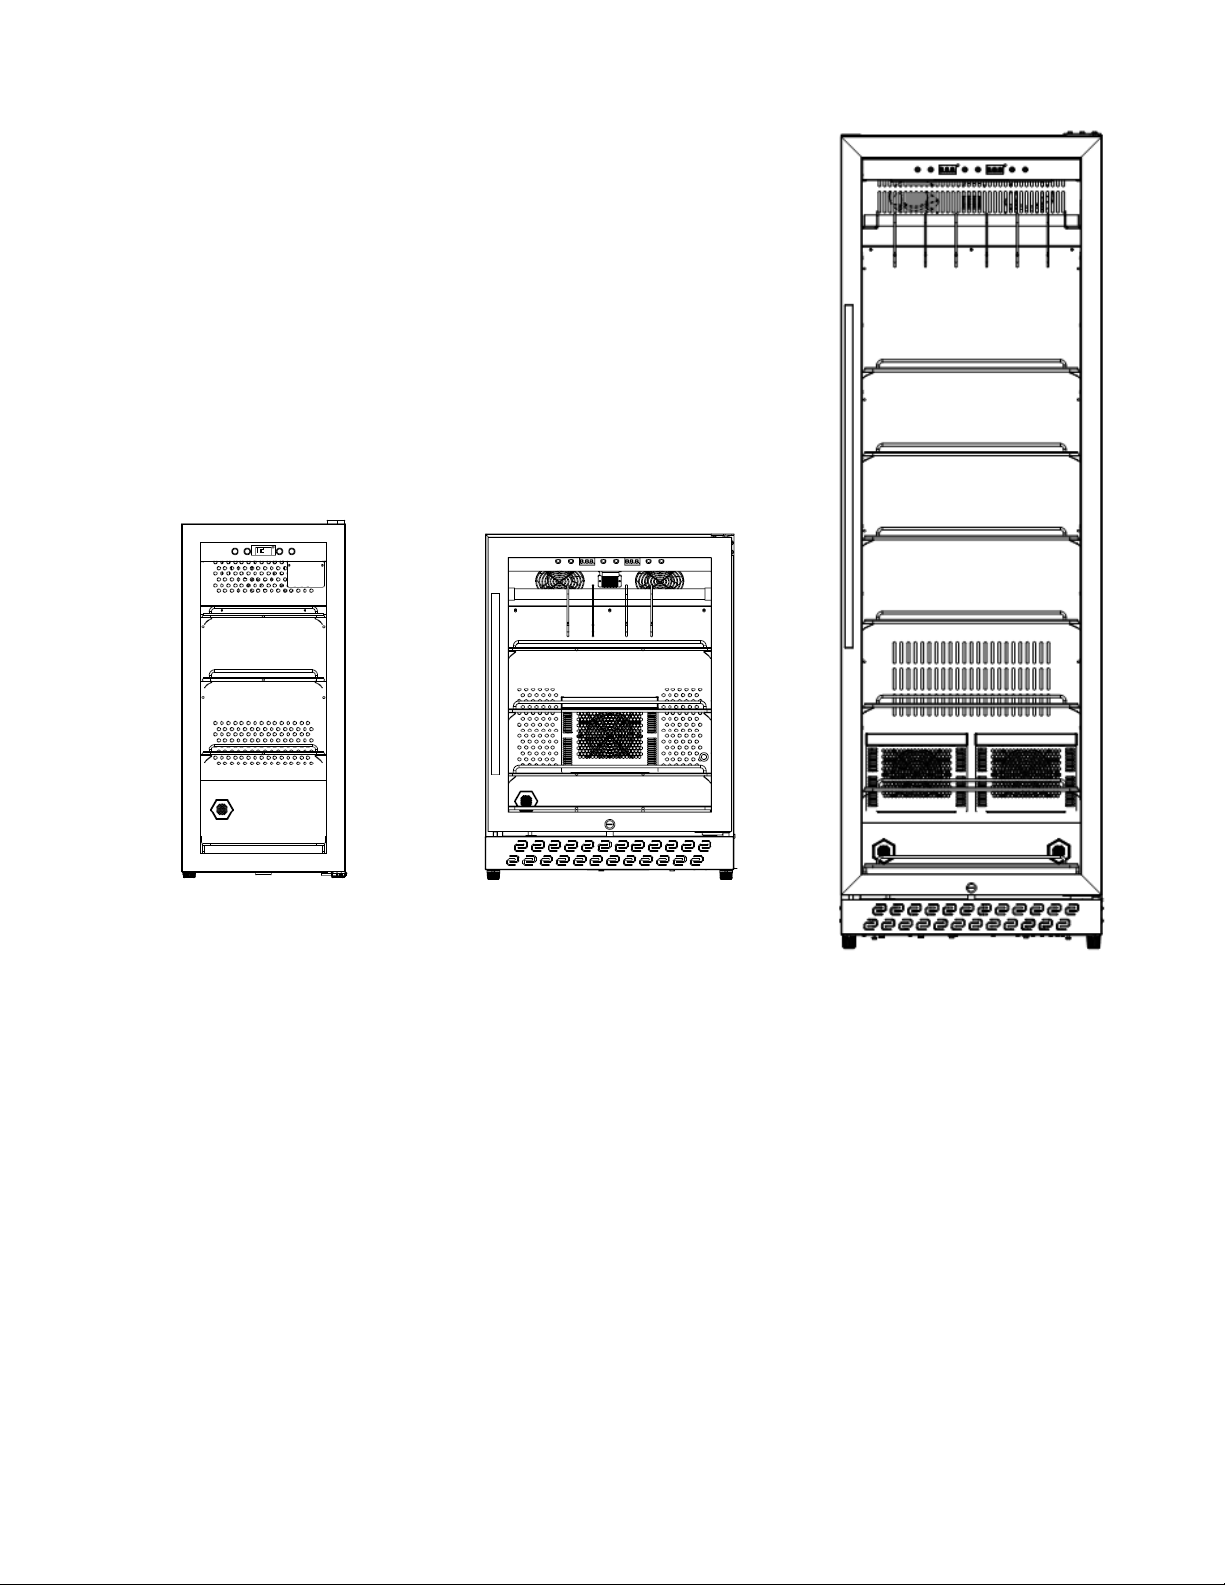
SL100 STUDIO EDITION
SL150 HOME EDITION
SL520 PRO EDITION
2
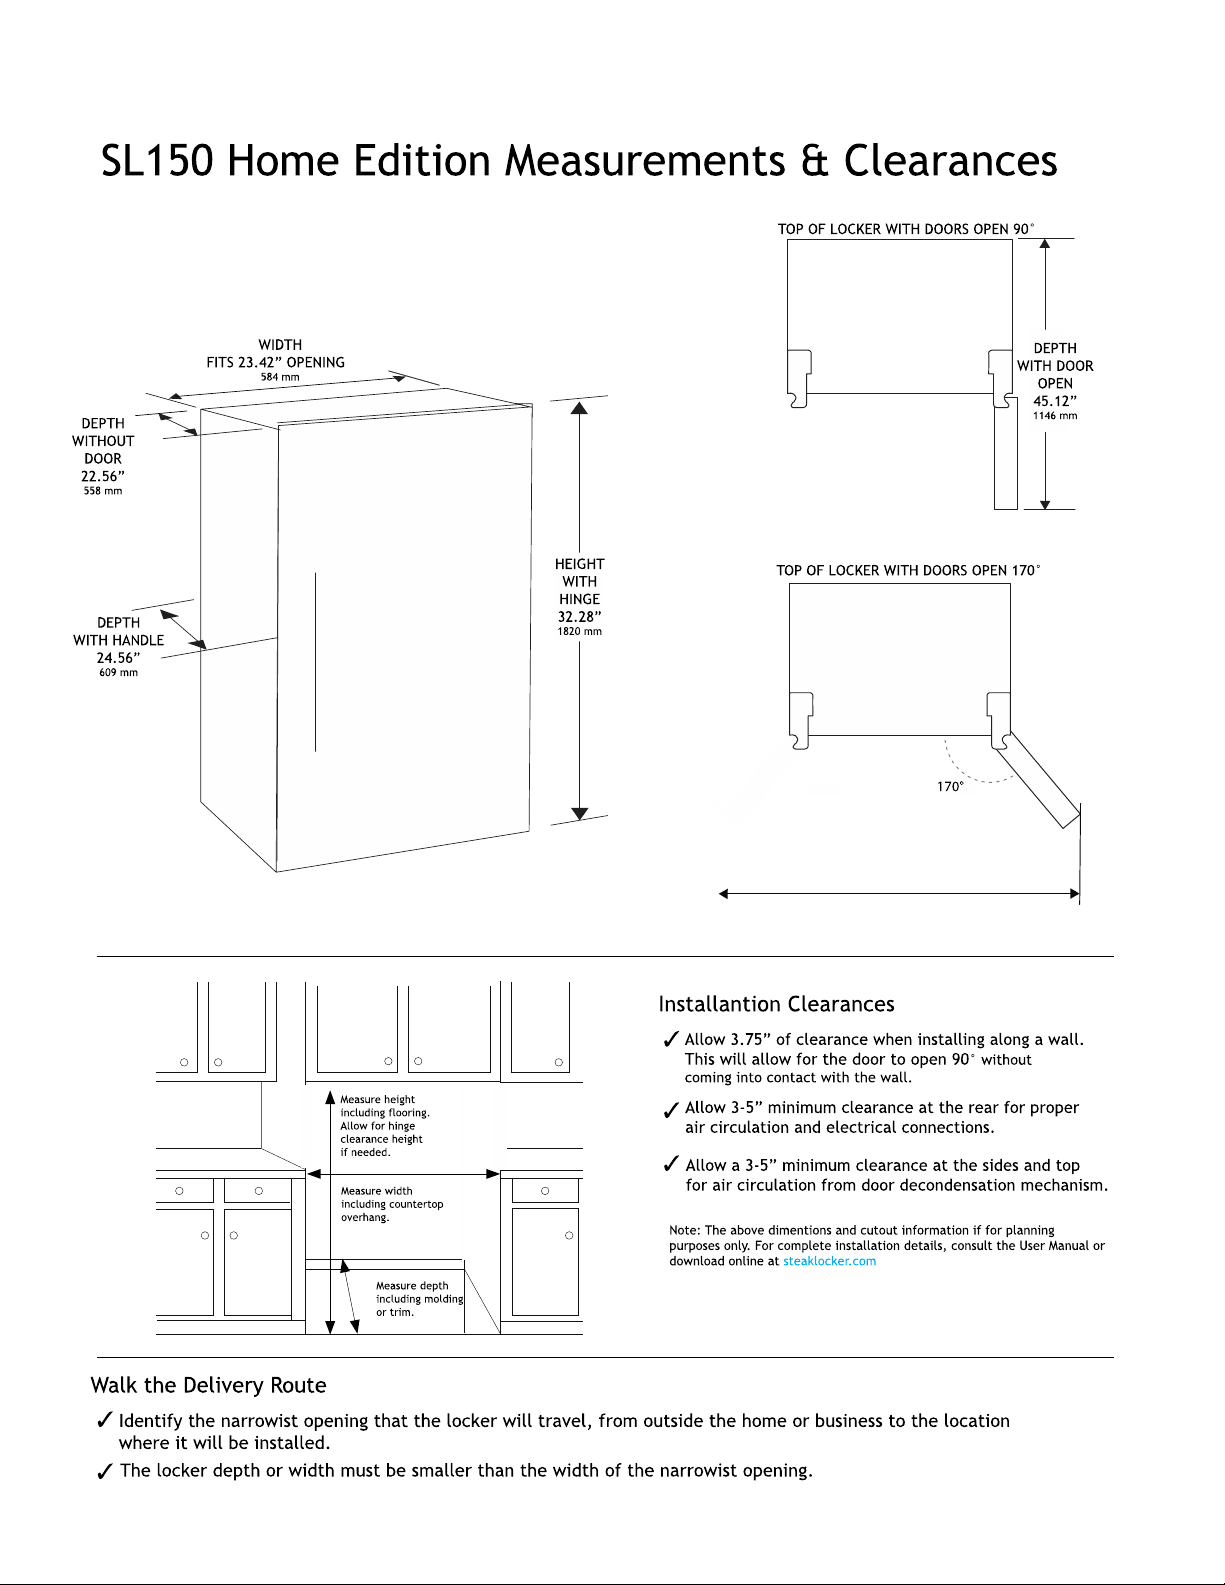
Dimensions: Dimensions: Dimensions:
D 21.45 x W 15.55 x H 34.44 in D 22.56 x W 23.42 x H 32.28 in D26.77 x W 23.43 x H 73.43
(D545xW395xH875) mm (D573xW595xH820) mm D68 x W595 x H1865 mm
Capacity: Capacity: Capacity:
30 LBS / 14 KG 65LBS - 29 KG 350 LBS - 150 KG
Usable Volume: Usable Volume: Usable Volume:
78 L / 2.65 cu. ft. 119 L / 4.2 cu. ft. 520 L / 18.36 cu. ft.
WARRANTY: One Year Parts / Labor (includes Compressor)
Please read the user manual before operation and save for reference. Think Before Printing.
SL520 Pro
SL100 Studio
SL520 Home

3
TABLE OF CONTENTS
INSTALLATION INSTRUCTIONS
4
SL100 STUDIO EDITION - COMPLETE OVERVIEW
6
SL100 STUDIO EDITION –OPERATING ELEMENTS & DISPLAYS
7
SL100 STUDIO EDITION –MEASURMENTS & CLEARANCES
9
SL150 HOME EDITION - COMPLETE OVERVIEW
10
SL150 HOME EDITION - OPERATING ELEMENTS & DISPLAYS
13
SL150 HOME EDITION –MEASURMENTS & CLEARANCES
14
SL520 PRO EDITION - COMPLETE OVERVIEW
15
SL520 PRO EDITION - OPERATING ELEMENTS & DISPLAYS
18
SL520 PRO EDITION –MEASURMENTS & CLEARANCES
19
CLEANING & MAINTENANCE
20
TROUBLESHOOTING - REFRIGERATOR
21-23
SYNC S4 WI-FI CONTROLLER –SL128 STUDIO; SL150 HOME, SL520 PRO
24
FULL RESET INSTRUCTIONS FOR WIFI SYNCING TROUBLE SHOOTING
25
PRECAUTIONS
26
HANDELING TIPS
27
GENERAL SAFETY INFORMATION
28-30
DISPOSAL OF STEAK LOCKER
31

4
INSTALLATION INSTRUCTIONS:
1. Setup location
Keep proper distance between the equipment and surrounding objects. To ensure the smooth flow of air around the
locker, when the machine is installed into a cabinet space, leave enough space on both sides, top and the back to the
wall. Keep at least 3 - 5 inches (8 - 13cm) away from the back wall. If the gap between the product and surrounding area
is too small, the side operation efficiency may be affected and the power consumption will increase.
2. Install in a dry, well ventilated location
Do not set up the locker in a wet or extremely damp environment, to prevent metal parts from rusting or causing
increased electricity usage.
3. Avoid heat or direct sunlight
If the environment temperature is too high, the refrigerant and humidity levels may fluctuate and cause the power
consumption to increase. Locate the appliance away from direct sunlight and sources of heat (stove, heater, radiator,
etc.). Direct sunlight may affect the acrylic coating and may increase electrical power consumption.
4. Place the SL on a floor that is strong enough to support the appliance when it is fully loaded
If the floor is uneven, use adjustable legs to keep the product be stable. It is not recommended to place the locker on
carpet or unsealed wood. If placed on carpet, it’s recommended to place a board below the locker to avoid heat or
water creating mold. Unstable installation can cause vibration, noise or door to misaligned.
5. Adjust the front of the device to be slightly higher than the rear
Check the locker for firmness to the floor, then re-adjust the front leveling feet brackets so that the front part of device
is slightly (approximately ½ inch) higher than the rear. If the front two feet are too low, the door may not close tightly
and may cause frost on the back wall.
6. Ground connection
The cord must be grounded to avoid electric shock. Connect socket to a grounded wire. If the socket has been
connected to the ground wire correctly, then, no need to connect another grounded wire.
7. Unable to connect ground position
If the location of the outlet cannot be connected via the grounded wire, connect the equipment to a surge protector
switch (the rated current can be checked on the rating label), then, connect the locker to the socket. Please Note:
Nonconductive plastic tubing cannot be used to connect ground wires. DO not connect ground wire to gas pipe, water
pipe, lightning arresters or telephone lines.
8. Electrical
It is essential that the Locker is plugged into an unencumbered 15AMP circuit and Non-GIF outlet. Do not place other
large appliances on the same circuit. Best practice is to place a Surge Protector on the outlet to the Locker.
After the equipment is installed, it should remain in place for at least 4 hours before connecting the power. This is
to avoid abnormal refrigeration pattern caused by the compressor oil that does not flow back into the compressor
during shipment.
After at least 4 hours, plug the locker into the wall outlet or surge protector, then allow the locker to run for at
least 5 hours prior to the first use of dry aging or charcuterie.
5
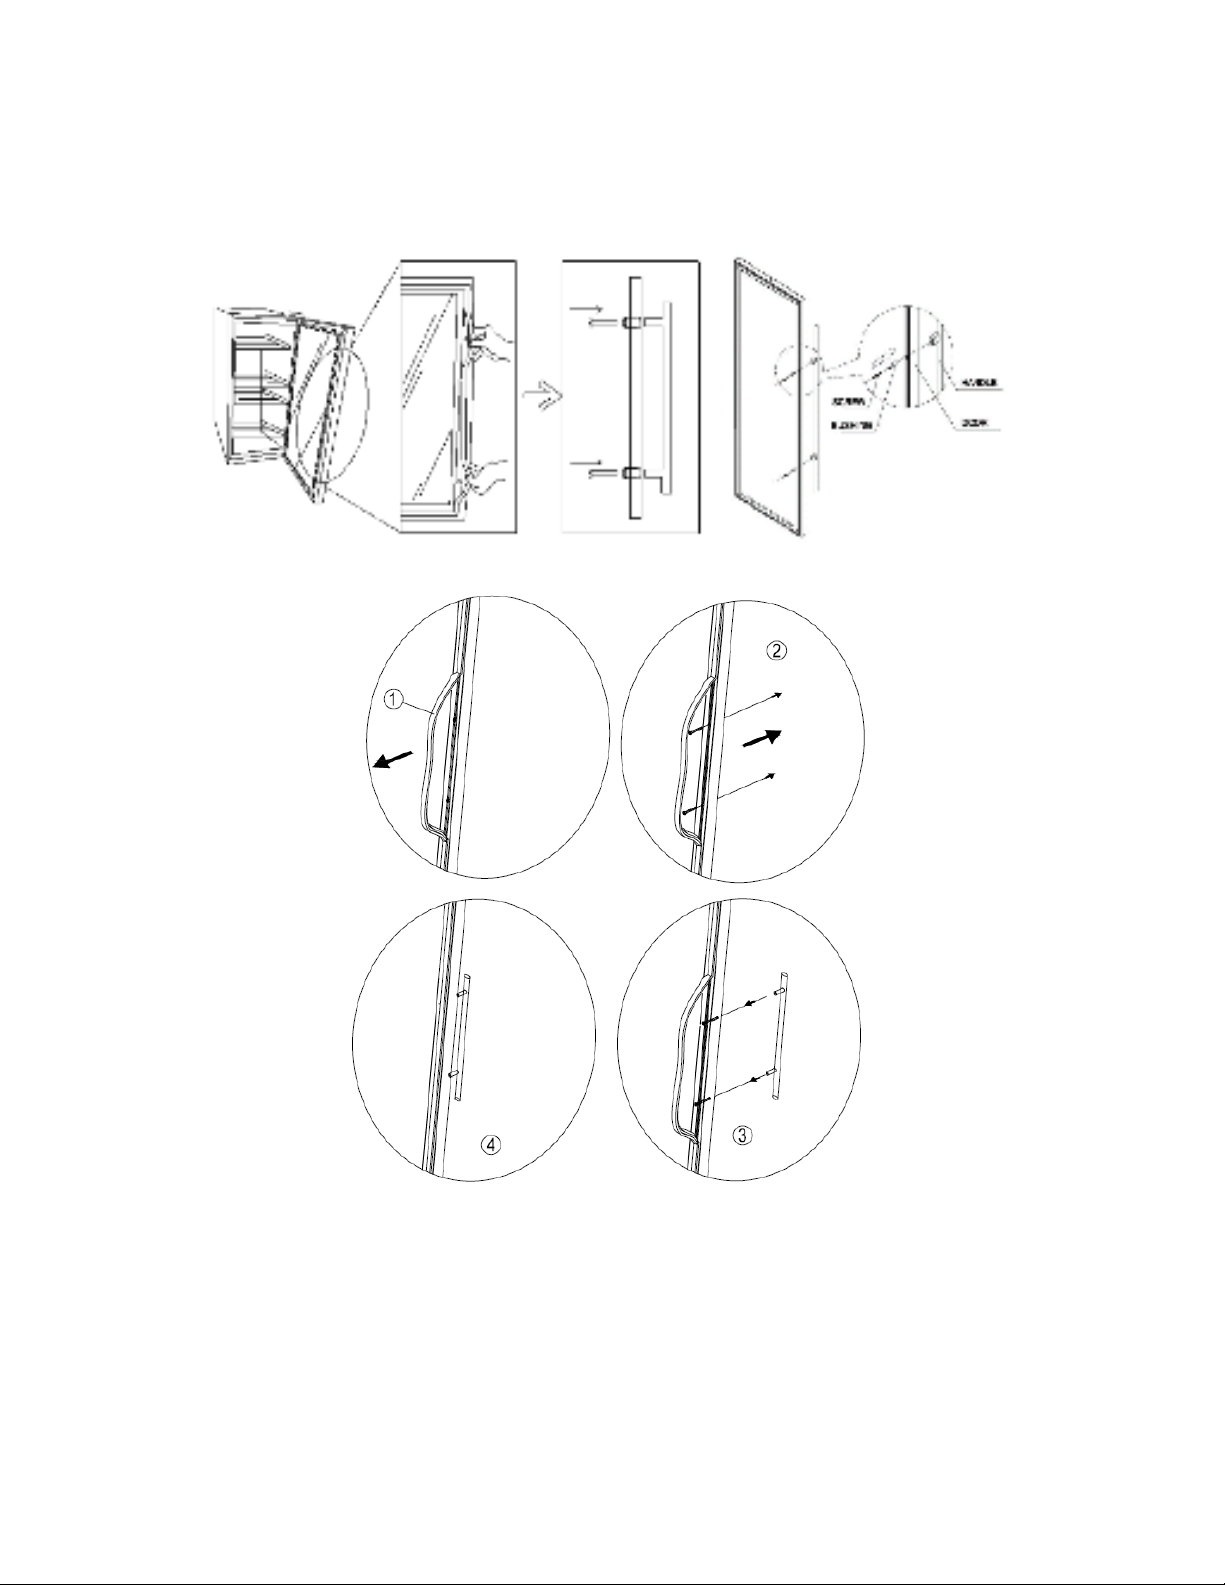
9. Handle Bar Installation; SL100 Studio, SL150 Home, SL520 Pro
All lockers include the Handle Bar and two supplied screws. To install, slide the rubber gasket on the inside of the door
to view the predrilled holes, then use a Phillip head screw driver to set into place.
6
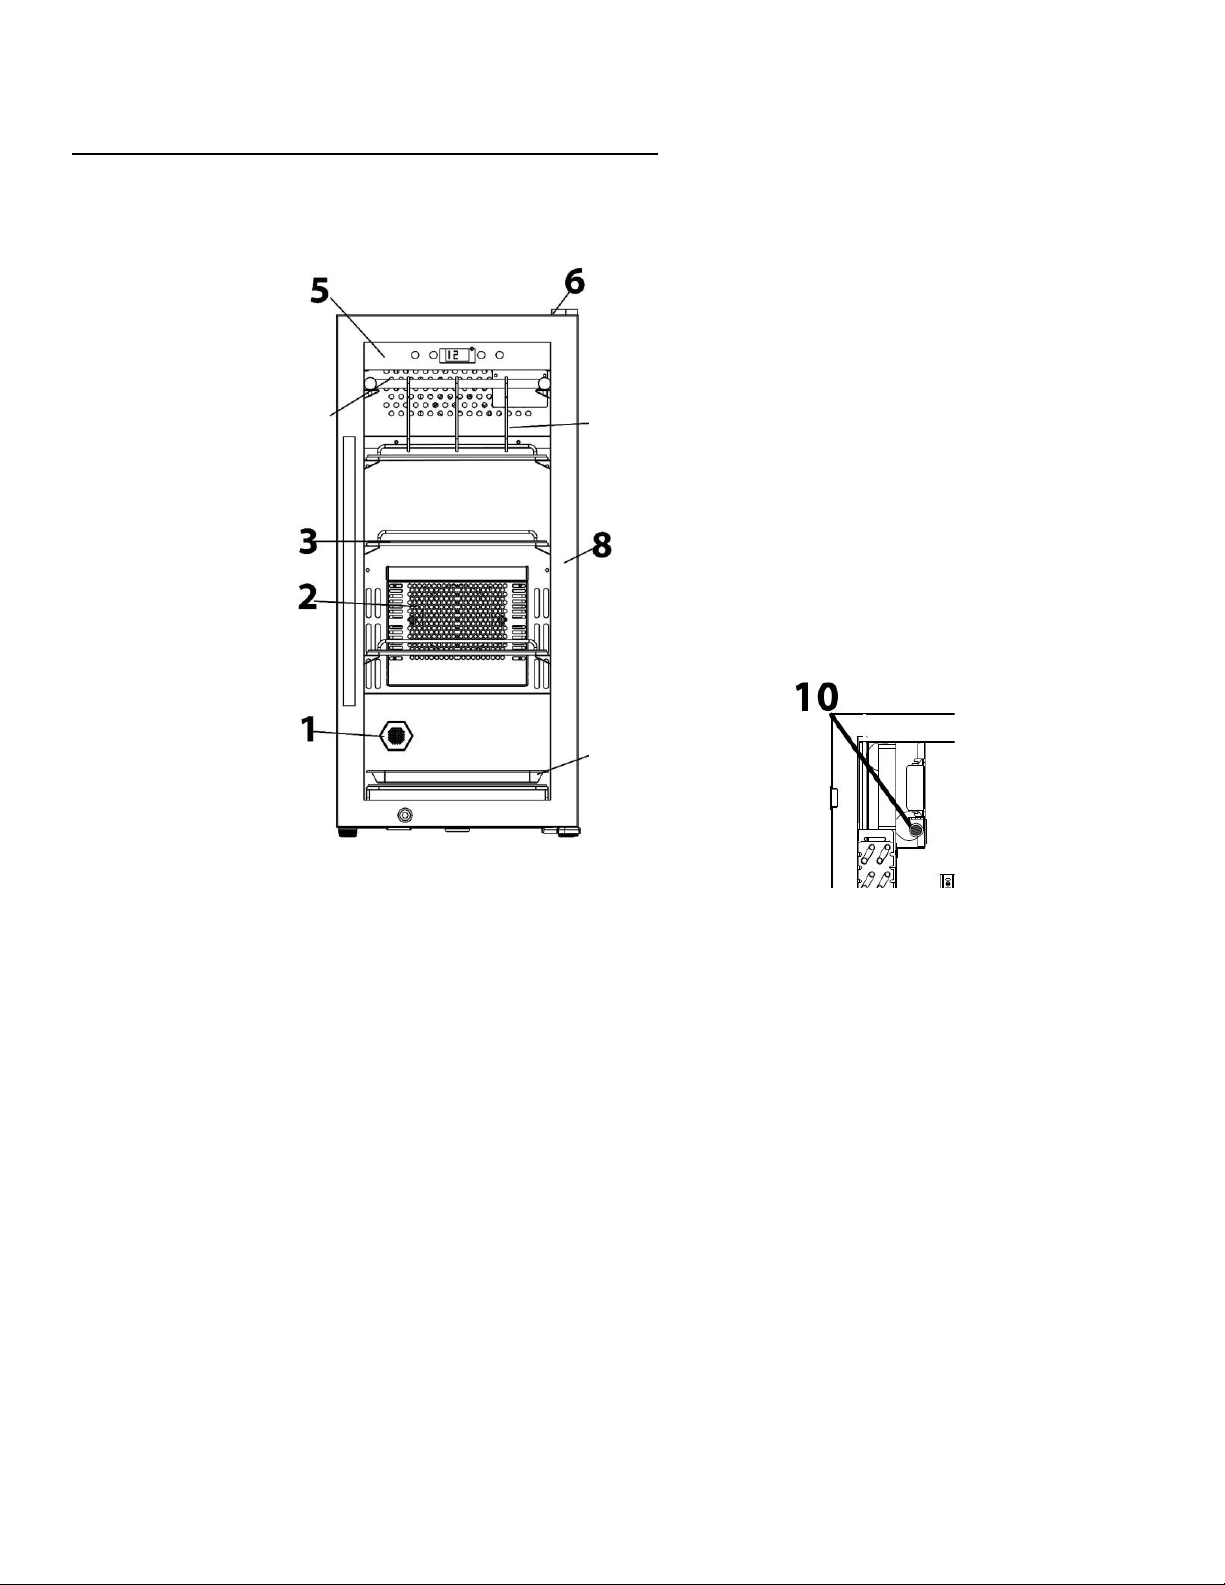
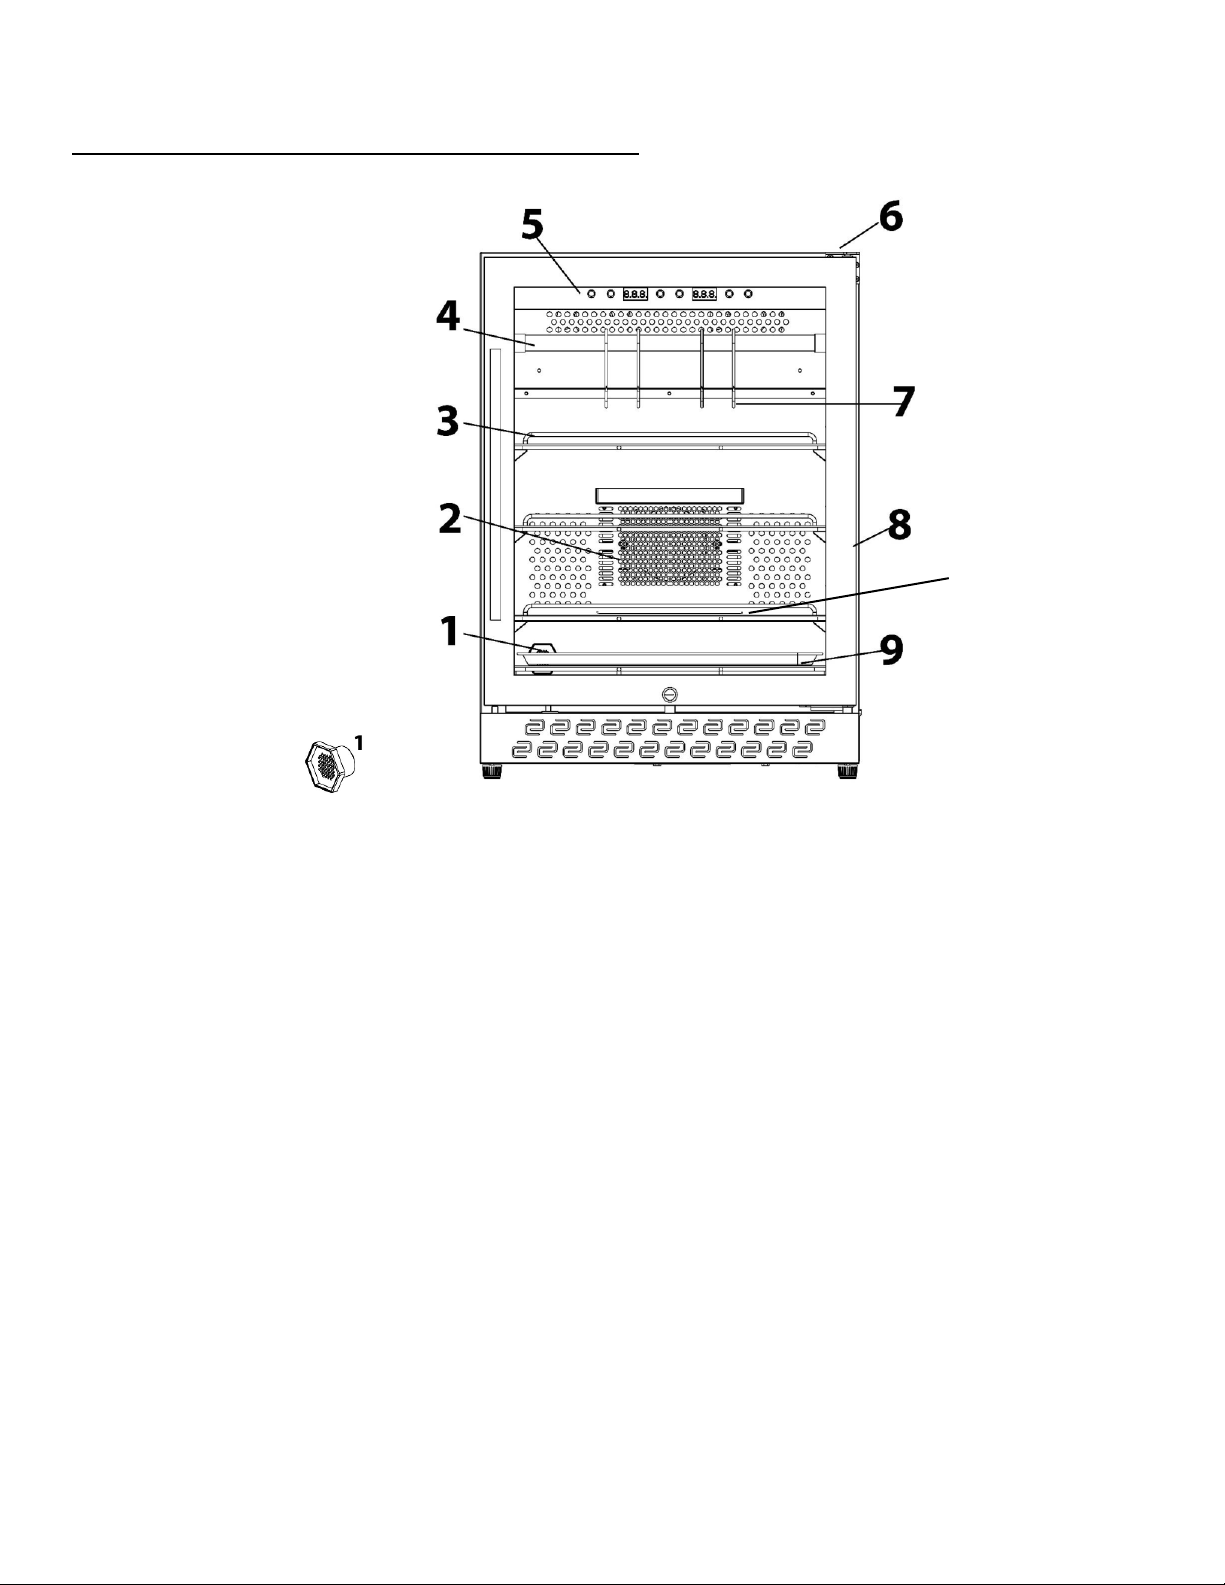
SL100 STUDIO EDITION - COMPLETE OVERVIEW:
1. Carbon Filter 6. Door Hinge
2. Water Reservoir 7. N/A
3. Stainless Steel Shelves 8. Door Frame
4. N/A 9. N/A
5. Control Panel 10. UV Light Bulb
7
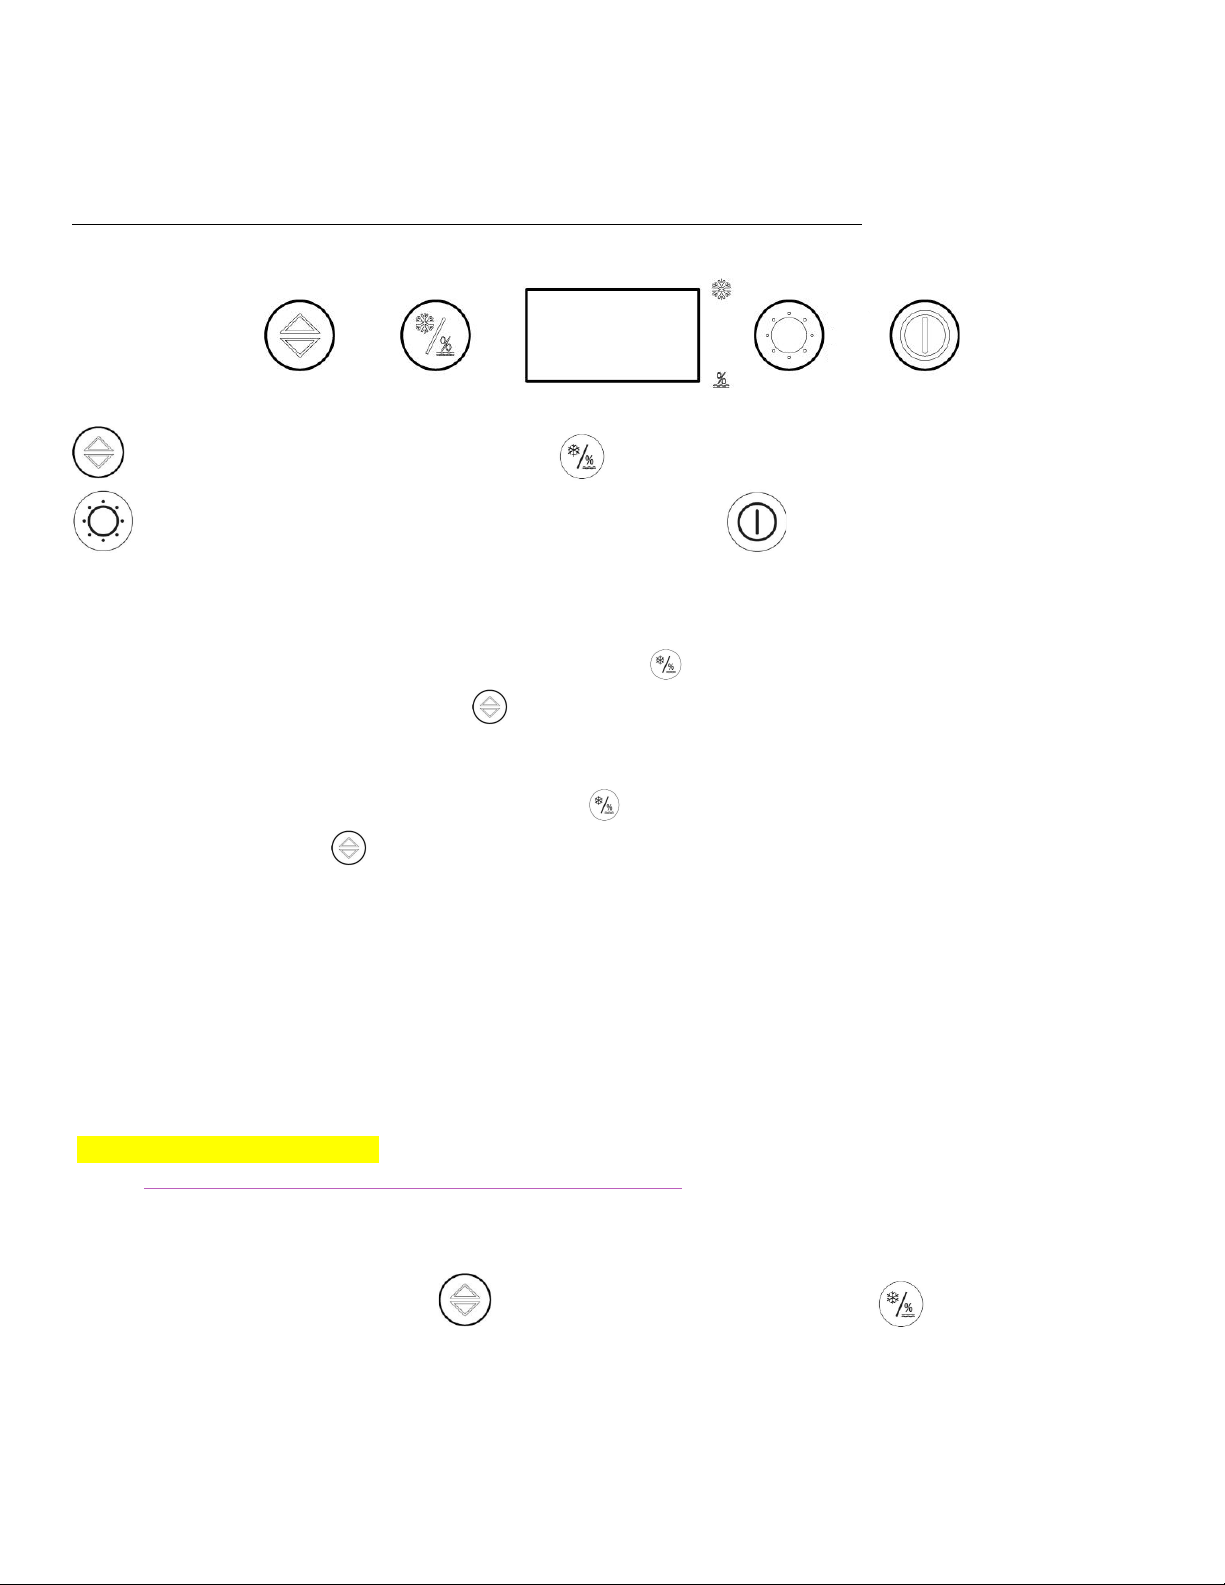
SL100 STUDIO EDITION –OPERATING ELEMENTS AND DISPLAYS:
Increase / Decrease Temperature / Humidity Toggle between Temperature and Humidity
Press 1x: LED Light On/Off or Hold 5 seconds: UV Light On/Off Locker On/Off
a. Temperature control:
The temperature range is 35-46°F(2-8°C), press the toggle key once and the temperature display will start to flash,
then adjust the temperature by pressing the button.Recommended for Dry Aging: 35°F
b. Humidity control:
The humidity range is 50%~85%, press the toggle button twice, the humidity display will start flashing, then adjust
the humidity by pressing the button.Please note: If you do not change the setting within 3 seconds, then the
device will return to its previous setting. Recommended for Dry Aging: 70%
c. Tankless –Water Humidity System:
►Current versions contain this system.
►Take one cup of water, no preference on distilled or not, add to the water slot located within the Air Filter on
back wall inside the locker. To remove the Reservoir Holder, pull the black cage forward until released then fill the drip
with water, place the filter inside then return the black cage into place.
It is recommended to remove the Reservoir and Tray every Three (3) Months to clean and replenish water.
*See Pg 13 for Reservoir Diagram
https://steaklocker.com/collections/replacement-parts
d. Toggle the LED display between Celsius or Fahrenheit readings
By pressing both the Increase/Decrease button and the Temperature / Humidity button at the same time
for three (3) seconds, the panel will toggle between Celsius and Fahrenheit readings.
8
e. LED light
►Press to turn on the LED Light, it turns off automatically after 4 hours
►The LED light will turn off automatically after 5 seconds when the door is closed and the switch is off.
f. UV light:
►The door has a safety switch, if the door of the locker is opened, the UV light will automatically
switch itself off in order to protect your eyes. Never look directly at the UV light.
►The UV light is used to keep bacteria from replicating through the aging process.
►The UV light may burn out within 6-8 months.
https://steaklocker.com/collections/replacement-parts
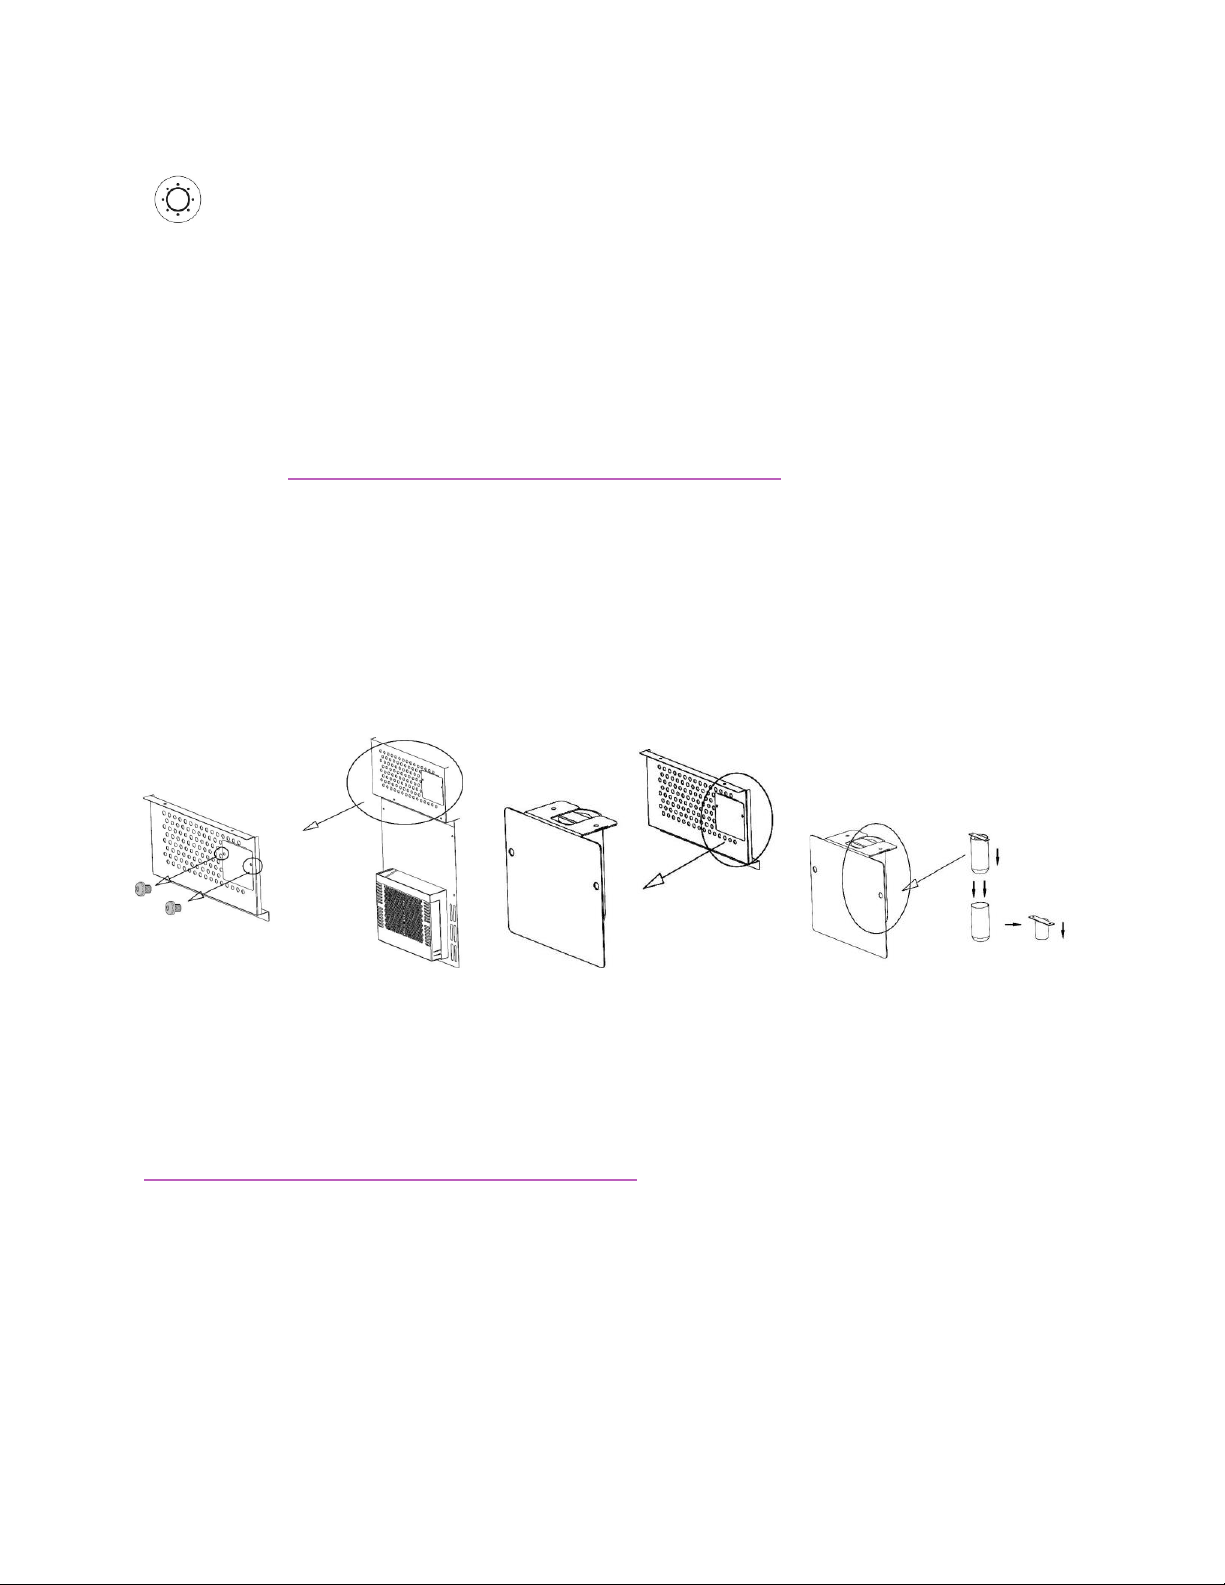
To Change the UV Light:
Turn the Locker Off. Carefully loosen two screws located on back wall of locker.
Remove the cover to the ballast by pulling downward.
Replace the UV Light bulb, then reverse the instructions to replace the cover and screws.
g. Carbon Filter:
►Please use this link to purchase the replacement carbon fiber filter filler. Remove the carbon fiber container,
uncap the top, remove the old carbon and replace with the new. This should be done about once a year.
https://steaklocker.com/collections/replacement-parts

9
10
SL150 HOME EDITION - COMPLETE OVERVIEW:
1. Carbon Filter 6. Door Hinge
2. Water Reservoir 7. Butcher Hooks
3. Stainless Steel Shelves 8. Door Frame
4. Hanging Bar 9. N/A
5. Control Panel 10. UV Light (Below the Reservoir)
10
11
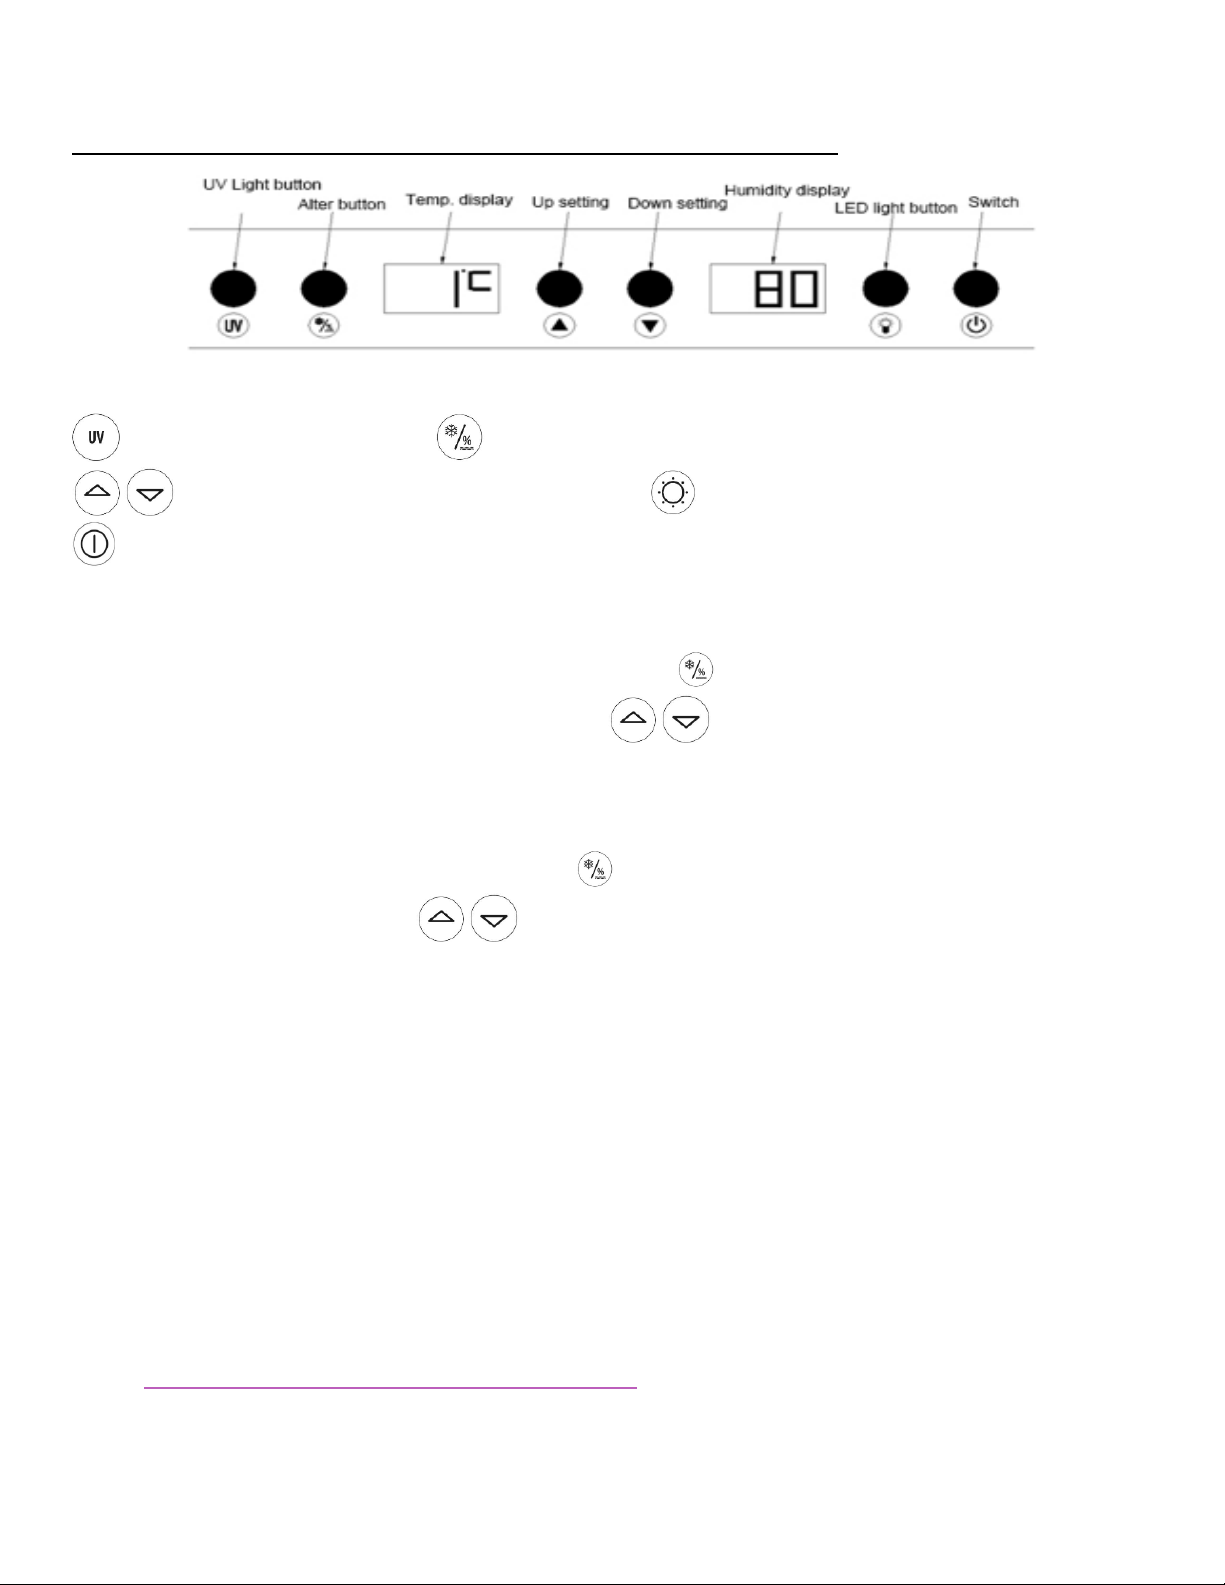
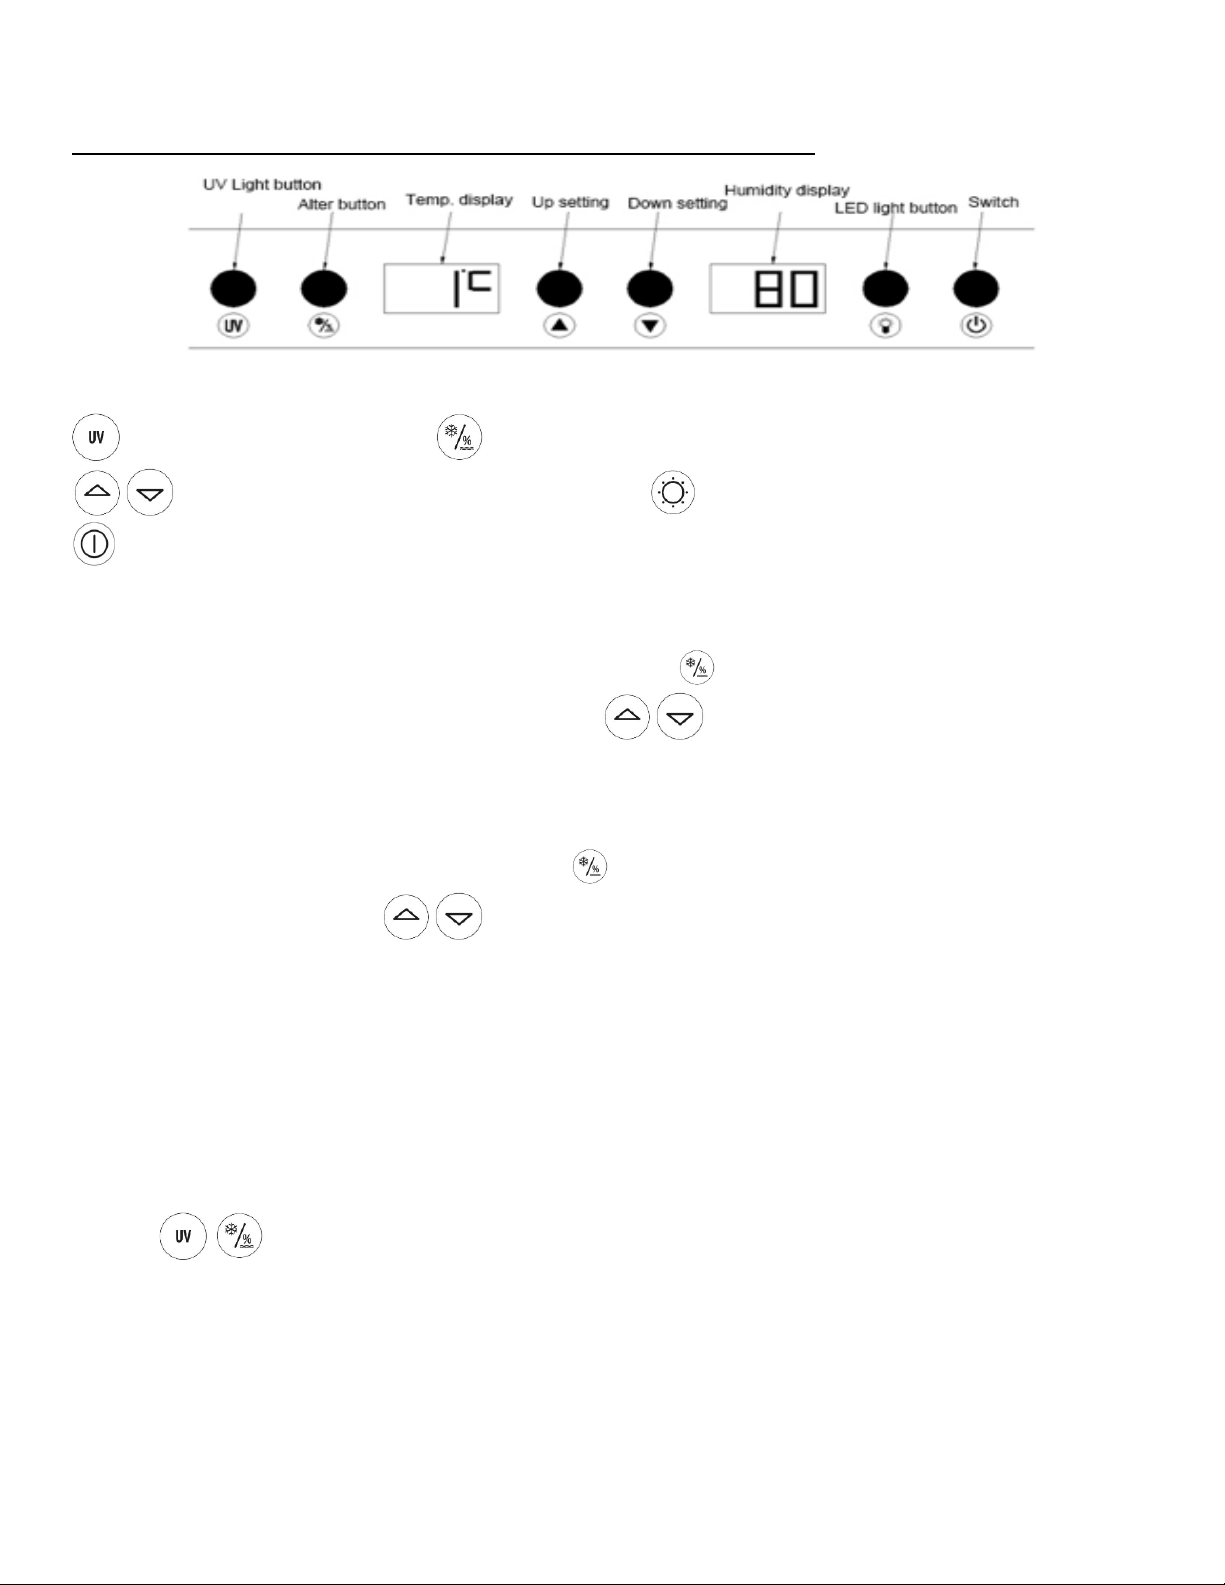
SL150 HOME EDITION - OPERATING ELEMENTS AND DISPLAYS:
a. Key Introduction:
Toggle UV Light On/Off Alternate between Temperature and Humidity in Display
Increase or Decrease Temperature or Humidity LED Light On/Off
Locker On/Off Switch
b. Temperature control:
The temperature range is 32 - 72° F (1-22°C)press the alter button once and the temperature display will start
flashing. Adjust the temperature by pressing either button up or down to increase or decrease by one
degree at a time. Recommended for Dry Aging: 35°F
c. Humidity control:
The humidity range is 50%~85%,press the alter button twice and the humidity display will start flashing.Adjust
the humidity by pressing either button up or down to increase or decrease by one percent at a time. Please
note: If you do not change the setting within 3 seconds, then the locker will return to its previous setting.
Recommended for Dry Aging: 70%
d. LED light
►To complement the look of your device, LED lighting has been built into the locker. When the door is open, simply
push the "Light" button and the light comes on, push again to turn off. For maximum energy efficiency, leave light off
when not viewing your collection.
►The LED light will turn off automatically after 5 seconds when the door is closed and the switch is off.
e. UV light:
►The door has a safety switch, if the door of the locker is opened, the UV light will automatically switch itself off in
order to protect your eyes. Never look directly at the UV light.
►The UV light is used to keep bacteria from replicating through the ageing process.
►The UV light may burn out within 6-8 months.
https://steaklocker.com/collections/replacement-parts
12
f. Toggle the LED display between Celsius or Fahrenheit readings
Press the buttons simultaneously for 3 seconds to toggle the LED display between Celsius and Fahrenheit
readings.
To Change the UV Light: (Previous versions contain this system)
•Turn the Locker Off. Then Unplug the Locker.
•Remove the four screws around the cage surrounding the UV Light. Once cage is removed, twist
the light out in one direction, then twist the replacement into the ballast in the opposite
direction. Should be able to hear or feel it click into place.
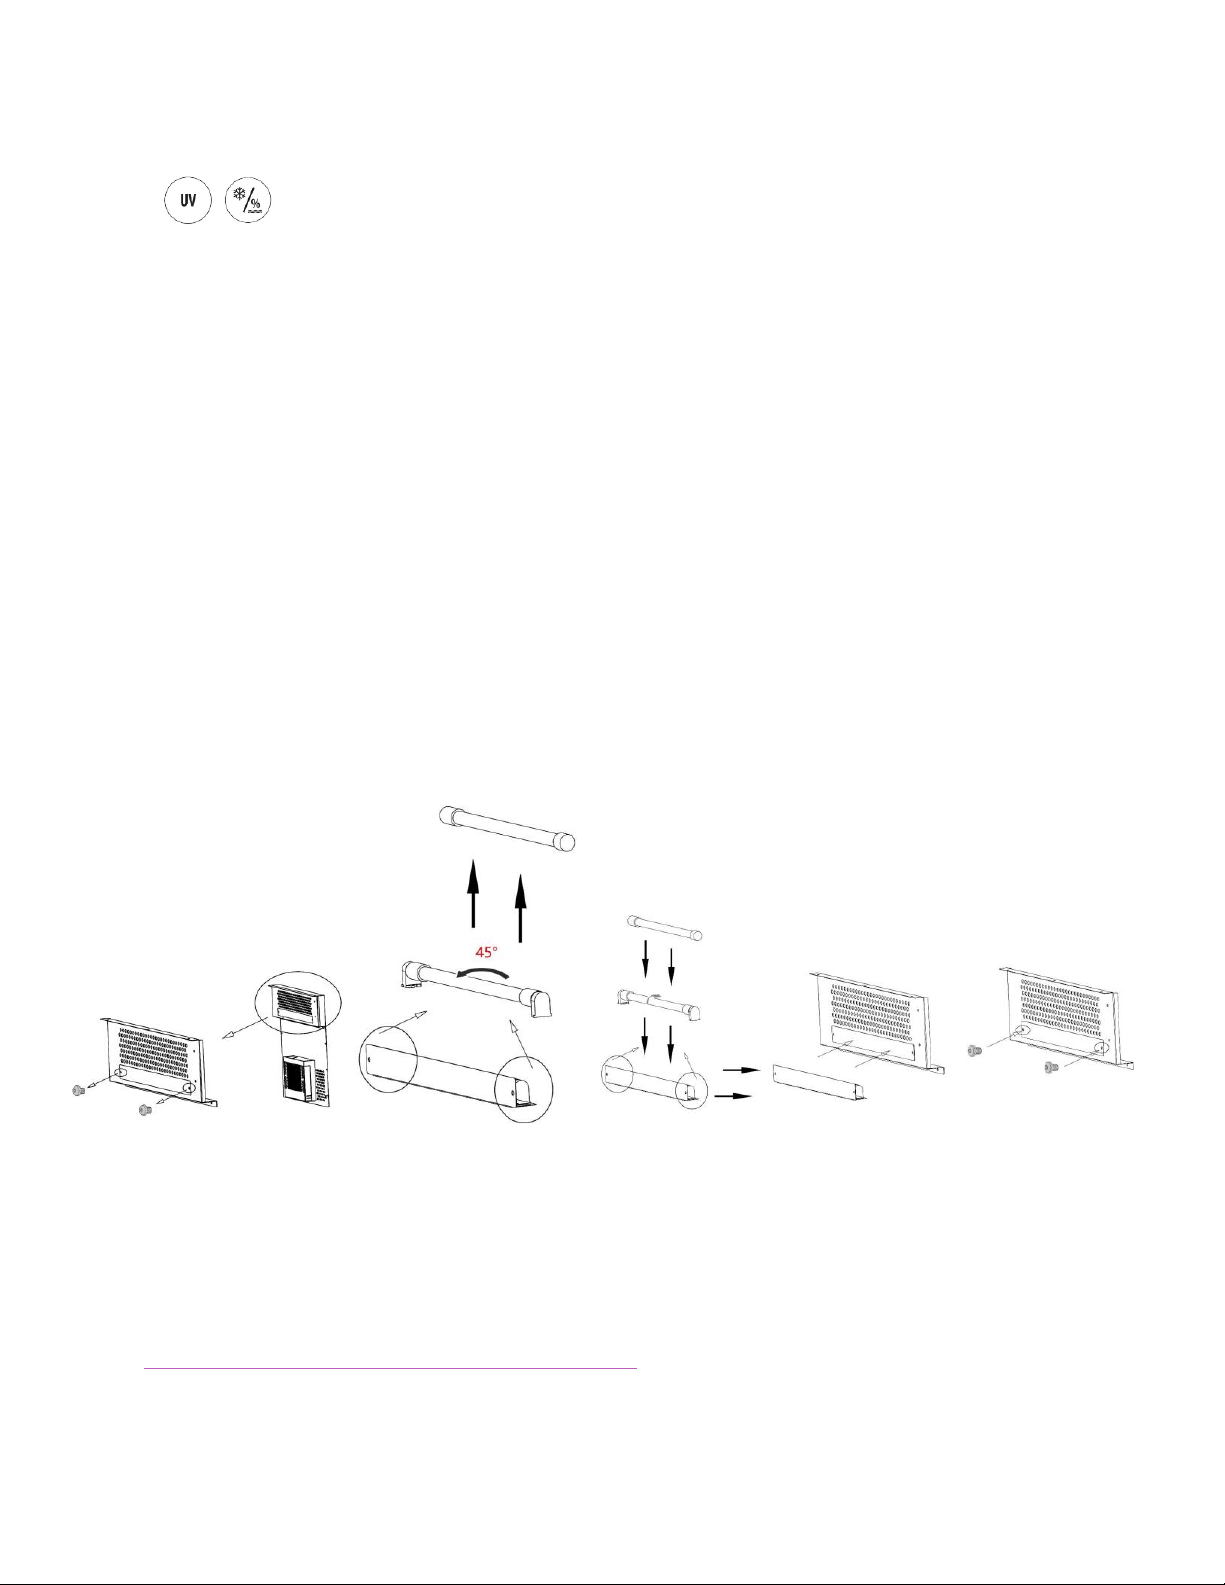
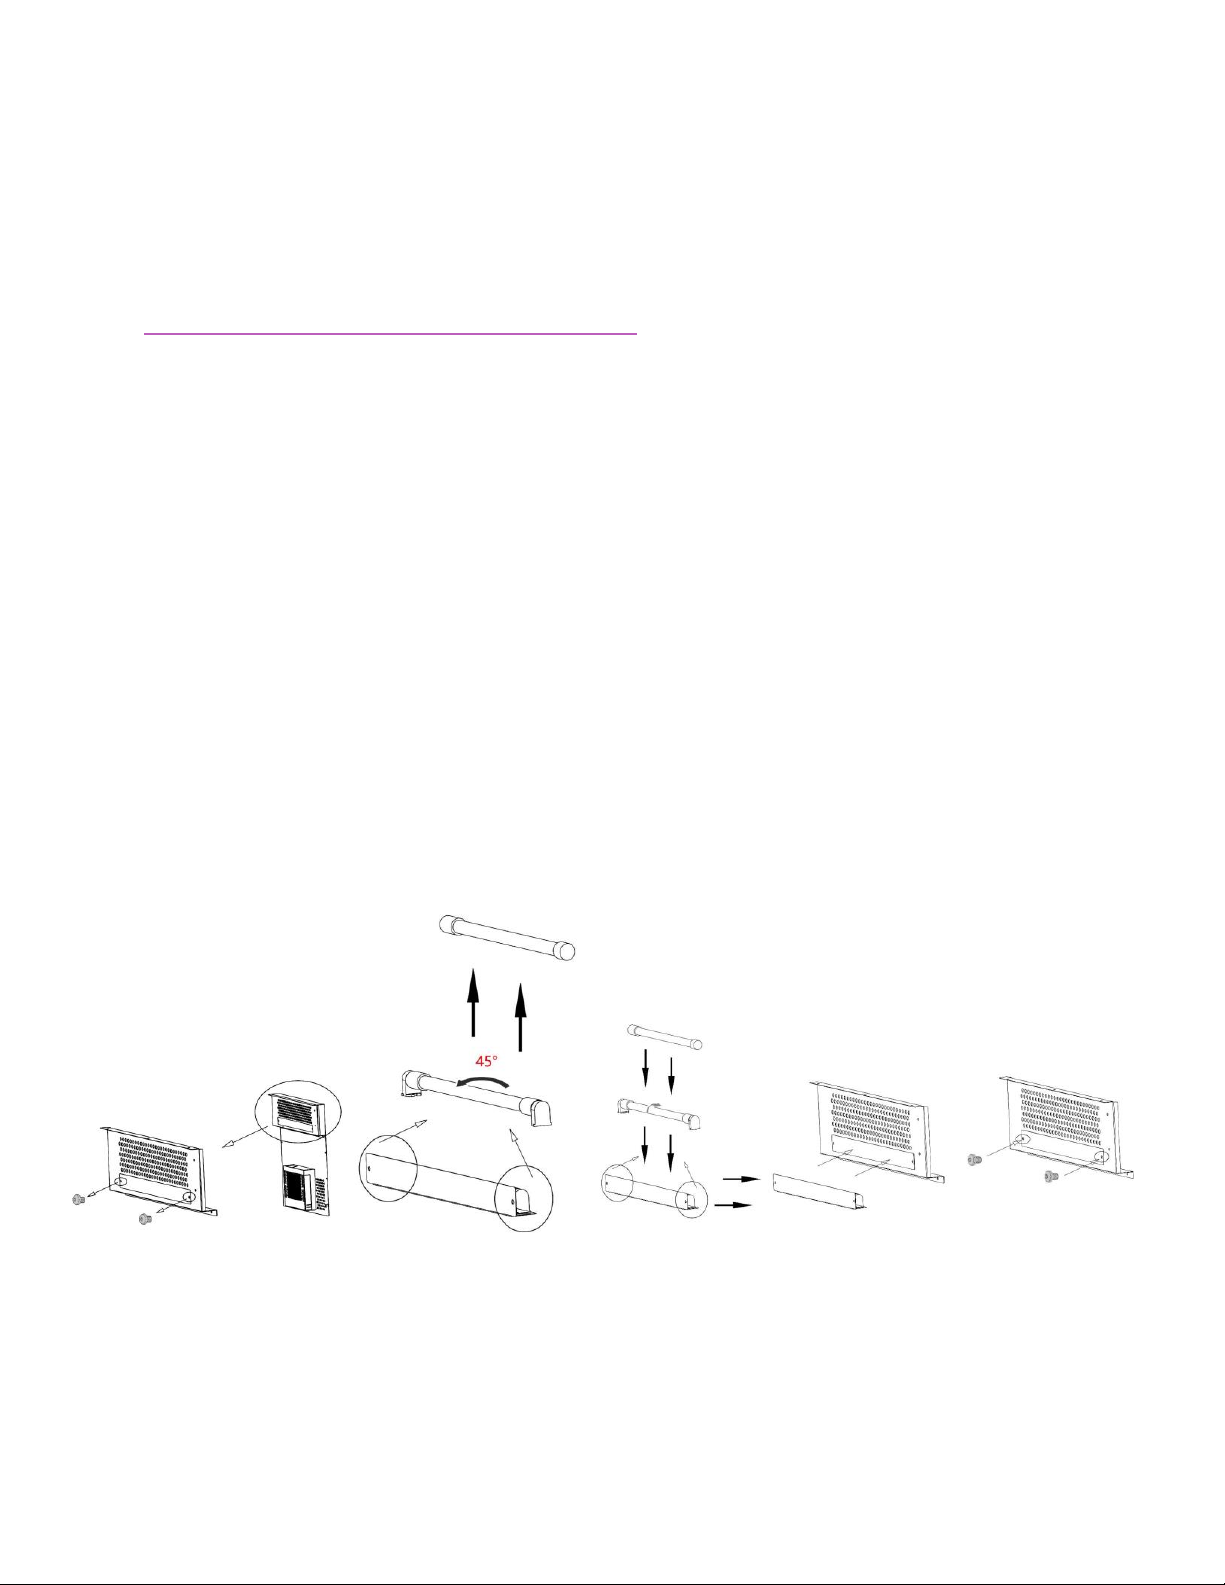
To Change the UV Light: (Current versions contain this system.)
•Turn the Locker Off. Then Unplug the Locker.
Carefully loosen two screws located on back wall of locker.
•Remove the cover to the ballast by pulling downward.
•Replace the UV Light bulb from the ballast by twisting the bulb out at a 45° angle, twist
replacement bulb in opposite direction and click into place.
•Then reverse the instructions to replace the cover and screws.
g. Carbon Filter:
►Please use this link to purchase the replacement carbon fiber filter filler. Remove the carbon fiber container,
uncap the top, remove the old carbon and replace with the new. This should be done about once a year.
https://steaklocker.com/collections/replacement-parts
13
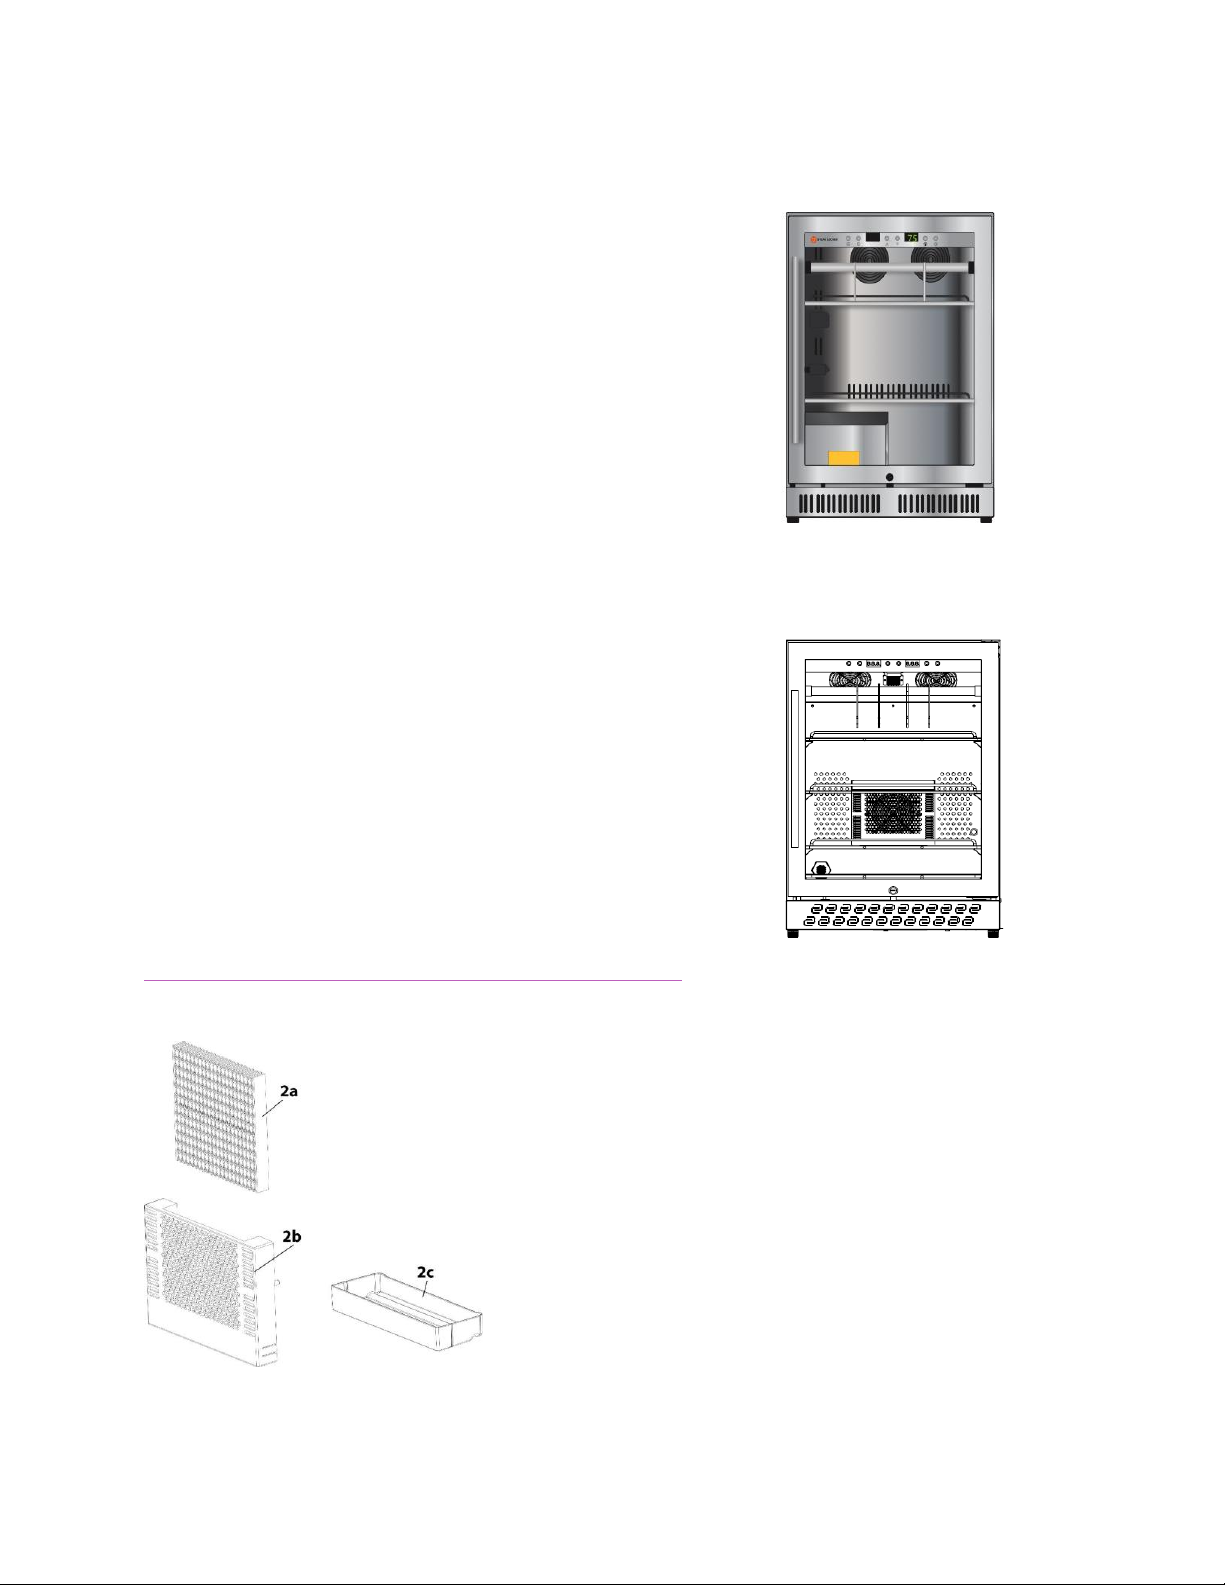
h. Reservoir –Water Humidity System:
►Some previous versions contain this system.
►Prior to powering on the locker, ADD approximately
three fourths of a gallon of Distilled Water purchased
from the grocery store.
►Remove the plastic wrapping from the orange filter
prior to use inside the reservoir.
►When the reservoir is low on water, an audible alarm
will sound and an E6 error message will display in the
temperature display screen.
►If E6 alarm and error continues with plenty of water,
check that the wires connecting the reservoir drawer
to the locker have full contact. If not, unplug the clips,
then reconnect.
►The Orange Filter should be replaced yearly.
i. Tankless –Water Humidity System:
►Current versions contain this system.
►Take one cup of water, no preference on distilled or not,
add to the water slot located within the Air Filter on
back wall inside the locker. To remove the Reservoir Holder,
pull the black cage forward until released then fill the drip
with water, place the filter inside then return the black cage
into place.
It is recommended to remove the Reservoir and
Tray every Three (3) Months to clean and
replenish water.
*See below for Reservoir Diagram
https://steaklocker.com/collections/replacement-parts
2a: Water Reservoir
2b: Reservoir Holder
2c: Reservoir Drip Tray
14

15
SL520 PRO EDITION - COMPLETE OVERVIEW:
1. Carbon Filter 6. Door Hinge
2. Water Reservoir 7. Butcher Hooks
3. Stainless Steel Shelves 8. Door Frame
4. Hanging Bar 9. N/A
5. Control Panel 10. UV Light (Below the Reservoir)
10
16
SL520 PRO EDITION - OPERATING ELEMENTS AND DISPLAYS:
a. Key Introduction:
Toggle UV Light On/Off Alternate between Temperature and Humidity in Display
Increase or Decrease Temperature or Humidity LED Light On/Off
Locker On/Off Switch
b. Temperature control:
The temperature range is 32 - 72°F (1-22°C)press the alter button once and the temperature display will start
flashing. Adjust the temperature by pressing either button up or down to increase or decrease by one degree
at a time. Recommended: 35°F
c. Humidity control:
The humidity range is 50%~85%,press the alter button twice and the humidity display will start flashing.Adjust the
humidity by pressing either button up or down to increase or decrease by one percent at a time. Please note: If
you do not change the setting within 3 seconds, then the locker will return to its previous setting. Recommended: 70%
d. LED light
►To complement the look of your device, LED lighting has been built into the locker. When the door is open, simply
push the "Light" button and the light comes on, push again for off. For maximum energy efficiency, leave light off when
not viewing your collection.
►The LED light will turn off automatically after 5 seconds when the door is closed and the switch is off.
e. Toggle the LED display between Celsius or Fahrenheit readings
Press the buttons simultaneously for 3 seconds to toggle between the LED display Celsius or Fahrenheit
readings.
17
f. UV light:
►The door has a safety switch, if the door of the locker is opened, the UV light will automatically switch itself off in
order to protect your eyes. Never look directly at the UV light.
►The UV light is used to keep bacteria from replicating through the ageing process.
►The UV light may burn out within 6-8 months.
https://steaklocker.com/collections/replacement-parts
.To Change the UV Light: (Previous versions contain this system)
•Turn the Locker Off. Then Unplug the Locker.
•Remove the four screws around the cage surrounding the UV Light. Once cage is removed, twist
the light out in one direction, then twist the replacement into the ballast in the opposite
direction. Should be able to hear or feel it click into place.
To Change the UV Light: (Current versions contain this system.)
•Turn the Locker Off. Then Unplug the Locker.
Carefully loosen two screws located on back wall of locker.
•Remove the cover to the ballast by pulling downward.
•Replace the UV Light bulb from the ballast by twisting the bulb out at a 45° angle, twist
replacement bulb in opposite direction and click into place.
•Then reverse the instructions to replace the cover and screws.

18
g. Carbon Filter:
►Please use this link to purchase the replacement carbon fiber filter filler. Remove the carbon fiber container,
uncap the top, remove the old carbon and replace with the new. This should be done about once a year.
https://steaklocker.com/collections/replacement-parts
h. Reservoir –Water Humidity System:
►Some previous versions contain this system.
►Prior to powering on the locker, ADD approximately three fourths of a gallon of Distilled Water purchased
from the grocery store.
►Remove the plastic wrapping from the orange filter prior to use inside the reservoir.
►When the reservoir is low on water, an audible alarm will sound and an E6 error message will display in the
temperature display screen.
►If E6 alarm and error continue with plenty of water, check that the wires connecting the reservoir drawer to
the locker have full contact. If not, unplug the clips, then reconnect.
►The Orange Filter should be replaced yearly.
https://steaklocker.com/collections/replacement-parts
i. Tankless –Water Humidity System:
►Current versions contain this system.
►Take one cup of water, no preference on distilled or not, add to the water slot located within the Air Filter on
back wall inside the locker. To remove the Reservoir Holder, pull the black cage forward until released then fill the drip
with water, place the filter inside then return the black cage into place.
It is recommended to remove the Reservoir and Tray every Three (3) Months to clean and replenish water.
*See Pg 13 for Reservoir Diagram
https://steaklocker.com/collections/replacement-parts

19

20
CLEANING AND MAINTENANCE:
This chapter provides you with important information in regards to cleaning and maintaining the locker. These
practices are to prevent damages due to cleaning the locker incorrectly and to ensure a trouble-free operation.
►Before cleaning, switch the locker off, un-plug from the wall outlet and remove all the meat.
►Interior space: Wash the inside with a damp cloth in lukewarm water and a bit of mild detergent. Do not spill any
liquid into fan space or air ways.
►Door gasket: The door gasket can be removed to clean with a mild detergent. After cleaning, to replace the door
gasket, fix the four corners first then embed it segment by segment.
►Do not use boiled water, detergent, acid alkaline detergent, soap, grinding powder, gasoline, alkenes, alcohol,
benzene, organic solvent to scrub. A light amount of dish soap works best.
►Do not flush the cabinet with water directly as it may cause electrical failure.
►After cleaning, check for damage to the power cord and outlet. If there is any damage to the cord, like fraying of the
wires, the locker must be repaired by professional electrician.
►If you do not use the equipment for a fairly long period of time, you should remove all the metal shelves, the metal
suspension system and the meat hooks and you should clean the equipment thoroughly, then leave the door open for
2~3 days. After the interior is fully dried, the activated carbon can be replaced to avoid mold and odor.
►The UV light is a consumable and may burn out within approximately 6-8 months.
It is custom made for this locker. https://steaklocker.com/collections/replacement-parts
This manual suits for next models
2
Table of contents
Other Steak Locker Commercial Food Equipment manuals


Popular Commercial Food Equipment manuals by other brands

Amitek
Amitek AK400WLUX Installation, operating and service instructions

JAC
JAC Integra IMP 800 manual

Lotus
Lotus LIBR.ISTR.F110E Installation and operating instructions

Electrolux
Electrolux E9BSGLIUFE Spare Parts Diagram

Vogue
Vogue GJ500 Assembly instructions

Vollrath
Vollrath Stoelting U411 Service manual

Proluxe
Proluxe DOUGHPRO DP1100BZ Series Operation manual

saro
saro ES 901 S/S Top 0/4 operating instructions

Igloo
Igloo Wojtek 1.0 W user manual

Fri-Jado
Fri-Jado GO Combi Two-GO Mounting instruction

Keysight Technologies
Keysight Technologies 11636C Operating and service manual

CookMax
CookMax AK100EF Installation, operating and service instructions


