Steak Locker SL103US User manual
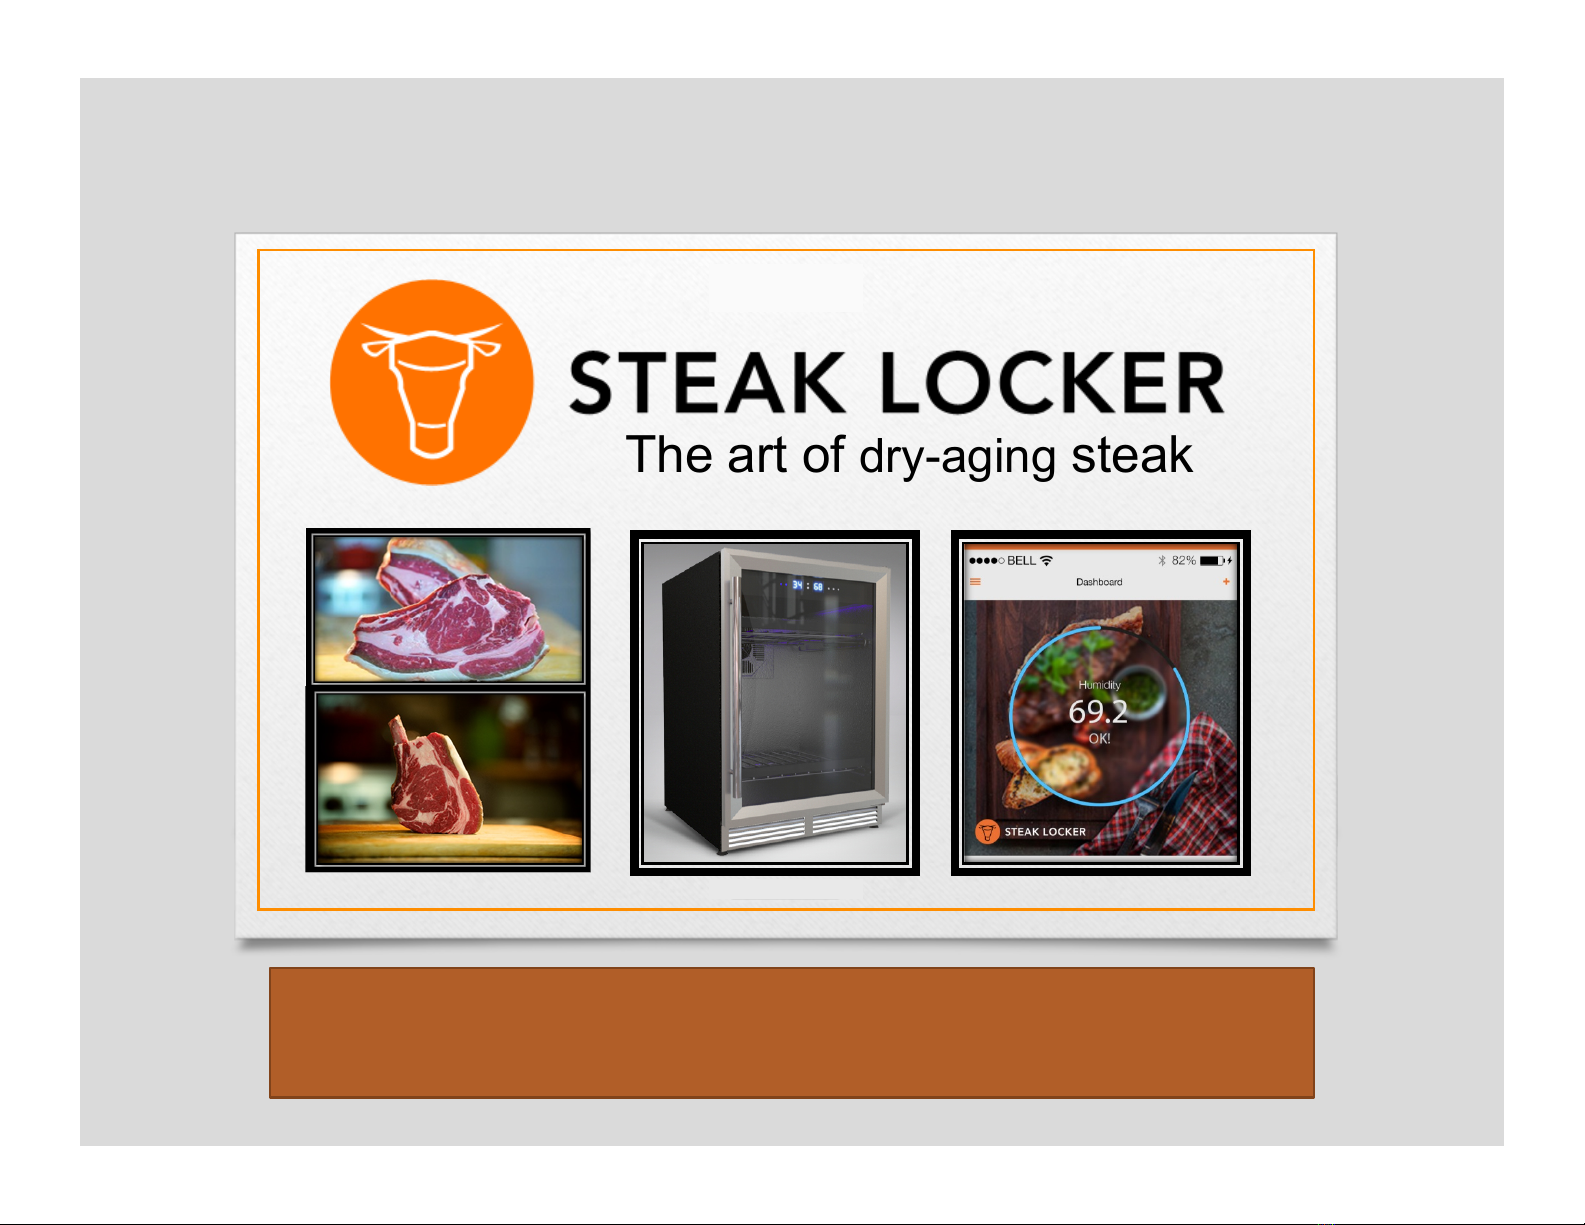
The art of dry-aging steak
Steak Locker – Quick Setup Guide
SL103US/EU Systems

Terminology
! Steak Locker Control Panel, your fridge digital front panel used for setting
temperature and light controls
! Germicidal UV Light, the UV bacterial light
! Steak Locker Handle Bar, the brushed aluminum handle bar for your Steak Locker
! WIFI, your home internet WIFI connection which has to be using a 2.4 GHz
frequency (not 5 GHz) and your wireless router is 802.11n standard or 802.11b/g.
! Blink Up, we use this to describe the process of connecting your Steak Locker
controller to your home WIFI
! Smartphone, describes either your Android or Apple iphone
! Cloud Server, describes the service used to connect between your phone and our
server in the cloud
! Electric Imp, describes the WIFI chip technology used to facilitate the Blink Up
! Smart App, the Steak Locker App – both Android and iphone
! Steak Locker Atomizer that will add moisture when required
Please read these instructions before
starting installation
The Art of Dry-Aging Steak
Step 1- Front Panel
! Please ensure that your Steak Locker is plugged into a dedicated 15 amp circuit.
! After unpacking and plugging in your Steak Locker, leave it running for at least 4-6
hours to ensure the Freon will distribute evenly
! Steak Locker Control Panel, your fridge digital front panel used for setting
temperature and light controls. Steak Locker will show the standard setting (EU-
Celsius). Use the toggle function to change the setting to Fahrenheit
! Toggle function - Fahrenheit to Celsius. To change the temperature from Celsius
to Fahrenheit, press the Lock sign (the button with a lock on it - the furthest right)
for 5 seconds until you hear it beep. Then press both the Lock and O button next
to it simultaneously for 5 seconds. This will change the setting. The lock functions
lock the fridges setting in place until you un-lock it again by pressing the lock for 5
seconds.
! The germicidal light is operated with the toggle switch at the far right of the panel.
The blue UV light is operated with the bulb button furthest to the left on the panel.
Please ensure the germicidal light is always on when dry aging steaks inside the
Steak Locker.
Please follow these instructions exactly
when installing Steak Locker
The Art of Dry-Aging Steak

Step 2- Handle Bar
! Handle Bar Installation. The handle bar is attached by wire to the second shelf
! Remove the handle bar from the shelf and unpack
! Peel back gently the black rubber gasket on the top and bottom where the screw
is located. Please peel gently as the gasket may come out of the groove when
pulled to firmly.
! Place the handle bar over the top screw emerging on the front of the door and
tighten it gently with a phillips head screw driver.
! Repeat the procedure for the bottom screw location
! DO NOT OVER TIGHTEN THE SCREWS.
Please follow these instructions exactly
when installing Steak Locker
The Art of Dry-Aging Steak

Step 2 Continued
! Steak Locker’s food grade chrome shelves can be re-positioned by following the steps
below.
! On the illustration below, find the small thin release levers inside the runners that are
on the inside of the roller bracket. You can push the levers up and take the shelf
brackets off one at a time. They will slide right off the chrome runners when you hold
the release levers continuously.
! At the front of the shelf push up to release the front hooks about an inch then just pull
towards you to release the back hooks.
! Slide shelf and side brackets all out together
! Reverse the process for inserting in new position. Please be careful not to scratch the
embossed aluminum envelope.
How to re-position Steak Locker shelves
The Art of Dry-Aging Steak
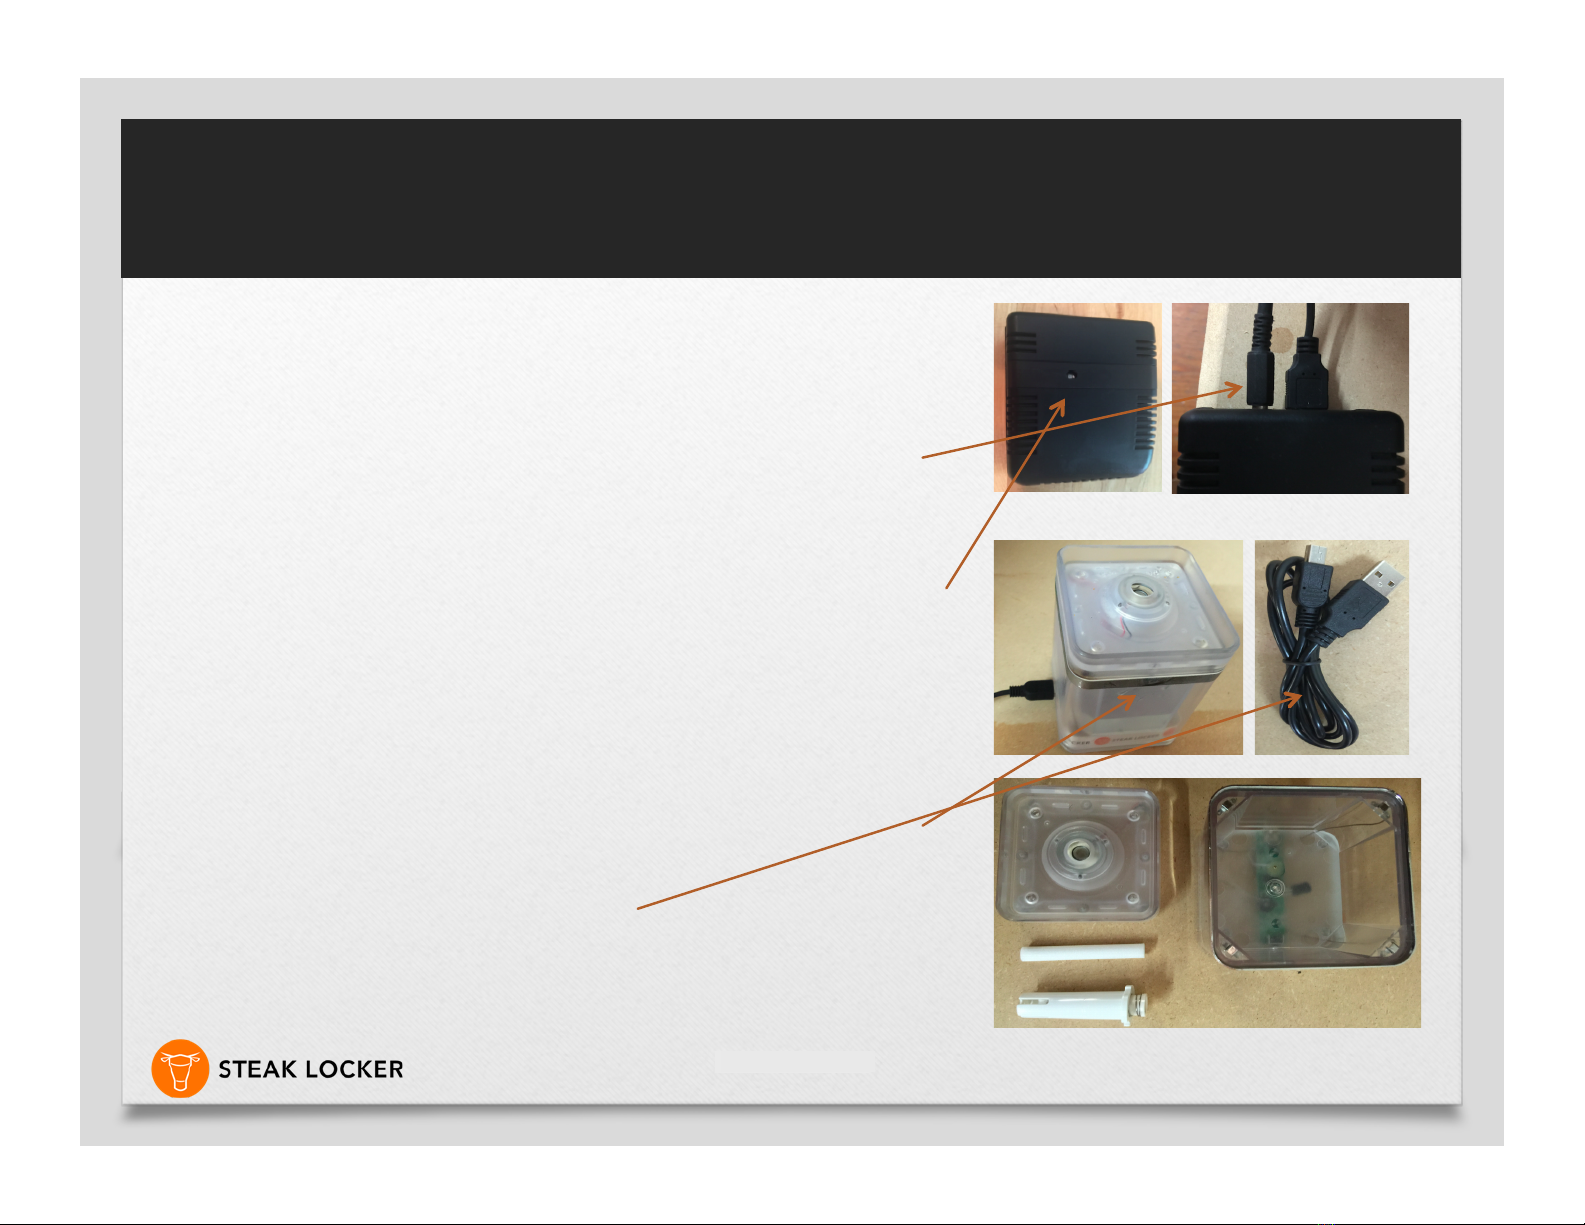
Step 3 - Controller & Atomizer
! Your Steak Locker is controlled by the Black Box
Controller (BBC). The Atomizer will not blink and is
responding only to the BBC
! Connect the BBC to the 6 V connector in the
bottom left inside the Steak Locker. Ensure the
power cord is connected through the small clip on
cable leading into the housing of the Steak Locker.
! Once connected, the BBC top LED should light up
in an amber color.
! Unpack the Atomizer from its box and follow its
assembly instruction.
! Open up the top of the atomizer and fill no more
than 200 ml of DISTILLED WATER ONLY into it.
Then place it on the bottom of the Steak Locker.
! Use the provided USB cable to connect the
atomizer with the small end and into the BBC with
the larger end..
Please follow these instructions exactly
when installing Steak Locker
The Art of Dry-Aging Steak

Step 3 - Continued
! The Atomizer is controlled entirely by the BBC.
! To test its operating ability, just plug the USB plug
into your computer (after filling it with 200ml distilled
water) and it will run uninterrupted.
! We have designed the Atomizer to only receive
commands from the BBC.
! When the humidity level in the Steak Locker falls
below 55%, the atomizer will then activate and add
moisture to the envelope for 10 seconds.
! It will recalculate the humidity levels every minute
and the algorithm will decide on the trend in dew
levels to add further moisture or remain off if
enough moisture has been added.
! We also programmed the controller to check on
water levels and diagnostics once every 24 hours to
ensure proper working conditions are present.
The Atomizer Explained
The Art of Dry-Aging Steak

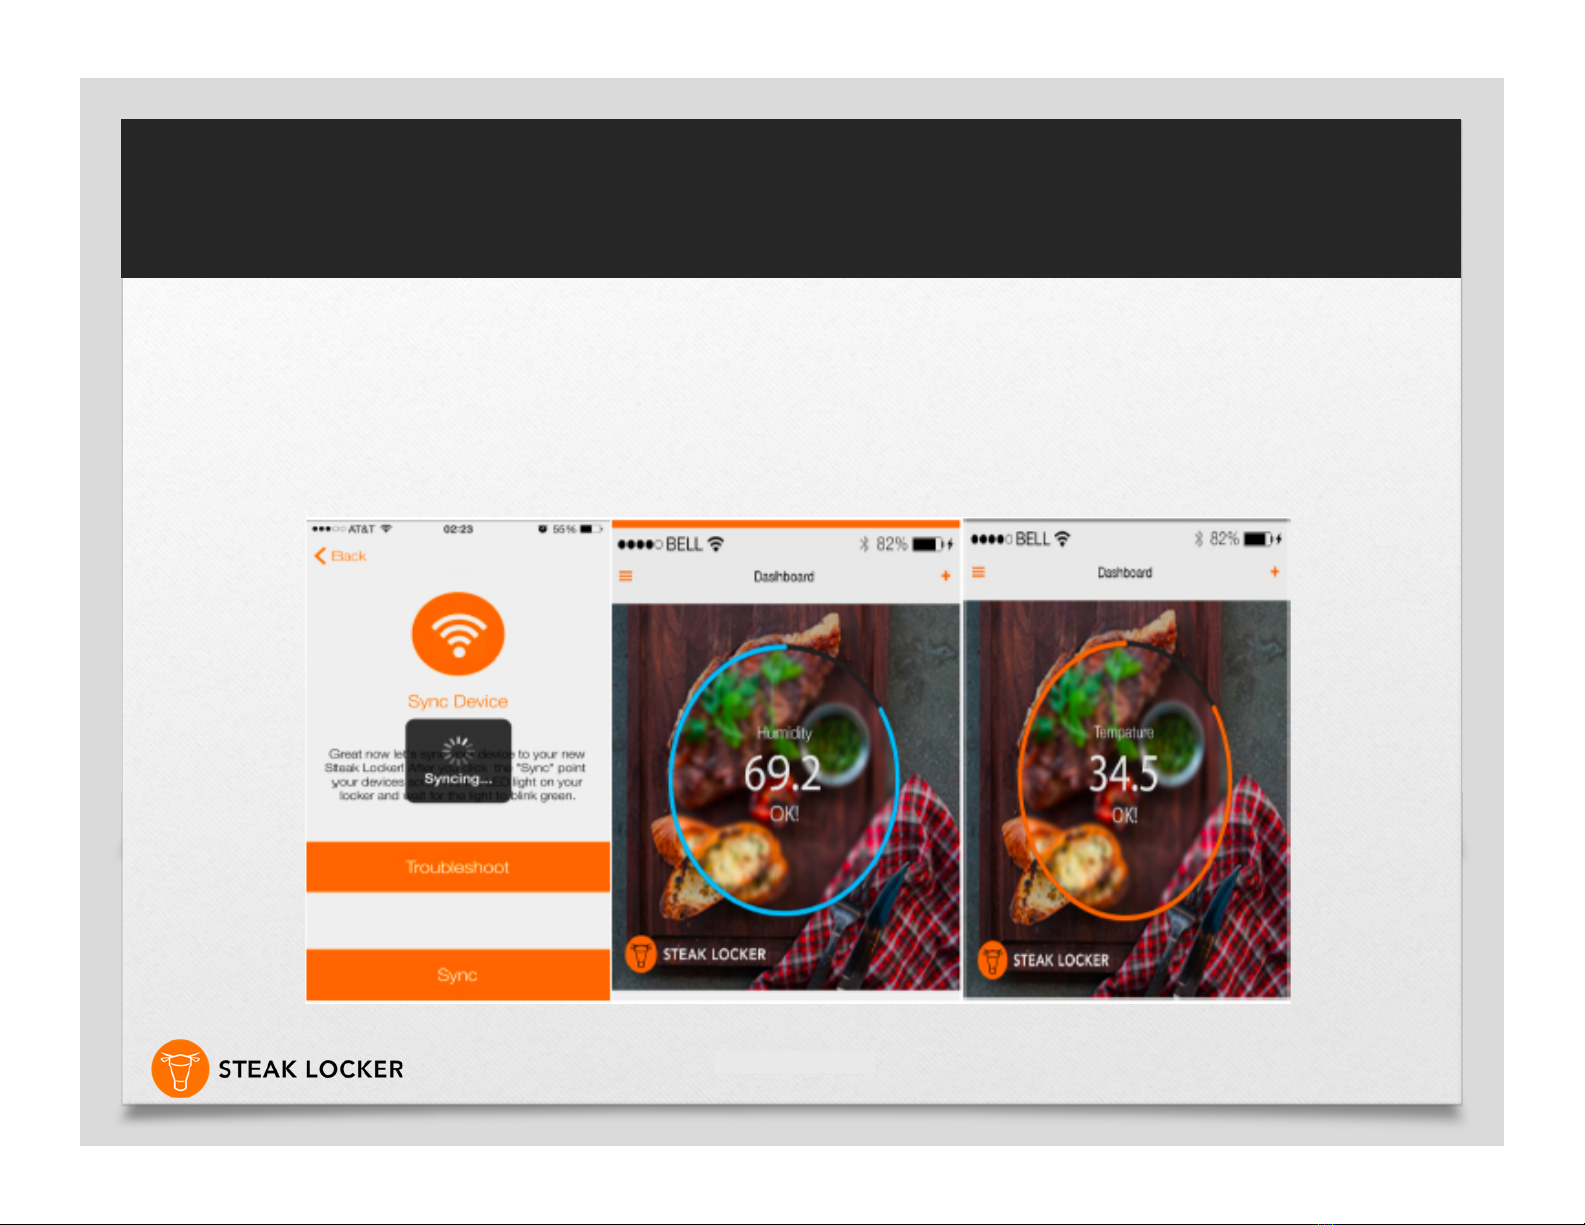
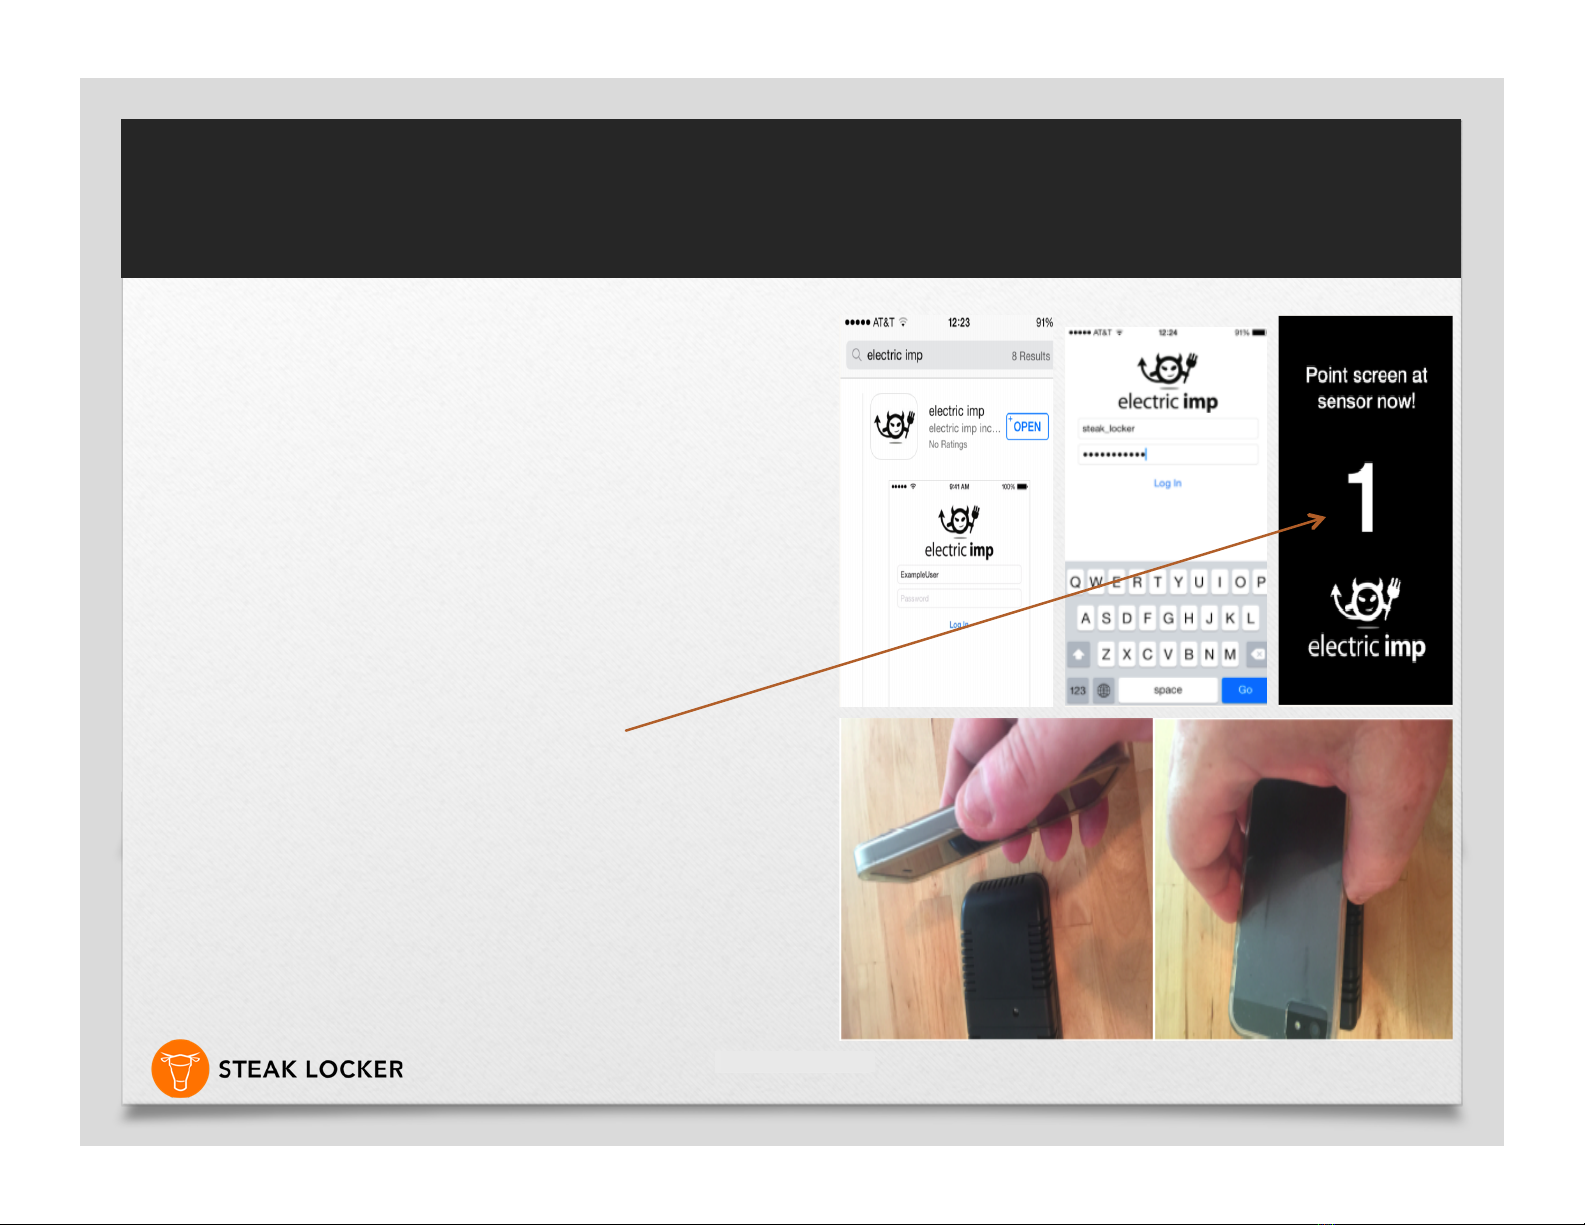
Step 4 – Blink Up - Sync
! Download the Steak Locker App from Apple or
Google Play
! Follow the instructions on the APP
! Select the network your BBC should communicate
with. Enter the password and press NEXT
! If everything is correct, press SYNC on the device
screen, move the screen of your phone over the
LED-Open sensor light that is exposed on the top of
the BBC. The SYNC screen will turn black and
automatically should sync the BBC through your
WIFI to the Steak Locker Cloud Services.
! Syncing takes about 15 seconds to finish
! LED should now turn GREEN
! Solid green means that your BBC is receiving the
firm ware. When GREEN turns off, the BBC is
running normally and will upload temperature and
humidity measurements to the Steak Locker Cloud
service on a regular basis.
! The first measurements should now appear on your
Steak Locker APP
Please follow these instructions exactly
when installing Steak Locker
The Art of Dry-Aging Steak
Step 4 – Continued
! You should now have your measurement on your Steak Locker APP similar to the picture
adjacent.
! Please be aware that it will take the sensor at least 4-6 hours to calibrate itself and therefore the
data on your Steak Locker APP will vary and at times appear irrational. Be patient as this is a very
important validation and calibration period to be as accurate as possible.
Please follow these instructions exactly
when installing Steak Locker
The Art of Dry-Aging Steak

Step 5 Troubleshooting
! .
Please follow these instructions exactly
when installing Steak Locker
The Art of Dry-Aging Steak
Step 5 Continued
! Sometimes the controller does not blink amber.
In this case, residual memory is blocking the wifi.
Please follow these steps.
! Go to Apple and download the ELECTRIC IMP
app, same for Google Play
! log in – steak_locker, Password – steaklocker
! Once logged in, unplug your BBC for 15 sec. and
reconnect the 12V power cord.
! Press clear wireless configuration on the Electric
Imp app, the screen will turn black.
! Turn the face of your phone over the face of the
(LED sensor area) of your BBC.
! It will bleep for 3 seconds and then blink over the
BBC (this clears the current configuration). After
the process finishes, unplug your BBC for 15 sec.
and re connect. Your BBC should blink AMBER.
! Now re-sync the BBC with the Steak Locker app
as before. Try a couple of times if not successful.
Non-Sync Issue
The Art of Dry-Aging Steak

Step 6 - Smart APP
! Once your SYNC or Blink Up has been successful,
the following screen will appear.
! You are now able to toggle (touch) the bar identified
by Temperature and Humidity.
! Do not be alarmed by the higher temperatures
initially, your Steak Locker is designed to calibrate
itself .This can take up to 6 hours dependant on your
location, latent humidity and elevation.
! Once your ready to dry age, simply touch the ADD
TO MY LOCKER or the PLUS + symbol on the top
right of the dashboard. To deleet an item, just move
the item left and delete.
! This app is very intuitive and self explanatory. Just
follow the instructions on the app. We suggest, when
asked for a “nickname”, to use the date when first
you put the meat inside the Steak Locker. This will
always give you an accurate start date. It never
expires, whereas the visual dry aging circle will
complete its time allocation.
Smart Application Operating
Instructions
The Art of Dry-Aging Steak

Step 6 Continued
! Your Steak Locker APP also includes a series of
instructional and informative videos that will highlight
the process, safety, butchery and overall culinary
skills around the dry age steak environment.
! In many cases, it will show you butchers and markets
where you may purchase the sub primal cuts of beef
and will help with simple tutorials.
! We are updating informative videos from Steak
Locker and elsewhere on a weekly basis. The one
below is from Cumbreas Butcher Markets.
Smart Application Operating
Instructions
The Art of Dry-Aging Steak
This manual suits for next models
1
Table of contents
Other Steak Locker Commercial Food Equipment manuals


Popular Commercial Food Equipment manuals by other brands


Diamond
Diamond AL1TB/H2-R2 Installation, Operating and Maintenance Instruction

Salva
Salva IVERPAN FC-18 User instructions

Allure
Allure Melanger JR6t Operator's manual

saro
saro FKT 935 operating instructions

Hussmann
Hussmann Rear Roll-in Dairy Installation & operation manual

Cornelius
Cornelius IDC PRO 255 Service manual

Moduline
Moduline HSH E Series Service manual

MINERVA OMEGA
MINERVA OMEGA DERBY 270 operating instructions

Diamond
Diamond OPTIMA 700 Installation, use and maintenance instructions

Diamond
Diamond G9/PLCA4 operating instructions

Cuppone
Cuppone BERNINI BRN 280 Installation

Arneg
Arneg Atlanta Direction for Installation and Use