Steam Cleaner monster 076 Cordless User manual


2

3
Indice Pagina
Norme importanti per la sicurezza ..................................... 4
Aspirapolvere portatile ....................................................... 5
Uso / Funzione .................................................................. 6
Utilizzo dellʼapparecchio .................................................... 6
Messa in funzione dellʼaspirapolvere portatile ................... 7
Sostituzione e pulizia del filtro del vano polvere ................ 7
Ricaricare lʼaspirapolvere senza fili ................................... 8
Sostituzione del pacco batterie ......................................... 8
Parti di ricambio disponibili ................................................ 9
Specifiche tecniche ........................................................... 9
Guida allʼindividuazione dei guasti .................................... 9
Requisiti elettrici ................................................................ 10
Garanzia e informazioni sullʼassistenza ............................ 10
Modulo di restituzione al servizio di assistenza
post-vendita tagliando di garanzia ..................................... 11

4
Quando si utilizza un apparecchio elettrico, è necessario osservare sempre le norme generali di sicu-
rezza, comprese le seguenti.
LEGGERE ATTENTAMENTE TUTTE LE ISTRUZIONI PRIMA DI UTILIZZARE IL VOSTRO ASPIRA-
POLVERE.
ATTENZIONE: Per ridurre il rischio di incendio, folgorazione o ferimento:
1. Non lasciare lʼapparecchio acceso incustodito.
2. Non utilizzare lʼapparecchio su superfici bagnate per evitare di danneggiarlo.
3. Non lasciare lʼapparecchio in uso senza sorveglianza ed in presenza di bambini. Non abbandonare
lʼapparecchio quando è in uso.
4. Non utilizzare lʼapparecchio come se fosse un giocattolo. Fare molta attenzione se viene utilizzato
vicino a bambini, animali o piante.
5. Lʼapparecchio è stato ideato per un uso esclusivamente domestico. Seguire attentamente tutte le
istruzioni dʼuso contenute nel presente manuale. Utilizzare solo accessori raccomandati dal costrut-
tore.
6. Non usare lʼapparecchio se il cavo o la spina di corrente sono danneggiati, oppure se lʼapparecchio
o altre sue parti abbiano subito dei danni o siano caduti . Per evitare il rischio di scosse elettriche
non cercare di smontare o di riparare lʼapparecchio, ma portarlo al rivenditore o a uno dei nostri
centri di assistenza autorizzati per il controllo e/o la riparazione. Scorrette riparazioni o montaggi
dellʼapparecchio possono causare il rischio di scosse elettriche o recare danno alle persone quando
viene utilizzato.
7. Non tirare mai il cavo per scollegare lʼalimentatore dalla presa di corrente , ma staccarlo afferrando
sempre la spina.
8. Non toccare la spina o lʼapparecchio con le mani umide e non utilizzarlo a piedi nudi.
9. Non inserire oggetti nelle aperture. Non utilizzare lʼapparecchio se le aperture sono ostruite. Tenere
le aperture libere da polvere,fili,capelli,e qualunque altra cosa possa impedire allʼaria di circolare
liberamente.
10. Tenere lontano dalle aperture e dalle parti in movimento capelli, abiti, dita e ogni altra parte del
corpo.
11. Non aspirare oggetti che bruciano o emettono fumo, come ad esempio sigarette, fiammiferi o cenere
calda.
12. Spegnere sempre lʼapparecchio prima di collegarlo allʼalimentatore.
13. Non utilizzare lʼapparecchio per raccogliere liquidi o combustibili, quali la benzina, né usarlo in luoghi
dove tali sostanze possano essere presenti.
14. Non utilizzare lʼaspirapolvere portatile senza che il filtro raccogli polvere sia inserito correttamente
nellʼapposita sede.
15. Tenere lʼaspirapolvere in un luogo riparato. Riporre sempre lʼapparecchio dopo lʼuso per evitare che
qualcuno possa inciamparvi.
16. Lʼuso di un voltaggio sbagliato potrebbe danneggiare il motore e ferire lʼutilizzatore dellʼapparecchio.
La tensione corretta è indicata nella targhetta che riporta i dati elettrici.
17. In caso di guasti, lʼaspirapolvere deve essere riportato al costruttore o ad un centro di assistenza
autorizzato oppure al personale specializzato, al fine di evitare possibili rischi.
NORME IMPORTANTI PER LA SICUREZZA

5
ASPIRAPOLVERE PORTATILE
Modello: Monster 076 Cordless
1. Bocca dʼaspirazione
2. Tasto per aprire il vano di raccolta polvere
3. Pulsante dʼaccensione/spegnimento
4. Impugnatura
5. Vano raccogli polvere (contenitore)
6. Filtro raccogli polvere
7. Spazzola grande per tappeti/pavimenti
8. Bocchetta a lancia
9. Spazzola
10. Trasformatore e cavo alimentazione
11. Tubo prolunga 3 pezzi
12. Jack del caricatore
13. Base per ricarica con portaccessori
11
13
1
6
9
10
12
5
2
3
4
8
7

6
UTILIZZO DELLʼAPPARECCHIO
Nota: Il filtro raccogli polvere (6) deve essere sempre utilizzato quando lʼaspirapolvere è in funzione.
1. Per aprire il vano raccogli polvere (contenitore) (5), premere il tasto (2) ed estrarre il vano (5).
Verificare che il filtro (6) sia allʼinterno, quindi riagganciare il contenitore raccogli polvere (5) allʼaspira-
polvere manuale.
Fig. 1 Fig. 2
2.Per collegare la spazzola per pavimenti (7), la bocchetta a lancia (8) o la spazzola (9) allʼaspirapolvere
manuale,infilare le rispettive spazzole nella bocca di aspirazione (1), come mostrato nella figura sotto.
3.Per la pulizia dei pavimenti agganciare la spazzola (7) al tubo prolunga (3 pz.) come mostrato nella foto
sotto.Eʼpossibile utilizzare anche la bocchetta a lancia (8) o la spazzola (9) al tubo prolunga.
USO / FUNZIONE

7
MESSA IN FUNZIONE DELLʼASPIRAPOLVERE PORTATILE
1. Tenere saldamente in mano lʼaspirapolvere afferrandolo per lʼ impugnatura (4).
2. Posizionare il tasto di accensione/spegnimento (3) su I.
3. Iniziare ad aspirare.
AVVERTENZA: Lʼaspirapolvere è un apparecchio molto potente. Assicurarsi di tenerlo in mano salda-
mente, al fine di evitare che scivoli via causando incidenti o ferite.
SOSTITUZIONE E PULIZIA DEL FILTRO DEL VANO POLVERE
Attenzione: Per aprire il vano raccogli polvere (contenitore) (5), premere il tasto (2) ed estrarre il vano
(5), (fig. 1).
1. Estrarre il filtro (6), (fig. 2).
2. Eliminare la polvere dal filtro raccogli polvere (6).
3. Sciacquare il filtro (6) sotto un getto di acqua fredda. Attendere che sia completamente asciutto prima
di reinserirlo allʼinterno dellʼapposito vano (5).
4. Ricollocare con cura il filtro (6) nel vano (contenitore) (5).
5. Agganciare il vano (contenitore) (5) allʼaspirapolvere portatile.
fig.1 fig.2
AVVERTENZA: La bocca dʼaspirazione (1) deve essere sempre aperta e priva di occlusioni. In caso
contrario il motore potrebbe surriscaldarsi e subire dei danni.

8
SOSTITUZIONE DEL PACCO BATTERIE
NOTA: Se non siete sicuri su come togliere il pacco batterie, vi consigliamo di recarvi con il vostro aspi-
rapolvere presso un centro di assistenza tecnica qualificato per effettuare questa operazione.
Il pacco batterie del vostro Monster 076 Cordless è sostituibile, in ogni caso è necessario prestare at-
tenzione nellʼeffettuare ciò. Quando si rende necessaria la sostituzione, seguire le istruzioni di seguito
riportate.
1. Aprire il comparto delle batterie togliendo la vite situata sul retro dellʼunità. Non aprire mai il comparto
batterie se non per sostituire il pacco batterie (se necessario).
2. Togliere il coperchio del comparto batterie. Mettere da parte il coperchio e la vite.
3. Staccare con molta cura i due connettori elettrici dal pacco batterie, estraendoli dalla batteria.
4. Sollevare il vecchio pacco batterie e metterlo da parte.
5. Inserire il nuovo pacco batterie nel comparto e ricollegare i terminali premendo i fili contro le linguette
delle batterie.
6. Piegare i fili dentro al comparto batterie affinché non intralcino quando si richiude il coperchio.
7. Reinstallare il coperchio facendolo scivolare sulle batterie verso la parte anteriore dellʼapparecchio,
assicurandosi che si agganci bene allʼapparecchio.
8. Richiudere il comparto batterie avvitando la vite.
AVVERTENZA: non usare MAI lʼapparecchio senza che il coperchio del comparto batterie sia corretta-
mente nella sua sede.
SMALTIMENTO BATTERIE
Questo aspirapolvere contiene batterie al nichel-cadmio (NI-CAD) che devono essere smaltite in modo
corretto. Contattare il centro di smaltimento rifiuti a voi più vicino per informazioni sul riciclo e lo smalti-
mento di batterie al nichel/cadmio (Ni-Cad).
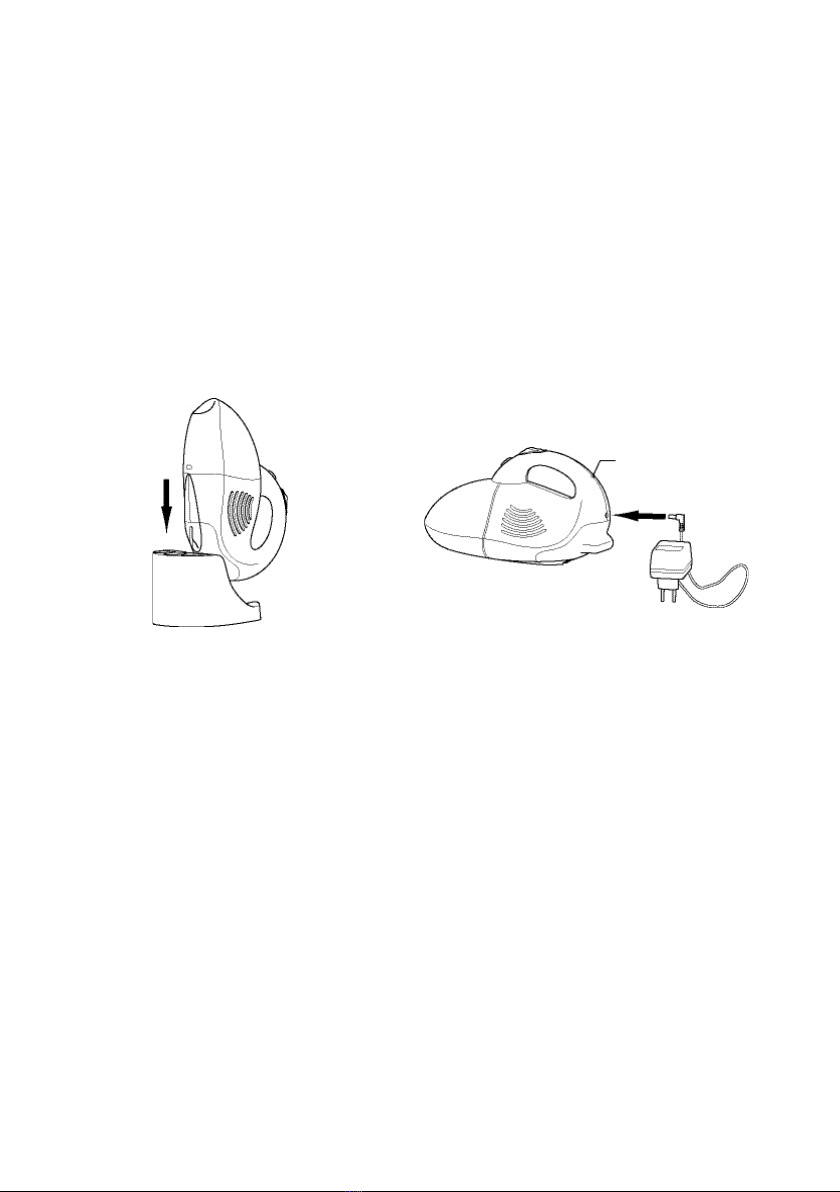
1. Inserire la spina del trasformatore di ricarica nella presa di corrente a muro. Lʼaltro sistema di ricarica
consiste nel posizionare lʼaspirapolvere senza fili nella base, successivamente inserire la spina del
trasformatore di ricarica nella presa di corrente a muro .
2. Questo aspirapolvere funziona con batterie al nichel/cadmio (NI-CD). Quando si utilizza lʼapparecchio
per la prima volta assicurarsi che sia stato ricaricato per almeno 16-20 ore.
3. Quando le batterie saranno completamente cariche, lʼaspirapolvere funzionerà per circa 15 minuti
prima che sia necessario porlo nuovamente in ricarica.
4. Per ricaricarlo, ripetere lʼoperazione descritta qui sopra. Il tempo di ricarica varierà in funzione di
quanto lʼaspirapolvere viene utilizzato tra un ciclo di ricarica e il successivo.
5. La spia di ricarica (segnalata nella fig.sotto) posta sullʼaspirapolvere si accenderà, indicando così che
lʼaspirapolvere si sta ricaricando correttamente.
Nota: il rendimento ottimale si ottiene soltanto dopo che lʼapparecchio è stato ricaricato e scaricato per
due o tre volte.
Importante: Per mantenere il rendimento ottimale del vostro aspirapolvere portatile senza fili, si rac-
comanda che lʼunità venga scaricata completamente, e successivamente ricaricata, almeno una volta
al mese.
RICARICARE LʼASPIRAPOLVERE SENZA FILI
Fig. 1 Fig. 2
Spia di
ricarica

9
PARTI DI RICAMBIO DISPONIBILI
Filtro permanente - 1 Pezzo
SPECIFICHE TECNICHE
Alimentazione: Batterie 16.8 V
Carica batterie: 230V - 50Hz
Potenza motore: 150W
Accessori: Spazzola per tappeti / pavimenti
Bocchetta a lancia
Spazzola
Tubo prolunga
Base per ricarica
GUIDA ALLʼINDIVIDUAZIONE DEI GUASTI
PROBLEMA PROBABILE CAUSA POSSIBILE SOLUZIONE
Lʼaspirapolvere non fun-
ziona 1 Lʼaspirapolvere è scarico
2 Lʼapparecchio ha bisogno di
manutenzione
1 Provvedete a ricaricarlo come
descritto a pag. 8
2 Portare lʼapparecchio in un centro
autorizzato
Lʼaspirapolvere non aspira
o la potenza di aspirazione
è debole
1 Il vano raccogli polvere è pieno
2 Lʼapparecchio è intasato
3 Il filtro raccogli polvere necessita
di pulizia
1 Svuotare il filtro dal vano polve-
re
2 Spegnere lʼapparecchio . Ri-
muovere il filtro dal vano raccogli
polvere e controllare che non
ci siano oggetti nel condotto
bocchetta di aspirazione o nel
tubo flessibile. Eventualmente
rimuoverli
3 Pulire o sostituire il filtro del vano
polvere (vedi pag. 5)
La polvere fuoriesce dalla
aspirapolvere 1 Il filtro raccogli polvere è pieno
2 Il filtro raccogli polvere non è
posizionato correttamente
3 É presente un foro nel filtro rac-
cogli polvere
1 Pulire o sostituire il filtro del vano
raccogli polvere
2 Rileggere le istruzioni sullʼinstal-
lazione del filtro ( vedi paragrafo
SOSTITUZIONE E PULIZIA
FILTRO)
3 Sostituire il filtro del vano raccogli
polvere (vedi fig.2)
Il tubo o le spazzole non
aspirano 1 Il tubo è intasato
2 Il filtro polvere è pieno
1 Togliere il tubo e/o le spazzole
2 Togliere lʼoggetto che ostruisce il
tubo
3 Svuotare e pulire il filtro raccogli
polvere

10
IMPORTANTE
Requisiti elettrici:
Verificare che la tensione indicata nella targhetta dati del vostro apparecchio corrisponda alla rete di
alimentazione domestica, che dovrà essere A.C. (corrente alternata) 230V - 50Hz.
Apparecchi forniti con una spina in dotazione:
Se la spina dellʼapparecchio non si adatta alla presa elettrica di casa vostra, la spina non dovrà essere
rimossa. Usare un adattatore a norma.
Nota: Qualunque spina tolta dal cavo principale, se tagliata, deve essere distrutta poiché una spina con
un cavo flessibile sbucciato è pericolosa se viene inserita in una presa sotto tensione.
GARANZIA E INFORMAZIONI SULLʼASSISTENZA
La presente garanzia non copre i danni causati da normale usura, da sovraccarico, da negligenza od
uso improprio. Eventuali sostituzioni, modifiche o riparazioni effettuate dallʼacquirente o dallʼutente
invalideranno la garanzia.
La garanzia sarà valida solo se lʼapparecchio è stato utilizzato conformemente alle istruzioni ed è stato
collegato ad una rete elettrica conforme a quella indicata sulla base dellʼapparecchio.
La garanzia sarà dichiarata nulla se il prodotto viene rivenduto. Il prodotto deve essere usato solo per
scopi domestici.

11
MODULO DI RESTITUZIONE AL SERVIZIO DI ASSISTENZA POST-VENDITA TAGLIANDO DI GARANZIA
Qualora il vostro apparecchio necessitasse di assistenza post-vendita, siete pregati di contattare il vostro
rivenditore che vi informerà circa la procedura di restituzione. In alternativa, contattare la Euroflex srl al
numero 0438.661711.
Per godere dei vantaggi della garanzia di 2 anni, siete pregati di conservare lo scontrino dʼacquisto,
assicurandovi che esso indichi chiaramente la data dʼacquisto, oppure chiedete al vostro rivenditore di
timbrare il presente tagliando di garanzia specificando la data dʼacquisto. Siete pregati di conservarlo
in caso di reclami futuri. La prova dʼacquisto sarà necessaria per godere dellʼassistenza gratuita entro
il periodo di garanzia.

12
Index Page
Important safeguards ........................................................ 13
Hand vacuum cleaner ....................................................... 14
Use / Assembly .................................................................. 15
Use of the appliance .......................................................... 15
How to operate your hand vacuum .................................. 16
Changing and cleaning the dust cup filter ......................... 16
Charging the cordless vacuum cleaner ............................. 17
Battery pack replacement .................................................. 17
Available spare parts ......................................................... 18
Technical specifications ..................................................... 18
Troubleshooting guide ....................................................... 18
Electrical requirements ..................................................... 19
Guarantee and service information ................................... 19
After sales service returns form - guarantee slip ............... 20

13
When using an electrical appliance, basic safety precautions should always be observed, including the
following.
PLEASE CAREFULLY READ ALL INSTRUCTIONS BEFORE USING YOUR VACUUM CLEANER.
WARNING: To reduce the risk of fire, electrical shock, or injury:
1. Do not leave the appliance unattended while connected.
2. Do not use on wet surfaces to avoid damaging the appliance.
3. Do not leave the appliance unattended in presence of children. Do not leave the appliance unattended
when it is operating.
4. Do not allow to be used as a toy. Close attention is necessary when used by or near children, pets
or plants.
5. The appliance must be used only for domestic purposes. Carefully follow all instructions contained
in this manual. Use only manufacturerʼs recommended attachments.
6. Do not use with damaged cord or plug. Do not use hand vacuum or parts of it if they have been
damaged or dropped. To avoid the risk of electrical shocks, do not disassemble or attempt to repair
the appliance, but return it to your retailer or to one of our authorized service centres for examination
and/or repair. Incorrect repair or re-assembly of the appliance may cause the risk of electrical shock
or injury to people when it is used.
7. Do not unplug by pulling on cord. To unplug, grasp the plug, not the cord.
8. Do not handle plug or appliance with wet hands and do not use it without shoes.
9. Do not put any object into openings. Do not use with any opening blocked. Keep free of dust, lint,
hair, and anything else that may reduce air flow.
10. Keep hair, loose clothing, fingers and all parts of body away from openings and moving parts.
11. Do not pick up anything that is burning or smoking, such as cigarettes, matches, or hot ashes.
12. Turn off the appliance before unplugging from the mains socket.
13. Do not use to pick up flammable or combustible liquids, such as gasoline, or use in areas where they
may be present.
14. Do not use the hand vacuum cleaner without dust cup filter in place.
15. Store the hand vacuum indoors. Put the hand vacuum away after use to prevent tripping acciden-
ts.
16. Using improper voltage may result in damage to the motor and possible injury to the user. Correct
voltage is listed on the rating label.
17. If the cleaner is damaged, it must be repaired by the manufacturer or an authorized service centre
or a similarly qualified person in order to avoid possible hazards.
IMPORTANT SAFEGUARDS

14
HAND VACUUM CLEANER
Model: Monster 076 Cordless
1. Suction hole
2. Push to open dust cup (container)
3. On/Off power switch
4. Handle
5. Dust cup (container)
6. Dust cup filter
7. Brush for floor/carpets
8. Crevice nozzle
9. Brush
10. Charging transformer and power cord
11. Extension tube (x 3)
12. Charging jack
13. Charging base, fit for accessories
11
13
1
6
9
10
12
5
2
3
4
8
7

15
USE OF THE APPLIANCE
Note: Dust cup filter (6) must always be used when operating the hand vacuum.
1. To open the dust cup (container) (5), push button (2) and pull out the dust cup (5).
Verify that the dust cup filter (6) is inside, then attach the dust cup (container) (5) to the hand vacuum
cleaner.
2.To attach the floor brush (7), the crevice nozzle (8) or brush (9) to the vacuum cleaner, push brush
into the suction hole (1), as shown below.
3.To clean floors, attach brush (7) to the extension tube (3 pieces), as shown below. It is also possible
to use the crevice nozzle (8) or the brush (9) with the extension tube.
USE / ASSEMBLY

16
HOW TO OPERATE YOUR HAND VACUUM
1. Hold the hand vacuum firmly with your hand on the handle (4).
2. Push the power switch (3) to “I” position.
3. Start vacuuming.
CAUTION: The Hand Vacuum is a very powerful unit. Make sure that you hold it firmly, otherwise it can
slip out of your hand and cause injury.
CHANGING AND CLEANING THE DUST CUP FILTER
Warning: To open the dust cup (container) (5), push button (2) and pull out the dust cup (5), (fig. 1).
1. Pull out the dust cup filter (6), (fig. 2).
2. Empty the dust from the dust cup filter (6).
3. Rinse the dust cup filter (6) in cold water. Wait until it dries up before replacing it into the dust cup
(container) (5).
4. Place the dust cup filter (6) carefully into the dust cup (container) (5).
5. Attach the dust cup (container) (5) to the hand vacuum.
fig.1 fig.2
CAUTION: The suction hole (1) must be open, free of any obstructions at all times. Otherwise, the motor
will overheat and could get damaged.
17
BATTERY PACK REPLACEMENT
NOTE: if uncertain as to how to change your battery pack, we suggest you take your vacuum to a qualified
service centre to have this service performed.
The battery pack of your Monster 076 Cordless is replaceable, however care should be taken when doing
so. Follow these steps when replacement is required.
1. Open the battery compartment, by removing the screw located in the recess of the unit. Never open
battery compartment except to change the battery (if required).
2. Remove battery compartment cover. Set aside battery compartment cover with screw.
3. Carefully detach the two electrical connectors from the battery pack by pulling straight out from the
battery pack.
4. Lift out the old battery pack and set aside.
5. Insert the new battery pack in battery compartment and re-connect terminals by pushing lead wires
onto battery tabs.
6. Tuck wiring inside battery compartment so that the wiring does not interfere with the battery compart-
ment cover when it is re-positioned.
7. Re-install the battery compartment cover by sliding it over the battery towards the front of the unit,
making sure that the front snap engages the body of the unit.
8. Replace the battery compartment cover screw.
CAUTION:NEVER use the unit without the battery compartment cover in place.
BATTERY DISPOSAL
This vacuum cleaner contains nickel-cadmium(NI-CAD) batteries and must be disposed of properly. Call
your nearest recycling center for information on the recycling and disposal of nickel-cadmium(NI-CAD)
battery.
1. Plug the charging transformer into the wall outlet. Alternative way of charging: place the cordless
vacuum in the base, then plug the charging transformer into the wall outlet.
2. This vacuum cleaner is powered by NI-CD batteries. Before its first use, they must be charged for a
minimum of 16-20 hours.
3. Once the batteries are fully charged, the vacuum cleaner will run for approximately 15 minutes before
recharging is required.
4. To recharge, repeat step above described. Charging times will vary depending upon the amount of
usage between the charging cycles.
5. The charging indicator light (see fig. below) on the top of the vacuum will illuminate to indicate that
the vacuum is properly charging.
Note: peak performance may only be achieved after the until has been charged and discharged two or
three times.
Important: to maintain peak performance of your cordless hand vacuum, it is recommended that the unit
be fully discharged , then completely re-charged at least once a month.
CHARGING YOR CORDLESS VACUUM CLEANER
Fig. 1 Fig. 2
Charging in-
dicator light

18
AVAILABLE SPARE PARTS
Permanent filter – 1 piece
TECHNICAL SPECIFICATIONS
Voltage: Batteries 16.8 V
Battery charging: 230 V – 50 Hz
Motor power : 150W
Accessories: Brush for carpets / floors
Crevice nozzle
Brush
Extension tube
Charging base
TROUBLESHOOTING GUIDE
PROBLEM POSSIBLE REASON POSSIBLE SOLUTION
Hand vacuum will not ope-
rate 1 Appliance is discharged.
2 Appliance needs maintenance.
1 Charge the unit as described on
page 8.
2 Take it to an authorized service
centre.
Hand vacuum will not pick-up
or suction power is weak 1 Dust cup is full.
2 Unit clogged.
3 Filter needs cleaning.
1 Empty dust cup filter.
2 Turn unit off and unplug from wall
outlet. Remove dust cup filter and
check for object(s) in air duct or
hose. If so, remove them.
3 Clean or replace dust cup filter.
(see pag. 5).
Dust escaping from hand
vacuum 1 Dust cup filter is full.
2 Dust cup filter is not correctly
installed.
3 Hole in dust cup filter.
1 Clean or replace dust cup filter.
2 Review dust cup filter instruc-
tions (see par. CHANGING &
CLEANING THE DUST CUP
FILTER).
3 Replace dust cup filter (see fig.
2).
Hose or brushes will not
pick up 1 Hose clogged.
2 Dust cup filter is full.
1 Remove hose and/or brushes.
2 Remove obstruction from hose.
3 Empty and clean dust cup filter.

19
IMPORTANT
Electrical Requirements:
Please ensure that the voltage shown on the rating plate of your appliance corresponds with your hou-
sehold electricity supply which must be A.C. (alternating current) 230 V – 50 Hz.
Appliances supplied with a fitted plug:
If the electrical sockets in your home are not suitable for the plug fitted to this appliance, the plug should
not be removed. Use a standard adapter.
Note: Any plug removed from the mains lead, if severed, must be destroyed as a plug with a bared flexible
cord is hazardous if engaged into a live socket outlet.
GUARANTEE AND SERVICE INFORMATION
This guarantee does not cover normal wear and tear, damage caused by overloading, negligence, ac-
cident or improper use. Any change or modification made by the purchaser or user to the appliance will
invalidate the guarantee, as would any attempted repair.
The guarantee applies only when the appliance has been operated in accordance with the instructions
and connected to an electricity supply which matches that shown on the base of the appliance.
The guarantee will be rendered invalid if the product is resold. The product must be used solely for
domestic purposes.

20
AFTER SALES SERVICE RETURNS FORM - GUARANTEE SLIP
Should your appliance require After Sales Service, please contact your retailer who will advise you of the
returns procedure. Alternatively, please contact Euroflex srl at phone number 0438.661711.
In order to enjoy the benefits of the two-year guarantee, please retain your proof of purchase, ensuring
that it shows the date of purchase, or ask your retailer to stamp this guarantee slip with the date of pur-
chase. Please retain in your possession in case of future claims. Proof of purchase will be required to
qualify for free service within the guarantee period.
Table of contents
Languages:
Popular Vacuum Cleaner manuals by other brands

Little Wonder
Little Wonder PROVAC SI 5511-02-01 Operator and parts manual

Coline
Coline VCB46A15F-70 instruction manual

Kalorik
Kalorik USK VC 16107 operating instructions

LG
LG V-C20820HE owner's manual

Bissell
Bissell CrossWave 1713 SERIES user guide

Electrolux
Electrolux EL8600 Series Assembly / Disassembly Guide


