Steba LE 100 User manual

www.steba.com
Luftentfeuchter LE 100
Gebrauchsanweisung 2
Instructions for use 9
Mode d´emploi 16
Gebruiksaanwijzing 23
Brugsanvisning 31

2
1. Lüftungsgitter
2. Bedienpult
3. Griff
4. Front
5. Rückseite
6. Schlauchanschluss
7. Wassertank
Bedienpult:

3
Allgemein
Dieses Gerät ist nur für den Gebrauch im Haushalt und Innen-
räumen, jedoch nicht im Gewerbe bestimmt. Bitte lesen Sie die
Gebrauchsanweisung aufmerksam durch und bewahren Sie diese
sorgfältig auf. Bei Weitergabe des Gerätes an andere Personen
ist die Gebrauchsanweisung mit zu übergeben. Benutzen Sie das
Gerät wie angegeben und beachten Sie die Sicherheitshinweise.
Für Schäden oder Unfälle, die durch Nichtbeachtung entstehen,
wird keine Haftung übernommen.
Sicherheitshinweise
∙Gerät nur gemäß Angaben auf dem Typenschild anschließen
und betreiben.
∙Nur benutzen, wenn Zuleitung und Gerät keine Beschädi-
gungen aufweisen.
∙Vor jedem Gebrauch überprüfen!
∙Das Gerät kann von Kindern ab 8 Jahren sowie von
Personen mit reduzierten physischen, sensorischen oder
mentalen Fähigkeiten oder Mangel an Erfahrung und/oder
Wissen benutzt werden, wenn sie beaufsichtigt oder bezüglich
des sicheren Gebrauchs des Gerätes unterwiesen wurden und
die daraus resultierenden Gefahren verstanden haben. Kinder
dürfen nicht mit dem Gerät und der Verpackung spielen.
Reinigung und Benutzer-Wartung dürfen nicht durch Kinder
durchgeführt werden, es sei denn sie sind älter als 8 Jahre und
beaufsichtigt.
∙Kinder jünger als 8 Jahre sind vom Gerät und der Anschlusslei-
tung fernzuhalten.
∙Das Gerät darf nicht mit einer Zeitschaltuhr oder mit einem
separaten Fernwirksystem betrieben werden!
∙Stecker ziehen nach jedem Gebrauch oder im Fehlerfall
∙Reißen Sie nicht an der Netzanschlussleitung. Scheuern Sie
diese nicht an Kanten und klemmen Sie diese nicht ein.

4
∙Stellen Sie nichts auf dem Gerät ab und decken Sie die Lüf-
tungsschlitze nicht ab.
∙Stecken Sie keine Gegenstände in die Lüftungsgitter.
∙Benutzen Sie das Gerät niemals nach einer Fehlfunktion, z.B.
wenn es heruntergefallen ist oder auf eine andere Weise be-
schädigt wurde.
∙Der Hersteller übernimmt keine Verantwortung bei falschen
oder unsachgemäßen Gebrauch, der durch die Nichtbeachtung
der Gebrauchsanleitung zustande kommt.
∙Reparaturen am Gerät, wie z.B. eine beschädigte Netzan-
schlussleitung austauschen, dürfen nur durch einen Kunden-
dienst ausgeführt werden, um Gefährdungen zu vermeiden.
∙Stellen Sie das Gerät auf eine ebene, feste, wasserunempfind-
liche Fläche.
∙Achten Sie auf einen sicheren Stand damit das Gerät nicht
umfällt.
∙Decken Sie die Lufteintrittsöffnung nicht ab und sorgen Sie
dafür, dass keine Vorhänge etc. die Luftzirkulation behindern.
∙Vorsicht! Bei Überhitzung besteht Brandgefahr!
Halten Sie einen Sicherheitsabstand von min. 60 cm zu
Wasserzellen (z.B.: Duschen, Wannen, Becken) und
min. 120 cm zu Wasserhähnen!
Inbetriebnahme
∙Wenn Sie das Gerät ausgepackt haben, stellen sie es senkrecht auf und lassen es 12
Stunden ruhen, damit die Kühlflüssigkeit blasenfrei wird.
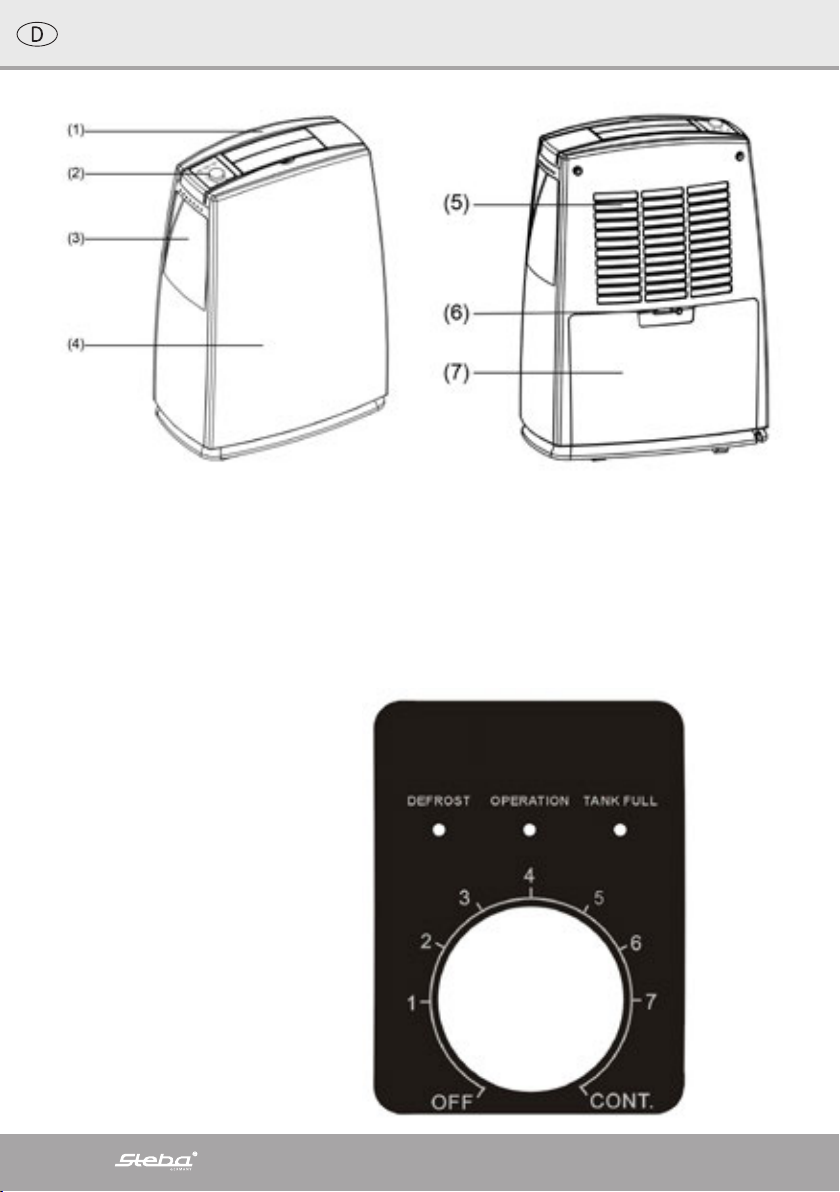
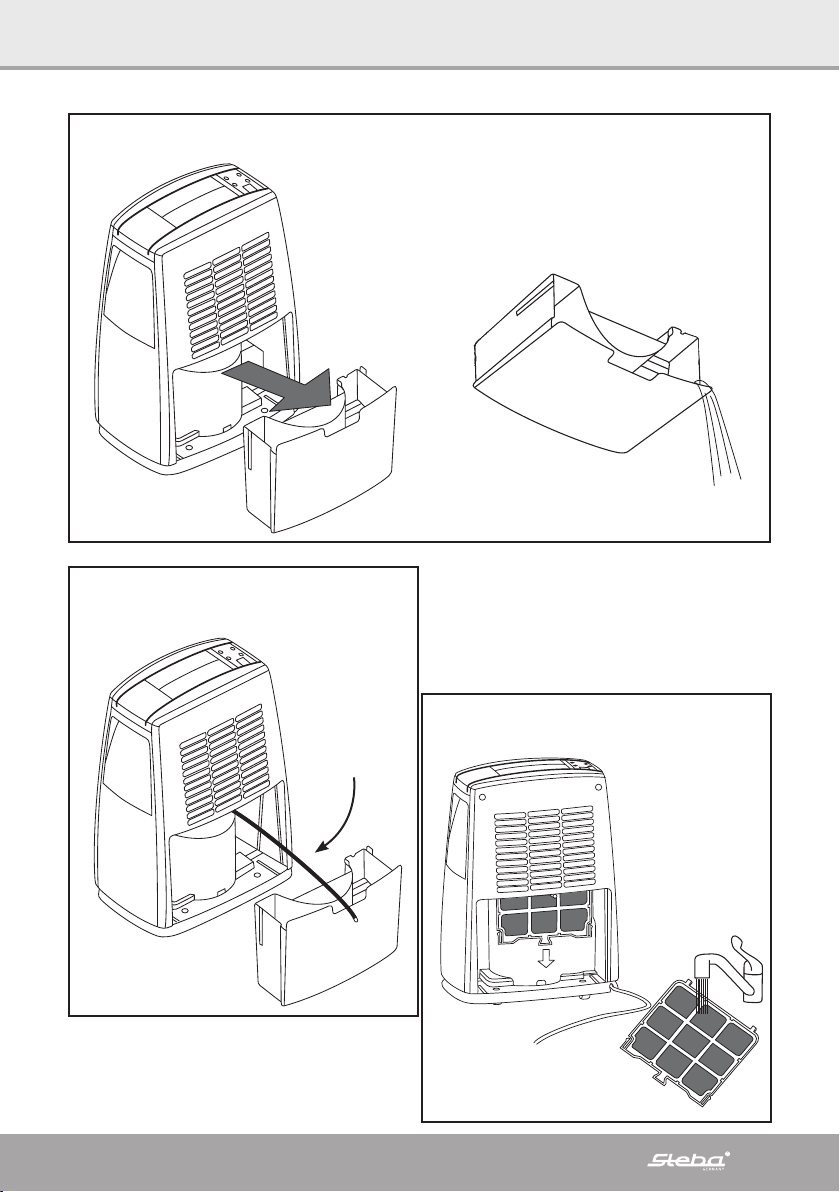
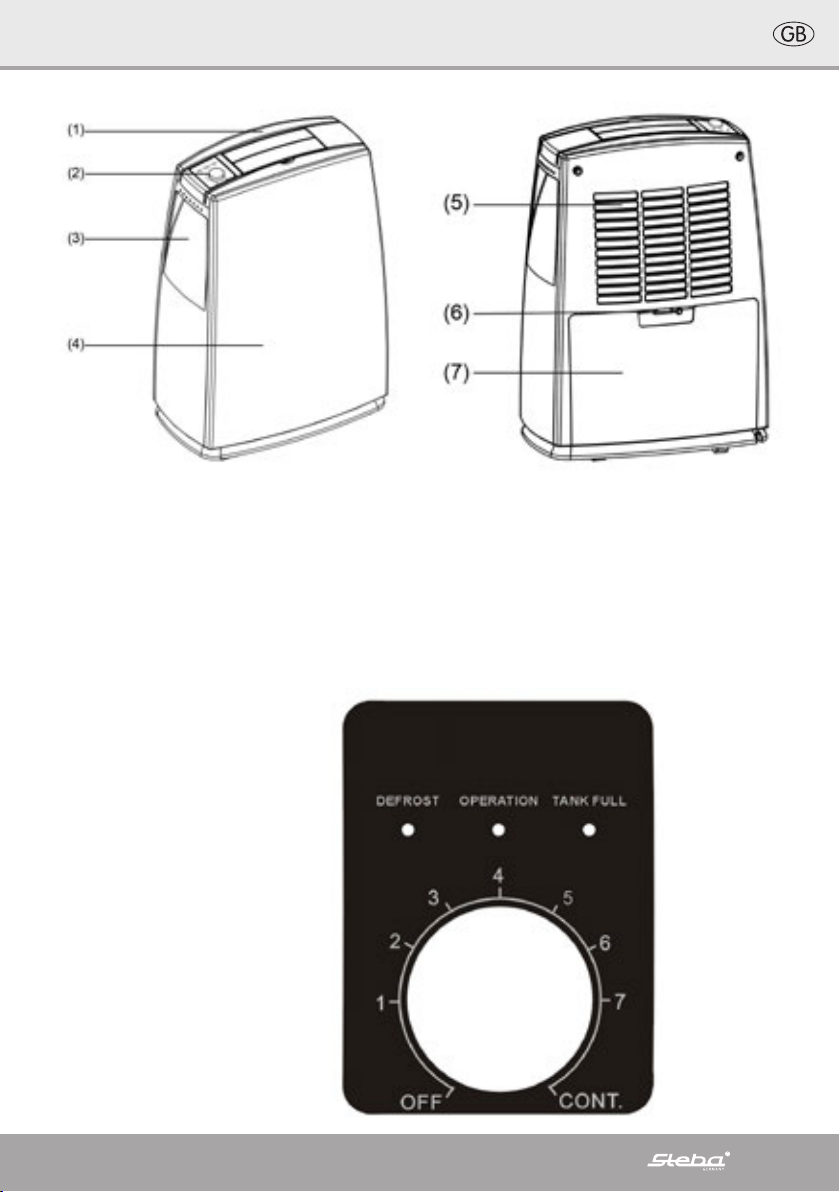
∙Achten Sie darauf, dass der Wassertank richtig eingeschoben ist.
∙Stellen Sie den Feuchtigkeitsregler auf „OFF“.
∙Schließen Sie den Netzstecker mit trockenen Händen an.
∙Achten Sie darauf, dass die Lüftungsgitter geöffnet sind.
∙Drehen Sie den Feuchtigkeitsregler auf Pos. 4 (entspricht ca. 60 % Luftfeuchtigkeit)
∙Der Kompressor arbeitet nur wenn die tatsächliche Luftfeuchtigkeit höher ist, als
der Einstellwert. Wenn der Kompressor arbeitet, leuchtet am Bedienpult die Lampe
„Operation“.

5
45
DD-TEC16E DD-TEC16E
COMPONENTS
CONTROL PANEL
WATER TANK DRAINAGE (OPTION A)
CONTINUOUS WATER DRAINAGE (OPTION B)
FILTER CLEANING
Fig. 1
Fig. 3
Fig. 2
Fig. 4
Filterreinigung
45
DD-TEC16E DD-TEC16E
COMPONENTS
CONTROL PANEL
WATER TANK DRAINAGE (OPTION A)
CONTINUOUS WATER DRAINAGE (OPTION B)FILTER CLEANING
Fig. 1
Fig. 3
Fig. 2
Fig. 4
Wassertank entleeren:
45
DD-TEC16E DD-TEC16E
COMPONENTS
CONTROL PANEL
WATER TANK DRAINAGE (OPTION A)
CONTINUOUS WATER DRAINAGE (OPTION B)FILTER CLEANING
Fig. 1
Fig. 3
Fig. 2
Fig. 4
Permanenter Ablauf
Schlauch

6
Einstellung ca. Luftfeuchte
730%
640%
460%
280%
∙Ist der Regler auf “Cont.” eingestellt, arbeitet der Kompressor permanent.
∙Das Gerät ist ausgelegt für Temperaturen von 5°C - 31°C.
∙Die Leistung des Gerätes ist abhängig von Luftfeuchtigkeit und Temperatur im
Raum. Bei kalten Temperaturen ist die Luftfeuchtigkeit niedrig. Eine gute Entfeuch-
tung wird ab Temperaturen größer 22°C und hoher Luftfeuchtigkeit ab 70% erzielt.
∙Wenn der Entfeuchter die programmierte Luftfeuchtigkeit erreicht hat unterbricht
der Kompressor den Betrieb und startet erst wieder wenn die Luftfeuchtigkeit über
dem programmierten Wert liegt.
∙Halten Sie Fenster und Türen des zu entfeuchtenden Raumes geschlossen.
∙Achten Sie darauf, dass nichts in das Gerät tropfen kann.
∙Während des Betriebs erzeugt das Gerät Wärme.
∙Um das Gerät im Dauerbetrieb laufen zu lassen drehen Sie den Feuchtigkeitsregler
auf „cont“.
Wasserablauf
∙Wenn der Wassetank voll ist brennt eine rote Lampe „Tank full“ und das Gerät
stellt sich ab. Warten Sie ca 15min, bevor Sie den Wassertank entnehmen, damit
das Wasser noch in den Wassertank laufen kann. Entnehmen Sie den Behälter
vorsichtig damit der Schwimmer nicht beschädigt wird und gießen Sie ihn aus (Fig
1 + 2).
∙Das Wasser nicht für den persönlichen Bedarf verwenden.
∙Ist der Behälter wieder eingesetzt, ca. 3 Minuten warten, dann wieder starten.
Permanenter Ablauf
Mittels eines Schlauches (nicht im Lieferumfang - kann als Sonderzubehör bei Steba
bezogen werden) den man am Wasserablauf befestigt (siehe Fig 3) kann man das
Wasser in einen Ausguss führen. Das Gerät darf nicht niedriger stehen als der Abfluss.
Entfernen Sie den Wassertank und stecken Sie den Schlauch auf den Schlauchan-
schluss. Setzen Sie dann den Tank wieder ein.
Entfrosten
Bei Raumtemperaturen unter 5°C taut das Gerät ab. Der Kompressor ist ausgeschal-
tet, der Lüfter läuft weiter. Es leuchtet im Bedienpult die “Defrost” Leuchte.

7
Reinigung und Pflege
∙Bevor Sie das Gerät reinigen, den Regler auf „OFF“ stellen und den Netzstecker
ziehen!
∙Wasserbehälter täglich entleeren. Darauf achten dass der Schwimmer nicht be-
schädigt wird. Alle 2 Wochen mit einem handelsüblichen Spülmittel spülen.
∙Öffnen Sie wöchentlich das Ansauggitter an der Rückseite und ziehen den Netz-
filter nach unten heraus (Fig 4). Den Filter in warmem Seifenwasser spülen und
trocknen lassen. Danach den Filter wieder einsetzen und das Ansauggitter schlie-
ßen.
∙Achtung!
Das Gerät ist schwer!
∙Die äußeren Flächen mit einem feuchten Tuch abwischen.
∙Bei einer längeren Pause sollten Wasserbehälter und Ansaugfilter gereinigt sein.
Das Gerät senkrecht lagern.
Fehlerursachen
Problem mögliche Ursache
Entfeuchter arbeitet nicht ∙Kein Strom (Sicherung kontrollieren
oder Steckdose defekt)
∙Wasserbehälter ist voll oder nicht rich-
tig eingeschoben
∙Überprüfen Sie, ob sich der Schwim-
mer im Wassertank befindet.
Entfeuchter erzeugt kein oder wenig
Kondenswasser
∙Zu geringe Luftfeuchtigkeit
∙Lufteinlass oder Auslass verschlossen
oder verstellt
∙Türen oder Fenster des Raumes sind
geöffnet
∙Netzfilter muss gereinigt werden
Entfeuchter vibriert Boden uneben:
∙legen Sie Schaumstoff unter das Gerät

8
Korrekte Entsorgung dieses Produkts:
Ausgediente Geräte sofort unbrauchbar machen.
Innerhalb der EU weist dieses Symbol darauf hin, dass dieses Produkt nicht
über den Hausmüll entsorgt werden darf. Altgeräte enthalten wertvolle
recyclingfähige Materialien, die einer Wiederverwertung zugeführt werden
sollten und um der Umwelt bzw. der menschlichen Gesundheit nicht durch
unkontrollierte Müllbeseitigung zu schaden. Bitte entsorgen Sie Altgeräte deshalb
über geeignete Sammelsysteme oder senden Sie das Gerät zur Entsorgung an die
Stelle, bei der Sie es gekauft haben. Diese wird dann das Gerät der stofflichen
Verwertung zuführen.
Verpackungs-Entsorgung
Verpackungsmaterial nicht einfach wegwerfen, sondern der Wiederverwertung
zuführen. Papier-, Pappe- und Wellpappeverpackungen bei Altpapiersammelstellen
abgeben. Kunststoffverpackungsteile und Folien sollten ebenfalls in die dafür vorge-
sehenen Sammelbehälter gegeben werden
In den Beispielen für die Kunststoffkennzeichnung steht: PE für
Polyethylen, die Kennziffer 02 für PE-HD, 04 für PE-LD, PP für
Polypropylen, PS für Polystyrol.
Kundenservice:
Sollte Ihr Gerät wider Erwarten einmal den Kundendienst benötigen, wenden Sie
sich bitte an nachfolgende Anschrift. Wir werden dann im Garantiefall die Abholung
veranlassen. Das Gerät muss transportfähig verpackt sein.
Unfreie Pakete können nicht angenommen werden!
STEBA Elektrogeräte GmbH & Co KG
Pointstr. 2, 96129 Strullendorf / Germany
Vertrieb-Tel.: 09543 / 449-17 / -18,
Service-Tel.: 09543 / 449-44, Fax: 09543 / 449-19
E-Mail: elek[email protected] Internet: http://www.steba.com
Achtung! Elektrogeräte dürfen nur durch Elektro-Fachkräfte repariert werden, da
durch unsachgemäße Reparaturen erhebliche Folgeschäden entstehen können.

9
1. Air Outlet
2. Panel
3. Handel
4. Front
5. Back
6. Water outlet
7. Water tank
Panel:

10
Generally
This appliance is for private and indoor use only and must not be
used commercially. Please read the instruction manual carefully
and keep it at a safe place. When the appliance is given to ano-
ther person the instruction manual should be passed to that per-
son, too. Only use the appliance as described in the instruction
manual and pay attention to the safety information. No liability
for damages or accidents will be accepted, which are caused by
not paying attention to the instruction manual.
Safety information
∙Connect and operate the appliance in accordance with the spe-
cifications shown on the rating label
∙Do not plug with wet hands.
∙Do not plug into a socket where several other appliances are
plugged in.
∙Do not use if the plug cord is damaged or when the power plug
does not fit the socket securely.
∙Do not modify the parts, or repair the unit by yourself.
∙Do not use the unit near a flame.
∙Do not use where children can easily touch the unit, nor let
children use the unit by themselves.
∙The appliance can be used by children aged 8 and above
and persons with limited physical, sensory or mental capa-
bilities or lack of experience/knowledge, provided that are su-
pervised or have been provided with instruction in the safe use
of the appliance and have understood the resulting dangers.
Children must not use the packaging as a toy. Cleaning and user
maintenance must not be carried out by children unless they
are 8 years or older and are supervised.
∙Children under the age of 8 must be kept away from the appli-
ance and the connecting cable.
∙The appliance must not be operated using a timer or a separate
remote system!

11
∙Never pull at the power cord or chafe it over sharp edges.
∙Never leave the appliance unattended when in use.
∙The manufacturer is not liable for damage which is occurring
due to the usage of the appliance in a different way as descri-
bed or a mistake in the handling has been made.
∙Place the appliance on a flat, stable, water resisting surface.
∙The appliance must stand this way that it cannot tip over.
∙Do not cover the ventilation openings and take care that no
curtains etc can be hindered the air circulation.
∙Attention! In case of overheating, risk of fire! Keep a
safety distance of min 60cm to wet areas (e.g. Shower,
bath tubes, sinks) and min 120cm to water taps!
Operation:
∙When the unit is unpacked, place the appliance vertical on the floor and leave it for
12h, that the cooling liquid is bubble free
∙Take care that the water tank is inserted correctly.
∙Turn the humidity regulator is turned to “Off”
∙Plug the appliance in with dry hands.
∙Ensure that the ventilation openings are open.
∙Turn the humidity regulator to Pos.4 ( ca 60% humidity).
∙The compressor is only working when the humidity in the air is higher than the
adjusted. When the compressor is working, then the „Operation“ lamp at the panel
is on.
Adjusted Ca. humidity
730%
640%
460%
280%
∙When the regulator is adjusted to „Cont., then the compressor is working perma-
nently.
∙The unit is suitable to work at temperatures from 5°C to 31°C.
∙The humidity performance is depending on the surrounding humidity and tempe-
rature. A good dehumidification is achieved at temperatures higher than 22°C and
a humidity above 70%.
∙When the dehumidifier reaches the adjusted value, the compressor will stop wor-
king and starts again when the humidity is again above the programmed value.
∙Keep doors and windows closed of the room which should be dehumidified.

12
45
DD-TEC16E DD-TEC16E
COMPONENTS
CONTROL PANEL
WATER TANK DRAINAGE (OPTION A)
CONTINUOUS WATER DRAINAGE (OPTION B)
FILTER CLEANING
Fig. 1
Fig. 3
Fig. 2
Fig. 4
Cleaning the filter
45
DD-TEC16E DD-TEC16E
COMPONENTS
CONTROL PANEL
WATER TANK DRAINAGE (OPTION A)
CONTINUOUS WATER DRAINAGE (OPTION B)FILTER CLEANING
Fig. 1
Fig. 3
Fig. 2
Fig. 4
Empty water tank
45
DD-TEC16E DD-TEC16E
COMPONENTS
CONTROL PANEL
WATER TANK DRAINAGE (OPTION A)
CONTINUOUS WATER DRAINAGE (OPTION B)FILTER CLEANING
Fig. 1
Fig. 3
Fig. 2
Fig. 4
Continuous drainage
Tube

13
∙Take care that nothing can drop on the appliance.
∙During use, the appliance will create warm air.
∙To run the appliance continuously, turn the humidity regulator to “cont”.
Water drainage:
∙If the water tank is full, then a red light „Tank full“ will go on and the appliance will
stop working. Wait ca 15min before the water tank is removed. Residual water can
drop into the water tank at that time. Remove the water tank carefully, that the
floater is not damaged and pour out the water (Fig 1+2).
∙The water is not suitable for personal usage (drinking, washing etc.).
∙After the water tank is inserted wait for ca 3min then the appliance can be restar-
ted.
Continuous drainage:
∙With a pipe (not supplied with the appliance, can be ordered at Steba as an addi-
tional accessory), which is applied to the water out hole (Fig3), the water can be
drained into a sink. Take care that the appliance is not placed lower than the sink.
Remove the water tank and attach the pipe at the water out hole. Insert the water
tank carefully again.
Defrost:
At room temperatures bellow 5°C the appliance will defrost. The compressor stops
working, the fan keeps running. At the panel the „Defrost“ lamp is on.
Cleaning and maintenance:
∙Before cleaning the appliance the humidity regulator should be turned to “Off”
and the plug should be pulled out of the socket.
∙The water tank should be emptied every day. Take care that the floater is not da-
maged. Rinse the tank every 2 weeks with a normal wash-up liquid.
∙Open every week the filter at the back and pull the filter gently downwards (Fig4).
Rinse the filter in warm soap water and dry it completely. Re-insert the filter and
close it.
∙Attention: The appliance is heavy!
∙The outer shell should be cleaned with a damp cloth.
∙When the appliance is not used for quite a while the filter and the water tank
should be cleaned.
∙Store the appliance in a vertical way.

14
Failure list
Problem Possible Reason
Dehumidifier is not working ∙No power supply (Check Fuse or the
socket)
∙Water tank is not inserted completely
∙Check if the floater is in the water
tank.
Dehumidifier produces no or only little
water
∙Air humidity too low
∙Air inlet or outlet covered or blocked
∙Doors or windows of the room are
open
∙Filter full
Vibrating dehumidifier Floor not plane
∙Place some foam material bellow the
appliance

15
Correct Disposal of this product
This marking indicates that this product should not be disposed with other
household wastes throughout the EU. To prevent possible harm to the
environment or human health from uncontrolled waste disposal, recycle it
responsibly to promote the sustainable reuse of material resources. To return
your used device, please use the return and collection systems or contact the retailer
where the product was purchased. They can take this product for environmental safe
recycling.
Packaging disposal: Do not throw away the package materials. Please put it in the
recycling bin.
Gift box: Paper, should be put to the old paper collection point.
Plastic packaging material and foils should be collected in the
special collection containers.
Service and Repair:
If the appliance must be repaired, please get in touch with your trader or with the
manufacturer:
STEBA Elektrogeräte GmbH & Co KG
Pointstr. 2, 96129 Strullendorf / Germany
Distribution-Tel.: 09543 / 449-17 / -18,
Service-Tel.: 09543 / 449-44, Fax: 09543 / 449-19
e-Mail: elek[email protected] Internet: http://www.steba.com

16
1. Écran / Pupitre de commande
2. Sortie d‘air
3. Poignée
4. Façade
5. Côté arrière
6. Raccord de tuyau
7. Réservoir d‘eau
Réglage:

17
Généralement
Cet appareil est conçu pour un usage privé et non commercial.
Veuillez lire attentivement le mode d‘emploi et gardez-le soig-
neusement. En cas de remise de l‘appareil à une tierce personne,
n’oubliez pas de joindre le mode d’emploi. N’utilisez l‘appareil
que selon les indications et respectez les consignes de sécurité.
Nous déclinons toute responsabilité en cas de dommages ou
d’accidents résultant du non-respect des indications du mode
d’emploi.
Consignes de sécurité
∙Ne pas saisir la fiche avec les mains humides.
∙N´utilisez l´appareil que si lui et son cordon d´alimentation élec-
trique ne présentent aucun dégât. Vérifiez l´appareil avant cha-
que utilistion.
∙Ne pas utiliser l´appareil prés d´un feu ouvert ou dans un endro-
it humide.
∙Ne pas utiliser la plaque quand des enfants peuvent s´en appro-
cher. Interdire aux enfants d´utiliser cet appareil.
∙L‘appareil peut être utilisé par des enfants à partir de 8 ans
ainsi que par des personnes atteintes de déficiences phy-
siques, sensorielles ou mentales, ou manquant d‘expérience et/
ou de connaissances, si elles sont surveillées ou ont été instruites
de la manière d‘utiliser l‘appareil en toute sécurité et qu‘elles en
ont compris les dangers potentiels. Les enfants ne doivent pas
jouer avec l‘appareil ni avec l‘emballage. Le nettoyage et
l‘entretien de l‘appareil ne doivent pas être réalisés par des en-
fants, sauf s‘ils sont âgés de plus de 8 ans et exécutent ces opé-
rations sous surveillance.
∙Tenir l‘appareil et le cordon d‘alimentation hors de portée des
enfants de moins de 8 ans.
∙L´appareil ne doit pas fonctionner avec une minuterie ou avec
un système séparé de télécommande!
∙Débranchez la fiche mâle après chaque utilisation ou en cas de
défaillance

18
∙N‘arrachez pas le câble d‘alimentation du secteur. N‘en frottez
pas les bords et ne le pincez pas.
∙Maintenez les câbles loin des pièces brûlantes.
∙Ne laissez jamais l‘appareil sans surveillance lors de son fonc-
tionnement.
∙Ne posez rien sur l‘appareil et ne recouvrez pas le système
d‘aération.
∙N‘utilisez jamais l‘appareil après un fonctionnement défaillant,
par ex. s’il est tombé ou s’il a été endommagé d‘une autre ma-
nière.
∙Le fabricant ne sera pas tenu responsable en cas de mauvai-
se utilisation ou d‘utilisation inappropriée par non respect du
mode d‘emploi.
∙Pour éviter tout danger, les réparations sur l‘appareil, notam-
ment le remplacement d‘un câble endommagé, ne peuvent
être réalisées que par un service après-vente autorisé.
∙Placez l‘appareil sur une surface plane, solide et étanche à l‘eau.
Veillez à la bonne stabilité de l‘appareil afin qu‘il ne se renverse
pas.
∙Ne recouvrez pas l‘ouverture de ventilation et veillez à ce
qu‘aucun rideau etc. n‘empêche l‘air de circuler.
∙Attention! En cas de surchauffe, il existe un risque
d‘incendie !
Gardez une distance de sécurité d‘au moins 60 cm avec
les points d‘eau (par ex. douches, baignoires, lavabos) et au
moins 120 cm avec les robinets d‘eau !
1. Mise en service
∙Lorsque vous avez déballé l‘appareil, placez le à la verticale et laissez-le
∙reposer 12 heures afin que le liquide de refroidissement se libère de toute bulle
d‘air.
∙Veuillez à ce que le réservoir d‘eau soit bien inséré. Branchez la prise avec les mains
sèches.
∙Placez le régulateur d‘humidité sur „OFF“.
∙Branchez la prise avec les mains sèches.
∙Veillez à ce que les grilles de ventilation soient ouvertes.

19
∙Placez le régulateur d‘humidité sur la position 4 (correspond env. à 60 %). Le com-
presseur travaille uniquement lorsque l‘humidité de l‘air réglée est supérieure au
paramètre. Lorsque le compresseur travaille, la lampe „Operation“ s‘allume sur le
pupitre de commande.
Réglage Humidité de l‘air approximative
730%
640%
460%
280%
∙Lorsque le régulateur est placé sur „Cont.“, le compresseur travaille en permanence.
∙L‘appareil est conçu pour des températures de 5°C - 31°C.
∙La puissance de l‘appareil dépend de l‘humidité de l‘air et de la température
∙de la pièce. Lorsque les températures sont froides, l‘humidité de l‘air est faible.
Une bonne purge d‘air est obtenue à partir de températures supérieures à 22°C et
d‘humidité supérieure à 70 %.
∙Lorsque le déshumidificateur a atteint l‘humidité de l‘air programmée, il s‘arrête de
fonctionner et redémarre lorsque l‘humidité de l‘air se situe au-dessus de la valeur
programmée.
∙Maintenez les fenêtres et les portes de la pièce à déshumidifier fermées. Veillez à ce
que rien ne puisse goutter dans l‘appareil.
∙Pendant le service, l‘appareil produit de la chaleur.
∙Afin de faire fonctionner l‘appareil en continu, placez le régulateur d‘humidité sur
„cont“.
Utilisation du réservoir d‘eau :
Lorsque le symbole „Réservoir d‘eau plein (WF)“ s‘allume, il faut vider le réservoir
d‘eau. Le compresseur et le ventilateur s‘arrêtent. Attendez environ 15 minutes avant
de retirer le réservoir d‘eau pour que l‘eau puisse encore couler dans celui-ci.
Veuillez vider le réservoir d‘eau comme suit :
1) Retirez le réservoir d‘eau comme sur l‘illustration 1 et videz-le.
2)Ensuite, réinsérer le réservoir d‘eau avec précaution dans l‘appareil jusqu‘à ce qu‘il
se trouve dans la position correcte.
Écoulement permanent
À l‘aide d‘un tuyau (non fourni, peut être commandé en tant qu‘accessoire spécifique
chez Steba) que l‘on fixe sur l‘alimentation en eau (voir illustration 3), on peut con-
duire l‘eau dans un évier. L‘appareil ne doit pas se trouver plus bas que l‘écoulement
d‘eau. Retirez le réservoir d‘eau et branchez le tuyau sur le raccord correspondant.
Replacez le réservoir.

20
45
DD-TEC16E DD-TEC16E
COMPONENTS
CONTROL PANEL
WATER TANK DRAINAGE (OPTION A)
CONTINUOUS WATER DRAINAGE (OPTION B)
FILTER CLEANING
Fig. 1
Fig. 3
Fig. 2
Fig. 4
Nettoyage le Filtre
45
DD-TEC16E DD-TEC16E
COMPONENTS
CONTROL PANEL
WATER TANK DRAINAGE (OPTION A)
CONTINUOUS WATER DRAINAGE (OPTION B)FILTER CLEANING
Fig. 1
Fig. 3
Fig. 2
Fig. 4
évacuer le réservoir d´eau:
45
DD-TEC16E DD-TEC16E
COMPONENTS
CONTROL PANEL
WATER TANK DRAINAGE (OPTION A)
CONTINUOUS WATER DRAINAGE (OPTION B)FILTER CLEANING
Fig. 1
Fig. 3
Fig. 2
Fig. 4
Écoulement permanent
tuyau
Table of contents
Languages:
Other Steba Dehumidifier manuals