Steel mate M900 User manual

M910
M900
Manual
Driving Video Recorder
ONE-S Safety Driving System
Please scan the
QR code for the
additional modules.
Steelmate Industrial Park, Heping Street, Dongfu Road, Dongfeng Town,
Zhongshan City, Guangdong, P.R. China 528425
STEELMATE CO., LTD.
Steelmate Co., Ltd. All rights reserved.
The trademark, patent and copyright are owned by Steelmate Co., Ltd.
The right to change the design and specifications reserved.

User Manual
Disclaimer
This recorder is for vehicle with 12V DC only.
Do not touch the lens with your fingers. Oils
from your fingers may be left on the lens,
resulting in video or photographic unclear.
Periodically clean the lens.
Make sure the view will not be blocked when
determining the installation location of
camera.
The image quality may be affected by
intensity of light.
Important notice
Steelmate reserves the right to change
details and specifications in this manual
without notice.
Steelmate does not warranty this manual is
error-free.
Steelmate assumes no liability for damage
incurred directly or indirectly from errors,
omission, or discrepancies between the
recorder and the manual.
This camera is for personal use not for
commercial purpose.
Please read this manual carefully before
using the camera.
Contents
01
01
01
01
02
03
04
04
04
05
05
06
06
07
07
07
07
07
07
Disclaimer
---------------------------------------------
Important Instructions
------------------------------
1. Introduction
----------------------------------------
1.1 Brief Look
------------------------------------
1.2 interface details
-----------------------------
1.3 Specifications
--------------------------------
2. Basic Operations
---------------------------------
2.1 Storage
----------------------------------------
2.2 Recorder ON/OFF
--------------------------
2.3 Hardware Reset
-----------------------------
2.4 TF Card Self-Checking
--------------------
2.5 Loop Recording
-----------------------------
2.6 Emergency Recording
---------------------
2.7
Photo taking
---------------------------------
2.8 Auto brightness
------------------------------
2.9 Intelligent sleeping mode
------------------
2.10 Camera switching
-------------------------
2.11 Recording while Parked ------------------
2.12 Time lapse while parked -----------------
User Manual
08
09
2.13 File Playback
-----------------------------
--
2.14 System settings
-------------------------
---
3. Additional functions
-------------------------------
3.1 Optional part - wireless Receiver
------------
3.2
Optional Module - Tire Pressure
-------------
3.3
Optional Module - Parking Mode
------------
3.4
Optional Module - Blind Spot Detection
----
3.5
Optional Module - Front Collision Warning
-
3.6
Optional Module –Front Radar Warning
---
3.7
Optional Module –Rear Radar Warning
-----
3.8
Optional Module –Seat Belt Reminder
------
3.9
Optional Module –Air Monitoring
------------
4.
Fault information reminder area for additional
functions
------------------------------------------------
5.Includes
----------------------------------------------
6.
Wiring diagram for front camera and rear
camera
-------------------------------------------------
7.Troubleshooting -----------------------------------
11
11
11
12
13
14
15
15
16
16
17
17
18
19
0201
M900 M910
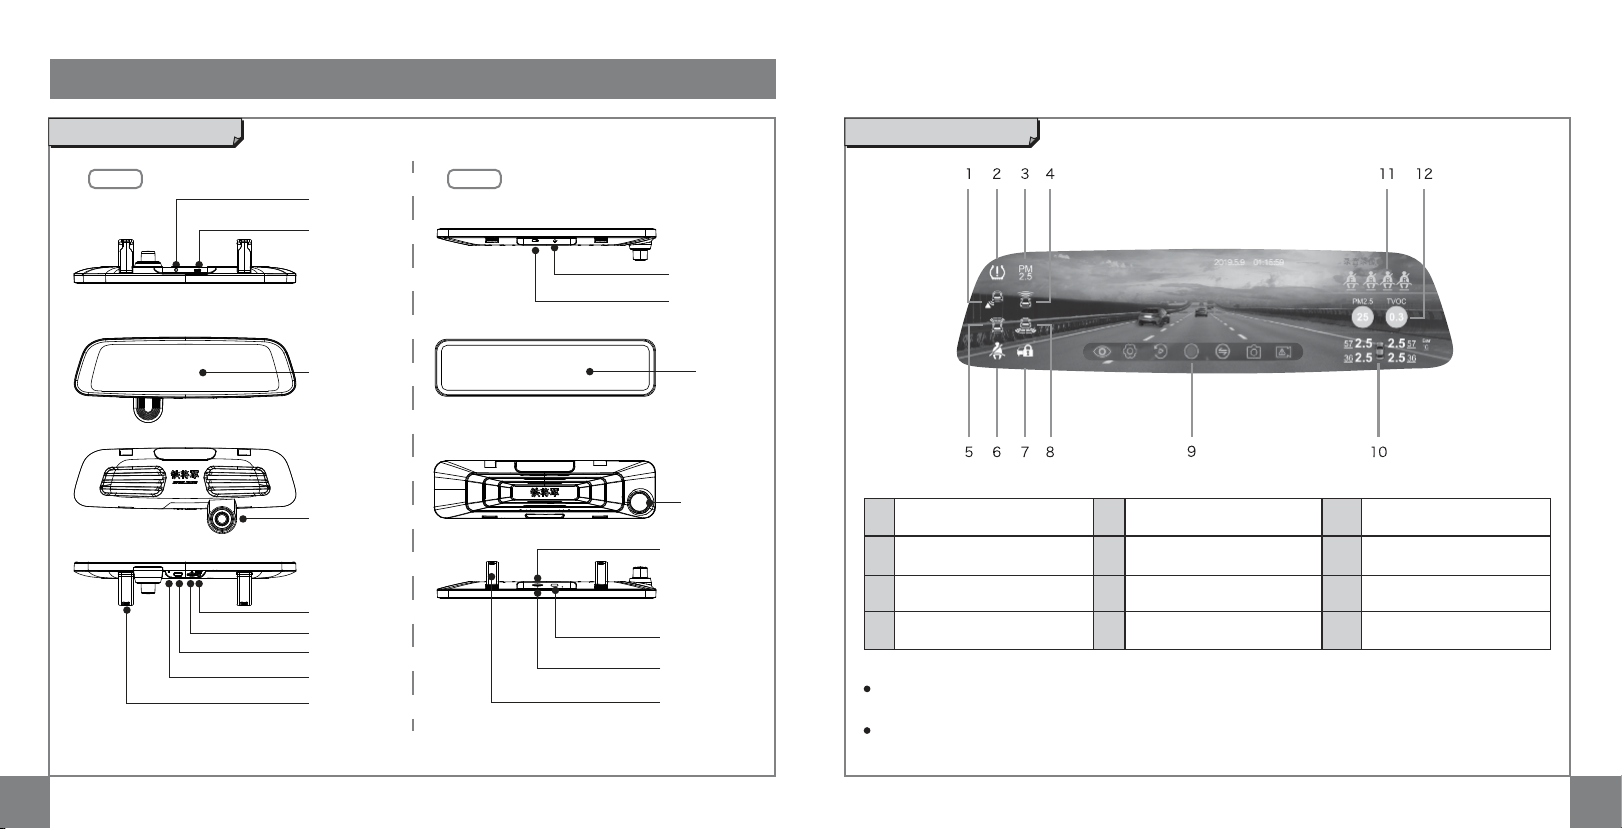
For item 1 –8, if the functions are installed, the corresponding icons will turn yellow when the system
powered ON every time.
For item 10-11, if the corresponding functions are installed, the detail information will be shown on the
screen.
1Icon for Blind Spot Detection
function 5Icon for Front Radar
Warning function 9Function button for
DVR function
2Icon for Tire Pressure
Monitoring function 6Icon for Seat Belt Reminder
function 10 Information for Tire Pressure
Monitoring
3Icon for Air Monitoring
function 7Icon for Parking mode
function 11 Information for Seat belt
reminder
4Icon for Front Collision
Warning function 8Icon for Rear Radar
Warning function 12 Information for Air
Monitoring
1. Introduction
1.2 Interface details
1.1 Brief look
Mirror
Mirror
Tie Tie
RESET button
RESET button
TF card
TF card
ON/OFF button
ON/OFF button
Microphone
Connection port
for rear camera
Connection port
for rear camera
USB port
( for charging
and transmission)
USB port
( for charging
and transmission)
Front camera
Front camera
Remarks:

0403
1.3 Specifications
Camera sensor type Front camera: CMOS
Rear camera: CMOS
Maximum effective pixels Front camera: 1920 (H) x 1080 (V)
Rear camera: 1920 (H) x 1080 (V)
Effective field angle Front camera:130°± 2°
Rear camera:126°± 2°
Frames per second 30fps
25fps
IP rate Rear camera: IP67
Working voltage 9 ~16V±0.5V
Average working current <1500mA
<6s
Maximum working current ≤2500mA
≤1s
Working temperature -20℃~70℃
-30℃~85℃
Storage temperature
Video signal stabilization time
Starting recording time
Language Chinese, English
Outage delay B+/ACC 2s
Video Pixel 1920 x 1080P,1280 x 720P
Video compression mode Video: H.264
Photo: JPEG
Repeat recording settings 1 min / 3 min/ 5 min
MMC capacity & level Capacity:8 GB ~ 128 GB
Level: CLASS 10 or above
2. Basic Operations
2.1 Storage
To insert TF card
Slide memory into card slot with label facing front of recorder
The card will click into place when fully inserted
To remove TF card
Place fingernail against edge of memory card and lightly press further into recorder.
Card will spring out far enough to be removed.
Tips:
Do not insert/remove TF card when operating the recorder.
Please format the TF card before use.
Notes: Steelmate does not guarantee the recorder's compatibility with TF card from all manufacturers.
2.2 Recorder ON/OFF
When ACC ON, the recorder will start recording automatically.
When ACC OFF, the recorder will stop recording and save the file automatically, and it will turn off
within 15 seconds.
Press the “ ” button to turn ON the recorder manually.
Hold the “ ” button for 3 seconds to turn OFF the recorder manually.

05 06
2.5 Loop Recording
Message Pop-up Means
No TF Card No memory card inserted
Invalid image card Memory card damaged
Press "Reset"
2.4 TF Card Self-Checking
2.3 Hardware Reset
Occasionally, hardware needed to restart
when the recorder stops recording; or appears
to be "frozen" or "locked-up".
Press the RESET button to perform a
hardware reset.
Notes:
The recorder checks the TF card when it is powered ON
every time;
The recorder will start recording automatically if the
memory card is valid;
The system will upgrade automatically if there is
upgraded software saved in the memory card.
When vehicle ACC is ON, the recorder will start recording automatically if Auto Recording mode is
ON. The frameless recording may be divided into several video clips (default is 1 min /video clips).
The length of video clips can be changed in Setup Menu (Please refer to page 09 ).
When vehicle ACC is OFF, the recorder will stop recording and save files automatically;
Notes:
The files can be founded in the File Playback (Please refer to page 08).
Notes:
•When the memory is full, The Emergency Video will be overwritten by the Emergency video.
•The files can be founded in the File Playback (Please refer to page 08).
Or touch the screen, then press “ “ icon to start the Emergency Recording manually.
2.6 Emergency Recording
By default, if an event happens, such as sudden impact, high-speed driving, an overdone turn or an
accident crash, the G sensor will trigger the recorder to start an Emergency Recording
automatically .
Event

0807
2.7 Photo taking
2.8 Auto brightness
2.9 Intelligent sleeping mode
2.11 Recording while Parked
2.12 Time lapse while parked
2.10 Camera switching
Touch the screen, then press “ ” icon to take the photo.
Note: The JPG file can be founded in the File Playback (Please refer to page 08).
The recorder can adjust the brightness based on the light conditions.
When ACC OFF, the recorder will enter the intelligent sleeping mode.
Notes: The screen is always closed during the recording unless press “ “ button by manual.
Notes: The screen is always closed during the recording unless press “ “ button by manual.
In setting page, select Parking Mode and confirm it is not turned OFF. When the vehicle is parked, if
an event happens, such as sudden impact or accident crash, the recorder will turn on and recoding
automatically. The video from the moment will save in 1 minute. Finally, the recorder will enter the
intelligent sleeping mode after the recording finished.
In setting page, select Time Lapse and confirm it is not turned OFF. When the vehicle is parked, the
video will start to record an video for 8/12/24 hours with 1 fps.
Touch the screen, then press “ ” icon to switch the front or rear camera .
The switch sequence as follows:
Front camera → Rear camera → Front and rear camera displayed in one screen
2.13 File playback
Touch the screen, then press “ ” icon to select a photo or video for playback:
Notes:
If the recording is in progress, press “ ” button to stop recording first.
If there is no operation within 30 seconds, the system will back to the Main interface.
Photo Loop recording Emergency recording
This manual suits for next models
1
Table of contents


