Roav C2 User manual

Owner’s Manual
DASHCAM C2
Model: R2210
51005000648 V01

English 01
Deutsch 15
Français 28
Italiano 41
Español 54
日本語 67
简体中文 79
91

Deutsch Français
DashCam Autokamera
Ladekabe
Kfz-Ladegerät
Halterung
Saughalterung
Anbring Hilfe
Handbuch
Caméra de voiture
Câble de charge
Chargeur allume-cigare
Support
Ventouse
Pied-de-biche
Manuel
Italiano Español
DashCam
Cavo per la ricarica
Caricabatterie da auto
Kit di Montaggio
Ventosa
Attrezzo per inserimento
del cavo oltre il tettuccio
Manuale
DashCam
Cable de carga
Cargador para automóvil
Montura
Soporte con ventosa
Herramienta de ticería
Manual
Owner’s Manual
DASHCAM C1
DashCam
Suction mount
Charging cable
CrowbarCar charger
Mount
Manual

English 01
日本語 中文
DashCam
充電ケーブル
カーチャージャー
取り付けマウント
吸着盤
調整用バール
取扱説明書
行车记录仪
电源线
车充
底座
吸盘底座
小撬棍
用户手册
DashCam
Safety Instructions
Please read and understand all instructions before using
this product. If damage is caused by failure to follow the
instructions, the warranty does not apply.
• Keep these instructions.
• Do not drop, puncture or disassemble this product.
• This product shall not be exposed to dripping or splashing.
• Avoid long exposure to direct sunlight, which may cause damage.
• Exposing this product to open flames may cause explosion.
• Use original accessories only.
• Do not install this product where it will block the driver’s view of
the road or the deployment of the airbag.
• Keep your attention on the road. Do not operate the controls of
this product while driving.
• Ensure the camera lens is kept clean and there is nothing
blocking the lens.
• Setup time and date accurately before using this product.
• Do not use the charger if the cord is damaged or broken.
• Remove this product from your vehicle when not in use for a long
period.
• Keep out of reach of children.
• Use clean, soft cloth to clean. Do not use any corrosive cleaner/
oil to clean.
• The Company is NOT responsible for the loss of any data/
content during operation.
02 English English 03
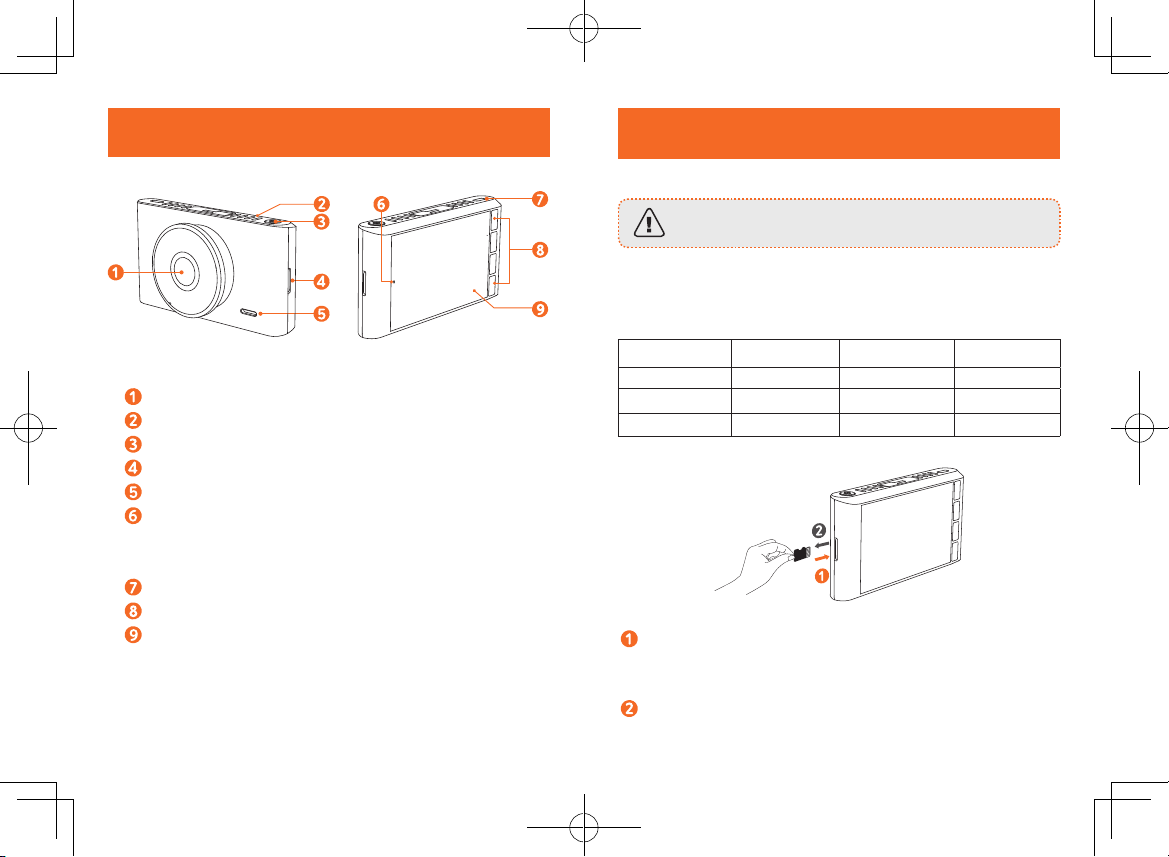
At a Glance
Camera lens
Air vent
Power button
Memory card slot
Speaker
LED indicator
• Flashing blue: recording in progress
• Steady red: no recording status
Micro USB charging port
Buttons
LCD screen
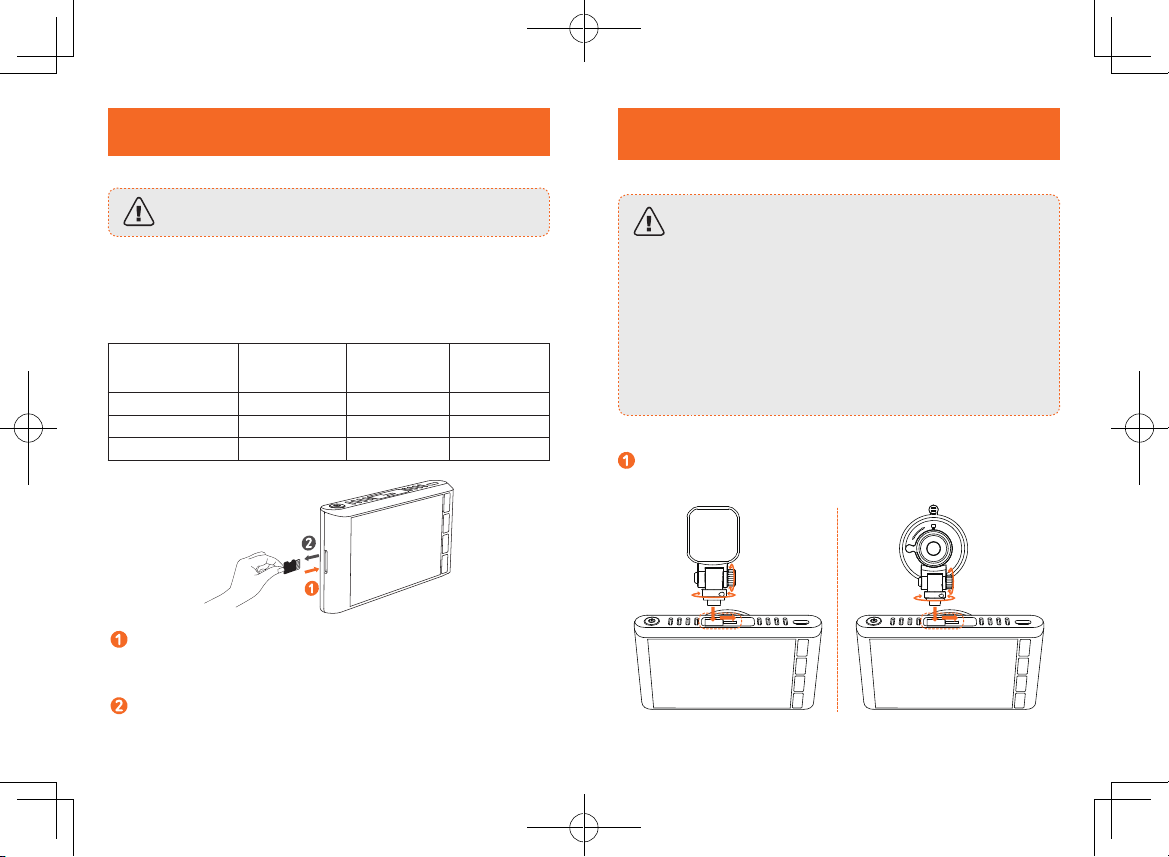
Inserting Memory Card
Do not remove or insert microSD / TF card when this
product is powered on, which may damage the card.
For reliable operation, use a Class 10, 32GB microSD / TF
card. For a 64GB/128GB card, format it before using. It is
recommended to format the card regularly.
Card Capacity 1080P 30FPS 720P 60FPS 720P 30FPS
32 GB 320 min 360 min 480 min
64 GB 640 min 720 min 960 min
128 GB 1280 min 1440min 1920 min
Insert a microSD / TF card with the gold contacts facing
the screen side of the DashCam. Push the card until it
clicks into place.
To remove the card, gently push its top edge inward until it
clicks, and then pull it out of the slot.
04 English English 05
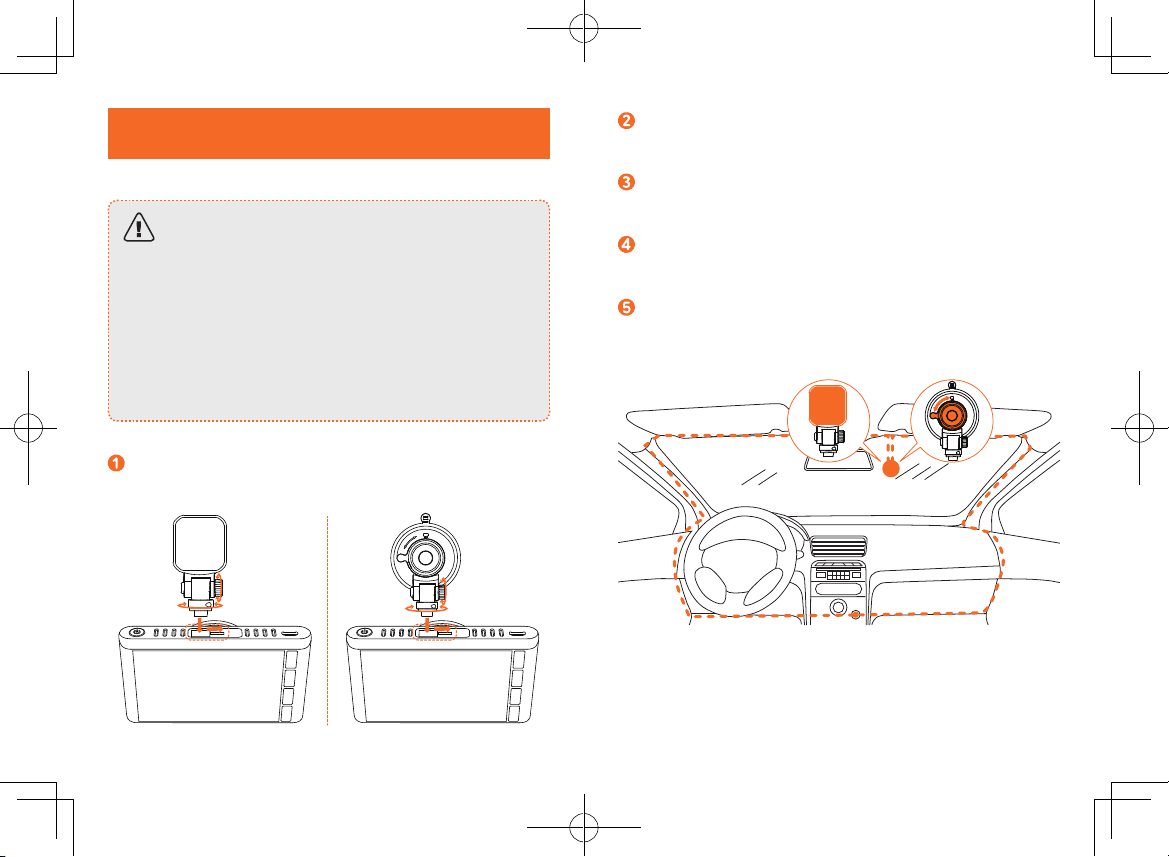
Installing Your DashCam
• Never install this product while driving.
• Install this product near the rear-view mirror to obtain
the best open-field view. Do not install in a location that
will obstruct your required driving view.
• Make sure that the lens is within the wiping range of the
windscreen wiper to ensure a clear view even when it
rains.
• Do not touch the lens with your fingers. Finger grease may
be left on the lens and will result in unclear videos.
• The mount is adhesive and may be destroyed if it is
removed from the windshield.
Attach the DashCam onto the mount.
Select a location on the windshield near the bottom right
corner of the rear-view mirror, clean with clear water and
wait until fully dry.
Remove 3M adhesive sticker and firmly ax the mount onto
the windshield. Alternatively, cover the suction mount onto
the windshield and rotate the lock as indicated.
Use the crowbar to press and hide the charging cable
into the seams and weatherstrips around the edge of the
dashboard.
Adjust the lens viewing angle to ensure that it is aligned
with the road ahead, then rotate the fixing knob to fasten.
06 English English 07
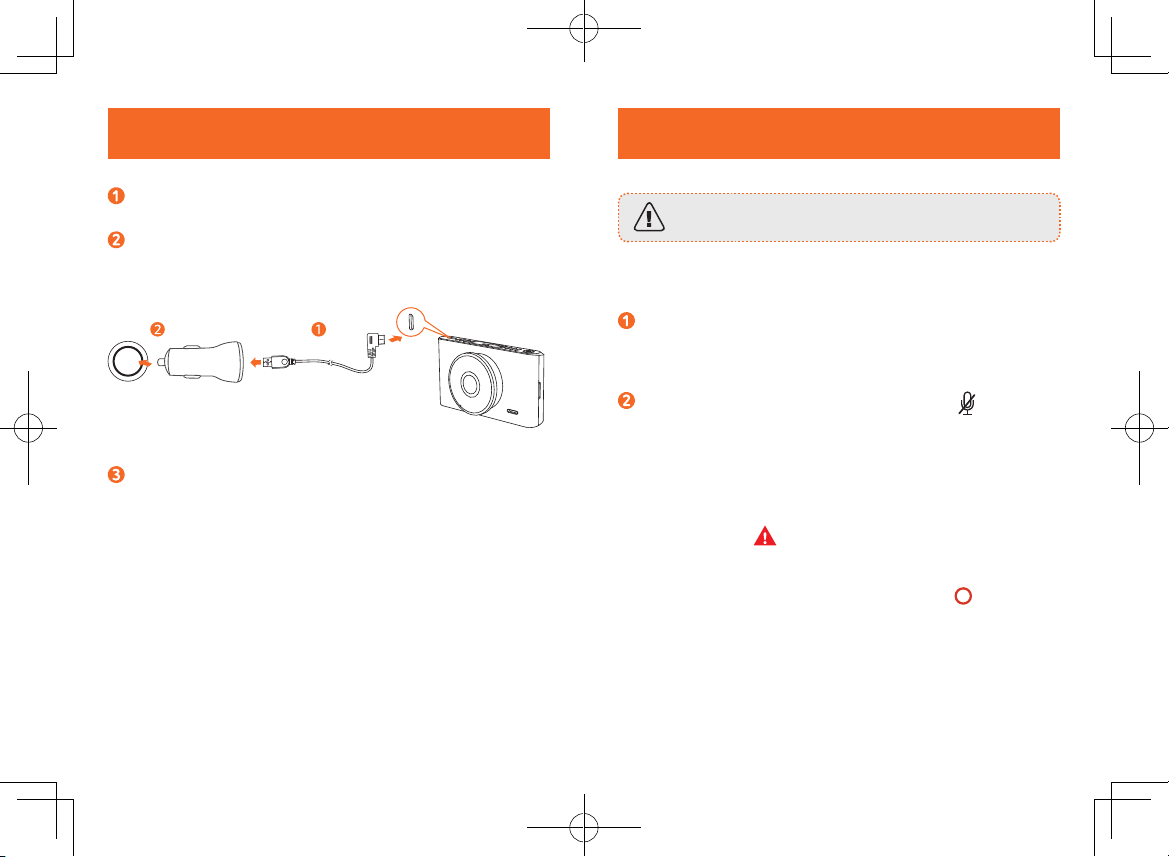
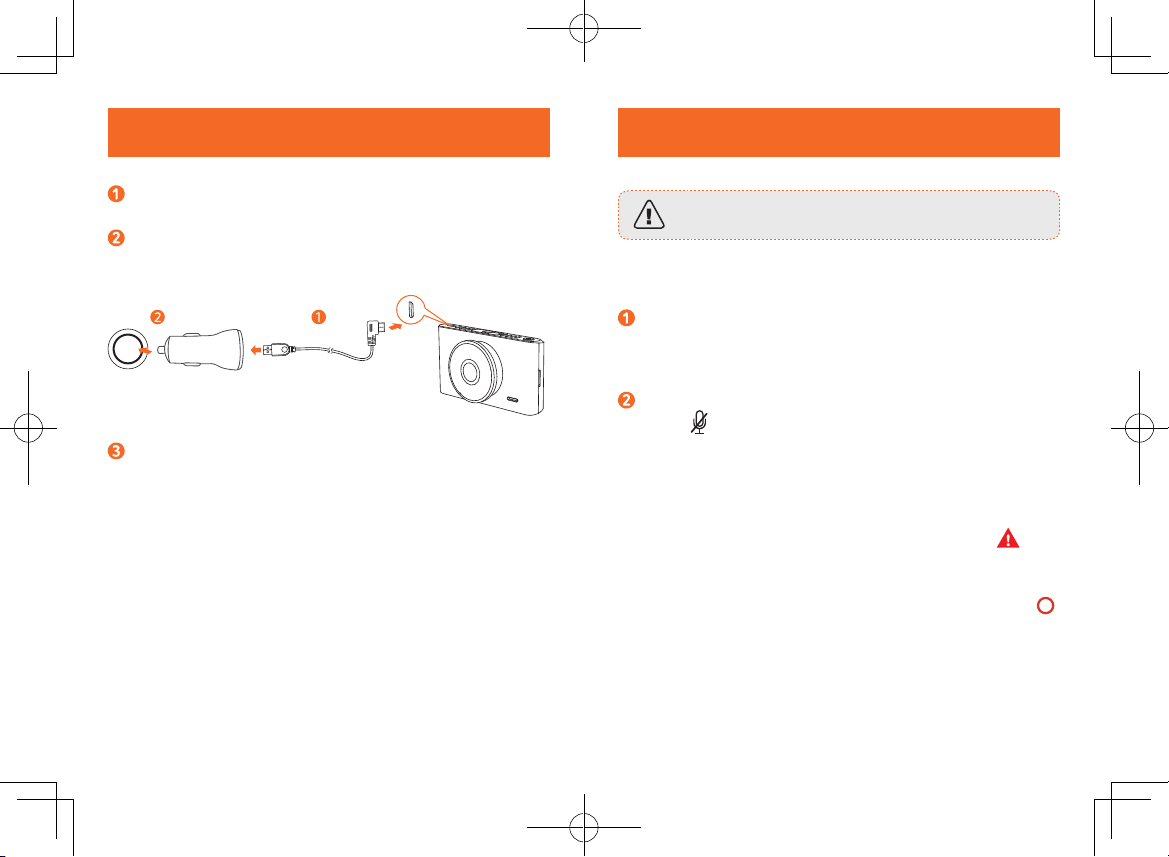
Connecting to Power
Connect the car charger and DashCam by using the
charging cable.
Plug the other end of the car charger to your vehicle’s
cigarette lighter socket.
Once the car engine is started, DashCam will automatically
power on and start recording. Once the car engine is shut
down, DashCam automatically saves the recording and
turns o within 10 seconds.
Using Your DashCam
As a driver, you have full responsibility to drive safely and adhere
to all applicable trac regulations.
Record Videos
When connected to a car charger, DashCam automatically
starts recording and a red dot flashes on the screen. The
current recording duration is displayed, and the current date
and time is displayed.
To enable / disable the audio recording, press .
Protect the Current Recording
By default, DashCam uses a sensor to automatically detect
accidental collisions and protect the video file with duration
of 30 seconds, and is displayed. This indicates that those
recordings have been locked and will not be overwritten by new
video clips.
To protect the current recording manually, press .

08 English English 09
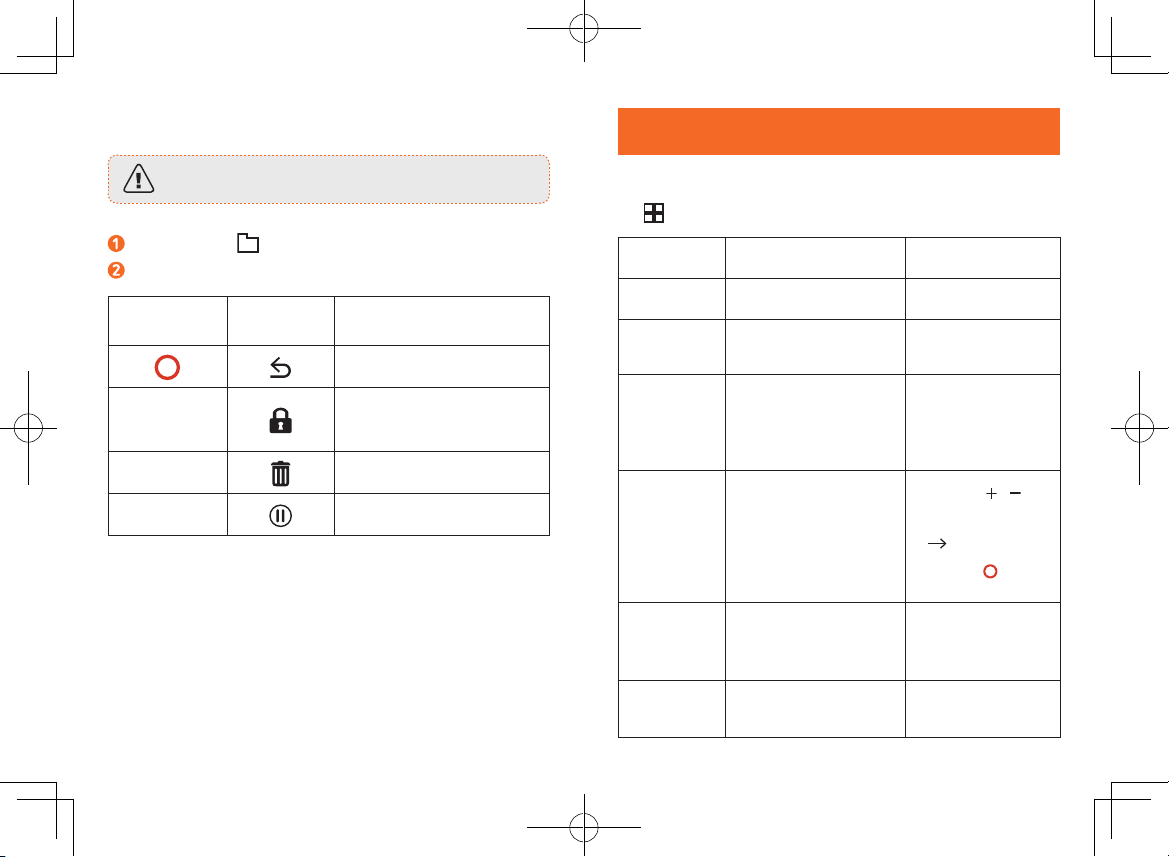
Playback Videos
The DashCam stops recording while viewing videos or settings.
Press to view all saved videos.
Select a video to playback.
Button Virtual Button Function
Back to previous menu
Lock Current / Unlock
Current
Delete Current / Delete All
Play / Pause
System Setup
To adjust DashCam’s settings, Press .
Menu Options Description Available Options
Resolution Set a desired video
resolution.
720P 60FPS / 720P
30FPS / 1080P 30FPS
Driving
Collision
Detection
Sensitivity for gravity helps
to detect vibration and
shock while driving and
makes DashCam to respond
appropriately.
Low / Medium /
High / O
Parking
Monitor
Enable to keep DashCam in
standby mode. Motion will
be detected for 15 times and
DashCam starts recording a
30 second video each time.
Low / High / O
Time Setup Set date and time
Press / to adjust
the value, press
to next option, press
to save
Language Set on-screen display menu
language.
English / Deutsch /
日本語 / 简体中文 /
繁体中文/Español /
Italiano / Français
LCD Auto O Turn o the screen backlight
after a period of inactivity.
30 Seconds / 60
Seconds / O
10 English English 11
Loop Recording Set the duration of each
recording video clip.
1 Minute / 3 Minutes
/ 5 Minutes / 10
Minutes
Machine Sound
Button Sound / Voice prompts
/ Power On/O Sound
On / O
Format
Format the memory card and
all the data will be deleted.
Cancel / OK
Water Mark Display / hide the date and
time on the recordings. On / O
Night Vision
Enhancement
Adjust the brightness to
enhance night vision.
Licence plate mode
/ Balance mode /
Panorama mode
Default Reset all options to the
default settings. Cancel / OK
Frequency
Match the video frequency of
DashCam with the electrical
frequency of your location.
50 Hz (EU / China) /
60 Hz (US)
About Check the current version
number.
Button Virtual Button Function
Back to recording mode
Toggle the previous setting
Toggle the next setting
Click to confirm a selection
Specifications
Specifications are subject to change without notice.
Screen: 3” LCD color TFT (960 x 240)
Camera sensor: Sony Exmor IMX 323
Camera lens: wide-angle lens 145°
Chipset: Ambarella A12
Power input: 5V 1A
Max video resolution: 1080P 30FPS (1920x1080)
Video clip format: .MP4
Battery capacity: 470mAh
Operating temperature range: -20°C to 70°C / -4°F to 158°F
Operating temperature range: 0°C to 70°C / 32°F to 158°F
(Parking Monitor)
Weight: Approx. 102 g / 3.6 oz
Size: 99*30*55 mm / 3.9*1.2*2.2 in
12 English English 13
FAQ
Can not record?
• Check if the memory card is inserted properly and there is
enough free capacity.
• Check the battery level.
Blurred image?
• Use a clean, soft lens-cleaning cloth to gently clean the
lens.
Malfunction or crash?
• Press and hold the POWER button for at least 8 seconds.
Blank screen?
• The screen saver is activated. Change settings to “O” if
required.
How to enable parking monitor?
• Press , select “Parking Monitor” > “ON”.
Worry about the memory card is full?
• Continuous loop recording allows to overwrite the old
unlocked files.
Notice
This product complies with the radio interference
requirements of the European Community.
This product is designed and manufactured with
high quality materials and components, which can
be recycled and reused.
This symbol means the product must not be
discarded as household waste, and should be
delivered to an appropriate collection facility for
recycling. Follow local rules and never dispose of
the product and rechargeable batteries with normal
household waste. Correct disposal of old products
and rechargeable batteries helps prevent negative
consequences for the environment and human
health. Removal of the built-in battery invalidates
the warranty and may destroy the product. Always
bring your product to a professional to remove the
built-in battery.
FCC Statement
This device complies with Part 15 of the FCC Rules. Operation is
subject to the following two conditions: (1) This device may not
cause harmful interference, and (2) This device must accept
any interference received, including interference that may
cause undesired operation.
Warning: Changes or modifications not expressly approved
by the party responsible for compliance could void the user's
authority to operate the equipment.

Deutsch 15
14 English
Note: This equipment has been tested and found to comply
with the limits for a Class B digital device, pursuant to Part 15 of
the FCC Rules. These limits are designed to provide reasonable
protection against harmful interference in a residential
installation.
This equipment generates, uses and can radiate radio
frequency energy and, if not installed and used in accordance
with the instructions, may cause harmful interference to
radio communications. However, there is no guarantee
that interference will not occur in a particular installation. If
this equipment does cause harmful interference to radio or
television reception, which can be determined by turning the
equipment off and on, the user is encouraged to try to correct
the interference by one or more of the following measures: (1)
Reorient or relocate the receiving antenna. (2) Increase the
separation between the equipment and receiver. (3) Connect
the equipment into an outlet on a circuit different from that to
which the receiver is connected. (4) Consult the dealer or an
experienced radio / TV technician for help.
Sicherheitshinweise
Bitte lesen und verstehen Sie alle Anweisungen, bevor Sie dieses
Produkt verwenden. Bei Beschädigung durch Nichtbeachtung der
Anweisungen gilt die Gewährleistung nicht.
• Bewahren Sie diese Anleitung auf.
• Lassen Sie dieses Produkt nicht fallen und zerlegen Sie es nicht.
• Dieses Produkt darf keinen Tropfen oder Spritzwasser ausgesetzt werden.
• Vermeiden Sie lange Sonneneinstrahlung, diese kann zu Schäden führen.
• Wenn das Gerät oenem Feuer ausgesetzt wird, kann dies zu
Explosionen führen.
• Nur Originalzubehör verwenden.
• Installieren Sie dieses Produkt nicht, wo es die Sicht des Fahrers
auf die Straße oder die Airbags blockiert.
• Richten Sie Ihre Aufmerksamkeit auf die Straße. Bedienen Sie die
Bedienelemente dieses Produkts nicht während der Fahrt.
• Stellen Sie sicher, dass das Kameraobjektiv sauber gehalten wird
und das Objektiv nicht blockiert wird.
• Stellen Sie Zeit und Datum ein, bevor Sie dieses Produkt verwenden.
• Verwenden Sie das Ladegerät nicht, wenn das Kabel beschädigt
oder defekt ist.
• Berühren Sie das Produkt nicht direkt, wenn es nach längerer
Sonneneinstrahlung oder kontinuierlichem Betrieb überhitzt wird.
• Entfernen Sie dieses Produkt aus Ihrem Fahrzeug, wenn es für
längere Zeit nicht benutzt wird.
• Außerhalb der Reichweite von Kindern aufbewahren.
• Verwenden Sie ein sauberes, weiches Tuch zum Reinigen.
Verwenden Sie keine korrosiven Reiniger oder Öl zur Reinigung.
• ROAV ist nicht für den Verlust von Daten / Inhalten während des
Betriebs verantwortlich.

16 Deutsch Deutsch 17
Auf einen Blick
Kameraobjektiv
Entlüftung
Netzschalter
Speicherkartensteckplatz
Lautsprecher
LED-Anzeige
• Blaues Blinken: Aufnahme läuft
• Durchgehend rotes Leuchten: kein Aufnahmestatus
Micro-USB-Ladeanschluss
Taste
LCD-Bildschirm
So setzen Sie Ihre Speicherkarte ein
Die microSD / TF-Karte nicht entfernen oder einlegen,
wenn die DashCam eingeschaltet ist. Die Karte könnte
ansonsten beschädigt werden.
Verwenden Sie eine Klasse 10, 32GB microSD / TF Karte. Für
eine 64 / 128GB microSD / TF-Karte, formatieren Sie es vor
der Verwendung. Es wird empfohlen, die Karte regelmäßig zu
formatieren.
Kartenkapazität 1080P 30FPS 720P 60FPS 720P 30FPS
32GB 320 Min 360 Min 480 Min
64 GB 640 Min 720 Min 960 Min
128GB 1280 Min 1440 Min 1920 Min
Legen Sie Ihre microSD / TF-K
arte mit
den Goldkontakten zur
Bildschirmseite der DashCam ausgerichtet ein.
Schieben Sie
die Karte in die DashCam, bis sie einrastet.
Um die Karte zu entfernen, drücken Sie die Karte vorsichtig nach
innen, bis sie klickt und ziehen Sie sie dann aus dem Schlitz.

18 Deutsch Deutsch 19
So installieren Sie Ihre DashCam
• Installieren Sie dieses Produkt niemals während der Fahrt.
• Installieren Sie dieses Produkt in der Nähe des Rückspiegels,
um die beste Sichtfeldansicht zu erhalten. Installieren Sie
nicht so, dass Ihre Sicht behindert wird.
• Vergewissern Sie sich, dass sich das Objektiv im
Wischbereich des Scheibenwischers befindet, um auch bei
Regen eine klare Sicht zu gewährleisten.
• Berühren Sie das Objektiv nicht mit Ihren Fingern. Fingerfett
kann auf dem Objektiv festhaften und zu unklaren Videos
führen.
• Die Halterung ist klebend und kann zerstört werden,
wenn sie
von der Windschutzscheibe entfernt wird.
Befestigen Sie die DashCam auf der Halterung.
Wählen Sie einen Standort an der Windschutzscheibe in der
Nähe der rechten unteren Ecke des Rückspiegels. Reinigen
Sie die Fläche mit Wasser und trocknen Sie diese vor dem
Anbringen vollständig.
Entfernen Sie den 3M Klebeaufkleber und befestigen Sie die
Halterung fest an der Windschutzscheibe. Sie können auch
den Saugnapf an der Windschutzscheibe befestigen, indem
Sie den Verschluss wie angegeben drehen.
Benutzen Sie die Anbringhilfe, um das Kabel in die
Verkleidung zu drücken und zu verstecken.
Passen Sie den Betrachtungswinkel des Objektivs so an,
dass er auf die Fahrbahn ausgerichtet ist, und drehen Sie
dann den Knopf zum fixieren.
20 Deutsch Deutsch 21
So versorgen Sie Ihre DashCam mit Strom
Verbinden Sie das KFZ-Ladegerät und die DashCam mit
dem Ladekabel.
Stecken Sie das andere Ende des Kfz-Ladegeräts in die
Zigarettenanzünderbuchse Ihres Fahrzeugs.
Sobald der Automotor in Betrieb ist, schaltet sich die
DashCam automatisch ein und startet die Aufnahme.
Sobald der Automotor abgeschaltet wird, speichert die
DashCam automatisch die Aufnahme und schaltet sich
innerhalb von 10 Sekunden aus.
So verwenden Sie Ihre DashCam
Als Fahrer haben Sie die volle Verantwortung, sicher zu fahren
und alle Verkehrsvorschriften einzuhalten.
So nehmen Sie Videos auf
Bei Anschluss an ein Kfz-Ladegerät startet Ihre DashCam
automatisch die Aufnahme. Es wird ein roter Punkt blinkt
auf dem Bildschirm, die Aufnahmedauer, Datum und Uhrzeit
werden angezeigt.
Um die Audioaufnahme zu aktivieren / deaktivieren, drücken
Sie auf .
So speichern Sie die aktuelle Aufnahme
Regulär verwendet Ihre DashCam einen Sensor, um
automatisch Kollisionen zu erkennen und Videodateien mit
einer Dauer von 30 Sekunden zu speichern, dann wird
angezeigt. Dies zeigt an, dass diese Aufnahmen gesichert sind
und nicht von neuen Aufnahmen überschrieben werden.
Um die aktuelle Aufnahme manuell zu schützen, drücken Sie auf
.
22 Deutsch Deutsch 23
So sehen Sie sich Aufnahmen an
Die DashCam stoppt die Aufnahme während der Wiedergabe
von Videos oder wenn Einstellungen vorgenommen werden.
Drücken Sie auf , um alle gespeicherten Videos anzuzeigen.
Wählen Sie ein Video für die Wiedergabe aus.
Taste Anzeige auf
dem Display Funktion
Zurück zum vorherigen
Menüpunkt
Ausgewählte Aufnahme sichern
/ Ausgewählte Aufnahme zum
Löschen freigeben
Ausgewähltes Element
löschen / Alles löschen
Wiedergabe / Pause
Einstellungen
Um die Einstellungen Ihrer DashCam anzupassen, drücken Sie
auf .
Menüoption
Funktion Verfügbare
Einstellungen
Auflösung
Stellen Sie die gewünschte
Videoauflösung ein
720P 60FPS / 720P
30FPS / 1080P 30FPS
Kollision-
serkennung
Stellt die Empfindlichkeit der
DashCam auf Erschütterungen
und Aufprall ein
Niedrig / Hoch / Aus
Parkmonitor
Aktivieren, um DashCam im
Standby-Modus zu halten.
Bewegungen werden 15
Mal erkannt und jedes Mal
wird ein 30 Sekunden Video
aufgenommen.
Niedrig / Mittel / Hoch
/ Aus
Zeiteinstellung
Datum und Uhrzeit einstellen
Tippen Sie auf
/
, um
das Datum und die Uhrzeit
einzustellen, tippen Sie
auf
, um zur nächsten
Option zu navigieren,
tippen Sie auf , um Ihre
Einstellungen zu speichern
Sprache
Legen Sie die Menüsprache
fest
English / Deutsch / 日本
語/ 简体中文 / 繁体中
文/Español / Italiano /
Français
Automatische
LCD-
Abschaltung
Schaltet den Bildschirm nach
einer Zeit der Inaktivität aus 30 Sek / 60 Sek / Aus

24 Deutsch Deutsch 25
Loop Recording
Stellen Sie die Länge jeder
Aufnahme ein
1 Min. / 3 Min. / 5 Min.
/ 10 Min.
sound-system
Tastenton /
Sprachauorderungen /
Strom Ein/Aus Ton
Ein / Aus
Format
Formatieren Sie die
Speicherkarte, alle Daten
werden gelöscht
Abbrechen / OK
Wasserzeichen
Anzeigen oder Ausblenden
von Datum und Uhrzeit in den
Aufnahmen
Ein / Aus
Nachtsicht-
verstärkung
Passen Sie die Helligkeit
an, um die Nachtsicht zu
verbessern.
Kennzeichen-Modus/
Balance-Modus/
Panorama-Modus
Standard
Setzen Sie alle Optionen auf die
Standardeinstellungen zurück
Abbrechen / OK
Frequenz
Stellen Sie die Videofrequenz ein
50 Hz (EU / China) / 60
Hz (USA)
Über
Überprüfen Sie die aktuelle
Versionsnummer
Taste Anzeige auf
dem Display Funktion
Klicken Sie wiederholt, um eine Einstellung
auszuwählen
Klicken Sie, um eine Auswahl zu bestätigen
Zum vorherigen Menüpunkt navigieren
Zum nächsten Menüpunkt navigieren
Zurück zum Aufnahmemodus
Technische Daten
Technische Daten können ohne vorherige Ankündigung geändert
werden.
Bildschirm: 3” LCD color TFT (960 x 240)
Kamerasensor: Sony Exmor IMX 323
Kameraobjektiv: Weitwinkelobjektiv 145 °
Chipsatz: Ambarella A12
Leistungsaufnahme: 5V 1A
Max. Videoauflösung: 1080P 30FPS (1920 x 1080)
Videoformat: .MP4
Batteriekapazität: 470 mAh
Betriebstemperaturbereich: -20°C to 70°C / -4°F to 158°F
Betriebstemperaturbereich: 0°C to 70°C / 32°F to 158°F
(
Parkmonitor
)
Gewicht: 102 g / 3.6 oz
Größe: 99*30*55 mm / 3.9*1.2*2.2 in
26 Deutsch Deutsch 27
Häufig gestellte Fragen
Meine DashCam nimmt nicht auf?
• Überprüfen Sie, ob die Speicherkarte richtig eingelegt ist
und genügend freie Kapazität vorhanden ist. Überprüfen
Sie den Batteriestand.
Verschwommenes Bild?
• Verwenden Sie ein sauberes, weiches
Objektivreinigungstuch, um das Objektiv vorsichtig zu
reinigen.
Störungen oder meine DashCam hängt sich auf?
• Halten Sie die Ein / Aus-Taste mindestens 8 Sekunden
lang gedrückt.
Der Bildschirm ist schwarz?
• Der Bildschirmschoner ist aktiviert. Ändern Sie bei Bedarf
die Einstellungen auf "Aus".
Wie aktiviere ich den Parkmonitor?
• Drücken Sie auf , wählen Sie "
Parkmonitor
" > "Ein".
Ich befürchte, dass die Speicherkarte voll ist?
• Freigeschaltete Dateien werden überschrieben.
Hinweise
Dieses Produkt entspricht den
Funkentstörungsanforderungen der Europäische
Union. Betriebsfrequenzbereich: 2400-2483,5 MHz;
Max. Ausgangsleistung: 15 dBm
Ihr Gerät wurde unter Verwendung hochwertiger
Materialien und Komponenten entwickelt und
hergestellt, die recycelt und wiederverwendet
werden können.
Dieses Symbol bedeutet, dass das Produkt nicht
mit dem Hausmüll entsorgt werden darf, sondern
bei einer geeigneten Sammelstelle für das Recycling
abgegeben werden muss. Befolgen Sie die örtlichen
Bestimmungen, und entsorgen Sie das Produkt und
die Akkus nicht mit dem normalen Hausmüll. Eine
ordnungsgemäße Entsorgung von alten Produkten
und Akkus hilft, negative Auswirkungen auf Umwelt
und Gesundheit zu vermeiden. Durch Entnahme des
integrierten Akkus verwirkt die Garantie. Außerdem
kann das Produkt dadurch beschädigt werden.
Bringen Sie Ihr Produkt immer zu einem Fachmann,
um die integrierte Batterie zu ersetzen.

28 Français Français 29
Consignes de sécurité
Veuillez lire et comprendre toutes les instructions avant d'utiliser ce
produit. La garantie ne s’applique pas en cas de dommage causé par
le non-respect de ces instructions.
• Conservez ces instructions.
• Ne faites pas tomber ce produit, ne le perforez ou ne le démontez pas.
• Ce produit ne doit pas être exposé aux gouttes ou aux
éclaboussures.
• Évitez une exposition prolongée à la lumière directe du soleil, qui
pourrait causer des dommages au produit.
• L'exposition de ce produit aux flammes ouvertes peut provoquer
une explosion.
• Utilisez uniquement les accessoires originaux.
• N'installez pas ce produit à un endroit qui pourrait bloquer la vue
du conducteur sur la route ou gêner le déploiement de l’airbag.
• Gardez votre attention sur la route. N'utilisez pas les commandes
de ce produit pendant la conduite.
• Assurez-vous que l'objectif de la caméra est propre et que rien
ne le bloque.
• Configurez l'heure et la date avec précision avant d'utiliser le produit.
• N'utilisez pas le chargeur si le cordon est endommagé ou cassé.
• Ne touchez pas directement le produit lorsqu'il surchaue, après
une longue exposition à la lumière du soleil ou un long travail en
continu par exemple.
• Retirez ce produit de votre véhicule lorsqu'il n'est pas utilisé
pendant une longue période.
• Tenez-le hors de la portée des enfants.
• Utilisez un chion propre et doux pour le nettoyer. N’utilisez pas
de nettoyant corrosif ou d’huile pour le nettoyer.
• La marque Roav n'est PAS responsable de la perte de données ou
de contenus pendant l'utilisation.
Au premier coup d’oeil
Lentille de la caméra
Ventilation
Bouton marche/arrêt
Emplacement pour carte mémoire
Haut-parleur
Indicateur LED
• LED bleue clignotante : enregistrement en cours
• LED rouge fixe : enregistrement arrêté
Port de charge Micro USB
Boutons
Ecran LCD
30 Français Français 31
Insertion de la carte mémoire
Ne pas retirer la carte microSD / TF lorsque le produit est allumé,
cela pourrait endommager la carte mémoire.
Pour une utilisation sûre, utilisez une carte microSD / TF de
classe 10, 32GB. Si vous utilisez une carte de 64GB ou 128GB,
formatez-la avant utilisation. Il est recommandé de formater la
carte régulièrement.
Capacité de la
carte 1080P 30FPS 720P 60FPS 720P 30FPS
32GB 320 min 360 min 480 min
64 GB 640 min 720 min 960 min
128GB 1280 min 1440 min 1920 min
Insérez la carte microSD / TF avec les contacts dorés tournés
vers l’écran. Poussez la carte jusqu’à ce qu’elle s’enclenche.
Pour retirer la carte, poussez délicatement sur son bord
supérieur jusqu’au déclic, puis retirez-la de la fente.
Installation de votre DashCam
• N’installez jamais ce produit pendant la conduite.
• Installez ce produit près du rétroviseur pour obtenir la
meilleure vue. Ne l’installez pas dans un emplacement qui
pourrait gêner votre conduite.
• Assurez-vous que l'objectif est dans la plage d'essuyage
de l'essuie-glace afin que la vue reste claire lorsqu’il pleut.
• Ne touchez pas l'objectif avec vos doigts. Les marques
d'empreintes entraîneront des vidéos peu claires.
• Le support est adhésif et peut devenir inutilisable s'il
est
retiré du pare-brise
Fixez la DashCam sur le support.

32 Français Français 33
Sélectionnez un emplacement sur le pare-brise près du coin
inférieur droit du rétroviseur, nettoyez l’endroit avec de l'eau
claire et attendez jusqu'à ce qu'il soit complètement sec.
Retirez le film de l’adhésif 3M et fixez fermement le support
sur le pare-brise. Vous pouvez également coller la ventouse
sur le pare-brise en faisant pivoter le verrou comme indiqué.
Utilisez le pied-de-biche pour cacher le câble de charge
dans les coutures et les bordures du tableau de bord.
Réglez l'angle de vision de l'objectif pour vous assurer qu'il
est aligné avec la route à suivre, puis faites pivoter le bouton
de fixation pour le fixer.
Connexion à l’alimentation
Connectez le chargeur de voiture et la DashCam à l'aide du
câble de charge inclus.
Branchez l'autre extrémité du chargeur de voiture sur la
prise allume-cigare de votre véhicule.
Une fois que le moteur de la voiture est démarré, la
DashCam s'allume automatiquement et commence à
enregistrer. Lorsque le moteur est arrêté, la DashCam
sauvegarde automatiquement l'enregistrement et s'éteint
dans les 10 secondes.
Other manuals for C2
1
This manual suits for next models
1
Table of contents
Languages:
Other Roav Dashcam manuals


