Stein Mayer DP-260 User manual
Users manual
DP-260
Digital Piano
00027529
Version 10/2012
CAUTION
1
INSTRUCTIONS PERTAINING TO A RISK OF FIRE,
ELECTRIC SHOCK, OR INJURY TO PERSONS.
WARNING : TO REDUCE THE RISK OF FIRE OR ELECTRIC SHOCK, DO NOT
EXPOSE THIS APPLIANCE TO RAIN OR MOISTURE.
RISK OF ELECTRIC
SHOCK
CAUTION TO REDUCE THE RISK OF
ELECTRIC SHOCK
DO NOT REMOVE COVER (OR BACK)
NO USER SERVICEABLE PARTS INSIDE
REFER SERVICING TO QUALIFIED SERVICE
PERSONNEL
This Symbol is intended to alert the user to the presence of
uninsulated dangerous voltage within the product’s enclosure
that may be of sufficient magnitude to constitute a risk of fire
or electric shock.
This Symbol is intended to alert the user to the presence of
important in the literature accompanying this appliance.
All information should be read carefully to avoid misuse of
product.
WARNING : DO NOT OPEN THE CABINET.
DANGEROUS HIGH VOLTAGE IS PRESENT, SERVICING SHOULD ONLY
BE PERFORMED BY QUALIFIED PERSONNEL.
CAUTION : TO PREVENT ELECTRIC SHOCK. MATCH WIDE BLADE OF PLUG
TO WIDE SLOT, FULLY INSERT.
ATTENTION :
POUR ÉVITER LES CHOC ÉLECTRIQUES, INTRODUIRE LA LAME LA PLUS
LARGE DE LA FICHE DANS LA BORNE CORRESPONDANTE DE LA PRISE
ET POUSSER JUSQU AU FOND.
2
IMPORTANT SAFETY INSTRUCTIONS
When using electric products, basic precautions should always be followed, including the
following:
1. Read all the instructions before using the product.
2. To reduce the risk of injury, close supervision in necessary when a product is used near children.
3. Do not use this product near water - for example, near a bathtub, washbowl, kitchen sink, in a
wet basement, or near a swimming pool.
4. This product should be used only with a cart or stand that is recommended by the manufacturer.
5. This product, either alone or in combination with an amplifier and headphones or speakers,
may be capable of producing hearing loss. Do not operate for a long period of time at a high
volume level or at a level that is uncomfortable. If you experience any hearing loss or ringing
in the ears, you should consult an audiologist.
6. The product should be positioned so that its location does not interfere with its proper
ventilation.
7. The product should be positioned away from heat sources such as radiators, heat registers,
or other products that produce heat.
8. The product should only be connected to the type of power supply described in the operating
instructions or as marked on the product.
9. This product may be equipped with a polarized line plug (one blade wider than the other). This
is a safety feature. If you are unable to insert the plug into the outlet, contact an electrician to
replace your obsolete outlet. Do not defeat the safety purpose of the plug.
10. The power-supply cord of the product should be unplugged from the outlet when left unused
for a long period of time.
11. Care should be taken so that objects do not fall and liquids are not spilled into the openings of
the enclosure.
12. The product should be serviced by qualified service personnel when:
A. The power-supply cord or the plug has been damaged;
B. Objects have fallen, or liquid has been spilled into the product;
C. The product has been exposed to rain;
D. The product does not appear to operate normally or exhibits a marked change in performance;
3
13. Do not attempt to service the product beyond described in the user maintenance
instruction. All other servicing should be done by qualified service personnel.
14. To clean the exterior surfaces, wipe lightly with a clean, dry cloth. Never use solvents such
as benzine or paint thinners.
15. The product should be positioned away from a television, radio, or any heavy equipment that
can generate electromagnetic fields.
16. The product should be located on a flat, stable surface that is free of vibration.
17. Be careful to protect the product from knocks, particularly when carrying it.
18. During thunderstorms, turn the product off and disconnect the plug from the power outlet.
INFORMATION TO THE USER
This equipment has been tested and is found to comply with the limits for a class B digital device,
pursuant to part 15 of the FCC Rules. These limits are designed to provide reasonable protection
against harmful interference in a residential installation. This equipment generates, uses and can
radiate radio frequency energy and, if not installed and used in accordance with the instructions,
may cause harmful interference. If this equipment does cause harmful interference to radio or
television reception, which can be determined by turning the equipment off and on, the user is
encouraged to try to correct the interference by one more of the following measures :
- Reorient or relocate the receiving antenna.
- Increase the separation between the equipment and receiver.
- Connect the equipment into an outlet on a circuit different from that to which the receiver is connected.
- Consult the dealer or an experienced radio/TV technician for help.
WARNING
Changes or modifications not expressly approved by the manufacturer could void the user’s
authority to operate the equipment.

4
Thank you and congratulations on your purchase of the DIGITAL PIANO.
Your new DIGITAL PIANO is a state-of-the-art musical instrument which
incorporates the latest electronics technology to make its operation as easy as
possible.
Your versatile DIGITAL PIANO is ideal for beginners or experienced musicians. In
order to enjoy the features and functions of this unit to their fullest, be sure to
carefully read this manual and follow the instructions contained herein.
Precautions
Welcome/Contents
Care of Your Digital Piano
Unpacking (Upright Type/Grand Type)
Setting Up Your Piano (Upright Type/Grand Type)
External Appearance (Upright Type/Grand Type)
Panel Controls and Terminals
Adjusting the Volume
Demo play
Selecting Voices
Keyboard Percussion
GM Voice
Layer
Split
Using Pedals
Reverb
Chorus
Functions(Touch, Transpose, Tune)
Using Metronome
Recording
MIDI
The Connectors
GM Voice Table
Drum/SFX Table
MIDI Implementation Chart
Troubleshooting
Specifications
5
1
4
6
7,11
8,12
14,15
12
14
15
16
17
18
19
20
21
22
23
24
26
27
29
30
31
32
34
35
36
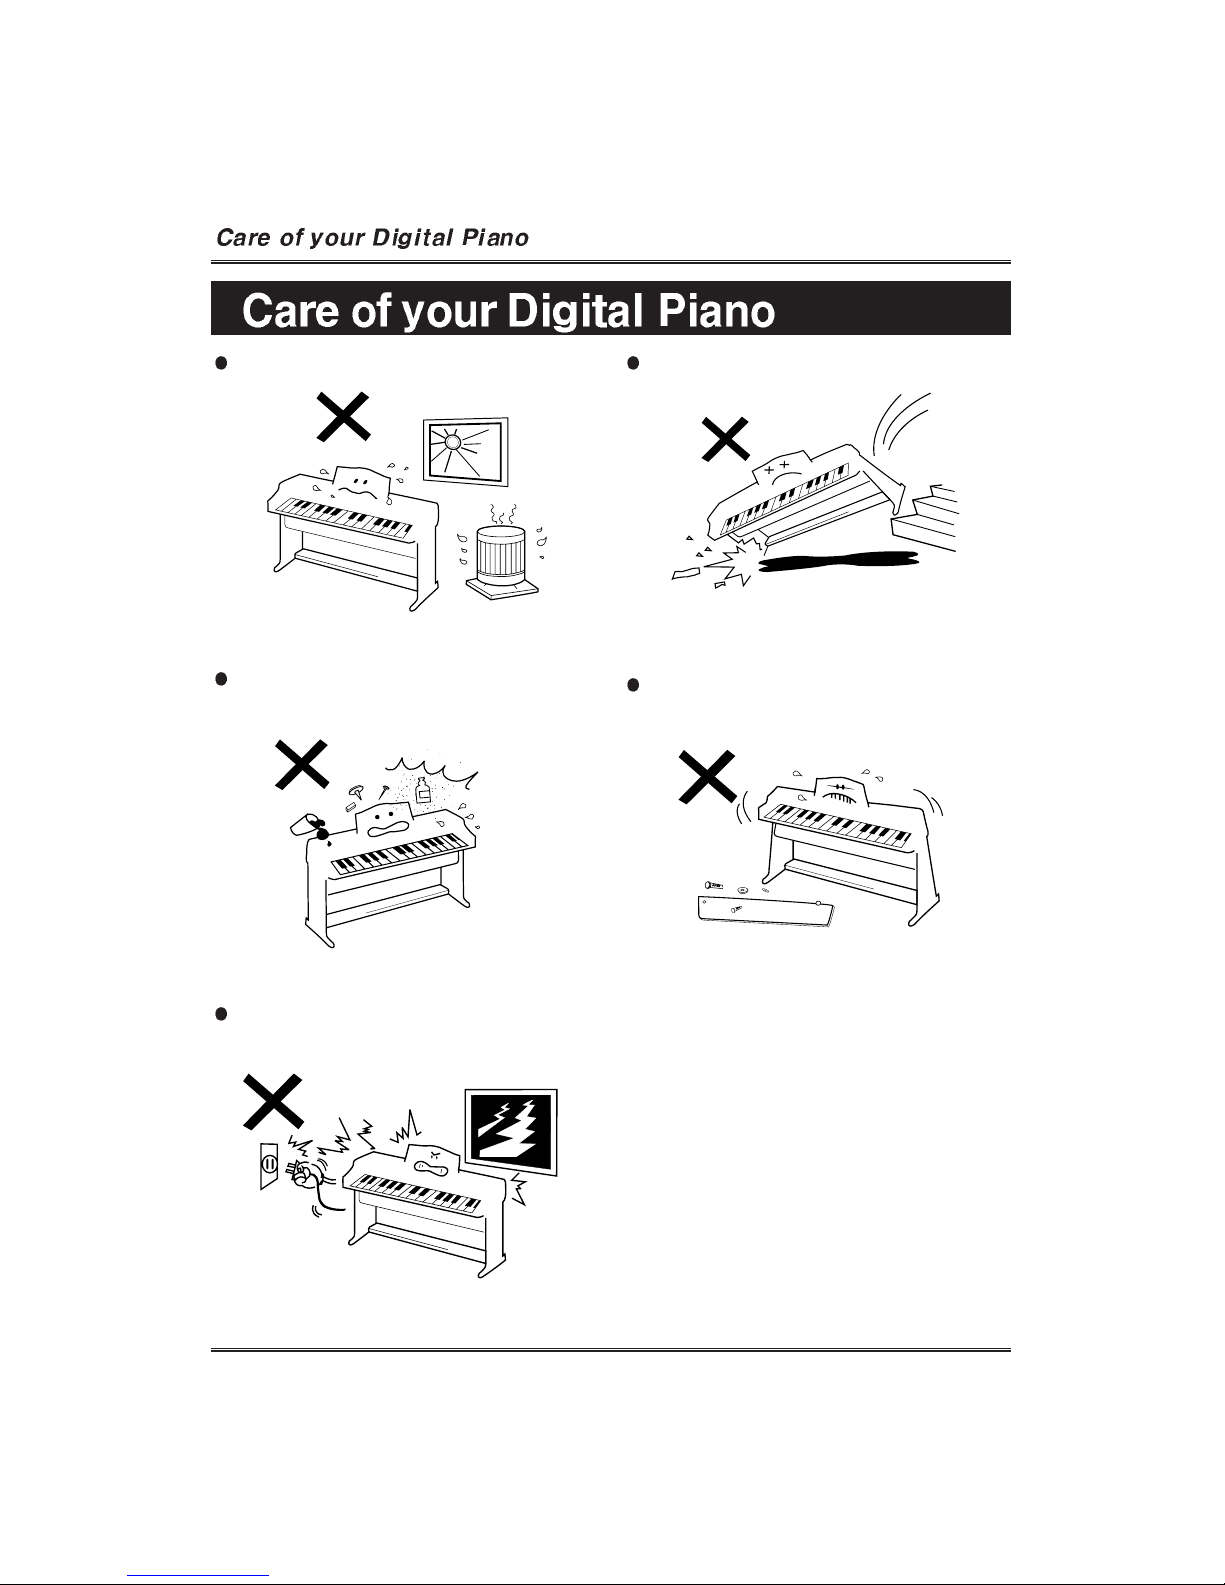
Avoid heat, humidity or direct sunlight.
Keep the unit free from liquids, dust, etc...
During thunderstorms, turn the product off and
disconnect the plug from the power.
Take care not to drop the unit and avoid
strong impact.
Never attempt to modify any parts of the
unit.
6
7
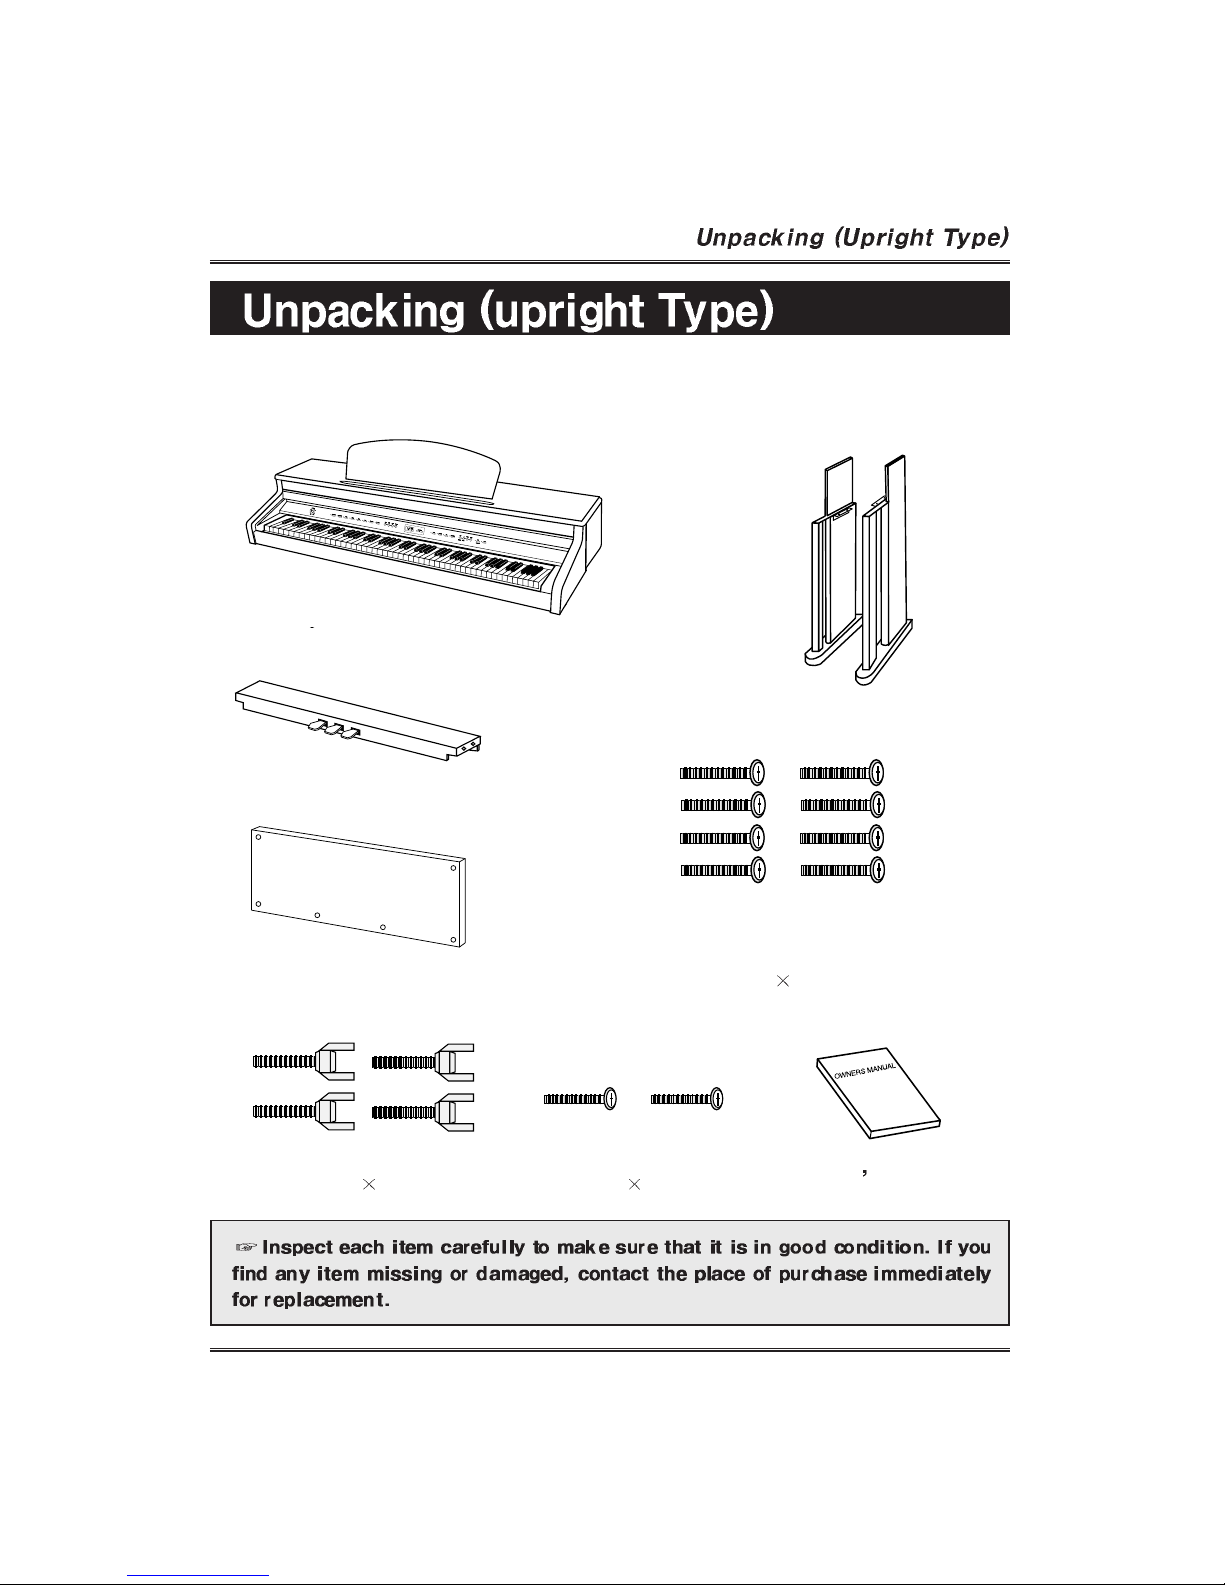
Carefully remove the Digital Piano and its accessories from the packing box. The
Digital Piano set consists of the following items.
Main Unit
Right, Left Legs (a, b)
Pedal Box (c)
Rear Plate (d)
Four Bolts for Main Unit
(g) (M6 15)mm
Eight Bolts
for Pedal Box and Rear Panel
(f) (6 24)mm
Owner s Manual
Tow Bolts for Rear Plate
(h) (4 22)mm

8
Attaching the both legs and pedal box assembly
Assembling the stand
Securely combine both legs(a,b) and pedal
box(c) by using four bolts(f) for pedal box.
For pedal stability, rotate the adjusters on
the bottom of the pedal assembly until they
come in firm contact with the floor surface.
Attach the rear plate(d) to the legs and
pedal box using two bolts(h) and four
bolts(f) for rear plate.

Connecting the pedal cord.
Plug pedal cord(c), which is protruding
from the top of the pedal assembly, into
the corresponding port in the back of the
main unit.
Attaching the main unit and stand
9
Set the stand upright and gently lower
the main unit on the stand, then tighten
the main unit with four bolts (g) for main
unit as shown in illustration.
Music Stand
Raise the music stand on the
piano s top panel by lifting two brackets
on the back of the music stand.
10
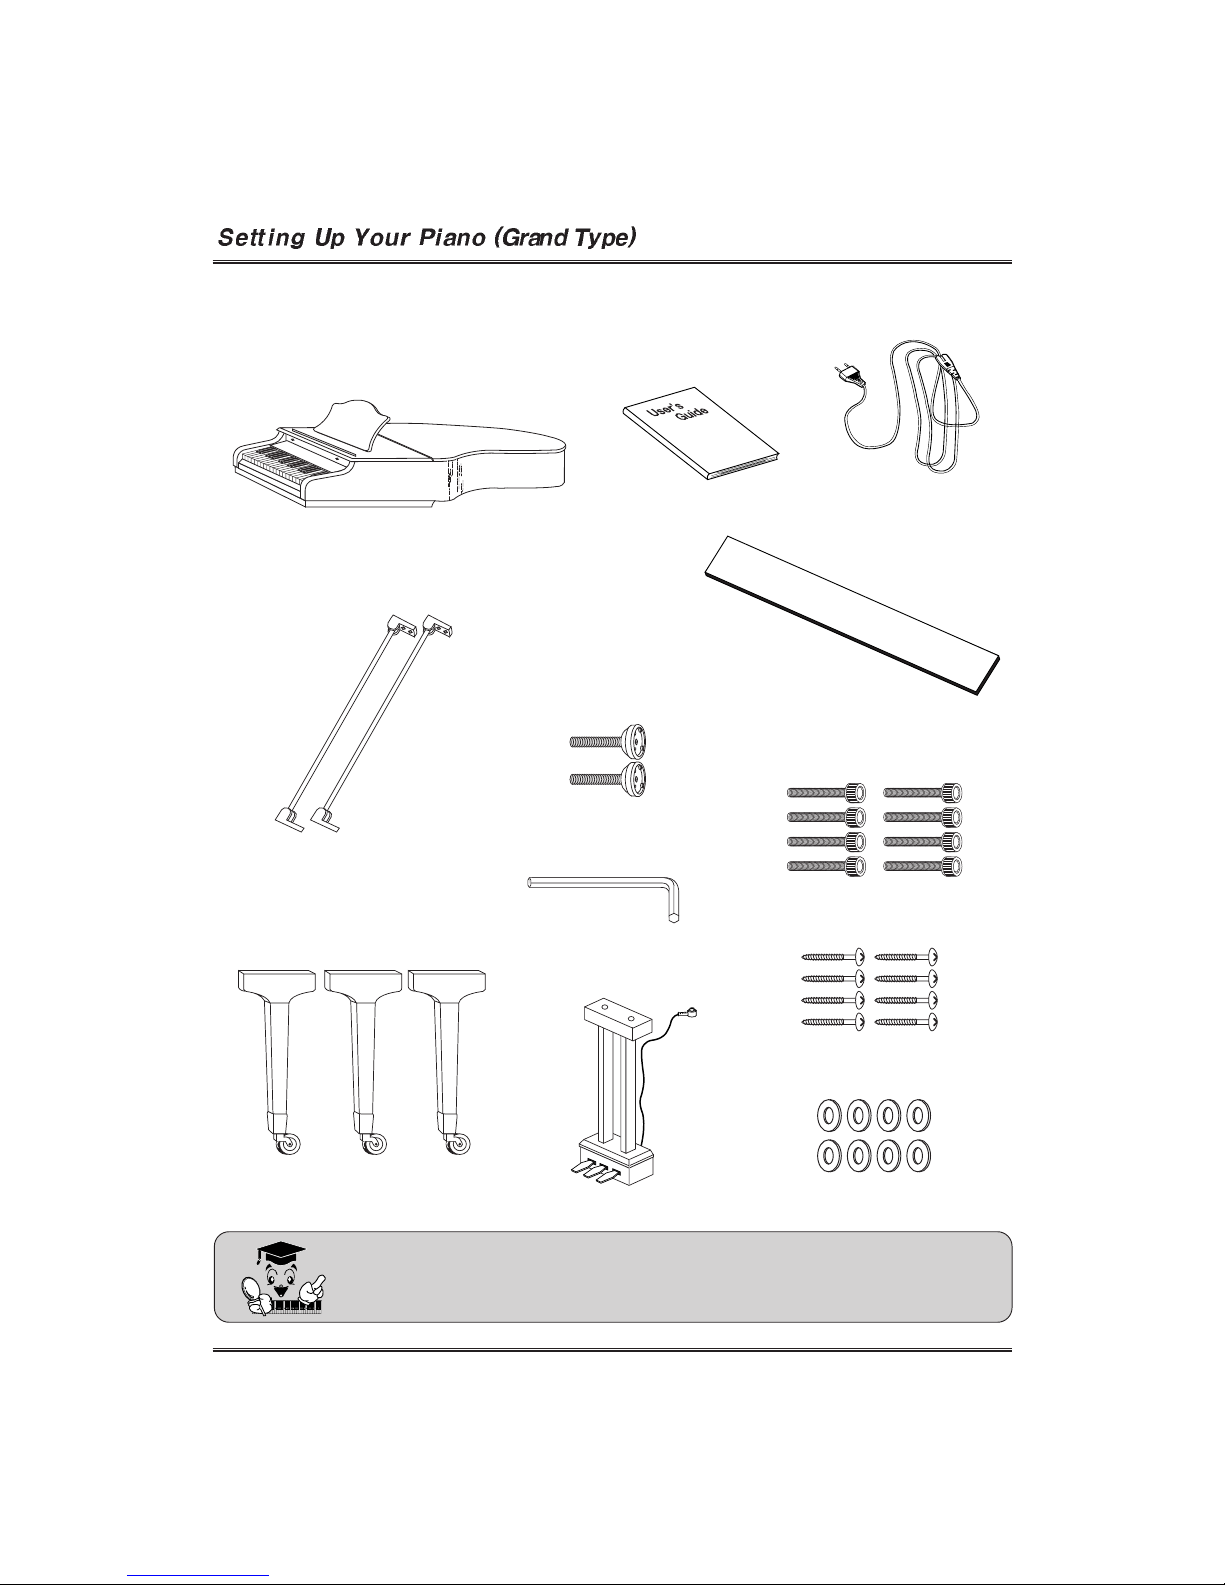
Carefully remove the Digital Piano and its accessories from the packing box. The
Digital Piano set consists of the following items.
Inspect each item carefully to make sure that it is in good condition. If
you find any item missing or damaged, contact the place of purchase
immediately for replacement.
Main Unit Manual
Keyboard Protection Cover
(Option)
Power Cord
Legs(3EA)
Pedal Nuts (2EA)
Bolt M10 X 60 (8EA)
Pedal Ass’y
Pedal Stand Brace(2EA)
Wrench (1EA)
Screw 3.5 X 25 (8EA)
Washer 20 X1T (8EA)
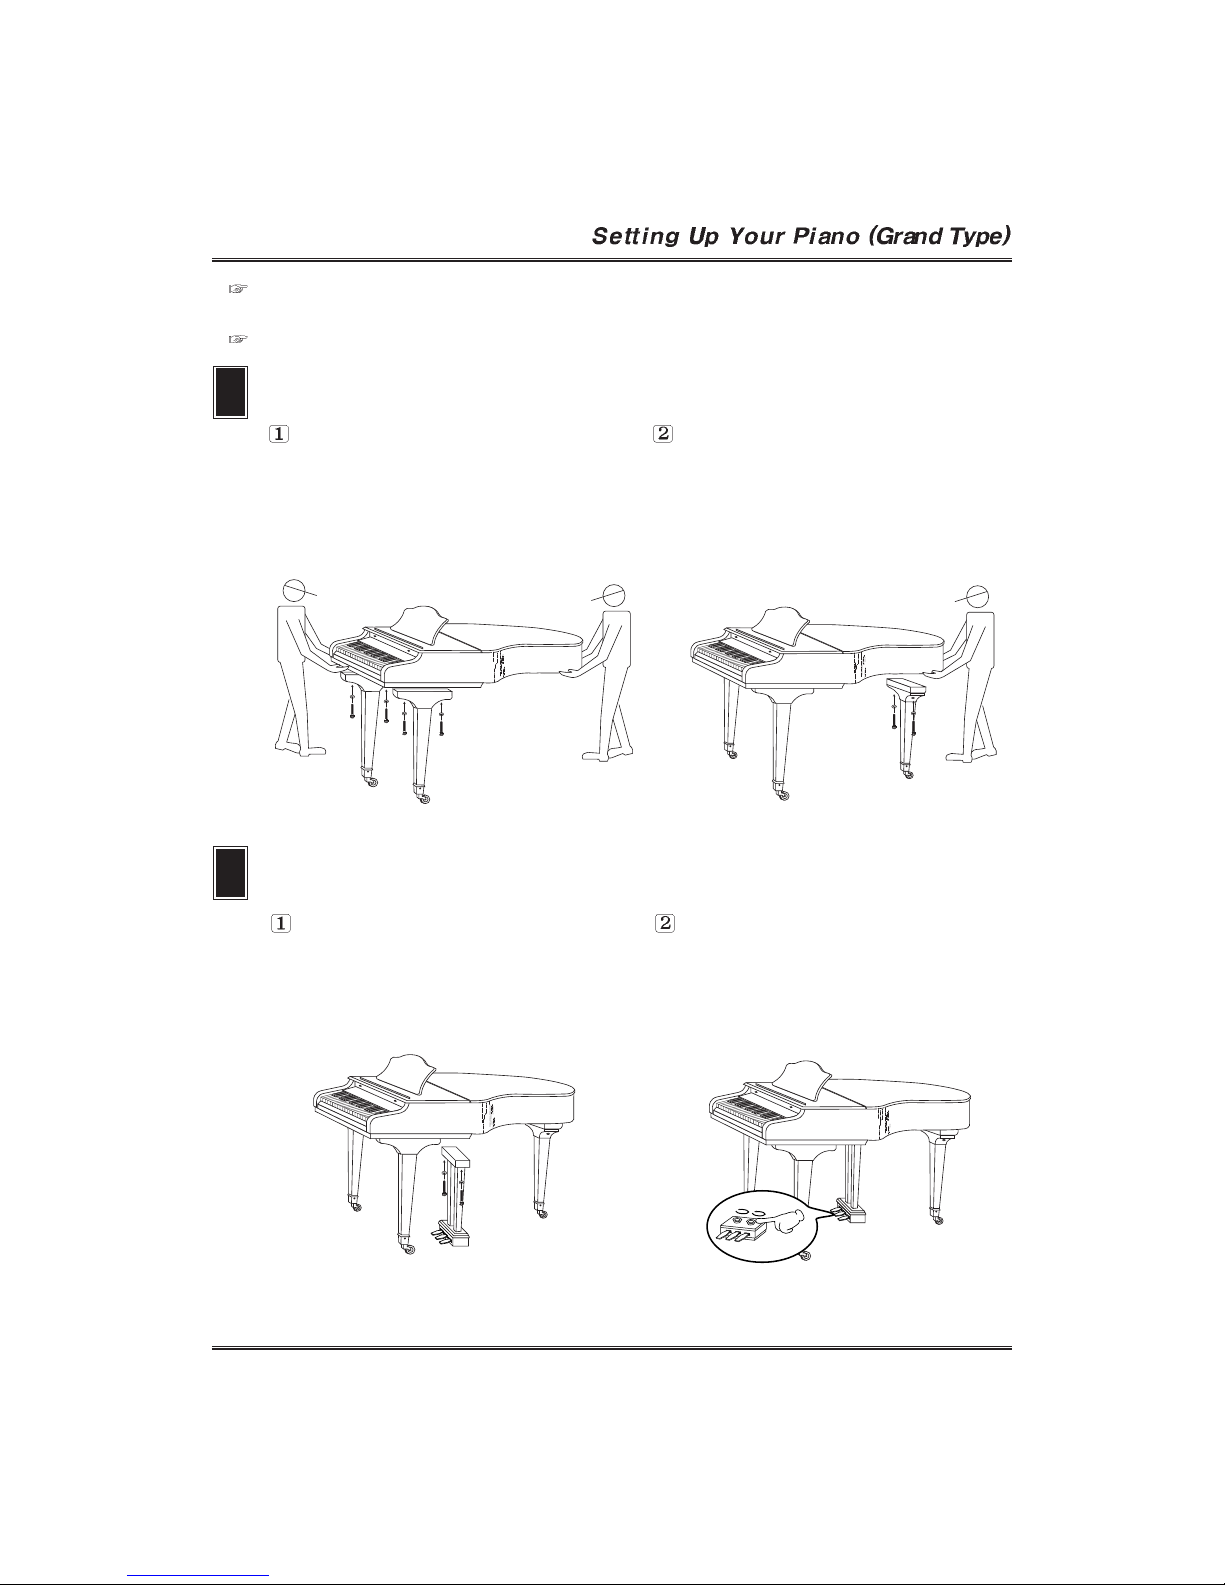
Attaching the main unit and three legs.
1
The first, Set the both legs upright
and hang the both legs at the main
unit, then tighten the main unit with
four bolts for main unit as shown in
the illustration.
After fixing the both legs to the
main unit, the remainder leg
upright and hang the leg at the
main unit, then tighten the main
unit with two bolts for main unit.
2
Set the pedal stand assembly
upright and securely attach the
pedal stand assembly and the main
unit assembly by using two bolts.
For pedal stability, rotate the
adjuster on the bottom of the pedal
stand assembly until it comes in
firm, contact with the floor surface.
Attaching the main unit and pedal stand assembly
To reduce the risk of injury, The Digital Piano should be assembled by qualified
service personnel.
Take care not to drop the unit and avoid strong impact.
11

12
Attach the pedal stand brace to the main unit and pedal stand assembly using four
screws. Make sure the screws are securely tightened.
3
Plug the Pedal Cord which is protruding from the top of the pedal assembly into
the corresponding port in the bottom of the main unit.
Connecting the Pedal Cord
13
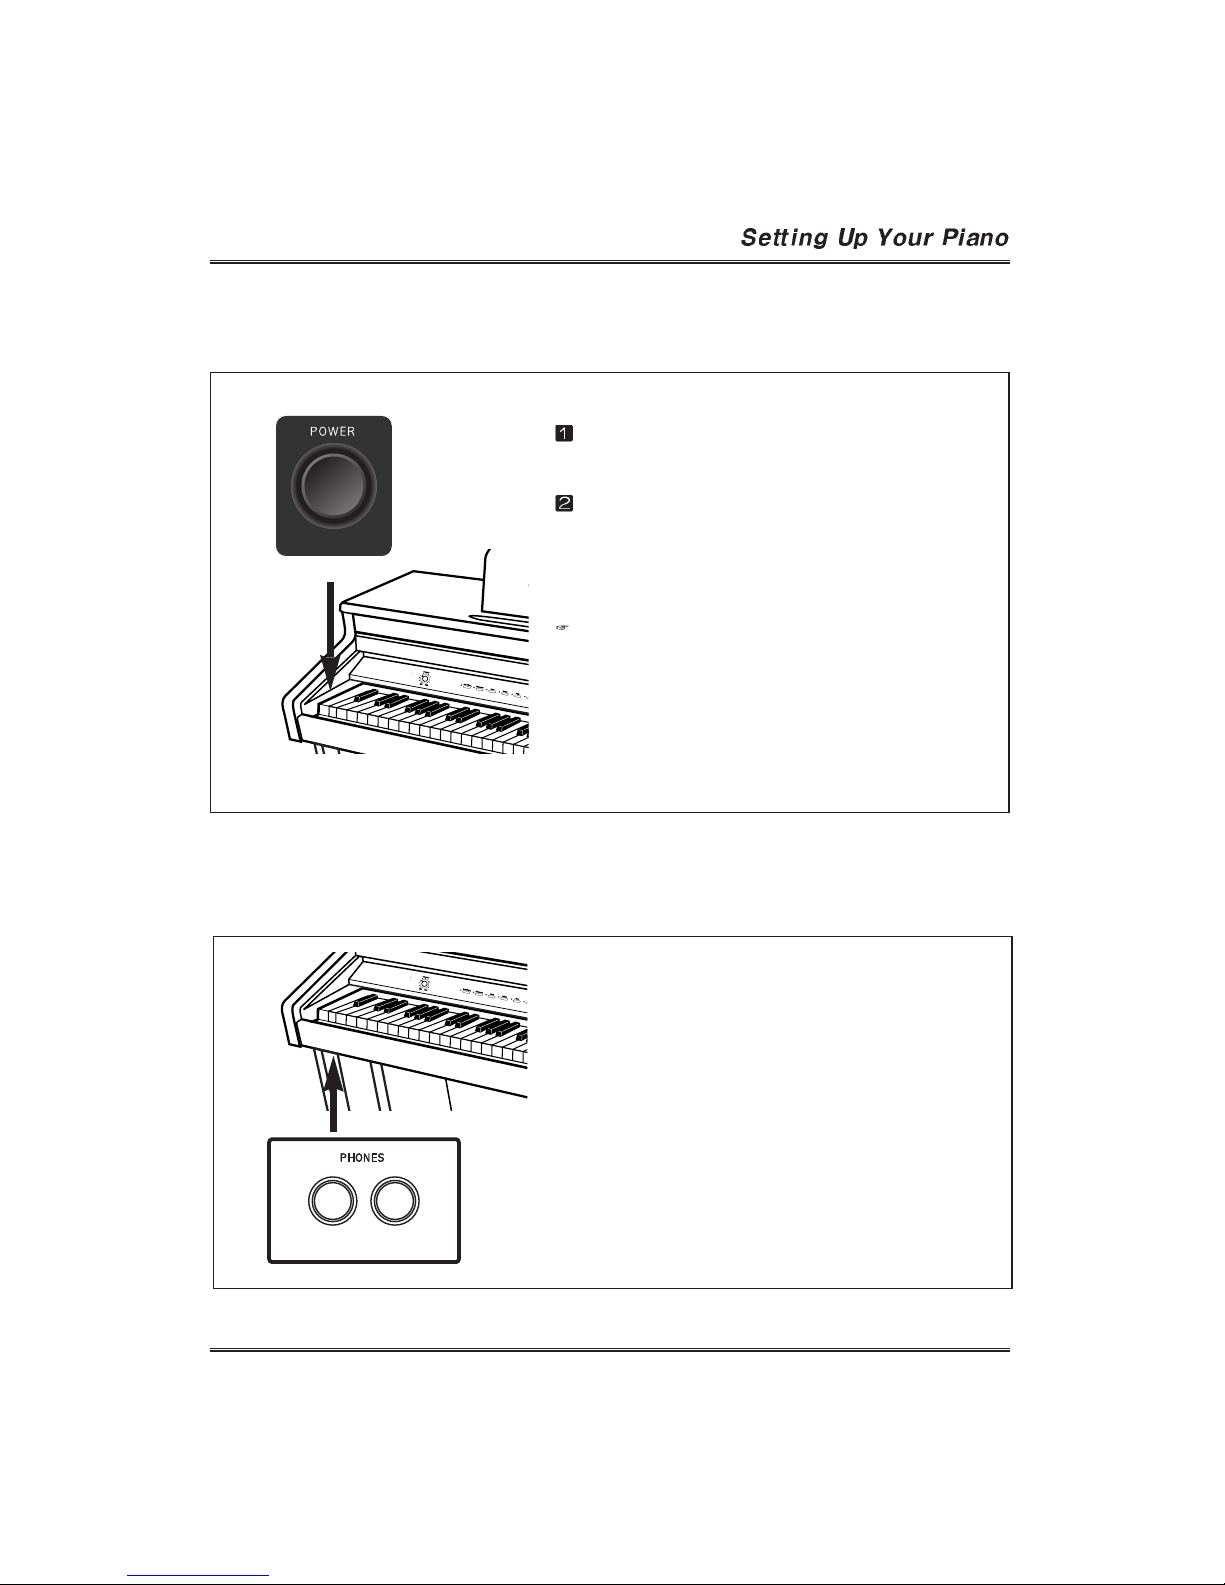
Turning on the Power
Connect the power cord. Insert the plug at the end
of the cord into a standard AC outlet.
Press POWER switch. The power is turned on
and the initial display appears in the Multi
Function Display. The voice of Grand Piano is
selected automatically at first.
Adjust the volume by using MASTER VOLUME.
Press POWER switch again when turning off the
power. All lamps and LED display will turn off.
Headphones
Connect a set of stereo headphones(optional) to
PHONES jack.
Insert plug of the headphone into the PHONES
jack on the bottom panel of the piano.
When headphones are connected, the internal
speaker system is automatically shut off.
Since the piano has two PHONES jacks, two sets
of headphones can be used simultaneously,
allowing two people to enjoy the performance.

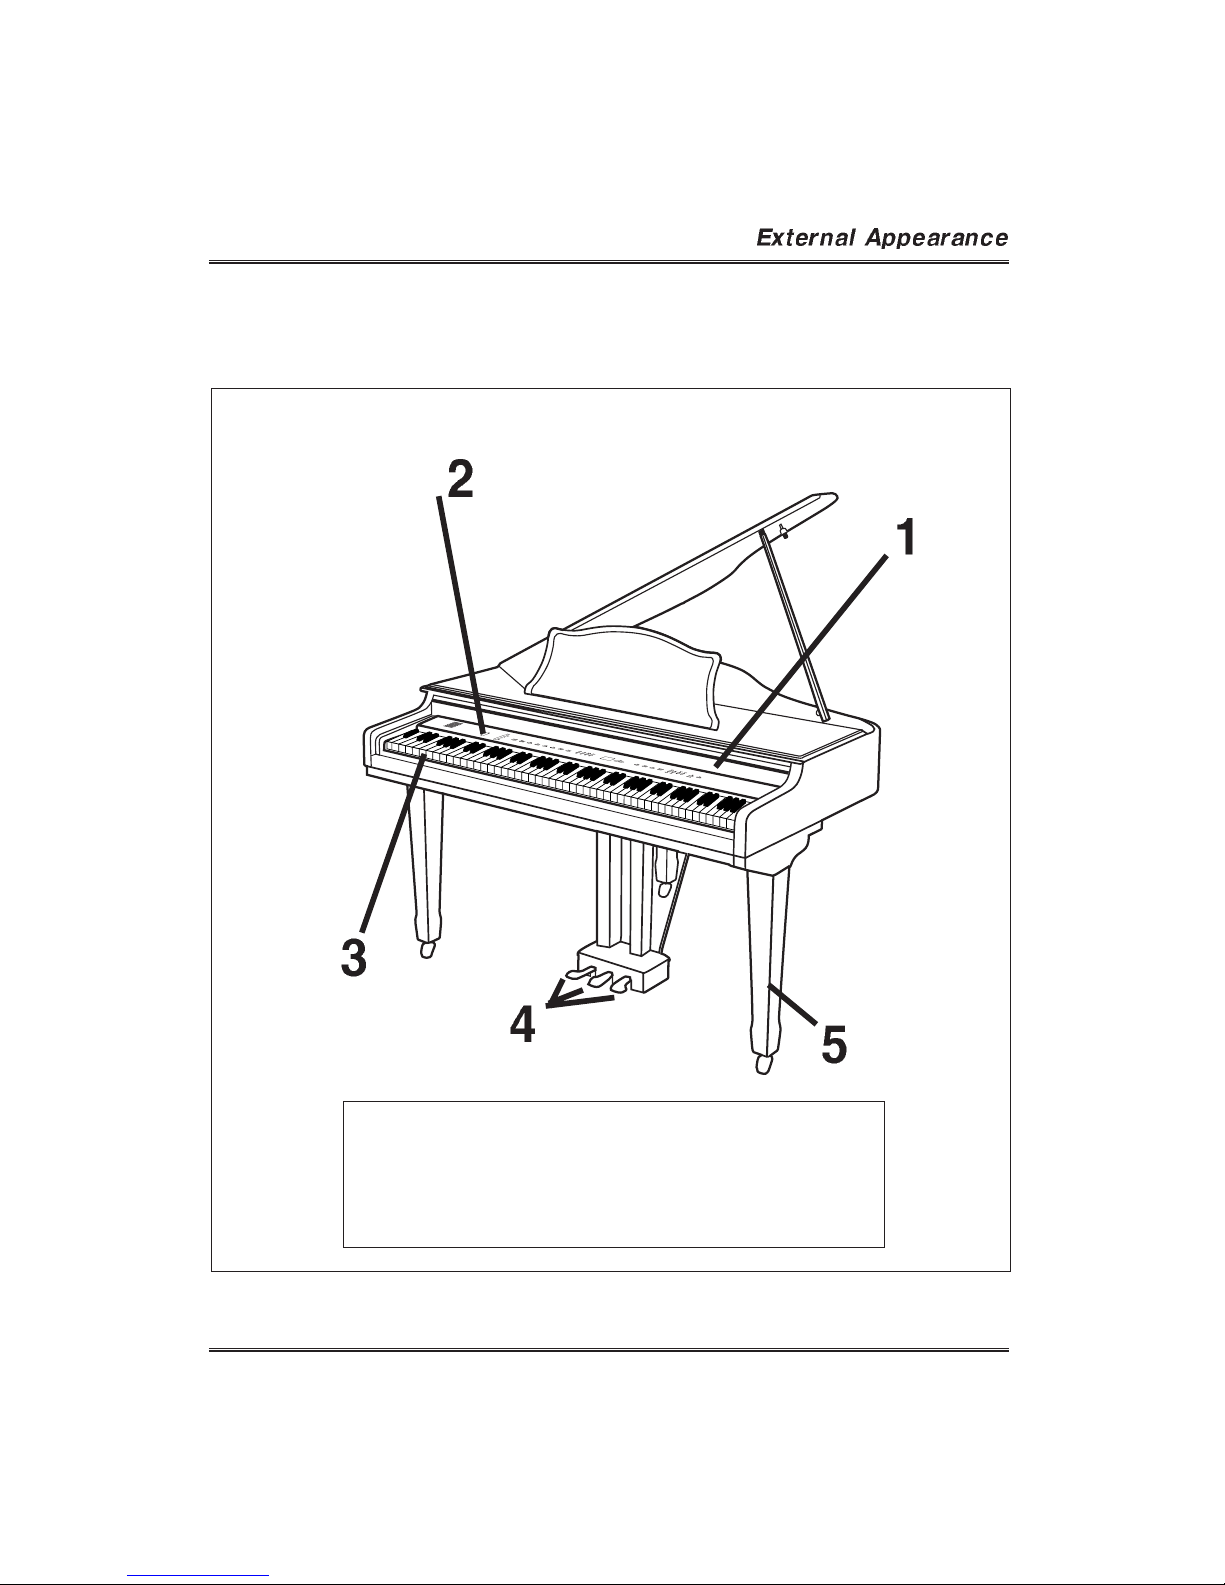
14
1. Keyboard Cover
2. Control Panel
3. Keyboard
4. Pedal
5. Stand
15
1. Keyboard Cover
2. Control Panel
3. Keyboard
4. Pedal
5. Stand

16
VOLUME SECTION
MASTER VOLUME
VOICE SECTION
LAYER
SPLIT
REVERB
CHORUS
VOICE
FUNCTION SECTION
METRONOME
Multi Function Display
DATA/TEMPO
TOUCH
TRANSPOSE
TUNE
SOUND BALANCE
Page 18
Page 21
Page 24
Page 26
Page 27
Page 20
Page 30
Page 28
Page 29
Page 29
Page 23
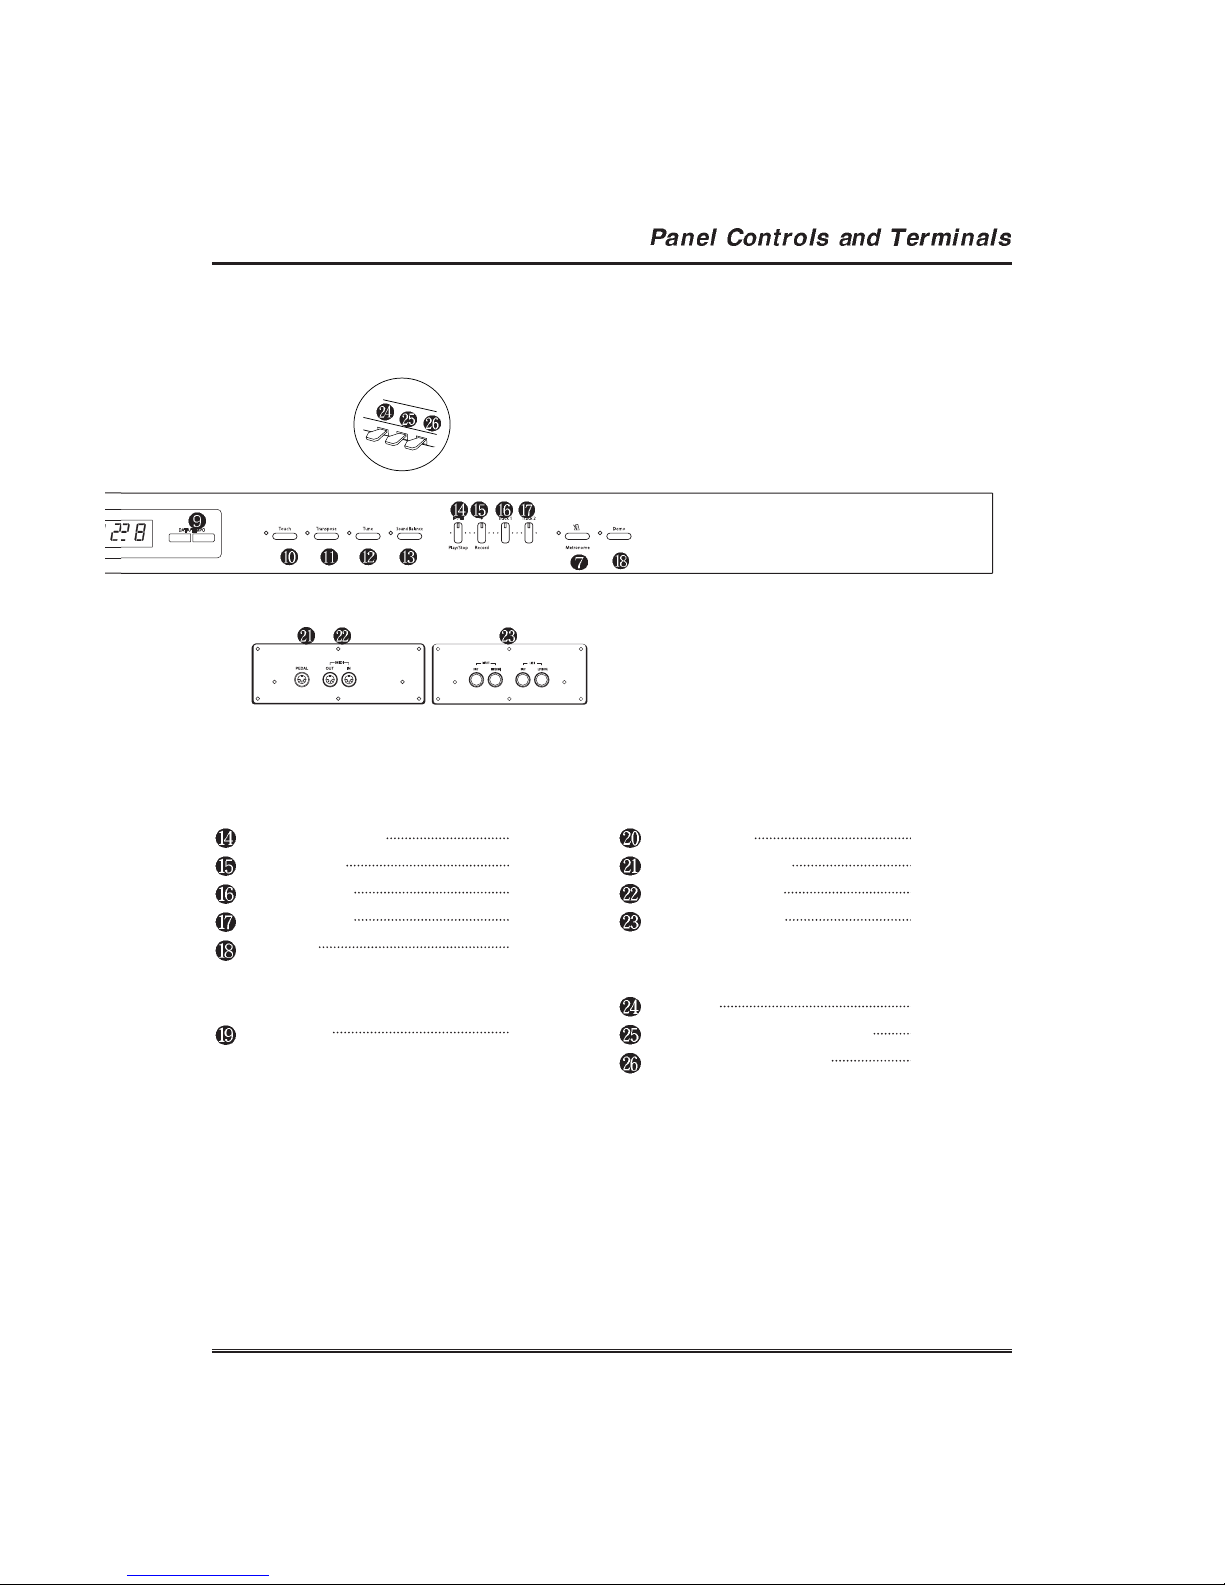
17
SONG CONTROL SECTION
PLAY/STOP
RECORD
TRACK 1
TRACK 2
DEMO
POWER
POWER
TERMINAL SECTION
PHONES
PEDAL JACK
MIDI IN/OUT
LINE IN/OUT
PEDAL SECTION
SOFT
SOSTENUTO PEDAL
DAMPER PEDAL
Page 31
Page 31
Page 31
Page 31
Page 19
Page 13
Page 34
Page 34
Page 34
Page 34
Page 25
Page 25
Page 25

18
The piano has one knob on the panel for adjusting the volume.
MASTER VOLUME
This determines the entire volume of the piano.
This also determines the output level of the signal at the PHONES.
19
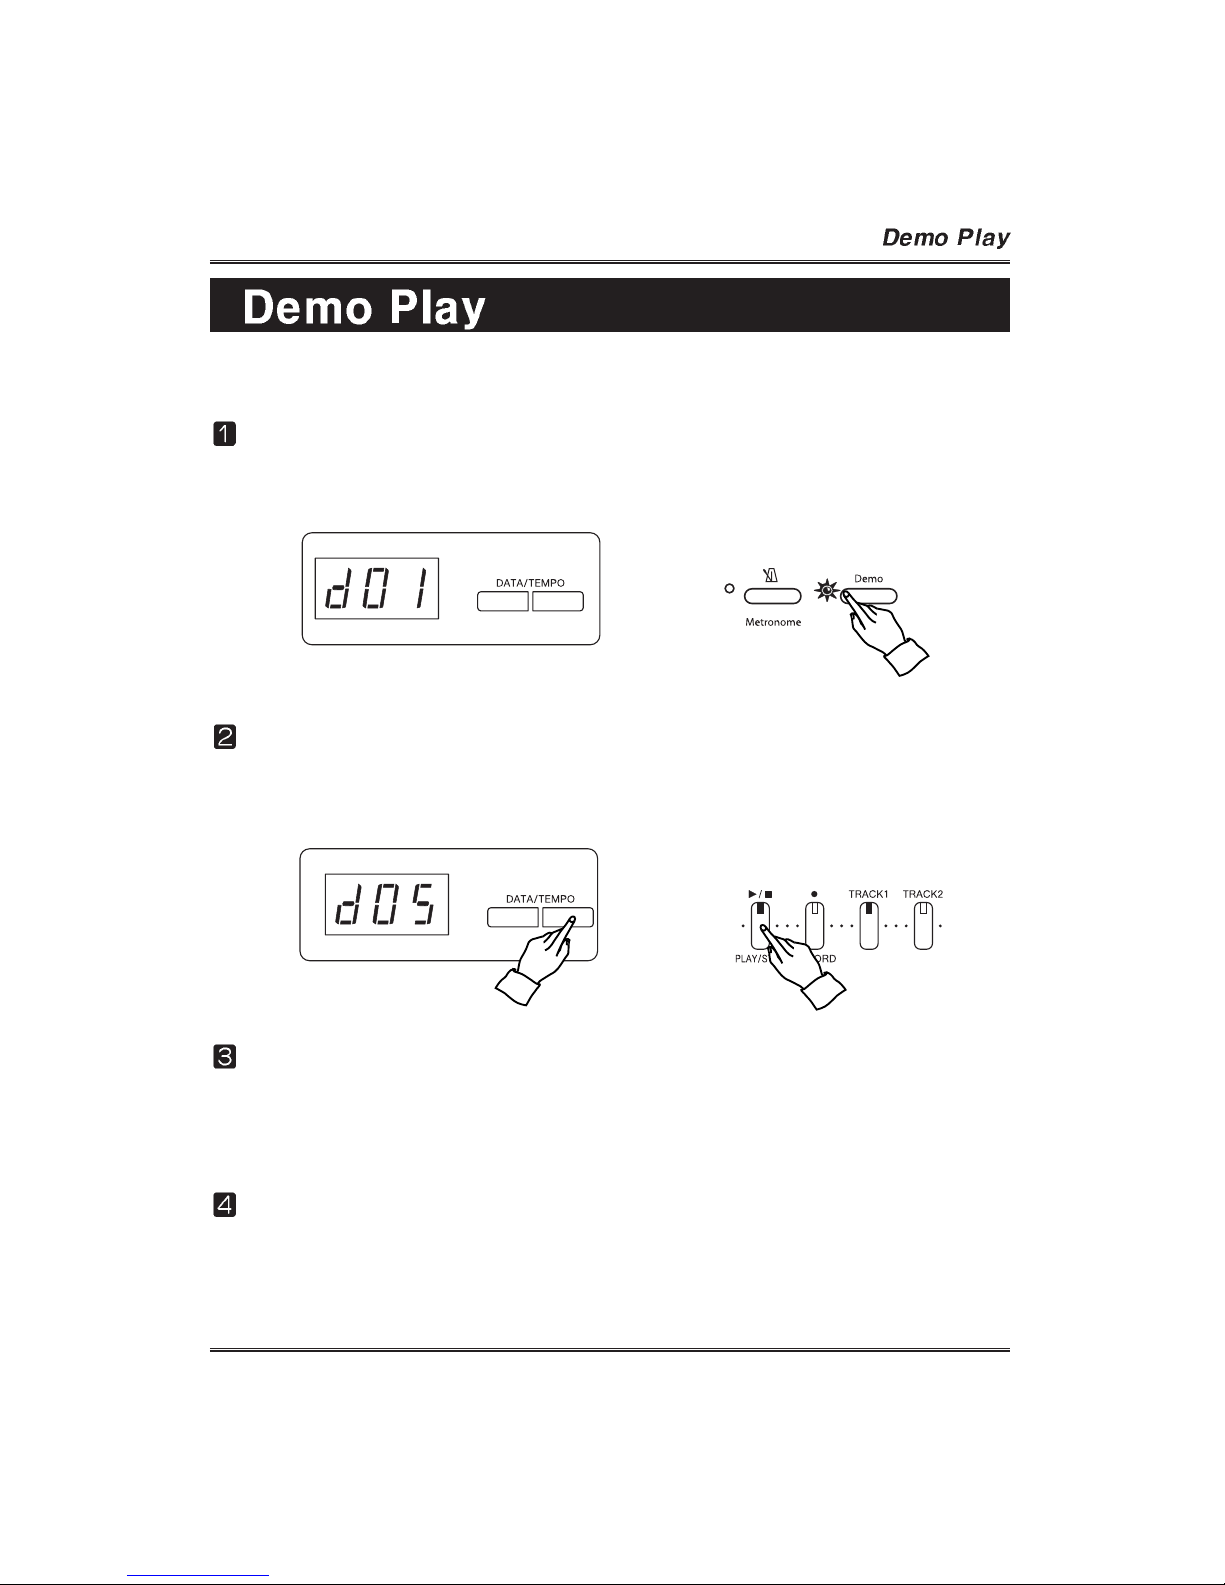
The piano features a total of 12 demo pieces. Listen to them all and hear what the piano
can do.
Call up the Demo Play mode.
Press DEMO. The DEMO display appears.
Select the song and start playback.
Choose the desired song by using the DATA buttons and press the PLAY/STOP
button. The selected demo plays.
Adjust the volume.
Adjust the volume of the Demo by using MASTER VOLUME.
Stop playback of the Demo.
To stop playback, press PLAY/STOP.
Table of contents
Other Stein Mayer Musical Instrument manuals


