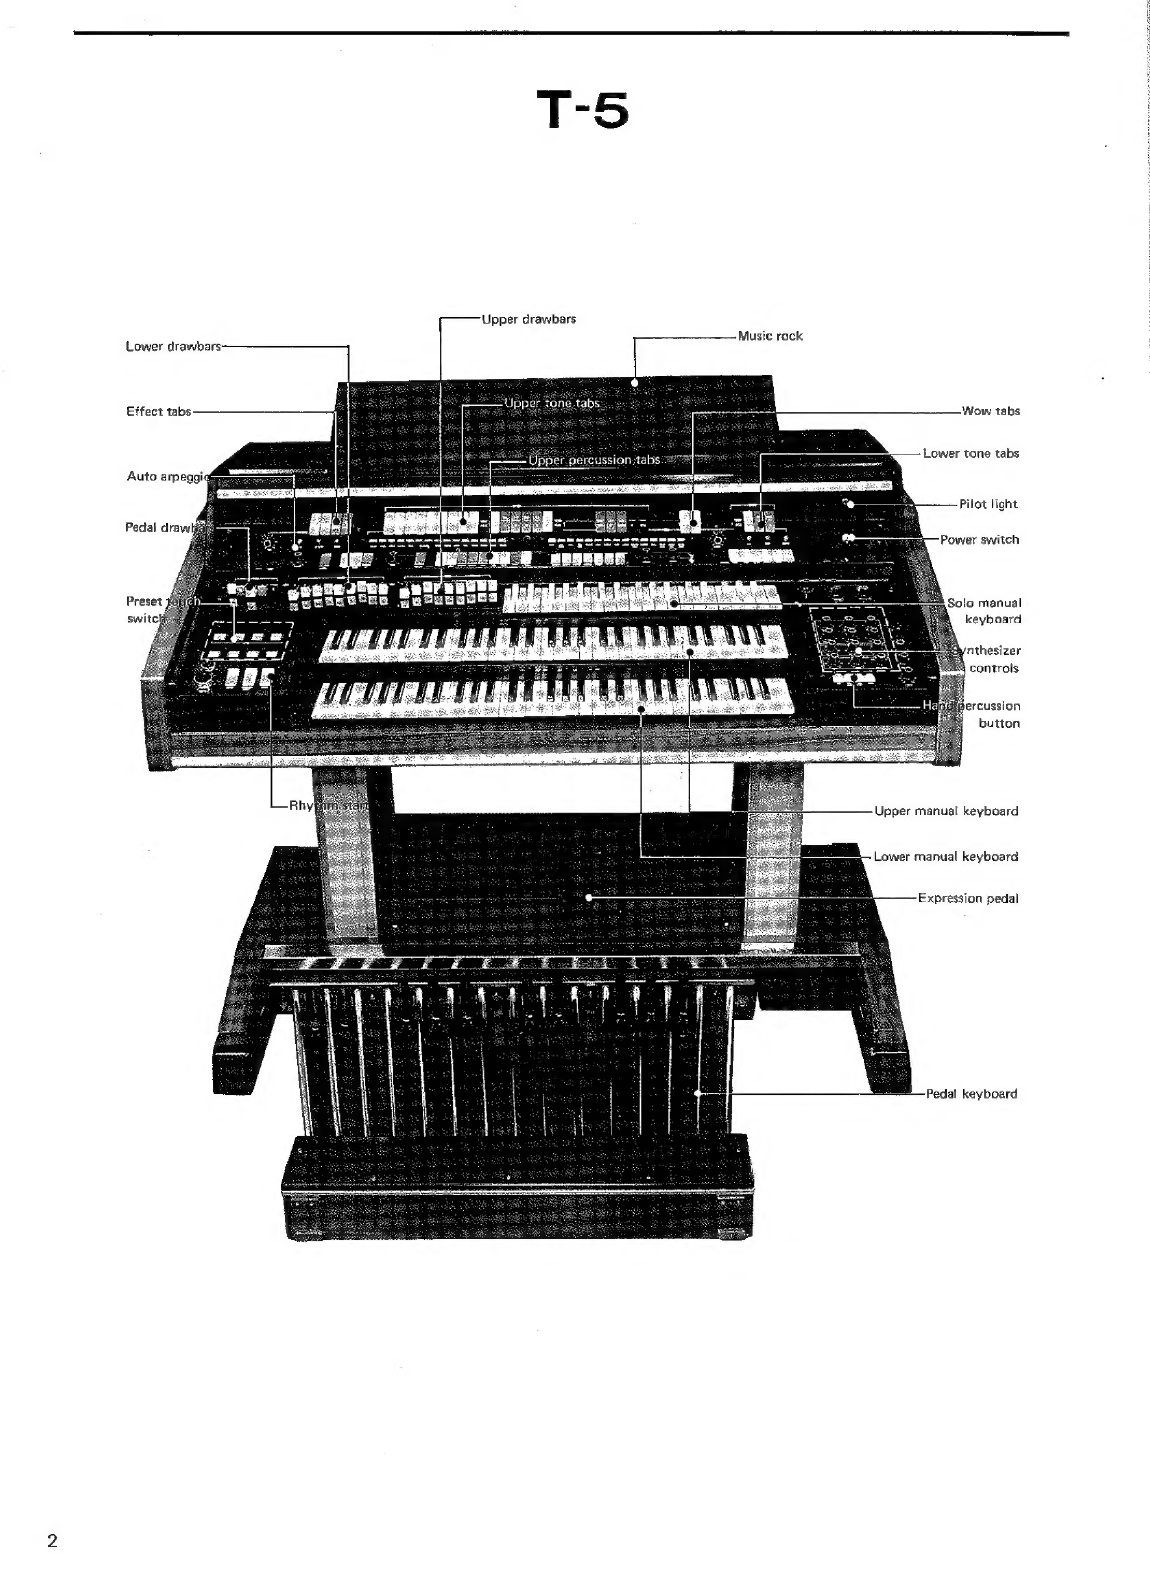
Kawai T-5 User manual

Kawai
Electronic
Organs
INSTRUCTION
T-5
Kawai
Musical
Instrument
Manufacturing
Co.,
Ltd.
ISSUED:
MAY
1976

‘Upper
drawbars
Music
rock
Lower
drawbars:
ý
tone
t
:
pper
tone
tabs:
‘Wow
tabs
Lower
tone
tabs
Pilot
light
Power
switch
Solo
manual
keyboard
nthesizer
controls
ercussion
button
Upper
manual
keyboard
Lower
manual
keyboard
Expression
pedal
Pedal
keyboard

KEYBOARDS
Upper
Manual:
61
keys
Lower
Manual:
61
keys
Pedals:
25
keys
Solo
Manual:
37
keys
(for
synthesizer)
PRESET
TOUCH
SWITCH
Preset
touch
switch
Four
preset
touch
switches
are
provided
on
the
left-hand
side
panel
for
both
the
upper
and
lower
manual
keyboards.
Keep
in
mind
the
function
of
these:
preset
touch
switches,
as
they
are
very
important
in
playing
the
organ.
The
touch
switch
operates
at
a
touch
of
the
finger
tips.
The
switch
is
lighted
when
engaged.
UPPER
PRESET
SWITCH
[E]
>
Pressing
this
switch
turns
on
the
manual
voices
on
the
upper
manual
tabs.
Press
this
switch
when
using
the
upper
manual
tone
tabs.
D|:
Pressing
this
switch
turns
on
the
upper
drawbars
and
Percussion
voices.
Press
this
switch
when
using
the
upper
manual
drawbars
and
percussion.
Pressing
this
switch
turns
on
the
preset
tibia
chorus.
Ey
H
Pressing
on
this
switch
turns
on
the
preset
reed
chorus.
LOWER
PRESET
SWITCH
L|:
Pressing
this
switch
turns
on
the
voices
controlled
by
the
lower
tabs,
drawbars.
Pressing
this
switch
turns
on
the
lower
drawbars.
Pressing
this
switch
turns
on
preset
tibia
chorus.
z3)
H)
[Sl
Pressing
this
switch
turns
on
preset
reed
chorus.
Note:
When
the
main
switch
is
on,
the
preset
touch
switches,
upper
and
lower
O,
also
are
on.
UPPER
TONE
LEVERS
(TABS)
Upper
tone
tabs
The
organ
is
provided
with
15
upper
tone
levers,
Put
on
the
upper
preset
switch
[E]
when
using
any
of
the
levers
(tabs).
The
voices
obtained
by
using
the
upper
tone
levers
are
divided
into
tibia
tones
and
orchestra!
tones.
TIBIA
16’,
8’,
5—1/3',
4’,
2-2/3’,
2’,
1-3/5’,
1-1/3’,
1"
ORCHESTRAL
Violin
8’
Clarinet
8
Trumpet
8
Oboe
8’
Kinura
8’
String
g
The
following
effect
levers
can
vary
the
orchestral
tones.

Orchestra
Accent:
With
this
tab
depressed,
orchestral
tones
can
be
increased
in
volume
and
accentuated.
Orchestra
Sustain:
With
this
tab
depressed,
a
sustain
effect
is
given
to
orchestral
tones.
The
sustain
time
is
predetermined
and
invariable.
The
effects
available
for
these
percussion
voices
are
as
follows:
Drawbar
Cancel:
When
this
tablet
is
on,
only
the
percussion
voices
are
produced
with
the
drawbar
tones
canceled.
This
effect
works
only
on
the
upper
key-
board.
Sustain:
With
this
tablet
on,
the
percussion
voices
other
than
the
vibraphone,
glockenspiel
and
chime
are
produced
with
sustain
effect.
The
vibraphone,
glockenspiel
and
chime
voices
are
sustained
irrespective
of
the
position
of
the
sustain
tablet.
‘Upper
to
Lower:
When
this
tablet
is
on,
percussion
voices
are
available
with
the
lower
keyboard
through
The
tones
are
of
the
tibia
range.
the
effect
of
the
coupler.
In
this
case,
while
the
lower
Drawbar:
16’,
8’,
5-1/3",
4’,
2-2/3,
2’,
1-3/5",
preset
switches
may
be
set
in
any
position,
the
upper
1-1/3,
v
preset
switch
must
be
turned
on.
Repeat
Speed:
The
tones
of
the
banjo,
mandolin
and
marimba
are
repeat
percussion
voices.
The
repeating
rate
can
be
adjusted
by
this
repeat
speed
knob.
The
repeat
percussion
uses
a
synchro
repeat
system
that
begins
the
moment
a
key
is
depressed.
UPPER
DRAWBARS
Nine
upper
drawbars
ranging
from
16’
to
1’
are
provided
to
enable
an
infinite
number
of
sounds
to
be
produced.
Set
the
upper
preset
switch
ID)
to
use
any
of
the
upper
drawbars.
UPPER
PERCUSSIONS
Upper
percussion
tabs
LOWER
TONE
LEVERS
ower
tone
tabs
Three
tones
can
be
obtained
by
using
the
lower
tone
levers.
The
levers
may
be
used
together
with
the
drawbars.
When
using
them,
put
on
the
lower
preset
switch
E).
The
tones
—
cello
8’,
clarinet
8‘
and
horn
8’
—
belong
to
the
orchestral
tone
group,
for
which
the
following
effect
lever
is
provided:
Orchestra
Accent:
This
increases
the
volume
of
the
orchestral
tones
and
accents
them.
The
upper
percussion
tablets
are
located
on
the
left
side
of
the
center
row.
The
musical
instrument
tones
indicated
on
the
various
tablets
can
be
obtained
by
pressing
the
tablet
of
the
particular
sound
or
sound
combination
desired.
These
percussion
voices
are
arranged
to
be
used
with
the
drawbars,
and
so
the
upper
preset
switch
should
be
on
when
using
percussion
voices.
Eight
percussion
voices
are
available,
as
given
below:
Piano
Banjo
Harpsichord
LOWER
DRAWBARS
Glockenspiel
Mandolin
There
are
nine
lower
drawbars,
ranging
from
16’
to
1’.
Marimba
The
lower
preset
switch
D:
should
be
put
on
when
any
Vibraphone
drawbars
are
used.
These
drawbars
may
be
used
together
Chimes
with
the
orchestral
tones
by
putting
on
the
lower
preset
switch
5O.

PEDAL
DRAWBARS
The
pedal
drawbars
are
used
to
set
the
pedal
tones,
offering
the
following
five
tones:
Tibia
16°
Tibia
8’
String
16’
String
8’
Bass
guitar*
*
The
bass
guitar
tone
is
a
percussive
sound.
PEDAL
EFFECT
The
pedal
effect
tablets
are
used
to
give
a
sustain
effect
to
the
pedal
tones.
The
sustain
length
can
be
selected
by
the
following
tablets:
Sustain:
A
short
sustain
effect
can
be
obtained
by
pressing
this
tablet.
Sustain
Long:
A
medium-length
sustain
effect
can
be
obtained
by
pressing
this
tablet.
*
With
these
two
tablets
on
at
the
same
time,
a
tong
sustaining
effect
can
be
obtained.
In
other
words,
the
organ
affords
the
choice
of
three
sustain
effects.
EFFECT
ATTACK
Despite
the
title,
“Attack”,
this
effect
has
sound
in
itself.
This
attack
sound
varies
in
strength
and
length
and
can
be
played
with
other
tones
(tone
levers
and
drawbars)
to
lend
a
fast
positive
attack
to
the
upper
manual.
Drawbar
Attack:
When
this
lever
is
on,
a
fast
attack
is
obtained
with
the
upper
preset
switch
D):
put
on.
This
is
used
along
with
the
drawbar.
With
this
lever
in
the
off
position,
an
attack
sound
is
obtained
when
the
upper
preset
switch
O}
is
put
on.
Attack
Forte:
A
strong
attack
sound
can
be
obtained
by
pressing
this
lever.
Decay
Long:
With
this
lever
on,
the
attack
sound
slowing
diminishes.
Attack
4’:
Pressing
this
lever
provides
a
4’
or
second
harmonic
attack
sound.
Attack
2—2/3':
Pressing
this
lever
provides
a
2—2/3’
or
third
harmonic
attack
sound.
Note:
Attack
sounds
are
available
in
two
kinds,
4’
and
2-2/3’.
Both
levers
should
be
turned
off
when
the
attack
effects
are
not
required.
The
attack
sounds
belong
to
the
tibia
group.
The
attack
sounds
can
be
used
when
the
upper
preset
switch
or
L
is
on.
wow
In
this
electronic
organ,
“wow”
effect
is
provided
in
combination
with
the
expression
pedal.
The
“wow”
effect
changes
as
the
pedal
is
depressed,
and
“wow”
sound
can
be
obtained
only
by
putting
on
the
“wow”'
lever.
l
Upper
Orchestra
Wow:
With
this
lever
put
on,
“wow”
sounds
can
be
obtained
for
notes
of
the
upper
keyboard.
Lower
Orchestra
Wow:
With
this
lever
put
on,
the
lower
keyboard
notes
will
be
played
with
a
“wow”
effect.
REVERB
Several
degrees
of
reverb
are
abailable.
Reverb
i:
A
slight
reverb
effect
can
be
obtained
with
this
tablet.
Reverb
II:
A
deep
reverb
effect
can
be
obtained
with
this
tablet.
Note:
A
deeper
reverb
effect
is
provided
when
the
tablets
|
and
Il
are
put
on
at
the
same
time.
Thus,
three
kinds
of
reverb
effects
can
be
obtained.
LESLIE
This
electronic
organ
is
designed
exclusively
to
go
with
the
Leslie
Model
710
tone
cabinet.
Two
tone
cabinets
are
normally
required.
The
organ
is
built
to
produce
the
tibia
tones
from
the
rotary
(Leslie)
channel
and
the
other
tones
(orchestral
tones)
from
the
stationary
channel.
Slow:
A
slowly
rotating
Leslie
effect
(chorus)
can
be
obtained
with
this
lever
on.
Fast:
A
fast
rotating
Leslie
effect
(tremolo)
can
be
obtained
with
this
lever
on.
Leslie
Orchestra
Chorus:
When
this
lever
is
put
on, not
only
the
tibia
tones
but
also
the
orchestral
tones
are
played
with
Leslie
effects.
Orchestra
Ensemble:
A
string
ensembie
effect
can
be
obtained
by
using
this
lever.
This
effect
is
useful
only
for
the
orchestral
tones.
Note:
The
Leslie
orchestra
chorus
and
orchestra
ensem-
ble
effects
act
on
the
tones
produced
by
the
tone
levers.
The
preset
switch
[J
should
be
turned
on
when
using
the
above
effect.

Leslie
controls
SOLO
MANUAL
The
solo
manual
keyboard
is
to
be
used
solely
for
tones.
The
synthetic
tones
are
monophonic
fone
note
at
a
producing
the
tones
of
the
built-in
synthesizer.
The
time,
and
the
highest
tone
sounds
when
two
or
more
keys
synthesizer
affords
synthesized
tones
as
well
as
14
preset
are
fingered
simultaneously.
Synthesizer
preset
tones
;
y
P
Synthesizer
controls
Page
oh
Solo
manual

PRESET
TONES
Violin
Saxophone
Tuba
Trombone
Trumpet
Horn
Clarinet
Flute
Guitar
Electric
bass
Whistle
Voice
Shakuhachi
Shamisen
SYNTHETIC
TONES
A
variety
of
tone
can
be
synthesized,
for
which
a
group
of
controllers
are
provided.
Controller
The
controllers
are
divided
into
two
groups:
one
group
provides
control
over
the
entire
synthesizer
(preset
tones
and
synthetic
tone)
and
the
other
controls
only
the
synthetic
tones
*
Controller
for
entire
synthesizer
è
Wow:
It
gives
a
“wow”
effect
to
the
synthesizer
tones,
Its
effect
can
be
varied
by
depressing
the
expression
pedal
in
various
degrees.
è
Glow:
This
produces
an
effect
like
the
flatted
attack
in
playing
a
flute.
The
effect
can
be
delayed.
®
Sustain:
This
keeps
sound
going
even
after
the
key
is
released.
However,
this
effect
differs
a
little
from
the
manual
and
pedal
keyboard
sustain
keys.
The
attenua-
tion
curve
is
determined
by
the
envelope
of
the
loudness
control.
Use
of
the
control
with
the
electric
bass
and
guitar
makes
performance
very
authentic.
®
Reverb
Volume:
This
controller
is
used
to
give
reverb
effect
to
the
synthesizer
tones.
Turn
it
clockwise
for
greater
reverberation
and
counterclockwise
for
less
reverberation.
Reverberation
is
off
when
the
contro!
is
turned
to
the
left-most
position.
®
Solo
Volume:
This
provides
control
of
the
synthesizer
volume
(solo
keyboard).
Sound
increases
as
it is
turned
clockwise.
@
Tuner
Block:
The
controls
related
to
the
pitch
of
the
solo
keyboard
are
gathered
in
this
block.
Slope:
This
is
used
to
determine
the
scale
between
octaves.
It
permits
1
octave
(12
keys)
to
be
tuned
with
the
standard
scale
or
to
be
converted
into
a
detuned
scale,
Tune:
This
is
provided
to
change
the
pitch
of
the
entire
solo
keyboard,
The
pitch
can
be
tuned
higher
or
lower
with
this
knob,
Glide:
This
is
used
to
determine
the
glide
time
of
a
portamento.
Turning
the
knob
clockwise
increases
the
glide
time
(time
required
for
frequency
shifting
from
one
note
to
the
next).
The
glide
time
is
reduced
to
zero
for
normal
playing
when
the
knob
is
turned
fully
counterclockwise,
Such
instruments
as
trombone
will
give
an
even
better
performance
if
played
with
a
touch
of
glide.
*
Controller
for
synthesizer
(synthetic
tones)
only
The
controllers
described
below
should
be
used
with
the
preset
switch
of
the
solo
keyboard
set
to
the
synthe-
sizer.
@
Range:
This
is
a
six-position
rotary
switch
to
determine
the
footage
of
the
solo
keyboard
(4’,
8’,
16‘,
32").
Set
the
switch
to
the
desired
footage.
Noise:
With
the
rotary
switch
set
to
this
position,
the
tone
becomes
a
white
noise,
which
may
be
utilized
to
produce
the
sound
of
wind
or
waves,
OFF:
The
tone
sources
are
canceled
when
the
switch
is
in
this
position.
This
position
is
used
when
the
oscillation
sound
of
the
VCF
(filter
control)
described
later
is
used
as
a
sound
source,
for
example
to
create
special
effects
requiring
unstable
pitch.
©
Filter
Control
Block:
The
controllers
related
to
the
tones
of
the
synthesizer
are
grouped
in
this
part.
The
tone
of
a
musical
instrument
rarely
retains
a
constant
sound
from
the
beginning
to
the
end
of
its
sounding;
it
usually
fluctuates
irregularly.
This
filter
control
block
changes
the
tone
colors
after
notes
have
started
to
sound
(keys
have
been
pressed).
Low
Pass:
This
determines
the
passing
frequency
of
the
filter.
Sound
becomes
harder
as
the
knob
is
turned
clockwise
and
softer
as
it
moves
counterclockwise.
This
is
sometimes
called
a
cutoff.
Emphasis:
This
produces
a
resonant
point with
the
frequency
determined
by
the
low
pass
and
decides
the
degree
of
emphasizing
harmonics.
This
is
also
Known
as
a
peak.
The
peak
lowers
and
the
harmonics
decrease
as
the
knob
is
turned
counterclockwise,
and
the
peak
grows
stronger
when
the
knob
is
turned
clockwise.
Oscillation
is
caused
by
intensifying
the
peak,
and
an
oscillation
tone
determined
by
the
balance
of
the
low
pass
and
emphasis
settings
is
obtained
regardless
of
tones.
This
can
be
applied
to
the
creation
of
special
effect
sounds.
Attack
[
J
->
_-7
]:
This
is
used
to
set
the
rise
of
a
tone.
The
rise
of
a
tone
refers
to
its
change
from
a
soft
sound
to
a
hard
sound.
The
tone
color
changes
increasingly
slowly
as
the
knob
is
turned
clockwise,
while
its
change
quickens
as
it
is
turned
counterclock-
wise.
Orchestral
tones
will
be
more
authentic
effective
when
played
with
a
slow
attack.
Decay
[L
>
NL
H:
Contrary
to
the
attack
knob,
this
determines
the
fall
of
a
tone.
The
tone
turns
into
decay
after
its
rise
time
set
by
the
attack
knob.
The
decay
grows
slower
as
the
knob
is
turned
clockwise
and
faster
as
it
is
turned
counterclockwise.

Sustain
[
J\——
]:
The
sustain
knob
is
used
to
make
the
tone
remain
constant
after
its
decay
has
started.
The
remaining
volume
increases
as
the
knob
is
turned
further
clockwise,
and
the
tone
at
the
end
of
the
attack
is
maintained
regardless
of
the
decay
setting
when
it
is
turned
fully
clockwise.
The
tone
changes
according
to
the
decay
determined
by
the
decay
knob
when
it
is
turned
fully
counterclockwise.
The
slow
attack
tones
of
a
reed
organ
and
an
accordion
can
be
created
by
turning
this
knob
fully
clockwise.
Level:
This
knob
controls
the
intensity
of
the
varia-
tions
set
by
the
attack,
decay
and
sustain
knobs,
thereby
deciding
to
what
degree
these
effects
should
be
applied
to
the
tone.
Variations
in
sound
can
be
obtained
by
turning
the
knob
clockwise,
and
it
becomes
less
varied
by
turning
counterclockwise.
With
the
knob
turned
fully
counterclockwise,
a
tone
deter-
mined
by
the
low
pass
and
emphasis
settings
is
obtained,
one
which
is
free
from
the
attack,
decay
and
sustain
effects.
Loudness
Control
Block:
The
controls
related
to
the
volume
of
the
synthesizer
are
arranged
in
this
area.
Elements
of
sound
are
not
always
uniform
from
beginning
to
end,
and
the
characteristics
of
various
instruments
and
tones
are
consistent
with
the
manner
in
which
sounds
increase
and
diminish.
Attack[
J
>
—~_
J:
This
determines
the
attack
of
a
sound
by
changing
the
volume
after
a
key
has
been
depressed.
Turning
the
knob
counterclockwise
causes
a
quicker
rise.
The
sound
of
such
instruments
as
a
piano,
etc.
should
be
palyed
with
the
knob
turned
fully
counterclockwise
so
that
they
rise
the
fastest.
Turning
the
knob
clockwise
results
in
a
slower
attack,
which
is
effective
for
creating
the
tones
of
a
wind
instrument
and
strings.
Decay
[
L
>
\—
]:
This
determines
the
attenu-
ation
of
sound.
Turn
the
knob
to
the
right
for
slower
decay,
which
is
effective
for
creating
the
decay
sounds
of
a
guitar
and
piano.
Turn
the
knob
to
the
left
for
faster
decay.
This
helps
authenticate
the
sounds
of
the
wind
instruments,
such
as
a
tuba,
French
horn,
etc.
Sustain
[
JA
]:
Though
the
title
is
the
same
as
those
of
the
upper
manual
and
pedal
keyboards,
the
effect
differs
from them
slightly.
This
is
used
to
define
how
long
the
tone
lasts
after
the
decay,
as
in
the
filter
control.
The
remaining
sound
increases
and
the
decay
effect
lessens
as
the
knob
is
turned
clockwise.
The
knob
should
be
turned
fully
clockwise
when
the
continuous
sounds
of
an
electronic
organ
are
required.
The
remaining
sound
lessens
as
the
knob
is
turned
counterclockwise.
Turn
the
knob
counterclockwise
to
use
the
damping
curve
of
decaying
sounds
like
those
of
a
piano,
Vibrato
Block:
The
controllers
related
to
the
fre-
quency
modulation
of
the
synthesizer
are
grouped
in
this
area.
In
short,
vibrato
effects
are
produced
by
these
controls.
Unlike
the
electronic
organ,
a
variety
of
vibrato
effects
can
be
obtained.
Depth:
This
control
defines
the
depth
of
vibrato.
Tur
the
knob
to
the
right
for
deeper
vibrato
and
to
the
lef
for
less
vibrato.
No
vibrato
is
produced
when
the
kno
is
turned
to
the
far
left.
While
the
electronic
orga
usually
provides
vibrato
as
deep
as
20
cents,
th
synthesizer
can
afford
extremely
deep
vibrato,
exceec
ing
1
octave.
Speed:
This
determines
the
frequency
of
vibrato.
Th
knob
should
be
turned
clockwise
for
faster
speed
ant
counterclockwise
for
slower
speed.
Unlike
the
electro
nic
organ,
the
synthesizer
offers
a
wide
range
of
speet
changes.
Wave
form:
The
electronic
organ
employs
a
sine
wav
as
the
modulated
wave
for
vibrato,
and
the
synthesize
uses
various
wave
forms.
This
wave
form
controller
ha:
a
four-position
switch,
thereby
enabling
selective
use
©
four
wave
forms
to
suit
the
music.
Saw
tooth
wave
[
AANA
]:
The
frequency
repeat:
gradual
rises
and
abrupt
drops,
resulting
in
a
serratec
wave
form.
Square
wave
[
TUUL
]:
This
changes
as
if
twc
frequencies
were
repeated
alternately.
An
interesting
effect
can
be
created
by
selecting
this
difference
skillfully,
Sine
Wave
[7\“\“
]:
The
frequency
changes
as
mildly
as
that
of
the
electronic
organ.
Delay
Vibrato
[——~w_
]:
This
is
the
sine
wave
vibrato
provided
with
delay
effect.
This
is
effective
for
creating
the
sounds
of
the
string
and
wind
instruments.
RHYTHMER
RHYTHM
Ballad
Waltz
Mambo
Tango
Cha-Cha
Bossa
Noval
|
March
Bossa
Nova
II
Rhumba
Samba
Beguine
Shuffle
Swing
Bolero
Rock
Variation
1
—
4
Swing
Variation
1
—
4
Swing
2
—
4
Beat
Select

RHYTHM
CONTROL
Rhythm
Start:
A
rhythm
is
produced
by
using
this
tablet.
Rhythm
Break:
With
this
tab
turned
on,
rhythm
is
interlocked
with
the
pedal
and
lower
manual
key-
boards.
The
first
rhythm
beat
starts
at
the
same
time
that
a
key
or
pedal
is
depressed,
and
it
stops
when
a
depressed
key
is
released.
Intro:
With
this
tablet
turned
on,
an
introduction
is
provided
before
the
rhythm
starts.
When
using
the
tablet,
it
should
be
put
on
before
the
“rhythm
start”
tablet
is
set.
Note:
Of
the
above
three
tablets,
the
“rhythm
start”
tablet
has
first
priority;
therefore,
the
other
two
tablets
will
remain
inoperative
if
the
“rhythm
start”
tablet
is
turned
on
first.
As
already
stated,
the
“intro”
tablet
should
be
set
before
the
“rhythm
start”
tablet
is
put
on
or
rhythm
with
an
introduction
will
not
sound.
When
using
the
“break”
tablet,
the
tablet
alone
should
be
turned
on.
INTRO
SYNCHRO
Rhythm
controls
Rhythm
Volume:
This
controls
the
volume
of
the
rhythmer.
The
volume
increases
as
the
knob
is
turned
to
the
right
and
decreases
as
it
is
turned
to
the
left.
Tempo:
This
knob
is
used
to
adjust
the
rhythm
tempo.
The
tempo
quickens
as
the
knob
turned
to
the
right
and
slows
down
as
it is
turned
to
the
left.
Tone:
The
rhythm
tone
quality
can
be
adjusted
by
this
slide
control.
The
drum
tones
become
stronger
when
the
lever
is
pulled
toward
the
player,
and
the
cymbals
tone
becomes
stronger
when
the
lever
is
pushed
in
farther.
A
balanced
tone
will
result
with
the
lever
set
at
the
midway
point.
Bass
Drum
Volume
Low
Conga
Volume
High
Conga
Volume
Claves
Volume
Cabasa
Volume
Guiro
Volume
As
the
above
slide
controls
are
pulled
toward
the
player,
the
respective
tones
are
stressed
more.
They
weaken
as
the
controls
are
pushed
in
farther,
and
no
tones
will
be
produced
if
set
to
the
innermost
position,
allowing
free
control
of
each
instruments
volume.
These
controls
should
be
set
in
the
middle
position
for
normal
playing
conditions.
TEMPO
LAMP
With
the
rhythmer
turned
on,
this
lamp
flashes
with
the
first
beats,
enabling
visual
recognition
of
the
rhythm.
Rhythm
percussion
volume
Rhythm
select
switches
HAND
PERCUSSION
BUTTON
The
effect
sounds
of
the
respective
indicators
can
be
obtained
by
pushing
these
buttons.
Each
volume
can
be
adjusted
by
the
rhythm
volume
knob.
This
electronic
organ
has
the
following
four
percussion
buttons:
Tap
Roll
Drum
High
Conga
Siren
SYNCHRO
PERCUSSION
The
synchro
percussion
produces
the
percussion
sounds
in
conjunction
with
the
pedal
keyboard
and
lower
manaul
keyboard,
Synchro
Percussion:
This
tablet
is
used
to
turn
on
and
off
the
synchro
percussion.
The
synchro
percussion
will
not
operate
unless
the
tablet
is
on.

10
Pedal
Keyboard
Pedal
Brush
Pedal
Cymbal
Pedal
Claves
With
these
tablets
on,
the
respective
sounds
are
produced
in
conjunction
with
the
pedal
keyboard,
Lower
Manual
Keyboard
Lower
Snare
Drum
Lower
Brush
Lower
Conga
With
these
tablets
on,
the
respective
sounds
are
produced
in
conjunction
with
the
lower
manual
keyboard.
AUTO
ARPEGGIO
The
auto
arpeggio
is
the
function
by
which
a
splendid
arpeggio
performance
can
be
obtained
automatically
in
the
tones
of
depressed
keys
simply
by
holding
down
the
keys
played
on
the
lower
keyboard.
Auto
arpeggio:
Used
to
turn
on
and
off
the
auto
arpeggio
function.
Note
that
auto
arpeggio
will
not
be
played
when
the
tablet
is
not
set
to
the
ON
position
even
if
some
of
the
arpeggio
voice
tablets
and
pattern
buttons
are
turned
on.
Voice
The
tones
of
the
piano,
harpsichord
and
harp
are
predetermined
exclusively
for
the
auto
arpeggio.
Use
them
as
desired.
However,
note
that
auto
arpeggio
will
not
sound
if
any
of
these voice
tablets
is
not
set
to
the
ON
position.
Pattern
Three
auto
arpeggio
patterns
are
available
as
described
below
and
may
be
used
as
desired.
Up:
With
this
button
pushed,
an
arpeggio
rises
from
a
low
key
to
a
high
key.
The
arpeggio
stops
when
the
hand
is
released
from
the
keyboard
and
starts
again
with
the
first
low
key
when
lower
manual
keys
are
depressed
once
more,
Up-Down:
Pushing
this
button
produces
an
arpeggio
which
rises
from
a
low
key
to
a
high
key
and
returns
to
the
low.
Repeat:
With
this
button
pushed,
an
arpeggio
repeat-
edly
sounds
from
a
low
key
to
a
high
key
and
vice
versa
until
the
lower
manual
keys
are
released.
Note:
The
auto
arpeggio
operates
only
while
the
lower
manual
key
is
being
depressed,
and
comes
to
a
stop
when
the
hand
is
released.
It
starts
from
the
first
bass
of
the
keys
played
when
depressed
again.
Control
Rate:
Arpeggio
speed
is
adjusted
by
turning
this
knob.
The
speed
increases
and
decreases
respectively
when
the
knob
is
turned
clockwise
and
counterclockwise.
Arpeggio
Balance:
The
knob
controls
the
arpeggio
volume.
The
volume
increases
and
decreases
respec-
tively
with
the
clockwise
and
counterclockwise
turning
of
the
knob.

OTHERS
Total
Volume:
This
controls
the
total
volume
of
the
organ.
Microphone
Reverb:
This
is
used
to
adjust
the
reveber-
ation
desired
in
the
microphone
channel
(used
in
speaking
or
singing}.
Reverb
increases
and
decreases
respectively
with
the
clockwise
and
counterclockwise
turning
of
the
knob.
No
reverb
effect
sounds
when
the
knob
is
turned
fully
counterclockwise.
Microphone
Volume:
This
is
used
to
adjust
the
volume
of
a
microphone.
Sound
volume
increases
and
de-
creases
respectively
when
the
knob
is
turned
clockwise
and
counterclockwise.
CONNECTION
WITH TONE
CABINET
The
Model
T-5
electronic
organ
has
but
one
small
monitor
speaker
built
in
the
console;
therefore,
the
organ
cannot
be
played
with
the
self-contained
speaker
alone.
The
Leslie
Model
710
is
the
standard
tone
cabinet
specifically
designed
for
the
T-5.
Although
the
organ
may
Tone
cabinet
710
Monitor
volume:
The
knob
is
provided
to
adjust
the
sound
volume
of
the
monitor
speaker
housed
in
the
organ
console.
Expression
pedal:
Depressing
and
releasing
the
pedal
permits
playing
with
more
expression.
Power
Switch:
The
organ
is
actuated
by
turning
on
this
switch.
Pilot
Lamp:
This
lamp
lights
up
when
the
organ
is
turned
on.
be
played
with
single
tone
cabinet,
two
units
are
the
minimum
required
to
fully
project
an
orchestral
ensemble.
An
exclusive
connecting
cable
(021600)
should
be
used
to
connect
the
organ
and
the
tone
cabinets.
27
Cable
021600
Tone
cabinet
710
When
additional
speaker
cabinets
are
used
in
a
concert,
the
connections
should
be
made
as
illustrated
below,
using
the
power
relay
(021709),
Power
relay
021709
710 710
T-5
Cable
Cable
02
able
021600
021600
710
710
11

12
Connectors
LEVEL
ADJUSTMENT
The
T-5
produces
its
output
through
two
channels,
the
rotary
channel
and
the
stationary
channel.
The
output
level
of
each
channel
can
be
adjusted
by
a
volome
control
fitted
with
the
Leslie
710.
The
standard
volume
level
is
Volume
controls
obtained
with
the
control
in
the
neutral
position.
Adjust
it
according
to
the
hall
condition
and
locations
of
the
tone
cabinets.
Also,
adjust
the
controls
to
balance
the
volume
properly
between
the
two
channels.

MODEL
T-5
SPECIFICATIONS
Keyboards
Upper
Manual
61
keys
Lower
Manual
61
keys
Pedals
25
keys
Solo
Manual
37
keys
Upper
Manual
Voices
Tibia
16’,
8’,
5-1/3",
4’,
2-2/3'
2°,
1-3/5',
1-1/3",
1
Violin
8°
Clarinet
38
Trumpet
8
Oboe
8’
Kinura
8
String
4
Orchestra
Sustain
Orchestra
Accent
Upper
Manual
Drawbars
Tibia
16’,
8’,
51/3",
4’,
2-2/3°
Piano,
Banjo,
Harpsichord
Glockenspiel,
Mandolin
Marimba,
Chimes,
Vibraphone
Drawbars
Cancei
Sustain
Upper
to
Lower
(Coupler)
Upper
Manual
Preset
Lever
Switches
Drawbars
Tibia
Chorus
Reed
Chorus
Lower
Manual
Voices
Cello
8'
Clarinet
8'
Horn
8
Orchestra
Accent
Lower
Manual
Drawbars
Tibia
16°,
8“,
5—1/3',
4°,
2—2/3'
2’,
1-3/5", 1-1/3",
1°
Lower
Manual
Preset
Lever
Switches
and
Drawbars
Drawbars
Tibia
Chorus
Reed
Chorus
Pedal
Drawbars
Tibia
16',8'
Bass
Guitar
String
16’,
8°
Pedat
Controls
Pedal
Sustain
on/off
Pedal
Sustain
tong/short
Soio
Manual
Voices
*
Preset
Voices
Violin,
Saxophone,
Tuba
Trombone,
Trumpet,
Horn
Clarinet,
Flute,
Guitar
Electric
Bass,
Whistle
Voice,
Shakuhachi
(bamboo
flute}
Shamisen,
Synthesizer
*
Controls
Wow,
Glow,
Sustain
Reverb
Volume,
Solo
Volume
Filter
Control
(Low
pass,
Emphasis,
Attack
Decay,
Sustain,
Level}
Loudness
Control
(Attack,
Decay,
Sustain}
Vibrato
(Depth,
Speed,
Waveform)
Tuner
(Slope,
Tune,
Glide)
Range
(32',
16°,
8’,
4’,
Noise,
off)
Effects
Upper
Attack
Forte
Upper
Decay
Long
Upper
Attack
4
Upper
Attack
2—2/3'
Upper
Drawbar
Attack
The
specifications
and
prices
are
subject
to
change
without
notice.
Upper
Orchestra
Wow
Lower
Orchestra
Wow
Orchestra
Ensemble
Reverb
|
Reverb
II
Tremolo
(Leslie)
Leslie
Fast
Leslie
Slow
Leslie
Orchestra
Chorus
Orchestra
Ensemble
Automatic
Rhythm
(Rhythmer)
*
Rhythm
Selectors
Bailad,
Waltz,
Mambo,
Tango
Cha-cha,
Bossa
Nova
|,
March
Bossa
Nova
2,
Rhumba,
Samba
Rock,
Beguine,
Shuffle,
Swing
Bolero,
Rock
Variation
Swing
Variation,
2—4
Beat
select
*
Rhythm
Controls
Rhythm
Start,
Rhythm
Break
Intro,
Rhythm
Volume,
Tempo
Tone
Bass
Drum
Volume
Claves
Volume
Guiro
Volume
Low
Conga
Volume
High
Conga
Volume
Cabasa
Volume
*
Tempo
Indicator
Lamp
Hand
Percussion
Buttons
High
Conga
Roll
Drum
Tap
Siren
Synchro
Percussion
On/Off
Pedal
Brush
Pedal
Cymbal!
Pedal
Claves
Lower
Snare
Drum
Lower
Brush
Lower
Conga
Automatic
Arpeggio
*
Voices
Piano
Harpsichord
Harp
*
Controls
Rate
Up
“Up-Down
Repeat
Arpeggio
Balance
(Volume}
Others
Microphone
Reverb
Microphone
Volume
Total
Volume
Expression
Pedal
Power
Switch
Pilot
Lamp
Monitor
Monitor
Volume
Monitor
Speaker
(1—-8"
x
6")
Monitor
Amp.
10
watts
r.m.s.
Dimensions
Width
140
cm
Height
117
cm
Depth
130
cm
Weight
Console
297
kg
Bench
29
kg
Finish
Rose
wood
and
Black
polish
13

PRINTED
IN
JAPAN
Other manuals for T-5
1
Table of contents
Other Kawai Musical Instrument manuals

Kawai
Kawai MP11SE User manual

Kawai
Kawai CN33 User manual

Kawai
Kawai CN25 User manual

Kawai
Kawai 500 User manual

Kawai
Kawai SR3 User manual

Kawai
Kawai CN29 User manual

Kawai
Kawai CL25-LDS User manual

Kawai
Kawai CP115 User manual

Kawai
Kawai EGP-10 Grand E1 User manual

Kawai
Kawai Concert Performer Series Digital Piano CP110 User manual

Kawai
Kawai PN Series User manual

Kawai
Kawai Nord Grand User manual

Kawai
Kawai Concert Performer CP205 User manual

Kawai
Kawai Heritage 200 User manual

Kawai
Kawai Stage Piano MP5 User manual

Kawai
Kawai ES520 Manual

Kawai
Kawai CN35 Technical manual

Kawai
Kawai KSP 5 User manual

Kawai
Kawai CN34 Technical manual

Kawai
Kawai CL36 User manual