Steinsvik Orbit 3100 User manual

Steinsvik AS Rundhaug 25, 5563 Førresfjorden, Norway | +47 52 75 47 00 | pos[email protected] | www.steinsvik.no
User Manual
Orbit 3000-series Camera

User manual | Orbit 3100/3300/3500/3400/3600 Camera
2
CONTENT LIST
1 Equipment that is included in this user manual ................................................................................ 3
2 Introduction ....................................................................................................................................... 4
2.1 Description ............................................................................................................................... 4
2.2 Contact information ................................................................................................................. 4
3 Health and safety ............................................................................................................................. 4
3.1 Recommendations and reservations ....................................................................................... 4
3.2 Disposal information ................................................................................................................ 5
3.3 Assessment of risk of escape .................................................................................................. 5
4 Installation ........................................................................................................................................ 5
4.1 Camera and camera cable ...................................................................................................... 5
5 Usage requirements ......................................................................................................................... 7
5.1 General use ............................................................................................................................. 7
5.2 Routinely inspection ................................................................................................................ 7
5.3 Problem diagnosis ................................................................................................................... 7
5.4 Disassembly and storage ........................................................................................................ 8
6 Service of camera ............................................................................................................................ 9
6.1 Routinely maintenance ............................................................................................................ 9
6.2 Indications that camera needs service/repair at supplier ...................................................... 10
6.3 Service which can be carried out at site by operations personnel ........................................ 10
6.4 Procedure for cleaning of oxygen sensor on Orbit-3500 ....................................................... 12
User manual | Orbit 3100/3300/3500/3400/3600 Camera
3
1 EQUIPMENT THAT IS INCLUDED IN THIS USER MANUAL

User manual | Orbit 3100/3300/3500/3400/3600 Camera
4
2 INTRODUCTION
2.1 Description
The Orbit-3000 camera system is an advanced surveillance system for controlling fish feeding in
aquaculture, and for general inspection of fish in cages.
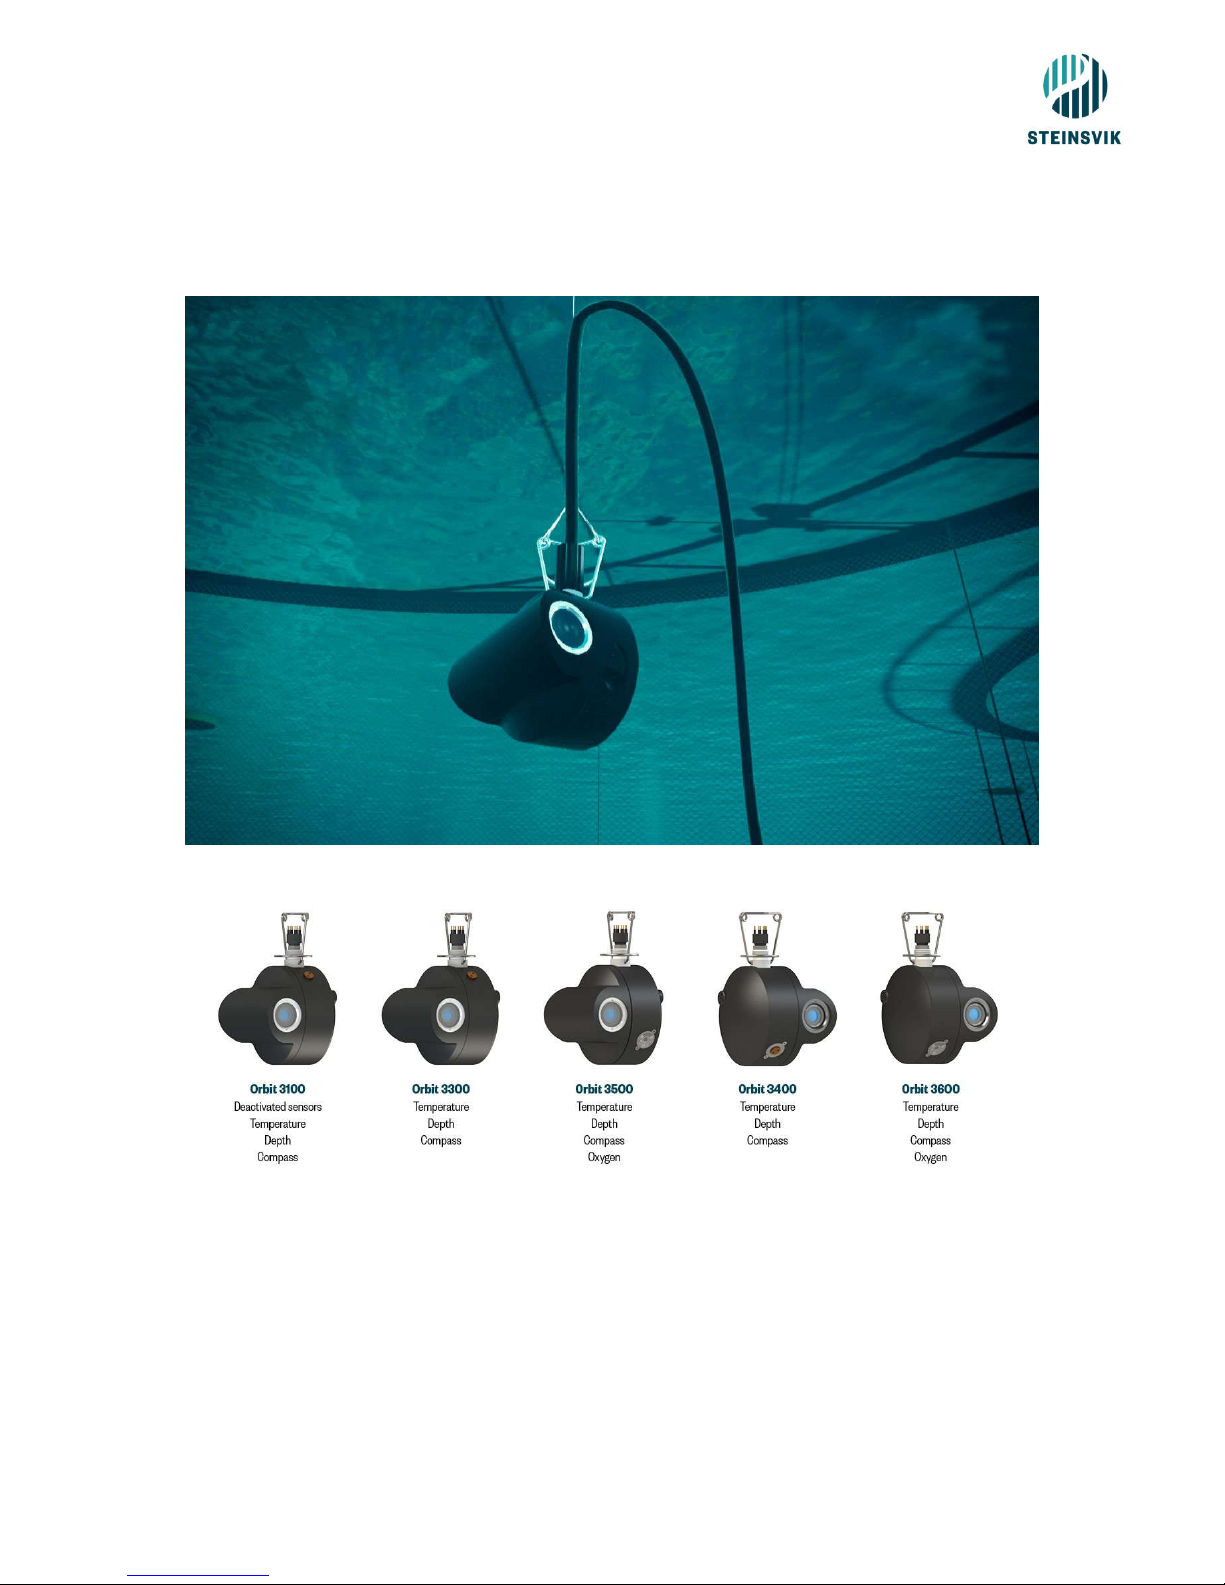
The system’s main component is an underwater camera with pan and tilt function:
Orbit-3100 – Camera with pan/tilt, with sensors but not activated
Orbit-3300 - Camera with pan/tilt, sensors: Temperature, depth and compass (TDC).
Orbit-3500 - Camera with pan/tilt, sensors: TDC and Oxygen.
Orbit-3400 – Camera pan/tilt, sensors: TDC.
Orbit-3600 – Camera pan/tilt, sensors: TDC, oxygen.
Additionally; Orbit-200 and Orbit-210 - surface, color camera with zoom. This is mounted on the edge
of the cage.
The cameras are powered and controlled by a PSU by the cage edge. In addition, the Orbit-3100,
Orbit-3300 and Orbit-3500 can be powered by a control desk, KB6000, which is connected to a 230V
AC and conveys low power and control signals to the connected camera. The Orbit-3100, Orbit-3300
and Orbit-3500 cameras can also be connected to a MB3000 portable control unit, which has a built-in
screen, joystick and 12V power to the camera.
For camera connection for these systems, see each systems user manual.
2.2 Contact information
Main number: +47 52 75 47 00 post@steinsvik.no
Service: +47 48 85 28 88 service@steinsvik.no
Support: +47 48 85 24 88 support@steinsvik.no
Post: Steinsvik AS
Rundhaug 25
N-5563 Førresfjorden
Norway
3 HEALTH AND SAFETY
3.1 Recommendations and reservations
In case of new installation by Steinsvik AS, the equipment is checked before and after installation to
eliminate danger of persons and fish.
When reconnecting equipment (with new generation) is it important to ensure the installation and
equipment are in accordance with the specifications given by Steinsvik AS. The user will not cause
any contamination for the fish.
The underwater cable’s contact surface is applied Molykote 44 or Molykote 111 to prevent intrusion of
moisture. The camera body’s external contact surface consists of POM, with some parts of stainless
steel and tempered Sikaflex to prevent fouling on the assembling screw.

User manual | Orbit 3100/3300/3500/3400/3600 Camera
5
3.2 Disposal information
PSU, winch and camera body are classified as EE-disposal.
Camera with depth sensor contains a minor amount of glycol.
The camera body mainly consist of POM with minor parts in stainless steel.
Fasteners (combi-mount, aluminum pipes and winch brackets) are made of aluminum.
External bolts, screws and nuts are made of stainless steel.
The wires contain copper.
During storage, there are no danger of environmental pollution. All parts are recyclable.
3.3 Assessment of risk of escape
The Orbit Camera System represents, under normal operating conditions, no risk of escape when
used in a cage in a fish farm. No other parts of the camera system can cause damage to the cage
nets, ropes or other pieces of plastic or steel cage construction under normal operating conditions.
Issues:
1. The camera suspension rope breaks: The camera is designed without sharp edges. It will not
cause holes or wear on the cage net, even though it sinks to the bottom of the cage. If the
camera remains on the bottom for a long while, and/or is being pinched during lift-up or other
equipment, this could cause wear on the cage net.
2. Suspension on the cage edge: Combi-fixing at the cage edge is made of high strength
aluminum and are secured with stainless steel bolts and screws. These are normally not in
contact with the cage net. If the parts loosen, or they are not installed properly, it may be a risk
of wear on the cage net; this will be at a height of 50-80 cm above the water surface.
3. The winch strength: The winch has integrated load protection and is set to lift 10 kg in sea. At
overloads, the engine protection will disable the motor, to prevent the rope/cable/winch (which
is managed by the winch) to be hooked and wear hole in the cage net, when maneuvering the
winch.
4 INSTALLATION
4.1 Camera and camera cable
4.1.1 Wiring on the PSU
Tie the Orbit-3XXX firmly to the camera rope from the winch. Make sure it hangs the correct way so
that the rope keeps the camera plug in the right positon. Fasten the camera cable to the camera. The
purpose of the camera rope is to tension relieve the camera cable to ensure that both the camera and
cable is lifted by the rope. The camera is then lowered in the water and the camera cable is laid out in
the cage. Tie a stop knot at the end of the camera cable and fix it to the mast to avoid unnecessary
stress to the plug in the PSU. Fasten the camera cable in the PSU marked “Camera”. Fasten the
Orbit-200/Orbit-210 on top of the mast and point it the direction you want to see. For Orbit-600 PSU
(and Orbit-3000 PSU), the cable is connected from the camera into the contact marked "Orbit-200".
On the Orbit-5xx PSU the cable is connected from the camera into the "Multi Contact 1". See picture 1
for illustration of how the connections in the PSU are.

User manual | Orbit 3100/3300/3500/3400/3600 Camera
6
Picture 1: Connections PSU
NOTE! Remember: do not connect 230V before everything else is completely wired. When
disassembling, remove the power before starting work.
4.1.2 Camera coupling
Before connecting the camera cable, make sure to add a thin layer Molykote 44 (approx. 1/10 of the
depth of the contact). See picture 2 below for illustration.
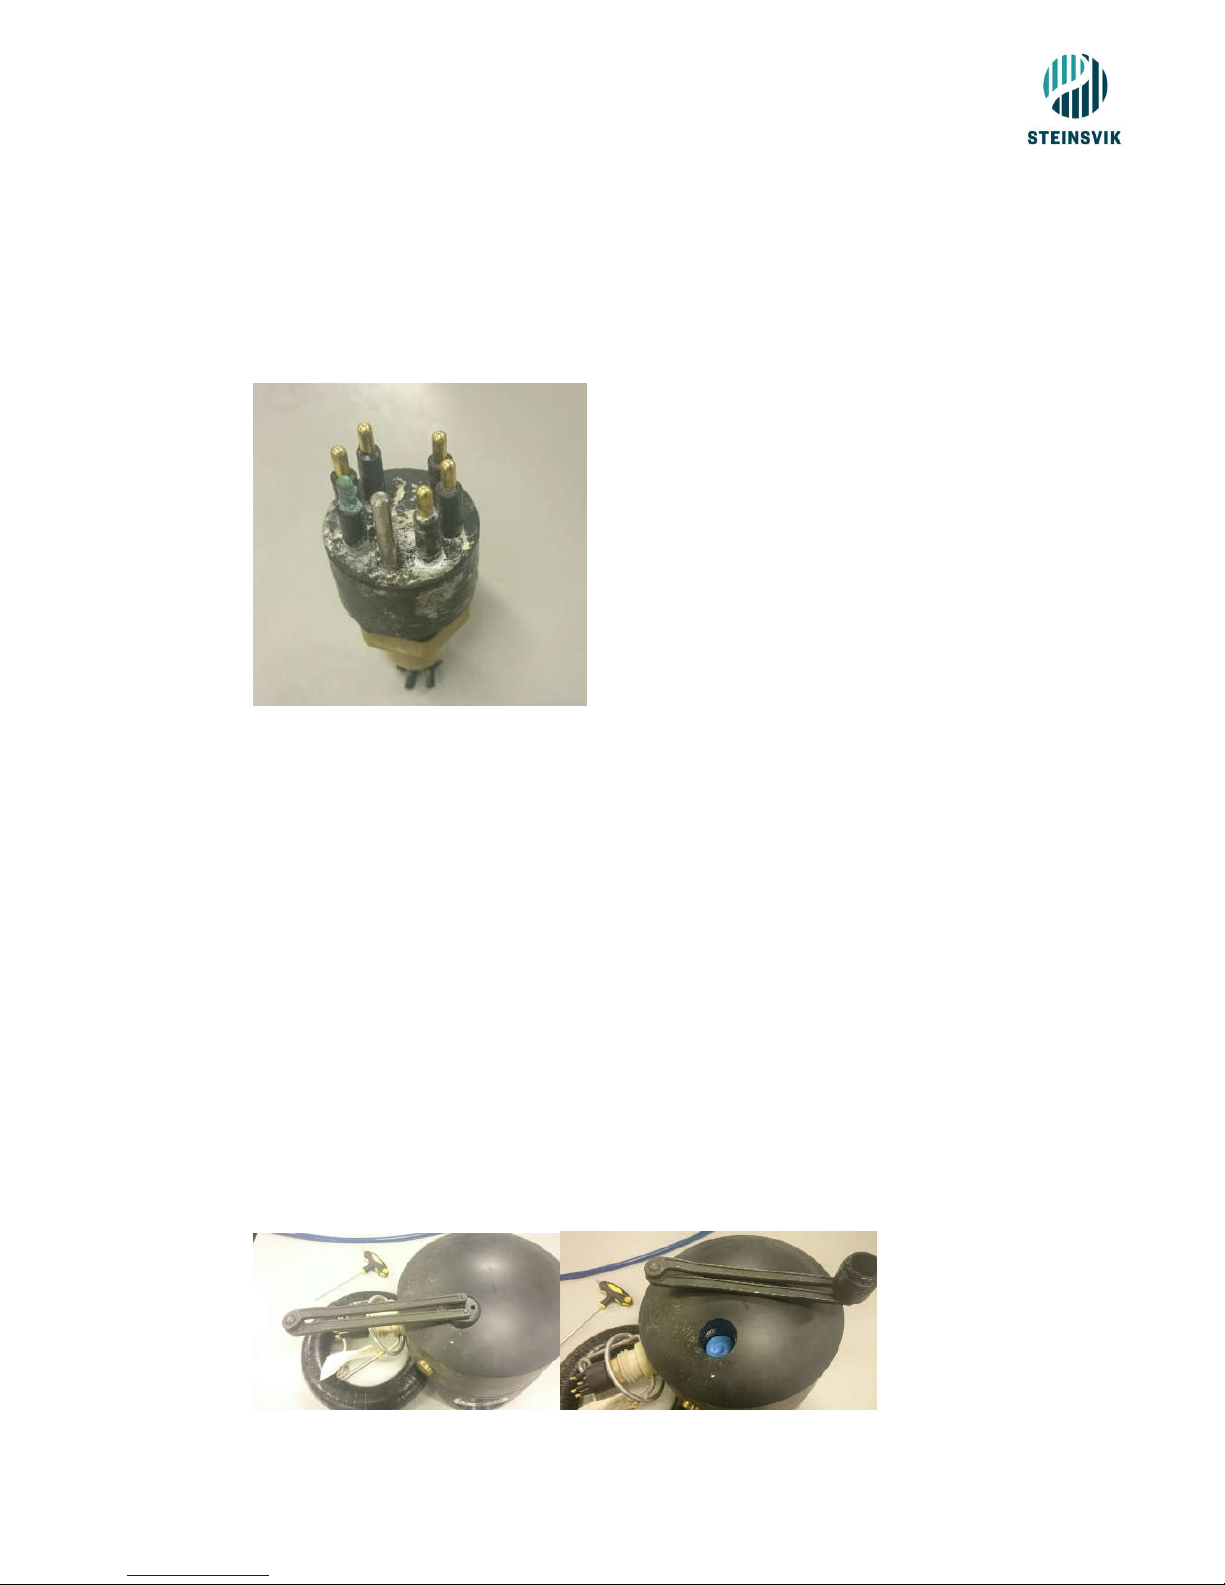
Picture 2: 6-pin underwater Connector with recommended level of grease
After the connector is disconnected, rinse thoroughly with Isopropyl alcohol to make sure all sand,
fouling etc. is taken out, and apply a new layer of Molykote 44.
Picture 3: Connecting cable to camera housing

User manual | Orbit 3100/3300/3500/3400/3600 Camera
7
Do not use tools to tight the black nut, only use your hands.
NB! Use of aerosol oils such as WD40 or electronic cleaner will destroy the contacts and cause the
water to intrude into the camera and camera cables. ONLY use silicon-based grease.
5 USAGE REQUIREMENTS
5.1 General use
The camera system is controlled from a PC or a control desk from a barge or land base. The winch
can be operated on the edge of the cage, to facilitate access to the camera for inspection. There are
mounted two switches for maneuvering the winch at the edge of the cage. The switches are marked.
One switch raise/lower the camera and the other switch move the camera sideways. Up/down can be
operated separately, but both switches must be operated at the same time to move the camera
sideways. To move the camera towards the winch; “raise” the switches. To move the camera from the
winch; press both switches down. Newer winches have three switches for maneuvering. These are
marked “up”, “down” and “sideways”.
NOTE! Camera, cables and winch contains no parts that can be repaired at site/customer.
All repairs must take place at Steinsvik AS or at authorized partners.
PSU can be opened for fuse replacement and modification of settings; this should only be performed
by instructed personnel.
5.2 Routinely inspection
Wipe the lens glass on the camera weekly. It is recommended to also clean the other parts of the
camera and the top plug can also be wiped clean for fouling/shells. This does not affect the use of the
camera, but is advantageously for dismounting for service/storage, etc.
NOTE! Pay particular attention to the sensors on the Orbit-3XXX-cameras. These sensors require
care when handling. This applies especially the film on the surface of the oxygen sensor. Only clean
the film with a soft cloth or gently with cotton buds. For dense fouling or damage of the film, the
environmental sensor will show incorrect values. If you suspect incorrect values, check the sensors for
fouling or visible damages.
Avoid using high-pressure washer on the camera.
5.3 Problem diagnosis
No pictures from the camera:
1. Check that the camera cable is intact and connected securely at both ends.
2. Physically check the camera for damages.
3. Check the PSU connectors, and make sure everything looks normal.
4. Check the camera fuse in the PSU.
No control of camera system
1. Check power supply to cage.
2. On the panel PC, use the “camera tools” in the Steinsvik software to verify communication and
status between PSU and camera.
3. For fiber facilities: check status on fiber link and fiber cables.
For wireless facilities: check that the frequency setup is correct, and that all antennas are intact.

User manual | Orbit 3100/3300/3500/3400/3600 Camera
8
5.4 Disassembly and storage
It is recommended that all equipment is dismantled for storage indoors. This also applies for combi-
fixing and ropes.
1. Cleanse the rope and flush with clean water to remove fouling. Check for wear points and
order new, if necessary.
2. Flush the aluminum parts with clean water. Apply grease on contact surfaces/threads to avoid
corrosion.
3. Flush, cleanse and dry the cables to remove any salt remains. Check for wear damages and
replace them, if necessary. Gently coil together for storage.
4. Clean the camera for fouling. It is recommended to send it for service after storage (to replace
gaskets and calibrate sensors).
5. Winch and PSU: clean to remove salt, check all connectors; consider whether they should be
sent for service to ensure they are ready to be used again without any problems. Store
indoors to avoid intrusion of moisture the connectors and lid, when it does not hang in
intended position (connectors downwards).
6. Fiber cable: if the fiber cable plug has been exposed to seawater during disconnecting, make
sure to rinse thoroughly in clean water immediately. Let it thoroughly dry before the lid is put
back on. Make sure the cable is not buckled when it is coiled, to avoid damage. Minimum coil
radius: 50 cm.

User manual | Orbit 3100/3300/3500/3400/3600 Camera
9
6 SERVICE OF CAMERA
6.1 Routinely maintenance
Daily:
1. After use, park the camera at 15m deep, with the lens facing down, to reduce sludge/fouling
the lens.
Weekly:
1. Check the winch rope for fouling and mussels to prevent the camera rope breaks and ensure
that the winch rope runs smoothly.
2. Wipe the entire camera, pay special attention to the lens on the camera and the sensors.
3. Wipe the membrane of the sensor station (Use soft cloth/cotton buds to avoid damage of the
membrane).
Monthly:
1. Check the attachment to cage; check that the bolts and fixing are fastened.
2. Check the strain relief, suspension rings, ropes and blocks are in good condition.
3. Check cables for kinks and damages.
Recommended service interval:
1. Camera: each generation
2. Winch and PSU: Every other generation
Else, if necessary:
1. Calibration/ exchange of oxygen film if needed/damage (estimated life without damage: about
5 years).
User manual | Orbit 3100/3300/3500/3400/3600 Camera
10
6.2 Indications that camera needs service/repair at supplier
1. If the underwater connector has white coating or is corroded, see picture 4 for illustration, you
have to check whether the camera cable is defect or if there is a leakage in the camera via the
underwater connector. The camera frame will typically flicker when this happens. Both camera
cable and the camera must be checked for leakage and sent for repair as soon as possible.
Picture 4: Corroded underwater Connector
2. If the camera frame flickers, it is an indication of either a poor camera cable or a fault in the
camera itself. Troubleshoot by switching camera on the camera cable (make sure you use a
camera that works properly); if the camera continues to flicker, the cable is defective. If not, it
is the camera. Send the defective part for repair.
3. It is an indication that the camera needs service if it rotates poorly up/down. Test manually by
rotating the camera part, and if the engines gives resistance and is not rotating easily, you
must send the camera for service.
6.3 Service which can be carried out at site by operations personnel
1. If the camera shows the wrong depth, (e.g. shows that there are several meters deep when
the camera is in the water surface) indicates that there may be fouling under the membrane
pressure sensor. Either send the camera to service or repair the camera in place. This is a
simple procedure:
The lid of the pressure sensor is removed, as shown in picture 5, and mussels and dirt are
washed out of the lid.
Picture 5: Removal of pressure sensor lid

User manual | Orbit 3100/3300/3500/3400/3600 Camera
11
The membrane tends to bulge; press with a finger. Optionally, remove the membrane and fill
with silicone oil/antifreeze (only 100% pure glycol, any contamination will cause gas bubbles
in the membrane). The silicone oil/antifreeze is to prevent the pressure sensor to be exposed
to seawater and to prevent corrosion on the sensor. See picture 6 for illustration.
Picture 6: Removal of membrane
Place the membrane back into the camera and note the orientation; the membrane has an up-
and a down side. If the membrane is damaged, it must be replaced. The glycol should
preferably float slightly above the membrane and a minimum of air should be under it. Make
sure the membrane is placed directly on its place and no parts are wrinkled.
Picture 7: Placing of membrane
Screw the lid back on and make sure not to over tighten, as the lid will cut the membrane.
Picture 8: Pressure sensor lid
Test if the membrane is properly in place with a small Allen key with rounded end.
When the key is gently pressed down, it should not hit directly on hard surfaces, but give
counter pressure. Neovision or monitor should display depth when the key is pressed down.
Do not press down harder than -3M, as the key can damage the membrane.
Picture 9: Testing of the pressure sensor
User manual | Orbit 3100/3300/3500/3400/3600 Camera
12
If the depth does not go down using the Allen key, you must remove the cover and reapply the
membrane.
2. If the bracket or some other parts of the camera have been mechanically damaged, the
camera must be sent for repair. If the camera starts to flicker, and this only happens when it is
deep in the cage, the electric connection between the camera halves has been mechanically
destroyed. This happens by careless handling onshore and that the camera has been bumped
hard against the ground with lopsided strain on camera halves.
3. If the camera has an oxygen sensor, the calibration can be checked approximately by +/- 5%
error margin by raising the camera up above the water surface. The camera will show near
100% saturation after 5 minutes. If the camera shows significantly below 95% or much more
than 105% the sensor must be sent for calibration. The sensor shows higher oxygen
saturation if the camera is above the water surface for a long period. This is because the
sensor is heated up without access to water-cooling, and because of this uses incorrect
temperature to calculate the oxygen percentage.
6.4 Procedure for cleaning of oxygen sensor on Orbit-3500 and Orbit-3600
From the service instructions on sensors from suppliers Aanderaa/Xylem:
Interval for cleaning:
This depends on fouling conditions at site. The sensor will measure oxygen levels in front of
the measuring film. If fouling is preventing the water from penetrating through to the surface of
the film, cleaning is necessary. If fouling is in the form of algae or organisms that produce or
consume oxygen, this can affect the measurement and cleaning would be required. A lot of
fouling on the film can also influence the response time of the measurement. Therefore, the
sensor should be cleaned regularly depending on fouling conditions at the location. We
recommend cleaning BEFORE the sensor is stored in air over a longer period (e.g. sent to
service).
Use a toothbrush or another soft brush to clean the film.
The sensor housing can be cleaned using a soft brush and clean water. Use a medium hard
toothbrush or Q-tip to clean the film itself. Fouling consisting of calcareous organisms can be
removed by immersing the sensor, or brush it with a toothbrush dipped in a weak vinegar
solution. Recommended solution is 1 part fresh water and 1 part 7% clear vinegar. Rinse with
(sea) water to neutralize the acid afterwards. If cleaning is performed immediately after the
sensor is taken out of the water is not normally necessary to use vinegar solution.
¨
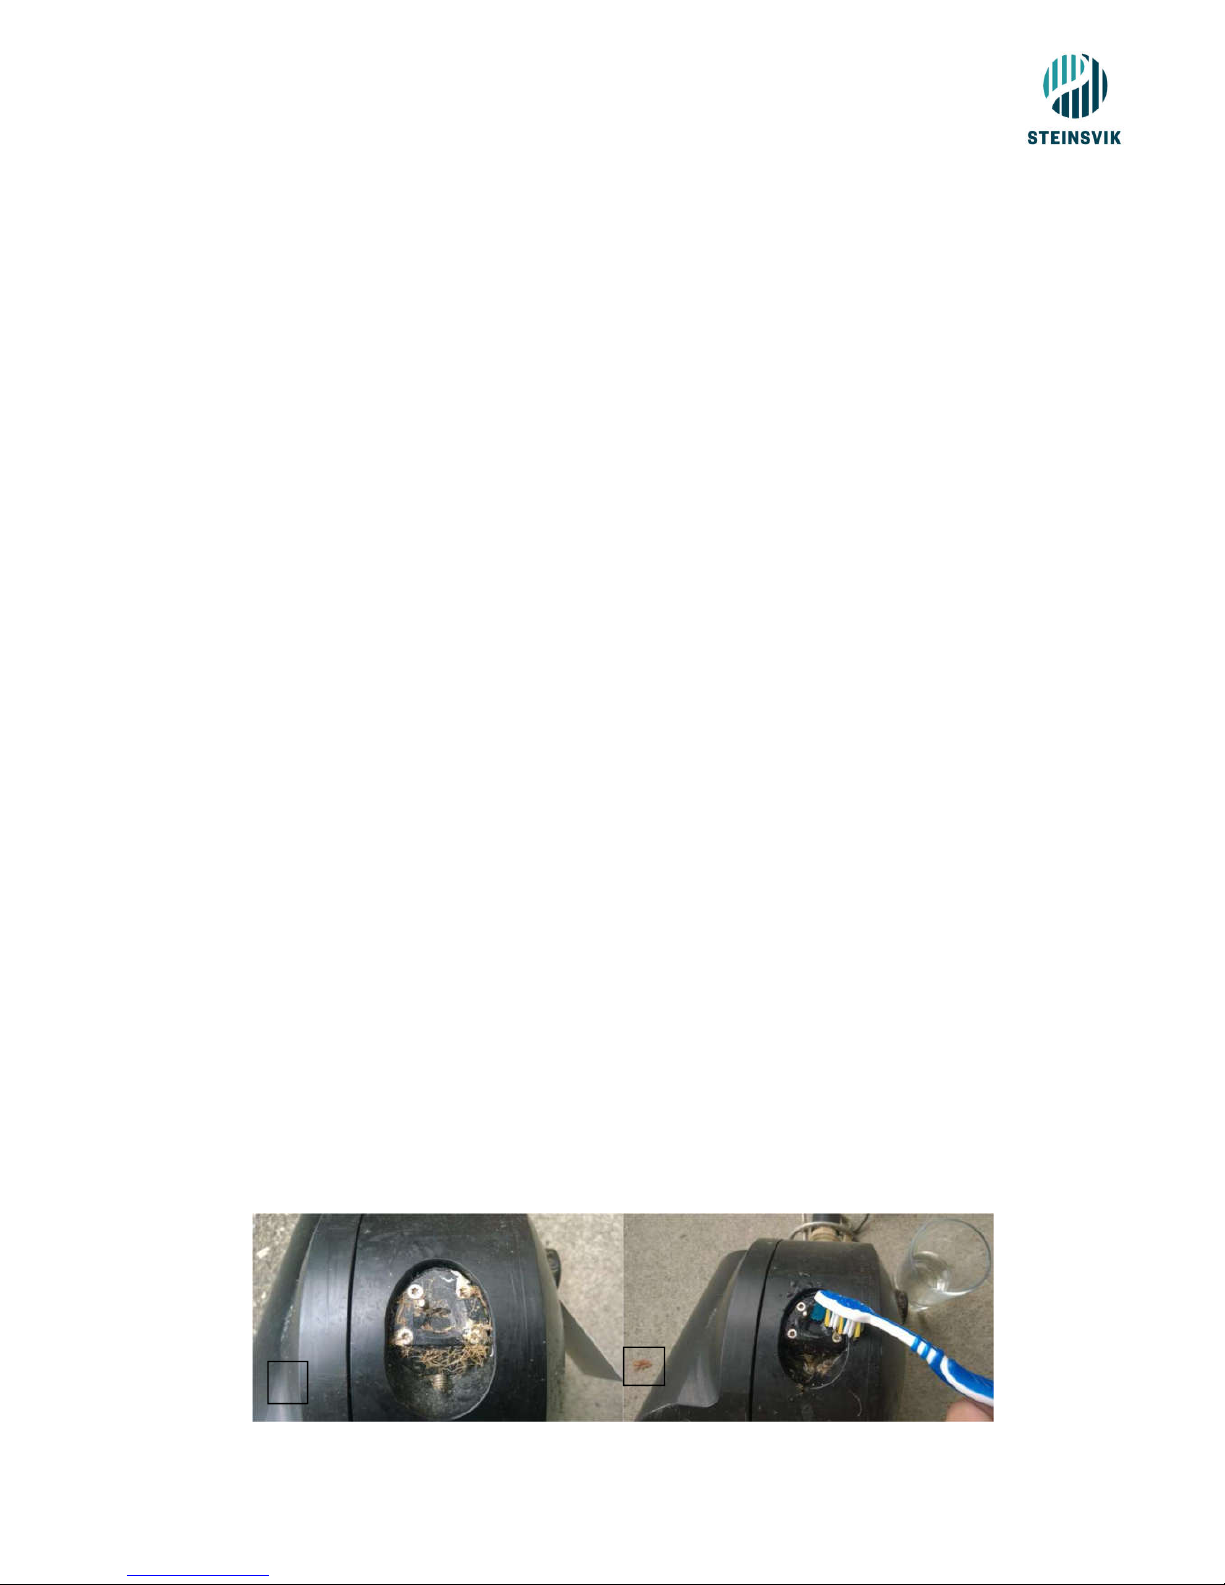
The pictures numbered 1 – 3 shows cleaning of the Orbit-3500 oxygen sensor, while the
pictures numbered 4 - 5 shows the oxygen sensor on Orbit-3600.
Picture 10: Orbit-3500 oxygen sensor
1 2

User manual | Orbit 3100/3300/3500/3400/3600 Camera
13
Picture 11: Clean Orbit-3500 sensor
Picture 12: Orbit-3600 oxygen sensor
Do not use sharp objects or a pressure washer to clean the film.
3
4
5
This manual suits for next models
4
Table of contents
Other Steinsvik Digital Camera manuals


