Stelrad LECCO User manual

LECCO
NEW & EXCLUSIVE TO STELRAD
The exclusive Stelrad Lecco towel rail adds a designer
touch of luxury to your room with its stunning combination
of brushed and polished steel finishes.

Boutique Series
LECCO
www.stelrad.com
Telephone: 0844 543 6200
t is the UK’s industry standard for heating outputs, which has an operating temperature of //ºC. If you have a low temperature
heat source you may wish to consider t or t output (see your installer or system designer or download from www.stelrad.com).
For EN442 data, technical and installation information please visit our website: www.stelrad.com and search product downloads.
t
50
(//ºC)
Height
mm
Length
mm
Stelrad
UIN
Heat output
Watts Btu/hr
1200 500 730001 200 682
STRAIGHT
NEW & EXCLUSIVE TO STELRAD
Boutique Series
LECCO
WALL MOUNTING INFORMATION
All dimensions in mm.
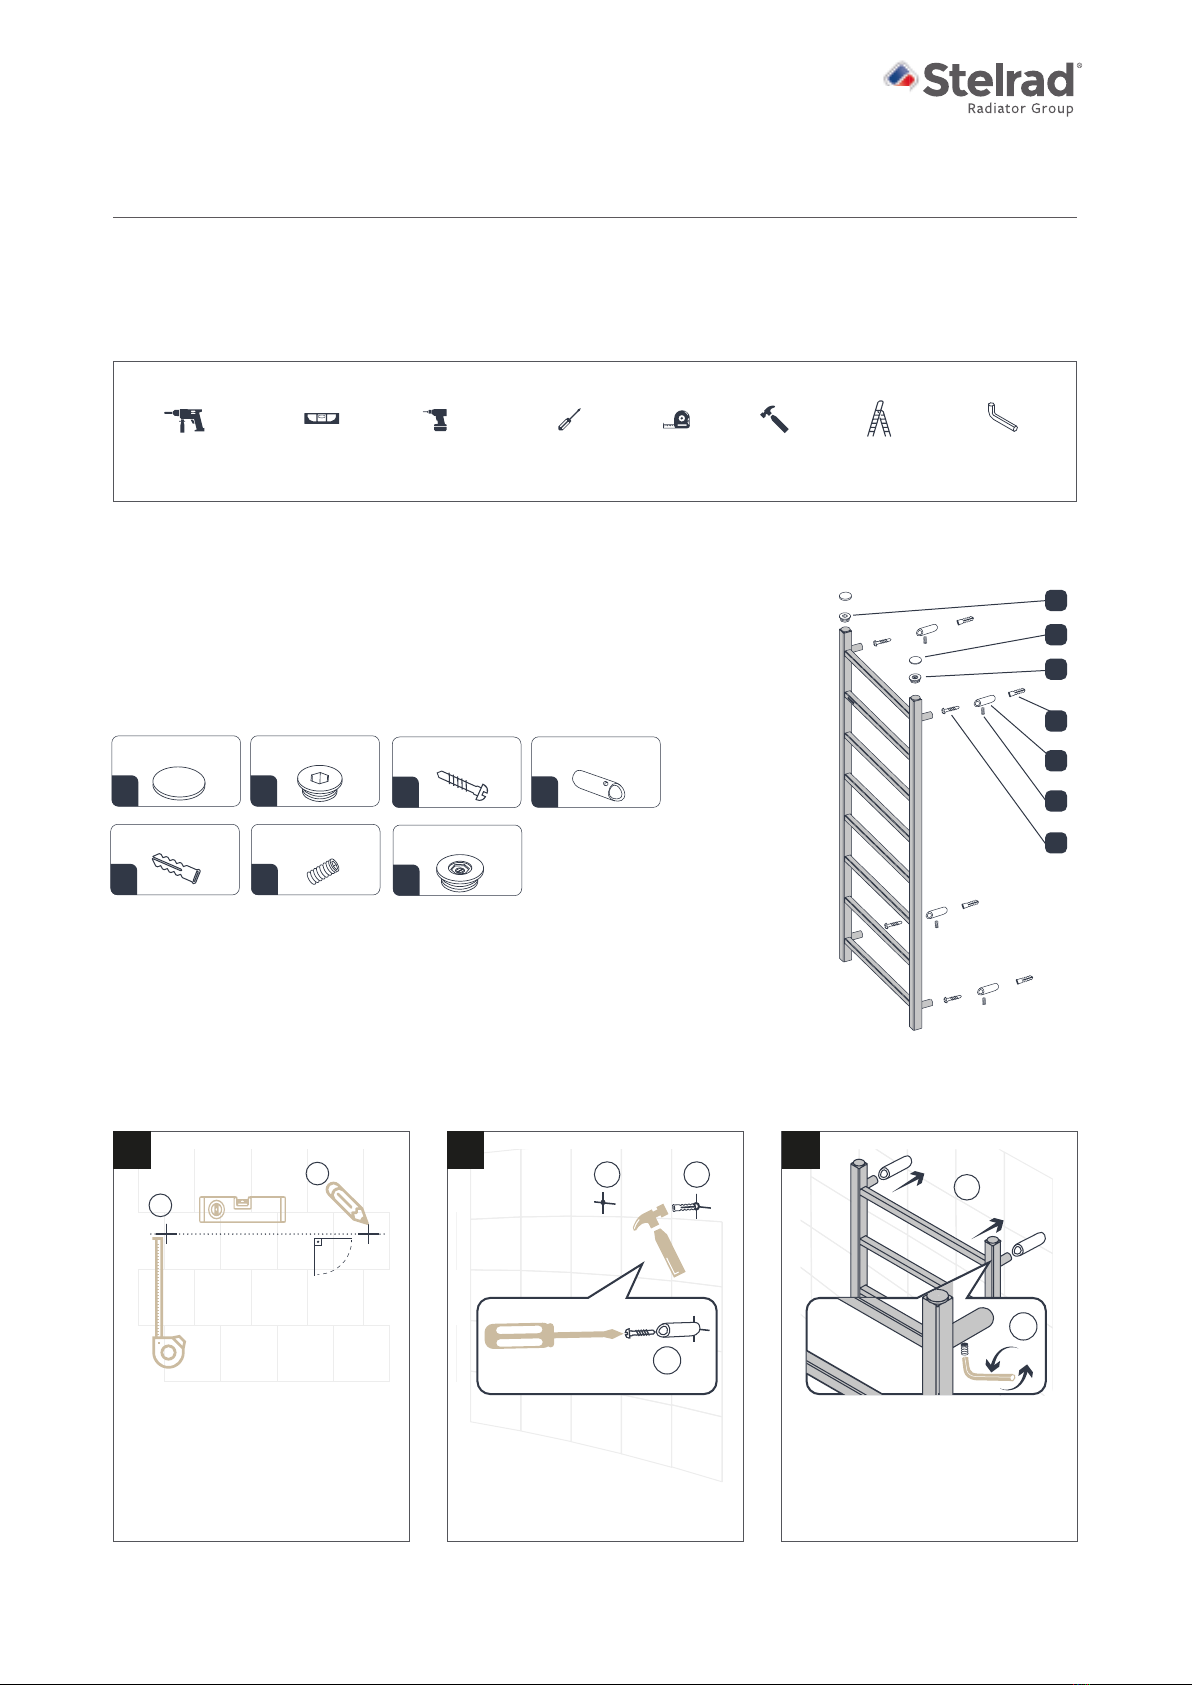
TOOLS REQUIRED FOR INSTALLATION
INSTALLATION INSTRUCTIONS
Place your radiator at least 12.5 cm above the floor.
Provide insulation by wrapping PTFE tape on the treads before installing the valves.
Apply silicone seal fluid to all treaded parts containing o-rings.
Connect your radiator to the utilities after following all the installation steps in the manual.
After connecting to the utilities, do not forget to discharge the trapped air inside the radiator.
INSTALLATION INSTRUCTIONS FOR THE STAINLESS STEEL TOWEL RAIL
INSTALLATION
90°
1 2 13
A
B
C
D
E
F
G
1- Adjust the height of your radiator by
using a metric ruler.
2- Set the location of your radiator as
desired, align with the ground by using
a spirit level and mark the position of
the wall mounting brackets.
1- Drill holes (Ø 10 mm) into the spots
you have marked.
2- Nail the wall plugs (E) in the holes by
using a hammer.
3- Screw the wall mounting brackets all
the way to the holes with the help of a
screwdriver.
1- Place your radiator into the wall
mounting brackets (D).
2- Insert the setscrews (F) into the slots
on the mounting brackets (D), adjust the
distance between the wall and your
radiator then tighten the setscrews by
using an Allen key (M3).
1
221
3
2
WARNING
STAINLESS STEEL
INSTALLATION GUIDE
TOOLS REQUIRED FOR INSTALLATION
ELECTRIC DRILL &
DRILL BIT
STEP LADDER
(FOR HIGH PRODUCTS)
SPIRIT LEVEL
CORDLESS
SCREWDRIVER
(BIT PH2)
CROSS POINT
SCREWDRIVER
&METRIC RULER HAMMER ALLEN KEY
CONTENT OF MOUNTING SET
Blind Plug (x1)
Wall Mounting
Screw (x4)
Wall Mounting Bracket (x4)
Wall Plug (x4) Setscrew (x4)
A B
C D
E F
Air Vent (x1)
G
Decorative Cap (x2)
(Only for mirror finished products)
&
∙ Place your radiator at least 12.5 cm above the floor.
∙ Provide insulation by wrapping PTFE tape on the treads before installing the valves.
∙ Apply silicone seal fluid to all treaded parts containing o-rings.
∙ Connect your radiator to the utilities after following all the installation steps in the manual.
∙ After connecting to the utilities, do not forget to discharge the trapped air inside the radiator.
90°
1 2 1
A
B
C
D
E
F
G
1- Adjust the height of your radiator by
using a metric ruler.
2- Set the location of your radiator as
desired, align with the ground by using
a spirit level and mark the position of
the wall mounting brackets.
1- Drill holes (Ø 10 mm) into the spots
you have marked.
2- Nail the wall plugs (E) in the holes by
using a hammer.
3- Screw the wall mounting brackets all
the way to the holes with the help of a
screwdriver.
1- Place your radiator into the wall
mounting brackets (D).
2- Insert the setscrews (F) into the slots
on the mounting brackets (D), adjust the
distance between the wall and your
radiator then tighten the setscrews by
using an Allen key (M3).
1
2
21
3
2
WARNING
ELECTRIC DRILL &
DRILL BIT
STEP LADDER
(FOR HIGH PRODUCTS)
SPIRIT LEVEL
CORDLESS
SCREWDRIVER
(BIT PH2)
CROSS POINT
SCREWDRIVER
&METRIC RULER HAMMERALLEN KEY
CONTENT OF MOUNTING SET
Blind Plug(x1)
Wall Mounting
Screw (x4)
Wall Mounting Bracket (x4)
Wall Plug (x4) Setscrew (x4)
A B
C D
E F
Air Vent (x1)
G
Decorative Cap (x2)
(Only for mirror finished products)
&
∙ Place your radiator at least 12.5 cm above the floor.
∙ Provide insulation by wrapping PTFE tape on the treads before installing the valves.
∙ Apply silicone seal fluid to all treaded parts containing o-rings.
∙ Connect your radiator to the utilities after following all the installation steps in the manual.
∙ After connecting to the utilities, do not forget to discharge the trapped air inside the radiator.
90°
1 2
1
A
B
C
D
E
F
G
1- Adjust the height of your radiator by
using a metric ruler.
2- Set the location of your radiator as
desired, align with the ground by using
a spirit level and mark the position of
the wall mounting brackets.
1- Drill holes (Ø 10 mm) into the spots
you have marked.
2- Nail the wall plugs (E) in the holes by
using a hammer.
3- Screw the wall mounting brackets all
the way to the holes with the help of a
screwdriver.
1- Place your radiator into the wall
mounting brackets (D).
2- Insert the setscrews (F) into the slots
on the mounting brackets (D), adjust the
distance between the wall and your
radiator then tighten the setscrews by
using an Allen key (M3).
1
2
2
1
3
2
WARNING
ELECTRIC DRILL &
DRILL BIT
STEP LADDER
(FOR HIGH PRODUCTS)
SPIRIT LEVEL
CORDLESS
SCREWDRIVER
(BIT PH2)
CROSS POINT
SCREWDRIVER
&METRIC RULER HAMMERALLEN KEY
CONTENT OF MOUNTING SET
Blind Plug(x1)
Wall Mounting
Screw (x4)
Wall Mounting Bracket (x4)
Wall Plug (x4) Setscrew (x4)
A B
C D
E F
Air Vent (x1)
G
Decorative Cap (x2)
(Only for mirror finished products)
&
∙ Place your radiator at least 12.5 cm above the floor.
∙ Provide insulation by wrapping PTFE tape on the treads before installing the valves.
∙ Apply silicone seal fluid to all treaded parts containing o-rings.
∙ Connect your radiator to the utilities after following all the installation steps in the manual.
∙ After connecting to the utilities, do not forget to discharge the trapped air inside the radiator.
90°
1 2 1
A
B
C
D
E
F
G
1- Adjust the height of your radiator by
using a metric ruler.
2- Set the location of your radiator as
desired, align with the ground by using
a spirit level and mark the position of
the wall mounting brackets.
1- Drill holes (Ø 10 mm) into the spots
you have marked.
2- Nail the wall plugs (E) in the holes by
using a hammer.
3- Screw the wall mounting brackets all
the way to the holes with the help of a
screwdriver.
1- Place your radiator into the wall
mounting brackets (D).
2- Insert the setscrews (F) into the slots
on the mounting brackets (D), adjust the
distance between the wall and your
radiator then tighten the setscrews by
using an Allen key (M3).
1
22
1
3
2
WARNING
ELECTRIC DRILL &
DRILL BIT
STEP LADDER
(FOR HIGH PRODUCTS)
SPIRIT LEVEL
CORDLESS
SCREWDRIVER
(BIT PH2)
CROSS POINT
SCREWDRIVER
&METRIC RULER HAMMERALLEN KEY
CONTENT OF MOUNTING SET
Blind Plug(x1)
Wall Mounting
Screw (x4)
Wall Mounting Bracket (x4)
Wall Plug (x4) Setscrew (x4)
A B
C D
E F
Air Vent (x1)
G
Decorative Cap (x2)
(Only for mirror finished products)
&
∙ Place your radiator at least 12.5 cm above the floor.
∙ Provide insulation by wrapping PTFE tape on the treads before installing the valves.
∙ Apply silicone seal fluid to all treaded parts containing o-rings.
∙ Connect your radiator to the utilities after following all the installation steps in the manual.
∙ After connecting to the utilities, do not forget to discharge the trapped air inside the radiator.
90°
1 2 1
A
B
C
D
E
F
G
1- Adjust the height of your radiator by
using a metric ruler.
2- Set the location of your radiator as
desired, align with the ground by using
a spirit level and mark the position of
the wall mounting brackets.
1- Drill holes (Ø 10 mm) into the spots
you have marked.
2- Nail the wall plugs (E) in the holes by
using a hammer.
3- Screw the wall mounting brackets all
the way to the holes with the help of a
screwdriver.
1- Place your radiator into the wall
mounting brackets (D).
2- Insert the setscrews (F) into the slots
on the mounting brackets (D), adjust the
distance between the wall and your
radiator then tighten the setscrews by
using an Allen key (M3).
1
221
3
2
WARNING
ELECTRIC DRILL &
DRILL BIT
STEP LADDER
(FOR HIGH PRODUCTS)
SPIRIT LEVEL
CORDLESS
SCREWDRIVER
(BIT PH2)
CROSS POINT
SCREWDRIVER
&METRIC RULER HAMMERALLEN KEY
CONTENT OF MOUNTING SET
Blind Plug(x1)
Wall Mounting
Screw (x4)
Wall Mounting Bracket (x4)
Wall Plug (x4) Setscrew (x4)
A B
C D
E F
Air Vent (x1)
G
Decorative Cap (x2)
(Only for mirror finished products)
&
∙ Place your radiator at least 12.5 cm above the floor.
∙ Provide insulation by wrapping PTFE tape on the treads before installing the valves.
∙ Apply silicone seal fluid to all treaded parts containing o-rings.
∙ Connect your radiator to the utilities after following all the installation steps in the manual.
∙ After connecting to the utilities, do not forget to discharge the trapped air inside the radiator.
INSTALLATION
90°
1 2 13
A
B
C
D
E
F
G
1- Adjust the height of your radiator by
using a metric ruler.
2- Set the location of your radiator as
desired, align with the ground by using
a spirit level and mark the position of
the wall mounting brackets.
1- Drill holes (Ø 10 mm) into the spots
you have marked.
2- Nail the wall plugs (E) in the holes by
using a hammer.
3- Screw the wall mounting brackets all
the way to the holes with the help of a
screwdriver.
1- Place your radiator into the wall
mounting brackets (D).
2- Insert the setscrews (F) into the slots
on the mounting brackets (D), adjust the
distance between the wall and your
radiator then tighten the setscrews by
using an Allen key (M3).
1
221
3
2
WARNING
STAINLESS STEEL
INSTALLATION GUIDE
TOOLS REQUIRED FOR INSTALLATION
ELECTRIC DRILL &
DRILL BIT
STEP LADDER
(FOR HIGH PRODUCTS)
SPIRIT LEVEL
CORDLESS
SCREWDRIVER
(BIT PH2)
CROSS POINT
SCREWDRIVER
&METRIC RULER HAMMER ALLEN KEY
CONTENT OF MOUNTING SET
Blind Plug (x1)
Wall Mounting
Screw (x4)
Wall Mounting Bracket (x4)
Wall Plug (x4) Setscrew (x4)
A B
C D
E F
Air Vent (x1)
G
Decorative Cap (x2)
(Only for mirror finished products)
&
∙ Place your radiator at least 12.5 cm above the floor.
∙ Provide insulation by wrapping PTFE tape on the treads before installing the valves.
∙ Apply silicone seal fluid to all treaded parts containing o-rings.
∙ Connect your radiator to the utilities after following all the installation steps in the manual.
∙ After connecting to the utilities, do not forget to discharge the trapped air inside the radiator.
1 2 3
Table of contents
Other Stelrad Heater manuals

Stelrad
Stelrad ELECTRIC Series User manual

Stelrad
Stelrad ELECTRIC Series User manual

Stelrad
Stelrad Regal User manual

Stelrad
Stelrad ELECTRIC Series User manual

Stelrad
Stelrad ELECTRIC Series User manual

Stelrad
Stelrad ELECTRIC Series User manual

Stelrad
Stelrad Alyne GYA0610F User manual

Stelrad
Stelrad ELECTRIC Series User manual

Stelrad
Stelrad ELECTRIC Series User manual

Stelrad
Stelrad E-VENTO 0184B0002 Guide


