manuals.online logo
Brands
  1. Home
  2. •
  3. Brands
  4. •
  5. Steren
  6. •
  7. Automobile Accessories
  8. •
  9. Steren AUT-090 User manual

Steren AUT-090 User manual

Product / Producto: POWER DOOR
LOCK KIT / ACTUADOR UNIVERSAL
PARA SEGUROS ELÉCTRICOS
Model / Modelo: AUT-090
Brand / Marca: Steren
CONDICIONES
1. Para hacer efectiva esta garantía se requiere: La presentación de esta póliza y del producto, en el lugar en donde fue adquirido o en ELECTRONICA STEREN S.A. DE C.V.
2. ELECTRONICA STEREN S.A. DE C.V. se compromete a reparar el producto en caso de estar defectuoso sin ningún cargo al consumidor.
3. El tiempo de reparación en ningún caso será mayor a 30 días contados a partir de la recepción del producto en cualquiera de los sitios en donde pueda hacerse efectiva la
garantía.
4. El lugar donde puede adquirir partes, componentes, consumibles y accesorios, así como hacer válida esta garantía es: En cualquiera de las direcciones arriba mencionadas.
ESTA GARANTIA NO ES VALIDA EN LOS SIGUIENTES CASOS:
1. Cuando el producto ha sido utilizado en condiciones distintas a las normales.
2. Cuando el producto no ha sido operado de acuerdo con el instructivo de uso.
3. Cuando el producto ha sido alterado o reparado por personas no autorizadas por ELECTRONICA STEREN S.A. DE C.V.
Nota: El consumidor podrá solicitar que se haga efectiva la garantía ante la propia casa comercial, donde adquirió el producto. Si la presente garantía se extraviara, el
consumidor puede recurrir a su proovedor para que le expida otra póliza de garantía, previa presentación de la nota de compra o factura respectiva.
DATOS DEL DISTRIBUIDOR
DISTRIBUTION / NOMBRE / DISTRIBUIDOR:
ADDRESS / DOMICILIO:
PRODUCT / PRODUCTO: BRAND / MARCA:
MODEL / MODELO: SERIAL NUMBER / No. DE SERIE:
DATE OF DELIVERY / FECHA DE ENTREGA:
Call Center / Centro de Atención a Clientes
del Interior 01 800 500 9000
Mexico City / Cd. de México: 53 54 22 90
Warranty
CONDITIONS:
1. This warranty card with all the required information, the invoice or purchase ticket, the packing or package, must be presented with the product when warranty
service is required.
2. If product hasn’t exceed warranty period, the company will repair it free of charge including transportation charges.
3. The repairing time will not exceed 30 natural days, from the day the claim was received.
4. Steren sells parts, components, consumables and accessories to customer, as well as warranty service, at any of the following addresses:
THIS WARRANTY IS VOID ON THE NEXT CASES:
If the product has been damage by an accident, acts of God, mishandling, leaky batteries, failure to follow enclosed instructions, improper repair by unauthorized
personnel, improper safe keeping.
Notes:
a) The customer can also claim the warranty service on the purchase establishment.
b) If you lose the warranty card, we can reissue it just showing the invoice or purchase ticket.
Póliza de Garantía
This Steren product is guaranteed under
normal usage against defects in
workmanship and materials to the original
purchaser for one year from the date of
purchase.
Garantiza este producto por el término de
un año en todas sus partes y mano de obra
contra cualquier defecto de fabricación y
funcionamiento, a partir de la fecha de
entrega.
V0706
INSTRUCTIVO DE USO DE ACTUADOR UNIVERSAL PARA SEGUROS
ELÉCTRICOS
Modelo: AUT-090
Marca: Steren
Antes de utilizar su nuevo Actuador Universal lea este instructivo
para evitar cualquier mal funcionamiento. Guárdelo para futuras
referencias.
Este kit esta diseñado para convertir cualquier vehículo con seguros de
puertas manuales a un sistema de apertura eléctrica.
Es compatible con cualquier sistema de apertura eléctrica, alarma, o
sistema de arranque remoto.
Cuenta con todos los accesorios necesarios para su instalación,
incluyendo tornillos, clips, y barra de instalación.
Diseño tradicional de pistola. Equipado con un torque de alta calidad.
IMPORTANTE
No use ni almacene este equipo en lugares donde este expuesto a
salpicaduras o goteo. Esto puede causar mal funcionamiento.
En caso de que no tenga conocimiento de instalaciones en automóviles,
acuda con el personal calificado.
GUÍA DE INSTALACIÓN
Esta guía es sólo un ejemplo, la forma de instalación puede variar de
un automóvil a otro. Por favor consulte personal especializado.
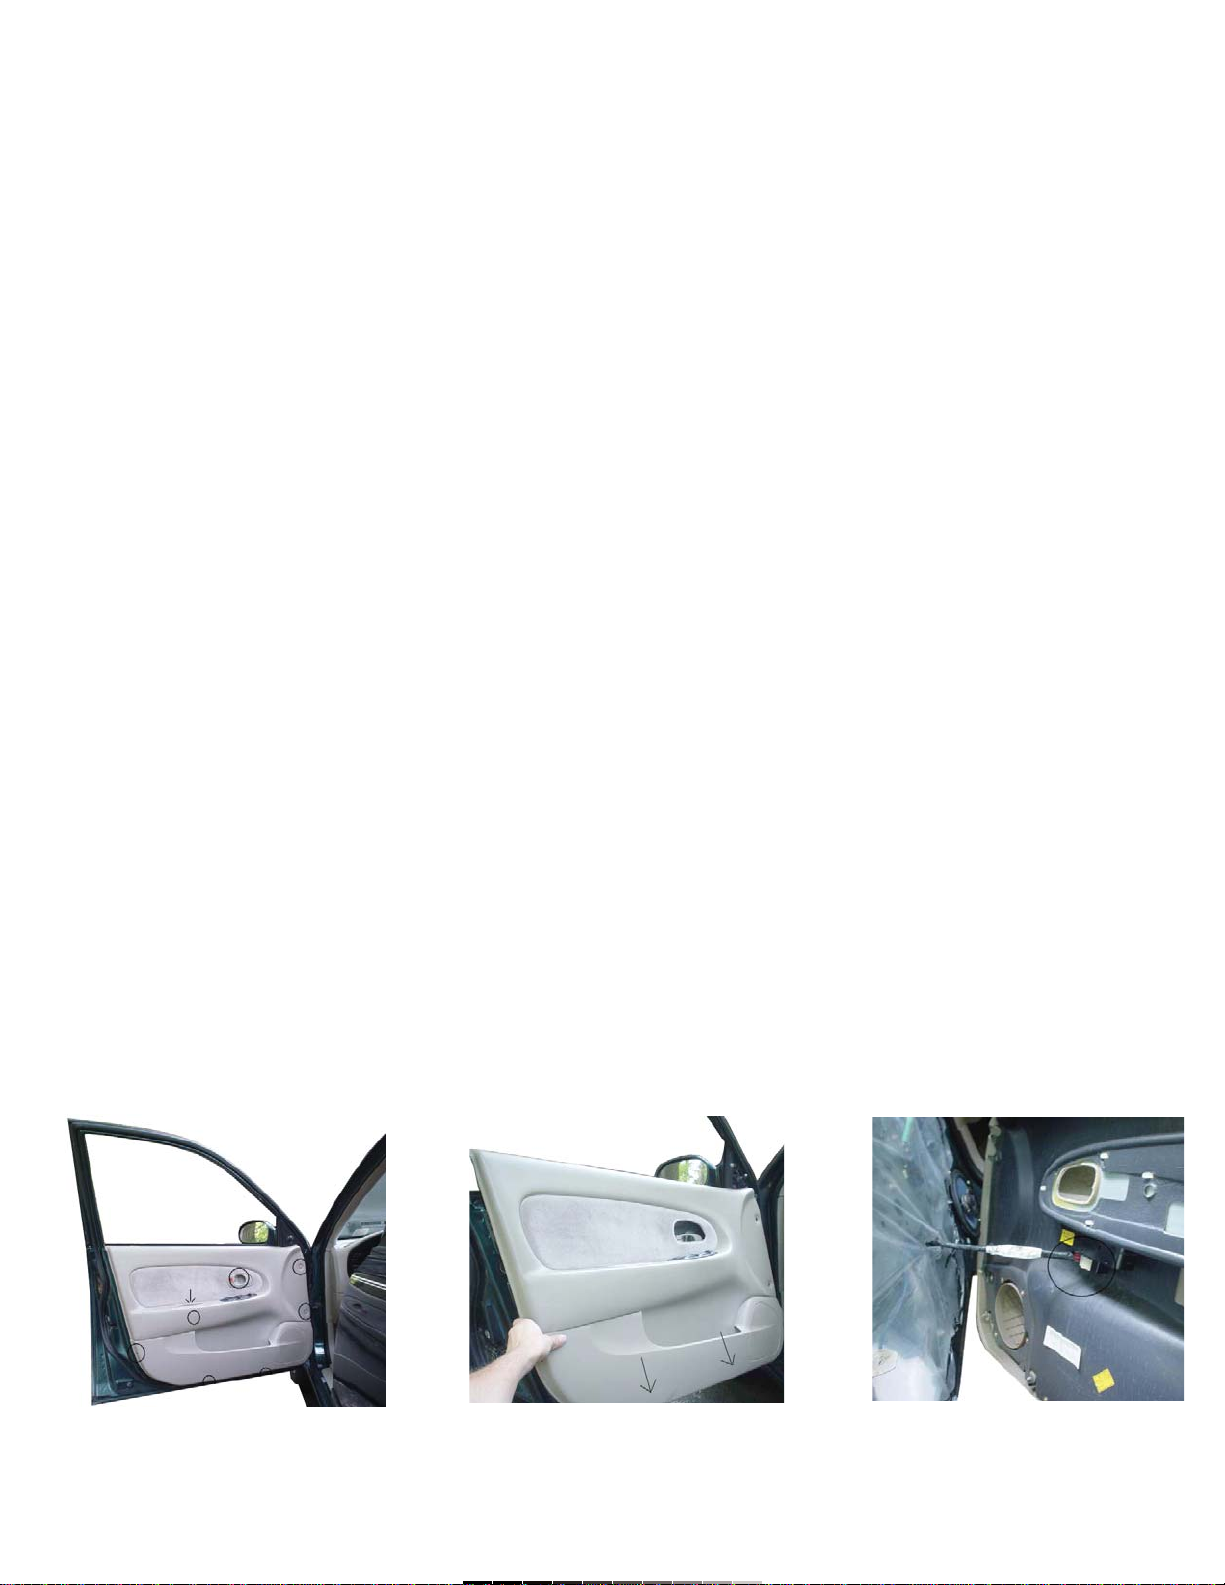
1.- Retire todos los tornillos de la puerta. Guárdelos en un lugar seguro
para evitar su pérdida. Dependiendo de la marca de su auto, los tornillos
variarán de lugar (Fig. 1).
2.- Jale desde la parte inferior del panel de la puerta, como si fueran las
bisagras de una ventana. Note que podría jalar con fuerza a fin de retirar
el panel de la puerta. Sin embargo, si siente que está jalando muy fuerte,
asegúrese de que retiró todos los tornillos de la puerta (Fig. 2).
3.- Deslice el panel de la puerta, ahora podrá desmontarla.
4.- Desconecte cualquier cable que esté conectado al panel de la puerta.
Normalmente deben traer conectores para su fácil desinstalación. NO
corte ningún cable si no cuentan con conectores (Fig. 3).
5.- Retire la cubierta plástica de la puerta. Sea cuidadoso, necesitará
reinstalarla posteriormente (Fig. 4).
6.-Coloque el actuador de tal forma que esté paralelo a la barra el seguro
de la puerta. Para montar el actuador, deberá atornillar el soporte de
metal. Asegúrese de colocar el equipo de tal forma que no tenga ningún
problema cuando vuelva a colocar el panel de la puerta (Fig. 5).
7.- Coloque los cables del actuador a través de la manguera de plástico
que conecta a la puerta con el vehículo. Una vez que pasó los cables a
través de la manguera, puede conectar los cables del actuador de
acuerdo a los color de cableado.
8.- Vuelva a colocar el plástico de la puerta (Fig, 6).
9.- Vuelva a colocar el panel de la puerta. Deberá colocarlo de arriba
hacia abajo.
10.- Finalmente, ajuste el panel de la puerta, atornillándola firmemente.
INSTRUCTION MANUAL FOR POWER DOOR LOCK KIT
Model: AUT-090
Brand: Steren
Before using your new Power Door Lock Kit please read this
instruction manual to prevent any damage. Put it away in a safe place
for future references.
This kit is designed to convert any vehicle with manual door locks to
central locking power door locks.
These are compatible with any keyless entry, alarm or remote starter
system and comes complete with bracket, hardware screws and clips.
Traditional gun style design. Made with high quality torque.
IMPORTANT
Do not use or store the equipment near wet places or water drop. This
may cause malfunction.
If you don’t have enough knowledge making car installations, refers to
qualified personnel.
INSTALLATION GUIDELINE
This guide is only an example, the installation may vary from car to
car. Please refers to qualified personnel.
1.- Remove all the screws from your door. Make sure you do not miss any.
Depending on the make of your vehicle, the screws will vary in location
(Fig. 1).
2.- Pull from the bottom of the door paneling as if it’s on hinges from the
window area. It will unsnap from your door frame. Note that you may need
to pull with some force to get the door paneling to unsnap. If it feels like
you are pulling too hard, check for any missed screws (Fig. 2).
3.- Slide the door paneling up and it will come off the frame of your door
4.-Disconnect any wires that are connected to the door paneling. They
should unclip. Do not cut any wires if they don’t unclip (Fig. 3).
5.- Detach the plastic covering in the door. Be careful, you will need to
reattach it later (Fig. 4).
6.- Setup the door actuator so that it will run parallel with the door lock rod.
You will need to screw the metal bracket in the door in a manor that the
actuator will be able to mount it. Make sure you locate the actuator in a
place that won’t cause a problem when you reattach the door paneling
(Fig. 5).
7.- Run the wires for the actuator through the rubber hose which connects
between the door and the vehicle. Now you can connect the wires to the
actuator according to the wire colors.
8.- Reattach the plastic to the door (Fig. 6).
9.- Reattach the door paneling to the door. You will have to attach it to the
top before the bottom will attach properly.
10.- Snap the door paneling back in place. Then attach the screws
appropriately.
Fig. 1 Fig. 2 Fig. 3
DIAGRAMA
ESPECIFICACIONES
Entrada: 12V
Fuerza de desplazamiento: Hasta 2,5kg
Distancia de desplazamiento: 19mm
Tiempo de vida: Hasta 100,000 operaciones
Dimensiones: 160 x 60 x 30mm
Peso: 130g
Nota:
El diseño del producto, ilustraciones y especificaciones pueden cambiar
sin previo aviso.
DIAGRAM
SPECIFICATIONS
Input: 12V
Shifting force: Up to 2,5kg
Shifting range: 19mm
Consistently passes life operating cycle: Up to 100,000 times
Dimensions: 160 x 60 x 30mm
Weight: 130g
Note:
Product design, illustrations and specifications are subject to change,
without notice.
Fig. 4 Fig. 5 Fig. 5
Verde
/ Green
Verde
/ Green
Azul /
Blue
Azul /
Blue
Verde
/ Green
Verde
/ Green
Azul /
Blue
Azul /
Blue
A la cerradura central
To Central Lock

Other Steren Automobile Accessories manuals

Steren POD-146 User manual

Steren

Steren POD-146 User manual

Steren AutoLock POD-274 User manual

Steren

Steren AutoLock POD-274 User manual

Steren POD-090 User manual

Steren

Steren POD-090 User manual

Steren Platinum AUD-7700 User manual

Steren

Steren Platinum AUD-7700 User manual

Steren POD-297 User manual

Steren

Steren POD-297 User manual

Steren ELI-865 User manual

Steren

Steren ELI-865 User manual

Steren TH-010 User manual

Steren

Steren TH-010 User manual

Steren FMT-810 User manual

Steren

Steren FMT-810 User manual

Steren MOV-060 User manual

Steren

Steren MOV-060 User manual

Steren POD-095 User manual

Steren

Steren POD-095 User manual

Steren AUT-510 User manual

Steren

Steren AUT-510 User manual

Steren ELI-885 User manual

Steren

Steren ELI-885 User manual

Steren POD-299 User manual

Steren

Steren POD-299 User manual

Steren POD-290 User manual

Steren

Steren POD-290 User manual

Steren 255-310 User manual

Steren

Steren 255-310 User manual

Steren FMT-800 User manual

Steren

Steren FMT-800 User manual

Steren AUT-030 User manual

Steren

Steren AUT-030 User manual

Popular Automobile Accessories manuals by other brands

Carefree FREEDOM WM AWNING installation manual

Carefree

Carefree FREEDOM WM AWNING installation manual

Yakima KingJoe 2 quick start guide

Yakima

Yakima KingJoe 2 quick start guide

Jaeger 21020520J Fitting instructions

Jaeger

Jaeger 21020520J Fitting instructions

Go Rhino 3219MC installation instructions

Go Rhino

Go Rhino 3219MC installation instructions

1st Call Lockouts TouchClone version 1.5 User's manualer's manual

1st Call Lockouts

1st Call Lockouts TouchClone version 1.5 User's manualer's manual

Dometic FJX4233EEH quick start guide

Dometic

Dometic FJX4233EEH quick start guide

Nokia CK-300 CarMenu User Guide

Nokia

Nokia CK-300 CarMenu User Guide

TrailFX FX3001 manual

TrailFX

TrailFX FX3001 manual

Wunderlich 44840 FITTING INSTRUCTION

Wunderlich

Wunderlich 44840 FITTING INSTRUCTION

GMC 5581-00-100 installation instructions

GMC

GMC 5581-00-100 installation instructions

Thule 1643 instructions

Thule

Thule 1643 instructions

Volvo 2000 installation instructions

Volvo

Volvo 2000 installation instructions

ABB Terra DC wallbox quick start guide

ABB

ABB Terra DC wallbox quick start guide

Gecko GG520012 User manual and warranty

Gecko

Gecko GG520012 User manual and warranty

Menabo ICEBERG Fitting instructions

Menabo

Menabo ICEBERG Fitting instructions

ATD Tools SPI-77300 user manual

ATD Tools

ATD Tools SPI-77300 user manual

aFe Power advanced FLOW engineering instruction manual

aFe Power

aFe Power advanced FLOW engineering instruction manual

JKS JKS1610 installation instructions

JKS

JKS JKS1610 installation instructions

manuals.online logo
manuals.online logoBrands
  • About & Mission
  • Contact us
  • Privacy Policy
  • Terms and Conditions

Copyright 2025 Manuals.Online. All Rights Reserved.