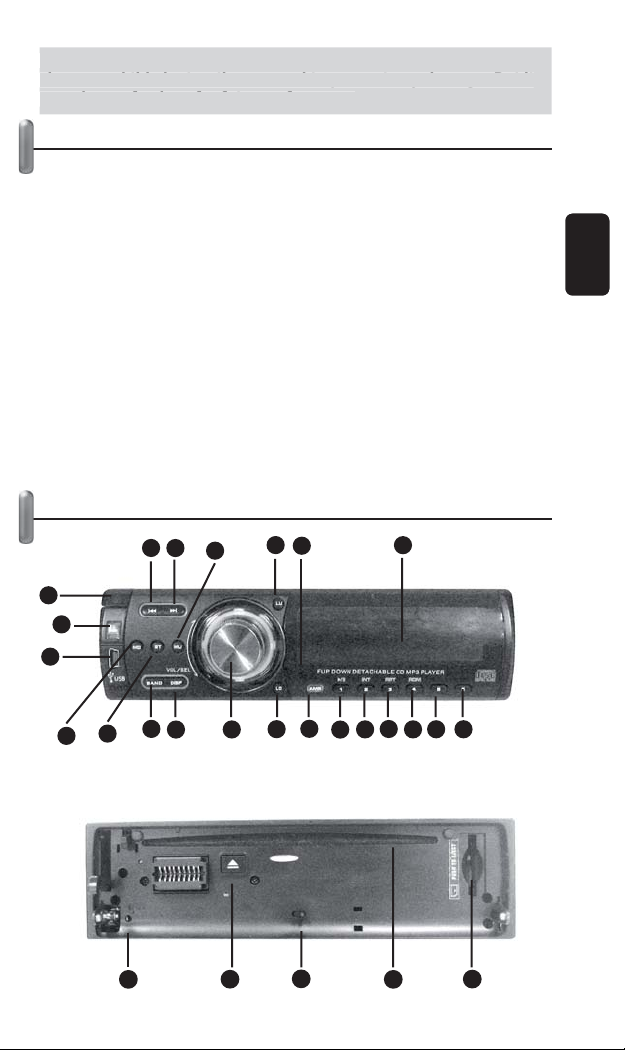
Steren CAR-210 User manual


Before using your new SD & flash drive MP3 encoder car stereo,
please read this instruction manual to prevent any damage. Put it
away in a safe place for future references.
IMPORTANT
Do not try to open the equipment, may be exposed to dangerous
radiation.
Warranty is void if you open the case.
In order to reduce the risk of electrical shock, do not remove the device’s
cover
Do not expose the equipment to extreme weather.
Do not use or store the equipment near wet places. May cause
malfunction or shock hazard.
Do not touch the contacts on the front panel or the main body, may
result in poor electrical contact.
Clean only with a soft, dry cloth.
Install the equipment in a place where cannot interfere with driving.
Wire and test the cables temporally before to install the equipment
permanently.
Refer to qualified personnel for any needed technical service.
If the installation angle exceeds 30° horizontally, the unit may not works
appropriately.
CONTROLS
ENGLISH
ENGLISH-2
B
efore usin
g
y
our new SD & flash drive MP3 encoder car stereo,
pl
ease rea
d
t
hi
s
i
nstruct
i
on manua
l
to prevent an
y
d
ama
g
e.
P
ut
i
t
a
way in a safe place for future references
.
1
2
3
4
56
7
10
11 12
13 14 15 16 17 18 19
20 21
22 25
26
8
923 24 27

1.- On / Off
Press and hold for 2 seconds to power the car stereo on. Press and hold
2 seconds to power it off.
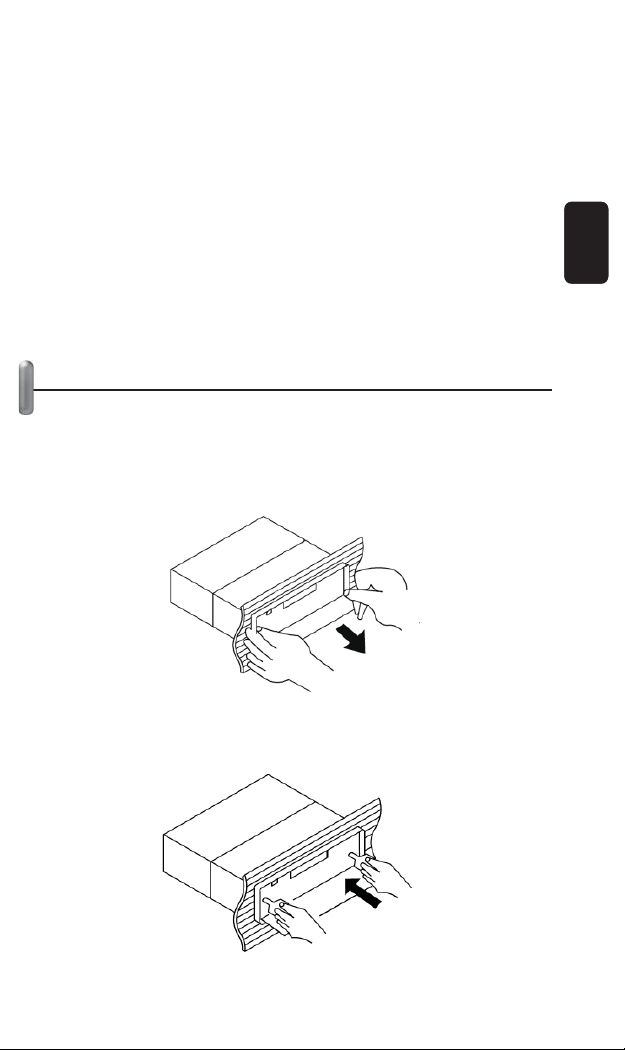
2.- Release
Press to release the frontal panel
3.- Volume / Selector
Allows you to set the volume level (turn it right or left)
Press to switch between:
Bass: Set the bass frequencies
Treble: Set the treble frequencies
Balance: Allows you to select the left speakers, right speakers
or both
Fader: Use to select the frontal, rear or both speakers
Press and hold for 3 seconds and you will see in the screen:
DSP Off: allows you to select one of predetermined EQ: Rock,
Classic, Flat, Pop or Off.
ESP: Select between 12 or 45 seconds of ESP
Beep: Use to activate or deactivate the button beep
Seek: Switch between Seek 1 and Seek 2
Press the Selector button each time you want to switch between
different modes.
4.- Mute
Press once to mute the sounds. Press again to return normal play.
5.- Mode
Press to switch between: CD, Aux, memory card / USB memory
6.- Display
In MP3, CD, memory card or flash memory mode, press DISP to show
the current time for 5 seconds
If you are in Clock mode, press and hold DISP for 2 seconds, to set the
current time. The clock will blink, move the selector button to the right to
set the hour, move it to the left to set the minutes, finally press DISP to
store the changes.
7. LCD screen
Display several information
ENGLISH
ENGLISH-3
P
ress the Selector button each time
y
ou want to switch between
d
ifferent modes
.

8.- Sensor
Lights on when the frontal panel is out of the main body
9.- Restart
Press this button when:
- The initial installation is completed
- Function buttons do not operate
- An error is displayed in the screen
Remember, you must use a thin metal object to press the button, but do
not use any sharp object.
If the equipment does not work even if you pressed the Restart button,
use an alcohol damped Qtip to clean the contact located behind of the
frontal panel.
10.- Band
In radio mode, press band to switch between different radio bands: FM1,
FM2, FM3, AM1, AM2.
11.- Tune seek / Track
In radio mode allows you to seek the next frequency
In CD mode, jumps to next track
12.- Tune seek / Track
In radio mode allows you to seek previous frequency
In CD mode, jumps to previous track
13.- Automatic memory storing
Press and hold AMS and the device will search the strongest radio
signals, automatically will be stored in the preset memories (up to 6
memories)
Press AMS once to search into the stored radio stations
14. Play / Pause / Memory 1
Play a song contained in a CD, flash memory or SD card
Pause a song
In radio mode allows you to access the memory 1
15.- Intro / Memory 2
In CD mode you can listen the first 10 seconds of each song contained
in the CD
If you want to listen a complete song, press Play once
In radio mode press to get access to memory 2
16.- Repeat / Memory 3
In CD mode allows you to activate the repeat function, repeat all disc or
deactivate the function.
In Radio mode allows you to get access to memory 3
ENGLISH
ENGLISH-4

17.- Random / Memory 4
In CD mode allows you to play the songs, randomly. RDM word displays
in screen.
In Radio mode allows you to get access to memory 4
18.- Memory 5
In Radio mode allows you to get access to memory 5
19.- Memory 6
In Radio mode allows you to get access to memory 6
20.- Stereo / Mono
In radio mode press to switch between Stereo or Mono audio output
While playing a song, press to select the left, right or stereo output
sound
21.- LOC / DX
Press LOC to select the reception of a strong or weak radio signal. If
you press LOC once, you will listen to local radio stations, only and LOC
word displays in the screen. Press LOC once again, and you will switch
to DX mode, where you can listen to local and distance radio stations (if
available)
22.- Loudness
Press to activate or deactivate the loudness function
23.- Eject
Press to eject a CD
24.- CD slot
Use to insert a CD
25.- IR sensor
IR remote control sensor
26.- Mini USB connector
Allows you to plug an USB device which contain music
27.- SD slot
Allows you to insert a SD card which contain music
ENGLISH
ENGLISH-5

REMOTE CONTROL
1.- On / Off
Press to power the car stereo on / off.
2.- Play / Pause / Memory 1
Play a song contained in a CD, flash memory or SD card
Pause a song
In radio mode allows you to access the memory 1
3.- Intro / Memory 2
In CD mode you can listen the first 10 seconds of each song contained
in the CD
If you want to listen a complete song, press Play once
In radio mode press to get access to memory 2
ENGLISH
ENGLISH-6
+
-
DN
DN UP
SEL
DISP A.P. ST
MODE BAND LOC LOUD
SCN
123
456
1
2
34
5 6 7
8
9
10
11
12
13
14
15
16
1718 19
18
9

4.- Repeat / Memory 3
In CD mode allows you to activate the repeat function, repeat all disc or
deactivate the function.
In Radio mode allows you to get access to memory 3
5.- Random / Memory 4
In CD mode allows you to play the songs, randomly. RDM word displays
in screen.
In Radio mode allows you to get access to memory 4
6.- Memory 5
In Radio mode allows you to get access to memory 5
7.- Memory 6
In Radio mode allows you to get access to memory 6
8.- Mute
Press once to mute the sounds. Press again to return normal play.
9.- Volume
Set the volume level
10.- Mode
Switch between: Radio, CD, AUX; Memory Card / USB Card
11.- Stereo / Mono
In radio mode press to switch between Stereo or Mono audio output
While playing a song, press to select the left, right or stereo output
sound
12.- Loudness
Press to activate or deactivate the loudness function
13.- Scan
Press this button to scan the strongest radio frequencies
14.- Display
Displays the current hour
15.- A.P.
Press to switch between stored radio stations
16.- LOC / DX
Press LOC to select the reception of a strong or weak radio signal. If
you press LOC once, you will listen to local radio stations, only and LOC
word displays in the screen. Press LOC once again, and you will switch
to DX mode, where you can listen to local and distance radio stations (if
available)
ENGLISH
ENGLISH-7

17.- Band
In radio mode, press band to switch between different radio bands: FM1,
FM2, FM3, AM1, AM2.
18.- Tune seek / Track
In radio mode allows you to seek a frequency
In CD mode, jumps to previous / next track
19.- Selector
Press to switch between:
Bass: Set the bass frequencies
Treble: Set the treble frequencies
Balance: Allows you to select the left speakers, right speakers
or both
Fader: Use to select the frontal, rear or both speakers
INSTALLATION
This equipment can be mounted on the dashboard. Be sure to mount
the unit firmly. If installation requires hole drilling or another
modifications to the vehicle, contact with your nearest dealer.
1.- Remove the external cover from the car stereo.
2.- Insert the supplied keys on each side of the car stereo until you hear
a click.
ENGLISH
ENGLISH-8

3.- Remove the holder and place it on the dashboard.
4.- Connect wires (Refer to Wire Connections).
5.- Install the rear holder.
6.- Place the main body into the holder.
7.- To finalize, replace the external cover.
If you want to remove the frontal panel:
1.- Press Release button. The panel will be folded down.
2.- Be careful when remove the frontal panel, do not press on the LCD
screen. Move to the right and pull out.
ENGLISH
ENGLISH-9

3.- Enclose the front panel for safe keeping into the supplied protective
case.
To replace the front panel:
1.- Put the right hole from the frontal panel into the main body.
2.- Press to the right and place the left hole from the frontal panel into
the main body left contact, press until you hear a click.
3.- Fold up the frontal panel.
ENGLISH
ENGLISH-10

Make sure that the frontal panel is firmly attached , otherwise
Release button or other buttons may not function.
Do not touch the contacts on the frontal panel or the main body,
may result in poor electrical contact.
HOW TO INSERT A SD CARD
ADDITIONAL INFORMATION ABOUT MP3 FILES
MP3 (MPEG Audio Layer 3) refers to an audio compression standard.
The equipment is fully compatible with MP3 files recorded onto CD,
CD-R, CD-RW discs.
Disc recording compatible with level 1 and level 2 of ISO9660.
The unit can reproduce multi-session disc.
USB DEVICES
Do not remove the USB device while transferring music files between
car stereo and USB device, may cause data loss or failures in both
equipments.
Make data back-up on your PC. The company will be not responsible for
any data loss.
Before to plug or unplug the USB device, be sure that the equipment is
not active. Otherwise may cause damages on both equipments.
STORING A RADIO STATION IN MEMORY
1.- Tune a radio station.
2.- Press and hold for 5 seconds the desired memory button ( 1 to 6)
where you want to store the radio station.
3.- If you press a button with a stored radio station, you will delete it and
it will be replaced by the new radio station.
MP3 OPERATION
MP3 Search modes
Use the Band button to search files, tracks and characters in MP3
mode.
Press and hold Band for 5 seconds to select Track, File or Character
option. Also you can see the name of the artist, directory, file, song or
album information in the screen, pressing Band button.
ENGLISH
ENGLISH-11
Make sure that the frontal panel is firml
y
attached , otherwise
Release button or other buttons ma
y
not function.
D
o not touch the contacts on the frontal panel or the main bod
y
,
m
a
y
resu
l
t
i
n poor e
l
ectr
i
ca
l
contact
.

Track search
In MP3 mode, press and hold AMS 5 seconds to select Track search
option, after select the track with 1 or 2 digits, the songs will play after
pressing Selector button.
WIRE CONNECTIONS
ENGLISH
ENGLISH-12
+
-
+
-
+
-
+
-
Main unit
Ground
Antenna
Black Red
1A
Blue
Ignition Switch (B+)
Yellow Memory back up
Grey
Grey / Black
Violet
Violet / Black
Frontal
speaker
Rear
speaker
Front
speaker
Rear
speaker
White
White / Black
Green
Green / Black
Antenna
conenctor
Line out
(Gray)
Red
White

TROUBLESHOTTING
ENGLISH
ENGLISH-13
Problem Solution
Car ignition key is not placed in the switch,
p
lace it and
p
ower the car on
Fuse is blown
,
re
p
lace it
A CD is already loaded, remove it and insert
a new one
You are loading the CD in reverse direction.
Turn it u
p
and tr
y
a
g
ain
The CD is extremely dirty or has a defect.
Clean it or tr
y
with other disc
Temperature inside of the car is too high.
Wait until tem
p
erature returns to normalit
y
There are condensation. Do not turn the
device on for an hour and then tr
y
a
g
ain.
The volume level is at minimum, set to
desired level
Wire connections are wrong, please check
them
The angle of installation is bigger than 30°,
tr
y
to ad
j
ust it
The CD is extremely dirty or has a defect.
Clean it or tr
y
with other disc
Operation keys do not work May have microcomputer interference, press
Restart
Check if the antenna is correclt installed
Signals are too weak, select a radio station
manuall
y
Radio or automatic selection function
does not work
Cannot power on
CDs cannot be loaded or ejected
No sound
Sound skipping

SPECIFICATIONS
Input: 12 – 14,4V
Impedance: 4ohm
Output: 25Wx4
Chassis dimensions: 178x163x50mm
Weight: 1,3kg
Tone controls
Bass (at 100Hz): +10dB
Treble (at 10k): +10dB
CD player
SNR: More than 60dB
Channel separation: More than 60dB
Frequency response: 20Hz – 20kHz
FM radio
Frequency range (MHz): 87,5 – 107,9MHz
Sensitivity (S/N=30dB): 12dBu
Stereo separation: >30dB
AM Radio
Frequency range (kHz): 530 – 1710kHz
Sensitivity (S/N=20dB): <42dBu
Product design and specifications are subject to change, without
notice.
ENGLISH
ENGLISH-14
Product design and specifications are subject to change, without
notice
.


Antes de utilizar su nuevo Autoestéreo lea este instructivo para
evitar cualquier mal funcionamiento. Guárdelo para futuras
referencias.
IMPORTANTE
No intente desarmar el equipo, puede estar expuesto a radiaciones
peligrosas.
No intente desarmar el equipo, puede causar malfuncionamiento y
anulación de la garantía
No quite ninguna cubierta, en caso contrario puede estar expuesto a
voltajes peligrosos.
No exponga el equipo a temperaturas extremas.
No use ni almacene este equipo en lugares donde pueda caer agua.
Puede causar mal funcionamiento y peligro de choque eléctrico.
No toque los contactos del panel frontal o del cuerpo principal, puede
resultar en un pobre contacto eléctrico.
Siempre utilice un paño suave y seco para limpiar el equipo.
Coloque el equipo en un lugar en el que no interfiera con el manejo
normal del automóvil.
Antes de instalar la unidad permanentemente conecte los cables
temporalmente y asegúrese de que estén conectados apropiadamente.
Si requiere perforar el automóvil o hacer alguna modificación en él,
acuda con un profesional.
Si el ángulo de instalación excede de 30° horizontalmente, la unidad
podría no ofrecer su mejor rendimiento.
CONTROLES
A
ntes de utilizar su nuevo Autoestéreo lea este instructivo para
e
vitar cual
q
uier mal funcionamiento. Guárdelo
p
ara futuras
r
eferencias
.
ESPAÑOL
ESPAÑOL-1
1
2
3
4
56
7
10
11 12
13 14 15 16 17 18 19
20 21
22 25
26
8
923 24 27

1.- Encendido / Apagado
Presione por 2 segundos este botón para encender el equipo. Presione
2 segundos más para apagarlo
2.- Liberar
Este botón permite liberar el panel frontal del autoestéreo
3.- Volumen / Selector
Permite ajustar el volumen moviendo el control hacia la derecha o
izquierda.
Presione en el centro para cambiar entre
Graves (Bas): Ajusta las frecuencias bajas
Agudos (Tre) : Ajusta las frecuencias medias
Balance (Bal) : Permite seleccionar entre las bocinas
derechas, izquierdas o ambas
Desvanecido (Fad): Permite seleccionar entre las bocinas
frontales, traseras o ambas
Mantenga presionado el botón en el centro por 3 segundos, en pantalla
se mostrará
DSP Off: Permite elegir un tipo de ecualización
predeterminado: Rock, Clásico, Flat, Pop o apagado
ESP: Permite elegir entre 12 o 45 segundos de sistema anti
choque
Beep: Permite activar o desactivar el sonido de los botones
Seek: Permite elegir entre Seek 1 o Seek 2
Para cambiar entre los diferentes modos, es necesario que
presione el botón en el centro una vez cada vez que desee cambiar.
4.- Silenciar
Desactiva la salida de audio. Presione una vez más para regresar al
modo normal
5.- Modo
Permite elegir entre Radio, CD, Auxiliar, o Tarjetas de Memoria / Memo-
ria USB
6.- Desplegado
En modo de MP3, CD, tarjeta o memoria flash presione DISP y la hora
actual se desplegará en pantalla por 5 segundos.
ESPAÑOL
ESPAÑOL-2
Para cambiar entre los diferentes modos, es necesario
q
ue
p
resione el botón en el centro una vez cada vez
q
ue desee cambiar
.

Si se encuentra en el modo de Reloj, mantenga presionado el botón
DISP por 2 segundos, el reloj comenzará a parpadear y podrá ajustar
la hora. Mueva hacia la derecha el botón de Volumen / Selector para
cambiar la hora, mueva hacia la izquierda para cambiar los minutos,
presione nuevamente DISP para guardar los cambios
7.- Pantalla de LCD
Muestra diferentes opciones
8.- Sensor
Permite detectar cuando el panel frontal está colocado o no en el
cuerpo del auto estéreo
9.- Reinicio
Presione este botón cuando:
- La instalación inicial de la unidad esté completa
- No funcione ningún botón
- Un error está desplegado en la pantalla de LCD
Recuerde que debe utilizar un objeto puntiagudo, pero no utilice objetos
que puedan cortar.
En caso de que presione el botón de Reinicio y el equipo siga sin
funcionar, utilice un cotonete humedecido en alcohol isopropílico para
limpiar el contacto localizado en la parte posterior del panel frontal
10.- Banda
En modo de radio, presione el botón de Banda para seleccionar la
banda de radio deseada: FM1, FM2, FM3, AM1, AM2.
11.- Búsqueda de estación / Pista
En modo de radio permite buscar una frecuencia hacia delante
En modo de CD, permite cambiar a la siguiente pista
12.- Búsqueda de estación / Pista
En modo de radio permite buscar una frecuencia hacia atrás
En modo de CD, permite cambiar a la pista anterior
13.- Almacenamiento automático en memoria
Presione AMS durante varios segundos y el equipo comenzará a buscar
las estaciones de radio que presenten una frecuencia fuerte, y
automáticamente les asignará un lugar en las memorias
predeterminadas (hasta 6 estaciones)
Presione una vez AMS para realizar una búsqueda a través de las
estaciones previamente almacenadas.
14.- Reproducción / Pausa / Memoria 1
Comienza la reproducción de una canción contenida en un CD,
memoria flash o tarjeta SD
ESPAÑOL
ESPAÑOL-3

Hace una pausa durante la reproducción de una canción
En modo de radio permite acceder a la estación almacenada en la
memoria 1
15.- Intro / Memoria 2
En modo de CD permite escuchar los primeros 10 segundos de cada
canción
Cuando desee escuchar una canción de modo completo, presione Play
una vez.
En modo de radio permite acceder a la estación almacenada en la
memoria 2
16.- Repetir / Memoria 3
En modo de CD permite activar la función de repetición (Repeat ON),
todo el disco (Disc Repeat) o desactivar la función de repetición (Repeat
OFF).
En modo de radio permite acceder a la estación almacenada en la
memoria 3
17.- Aleatorio / Memoria 4
En modo de CD este botón permite reproducir las canciones de forma
aleatoria. El mensaje RDM aparecerá en pantalla.
En modo de radio permite acceder a la estación almacenada en la
memoria 4
18.- Memoria 5
En modo de radio permite acceder a la estación almacenada en la
memoria 5
19.- Memoria 6
En modo de radio permite acceder a la estación almacenada en la
memoria 6
20.- Estéreo / Mono
En modo de radio presione para elegir entre salida de audio Estéreo o
Monoaural
Durante la reproducción de una canción, presione para seleccionar la
bocina izquierda / derecha o sonido estéreo
21.- LOC / DX
Presione LOC para seleccionar la recepción de una estación con señal
fuerte o débil. Si presiona LOC una vez, el mensaje LOC aparecerá
en pantalla y únicamente se escucharán estaciones locales (si están
disponibles). Si presione una vez más LOC, cambiará a la opción
DX, ahora podrá escuchar estaciones locales y nacionales (si están
disponibles)
ESPAÑOL
ESPAÑOL-4

22.- Énfasis de graves
Presione para activar o desactivar la función de énfasis de frecuencias
graves.
23.- Botón de expulsión
Permite liberar el CD
24.- Ranura de CD
Permite introducir un CD
25.- Sensor infrarrojo
Sensor de recepción de señales infrarrojas del control remoto
26.- Conector mini USB
Permite conectar un dispositivo USB que contenga música
27.- Ranura SD
Utilice esta ranura para insertar una tarjeta SD que contenga música
ESPAÑOL
ESPAÑOL-5
Table of contents
Languages:
Other Steren Car Receiver manuals