manuals.online logo
Brands
  1. Home
  2. •
  3. Brands
  4. •
  5. Steren
  6. •
  7. Extender
  8. •
  9. Steren RMX-130 User manual

Steren RMX-130 User manual

CONDICIONES
1. Para hacer efectiva esta garantía se requiere: La presentación de esta póliza y del producto, en el lugar en donde fue adquirido o en ELECTRONICA STEREN S.A. DE C.V.
2. ELECTRONICA STEREN S.A. DE C.V. se compromete a reparar el producto en caso de estar defectuoso sin ningún cargo al consumidor.
3. El tiempo de reparación en ningún caso será mayor a 30 días contados a partir de la recepción del producto en cualquiera de los sitios en donde pueda hacerse efectiva la
garantía.
4. El lugar donde puede adquirir partes, componentes, consumibles y accesorios, así como hacer válida esta garantía es: En cualquiera de las direcciones arriba mencionadas.
ESTA GARANTIA NO ES VALIDA EN LOS SIGUIENTES CASOS:
1. Cuando el producto ha sido utilizado en condiciones distintas a las normales.
2. Cuando el producto no ha sido operado de acuerdo con el instructivo de uso.
3. Cuando el producto ha sido alterado o reparado por personas no autorizadas por ELECTRONICA STEREN S.A. DE C.V.
Nota: El consumidor podrá solicitar que se haga efectiva la garantía ante la propia casa comercial, donde adquirió el producto. Si la presente garantía se extraviara, el
consumidor puede recurrir a su proovedor para que le expida otra póliza de garantía, previa presentación de la nota de compra o factura respectiva.
DATOS DEL DISTRIBUIDOR
DISTRIBUTION / NOMBRE / DISTRIBUIDOR:
ADDRESS / DOMICILIO:
PRODUCT / PRODUCTO: BRAND / MARCA:
MODEL / MODELO: SERIAL NUMBER / No. DE SERIE:
DATE OF DELIVERY / FECHA DE ENTREGA:
Call Center / Centro de Atención a Clientes
del Interior 01 800 500 9000
Mexico City / Cd. de México: 53 54 22 90
Warranty
CONDITIONS:
1. This warranty card with all the required information, the invoice or purchase ticket, the product box or package, and the product, must be presented with the product
when warranty service is required.
2. If the product stills on the warranty time, the company will repair it free of charge even the transportation charges.
3. The repairing time will not exceed 30 natural days, from the day the claim was received.
4. Steren sells parts, components, consumables and accessories to customer, as well as warranty service, at any of the following addresses:
THIS WARRANTY IS VOID ON THE NEXT CASES:
If the product has been damage by an accident, acts of God, mishandling, leaky batteries, failure to follow enclosed instructions, improper repair by unauthorized
personal, improper safe keeping or otherwise.
Notes:
a) The customer can also claim the warranty service on the purchase establishment.
b) If you lose the warranty card, we can reissue it just showing the invoice or purchase ticket.
Póliza de Garantía
This Steren product is warranted under
normal usage against defects in
workmanship and materials to the original
purchaser for one year from the date of
purchase.
Garantiza este producto por el término de
un año en todas sus partes y mano de obra
contra cualquier defecto de fabricación y
funcionamiento, a partir de la fecha de
entrega.
Product / Producto: TRIPLE WIRED
REMOTE CONTROL EXTENDER /
EXTENSOR TRIPLE DE CONTROL
REMOTO ALÁMBRICO
Model / Modelo: RMX-130
Brand / Marca: Steren
INSTRUCTIVO DE USO DE EXTENSOR TRIPLE DE CONTROL
REMOTO ALÁMBRICO
Modelo: RMX-130
Marca: Steren
Antes de utilizar su nuevo Extensor Triple lea este instructivo para
evitar cualquier mal funcionamiento. Guárdelo para futuras
referencias.
Su nuevo extensor de control remoto le permite controlar hasta 3 equipos
diferentes que se operen a través de un control remoto, desde cualquier
lugar de la casa.
Puede controlar los dispositivos sin necesidad de moverlos de lugar en un
rango de hasta 50m y sin importar que haya obstáculos de por medio, ya
que la señal del control remoto viaja a través del cable coaxial.
IMPORTANTE
No exponga el equipo a temperaturas extremas.
No use ni almacene este equipo en lugares donde existan goteras o
salpicaduras de agua. Puede causar un mal funcionamiento o un choque
eléctrico.
Siempre utilice un paño suave limpio y seco para limpiar el equipo.
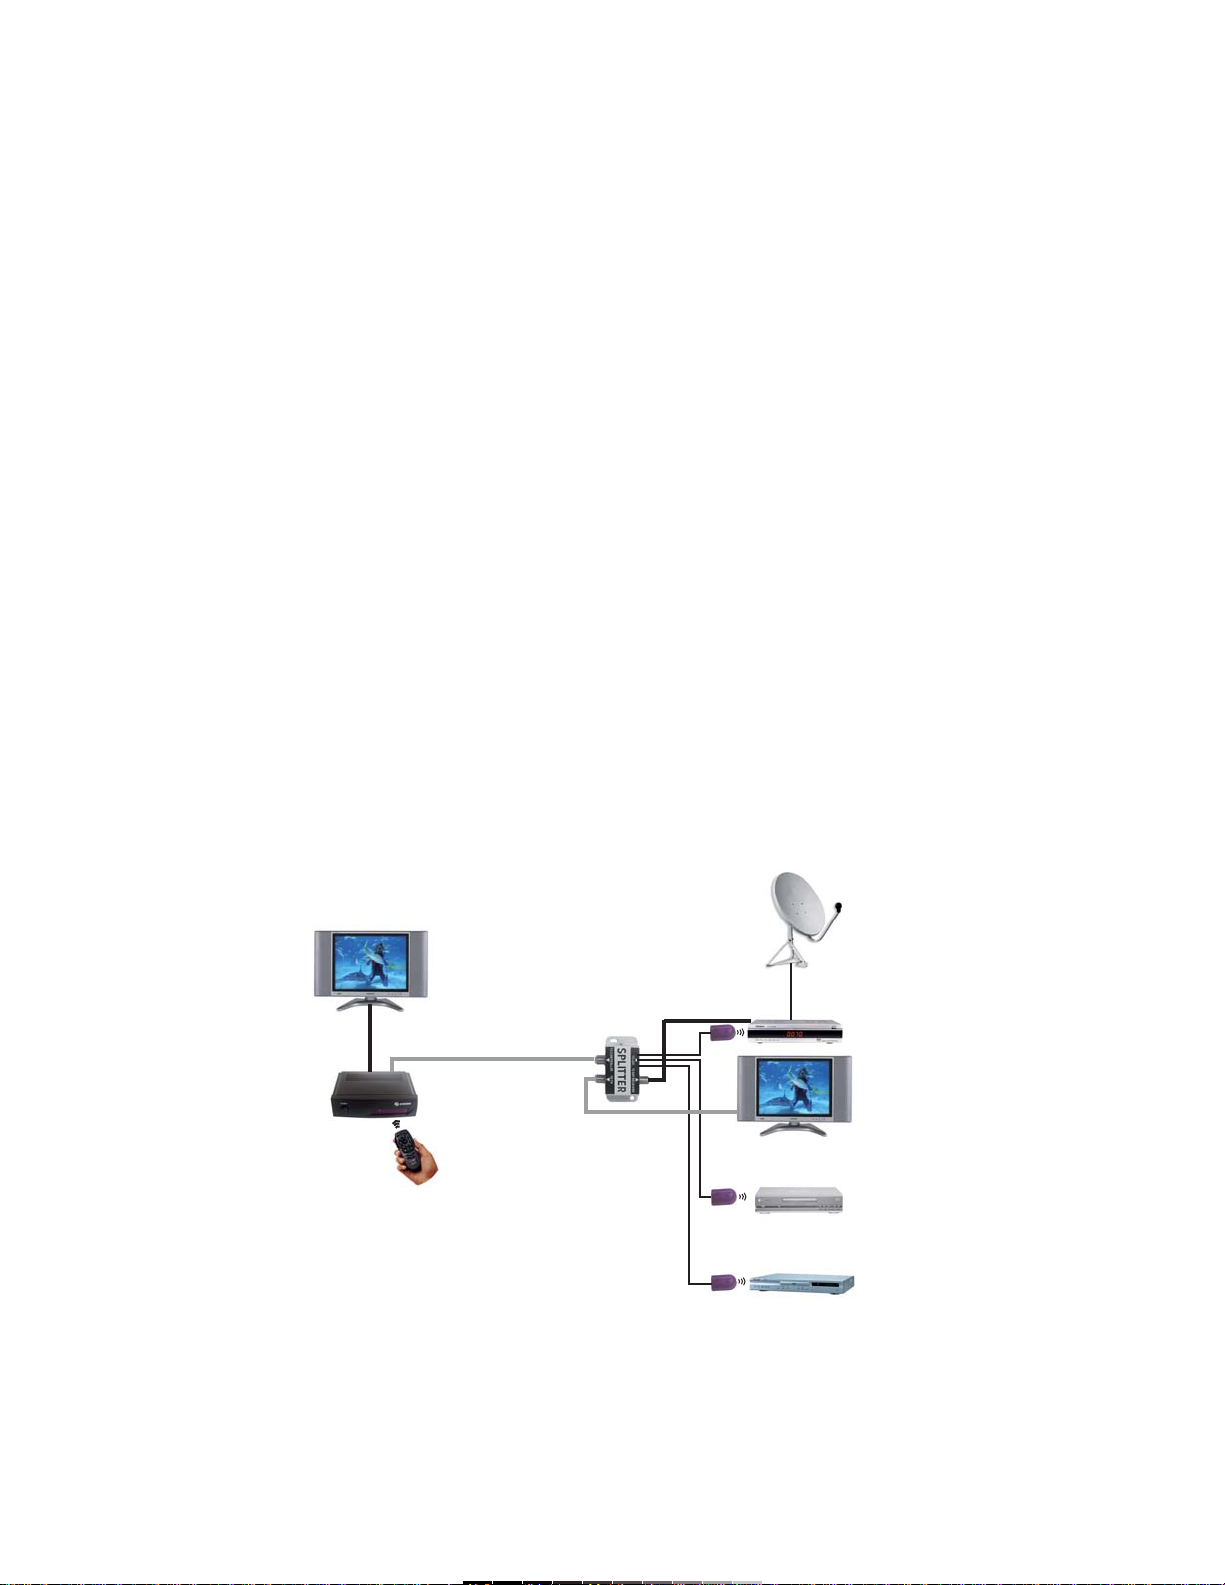
INSTALACIÓN CON UN RECEPTOR DE SATÉLITE
1.- Coloque los transmisores infrarrojos apuntando directamente a cada
una de las ventanas receptoras de infrarrojos de los equipos que desee
controlar (hasta 3 equipos diferentes).
2.- Conecte un cable coaxial de la salida del receptor de satélite a la
terminal del divisor denominado To SAT receiver.
3.- Conecte otro cable coaxial de la terminal del divisor denominada To TV
hacia la entrada de antena RF del televisor 2.
4.- De igual forma, conecte un cable coaxial de la terminal To Controller
del divisor hacia la unidad principal del RMX-130 en la entrada
denominada To Splitter.
5.- En la unidad principal conecte un cable coaxial en la terminal To TV
hacia la entrada RF del televisor 1.
6.- Conecte la antena del televisor 1 en la entrada Ant input de la unidad
principal.
7.- Una vez realizadas las conexiones, podrá controlar sus equipos, y
podrá ver la señal recibida por satélite en el televisor 1 y 2, así mismo
podrá controlar dos equipos más a través de la unidad principal utilizando
los controles originales.
ESPECIFICACIONES
Entrada: 110V ~ 60Hz 150mA
Dimensiones: 134 x 81 x 35mm
Peso: 416,2g
Nota:
El diseño del producto y las especificaciones pueden cambiar sin previo
aviso.
INSTRUCTION MANUAL FOR TRIPLE WIRED REMOTE CONTROL
EXTENDER
Model: RMX-130
Brand: Steren
Before using your new Remote Control Extender, please read this
instruction manual to prevent any damage. Put them away in a safe
place for future references.
Your new remote control extender allows you to control up to 3 different
devices which are operated by an IR remote control, from anyplace inside
of the home.
You can control the devices without moving them in a maximum range of
164ft. No matter if there are obstacles in the middle, because the signal
from the remote control travels through the coaxial cable.
IMPORTANT
Do not expose to extreme temperatures.
Do not use or store the equipment near wet places. May cause
malfunction or shock hazard.
Clean only with a soft, dry cloth.
INSTALLING USING A SATELLITE RECEIVER
1.- Place the infrared transmitter aiming directly to each one of the infrared
receiver boxes of the device that you want to control (up to 3 different
devices).
2.- Plug a coaxial cable from the satellite receiver RF output to the RF
input on the splitter, called To SAT Receiver.
3.- Plug another coaxial cable from the splitter output (To TV) to the RF
antenna input on TV set 2.
4.- In the same way, plug the coaxial cable from the splitter (To Controller
connector) to the RMX-130 into the input called To Splitter.
5.- In the main unit connect a coaxial cable to the RF antenna input on the
TV set 1.
6.- Plug the antenna from the TV set 1 into theAnt Input connector on the
main unit.
7.- Once you have finished the connections, you can control the devices,
and you can watch the video signal sent from the Sat Receiver in the TV
set 1 and TV set 2, at the same time you can control two more different
devices through the main unit using the original remote controls.
SPECIFICATIONS
Input: 110V ~ 60Hz 150mA
Dimensions: 5,2 x 3,1 x 1,3in
Weight: 0,91lb
Note:
Product design and specifications are subject to change, without notice.
Antenna
Receptor de Sat.
Sat receiver
TV 2
Rep. de CD
CD Player
Rep. de DVD
DVD player
TV 1
RMX-130
A TV 1
To TV 1
Al Divisor
To Splitter
A TV 2
To TV 2
Al receptor de Sat.
To Sat Receiver
IR 1
IR 2
IR 3

Other Steren Extender manuals

Steren 208-187 User manual

Steren

Steren 208-187 User manual

Steren COM-325 User manual

Steren

Steren COM-325 User manual

Steren BOS-950 User manual

Steren

Steren BOS-950 User manual

Steren RMX-400 User manual

Steren

Steren RMX-400 User manual

Steren BOS-900 User manual

Steren

Steren BOS-900 User manual

Steren USB-530 User manual

Steren

Steren USB-530 User manual

Steren CCTV-400 User manual

Steren

Steren CCTV-400 User manual

Steren 208-110 User manual

Steren

Steren 208-110 User manual

Steren RMX-500 User manual

Steren

Steren RMX-500 User manual

Steren AVS-1000 User manual

Steren

Steren AVS-1000 User manual

Steren COM-325 User manual

Steren

Steren COM-325 User manual

Steren BOS-650 User manual

Steren

Steren BOS-650 User manual

Steren BOS-660 User manual

Steren

Steren BOS-660 User manual

Steren BOS-650 User manual

Steren

Steren BOS-650 User manual

Steren USB-530 User manual

Steren

Steren USB-530 User manual

Steren 208-180 User manual

Steren

Steren 208-180 User manual

Steren 208-105 User manual

Steren

Steren 208-105 User manual

Steren CCTV-410 User manual

Steren

Steren CCTV-410 User manual

Popular Extender manuals by other brands

Marmitek 100304 owner's manual

Marmitek

Marmitek 100304 owner's manual

Gomax EX-54RZ2 user manual

Gomax

Gomax EX-54RZ2 user manual

Shunxun SX-EX24 manual

Shunxun

Shunxun SX-EX24 manual

Leviton LEPB-2 installation instructions

Leviton

Leviton LEPB-2 installation instructions

Vanco Evolution EVEXKVM3 manual

Vanco

Vanco Evolution EVEXKVM3 manual

FORESIGHT VE05ALT manual

FORESIGHT

FORESIGHT VE05ALT manual

Hear Technologies extreme extender ADAT IN user guide

Hear Technologies

Hear Technologies extreme extender ADAT IN user guide

Lindy 38349 user manual

Lindy

Lindy 38349 user manual

Gefen DVI Audio Extender user manual

Gefen

Gefen DVI Audio Extender user manual

Miditech PianoBox Pro Host owner's manual

Miditech

Miditech PianoBox Pro Host owner's manual

Liberty DigiIP Series owner's manual

Liberty

Liberty DigiIP Series owner's manual

Contro l4 CXM-RCR1-B installation guide

Contro l4

Contro l4 CXM-RCR1-B installation guide

Black Box IC400A user manual

Black Box

Black Box IC400A user manual

Pixel Magic Systems SE150-DH user manual

Pixel Magic Systems

Pixel Magic Systems SE150-DH user manual

Tributaries HDMI HXC5 instruction manual

Tributaries

Tributaries HDMI HXC5 instruction manual

Altronix AL1002ULADA installation guide

Altronix

Altronix AL1002ULADA installation guide

Special Optics 53C-30-2-10 Dimensional drawing

Special Optics

Special Optics 53C-30-2-10 Dimensional drawing

Vislink HDT-1000 User and technical manual

Vislink

Vislink HDT-1000 User and technical manual

manuals.online logo
manuals.online logoBrands
  • About & Mission
  • Contact us
  • Privacy Policy
  • Terms and Conditions

Copyright 2025 Manuals.Online. All Rights Reserved.