Steren HER-157 User manual


Before using your new Cordless Screwdriver, please read
this instruction manual to prevent any damage. Put it away
in a safe place for future references.
SAFETY INSTRUCTIONS
You must use eyeglasses or security mask every time you use
the equipment, to avoid several damages caused by rest of the
used material
Always disconnect the equipment from the electrical current
before cleaning or switch pieces
Clean only with a soft, dry cloth
Do not try to open the equipment, may cause malfunction and
warranty repeal
Do not use or store the equipment near wet places. May cause
malfunction or shock hazard
Do not use the equipment if the power cord of the adaptor is
broken
Only indoor use
PACKAGE CONTENT
1 cordless screwdriver
1 AC power adaptor / battery charger
2 double tips: crossed / flats
CONTROLS
1.- Small opening
Allows one to place different tips
2.- Forward / Reverse slide switch
Shift between turn the equipment to the right or turn to the left
3.- Turn button
Use this button to change the position of the equipment: straight
or pistol
4.- Charging LED
Lights on when the equipment is plugged to an outlet through an
AC power adaptor
5.- AC power adaptor
Allows one to plug the AC power adaptor included in the
package
ENGLISH
ENGLISH-2
Before usin
g
y
our new Cordless Screwdriver, please read
t
his instruction manual to prevent an
y
dama
g
e. Put it awa
y
i
n a safe
p
lace for future references
.
1
2
3
4
5

CHARGING THE EQUIPMENT
Your cordless screwdriver has a low charge in the battery to
avoid risks.
You must charge the equipment from 8 to 12 hours to get the
best charge and the best performance.
1.- Plug the AC power adaptor into the cordless screwdriver.
2.- Plug the AC power adaptor into an AC household outlet. The
charging LED, located on the top of the screwdriver, lights on
when you plug the AC power adaptor to the outlet, this indicates
that the equipment is charging. The charging LED keeps on until
you unplugged the AC power adaptor from the outlet.
Do not use the screwdriver while the AC power adaptor is
plugged, the equipment won’t works better if you do this.
After first charge, the time of the charge will be from 3 to 5
hours.
PLACING THE TIPS
1.- Put the tip inside of the small opening, as deep as you can.
1
2
3
4
5
ENGLISH
ENGLISH-3

2.- When you have finished to use the screwdriver, release the
tip from the small opening and place it in a safe place.
FORWARD / REVERSE SLIDE SWITCH
This equipment includes a reversible switch. Rotating direction is
controlled by a switch located on the handle of the screwdriver.
If you want to use the forward movement, press the switch up. If
you want to use the reverse movement, press the switch down.
To stop the movement, release the switch.
Warning:
Do not try to change the direction while the screwdriver is in
use.
Drop the switch and wait a few seconds until the motor
stops. Then you can change the direction.
CHANGING THE WAY OF USE
You can use the equipment in two different positions, in accord to
your necessities.
1.- Slide up the Turn button.
2.- Hold the button, and turn the front of the equipment
clockwise, until the screwdriver place in a L position (pistol
position).
ENGLISH
ENGLISH-4
W
arn
i
n
g:
D
o not tr
y
to chan
g
e the direction while the screwdriver is in
use
.
D
ro
p
the switch and wait a few seconds until the moto
r
s
tops. Then
y
ou can chan
g
e the direction
.

3.- If you want to back to straight position, slide and hold the
Turn button once again, and turn the front counterclockwise.
SPECIFICATIONS
Screwdriver
Input: 3,6V (3xAA) 300mA
RPM : 250
AC power adapter
Input: 120V~ 60Hz 5W
Output: 6V 300mA
Product design and specifications are subject to change,
without notice
ENGLISH
ENGLISH-5
P
roduct desi
g
n and specifications are sub
j
ect to chan
g
e,
wi
t
h
out not
i
c
e


Antes de utilizar su nuevo Destornillador Eléctrico lea
este instructivo para evitar cualquier mal funcionamiento.
Guárdelo para futuras referencias.
INSTRUCCIONES DE SEGURIDAD
Siempre que utilice el equipo deberá colocarse anteojos o
máscara de seguridad para evitar daños provocados por
desprendimiento del material con el que se labora
Antes de limpiar o intercambiar partes del equipo, desconéctelo
de la toma de corriente
Siempre utilice un paño suave, limpio y seco para limpiar el
equipo.
No intente abrir el equipo, puede ocasionar malfuncionamiento y
anulación de la garantía
No use ni almacene este equipo en lugares donde esté
expuesto a salpicaduras o goteo, esto puede causar mal
funcionamiento
No utilice este equipo si el cable del adaptador de corriente se
encuentra dañado
Para su uso en interiores únicamente
CONTENIDO
1 destornillador con mango giratorio
1 adaptador de corriente / cargador de batería
2 puntas dobles: cruz / plana
ESPAÑOL
ESPAÑOL-2
A
ntes de utilizar su nuevo Destornillador Eléctrico lea
e
ste instructivo
p
ara evitar cual
q
uier mal funcionamiento.
G
uárdelo
p
ara futuras referencias
.

CONTROLES
1.- Boquilla de entrada
Permite introducir las diferentes medidas de puntas
2.- Interruptor reversible
Selecciona entre girar el equipo hacia la derecha o hacia la
izquierda
3.- Botón para girar
Utilice este botón para cambiar la posición del equipo
4.- Indicador de carga
Se enciende cuando el equipo está conectado a un
tomacorriente mediante el adaptador de corriente
5.- Adaptador de corriente
Permite conectar el adaptador de corriente suministrado
1
2
3
4
5
1
2
3
4
5
ESPAÑOL
ESPAÑOL-3

CARGANDO EL DESTORNILLADOR
Su destornillador ha sido empacado de origen con un nivel bajo
de carga para prevenir riesgos. Para que su destornillador
funcione a toda su capacidad cárguelo un promedio de 8 a 12
horas antes de usarlo por primera vez.
1.- Conecte el adaptador de corriente suministrado en la entrada
correspondiente del destornillador.
2.- Conecte el cargador en un tomacorriente casero. El indicador
de carga que se encuentra localizado en la parte superior del
destornillador se encenderá en el momento que el cargador sea
conectado a un enchufe o contacto, esto indicará que el equipo
se está cargando. El indicador de carga permanecerá encendido
hasta que el adaptador de corriente sea desconectado.
No opere el destornillador mientras esté conectado al cargador,
la fuerza del equipo no aumentará haciendo esto.
El tiempo de carga posterior a la primera vez, será de 3 a 5
horas.
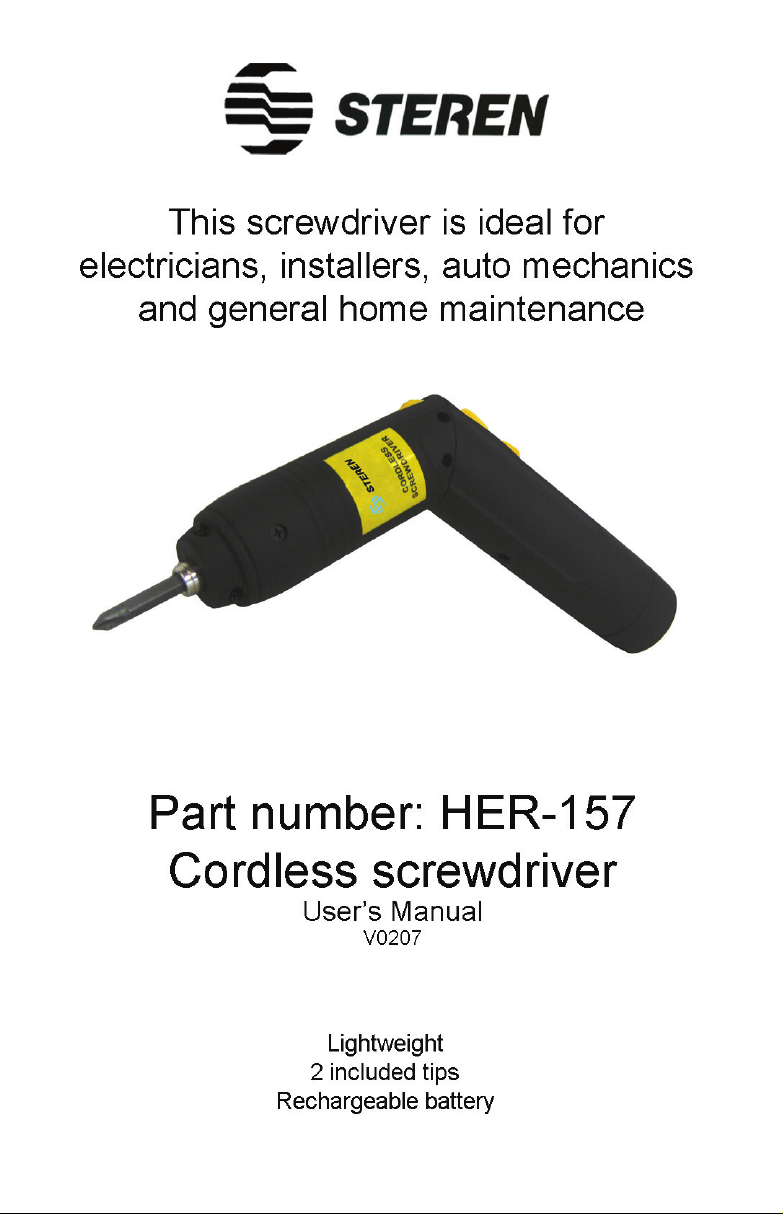
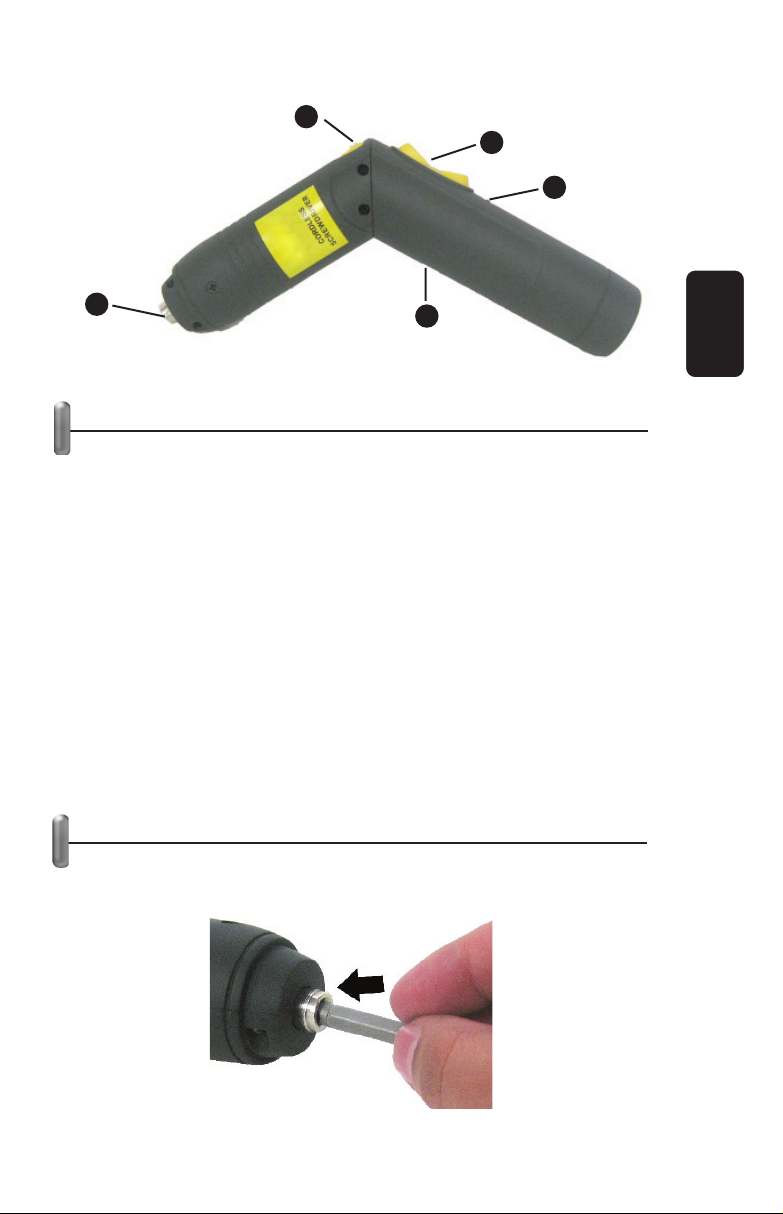
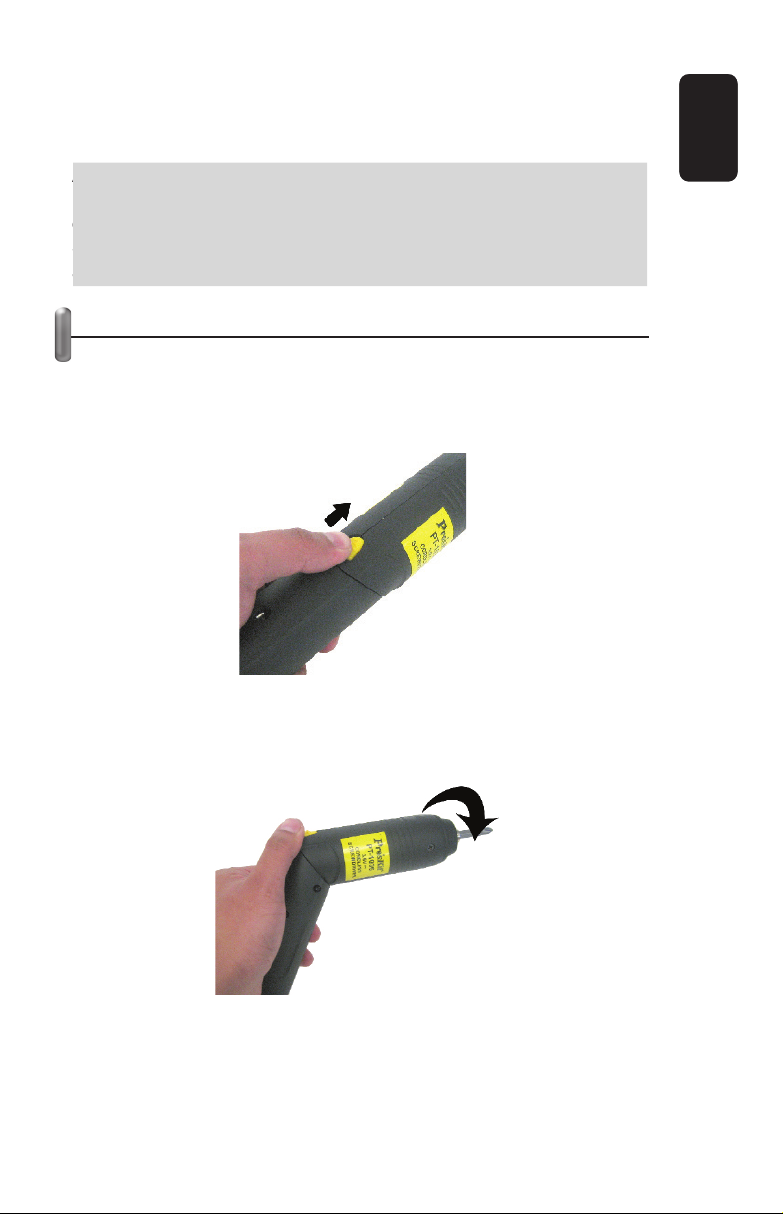
COLOCANDO LAS PUNTAS PARA DESARMADOR
1.- Inserte la punta dentro de la boquilla de entrada lo más
profundo que sea posible.
2.- Cuando haya terminado de usar su desarmador, retire la
punta de la boquilla y colóquela en un lugar seguro.
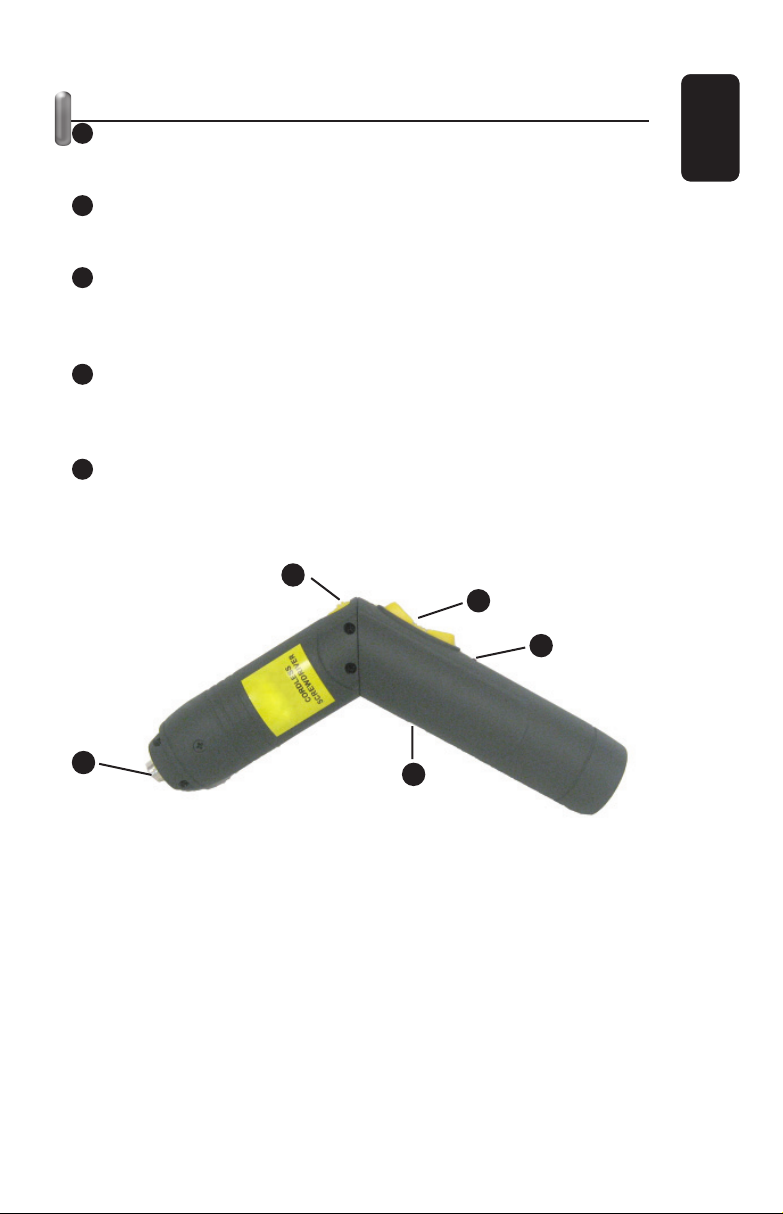
INTERRUPTOR REVERSIBLE
Esta herramienta es un destornillador reversible. La dirección
de rotación es controlada por un interruptor localizado sobre el
mango de la herramienta. Para ponerlo en posición de
rotación hacia delante presione el interruptor hacia arriba.
E
l tiempo de car
g
a posterior a la primera vez, será de 3 a 5
horas
.
ESPAÑOL
ESPAÑOL-4

Para el movimiento de reversa, presione el interruptor hacia
abajo. Para detener su desarmador suelte el interruptor.
Advertencia:
No intente cambiar de dirección el desarmador mientras
este funcionando.
Suelte el interruptor y permita que el motor se detenga
antes de cambiar la dirección de rotación.
CAMBIO DE POSICIÓN
Su destornillador cuenta con dos posiciones para lograr un
mejor soporte al momento de utilizarlo.
1.- Deslice hacia arriba el botón para girar el equipo.
2.- Mientras mantiene el botón presionado, gire en sentido de las
manecillas del reloj la parte delantera del destornillador, hasta
que quede en posición de L.
3.- Si desea regresar a la posición inicial, presione el botón para
girar una vez más y gire en sentido contrario de las manecillas
del reloj hasta que quede en posición vertical.
Ad
vertenc
i
a
:
No intente cambiar de dirección el desarmador mientras
e
ste funcionando.
S
uelte el interruptor
y
permita que el motor se deten
g
a
a
ntes de cambiar la dirección de rotación
.
ESPAÑOL
ESPAÑOL-5

ESPECIFICACIONES
Destornillador
Entrada: 3,6V (3xAA) 300mA
RPM : 250
Convertidor
Entrada: 120V~ 60Hz 5W
Salida: 6V 300mA
El diseño del producto y las especificaciones pueden
cambiar sin previo aviso.
E
l diseño del producto
y
las especificaciones pueden
c
ambiar sin
p
revio aviso
.
ESPAÑOL
ESPAÑOL-6

WARRANTY
This Steren product is warranted under normal usage against defects in workmanship and materials
to the original purchaser for one year from the date of purchase.
CONDITIONS
1.- This warranty card with all the required information, invoice or purchase ticket, product box or
package, and product, must be presented when warranty service is required.
2.- If the product stills on the warranty time, the company will repair it free of charge.
3.- The repairing time will not exceed 30 natural days, from the day the claim was received.
4.- Steren sell parts, components, consumables and accesories to costumer, as well as warranty
service, at any of the addresses mentioned later.
THIS WARRANTY IS VOID IN THE NEXT CASES:
If the product has been damaged by an accident, acts of God, mishandling, leaky batteries, failure
to follow enclosed instructions, improper repair by unauthorized personnel, improper safe keeping,
among others.
a) The consumer can also claim the warranty service in the purchase establishment.
b) If you lose the warranty card, we can reissue it, if you show the invoice or purchase ticket.
RETAILER INFORMATION
Name of the retailer
Address
Product
Brand
Part number
Serial number
Date of delivery
In case your product fails or have any doubt, please contact a closest retailer. If you are in
Mexico, please give a call to our Call Center.
Call Center
Mexico City: 53 54 22 90
Province: 01 800 500 9000
Product: Cordless screwdriver
Part number: HER-157
Brand: Steren

PÓLIZA DE GARANTÍA
Esta póliza garantiza el producto por el término de un año en todas sus partes y mano de obra,
contra cualquier defecto de fabricación y funcionamiento, a partir de la fecha de entrega.
CONDICIONES
1.- Para hacer efectiva la garantía, presente ésta póliza y el producto, en donde fue adquirido o en
Electrónica Steren S.A. de C.V.
2.- Electrónica Steren S.A de C.V. se compromete a reparar el producto en caso de estar defectuoso
sin ningún cargo al consumidor. Los gastos de transportación serán cubiertos por el proveedor.
3.- El tiempo de reparación en ningún caso será mayor a 30 días, contados a partir de la recepción
del producto en cualquiera de los sitios donde pueda hacerse efectiva la garantía.
4.- El lugar donde puede adquirir partes, componentes, consumibles y accesorios, así como hacer
válida esta garantía es en cualquiera de las direcciones mencionadas posteriormente.
ESTA PÓLIZA NO SE HARA EFECTIVA EN LOS SIGUIENTES CASOS:
1.- Cuando el producto ha sido utilizado en condiciones distintas a las normales.
2.- Cuando el producto no ha sido operado de acuerdo con el instructivo de uso.
3.- Cuando el producto ha sido alterado o reparado por personal no autorizado por Electrónica
Steren S.A. de C.V.
El consumidor podrá solicitar que se haga efectiva la garantía ante la propia casa comercial donde
adquirió el producto. Si la presente garantía se extraviara, el consumidor puede recurrir a su
proveedor para que le expida otra póliza de garantía, previa presentación de la nota de compra o
factura respectiva.
DATOS DEL DISTRIBUIDOR
Nombre del Distirbuidor
Domicilio
Producto
Marca
Modelo
Número de serie
Fecha de entrega
ELECTRONICA STEREN S.A. DE C.V.
Camarones 112, Obrero Popular, 02840, México, D.F. RFC: EST850628-K51
STEREN PRODUCTO EMPACADO S.A. DE C.V.
Biólogo MaximIno Martínez No. 3408 Int. 3 y 4, San Salvador Xochimanca, México, D.F. 02870,
RFC: SPE941215H43
ELECTRONICA STEREN DEL CENTRO, S.A. DE C.V.
Rep. del Salvador 20 A y B, Centro, 06000, México. D.F. RFC: ESC9610259N4
ELECTRONICA STEREN DE GUADALAJARA, S.A.
López Cotilla No. 51, Centro, 44100, Guadalajara, Jal. RFC: ESG810511HT6
ELECTRONICA STEREN DE MONTERREY, S.A.
Colón 130 Pte., Centro, 64000, Monterrey, N.L. RFC: ESM830202MF8
ELECTRONICA STEREN DE TIJUANA, S.A
Calle 2a, Juárez 7636, Centro, 22000, Tijuana, B.C.N. RFC: EST980909NU5
Producto: Destornillador Eléctrico
Modelo: HER-157
Marca: Steren
En caso de que su producto
presente alguna falla, acuda
al centro de distribución más
cercano a su domicilio y en caso
de tener alguna duda o pregunta
por favor llame a nuestro Centro
de Atención a Clientes, en
donde con gusto le atenderemos
en todo lo relacionado con su
producto Steren.
Centro de Atención a Clientes
Ciudad de México:
53 54 22 90
Interior de la República:
01 800 500 9000
Table of contents
Languages:
Popular Power Screwdriver manuals by other brands

Far Tools
Far Tools LI 12C Original manual translation

BLACK DECKER
BLACK DECKER AS36LN Original instructions

Gude
Gude 40079 instruction manual

Hyundai power products
Hyundai power products HPVD18L-B Original instructions

Atlas Copco
Atlas Copco QMC41-250-I06 Product instructions

Sturtevant Richmont
Sturtevant Richmont PM-5 operating instructions