Sterling Power Products DBT125 User manual
Sterling Power Products
Copyright
16
8
234
5
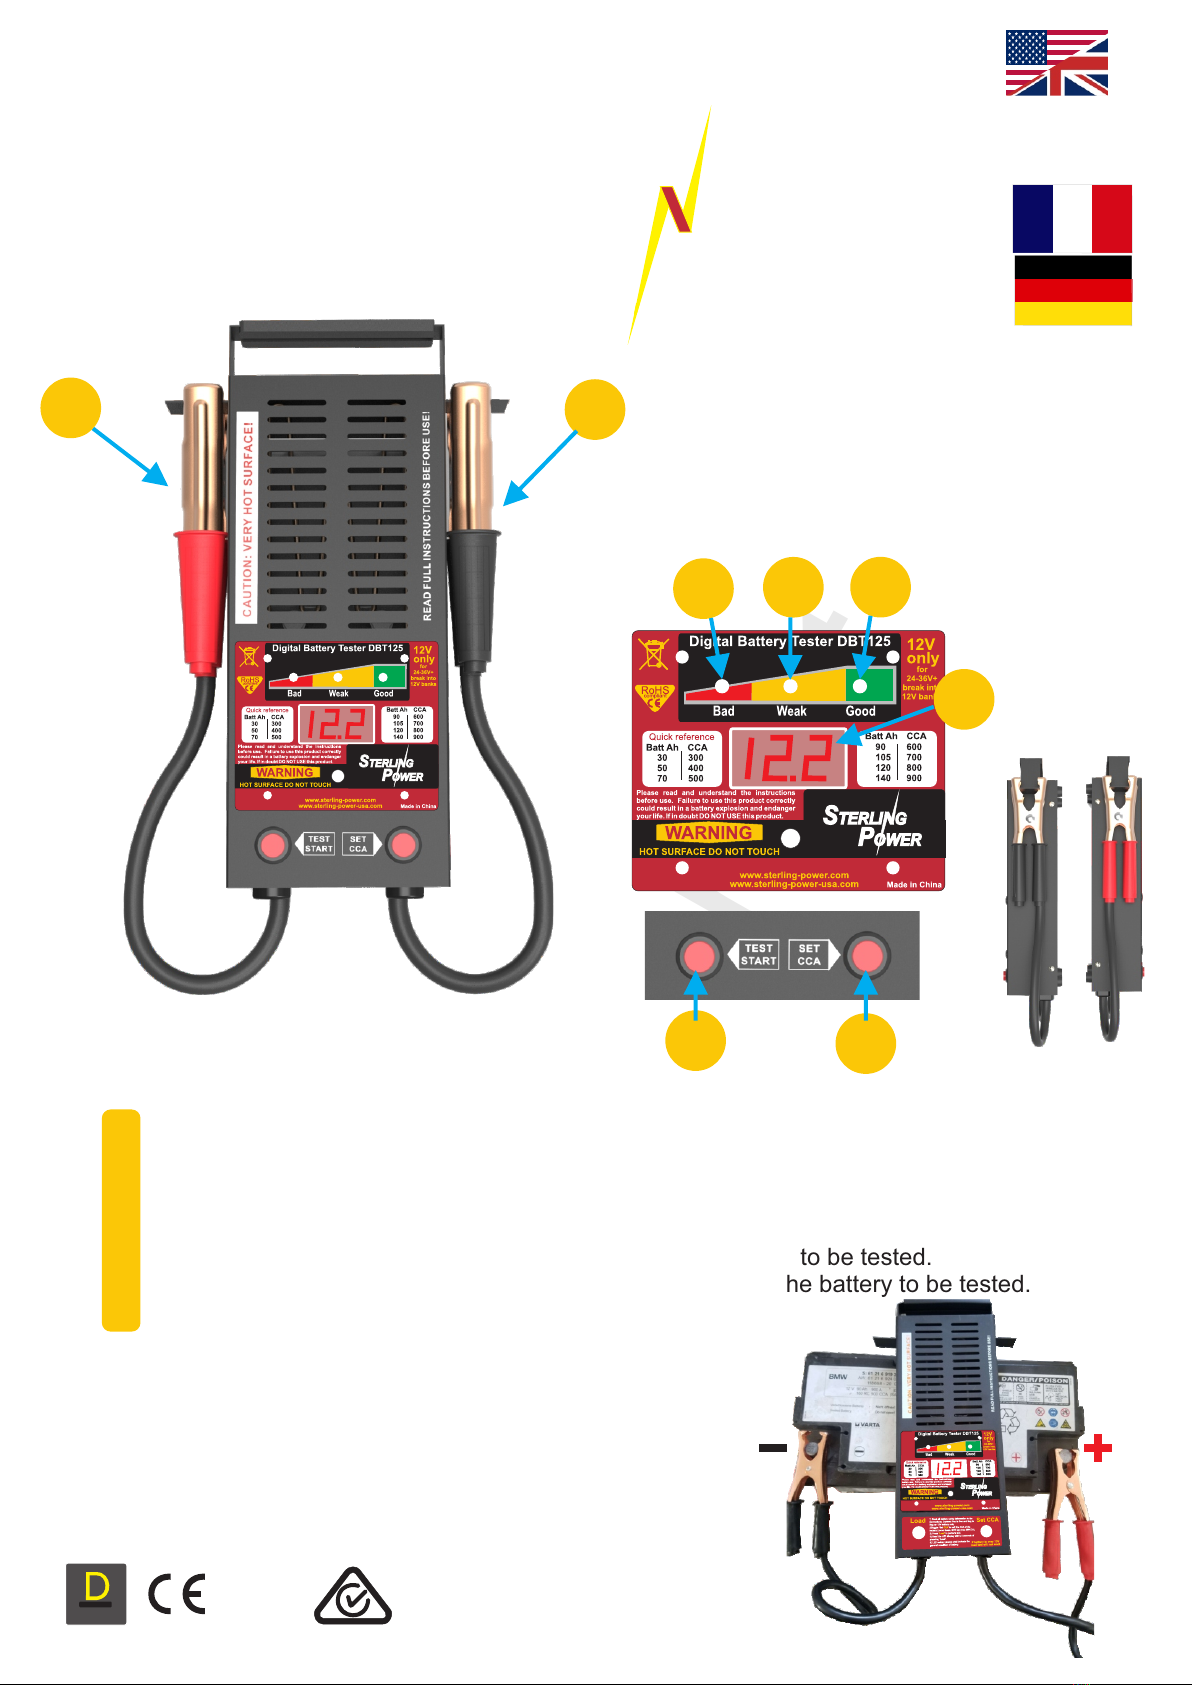
Quick Key guide
1) Negative clamp, clamp onto the negative terminal of the battery to be tested.
2) Red LED to indicate the battery is in poor condition.
3) Yellow LED to show the battery is just not good but may do the job for a short time.
4) Green LED to show battery in good condition.
5) LED screen to show voltage and Cold Cranking amps set.
6) Positive clamp, clamp onto the positive terminal of the battery to be tested.
7) Set CCA button to adjust the CCA (Cold Cranking Amps) of the battery to be tested.
8) Load button to be pushed to administer the test.
7
When unpacking, check to make sure that the product is
intact and undamaged. If any parts are missing or broken, do
not use the product and please contact where you
purchased the product.
STERLI G
POWER
12V Digital Battery Load Tester
DBT125
technology
4
D
U
:
L
R
A
A
T
I
B
G
L
I
E
D
:
:
D
C
I
E
S
M
I
A
G
N
N
Y
D
ProDigital
RoHS
compliant
English Manual
www.sterling-power.com
inside booklet

Sterling Power Products
Copyright
Using the Instruction Manual
This manual must be read throughout before
installing this electronic device. Do not lose these
instructions - keep them safe. The most up to date
instructions can be found on the Sterling Power
website. Please refer to the latest instruction manual
before contacting Sterling. At Sterling, we endeavour
to include all of the product information that we can
think of into the manual.
Installation of the electronic device must be carried
out by a qualified and trained personnel only. The
personnel must be familiar with the locally accepted
guidelines and safety measures.
Sterling Power’s warranty statement
A comprehensive warranty statement is provide at
the back of the instruction manual. A comprehensive
warranty statement can also be found on sterling-
power.com.
Copyright and plagiarism
Copyright © 2019 Sterling Power. All rights reserved.
Reproduction, transfer, distribution or storage of part
or all of the contents of this document is strictly
prohibited. If you wish to use all of this document, or
excerpts from it, Sterling Power must be contacted.
Liability
Sterling Power can not accept liability for:
Ÿconsequential damage due to use of this device
Ÿpossible errors in the manuals and the results
thereof
Device modification
Please do not modify the device unless you have
been instructed to do so by Sterling Power, directly.
Product modification shall be done at Sterling, when
needed. Warranty shall be voided if personal
attempts are made to modify the device, without
Sterling’s approval.
Use the battery TESTER:
ŸFor 12V batteries only.
ŸFor load testing 12V batteries.
ŸIn a well ventilated, dry, dust-free and
condensation free environment.
ŸWhen instruction manual has been read through.
Safety Symbols
ŸExample - WARNING. Never use the device in
situations where there is danger of gas / dust
EXPLOSION or potentially flammable products.
General maintenance and repair
The device must be switched off during maintenance.
It must also be protected against unexpected
switching off. Remove battery connections and
ensure unit is off. If repair is required, only use
original parts.
General safety and installation precautions
ŸInstall device in well ventilated space. Do not
expose device to: Rain, snow, spray, moisture,
pollution, condensation. Do not cover or obstruct
ventilation openings.
ŸDevice connects to common negative. Common
negative must be earthed.
ŸIn case of fire use a fire extinguisher.
ŸEnsure reverse polarity and short circuiting is
avoided - to prevent damage to battery.
ŸProtect DC wires with the appropriate sized fuse.
ŸCheck cabling annually- fix where needed.
ŸAvoid contact with device with damp hands.
ŸEnsure the device is adequately and securely
mounted to prevent the unit from displacement.
ŸUse a professional to install device.
Battery safety
Excessive charge or discharge and high voltages can
cause serious damage to batteries. Never exceed
the recommended limits. If battery acid contacts skin
or clothing, wash immediately with soap and water. If
acid enters the eye(s), immediately flood the eye(s)
with running cold water for 20 minutes and seek
medical attention.
Give extra care to not drop metal tools or jewellery on
to the battery terminals as short circuiting can take
place.
Refrain from charging battery up to 4 hours prior of
installation to avoid the formation of explosive gases.
Never smoke / generate a spark around batteries.
CAUTION
WARNING
EXPLOSION
Legal and Safety

General SAFETY - Please Read
1. Keep your work area clean and well lit. Cluttered
benches and dark areas invite accidents.
2. Do not operate power tools in explosive atmospheres,
such as: In the presence of flammable liquids, gases, or
dust. Power tools create sparks which may ignite the dust
or fumes.
3. Keep bystanders, children, and visitors away while
operating this tool. Distractions can cause you to lose
control. Protect others in the work area from debris such
as chips and sparks. Provide barriers or shields as
needed.
4. Do not force the tool. Use the correct tool for the
application. The correct tool will do the job better and
safer at the rate for which it is designed.
5. Do not use the power tool if the it looks damaged in any
way.
6. Store idle tools out of reach of children and other
untrained persons. Tools are dangerous in the hands of
untrained users.
7. Maintain tools with care. Keep clean. Do not use a
damaged tool. Tag damaged tools with "Do not use" until
repaired.
8. Tool service must be performed only by a qualified
repair personnel. Servicing or maintenance performed
by unqualified personnel could result in injury.
9. Maintain labels and nameplates on this tool. These
carry important information. If unreadable or missing,
contact us for a replacement or check our website for
download (www.sterling-power.com).
10. Always wear ANSI approved safety impact eye
goggles and heavy work gloves when using this tool.
Using personal safety devices reduce the risk for injury.
11. Maintain a safe working environment. Keep the work
area well lit. Make sure there is adequate surrounding
workspace. Always keep the work area free of
obstructions, grease, oil, trash, and other debris. Do not
use this tool in areas near flammable chemicals, dusts
and vapours. Do not use this product in a damp or wet
location.
12. People with pacemakers should consult their
physicians before using this product. Electromagnetic
fields in close proximity to a heart pacemaker could
cause interference to or failure of the pacemaker.
Caution is necessary when near the coil, spark plug
cables, or distributor of a running engine. The engine
should always be off if adjustments are to be made.
13. When connecting the battery cables to the battery,
avoid creating sparks (always connect and disconnect
clamps exactly as described in rule number 14, below).
Explosive gases are created during charging. Sparking
could also damage the vehicle electrical system.
14. Be certain of the test battery polarity before
connecting the test Cable Clamps. The red cable clamp
(Marked 6 on front diagram ) goes to the positive terminal
of the battery. The black Cable Clamp (marked 1 on front
diagram) goes to the negative terminal of the battery.
15. When placing the Battery Tester in the vehicle, take
special care that the metal housing of the Battery Tester
does not come in contact with either terminal of the
battery or other electrical connections.
16. Do not drop the Battery Tester as it may affect proper
operation.
17. Do not smoke or have open flames near the battery.
18. Reversing Battery Tester Cable Clamps on the
battery will damage the tester.
19. Do not connect the Battery Tester to the battery while
the battery is being charged. Turn the engine off before
connecting.
20. Do not touch the cooling vents on the Battery Tester
immediately after testing the battery. They become very hot.
OPERATING INSTRUCTIONS
WARNING This Battery Tester becomes very hot during
use. Touching it in the wrong places will result in serious
burns. Even after tests are completed the unit remains very
hot, ensure its not placed on a surface which can be
damaged due to the heat, only hold the unit in the desired
places. I.e. the handle.
What does the tester do?
The Sterling Battery Tester has multiple functions,
however, there are 3 main functions:
1) a voltmeter, the battery voltage alone can give the
user a rough indication of the level of charge in the
battery.
2) a load tester, by applying a 125A load to the battery
(emulating a stater motor) the general condition /
integrity of the battery and its ability to perform at the
stated cold cranking amps (CCA) is determined.
3) a charging system test, this test can determine the
effectiveness of the charging supply onto the battery.
The user will be informed as to whether the alternator /
battery charger (or other) is ‘good’, ‘weak’ or ‘bad’.
Testing the Battery ( 12V battery only up to about 140Ah
and FULLY CHARGED, for 24V then split bank into 2 x
12V )
Note: The temperature of the battery will marginally affect
the testing data. It will test lower when cold than when warm.
WARNING
Never test or charge a frozen battery.
To prevent sparks never disconnect ( or connect ) the
unit under test.
Always work in a well vented space.
Always wear safety goggles as battery hydrogen
explosions could happen.
This tester only works if the batteries are fully charged,
testing an empty battery is a waste of time.
Wear rubber gloves (not included) whenever working
with the Battery Tester or batteries.
Only test 1 x 12V battery at a time. For larger banks or
voltages they must be broken down to an individual 12V
battery. No larger than about 140Ah / 1000 CCA.
Note: Before any testing, make sure to clean the battery
contacts. Ensure the battery is fully charged. When
connecting the tester to the charged battery, the battery
voltage is over 13.2V ( surface voltage ) the load test will
not engage, as the unit assumes that you want to do the
charging test only. It also prevents the unit being used on 24-
36V battery banks.
1) Make sure the vehicle is switched off. If a single battery,
up to about 1000 CCA or about 140Ah then you can test in
position. However, for example, a boat with 4 batteries, each
battery must be isolated (removing the pos from each
battery link would be fine). Test 1 at a time with a 2 minute
rest interval between each test, this allows unit to cool down.
For 24V, 36V or 48V battery banks they must be split into
their 12V components. Do NOT use this directly on the 24V,
36V, 48V directly as it will destroy the unit.
Only an individual 12V battery can be tested and the
battery must be fully charged.

Sterling Power Products
Copyright
Open Circuit Voltage (V) ( Typical ) : Less than: 11.7V 12V 12.2V 12.4V 12.4V+
Battery Charge Percentage ( Typical ) : 0% 20% 50% 75% 100%
Battery Capacity Cold Cranking Amps (CCA)
(Ah) (typical)
30 300
50 400
70 500
90 600
105 700
120 800
140 900
General SAFETY - Please Read
1. Keep your work area clean and well lit. Cluttered benches
and dark areas invite accidents.
2. Do not operate power tools in explosive atmospheres,
such as: In the presence of flammable liquids, gases, or dust.
Power tools create sparks which may ignite the dust or
fumes.
3. Keep bystanders, children, and visitors away while
operating this tool. Distractions can cause you to lose
control. Protect others in the work area from debris such as
chips and sparks. Provide barriers or shields as needed.
4. Do not force the tool. Use the correct tool for the
application. The correct tool will do the job better and safer at
the rate for which it is designed.
5. Do not use the power tool if the it looks damaged in any
way.
6. Store idle tools out of reach of children and other untrained
persons. Tools are dangerous in the hands of untrained
users.
7. Maintain tools with care. Keep clean. Do not use a
damaged tool. Tag damaged tools with "Do not use" until
repaired.
8. Tool service must be performed only by a qualified repair
personnel. Servicing or maintenance performed by
unqualified personnel could result in injury.
9. Maintain labels and nameplates on this tool. These carry
important information. If unreadable or missing, contact us
for a replacement or check our website for download
(www.sterling-power.com).
10. Always wear ANSI approved safety impact eye goggles
and heavy work gloves when using this tool. Using personal
safety devices reduce the risk for injury.
11. Maintain a safe working environment. Keep the work
area well lit. Make sure there is adequate surrounding
workspace. Always keep the work area free of obstructions,
grease, oil, trash, and other debris. Do not use this tool in
areas near flammable chemicals, dusts and vapours. Do not
use this product in a damp or wet location.
12. People with pacemakers should consult their physicians
before using this product. Electromagnetic fields in close
proximity to a heart pacemaker could cause interference to
or failure of the pacemaker. Caution is necessary when near
the coil, spark plug cables, or distributor of a running engine.
The engine should always be off if adjustments are to be
made.
13. When connecting the battery cables to the battery, avoid
creating sparks (always connect and disconnect clamps
exactly as described in rule number 14, below). Explosive
gases are created during charging. Sparking could also
damage the vehicle electrical system.
14. Be certain of the test battery polarity before connecting
the test Cable Clamps. The red cable clamp (Marked 6 on
front diagram ) goes to the positive terminal of the battery.
The black Cable Clamp (marked 1 on front diagram) goes
to the negative terminal of the battery.
15. When placing the Battery Tester in the vehicle, take
special care that the metal housing of the Battery Tester
does not come in contact with either terminal of the
battery or other electrical connections.
16. Do not drop the Battery Tester as it may affect proper
operation.
17. Do not smoke or have open flames near the battery.
18. Reversing Battery Tester Cable Clamps on the
battery will damage the tester.
19. Do not connect the Battery Tester to the battery while
the battery is being charged. Turn the engine off before
connecting.
20. Do not touch the cooling vents on the Battery Tester
immediately after testing the battery. They become very
hot.
OPERATING INSTRUCTIONS
WARNING This Battery Tester becomes very hot during
use. Touching it in the wrong places will result in serious
burns. Even after tests are completed the unit remains
very hot, ensure its not placed on a surface which can be
damaged due to the heat, only hold the unit in the desired
places. I.e. the handle.
What does the tester do?
The Sterling Battery Tester has multiple functions,
however, there are 3 main functions:
1) a voltmeter, the battery voltage alone can give the
user a rough indication of the level of charge in the
battery.
2) a load tester, by applying a 125A load to the battery
(emulating a stater motor) the general condition /
integrity of the battery and its ability to perform at the
stated cold cranking amps (CCA) is determined.
3) a charging system test, this test can determine the
effectiveness of the charging supply onto the
battery. The user will be informed as to whether the
alternator / battery charger (or other) is ‘good’, ‘weak’
or ‘bad’.
Testing the Battery ( 12V battery only up to about
140Ah and FULLY CHARGED, for 24V then split bank
into 2 x 12V )
Note: The temperature of the battery will marginally
affect the testing data. It will test lower when cold than
when warm.
Using the Instruction Manual
This manual must be read throughout before installing
this electronic device. Do not lose these instructions -
keep them safe. The most up to date instructions can
be found on the Sterling Power website. Please refer to
the latest instruction manual before contacting Sterling.
At Sterling, we endeavour to include all of the product
information that we can think of into the manual.
Installation of the electronic device must be carried out
by a qualified and trained personnel only. The
personnel must be familiar with the locally accepted
guidelines and safety measures.
Sterling Power’s warranty statement
A comprehensive warranty statement is provide at the
back of the instruction manual. A comprehensive
warranty statement can also be found on sterling-
power.com.
Copyright and plagiarism
Copyright © 2019 Sterling Power. All rights reserved.
Reproduction, transfer, distribution or storage of part or
all of the contents of this document is strictly prohibited.
If you wish to use all of this document, or excerpts from
it, Sterling Power must be contacted.
Liability
Sterling Power can not accept liability for:
Ÿconsequential damage due to use of this device
Ÿpossible errors in the manuals and the results
thereof
Device modification
Please do not modify the device unless you have been
instructed to do so by Sterling Power, directly. Product
modification shall be done at Sterling, when needed.
Warranty shall be voided if personal attempts are made
to modify the device, without Sterling’s approval.
Use the battery TESTER:
ŸFor 12V batteries only.
ŸFor load testing 12V batteries.
ŸIn a well ventilated, dry, dust-free and condensation
free environment.
ŸWhen instruction manual has been read through.
Safety Symbols
ŸExample - WARNING. Never use the device in
situations where there is danger of gas / dust
EXPLOSION or potentially flammable products.
General maintenance and repair
The device must be switched off during maintenance. It
must also be protected against unexpected switching
off. Remove battery connections and ensure unit is off.
If repair is required, only use original parts.
General safety and installation precautions
ŸInstall device in well ventilated space. Do not
expose device to: Rain, snow, spray, moisture,
pollution, condensation. Do not cover or obstruct
ventilation openings.
ŸDevice connects to common negative. Common
negative must be earthed.
ŸIn case of fire use a fire extinguisher.
ŸEnsure reverse polarity and short circuiting is
avoided - to prevent damage to battery.
ŸProtect DC wires with the appropriate sized fuse.
ŸCheck cabling annually- fix where needed.
ŸAvoid contact with device with damp hands.
ŸEnsure the device is adequately and securely
mounted to prevent the unit from displacement.
ŸUse a professional to install device.
Battery safety
Excessive charge or discharge and high voltages can
cause serious damage to batteries. Never exceed the
recommended limits. If battery acid contacts skin or
clothing, wash immediately with soap and water. If acid
enters the eye(s), immediately flood the eye(s) with
running cold water for 20 minutes and seek medical
attention.
Give extra care to not drop metal tools or jewellery on to
the battery terminals as short circuiting can take place.
Refrain from charging battery up to 4 hours prior of
installation to avoid the formation of explosive gases.
Never smoke / generate a spark around batteries.
CAUTION
WARNING
EXPLOSION
Legal and Safety

Sterling Power Products
Copyright
STARTER TEST TABLE
LOAD (V) 10.4 10.6 10.8 11.0 11.2 11.4 11.6 11.8
MIN CRANK (V) 9.7 10.0 10.3 10.6 10.9 11.2 11.1 11.6
Code Situation Possible Meanings/Causes
Beep Keeps Load Test Tester/relay defective. Discontinue use.
Sounding Have a qualified technician service.
-L- Start of Test Battery voltage less than 12V
SPECIFICATIONS:
Capability: 12V DC battery tester with charging
system output
Load Test Capacity: 125A; 200-1000 cold
cranking amps
Digital LED Display: Analog, 0-16 VDC
(maximum).
Test Cycle Rate: 10 seconds per test with
minute cool down;
up to 3 tests in 5 minutes.
Overall Dimensions L = 11.5” W = 7" D = 5"
L = 29cm W = 17.5cm D
= 12.5cm
Additional Features 10 second auto cut off and
CCA set
Warranty
This product carries a 2 year return to factory warranty,
we cannot he held responsible for carriage charges to or
from the factory or the cost of any work incurred in
replacing the item.
Where as legally all warrantees should go through the
persons supplying you the product, however, Sterling
recognises that due to the international nature of this
business and the time added to repairs that this is not
always the best solution, as such we are happy to help
direct from the factory if possible, please understand that
this help is at our discretion and not a legal requirement.
WARNING
Never test or charge a frozen battery.
To prevent sparks never disconnect ( or connect ) the
unit under test.
Always work in a well vented space.
Always wear safety goggles as battery hydrogen
explosions could happen.
This tester only works if the batteries are fully charged,
testing an empty battery is a waste of time.
Wear rubber gloves (not included) whenever working
with the Battery Tester or batteries.
Only test 1 x 12V battery at a time. For larger banks or
voltages they must be broken down to an individual
12V battery. No larger than about 140Ah / 1000 CCA.
Note: Before any testing, make sure to clean the battery
contacts. Ensure the battery is fully charged. When
connecting the tester to the charged battery, the battery
voltage is over 13.2V ( surface voltage ) the load test
will not engage, as the unit assumes that you want to do
the charging test only. It also prevents the unit being used
on 24-36V battery banks.
1) Make sure the vehicle is switched off. If a single battery,
up to about 1000 CCA or about 140Ah then you can test in
position. However, for example, a boat with 4 batteries,
each battery must be isolated (removing the pos from each
battery link would be fine). Test 1 at a time with a 2 minute
rest interval between each test, this allows unit to cool
down. For 24V, 36V or 48V battery banks they must be split
into their 12V components. Do NOT use this directly on the
24V, 36V, 48V directly as it will destroy the unit.
Only an individual 12V battery can be tested and the
battery must be fully charged.
Connect the red (+) Clamp to the positive (+) terminal post
on the battery. Connect the black (-) Clamp to the negative
(-) terminal post on the battery. If less than 12.4V is
displayed on a 12V battery, disconnect the battery and
recharge before testing. Adjust the Set CCA button to
correspond with the CCA of the battery. Push the CCA
button (increments of 100) until the CCA that matches your
battery appears. Maximum is 999CCA. After 999CCA, If
CCA button is pressed again, the charging system mode
will be activated, “AAA" is displayed. As a measure of
good practice round your battery CCA number DOWN
to the nearest hundred, do not round up.
2) Check the Battery Tester LED Window (5) to determine
effectiveness of charge. If the Battery Tester does not
register and no display is seen, double check that the
clamps are connected to the proper terminal posts. Make
certain a clean connection has been made between the
clamps and terminal posts.
3) Push and release the LOAD button (8), a solid and
consistent measurement is indicated by the Battery Tester.
Within five seconds, read the LED Window display during
the test. Do not test more than three times in a five minute
period. Allow one minute for cool down between tests.
Note: If a battery does not have the charge expected,
have a qualified technician check the specific gravity.
There may be an electrical drain or charging system
trouble. If charging does not raise the specific gravity, you
may have a defective battery.
Operations (Continued)
Analysing test results by colour display: The Battery
Tester will measure battery output/charge in two ways.
The three lights above the LED Window (D ) will indicate a
colour telling you the general condition of the battery.
Red: Bad, No Charge, or Completely Discharged
Yellow: Weak, Needs Recharging
Green: Good or Normal - Has Existing Charge
4) If the battery is without significant charge, charge it
and check it again under load test. The battery should
measure at least 75% of Open-Circuit Voltage. 75% can
be considered fully charged. lf the charging rate reaches
at least 75% but fails to reach 75% after the load test, it
needs replacing. Refer to the table below for 12V battery
percentages:
Note a recently charged battery will have a surface
voltage, this can give false impressions of the actually
battery state. The below table refers to a battery which has
been left for a day or so, it is, however, impossible to judge
the state of the battery by this voltage alone, hence the
tester.
5) When test is complete, remove Black Clamp (-) from
battery first; then remove Red Clamp (+).
Testing the Charging System (Alternator / Regulator /
Charger Output):
WARNING: When testing a system in a car/truck, the
vehicle must be on a flat, dry surface. The transmission
must be in park and the emergency brake engaged.
1) Connect the red (+) Clamp to the positive (+) terminal
post on the battery. Connect the black (-) Clamp to the
negative (-) terminal post on the battery.
2) With the engine off, check the Battery Tester voltmeter
display for a voltage reading. If the Battery Tester does not
register any voltage, double check that the clamps are
connected to the proper terminal posts. Make certain a
clean connection has been made between the clamps
and terminal posts.
Other things which can be tested with this product
using the voltmeter only and not using the load test.
Alternator / Battery Charging System check
Attach the positive and negative clips from the tester to the
battery. The tester should start up. To enter ‘charging
system test’ repeatedly press ‘Set CCA’ button until ‘AAA’
appears on the display. The voltmeter should then
reappear, however, you are in ‘charging system test’
mode. If you then attach your charging system, whether it
be an alternator or battery charger and turn on charging
system the tester will determine whether the charging
system is ‘Good’, ‘Weak’ or ‘Bad’. The user can, therefore,
get some idea about the condition of their charging
system as well as their batteries.
Sterling Power Products
Copyright
Your 100 % satisfaction is our goal. We realise that every customer and circumstance is unique. If you have a
problem, question, or comment please do not hesitate to contact us. We welcome you to contact us even after
the warranty and return time has passed.
Product Warranty:
Each product manufactured by Sterling Power comes with at least a 2 year limited factory warranty. Certain
Products have a warranty period of time greater than 2 years. Each product is guaranteed against defects in
material or workmanship from the date of purchase. At our discretion, we will repair or replace free of charge any
defects in material or workmanship that fall within the warranty period of the Sterling Power product. The
following conditions do apply:
- The original receipt or proof of purchase must be submitted to claim warranty. If proof cannot be
located a warranty is calculated from the date of manufacture.
- Our warranty covers manufacture and material defects. Damages caused by abuse, neglect, accident,
alterations and improper use are not covered under our warranty.
- Warranty is null and void if damage occurs due to negligent repairs.
- Customer is responsible for inbound shipping costs of the product to Sterling Power either in the USA
or England.
- Sterling Power will ship the repaired or warranty replacement product back to the purchaser at their
cost.
If your order was damaged in transit or arrives with an error, please contact us ASAP so we may take care of the
matter promptly and at no expense to you. This only applies for shipping which was undertaken by our company
and does not apply for shipping organised by yourself. Please do not throw out any shipping or packaging
materials.
All returns for any reason will require a proof of purchase with the purchase date. The proof of purchase must be
sent with the returned shipment. If you have no proof of purchase call the vendor who supplied you and acquire
the appropriate documentation.
To make a claim under warranty, call our customer care line at ( USA 1-(207)-226-3500, England 01905
771771). We will make the best effort to repair or replace the product, if found to be defective within the terms of
the warranty. Sterling Power will ship the repaired or warranty replacement product back to the purchaser, if
purchased from us.
Please review the documentation included with your purchase. Our warranty only covers orders purchased
from Sterling Power. We cannot accept warranty claims from any other Sterling Power distributor. Purchase or
other acceptance of the product shall be on the condition and agreement that Sterling Power USA LLC and
Sterling Power LTD shall not be liable for incidental or consequential damages of any kind. Some states may not
allow the exclusion or limitation of consequential damages, so, the above limitations may not apply to you.
Additionally, Sterling Power USA and Sterling Power LTD neither assumes nor authorizes any person for any
obligation or liability in connection with the sale of this product. This warranty is made in lieu of all other
obligations or liabilities. This warranty provides you specific legal rights and you may also have other rights,
which vary from state to state. This warranty is in lieu of all other, expressed or implied.
Customer Service & Warranty
Sterling Power USA
Warranty Service Center
www.sterling-power-usa.com
Sterling Power Products Ltd
England
www.sterling-power.com
STERLI G
POWER
15

Sterling Power Products
Copyright
Customer Service & Warranty
Sterling Power USA
Warranty Service Center
www.sterling-power-usa.com
Sterling Power Products Ltd
England
www.sterling-power.com
STERLI G
POWER
15
Check if the alternator is okay
1) Start the engine and let it run. Without using the LOAD button, observe the voltage readout when the engine speed
reaches between 1200 to 1500 RPM (normal idle speed).
Once you push the LOAD button, the unit will enter charging system mode and, in the meantime, the LOAD is disabled.
2) Note meter reading with all electrical accessories off. One of three conditions will apply:
a) Voltage less than 13.5V indicates faulty alternator.
b) Voltage between 13.5V and 15V indicates charging system is good.
c) Voltage over 15V indicates faulty voltage regulator.
3) When charging system test is complete, remove Black Clamp (-) from battery first; then remove Red Clamp (+).
Testing the Starter motor
This Test identifies excessive starter current draw, which makes starting difficult and reduces battery life. Only perform the
starter motor load test if the battery has already tested well.
Engine should be at normal operating temperature.
1) Connect clamps to battery posts and run the basic load test (push and release Test Start Button). Note the exact voltage
with the load test on. If voltage continues to fall after 10 seconds, this test will not be available.
2) Apply the voltage obtained above to the starter tester table (below). Use the next to lower minimum cranking volts for
engines with less than 300 inches of cubic displacement ( CID) (5000cc). For example, if the load voltage is 11V, use 10.6V
for minimum cranking voltage.
3) Disable the ignition system so the car will not start, crank the engine and note the voltage during cranking.
4) If cranking voltage of step 3 is below the minimum cranking voltage in the starter test table (above), the starter current
draw is excessive. lf the starter cranks slowly, check for high resistance and poor connection. A meter reading of 9V or less
indicates excessive current draw. This may be due to bad connections, a failing starter motor or the battery is too small for
the vehicle requirements.
Your 100 % satisfaction is our goal. We realise that every customer and circumstance is unique. If you have a problem, question, or comment please
do not hesitate to contact us. We welcome you to contact us even after the warranty and return time has passed.
Product Warranty:
Each product manufactured by Sterling Power comes with at least a 2 year limited factory warranty. Certain Products have a warranty period of time
greater than 2 years. Each product is guaranteed against defects in material or workmanship from the date of purchase. At our discretion, we will repair or
replace free of charge any defects in material or workmanship that fall within the warranty period of the Sterling Power product. The following conditions
do apply:
- The original receipt or proof of purchase must be submitted to claim warranty. If proof cannot be located a warranty is calculated from the
date of manufacture.
- Our warranty covers manufacture and material defects. Damages caused by abuse, neglect, accident, alterations and improper use are not
covered under our warranty.
- Warranty is null and void if damage occurs due to negligent repairs.
- Customer is responsible for inbound shipping costs of the product to Sterling Power either in the USA or England.
- Sterling Power will ship the repaired or warranty replacement product back to the purchaser at their cost.
If your order was damaged in transit or arrives with an error, please contact us ASAP so we may take care of the matter promptly and at no expense to
you. This only applies for shipping which was undertaken by our company and does not apply for shipping organised by yourself. Please do not throw out
any shipping or packaging materials.
All returns for any reason will require a proof of purchase with the purchase date. The proof of purchase must be sent with the returned shipment. If you
have no proof of purchase call the vendor who supplied you and acquire the appropriate documentation.
To make a claim under warranty, call our customer care line at ( USA 1-(207)-226-3500, England 01905 771771). We will make the best effort to repair or
replace the product, if found to be defective within the terms of the warranty. Sterling Power will ship the repaired or warranty replacement product back to
the purchaser, if purchased from us.
Please review the documentation included with your purchase. Our warranty only covers orders purchased from Sterling Power. We cannot accept
warranty claims from any other Sterling Power distributor. Purchase or other acceptance of the product shall be on the condition and agreement that
Sterling Power USA LLC and Sterling Power LTD shall not be liable for incidental or consequential damages of any kind. Some states may not allow the
exclusion or limitation of consequential damages, so, the above limitations may not apply to you. Additionally, Sterling Power USA and Sterling Power
LTD neither assumes nor authorizes any person for any obligation or liability in connection with the sale of this product. This warranty is made in lieu of all
other obligations or liabilities. This warranty provides you specific legal rights and you may also have other rights, which vary from state to state. This
warranty is in lieu of all other, expressed or implied.
STARTER TEST TABLE
LOAD (V) 10.4 10.6 10.8 11.0 11.2 11.4 11.6 11.8
MIN CRANK (V) 9.7 10.0 10.3 10.6 10.9 11.2 11.1 11.6
Sterling Power Products
Copyright
Avertissement
La lecture du manuel est nécessaire, Il contient des conseils concernant la sécurité et les précautions
d’utilsation, vous y trouverez également des conseils sur l’utilisation et la maintenance des batteries.
Travailler sur des batteries est dangereux
Il faut lire et comprendre toutes les instructions, sinon vous risquez
des chocs électriques, des incendies, des explosions. En cas de doute ne pas utiliser
ce produit.
Sterling Power Products
Testeur digital de batteries.
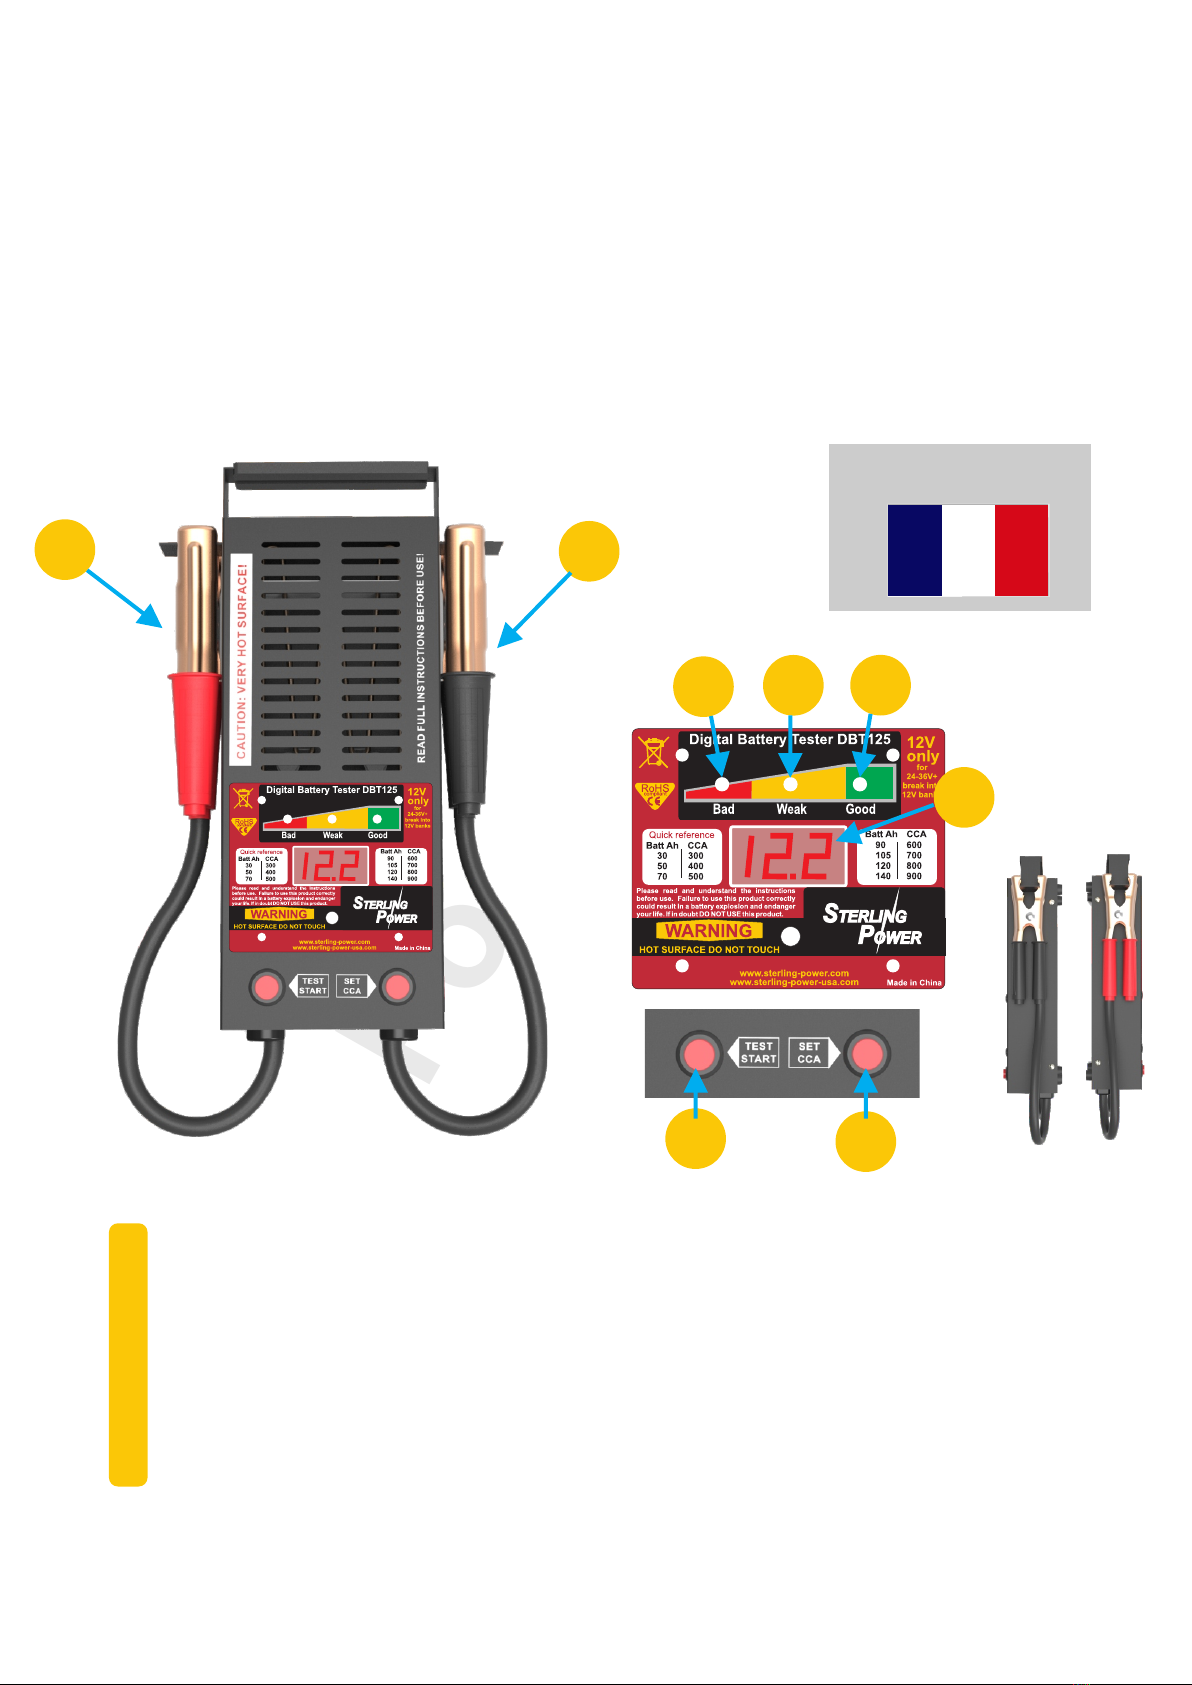
Description rapide
1) Pince Négative, Fixez sur la borne négative de la batterie à tester.
2) LED rouge indique que la batterie est endommagée.
3) LED jaune indique que la batterie n’est plus très bonne, mais peut fonctionner encore
quelque temps.
4) LED verte indique que la batterie est en bonne condition.
5) Ecran à LED indique la tension et le réglage du CCA.
6) Pince Positive,fixez sur la borne positive de la batterie à tester.
7) Bouton de réglage du Courant de démarrage, pour régler le CCA ( Cold Cranking
Amps ) de la batterie à tester.
8) Bouton Load. Doit être poussé pour effectuer le test de décharge.
Prenez-soin de vérifier à la réception que le produit est intact et non endommagé.
Si l’une des composants manque ou si il est cassé, n’utilisez pas le produit,
contactez le vendeur pour que le problème soit réglé le plus rapidement possible.
Teste uniquement 12V
Pour 24-36V +séparer le parc en unités de 12V
6
234
5
1
87
Anleitung
16
8
234
5
7

Sterling Power Products
Copyright
Règles générales de sécurité
1. Maintenir votre espace de travail dégagé et bien éclairé. Le désordre et le mauvais éclairage sont des sources
d’accidents..
2. N’utilisez pas d’outils électriques dans des atmosphères explosives: présence de liquide inflammable, de gaz ou de
poussières. Les outils électriques peuvent créer des étincelles suscitant l’explosion du gaz.
3. Ecartez les spectateurs, les enfants du lieu de travail où vous utilisez cet outils, ils risquent de vous distraire. Il faut aussi
protéger les personnes des étincelles et des projections.
4. Utilisez le bon outil pour accomplir votre travail, n’imposez pas à votre outil des tâches pour lesquelles il n’a pas été
conçu.
5. N’utilisez pas d’outils électriques qui paraissent endommagés.
6. Rangez les outils inutilisés hors de la portée des enfants et des personnes non averties.
7. Entretenez vos outils avec soin, gardez les propres. Un outil endommagé doit être écarté et réparé.
8. La réparation des outils doit être confiée à des professionnels. L’intervention de personnes non compétentes est source
d’accidents.
9. Laissez les étiquettes, les plaques du constructeur sur les outils, ils contiennent des informations importantes. Si elles
sont endommagées, contactez-nous afin de les remplacer, ou téléchargez les sur notre site web (www.sterling-power.com).
10. Portez des lunettes de protection et des gants de sécurité répondant aux normes quand vous utilisez cet outil, vous
réduisez le risque de blessures.
11. Maintenez un espace de travail propre, bien éclairé. N’utilisez pas ce produit dans des atmosphères contenant des
produits chimiques inflammables, vapeurs ou poussières. N’utilisez pas cet outil dans des endroits mouillés ou humides.
12. Les personnes ayant des pacemakers doivent demander conseil à leur médecin avant d’utiliser cet outil. Les champs
électromagnétiques produits risquent de perturber le fonctionnement du pacemaker. Il faut toujours prendre des précautions
à proximité du faisceau de distribution, de la bobine d’un moteur en marche. Le moteur doit être éteint si on doit faire des
réglages.
13. Evitez de provoquer des étincelles en connectant les câbles à la batterie (respectez les instructions de la règle 14) Des
gaz explosifs peuvent être fabriqués pendant la charge de la batterie, une étincelle peut alors endommager le système
électrique.
14. Bien noter les bornes positives et négatives de la batterie avant de connecter les pinces des câbles de l’appareil. Le
câble rouge, (6 sur le dessin) doit être fixé sur la borne positive de la batterie. La pince noire (1 sur le dessin) est à fixer sur
la borne négative de la batterie.
15. Vérifiez que le boîtier métallique du testeur de batteries n’entre pas en contact avec des connexions de la batterie ou
d’autres appareils électriques.
16. Ne bousculez pas le testeur de batteries, vous risquez de modifier son fonctionnement et les résultats.
17. Ne fumez pas, n’approchez pas de flamme près de la batterie.
18. Monter les câbles du testeur dans le mauvais sens sur la batterie peut endommager le testeur.
19. N’installer pas le testeur sur une batterie en charge. Eteindre le moteur avant de connecter le testeur.
20. Ne touchez pas le ventilateur du testeur juste après avoir testé une batterie, il est alors très chaud.
INSTRUCTIONS D’UTILISATION
ATTENTION, Ce testeur de batteries devient très chaud pendant son utilisation, le toucher au mauvais endroit peut
occasionner des brûlures importantes, l’appareil peut rester chaud un moment, ne le placez pas sur une surface sensible à la
chaleur, portez le par la poignée.
.
Que fait le testeur ?
Le testeur de batteries Sterling a de multiples fonctions, ses fonctions principales sont à retenir:
1) Un voltmètre, la tension de la batterie donne une première indication sur le niveau de charge de la batterie.
2) Un testeur de la charge que la batterie est capable de restituer, on impose à la batterie de fournir un courant de
125 A (simule un démarreur de moteur), on vérifie les capacités de la batterie et on mesure son cca (capacité de
démarrage à froid).
3) Un testeur du système de charge: permet de tester l’efficacité du système chargeant la batterie. L’utilisateur saura
si l’alternateur, le chargeur ou autre est bon, faible ou mauvais.
Permet de tester les batteries de 12V , ayant une capacité jusqu’à environ 140Ah complètements chargées, pour les
batteries de 24Vpartagez le parc en 2 x 12V )
Note: La température des batteries peut affecter légèrement les données relevées. Les valeurs seront inférieures s’il fait froid
et supérieures si s’il fait chaud (tension de référence 25 degrés)
Avertissement
Ne testez, ne chargez pas une batterie gelée.
Pour éviter les étincelles, ne déconnectez pas (ou connectez) l’appareil pendant un test.
Travaillez toujours dans une atmosphère bien ventilée.
Portez toujours des gants de sécurité, de l’hydrogène dégagé par la batterie est susceptible d’exploser.
Ce testeur fonctionne uniquement si les batteries sont complètement chargées, il est inutile de tester une batterie
déchargée.
Il faut tester une seule batterie 12V à la fois. Les parcs conséquents doivent être séparés en batteries 12V de
capacité maximum: 140Ah / 1000 CCA.

Sterling Power Products
Copyright
INSTRUCTIONS D’UTILISATION
ATTENTION, Ce testeur de batteries devient très chaud pendant son utilisation, le toucher au mauvais endroit peut
occasionner des brûlures importantes, l’appareil peut rester chaud un moment, ne le placez pas sur une surface
sensible à la chaleur, portez le par la poignée.
.
Que fait le testeur ?
Le testeur de batteries Sterling a de multiples fonctions, ses fonctions principales sont à retenir:
1) Un voltmètre, la tension de la batterie donne une première indication sur le niveau de charge de la batterie.
2) Un testeur de la charge que la batterie est capable de restituer, on impose à la batterie de fournir un courant
de 125 A (simule un démarreur de moteur), on vérifie les capacités de la batterie et on mesure son cca (capacité
de démarrage à froid).
3) Un testeur du système de charge: permet de tester l’efficacité du système chargeant la batterie. L’utilisateur
saura
si l’alternateur, le chargeur ou autre est bon, faible ou mauvais.
Permet de tester les batteries de 12V , ayant une capacité jusqu’à environ 140Ah complètements chargées,
pour les batteries de 24Vpartagez le parc en 2 x 12V )
Note: La température des batteries peut affecter légèrement les données relevées. Les valeurs seront inférieures s’il fait
froid et supérieures si s’il fait chaud (tension de référence 25 degrés)
Avertissement
Ne testez, ne chargez pas une batterie gelée.
Pour éviter les étincelles, ne déconnectez pas (ou connectez) l’appareil pendant un test.
Travaillez toujours dans une atmosphère bien ventilée.
Portez toujours des gants de sécurité, de l’hydrogène dégagé par la batterie est susceptible d’exploser.
Ce testeur fonctionne uniquement si les batteries sont complètement chargées, il est inutile de tester une
batterie déchargée.
Il faut tester une seule batterie 12V à la fois. Les parcs conséquents doivent être séparés en batteries 12V de
capacité maximum: 140Ah / 1000 CCA.
Note: Avant d’entreprendre tout test, assurez vous que les bornes de la batterie sont propres, que la batterie est
chargée complètement. Quand vous connectez le testeur, si la tension de la batterie est supérieure à 13,2V le test
de charge ne commence pas, l’appareil estime que vous voulez tester uniquement le système de charge, cela évite
aussi d’utiliser le testeur sur des batteries 24-36V.
1) Assurez-vous que la batterie est isolé de l’installation électrique. Vous pouvez alors tester sur place une batterie
isolée jusqu’à environ 1000A de CCA ou 140Ah. Cependant pour un parc de 4 batteries, par exemple, chaque batterie
doit être isolée (Il suffit d’enlever la liaison positive de chaque batterie). Testez une batterie à la fois, en ménageant un
intervalle de repos de 2 minutes entre deux tests afin d’assurer le refroidissement de l’ensemble.Les batteries de 24V,
36V ou 48V doivent être séparées, sinon l’appareil sera détruit.
Le test doit être effectué sur des batteries de 12V complètements chargées.
Connectez la pince rouge à la borne positive de la batterie. Connectez la pince noire (-) à la borne négative de la
batterie. SI la tension affichée est inférieure à 12.4V sur une batterie de 12V déconnectez la batterie et rechargez-la
avant d’entreprendre le test.
Réglez le CCA du testeur en fonction de celui de la batterie: Poussez le bouton réglage du CCA (les valeurs augmentent
de 100 en 100) jusqu’à ce que le CCA correspondant votre batterie apparaisse. Le maximum est 999 CCA. Paramétrez
un CCA arrondi à la centaine inférieure à celui de votre batterie, n’utilisez pas une valeur supérieure.
Si on pousse de nouveau le bouton le mode “test du circuit de charge” de l’appareil est activé, “AAA" est affiché. Dans
ce cas, déconnectez l’appareil et reprendre la procédure pour vous placer dans le mode “test batterie”.
2)Vérifiez la fenêtre d’affichage (5) pour valider que la tension apparaît correctement. Si rien ne s’affiche vérifiez que la
connexion entre les bornes batteries et les pinces est correcte.
3) Poussez, puis relâchez le bouton “load” (8). Notez l’évolution de la tension durant le test de charge, ceci permettra de
déterminer l’état de la batterie (voir 4). Ne testez pas la batterie plus de 3 fois par période de 5 minutes, laissez une
minute de repos pour le refroidissement du système entre 2 tests.
Note: Si une batterie ne possède pas le CCA prévue, ceci peut être lié à un problème de votre circuit de charge (la
Tension circuit ouvert (V): 11.7V 12V 12.2V 12.4V 12.4V+
Charge batterie Pourcentage: 0% 20% 50% 75% 100%
Capacié batterie Cold Cranking Amps (CCA)
(Ah) (typical)
30 300
50 400
70 500
90 600
105 700
120 800
140 900

Sterling Power Products
Copyright
INSTRUCTIONS D’UTILISATION
ATTENTION, Ce testeur de batteries devient très chaud pendant son utilisation, le toucher au mauvais endroit peut
occasionner des brûlures importantes, l’appareil peut rester chaud un moment, ne le placez pas sur une surface sensible à
la chaleur, portez le par la poignée.
. Que fait le testeur ?
Le testeur de batteries Sterling a de multiples fonctions, ses fonctions principales sont à retenir:
1) Un voltmètre, la tension de la batterie donne une première indication sur le niveau de charge de la batterie.
2) Un testeur de la charge que la batterie est capable de restituer, on impose à la batterie de fournir un courant de
125 A (simule un démarreur de moteur), on vérifie les capacités de la batterie et on mesure son cca (capacité de
démarrage à froid).
3) Un testeur du système de charge: permet de tester l’efficacité du système chargeant la batterie. L’utilisateur
saura
si l’alternateur, le chargeur ou autre est bon, faible ou mauvais.
Permet de tester les batteries de 12V , ayant une capacité jusqu’à environ 140Ah complètements chargées, pour
les batteries de 24Vpartagez le parc en 2 x 12V )
Note: La température des batteries peut affecter légèrement les données relevées. Les valeurs seront inférieures s’il fait
froid et supérieures si s’il fait chaud (tension de référence 25 degrés)
Avertissement
Ne testez, ne chargez pas une batterie gelée.
Pour éviter les étincelles, ne déconnectez pas (ou connectez) l’appareil pendant un test.
Travaillez toujours dans une atmosphère bien ventilée.
Portez toujours des gants de sécurité, de l’hydrogène dégagé par la batterie est susceptible d’exploser.
Ce testeur fonctionne uniquement si les batteries sont complètement chargées, il est inutile de tester une batterie
déchargée.
Il faut tester une seule batterie 12V à la fois. Les parcs conséquents doivent être séparés en batteries 12V de
capacité maximum: 140Ah / 1000 CCA.
Note: Avant d’entreprendre tout test, assurez vous que les bornes de la batterie sont propres, que la batterie est chargée
complètement. Quand vous connectez le testeur, si la tension de la batterie est supérieure à 13,2V le test de charge ne
commence pas, l’appareil estime que vous voulez tester uniquement le système de charge, cela évite aussi d’utiliser le
testeur sur des batteries 24-36V.
1) Assurez-vous que la batterie est isolé de l’installation électrique. Vous pouvez alors tester sur place une batterie isolée
jusqu’à environ 1000A de CCA ou 140Ah. Cependant pour un parc de 4 batteries, par exemple, chaque batterie doit être
isolée (Il suffit d’enlever la liaison positive de chaque batterie). Testez une batterie à la fois, en ménageant un intervalle de
repos de 2 minutes entre deux tests afin d’assurer le refroidissement de l’ensemble.Les batteries de 24V, 36V ou 48V
doivent être séparées, sinon l’appareil sera détruit.
Le test doit être effectué sur des batteries de 12V complètements chargées.
Connectez la pince rouge à la borne positive de la batterie. Connectez la pince noire (-) à la borne négative de la batterie.
SI la tension affichée est inférieure à 12.4V sur une batterie de 12V déconnectez la batterie et rechargez-la avant
d’entreprendre le test.
TABLE TEST DEMARREUR
Tension décharge (V) 10.4 10.6 10.8 11.0 11.2 11.4 11.6 11.8
Tension démarrage min (V) 9.7 10.0 10.3 10.6 10.9 11.2 11,1 11,6
Code Situation Causes possibles
Les Beeps Test décharge Testeur/relais defectueux. Suspendez
Sonnent l’utilisation, faites vérifier par un
technicien
-L- Début test Tension batterie inférieure à 12 V
CARACTERISTIQUES:
Capacités: Batterie12V courant continu munie d’un
système de charge.
Test décharge: 125A; 200-1000 courant démarrage
Affichage LED: 0-16 V (maximum).
période des tests: 10 secondes par test et une minute
pour refroidir; plus de 3 tests en 5 minutes.
Dimensions L=29 cm ; l=17,5 cm; P=12,5 cm.
Autres propriétés: se coupe après 10 secondes et
possède
un test de décharge.
Garantie.
Ce produit est muni d’une garantie de deux ans
retour usine, nous ne sommes pas responsables des
frais de transport et du coût du travail nécessaire
pour remplacer le produit.
Légalement toute garantie doit être traitée par la
personne ayant vendu le produit, cependant en
raison de la nature internationale de ses ventes,
Sterling reconnaît qu’il ne s’agit pas toujours de la
meilleure solution, nous nous efforçons de régler les
poblèmes directement depuis l’usine.
Notez que cette aide n’est pas une obligation légale.

Sterling Power Products
Copyright
WARNUNG!
Lesen und verstehen Sie genau die Anleitung und Hinweise.
Das Arbeiten an Batterien ist gefährlich.
Falsche Bedienung können zu einem Kurzschluss, Feuer,
Explosion und / oder gefährlichen Verletzungen führen.
Wenn Sie Zweifel haben, nutzen Sie dieses Produkt bitte nicht.
Sterling Power Products
Digitaler Batterie Leistungs Tester
Schnellanleitung
1) Negative Klemme - An den Negativpol der Batterie anschließen, welche getested
werden soll.
2) Rote LED zeigt an, dass die Batterie in einem schlechten Zustand ist.
3) Gelbe LED zeigt an, dass die Batterie in einem schwachen Zustand ist, aber noch eine
kurze Zeit funktionieren sollte.
4) Grüne LED zeigt an, dass die Batterie in gutem Zustand ist.
5) LED Anzeige für Spannung und Kaltstartleistung in Ampere.
6) Positive Klemme zum Anschluss an den positiven Pol der Batterie.
7) Am „Set CCA“ Taster stellen Sie die Kaltstartampere der Batterie ein.
8) Drücken Sie den „Load“ Taster um den Test zu starten.
ACHTUNG!! Am hinteren Teil des Gerätes wird es beim Test sehr heiß. Nicht auf
irgendeine Oberfläche legen, sondern das Gerät frei in der Hand halten!!
Nachdem Auspacken überprüfen Sie bitte sofort, ob das Gerät intakt und ohne Beschädigung ist.
Sollten Teile fehlen oder defekt sein, markieren Sie das Gerät mit „defekt“. Kontaktieren Sie ihren
Händler um den Austausch des Gerätes zu organisieren.
nur für 12V
bei 24V/36V nur einzelne 12V Batterie testen!
Anleitung
6
8
234
5
7
1
16
8
234
5
7

Sterling Power Products
Copyright
Allgemeine SICHERHEITSHINWEISE - unbeding lesen!
1. Halten Sie die Arbeitsfläche frei und gut beleuchtet.
2. Arbeiten Sie mit Geräten nicht in explosiven Luft, wie gewöhnlich bei entflammbaren Flüssigkeiten, Gasen oder Staub.
Geräte können Funken erzeugen und explosive Luft entzünden.
3. Halten Sie Zuschauer, Kinder und Besucher entfernt, wenn Sie das Gerät benutzen. Ablenkung kann dazu führen, dass Sie die
Kontrolle verlieren. Schützen Sie andere im Arbeitsbereich vor Verschmutzung wie Stücken und Funken. Stellen Sie Absicherungen
und Schutzkleidung bereit.
4. Wenden Sie niemals Gewalt an um das Werkzeug zu nutzen. Arbeiten Sie immer mit den passenden Werkzeugen. Die funktionieren
besser und die Arbeit sicherer.
5. Arbeiten Sie niemals mit diesem Werkzeug, wenn es beschädigt ist oder auch nur so aussieht.
6. Lagern Sie die Werkzeuge immer sicher und entfernt von Kindern und nicht ausgebildeten Personen.
7. Halten Sie die Werkzeuge immer sauber und in gutem Zustand. Verwenden Sie keine defekten Werkzeuge und markieren Sie diese
mit „DEFEKT“.
8. Geräte-Reparaturen dürfen nur von qualifiziertem Personal ausgeführt werden.
9. Halten Sie die Aufkleber auf den Werkzeugen sauber, da diese wichtige Informationen enthalten.
10. Benutzen Sie immer ANSI geprüfte Schutzbrillen und Handschuhe. Das Tragen reduziert das Unfallrisiko.
11. Nutzen Sie das Gerät nur in einer trockenen und unverschmutzten Umgebung.
12. Personen mit Herzschrittmachern müssen vor der Nutzung dieses Gerätes Ihren Arzt konsultieren. Magnetfelder in der Nähe des
Gerätes könnten den Schrittmacher aus dem Rhythmus bringen. Besondere Vorsicht ist in der Nähe von Spulen, Zündkerzen und
einem laufenden Motor geboten. Motoren sollten immer ausgestellt sein.
13. Beim Anschließen der Batteriekabel an die Batterie, verbinden Sie dieses immer gemäß der Anleitung. Explosive Gase können
während des Ladens entstehen. Funken können auch das elektrische System des Fahrzeuges schädigen.
14. Vor dem Anschluss des Batterietesters, überprüfen Sie immer die Funktion der Kabelklemmen. Das rote Kabel wird an den positiven
Pol angeschlossen (+) und das schwarze Kabel an den negativen Pol der Batterie (-).
15. Achten Sie immer darauf, dass das Metallgehäuse nicht in Kontakt mit den Polen der Batterie oder anderen elektrischen Kontakten.
16. Lassen Sie den Batterie-Tester niemals fallen.
17. Rauchen oder offene Flammen sind in der Nähe der Batterie verboten.
18. Verpolung der Anschlüsse des Batterietesters führt zur Zerstörung des Testers.
19. Den Batterie-Tester niemals anschließen, wenn die Batterie entweder durch ein Ladegerät oder den Motor geladen wird.
20. Niemals die Luftschlitze auf der Rückseite des Gehäuses berühren, während oder nach dem Test. Das rückwärtige Gehäuse wird
sehr heiß.
ANLEITUNG
ACHTUNG!
Der Batterie-Tester wird sehr heiß. Das Berühren an der Rückseite kann zu schlimmen Verbrennungen führen. Auch nach
dem Test bleibt es weiterhin sehr heiß. Legen Sie das Gerät nicht auf Oberflächen, welche durch Hitze beschädigt werden
könnten.
Was macht der Tester?
Der STERLING Batterie-Tester hat 3 grundlegende Funktionen.
1) Voltmeter.
2) Lasttest. Während des Testens wird eine Last von 125A verbunden um die Kaltstartlast (CCA) und den Zustand der
Batterie
3) Ladetest. Beim Ladetest wird die Effektivität der Lichtmaschine / Ladegerätes überprüft und als Ergebnis angezeigt.
Batterietest:
ŸEs können nur 12V Batterien getestet werden! Haben Sie ein 24V System, trennen Sie dieses auf und testen Sie jede
12V Batterie einzeln.
ŸMit diesem Gerät können Batterien bis max. 140Ah / 1000 CCA getestet werden.
ŸDie Batterien müssen voll geladen sein.
Hinweis: Die Temperatur der Batterie verändert das Messergebnis. Eine warme Batterie erzielt bessere
Ergebnisse als eine kalte.
Hinweis:
ŸTesten Sie niemals eine gefrorene Batterie.
ŸArbeiten Sie immer in einer gut belüfteten Umgebung.
ŸTragen Sie immer Sicherheitskleidung.
Vorbereitung:
ŸReinigen Sie die Batteriepole.
ŸStellen Sie sicher, dass die Batterie maximal geladen ist.
ŸDie Batteriespannung muss unter 13,2V liegen.
ŸTesten Sie nur einzelne 12V Batterien, keine Batteriebank.

Sterling Power Products
Copyright
ANLEITUNG
ACHTUNG!
Der Batterie-Tester wird sehr heiß. Das Berühren an der Rückseite kann zu schlimmen Verbrennungen führen. Auch nach
dem Test bleibt es weiterhin sehr heiß. Legen Sie das Gerät nicht auf Oberflächen, welche durch Hitze beschädigt werden
könnten.
Was macht der Tester?
Der STERLING Batterie-Tester hat 3 grundlegende Funktionen.
1) Voltmeter.
2) Lasttest. Während des Testens wird eine Last von 125A verbunden um die Kaltstartlast (CCA) und den Zustand der
Batterie
3) Ladetest. Beim Ladetest wird die Effektivität der Lichtmaschine / Ladegerätes überprüft und als Ergebnis angezeigt.
Batterietest:
ŸEs können nur 12V Batterien getestet werden! Haben Sie ein 24V System, trennen Sie dieses auf und testen Sie jede
12V Batterie einzeln.
ŸMit diesem Gerät können Batterien bis max. 140Ah / 1000 CCA getestet werden.
ŸDie Batterien müssen voll geladen sein.
Hinweis: Die Temperatur der Batterie verändert das Messergebnis. Eine warme Batterie erzielt bessere
Ergebnisse als eine kalte.
Hinweis:
ŸTesten Sie niemals eine gefrorene Batterie.
ŸArbeiten Sie immer in einer gut belüfteten Umgebung.
ŸTragen Sie immer Sicherheitskleidung.
Vorbereitung:
ŸReinigen Sie die Batteriepole.
ŸStellen Sie sicher, dass die Batterie maximal geladen ist.
ŸDie Batteriespannung muss unter 13,2V liegen.
ŸTesten Sie nur einzelne 12V Batterien, keine Batteriebank.
Test:
ŸSchließen Sie das rote Kabel an den positiven Pol (+) der Batterie und das schwarze Kabel an den negativen Pol (-).
ŸSollte die Batteriespannung unter 12,4V liegen, dann muss die Batterie zuerst geladen werden oder sie ist bereits defekt.
ŸStellen sie die korrekten CCA mit dem CCA Taster ein. Drücken Sie den Taster um den Wert zu erhöhen. Runden Sie
Ihren CCA Wert nach unten ab auf den nächsten Hunderterwert ab.
Wird im Display AAA angezeigt, dann ist man im Ladetestmodus.
ŸÜberprüfen Sie die LED Anzeige (5). Jetzt können Sie feststellen, ob die Batterie geladen ist. Leuchtet keine LED dann
überprüfen sie bitte die Anschlüsse.
ŸDrücken Sie den „LOAD“ Taster (8) kurz. Der Last-Test beginnt und dauert ca. 5 Sekunden. Das Ergebnis wird im Display
angezeigt.
ŸZwischen 2 Testintervallen muss das Gerät mindestens 1 Minute abkühlen. Machen Sie nicht mehr als 3 Tests innerhalb
von 5 Minuten.
Das Ergebnis wird durch das Farben-Display, wobei die 3 LEDs (D) über der Anzeige den Zustand der Batterie anzeigen.
Battery Capacity Cold Cranking Amps (CCA)
(Ah) (typical)
30 300
50 400
70 500
90 600
105 700
120 800
140 900

Sterling Power Products
Copyright
ANLEITUNG
ACHTUNG!
Der Batterie-Tester wird sehr heiß. Das Berühren an der Rückseite kann zu schlimmen Verbrennungen führen. Auch nach
dem Test bleibt es weiterhin sehr heiß. Legen Sie das Gerät nicht auf Oberflächen, welche durch Hitze beschädigt werden
könnten.
Was macht der Tester?
Der STERLING Batterie-Tester hat 3 grundlegende Funktionen.
1) Voltmeter.
2) Lasttest. Während des Testens wird eine Last von 125A verbunden um die Kaltstartlast (CCA) und den Zustand der
Batterie
3) Ladetest. Beim Ladetest wird die Effektivität der Lichtmaschine / Ladegerätes überprüft und als Ergebnis
angezeigt.
Batterietest:
ŸEs können nur 12V Batterien getestet werden! Haben Sie ein 24V System, trennen Sie dieses auf und testen Sie jede
12V Batterie einzeln.
ŸMit diesem Gerät können Batterien bis max. 140Ah / 1000 CCA getestet werden.
ŸDie Batterien müssen voll geladen sein.
Hinweis: Die Temperatur der Batterie verändert das Messergebnis. Eine warme Batterie erzielt bessere
Ergebnisse als eine kalte.
Hinweis:
ŸTesten Sie niemals eine gefrorene Batterie.
ŸArbeiten Sie immer in einer gut belüfteten Umgebung.
ŸTragen Sie immer Sicherheitskleidung.
Vorbereitung:
ŸReinigen Sie die Batteriepole.
ŸStellen Sie sicher, dass die Batterie maximal geladen ist.
ŸDie Batteriespannung muss unter 13,2V liegen.
ŸTesten Sie nur einzelne 12V Batterien, keine Batteriebank.
Test:
ŸSchließen Sie das rote Kabel an den positiven Pol (+) der Batterie und das schwarze Kabel an den negativen Pol (-).
ŸSollte die Batteriespannung unter 12,4V liegen, dann muss die Batterie zuerst geladen werden oder sie ist bereits
defekt.
ŸStellen sie die korrekten CCA mit dem CCA Taster ein. Drücken Sie den Taster um den Wert zu erhöhen. Runden Sie
Ihren CCA Wert nach unten ab auf den nächsten Hunderterwert ab.
Wird im Display AAA angezeigt, dann ist man im Ladetestmodus.
Code Situation Mögliche Ursachen
Dauerhafter Last Test Testgerät ist defekt.
Ton Service notwendig.
-L- Test Start Batteriespannung ist kleiner als 12V
Technische Daten:
Gerät: 12V DC Batterie-Tester mit Ladungs-Test-Funktion
Last Kapazität: 125A = 200 - 1000 CCA
Digitale LED Anzeige: Analog, 0-16 VDC (maximum).
Test Rate: 10 Sek. pro Test mit 1 Minute Abkühlung
Maximal 3 Test in 5 Minuten.
Maße: L = 29cm B = 17.5cm T = 12.5cm
Zusätzl. Merkmale:
10 Sek. automatischer Abbruch. CCA einstellbar. GARANTIE
Dieses Gerät besitzt eine 2-Jahres-Garantie
(Rücksendung an Hersteller).
Table of contents
Languages:
Popular Test Equipment manuals by other brands


Redtech
Redtech TRAILERteck T05 user manual

Venmar
Venmar AVS Constructo 1.0 HRV user guide

Test Instrument Solutions
Test Instrument Solutions SafetyPAT operating manual

Hanna Instruments
Hanna Instruments HI 38078 instruction manual

Kistler
Kistler 5495C Series instruction manual

Waygate Technologies
Waygate Technologies DM5E Basic quick start guide

StoneL
StoneL DeviceNet CK464002A manual

Seica
Seica RAPID 220 Site preparation guide

Kingfisher
Kingfisher KI7400 Series Training manual

Kurth Electronic
Kurth Electronic CCTS-03 operating manual

SMART
SMART KANAAD SBT XTREME 3G Series user manual

Agilent Technologies
Agilent Technologies BERT Serial Getting started