Sterling SPG6 User manual
INSTALLATION AND OPERATION MANUAL
Sterling Manufacturing, LLC
7601 Honeywell Drive
Fort Wayne, Indiana 46825
SALES: 844-437-6328
SERVICE: 800-426-4211
www.sterlingsteamers.com
FOR SERVICE CALL
800-426-4211
SMCD - IOMSPG100318
6 - PAN HIGH EFFICIENCY
BOILERLESS CONVECTION STEAMER
MODEL SPG6
FOR YOUR SAFETY:
Do not store or use gasoline
or other ammable liquids
and vapors in the vicinity of
this appliance.
POST IN A PROMINENT LOCATION:
Instructions to be used in the event
user smells gas. This information shall
be obtained by consulting your local
gas supplier. Ensure all users of this
equipment understand the instruc-
tions.
WARNING:
Improper installation, adjustment,
alteration, service, or maintenance
can cause property damage, injury
or death. Read the installation, oper-
ating, and maintenance instructions
thoroughly before installing and ser-
vicing this equipment.
STEAMER

GENERAL INFORMATION AND INSTALLATION......................................1
GENERAL..................................................................................................................1
UNPACKING..............................................................................................................1
INSTALLATION........................................................................................2-5
LOCATION AND PLACEMENT.................................................................................................2
COUNTERTOP INSTALLATION.........................................................................................2
ON A STAND WITH ADJUSTABLE FEET..........................................................................2
ON A STAND WITH CASTERS..........................................................................................3
EXHAUST HOOD..................................................................................................3
CONNECTIONS.......................................................................................3-5
GAS SUPPLY AND CONNECTIONS ..............................................................................3,4
ELECTRICAL............................................................................................................4,5
WATER and DRAIN CONNECTIONS.........................................................5
MANUAL-FILL (NOT-CONNECTED).........................................................................................5
AUTO-FILL (CONNECTED).......................................................................................................5
DRAIN CONNECTION.............................................................................................................5
IN-FIELD MODIFICATIONS...........................................................................................................5
HIGH LIMIT SAFETY......................................................................................................................5
BURNER BLOWER........................................................................................................................6
POWER FAILURE AND IGNITION WARNINGS............................................................................6
OPERATION..........................................................................................7-11
FILLING WITH WATER (AUTO-FILL).............................................................................................7
PREHEATING.................................................................................................................7
COOKING.......................................................................................................................7
BATCH COOK..........................................................................................................................7
À LA CARTE.............................................................................................................................7
HOLDING........................................................................................................................8
CLEANING.........................................................................................................8
DAILY CLEANING.....................................................................................................................8
ADDITIONAL CLEANING..........................................................................................................8
DOOR SEAL.............................................................................................................................8
CONTROL PANEL.......................................................................................9
COOKING TIPS.........................................................................................10
COOK TIMES............................................................................................11
WARRANTY...................................................................................................12
TABLE OF CONTENTS
STERLING MANUFACTURING, LLC SMCD - IOMSPG100318
STEAMER

GENERAL
Sterling Manufacturing, LLC produces the High Eciency Boilerless Convection Steamer with the highest quality
workmanship and materials available.
All units accomodate six 2-1/2” or four 4” full size steam table pans. The Steamer is designed to cook most food
products cooked in a commercial kitchen and doubles as an NSF® Approved Holding cabinet. The Steamer is
designed to be placed on a countertop or on a Sterling Manufacturing Steamer Stand in either a single or double
Steamer conguration.
GENERAL SAFETY
Please make sure each operator reads and understands this manual completely before operating the Steamer.
The owner and operator(s) must keep these instructions in an easily accessible location for reference and training.
Steam can cause serious injuries and equipment damage. Pay attention to the operational Safety section, the
warnings in this manual, and on the equipment.
GAS LEAK INSTRUCTIONS
Observe the following precautions in addition to the posted instructions:
• Do NOT light or start any appliance.
• Do NOT touch any electrical switch.
• Do NOT use any phone in the building.
• Immediately call the gas supplier from a phone away from the building.
• Follow the gas supplier’s instructions.
• If the gas supplier cannot be reached, call the re department.
OPERATIONAL SAFETY
• Do NOT store anything on top of the Steamer.
• Keep the area around and under the Steamer free and clear of combustible material.
• Do NOT obstruct the ow of combustion and ventilation air.
UNPACKING
Your Steamer was inspected, calibrated and tested before leaving the factory. The transportation company
assumes full responsibility for safe delivery. Immediately after unpacking, check for possible shipping damage. If
damage is found, save the packaging material and contact the shipping company immediately.
GENERAL INFORMATION
AND INSTALLATION
1
!
DANGER
GAS LEAKS ARE FIRE AND EXPLOSION HAZARDS.
INJURY, DEATH AND PROPERTY DAMAGE WILL RESULT.
If anyone smells gas, or suspects a gas leak, immediately refer to the posted gas leak
instructions. The posted instructions are provided by the local gas supplier and supersede any
other instructions.
STERLING MANUFACTURING, LLC SMCD - IOMSPG100318
STEAMER

LOCATION AND PLACEMENT
All Sterling Steamers are designed to be placed directly on a countertop or on a Sterling Manufacturing Steamer
Stand in either a single or double Steamer conguration. The installation location must provide for adequate
clearances for proper operation and servicing.
• Installation must comply with all local re and health codes.
• The location selected must be capable of supporting this appliance (the operating weight of a SPG6 is
275lbs).
• Position this appliance so it will not tip or slide.
• The operating surface must be level enough to allow leveling of this appliance with its adjustable legs.
This appliance MUST be level both front to back and side to side before operation.
• The location must include space for Operating and Service/Secondary Clearances and the Exhaust
Hood.
• KEEP THE AREA FREE AND CLEAR OF COMBUSTIBLES.
• Proper air supply for ventilation and combustion is REQUIRED for and CRITICAL to safe, ecient
operation of a SPG6. Do NOT obstruct the ow of combustion and ventilation air.
• Make sure the vents on the Steamer are not blocked by anything.
• Allow for sucient clearance if a “high heat source”, (e.g. a fryer) is located next to the Steamer. Please
contact Sterling Mfg., LLC at 800-426-4211 for recommendations.
High humidity air is vented from the exhaust at rear of unit. Condensation may occur on nearby surfaces.
COUNTERTOP INSTALLATION
The Steamer is shipped with four bullet feet with a 1-1/2” (3.8 cm) height adjustment. Each foot has an adhesive
backed non-slip pad attached to the bottom, which will keep the Steamer from sliding on the countertop under
normal use. Adjust the four feet as needed to level the Steamer in both front-to-back and side-to-side directions.
ON A STAND WITH ADJUSTABLE FEET
When installing the Steamer(s) onto a Steamer Stand with adjustable feet, follow the directions provided with
the Stand to ensure proper installation of the support brackets prior to mounting the Steamer(s). When proper
installation of the support brackets is veried, bolt the Steamer(s) to the support brackets on the Stand using
hardware provided with the Stand. Level the Steamer(s) front-to-back and side-to-side by adjusting the four feet
on the Stand.
INSTALLATION
Combustible Construction Noncombustible Construction
Back 8”
Right Side 2”
Left Side 2”
____
____
____
CLEARANCES
STERLING MANUFACTURING, LLC SMCD - IOMSPG100318 2
STEAMER
ON A STAND WITH CASTERS
When installing the Steamer(s) onto a Steamer Stand with casters, follow the directions provided with the Stand
to ensure proper installation of the support brackets prior to mounting the Steamer(s). When proper installation
of the support brackets is veried, lock the two locking casters located on the front of the Stand by pressing the
lever to the lock position prior to bolting the Steamer(s) to the support brackets on the Stand using the hardware
provided with the Stand.
The installation shall be made with a connector that complies with the standard for connectors for moveable gas
appliances; ANSI Z21.69 · CSA 6.16, and a quick-disconnect device that complies with the standard for quick-
disconnect devices for use with gas fuel, ANSI Z21.41 · CSA 6.9.
Adequate means must be provided to limit the movement of the appliance without depending on the connector
and the quick-disconnect device or its associated piping to limit the movement. The location where the restraining
device may be attached to the appliance shall be in accordance with Sterling specifications for the device.
EXAUST HOOD REQUIREMENTS
Install and operate this gas appliance in a well ventilated area. Adequate air must be supplied to replenish air used
for combustion. Installation must conform to local codes and/or with the National Fuel Gas Code, ANSI Z223.1/
NFPA-54 (latest edition) or the National Gas and Propane Code CSA B149.1 as applicable.
Do NOT restrict the ow of air for combustion and ventilation. Do NOT obstruct the ue cover or control side vents
after installation.
GAS SUPPLY
Observe the following precautions in addition to the posted instructions:
• Do NOT light or start any appliance.
• Do NOT touch any electrical switch.
• Do NOT use any phone in the building.
• Immediately call the gas supplier from a phone away from the building.
• Follow the gas supplier’s instructions.
• If the gas supplier cannot be reached, call the re department.
WARNING: When using a stand equipped with casters, the oor must be level and at. Failure
to have a Stand with casters on a level surface can result in a “TIPPING” hazard that could result
in serious injury.
!
INSTALLATION
!
DANGER
GAS LEAKS ARE FIRE AND EXPLOSION HAZARDS.
INJURY, DEATH AND PROPERTY DAMAGE WILL RESULT.
If anyone smells gas, or suspects a gas leak, immediately refer to the posted gas leak
instructions. The posted instructions are provided by the local gas supplier and supersede any
other instructions.
STERLING MANUFACTURING, LLC SMCD - IOMSPG100318 3
STEAMER

GAS SUPPLY REQUIREMENTS
• Gas supply type MUST match the type of gas shown on the rating plate.
• Gas supply pressure must NOT exceed 14” Water Column pressure and fall within the acceptable
pressure range shown below when using 1/2” NPT line and a 1/2” NPT connection.
• Gas supply pressure must be between 5”-14” Water Column.
• If the gas supply exceeds 14” Water Column, a pressure-regulating valve (pressure regulator) must be
installed in the gas supply plumbing to reduce pressure to the Steamer.
INSTALLATION OF THE GAS SUPPLY LINES
The installer/owner is responsible for furnishing and installing gas supply lines, valves, regulators and accessories.
When installing gas supply lines and accessories, observe the following:
• Use a non-hardening pipe thread sealant resistant to LP gas.
• The 1/2” NPT gas inlet is on the back of the steamer.
• Install main manual shut-o valve between gas supply and the Steamer. This main manual shut-o valve
is called the “Main Manual Gas Valve”.
• Install a sediment trap (drip leg) in gas supply line.
PRESSURE TESTING GAS SUPPLY LINES
If any pressure testing is required, the Steamer must be disconnected or isolated from the gas supply piping
system during any pressure testing as follows:
• The appliance and its main manual shut-o valve must be disconnected from the gas supply piping
system during any pressure testing of the system at test pressures in excess of 14” Water Column ( PSI
or 3.45 kPa).
• The appliance must be isolated from the gas supply piping system by closing its main manual shut-o
valve during any pressure testing of the gas supply piping system at test pressures in equal to or less
than 14” Water Column ( PSI or 3.45 kPa).
ELECTRICAL CONNECTIONS
The Sterling Manufacturing, LLC Steamer was designed, manufactured and tested to meet or exceed the strict
standards of safety and construction guidelines set forth by Underwriters Laboratories®. If any of these instructions
are not completely understood, or you have doubt as to whether your supply receptacle is of the correct voltage,
amperage or is properly grounded, consult a qualified electrician or serviceman.
INSTALLATION CODES AND STANDARDS
The Steamer must be installed in accordance with:
In the USA:
1. All State and Local Codes.
2. National Electric Code, ANSI/NFPA-70 (latest edition).
3. Vapor Removal from Cooking Equipment, NFPA-96 (latest edition).
In Canada:
1. All Local Codes
2. Canadian Electric Code, CSA C22.2 (latest edition).
WARNING: Electrical and grounding connections must comply with the applicable portions of
the National Electrical Code and/or other local codes.
!
INSTALLATION
STERLING MANUFACTURING, LLC SMCD - IOMSPG100318 4
STEAMER

INSTALLATION
ELECTRICAL SUPPLY
This Steamer was supplied from the factory with a cord and plug. The AC power requirements are listed on the Data
Tag located on the right side panel at the rear of the unit. Make sure the voltage at the supply receptacle is within
+/- 10% of the voltage listed on the unit’s Data Tag. Connection to any other voltage may permanently damage
your Steamer or cause premature component failure. This type of damage is NOT covered by the warranty.
GROUNDING
To reduce the risk of electric shock in the event of an electrical short circuit, this appliance must be grounded. The
unit is equipped with a cord having a grounding wire and a plug having a grounding prong, which must be plugged
into an outlet that is properly installed and grounded. Under no circumstances should the plug be cut or bent to t
a receptacle other than the one specied.
WATER CONNECTION
MANUAL-FILL
A Manual-Fill unit does not require any water line connection. Simply ll the cooking chamber with 2½ gallons of
water before turning the Steamer on and add water as necessary throughout the day.
AUTO-FILL (Connected)
The water connection location is on the back of the Steamer. The specications for the connection are:
1. 10-60PSI
2. 32-175°F, (0-80°C)
3. 3/4” MGHT Fitting
Use an NSF Approved appliance hose to connect from a spigot/shuto valve to the Steamer. It must also be
installed with adequate backow protection to comply with all applicable Federal, State and Local Codes.
NOTE: The Owner/Installer is responsible for the water connection of this appliance. The components required to
connect this appliance to a water supply are not provided.
IMPORTANT: Always keep the level sensing probes (located inside chamber under Trivet at right front) clean. This
will help to ensure proper working conditions.
DRAIN CONNECTION (FOR FIXED DRAIN PAN ONLY)
Run a hose from the drain pan to a funnel tting leaving a 1” (2.54cm) gap between the hose and the top of the
funnel. There must be slope in the drain hose towards the funnel or oor drain.
IN-FIELD MODIFICATIONS
Any in-eld modications made to this Steamer without written authorization from the Sterling Manufacturing, LLC
Engineering Department will void your warranty. Please call 800-426-4211, 8AM-5PM EST, Mon.-Fri. to reach the
Sterling Manufacturing, LLC Engineering Department.
HIGH-LIMIT SAFETY
The SPG6 is equipped with a High-Limit Safety Device to protect the unit from overheating. If the High-Limit
temperature is reached, the unit will completely shut down (no lights). If this happens, follow the steps listed below.
CLEAN THE INSIDE OF STEAMER:
1. Wait for the Steamer to cool
2. Remove the Trivet (cover over water reservoir) and clean the water level sensing probes (located at right
front of chamber).
3. Clean the water reservoir (bottom and lower sides of chamber).
4. Restart the Steamer.
If the problem repeats, call the Sterling Service Department at: 800-426-4211
STERLING MANUFACTURING, LLC SMCD - IOMSPG6100318 5
STEAMER
BURNER INFORMATION
BURNER BLOWER INFORMATION
The bearings in the Powered Infrared Burner Blower Motor are permanently lubricated and do not require any
periodic maintenance.
POWER FAILURE AND IGNITION WARNINGS
!
DANGER
Do NOT attempt to operate a Sterling SPG6 during a power failure.
DEATH, INJURY and EQUIPMENT DAMAGE can result.
During a power failure, turn the steamer OFF and close the Main Gas DShut-O Valve
!
DANGER
DO NOT TRY TO LIGHT BURNER WITH A FLAME
The SPG6 has an electronic ignition system, which automatically lights the burner, senses ame
and controls gas ow. This provides precise burner control, safe ignition and safe shutdown.
DEATH, INJURY, and EQUIPMENT DAMAGE may result from trying to light burners with a
ame or from an improperly adjusted gas control and ignition system. Do not try to light the
burner with a ame and do not alter the gas control adjustments.
If adjustment is required, contact the Sterling Service Department at: 800426-4211.
Sterling Manufacturing, LLC is in no way responsible for the operation or safety of this
equipment if the controller, valve, igniter probe or any other gas system component is adjusted
by anyone other than a qualied Sterling authorized service representative.
STERLING MANUFACTURING, LLC SMCD - IOMSPG100318 6
STEAMER

OPERATION
OPERATION
DAILY PREPARATION
FILLING WITH WATER - AUTO-FILL UNIT
Close the drain valve on the front of the unit and verify the water supply valve is turned on. The Steamer will
automatically ll and then maintain the proper water level when turned on. There is no need to manually ll the
Steamer.
If a HIGH WATER condition causes the HIGH WATER Light and Alarm to come on, turn unit o, turn o water
supply valve and slowly drain chamber before opening door and call for service.
IMPORTANT: TO ENSURE PROPER OPERATION OF THIS UNIT THE WATER RESERVOIR, LEVEL
SENSORS AND FLOAT SWITCH MUST BE KEPT CLEAN AT ALL TIMES. PLEASE FOLLOW THE
CLEANING INSTRUCTIONS DAILY.
NOTE: The Steamer will consume more water while cooking in À La Carte Mode than in Batch Mode.
PREHEATING
For best results, the Steamer should be preheated before starting the rst cook cycle of the day or after being
o for extended periods. With the water level full and the unit turned on, turn the timer to 10 minutes and set the
Hold Thermostat to 205°F, or if holding only, set Hold Thermostat to desired hold temperature. When the cycle is
complete, the Steamer is ready for use.
COOKING
Place food to be cooked into cooking chamber and set the timer to the desired cook time. When the cycle is
complete, the Steamer will automatically go into Hold Mode. However, you must manually turn the timer to the
Hold position to turn o the End-Of-Cycle Buzzer. If switching to Hold Mode after cooking is undesireable, or if you
wish not to use the timer, simply set the timer to the Continuous cook position.
You can check or remove food at anytime during cooking or holding. Just open the door, check or remove the food
and close the door. You DO NOT have to turn the unit o to open the door.
NOTE: Opening the door to check food will extend cook times.
BATCH COOK
Cooking in this mode maximizes eciency while cooking large quantities of food product.
À LA CARTE
Cooking in this mode maximizes speed while slightly reducing eciency for rapid cooking of smaller quantities of
food product.
!WARNING: The Steamer will be hot during cooking and holding operations. Use care when
operating, cleaning or servicing the steamer. The cooking chamber may contain live steam and
hot water. Stay clear when opening the door.
STERLING MANUFACTURING, LLC SMCD - IOMSPG100318 7
STEAMER
OPERATION
HOLDING
Follow preheating instructions before holding. To hold food, turn the timer to the Hold position and set the Hold
Thermostat to the desired hold temperature. To prevent the growth of harmful bacteria, it is recommended that you
hold food at a temperature of 150°F (66°C) or higher.
CLEANING
IMPORTANT: TO ENSURE PROPER OPERATION OF THIS UNIT THE WATER RESERVOIR, LEVEL
SENSORS AND FLOAT SWITCH MUST BE KEPT CLEAN AT ALL TIMES. PLEASE FOLLOW THE
CLEANING INSTRUCTIONS DAILY.
DAILY CLEANING
At the end of each day, the Steamer should be drained and cleaned. Please follow the steps below:
1. Turn the Steamer o and let cool.
2. Drain remaining water from cooking
chamber.
3. Remove Trivet (Water Reservoir Cover with
inspection and manual-ll hole), located
inside chamber at the bottom, by sliding it
out the front of unit.
4. Remove the Dual Impingement Baes,
which incorporate the pan racks by rst
lifting and then tilting them slightly towards
the center of the cooking chamber. These
parts are dishwasher safe or can easily be
cleaned in a sink.
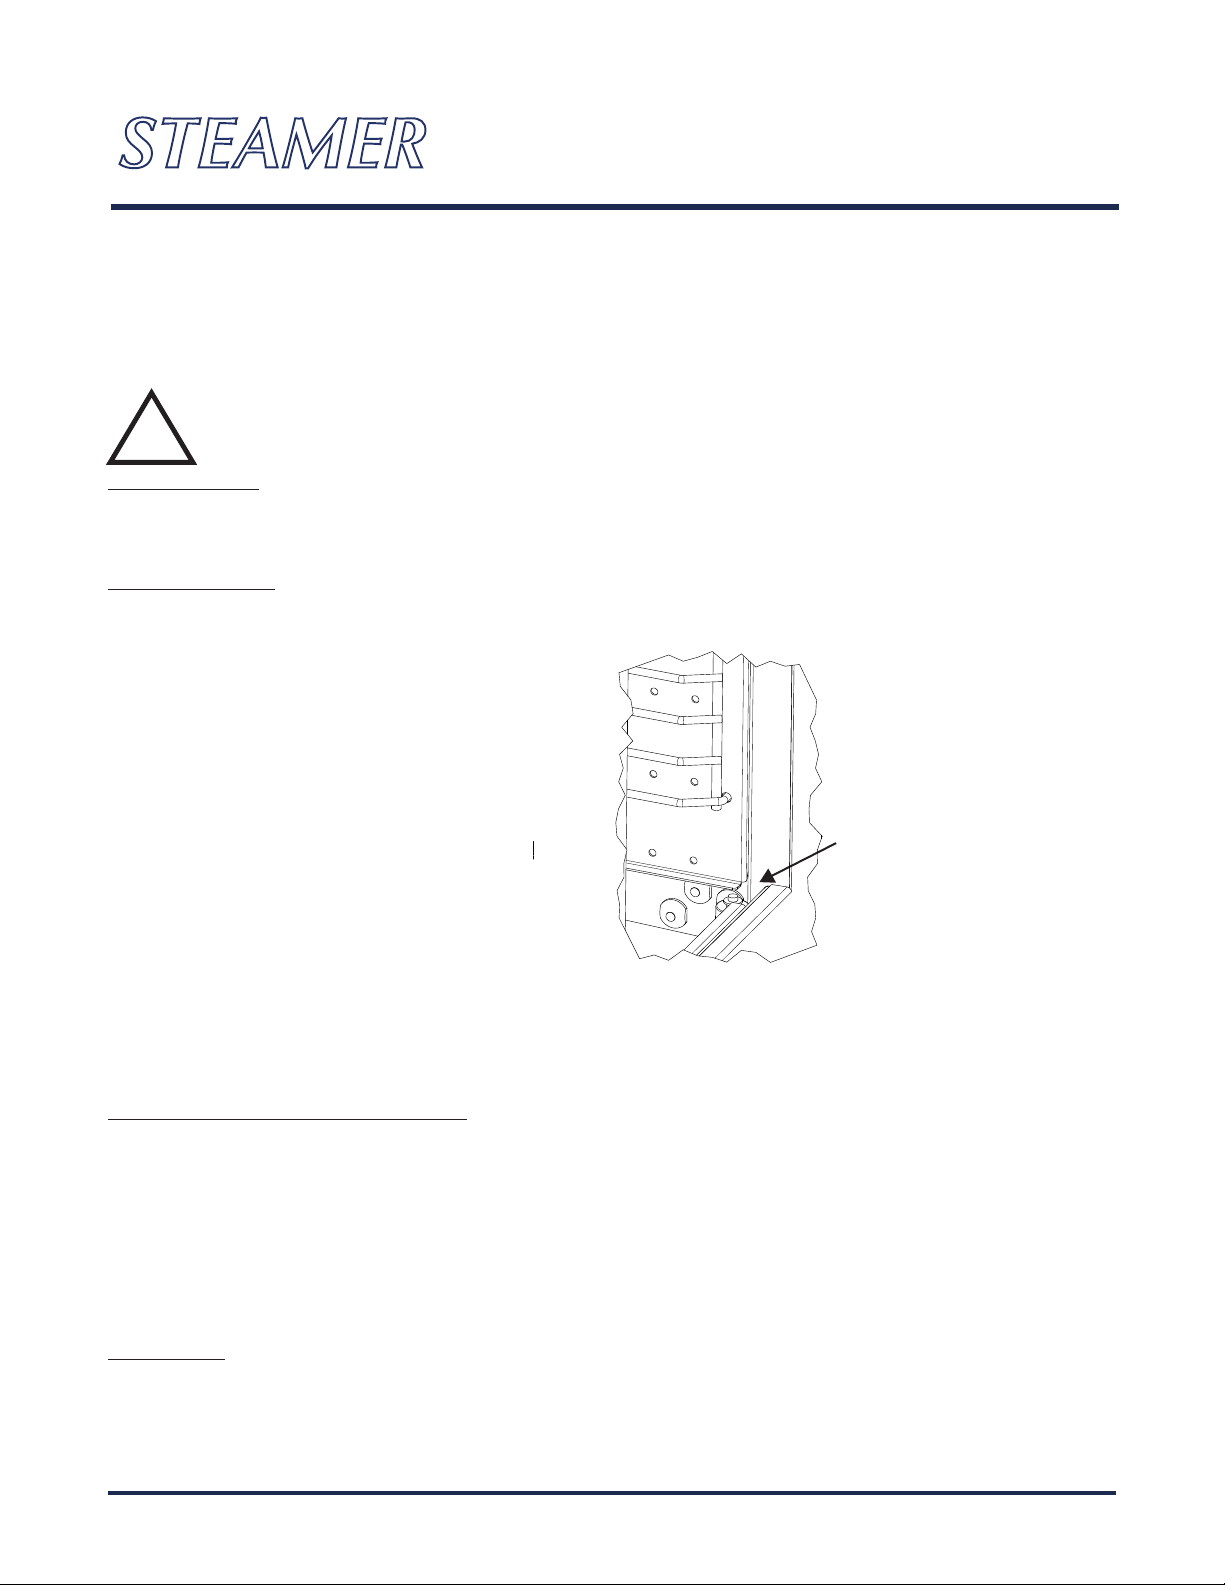
5. Clean the water reservoir, level sensors (if
an Auto-Fill Unit) and oat switch (located
at right side front of reservoir - see Fig. 1)
with mild non-chloride detergent and rinse
clean.
6. Re-install Baes and Trivet - leave door ajar.
ADDITIONAL CLEANING - IF NEEDED
1. With drain valve closed and Steamer o, add 8oz. (0.24 liters) or 1 cup of white vinegar to the cooking
chamber.
2. Turn unit ON. Set the timer to 15 minutes.
3. When the time expires, allow Steamer to cool down and drain chamber.
4. Repeat steps 1 and 2 without adding the white vinegar.
5. Proceed with the daily cleaning instructions.
Clean the exterior surfaces with a damp cloth. To remove discolorations, use a nonabrasive cleaner or polish.
DOOR SEAL
Clean the sealing surfaces of the cooking chamber and door seal daily to remove food acids. Do Not use any
solvents or sharp objects. Use a mild non-chloride detergent to clean door seal and rinse thoroughly.
Leave the door slightly open when not in use to extend door seal life.
!WARNING: Do not use a water jet, pressure washer or hose to clean any exterior surfaces of the
Steamer.
STERLING MANUFACTURING, LLC SMCD - IOMSPG100318 8
Fig. 1
IMPORTANT:
Keep Water Level Probes, Float
and Cooking Chamber Clean to
ensure proper Auto-Fill opera-
tion. Failure to keep these clean
may result in: Over-Filling, Not
Filling or Irregular Filling Con-
ditions.
DETAIL A
SCALE 3/2
A
STEAMER
HEATER
ON LOW
WATER
TEMPERATURE
HOLD TEMP
HOLD
MODE
100
110
120
130
140
150 160
170
180
190
200
212
COOK TIMER
COOK
MODE
0
5
10
15
20
25 30 35
40
45
50
55
60
65
CONTINUOUS
STEAM BOOST
BATCH COOK À LA CARTE
OFF ON
LG1189
S/N
(BUZZER OFF)
HOLD MODE
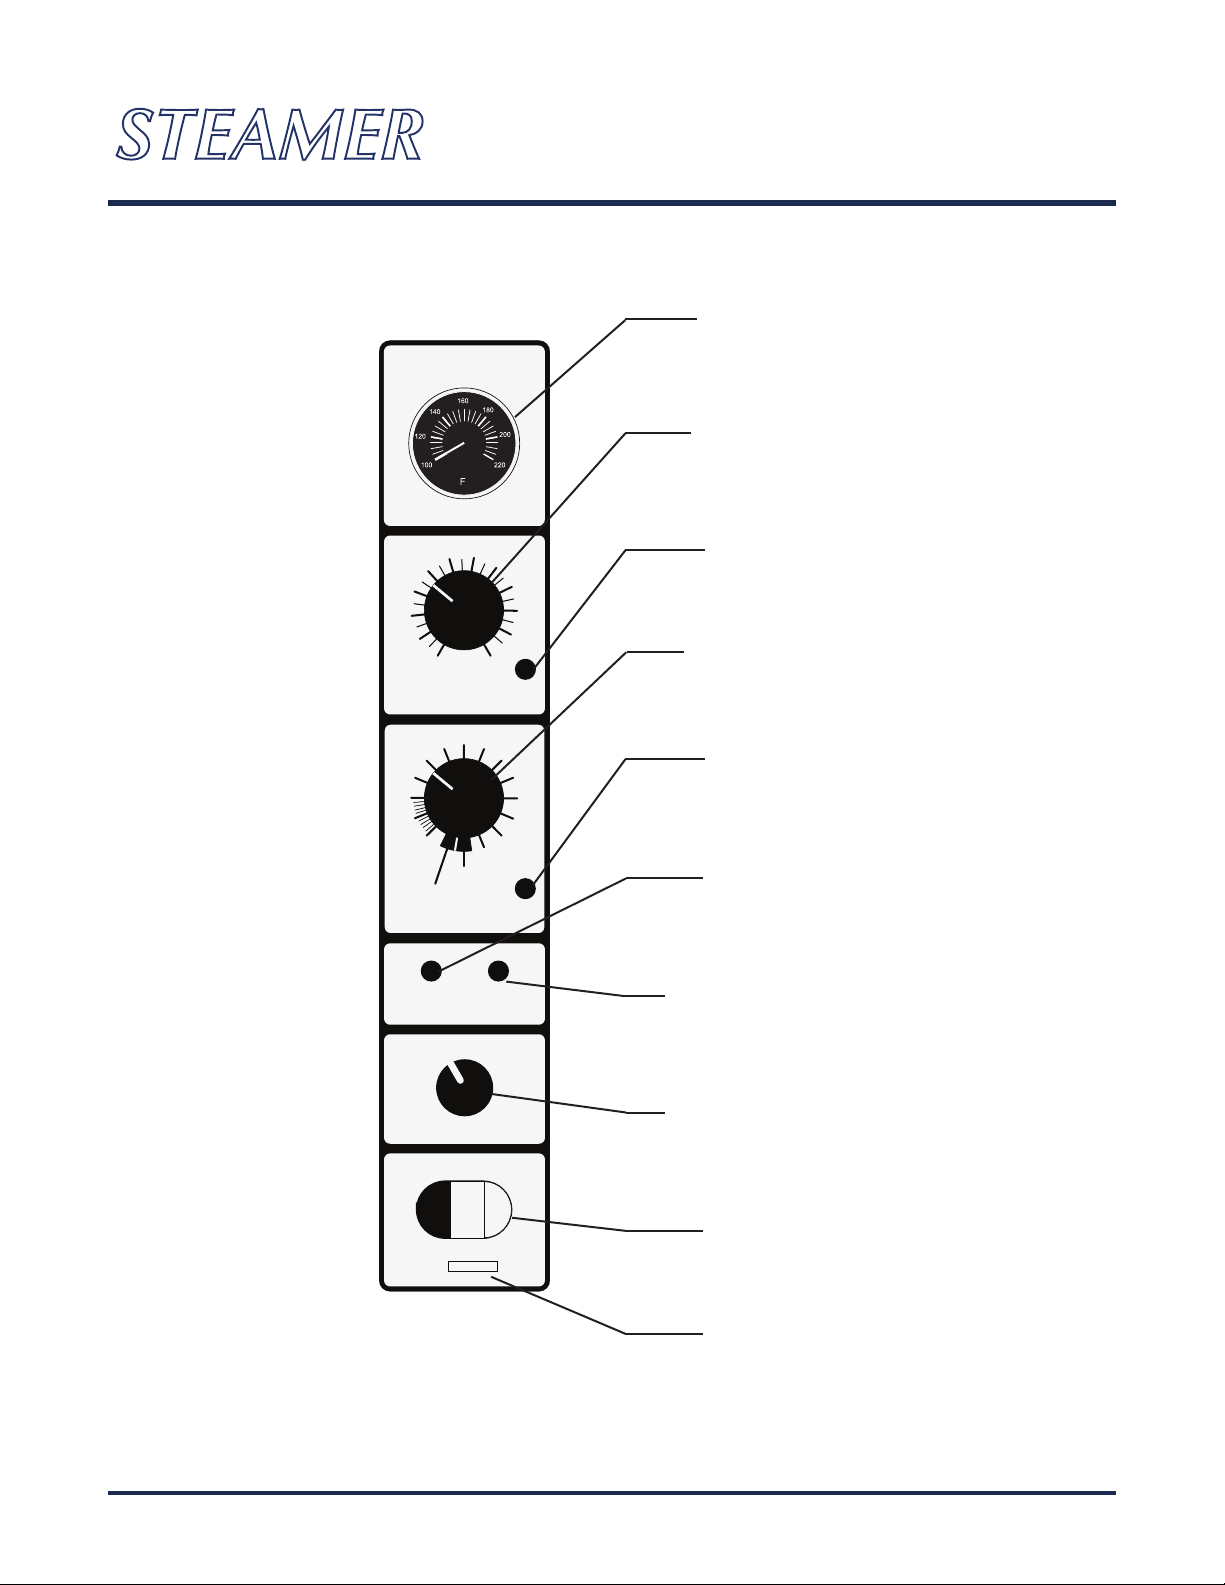
Cooking Chamber
Temperature
Hold Thermostat
(Sets Holding Temp)
Hold Mode
Indicating Light
Cook Cycle Timer
Cook Mode
Indicating Light
Heater On
Indicating Light
Add Water or High Water
Indicating Light
Batch Mode / À La Carte
Selector Switch
ON / OFF
Pushbutton
Serial Number
CONTROL PANEL
STERLING MANUFACTURING, LLC SMCD - IOMSPG100318 9
STEAMER

COOKING TIPS
For The Fastest Cook Times, Try One
Or More Of The Following Methods.
GENERAL COOKING TIPS
For fastest recovery, KEEP HOLD DIAL SET AT
205°F.
AVOID PUTTING LIDS ON PANS. Using a lid can
double or even triple cooking times. Use lids only
on soups, sauces, or anything desired crunchy.
USE PERFORATED PANS WHENEVER
POSSIBLE. You can put a solid pan on the rack
beneath the food being cooked to catch drippings
if needed.
If you must use a solid pan, add 1 cup (8oz. or
0.24 liters) of water to the pan per pound (453 g)
of product being cooked. This will shorten cook
times and help the food cook more evenly.
Using deep solid pans will lengthen cook times by
10-40%. Shallow pans are better. For Example: 10
lbs. of frozen peas takes less time if cooked in two
2.5” pans than one 4” pan.
HIGH VOLUME
During high volumes or if your sta tends to open
and close the door frequently, set the timer dial
to Continuous. This will shorten the recovery time
between batches.
SELECT THE RIGHT COOK MODE
The Examples Below Are Based On Using Batch
Mode. Using À LA CARTE Mode Will Shorten Cook
Times.
FROZEN VEGETABLES: Using perforated pans,
roughly 1 minute per pound plus 1 minute per pan.
Example: 15lbs. of corn in 3 perforated pans will take
approximately 18 minutes to cook.
RICE: DO NOT COVER. Most rice takes about 25
minutes. Institutional rice takes about 35. Use 1.8
parts water to 1 part rice. Example: 5 cups of rice
requires 9 cups of water.
DRY PASTA: Preheat water in a 4” solid pan. Add
pasta. Cook time is similar to stove top - stirring is not
required.
SCRAMBLED EGGS: Use plastic wrap to cover the
bottom of a 4” solid pan and ll with eggs. Cook until
done - approximately 25 minutes. DO NOT STIR. Invert
the eggs into another 4” solid pan. Hold at 160°F.
FROZEN PANCAKES: Layer pancakes in a perforated
pan and cook for 6 -10 minutes until internal
temperature reaches 150°F. Hold at 140°F.
PRECOOKED BREAKFAST MEAT: Rethermalize
precooked sausage and bacon. Cook until internal
temperature reaches 165°F, approximately 20-30
minutes depending on quantity. Hold at 160°F.
CORNBREAD: DO NOT COVER. Use milk instead of
water and cook for 15 minutes or until a knife comes
out clean. It will be moist, but not soggy.
BATCH COOK
Cooking in this mode maximizes eciency while
cooking large quantities of food product.
À LA CARTE
Cooking in this mode maximizes speed while slightly
reducing eciency for rapid cooking of smaller
quantities of food product.
STERLING MANUFACTURING, LLC SMCD - IOMSPG100318 10
STEAMER
COOK TIMES
These cook times are to be used as a guideline and are based on Batch Cooking Mode.
Using À La Carte Mode will shorten cook times. Times will vary with each kitchen.
VEGETABLES Amount Cook Time Pan Type
Aparagus Spears, frozen 5lbs. 7 Perforated
Asparagus Spears, fresh 5lbs. 5 Perforated
Broccoli Spears, frozen 10lbs. 12 Perforated
Broccoli, fresh 10lbs. 15 Perforated
Carrots, Whole Baby, frozen 5lbs. 8 Perforated
Carrots, Crinkle Cut, frozen 5lbs. 7 to 8 Perforated
Carrots, Sliced, fresh 10lbs. 9 to 11 Perforated
Cauliflower Florets, frozen 5lbs. 6 Perforated
Cauliflower Florets, fresh 5lbs. 8 Perforated
Celery, 1" Diagonal Cut 5lbs. 7 Perforated
Corn Whole Kernel, frozen 12lbs. 7 Perforated
Corn, 6" Cob Ears 5.5lbs. 13 Perforated
Green Beans, frozen 10lbs. 12 Perforated
Lima Beans, frozen 10lbs. 13 Perforated
Mixed Vegetables, frozen 5lbs. 7 Perforated
Peas, frozen 5lbs. 7 Perforated
Potatoes, Whole, 8oz. (100 ct) 10lbs. 45 Perforated
Potatoes, Quartered 8lbs. 16 Perforated
Zucchini, Slices 10lbs. 8 Perforated
RICE
Sticky, 1:1 Water to Rice Any 25 Solid 2.5"
Par Boiled, 1.8:1 Water to Rice Any 35 Solid 2.5"
SEAFOOD
Shrimp, thawed 16-20 ct 10 Perforated
Lobster Tail, fresh 11 Perforated
Lobster, 2lbs. Live 9 to 10 Perforated
Snow Crab, frozen 7 Perforated
MEAT
Hamburger Patties, frozen 3lbs. 20 Perforated
Hot Dogs, Beef, 8/lb. (240 ct) 30lbs. 20 Perforated
Hot Dogs, Beef, 4/lb. (200 ct) 30lbs. 30 Perforated
STERLING MANUFACTURING, LLC SMCD - IOMSPG100318 11
STEAMER

WARRANTY
1 YEAR PARTS & LABOR WARRANTY
Sterling Manufacturing, LLC (Sterling) warrants that your steam cooker will be free of defects in material and
workmanship under normal use for a period of one (1) year from the date of shipment from the factory.
During the warranty period, Sterling agrees to repair or replace, at it’s option, F.O.B. factory, any part which
proves to be defective due to defects in material or workmanship, provided the equipment has not been altered
in any way, and has been properly installed, maintained, and operated in accordance with the instructions in
the Steamer Installation and Operation Manual.
During the warranty period, Sterling also agrees to pay any factory authorized equipment service agency
(within the continental United States and Canada) for reasonable labor required to repair or replace parts due to
defects in material or workmanship, provided the service agency has received advance approval from Sterling
factory service to perform the repair or replacement. This warranty includes travel time not to exceed two
hours and mileage not to exceed 50 miles (100 miles round trip), but does not include post start-up assistance
or training, tightening of loose ttings or external electrical connections, minor adjustments, maintenance or
cleaning. Sterling will not reimburse the expense of labor required to repair or replace parts after the one year
warranty period.
Proper installation is the responsibility of the owner-user, or installing contractor and is not covered by this
warranty. While Sterling products are built to comply with applicable standards for manufacturers, including
Underwriters Laboratories (UL) and the National Sanitation Foundation (NSF), it is the responsibility of the
owner and installer to comply with any applicable local codes that may exist.
Sterling makes no other warranties or guarantees, whether expressed or implied, including any warranties of
performance, merchantability, or tness for any particular purpose. Sterling’s liability on any claim of any kind,
including negligence, with respect to the goods and services covered hereunder, shall in no case exceed the
price of the goods and services, or parts thereof, which give rise to the claim. In no event shall Sterling be liable
for special, incidental, or consequential damages, or damages in the nature of penalties.
This constitutes the entire warranty, which supercedes and excludes all other warranties, whether written, oral
or implied.
12
STERLING MANUFACTURING, LLC SMCD - IOMSPG100318
STEAMER
Table of contents


