Sterling 4500 Series User manual
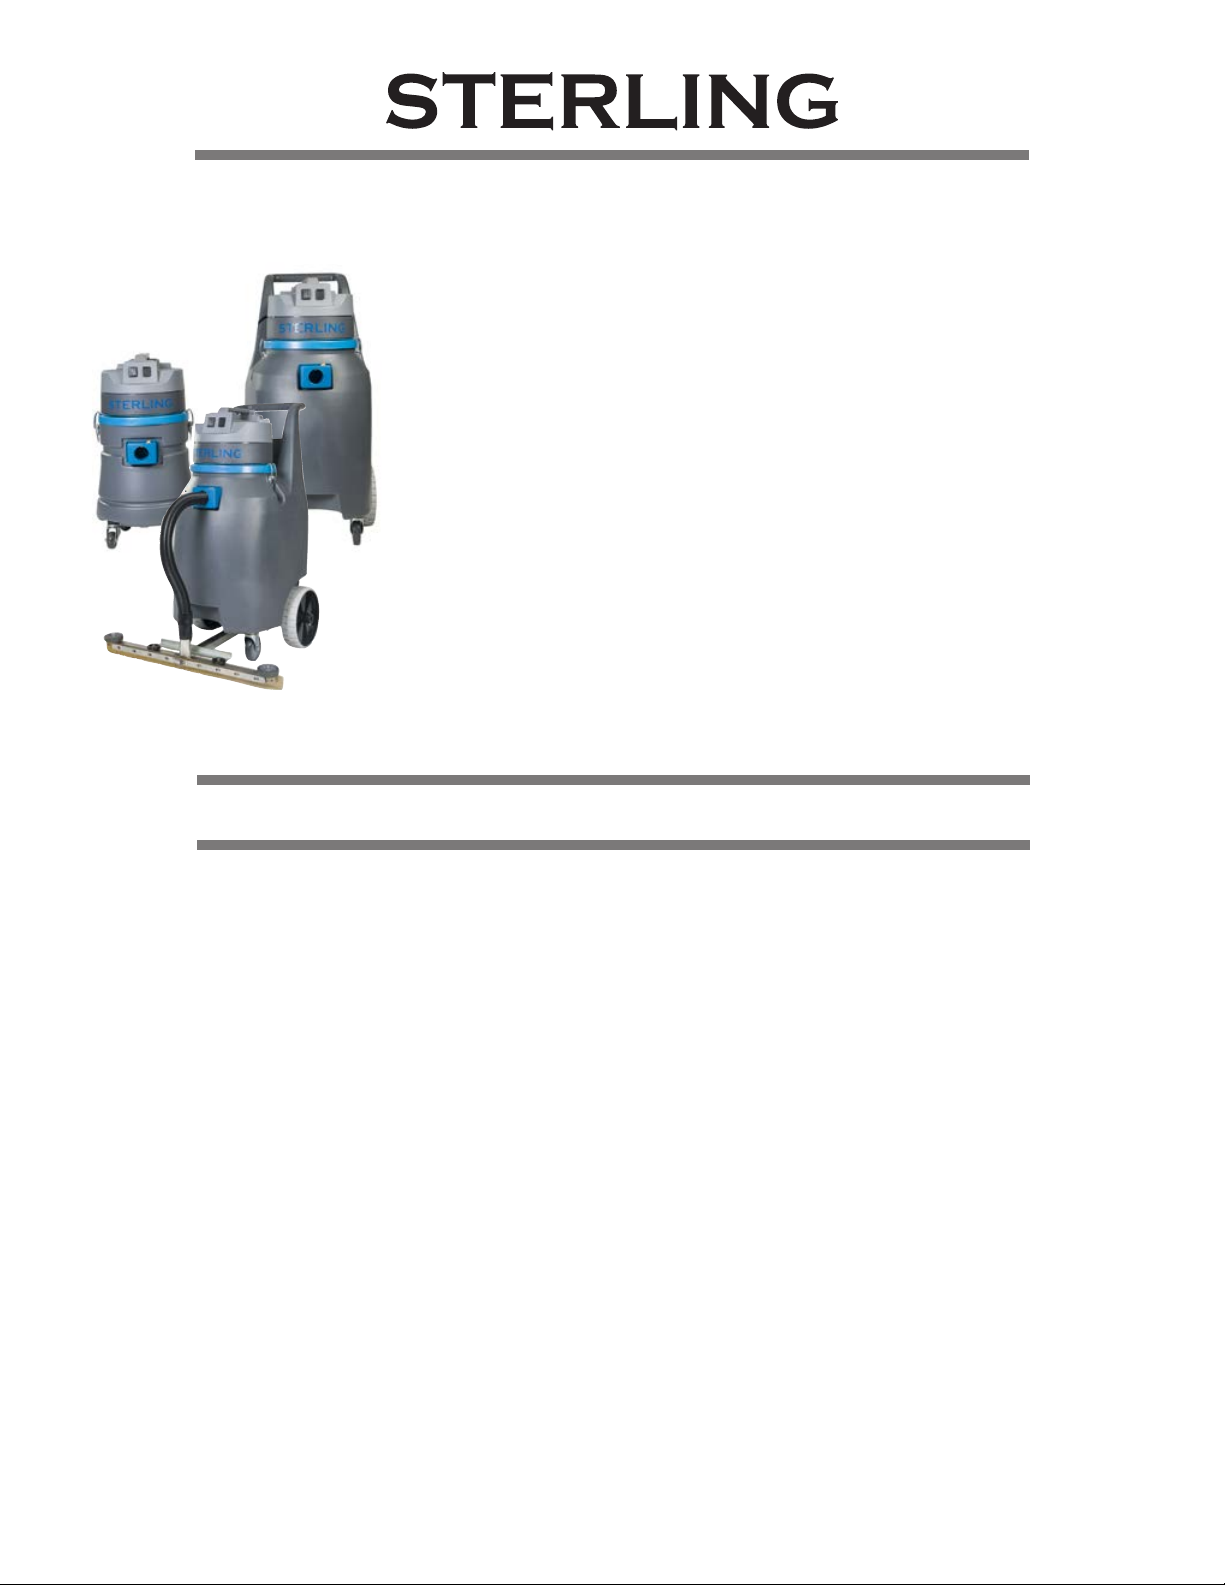
Series 4500 Wet/Dry Vacuums
(Models: 4510W, 4520W, 4520S & 4520P)
Thank you for your recent Sterling purchase. You have bought a high quality, long-
life commercial vacuum cleaner. For your safety and continued satisfaction with
this product, please read this owner’s manual carefully before using. For your infor-
mation, all parts used in the manufacturing of this vacuum cleaner meet or exceed
rigid quality control standards. We stand behind all our products and are available
to assist you with a knowledgeable and dedicated sta. If we can help you in any
way, please call Customer Service at 844-822-7787.
We also recommend that you visit our website www.sterlingna.com for the fastest
most ecient way to complete your product registration and see other Sterling
products and accessories to meet your cleaning needs.
Models 4510W, 4520W & 4520S
To Assemble (4510W Only): Insert casters into sockets on bottom of canister. Push casters until seated. Attach
hose to coupling on front of can.
To Connect Hose: Insert the hose end into the tank inlet until it clicks. To remove the hose, press the button on
top of the hose inlet, and remove hose.
To Operate:
(1) For Dry Pickup (4520W): Install paper bag on inlet inside of tank. Insert the cloth lter assembly in the top
of the tank. Install motor head. The cloth lter located inside the can provides highly ecient separation
of dust and dirt particles from the incoming air stream.
(2) For Wet Pickup: Remove paper bag and cloth lter from tank. Make sure foam lter sleeve is installed on
oat assembly. Make sure oat moves freely. When the liquid level in the tank rises to a point just below
the inlet, the oat assembly shuts o air ow, thus preventing overow and possible damage to the
vacuum motor.
To Maintain: This vacuum cleaner contains no user serviceable parts. If repair is needed, please take the vacuum
cleaner to an authorized Sterling factory service center.
CAUTION Never operate vacuum for dry pick-up unless the cloth lter is properly installed and in good condition.
CAUTION A disposable paper bag cannot be used during liquid pick up.
CAUTION Do not use this vacuum to pick up hazardous materials without HEPA lter being installed.
CAUTION Never lubricate the vacuum cleaner motor. The motor bearings are permanently sealed. This vacuum is
intended for indoor or outdoor use and for wet pickup, however, it is not intended to be exposed to rain.

The vacuum cleaner is warranteed for 1 year from the date of purchase. Parts not covered under warranty are power
cords, lters, motor brushes and squeegee blades. The warranty covers only failure due to defective parts or workman-
ship and will be invalidated by improper application and abuse.
Under no circumstances should you return a failed unit to the factory. If you experience any problems with your vacuum
during the warranty period, contact the Customer Service Department.
Limited Warranty
Model 4520P
Before Each Use:
(1) This vacuum cleaner is designed for wet only pickup. Please avoid picking up dry materials.
(2) Make sure the tank is clean, and that there is no debris in the tank that can impede the action of the pump
oat mechanism.
(3) Make sure the mesh lter bag is installed on the inlet inside the canister. The bag should be empty, and
the slide-on clamp should be installed on the bottom of the bag. Position the thin, at plastic strip that is
attached to the mesh lter bag, over the rim of the canister. This strip helps retain the bag when it lls with
debris.
(4) Make sure that the oat mounted on the underside of the motor head is able to move freely, and that the
lter on the outside of the oat housing is clean and properly in place. This lter will protect the vacuum
motor from debris.
(5) Attach the motor head to the canister using the two metal clamps mounted on the side of canister. The
pump cord exits the rear of the canister, near the top. Plug this cord into the electrical outlet on the top rear
of the motor head.
(6) Attach the long discharge hose to the brass tting on the rear of the canister. The tting is a ball coupling
type. Pull the collar of the female brass tting toward the canister before inserting the hose tting.
To Operate:
(1) The vacuum cleaner motor is controlled by the switch on the top left side of the motor head. The pump out
feature is controlled by the switch on the top right side of the motor head. If using the pump out feature,
the pump switch can be left on.
(2) The pump is equipped with a oat switch, which will automatically start the pump when the water level in
the canister rises. The oat switch will automatically stop the pump when the liquid level drops.
(3) If the vacuum is being used without the long discharge hose, leave the pump switch o. The liquid in the
canister can also be emptied using the short, black, corrugated hose attached to the rear of the canister. Be
sure the end of the hose is securely attached to the stationary drain hose plug after use.
(4) Check the mesh bag frequently for debris. To empty, remove the bag from the canister and slide o the
retaining clip on the bottom of the bag. Reinstall the mesh lter bag before continuing to use the vacuum.
Do not operate the vacuum without the mesh lter bag in place.
CAUTION Never lubricate the vacuum cleaner motor. The motor bearings are permanently sealed. This vacuum is
intended for indoor or outdoor use and for wet pickup, but it is not intended to be exposed to rain.
Important Safety Instructions
When using an electrical vacuum, basic safety precautions should always be followed, including the following:
READ ALL INSTRUCTIONS BEFORE USING YOUR VACUUM CLEANER
WARNING: To reduce the risk of re, electrical shock, or injury:
1. Do not leave appliance when plugged in. Unplug from outlet when not in use and before servicing.
2. Do not expose to rain. Store indoors.
3. Do not allow to be used as a toy. Close attention is necessary when used by or near children.
4. Use only as described in this manual. Use only manufacturer’s recommended attachments.
5. Do not use with damaged cord or plug. If appliance is not working as it should, has been dropped, damaged, left outdoors, or
dropped into water, contact Customer Service.
6. Do not pull or carry by cord, use as a handle, close a door on cord, or pull cord around sharp edges or corners. Do not run appli-
ances over cord. Keep cord away from heated surfaces.
7. Do not unplug by pulling on cord. To unplug, grasp the plug, not the cord.
8. Do not handle plug or appliance with wet hands.
9. Do not put any object into openings. Do not use with any opening blocked; keep free of dust, lint, hair and anything that may
reduce air ow.
10. Keep hair, loose clothing, ngers and all parts of the body away from openings and moving parts.
11. Do not pick up anything that is burning or smoking, such as cigarettes, matches, or hot ashes.
12. Do not use without dust bag and/or lters in place.
13. Turn o all controls before unplugging.
14. Use extra care when cleaning on stairs.
15. Do not use to pick up ammable or combustible liquids such as gasoline, or use in areas where they may be present.
16. This vacuum is for commercial use only.
17. Connect to a properly grounded outlet only. See grounding instructions.
SAVE THESE INSTRUCTIONS
GROUNDING INSTRUCTIONS - This appliance must be grounded. If it should malfunction or breakdown, grounding provides a
path of least resistance for electric current to reduce the risk of electric shock. This appliance is equipped with a cord having equip-
ment grounding conductor and grounding plug. The plug must be inserted into an appropriate outlet that is properly installed and
grounded in accordance with all local codes and ordinances.
WARNING: Improper connection of the equipment grounding conductor can result in a risk of electric shock. Check with a quali-
ed electrician or service person if you are in doubt as to weather the outlet is properly grounded.
Do not modify the plug provided with the appliance - if it will not t the outlet, have a proper outlet installed by a qualied electrician.
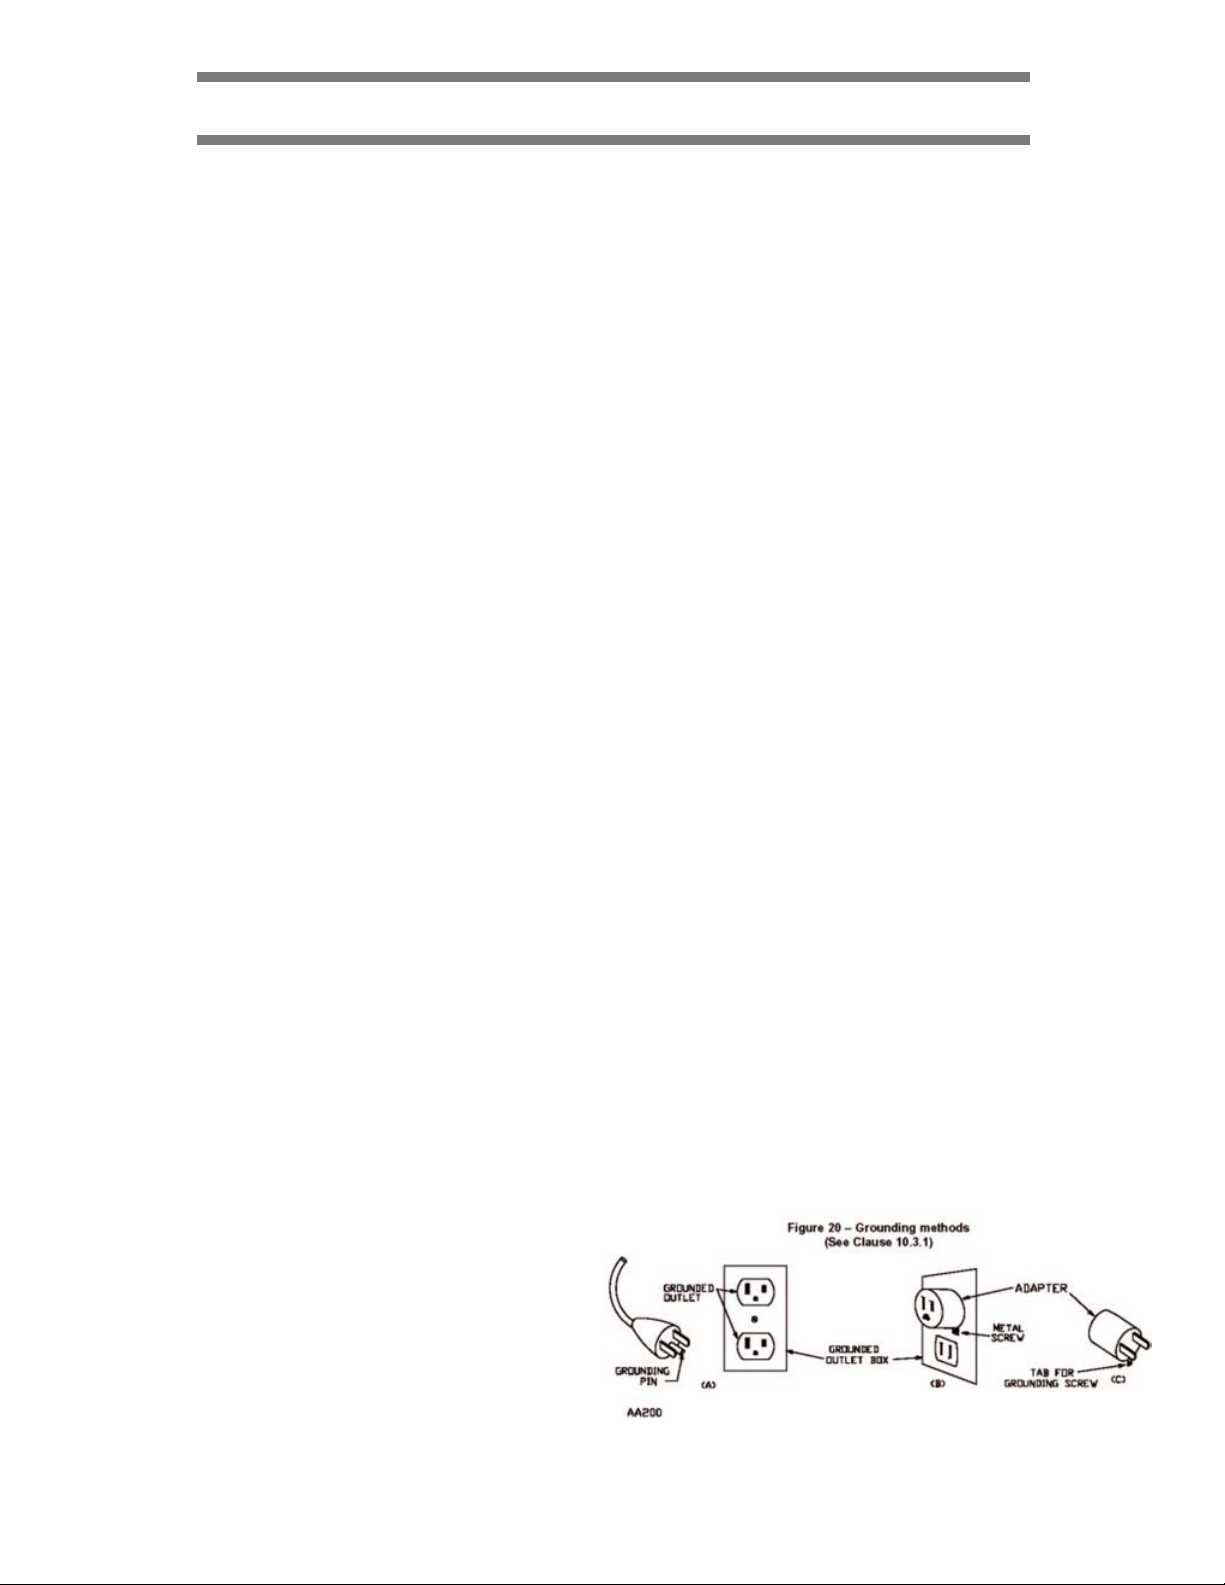
This appliance is for use on a nominal 120 - Volt circuit, and has a grounded plug that looks like the plug illustrated in sketch A be-
low. A temporary adapter that looks like the adapter illustrat-
ed in sketches B and C may be used to connect this plug to a
2-pole receptacle as shown in sketch B if a properly grounded
receptacle is not available. The temporary adapter should be
used only until a properly grounded outlet (sketch A) can be
installed by a qualied electrician. The green colored ear, lug,
or the like extending from the adapter must be connected to
a permanent ground such as a properly grounded outlet box
cover. Whenever the adapter is used, it must be held in place
by a metal screw.
NOTE: In Canada, the use of a temporary adapter is not permitted by the Canadian Electrical Code.
IMPORTANTES CONSIGNES DE SECURITE
L’utilisation d’un appareil électrique demande certaines précautions:
LIRE TOUTES LES INSTRUCTIONS AVANT DE FAIRE FONCTIONNER CET APPAREIL
AVERTISSEMENT: Pour réduire les risques d’incendie, de choc életrique ou de blessure:
1. Ne pas laisser l’appareil sans surveillance lorsqu’il est branché. De brancher lorsque l’appariel n’est pas utilisé et avant l’entretien.
2. Ne brancher qu’à une prise de courant avec mise à la terre. Voir les instructions visant la miseà la terre.
3. Ne pas permettre aux enfants de jouer avec l’appareil. Une attention particuliére est nécessaire lorsque l’appareil est utilisé par des
enfantsnou à proximité de ces derniers.
4. N’utiliser que conformément à cette notice avec les accessoires recommandês par le fabricant.
5. Ne pas utiliser si le cordon ou la che est endommagé. Retourner l’appareil à un atelier de réparation s’il ne fonctionne pas bien, s’il est
tombé ou s’il a été endommagé, oublié á l’extérieur ou immergé.
6. Ne pas tirer soulever ou trainer l’appareil par le cordon. Ne pas utiliser le cordon comeune poignée, le coincer dans l’embrasure d’une
porte ou l’appuyer contre des arêtes vives ou des coins. Ne pas faire rouler l’appareil sur le cordon. Garder le cordon á l’écart des sur-
faces chaudes.
7. Ne pas débrancher en tirant sur le cordon. Tirer plutot che.
8. Ne pas toucher la che ou l’appareil lorsque vos mains sonthumides.
9. N’insérer aucun object dans les ouvertures. Ne pas utiliserl’appareil lorsqu’une ouverture est bloquée. S’assurer que de la poussiére,
de la peluche, des cheveux ou d’autres matiéres ne réduisent pas le débit d’air.
10. Maintenir les cheveux, les vétements amples, les doigts et toutes les parties du corps a l’écart des ouvertures et des piéces mobiles.
11. Ne pas aspirer de matiéres en combustion ou qui dégagent de la fumée, comme des cigartettes, des allumettes ou des cendres
chaudes.
12. Ne pas utiliser l’appareil si le sac á poussiére ou le ltre n’est pas en place.
13. Mettre toutes les commandes á la position ARRET avant de débrancher l’appareil.
14. User de prudence lors du nettoyage des escaliers.
15. Ne pas aspirer des liquides inammables ou combustibles, comme de l’essence, et ne pas faire fonctionner dans des endroits ou peu-
vent se trouver de tels liquides.
16. Avertissement- Pour réduire les risques de choc électrique, ne pas exposer á la pluie et garder l’aspirateur á l’intérieur.
17. Appareils mis á la terre:“Ne brancher au’á une prise de courant avec mise á la terre. Vois less instructions visant la mise á la terre.
CONSERVER CES INSTRUCTIONS
INSTRUCTIONS VISANT LA MISE Á LA TERRE - Cet appareil doit étre mis à la terre. En cas de défaillance ou de panne éventuelles, la mise
à la terre fournit au courant un chemin de moindre résistance qui réduit le risque de choc électrique. Cet appareil est pourvu d’un
cordon muni d’un conducteur de terre et d’une che avec broche de terre. La che doit être branchée dans une prise appropriée cor-
rectment installée et mise à la terre conformement aux réglements et ordonnances municipaux.
AVERTISSEMENT: Un conducteur de terre mal raccordé peut entrainer un risque de choc électrique. Consulter un électricien ou n
technicien d’entretien qualié si vous n’êtes pas certain que la prise est correctement mise à la terre. Ne pas modier la che fournie avec
l’appareil - si elle ne peut être insérée dans la prise, faire installer
une prise adéquate par un électricien quali é.
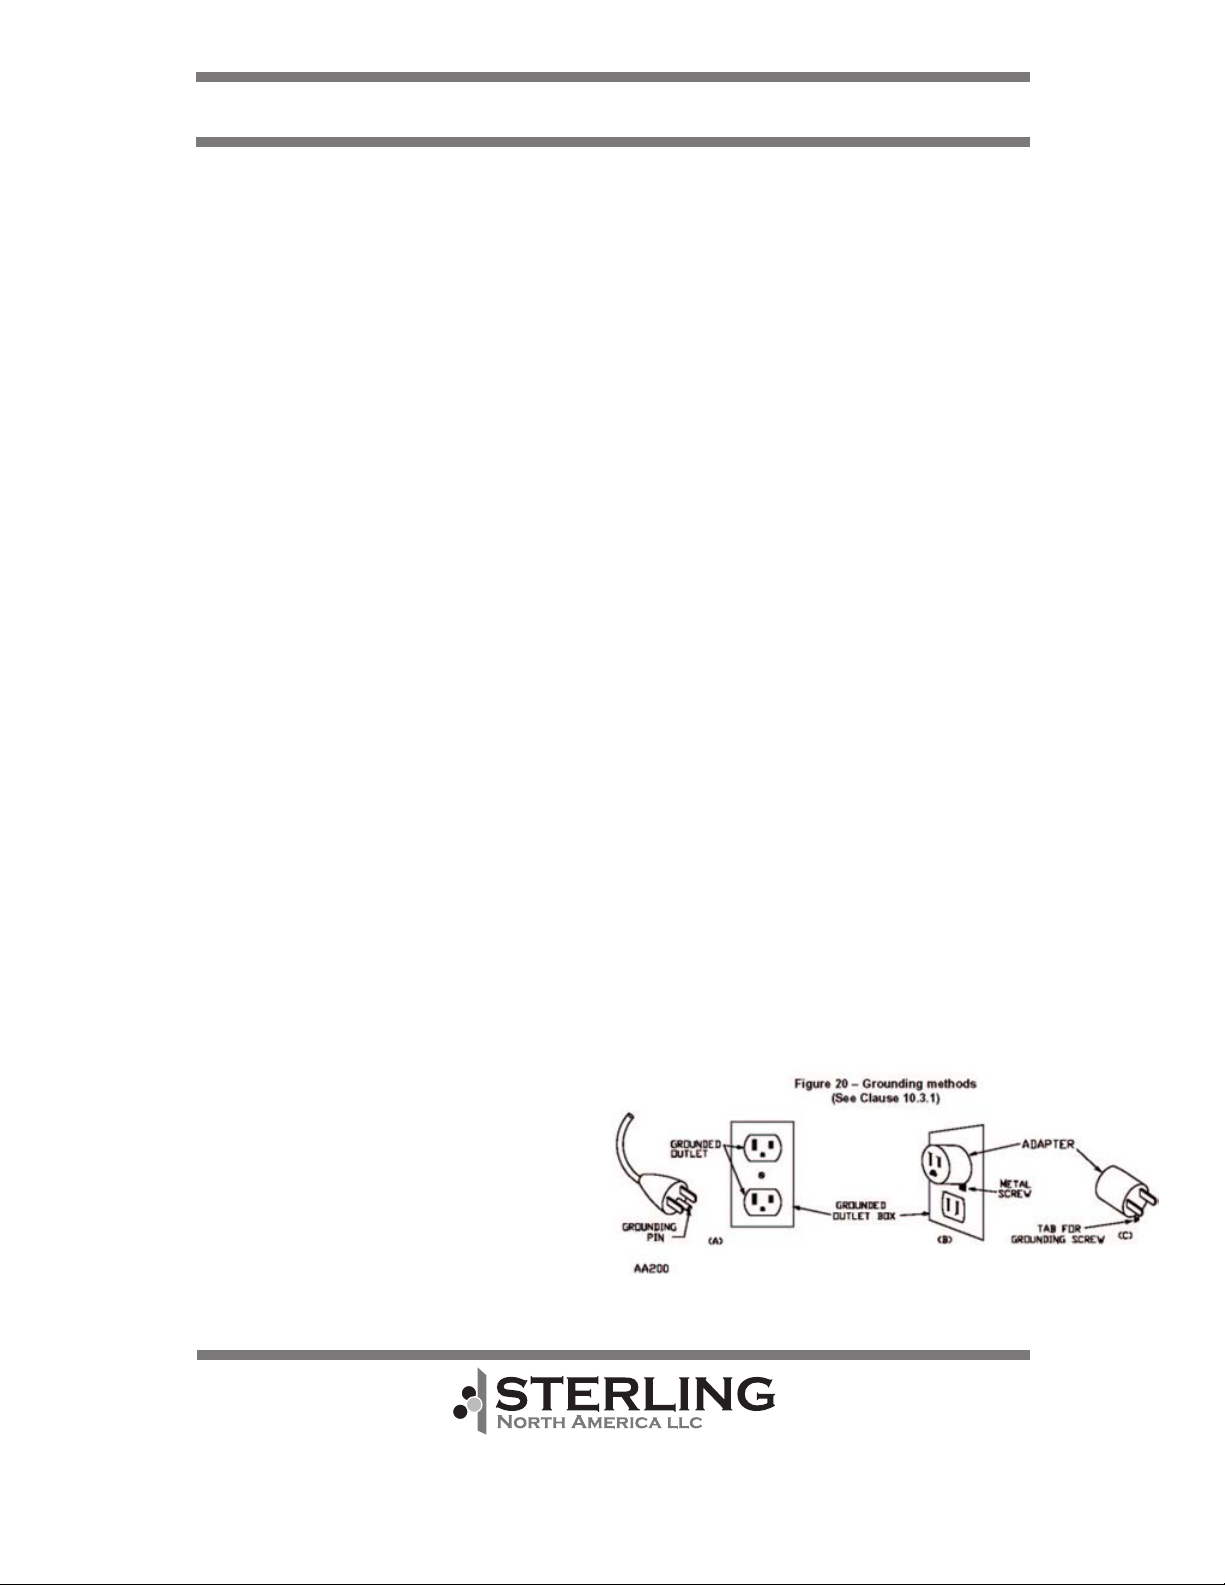
Cet appareil est destiné à un circuit de 120 V et est muni d’une
che de mise à la terre semblable à celle illustrée par le croquis A
de la gure. Sassurer que l’appareil est branché à une prise de cou-
rant ayant la mê conguration que la che. Aucun adaptateur ne
devrait être utilisé avec cet appareil.
Las mise à la terre selon les croquis B et C n’est pas permise au
Canada.
7545 Irvine Center Dr., Ste. 200 •Irvine, CA 92618
Toll Free: 844 VACS R US or 844-822-7787 •Fax: 949-623-8305
SterlingNA.com
This manual suits for next models
4
Table of contents
Other Sterling Vacuum Cleaner manuals


