STI solar Solar Duo Cascade User manual

Solar Cascade
Solar Duo Cascade
Solar Fish
Solar powered water fountains
operates in direct sunlight
SOLAR CASCADE
SOLAR DUO CASCADE
SOLAR FISH
SOLAR CASCADE •SOLAR DUO CASCADE •SOLAR FISH
Instruction Manual (ENGLISH)
CONTENTS
1. Introduction
2. Security instructions
3. Overview
4. Components
5. Assembling & using your product
These instructions relate ONLY to the STI Solar fountain
products and contain important information for using the
product for the first time. Please keep these instructions
for later reference. They should always accompany the
product in the event of transfer to a new user.
1. INTRODUCTION
Thank you for purchasing one of our STI Solar fountains. You
have purchased a product that complies with the latest and most
up-to-date solar technology available. To preserve these standards
and in order to maintain safety you should adhere to the
instructions for use detailed in this manual.
2. SECURITY INSTRUCTIONS
In the event of any problems arising or damage occurring as
a result of misuse the manufacturers warranty will be deemed
cancelled. The manufacturer is not responsible for any claims
or damages arising from the misuse of this product. For safety
reasons and in order to maintain standards (CE) you are prohibited
from altering or changing any component in the solar fountain.
Please follow the instructions very carefully. For commercial
applications due care and attention must be paid to the Health
and Safety Standards in your jurisdiction.
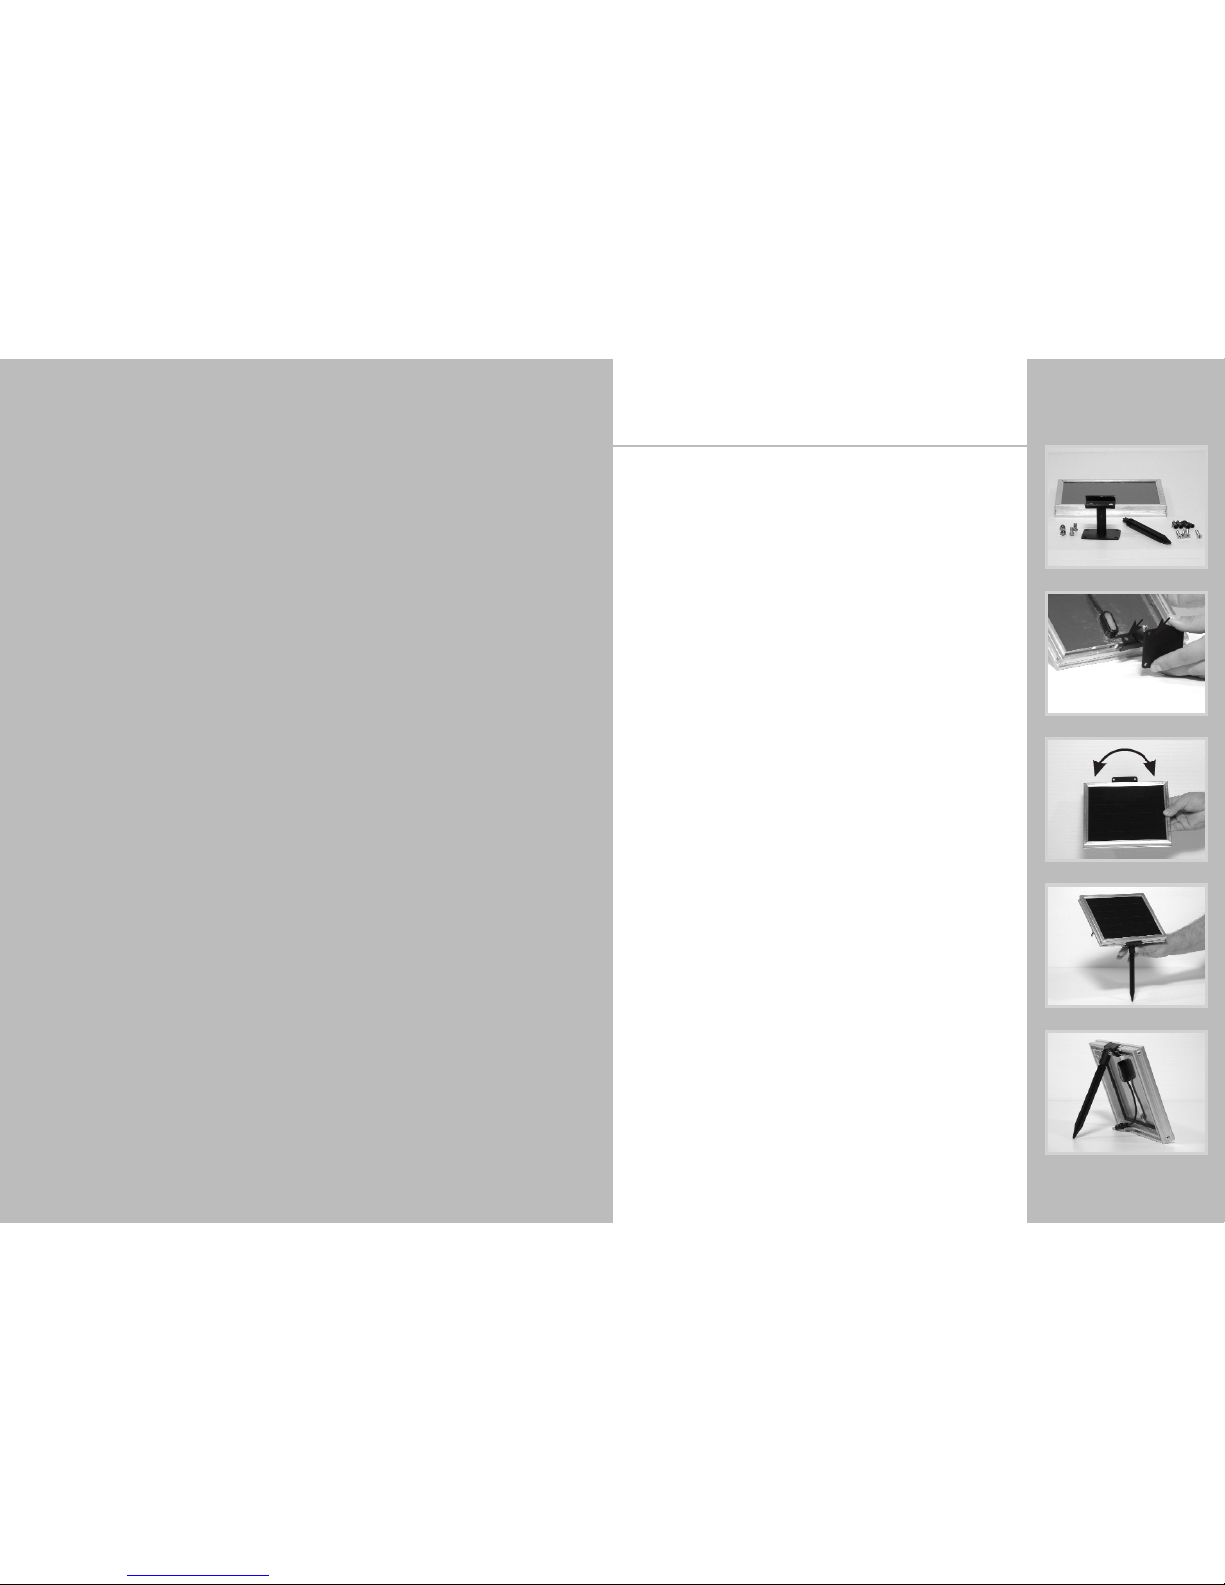
Solar Panel & Stand Kit
Fixing the Panel Holder
Wall Mounted Solar Panel
Stand Mounted Solar Panel
Standing Solar Panel
6. Cleaning and maintenance
7. Functionality problems
8. Technical data
9. Spare parts
10. 2 year warranty
3. OVERVIEW
STI Solar fountains have been designed for outdoor use. A solar
module powers the pump. The pump drives water to the topmost
jug and then cascades down through the lower tiered bowls. In
order for the pump to operate, the solar module needs to be
placed in direct sunlight. The performance of the pump depends
on the season and the position of the solar module.
Your unit is equipped with an optional AC adapter which enables
you to enjoy your fountain indoors. The pump is designed to
work with the AC adapter for periods of up to 4 hours at a time.
Please Note:
Prolonged use under AC mode can cause irrepairable damage
to the pump. This is not covered under the warranty.
SOLAR CASCADE •SOLAR DUO CASCADE •SOLAR FISH
Instruction Manual (ENGLISH)
SOLAR CASCADE •SOLAR DUO CASCADE •SOLAR FISH
Instruction Manual (ENGLISH)
5. ASSEMBLING AND
USING YOUR PRODUCT
SOLAR CASCADE
Unpack all components carefully.
First assemble the metal stand. There are connection points
as per the diagram on the right. Insert the big bowl first.
Make sure that this is properly followed.
Next insert the three small bowls.
Unroll the pump cable.
Draw the hose through the topmost ring and insert the
self-sealing soft rubber plug into the hole in the jug. Then
place the jug on the topmost ring ensuring correct alignment.
Affix the hose along the metal frame using the provided
plastic straps.
Fill the main bowl with water.
Insert the connector into the rear of the module.
Your fountain is now ready to operate.
Please Note:
The jug and the bowls are made of clay and are fragile.
Decide on a suitable location.
There will be water splashes when the product is in use.
Make sure that the surface on which you are placing the
fountain will not be affected.
We recommend you use filtered, distilled or rain water
to prevent scale building up.
On first use, there may be air in the pump.
It can take up to 5 minutes until the air escapes.
PANEL PERFORMANCE
MIN. MIN.
MAX.
CONDITION FUNCTIONALITY
SEASONAL FUNCTIONALITY
OPTIMUM LOW
LOW MEDIUM
GOOD MEDIUM
Solar panel connector
WINTER SPRING
AUTUMNSUMMER
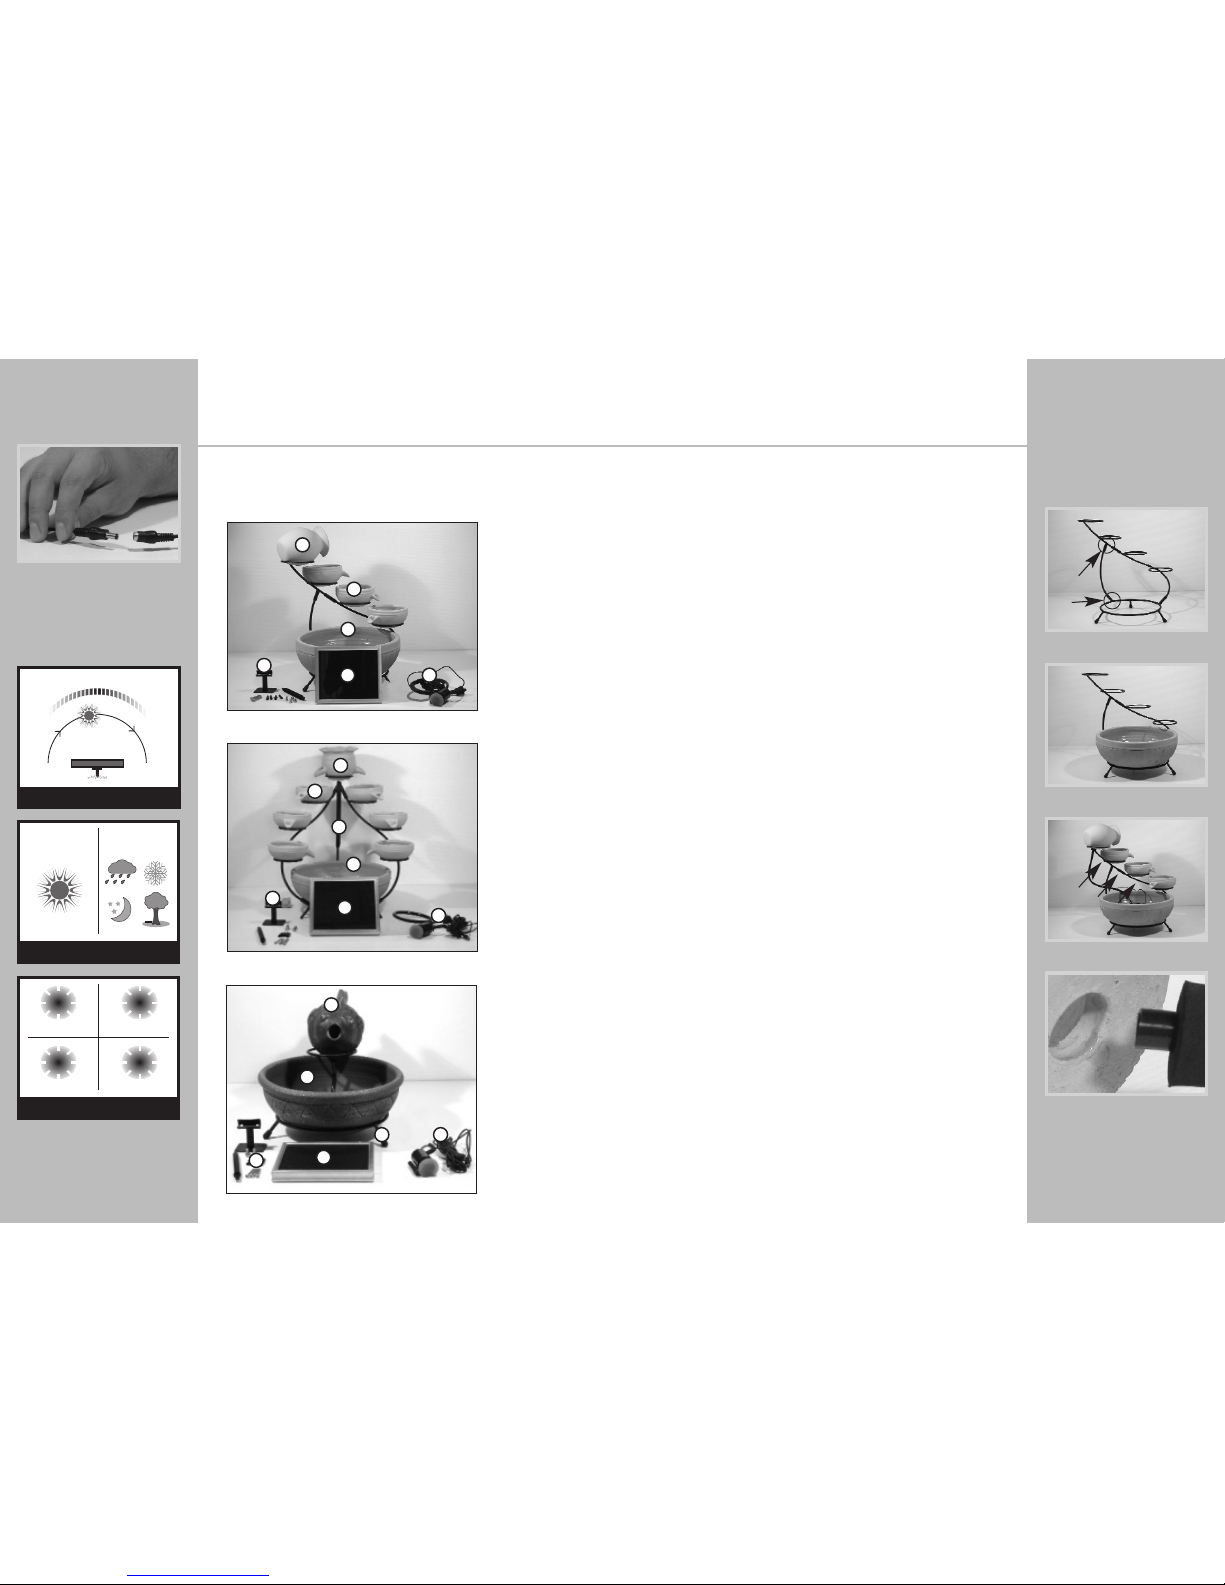
1Solar panel
2Pump with
plastic tube and
plastic straps
3Jug
4Small bowls (3 pcs)
5Main bowl
6 Solar panel
holder set
7 Metal frame
(4 pcs)
8 AC adapter
(not shown)
1Solar panel
2Pump with
plastic tube
3Jug
4Small bowls
(6 pcs)
5Main bowl
6 Solar panel
holder set
7 Metal stand
8 AC adapter
(not shown)
1Solar panel
2Pump
3Fish
4Main bowl
5 Solar panel
holder set
6 Metal stand
7 AC adapter
(not shown)
1
3
4
5
2
6
Stand connects at indicated points
Insert the main bowl into stand
Attach hose where indicated
The hose and the rubber bung fits into
the hole in the bottom of the jug
4. COMPONENTS
12
3
4
5
6
7
1
2
3
4
5
6
SOLAR CASCADE
SOLAR DUO CASCADE
SOLAR FISH
SOLAR CASCADE
SOLAR CASCADE •SOLAR DUO CASCADE •SOLAR FISH
Instruction Manual (ENGLISH)
SOLAR CASCADE •SOLAR DUO CASCADE •SOLAR FISH
Instruction Manual (ENGLISH)
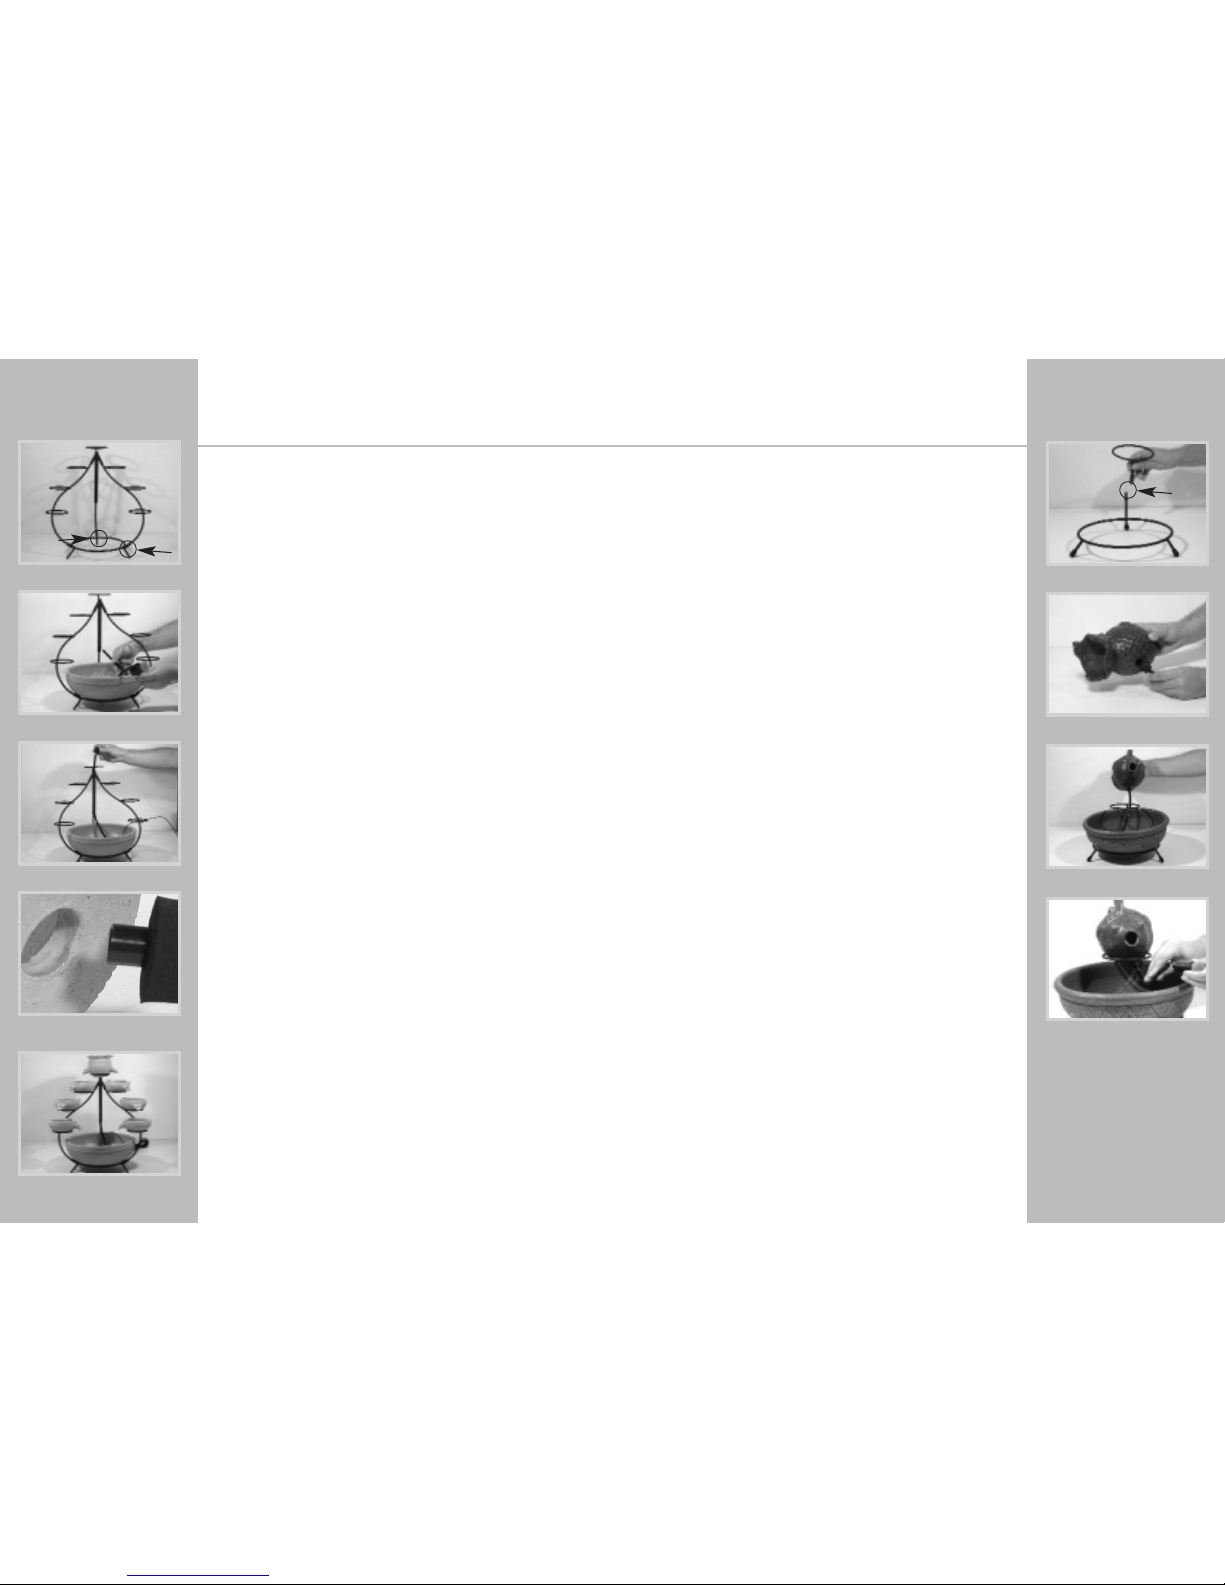
SOLAR DUO CASCADE
Unpack all components carefully.
First assemble the metal stand. There are connection points
as per the diagram on the right. Insert the big bowl first.
Make sure that this is properly followed.
Next insert the six small bowls.
Unroll the pump cable.
Draw the hose through the topmost ring and insert the
self-sealing soft rubber plug into the hole in the jug. Then
place the jug on the topmost ring ensuring correct alignment.
Affix the hose along the metal frame using the provided
plastic straps.
Fill the main bowl with water.
Insert the connector into the rear of the module.
Your fountain is now ready to operate.
Please Note:
The jug and the bowls are made of clay and are fragile.
Decide on a suitable location.
There will be water splashes when the product is in use.
Make sure that the surface on which you are placing the
fountain will not be affected.
We recommend you use filtered, distilled or rain water
to prevent scale building up.
On first use, there may be air in the pump.
It can take up to 5 minutes until the air escapes.
SOLAR FISH
Unpack all components carefully.
First assemble the metal stand. Then insert the main bowl.
Make sure that it is correctly aligned.
Insert the self-sealing soft rubber plug with the pump attached
into the hole of the fish. Then place the fish on the upper ring
ensuring correct alignment.
Unroll the pump cable.
Fill the main bowl with water.
Insert the connector into the rear of the module.
Your fountain is now ready to operate.
Please Note:
The fish and the main bowl are made of clay and are fragile.
Decide on a suitable location.
There will be water splashes when the product is in use.
Make sure that the surface on which you are placing the
fountain will not be affected.
We recommend you use filtered, distilled or rain water
to prevent scale building up.
On first use, there may be air in the pump.
It can take up to 5 minutes until the air escapes.
The hose and the rubber bung fits into
the hole in the bottom of the jug
Stand connects at indicated points
Draw the hole through the metal tube
Draw the hole through the soft rubber
Insert the small bowls
SOLAR DUO CASCADE SOLAR FISH
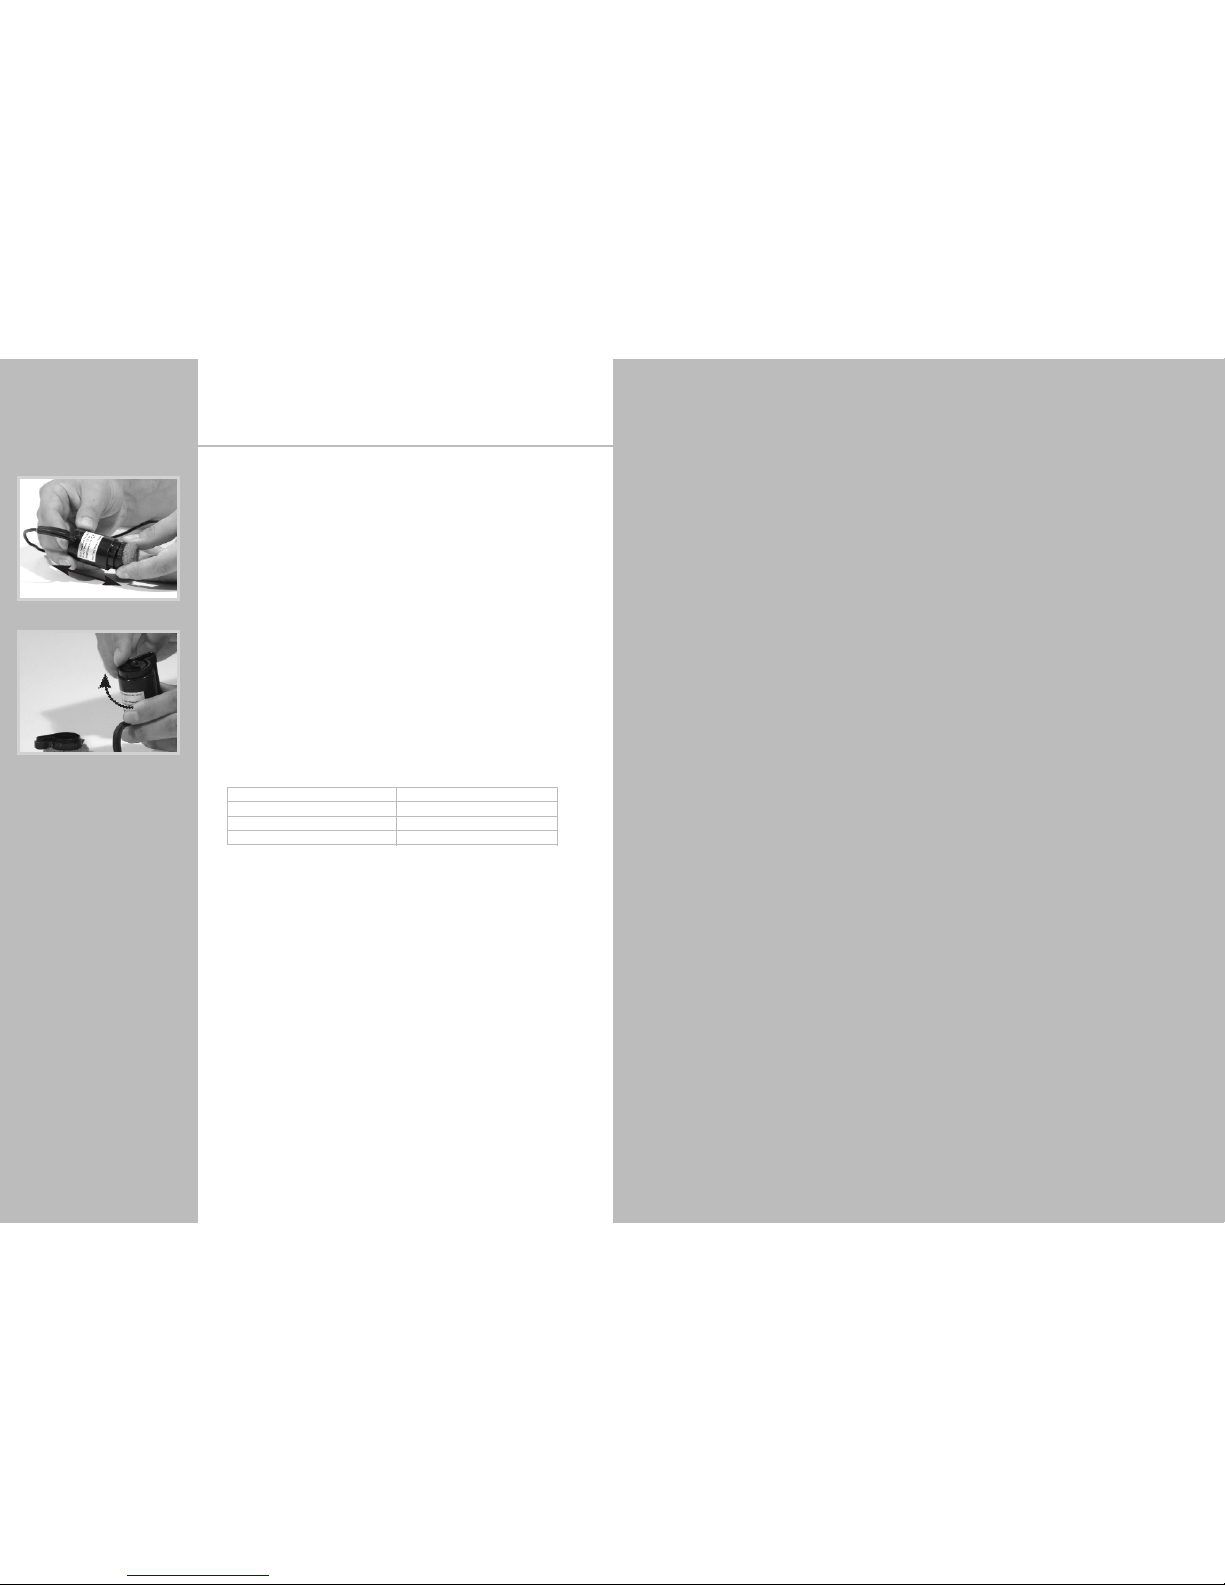
6. CLEANING AND MAINTENANCE
If after time the pump starts to lose power or stops working you
should check for the build up of sediment or scale in the bottom
of the pump housing. Carefully remove the pump from the hose.
Open the pump housing at its base. Remove the impeller. Remove
any dirt or scale, which has built up and close the case back up.
Carefully reattach the pump to the hose.
The Solar module should only be cleaned with soft tissue and any
mild glass cleaning solution.
Stand connects at indicated points
Insert rubber bung into the hole
Position urn onto upper stand
Attach hose to pump
SOLAR CASCADE •SOLAR DUO CASCADE •SOLAR FISH
Instruction Manual (ENGLISH)
7. TROUBLESHOOTING
Pump does not operate even though the solar module
is in full sunlight.
1) No connection to the solar module - Check the connection to
the solar module.
2) Impeller is blocked - Clean the pump.
Pump does operate but there is no water running
through the hose.
Check for the build up of sediment or scale in the hose or the
filter. Clean the hose and filter.
• Make sure pump is completely submerged in water.
Disconnect pump from panel, wait 3 seconds and re-connect.
• Disconnect pump from panel and plug into AC adapter.
• Connect AC adapter to wall outlet. Pump should operate.
If it does, unplug from AC adapter and reconnect to solar panel.
• If the pump does not operate under the AC mode, then the
pump needs to be replaced.
8. TECHNICAL DATA
Operation voltage: 6.0 V
Solar module: 7.5 V / 1.5 W
Pump performance: max. 75 gph
Cable: 32 ft.
Important: In winter, STI Solar fountains must be stored in a dry
and frost-proof environment. The pump must never be operated
dry (out of water). Dry operation permanently damages the pump.
9. SPARE PARTS
Solar panel: Item No. SP-600
Pump with plastic tube: Item No. SCP600
For ceramic parts, please call for availability.
10. 2 YEAR WARRANTY
If at any time within 24 months from the date of purchase this
product fails due to a defect in materials or workmanship, STI will
replace or repair it free of charge. Please be sure to register your
product within 7 days of purchase at www.zablp.com/registration.
The warranty does not apply to:
Pump burnout due to excessive use under AC mode. Damage
caused by accidents, abuse, poor handling, frost or normal wear
and tear. Products which have been subject to unauthorized
repair or modification.
For further information please contact your nearest service center
detailed on the last page of this instruction manual.
Remove pump base
Clear impeller

© 2005 STI Group Inc.
For further information, including parts, warranty repair
or general inquiries, please contact the STI Group at:
Please register your product online at our website:
www.zablp.com/registration
Corporate Office
Tel: 847.918.8558
Address: 1203 Loyola Drive •Libertyville, IL 60048
Email: [email protected]
Website: www.zablp.com
STI Group Locations:
CHICAGO LOS ANGELES ATLANTA SHENZHEN, CHINA
This manual suits for next models
2
Table of contents
Popular Outdoor Furnishing manuals by other brands

Forever Redwood
Forever Redwood Arched Open Sky Pergolas Assembly instructions

Sunjoy
Sunjoy L-OF087PST-B Assembly instructions

Walker Edison
Walker Edison BT40TB Assembly instructions

Accentrics Home
Accentrics Home DS-D475-700-1 Assembly instructions

Country Living
Country Living D71 M80786 owner's manual

PHI VILLA
PHI VILLA THD-PV-350 Use and care guide


Naterial
Naterial LUMA 2024R09P01-0198 instruction manual

ULAX FURNITURE
ULAX FURNITURE 970396 quick start guide

domi outdoor living
domi outdoor living LGMF1596 Assembly manual

MAISONS DU MONDE
MAISONS DU MONDE TILLANDSIA manual

sweeek.
sweeek. MARBELLA6 ECLOUNGETXX2 manual

CASARIA
CASARIA Deuba 992855 instructions