Stiltz Lifton Trio User manual
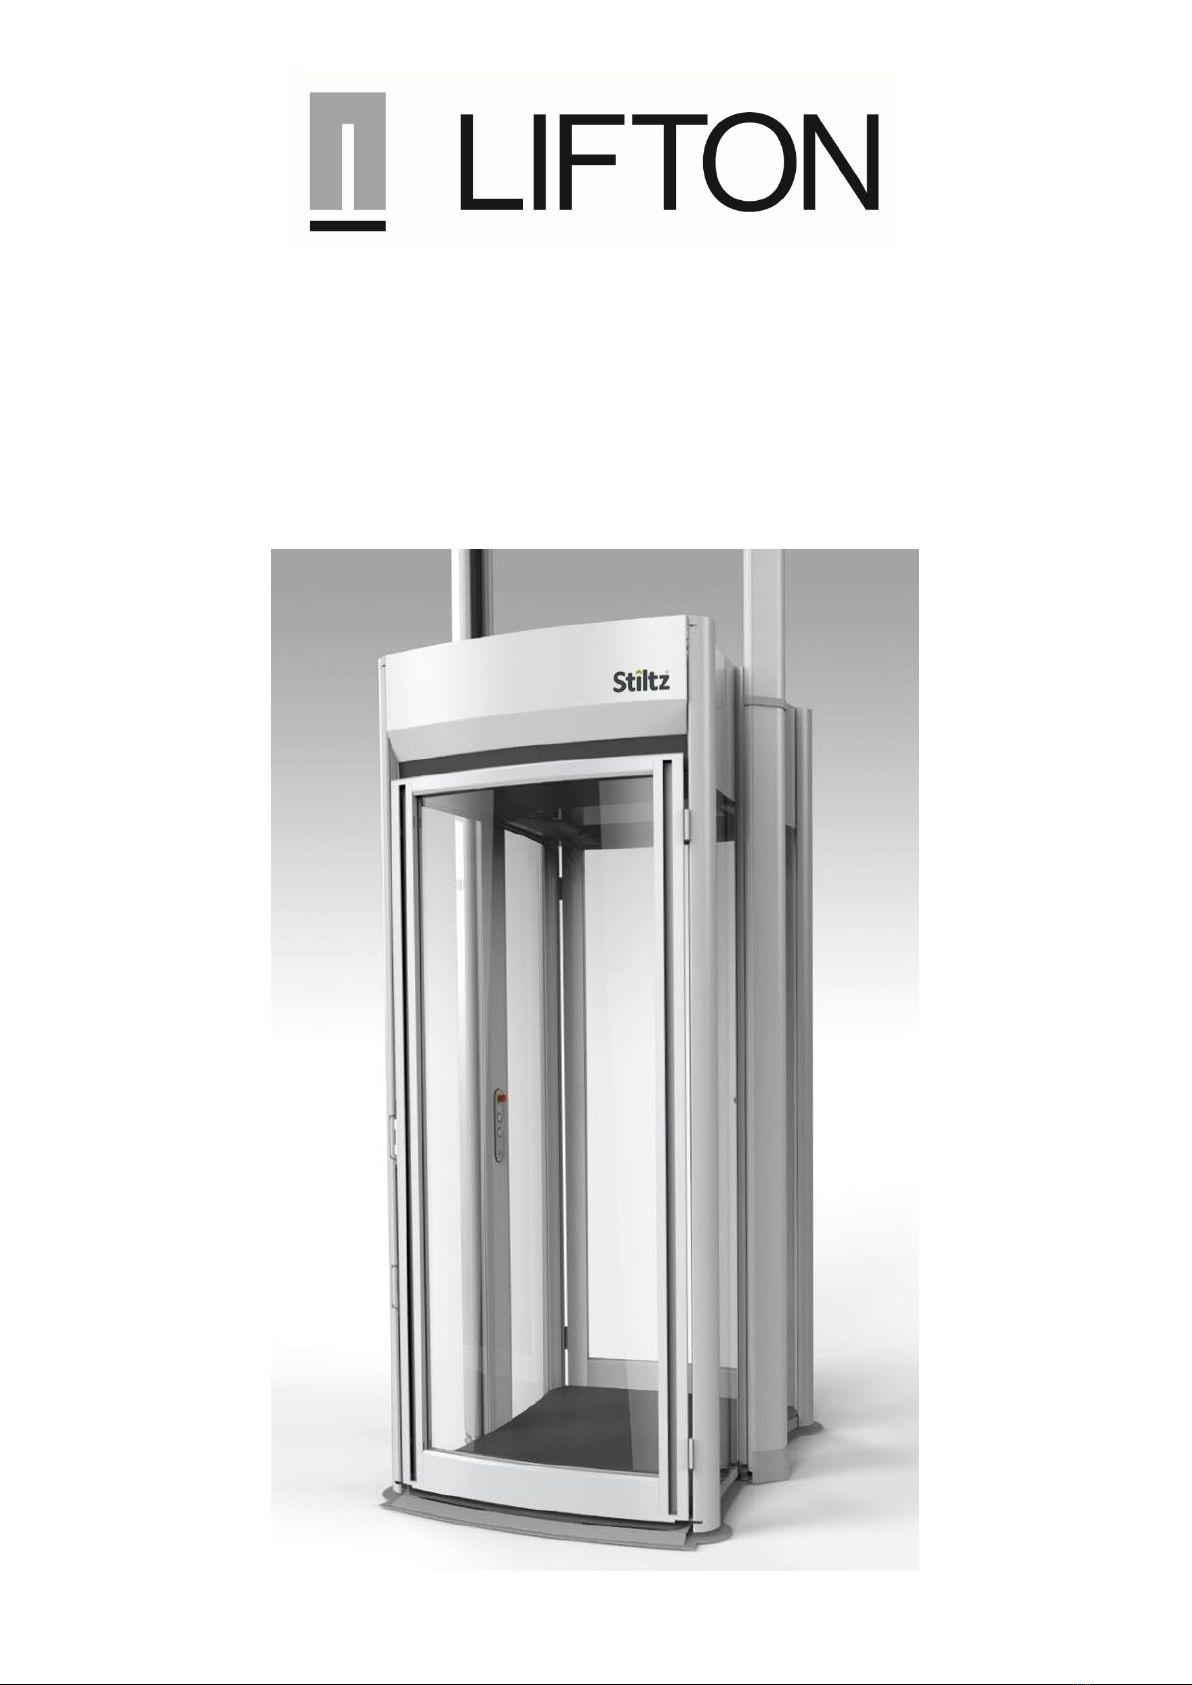
Lifton Trio User Manual (U.S.)
2018.07.20
v.2

User Manual (U.S.)
2018.07.20
v.2
Page |2
*Note: Images in the Lifton Trio User Manual, may depict the Duo or Trio. Many parts are universal with the exception to the Footprint and Lift Cab Size/Shape.
VERSION NOTES
Version
Date
Notes
v.1
2018.01.22
•New
v.2
2018.07.20
•Load capacity increased from 220kg (485lb); Supply voltage clarified to 220 –240V

User Manual (U.S.)
2018.07.20
v.2
Page |3
*Note: Images in the Lifton Trio User Manual, may depict the Duo or Trio. Many parts are universal with the exception to the Footprint and Lift Cab Size/Shape.
TABLE OF CONTENTS
SECTION 1 INTRODUCTION . . . . . . . . . . . . . . . . . . . . . . . . . . . . . . . . . . . . . . . . . . . . . . . . . . . . . . . . . . . . . . . . . . . 04
SECTION 2 ENSURE SAFE OPERATION . . . . . . . . . . . . . . . . . . . . . . . . . . . . . . . . . . . . . . . . . . . . . . . . . . . . . . . . . . . . 04
SECTION 3 LIFTON HANDOVER CHECKLIST . . . . . . . . . . . . . . . . . . . . . . . . . . . . . . . . . . . . . . . . . . . . . . . . . . . . . 05
SECTION 4 DESCRIPTION . . . . . . . . . . . . . . . . . . . . . . . . . . . . . . . . . . . . . . . . . . . . . . . . . . . . . . . . . . . . . . . . . . . 06
SECTION 5 TECHNICAL SPECIFICATIONS . . . . . . . . . . . . . . . . . . . . . . . . . . . . . . . . . . . . . . . . . . . . . . . . . . . . . . . . . . . . 07
SECTION 6 FOOTPRINTS . . . . . . . . . . . . . . . . . . . . . . . . . . . . . . . . . . . . . . . . . . . . . . . . . . . . . . . . . . . . . . . . . . . 08
SECTION 7 OPERATION . . . . . . . . . . . . . . . . . . . . . . . . . . . . . . . . . . . . . . . . . . . . . . . . . . . . . . . . . . . . . . . . . . . . . . . . . . 09
7.1. Operating Controls . . . . . . . . . . . . . . . . . . . . . . . . . . . . . . . . . . . . . . . . . . . . . . . . . . . . . . . . . . . . . . . . . . . 09
7.2. C.O.P. Function Lights . . . . . . . . . . . . . . . . . . . . . . . . . . . . . . . . . . . . . . . . . . . . . . . . . . . . . . . . . . . . . 10
SECTION 8 SAFETY FEATURES . . . . . . . . . . . . . . . . . . . . . . . . . . . . . . . . . . . . . . . . . . . . . . . . . . . . . . . . . . . . . . . . . . . . 11
8.1. Safety Pan and Floor Plug Sensors . . . . . . . . . . . . . . . . . . . . . . . . . . . . . . . . . . . . . . . . . . . . . . . . . . . . . . 11
8.2. Door Lock and Open-Door Sensor . . . . . . . . . . . . . . . . . . . . . . . . . . . . . . . . . . . . . . . . . . . . . . . . . . . . . . 11
8.3. Additional Safety Sensors . . . . . . . . . . . . . . . . . . . . . . . . . . . . . . . . . . . . . . . . . . . . . . . . . . . . . . . . . . . . . 11
8.4. Safety Brake . . . . . . . . . . . . . . . . . . . . . . . . . . . . . . . . . . . . . . . . . . . . . . . . . . . . . . . . . . . . . . . . . . . . 12
8.5. Battery Lowering System . . . . . . . . . . . . . . . . . . . . . . . . . . . . . . . . . . . . . . . . . . . . . . . . . . . . . . . . . . . . . 12
8.6. Emergency Evacuation Procedure . . . . . . . . . . . . . . . . . . . . . . . . . . . . . . . . . . . . . . . . . . . . . . . . . . . . . . 12
8.7. Cleaning . . . . . . . . . . . . . . . . . . . . . . . . . . . . . . . . . . . . . . . . . . . . . . . . . . . . . . . . . . . . . . . . . . . . . . . . . . 13
SECTION 9 TROUBLESHOOTING . . . . . . . . . . . . . . . . . . . . . . . . . . . . . . . . . . . . . . . . . . . . . . . . . . . . . . . . . . . . . . . . . . . . 14
SECTION 10 WARRANTY. . . . . . . . . . . . . . . . . . . . . . . . . . . . . . . . . . . . . . . . . . . . . . . . . . . . . . . . . . . . . . . . . . . . . . . . . . . 17

User Manual (U.S.)
2018.07.20
v.2
Page |4
*Note: Images in the Lifton Trio User Manual, may depict the Duo or Trio. Many parts are universal with the exception to the Footprint and Lift Cab Size/Shape.
SECTION 1 INTRODUCTION
Thank you for purchasing the Lifton Trio home lift. We are confident that this lift will make your life easier, safer and
more comfortable. The Lifton Trio home lift is a domestic personal home lift that complies with Machinery Directive
2006/42/EC and AS 1735.15. To ensure continued satisfaction with your Lifton Trio, please always follow these
instructions: -
•Read this user manual carefully before using your Lifton Trio home lift. This will help ensure safe, easy and
correct operation of the lift.
•In the event of malfunction, please refer to the “Troubleshooting” section first. Potential failure may be caused
by the lift's safety devices. It is very likely that you can correct these issues quickly and easily yourself. Please
contact your Authorized Lifton Dealer or contact Lifton directly.
•Even a solidly-built and technically low-maintenance lift such as the Lifton Trio home lift should be maintained
on a regular basis; once a year is ideal. This maintenance ensures continued safety and increases the long-
term reliability of the lift.
•We strongly recommend that you have all service and maintenance work to your Lifton Trio, carried out by an
authorized Lifton service technician.
•You should never use the lift in the event of a fire.
If you have any questions not covered in the User Manual, please contact your Authorized Lifton Dealer or contact
Lifton directly. Our contact information is outlined at the end of this User Manual.
SECTION 2 ENSURE SAFE OPERATION
The Lifton Trio home lift has been equipped with several safety and emergency features to ensure safe usage always.
Nevertheless, it is essential that the lift is operated in accordance with the user manual to ensure that no accidents
occur.
1. The lift is motorized with moving parts. Only those who have been shown how to operate it and who
understand that they are responsible for starting, travelling in and stopping the lift safely –and have been
cautioned on the potential hazards –should operate it.
2. The lift is not a toy. Childrenunder 14 years old should not be permitted to play with, or inside, the lift. Children
should only operate the lift if under adult supervision and only use it for its intended purpose.
3. Much like a stair case, this lift can pose a risk to small children when on the upper floor, without adult
supervision. When the lift is called from the lower floor while a small child is on the upper floor, the child could
potentially crawl into the partially lowered lift (if the lift has the half door option fitted). The safety light
barriers stop the lift ride as soon as there is an obstruction detected in the entrance area. However, that
system does not protect a child from potentially falling into the partially lowered lift. It is the user’s
responsibility to ensure that such a situation does not occur.
4. As the Owner, you are responsible for ensuring that regular service and inspections occur in a timely manner.
5. Upon completion of the installation, the dealer or installer must run through the Lifton Handover Checklist.

User Manual (U.S.)
2018.07.20
v.2
Page |5
*Note: Images in the Lifton Trio User Manual, may depict the Duo or Trio. Many parts are universal with the exception to the Footprint and Lift Cab Size/Shape.
LIFTON HANDOVER CHECKLIST
Date:
. . . . . / . . . . . / . . . . . . . . . .
Time:
. . . . . . . . . . . .
Customer:
. . . . . . . . . . . . . . . . . . . . . . . . . . . . . . . . . . . . . . . . . . . .
Address:
. . . . . . . . . . . . . . . . . . . . . . . . . . . . . . . . . . . . . . . . . . . .
Serial #:
. . . . . . . . . . . . . . . . . . . . . . . . . . . . . . . . . . . . . . . . . . . .
Installers/dealers:
. . . . . . . . . . . . . . . . . . . . . . . . . . . . . . . . . . . . . . . . . . . .
. . . . . . . . . . . . . . . . . . . . . . . . . . . . . . . . . . . . . . . . . . . .
Explanation of the Stiltz Home Lift
Check (tick)
1. Calling |Sending the Lift:
a. Remote transmitter controls
b. Constant pressure
c. Cab lights illuminate with call or send signal
☐
☐
☐
2. Entering |Exiting the Lift:
a. Cab door |Barrier
b. Door latch must contact strike tongue
c. Full height light curtains
d. Cab lights illuminate when light curtain broken
e. Demonstrated at each floor
☐
☐
☐
☐
☐
3. Lift Controls:
a. On/off key switch |Reset
b. Directional control buttons
c. C.O.P. function lights
d. Emergency stop button |Reset
☐
☐
☐
☐
4. Riding the Lift:
a. Standing |Sitting
b. Carrying goods
c. Light curtains
d. Roped drum system, rope revolution feeling
☐
☐
☐
☐
5. Lift Safeties:
a. Safety pan
b. Shaft lid
c. Overload switch and capacity
d. Slack rope switch (explanation)
e. Battery lowering
f. Emergency door release
☐
☐
☐
☐
☐
☐
6. Keys Issued:
a. Car operating panel (C.O.P.)
b. Door release key
☐
☐
7. User Acceptance:
a. End user understands lifts operation and safeties
b. End user accepts lift installation as complete
☐
☐
8. User Manual:
a. Handover checklist complete and signed
b. User manual handed over to end user
☐
☐
Dealer |Installer Signature
. . . . . . . . . . . . . . . . . . . . . . . . . . . . . . . . . . . . . . . .
Date
. . . . . / . . . . . / . . . . . . . . . .
Customer Signature
. . . . . . . . . . . . . . . . . . . . . . . . . . . . . . . . . . . . . . . .
Date
. . . . . / . . . . . / . . . . . . . . . .

User Manual (U.S.)
2018.07.20
v.2
Page |7
*Note: Images in the Lifton Trio User Manual, may depict the Duo or Trio. Many parts are universal with the exception to the Footprint and Lift Cab Size/Shape.
SECTION 5 TECHNICAL SPECIFICATIONS
The Lifton Trio home lift is classified as a non-automatic lift. The user must apply constant pressure to the ‘up’ or
‘down’ buttons to operator the lift. The lift must be activated by means of the internal control or the remote control
to make it move between each floor. The lift will automatically stop at the destination floor.
Drive Type:
Roped drum, braked gear motor drive
Maximum Speed:
150mm (5 15∕16”) / second
Maximum Load:
230kg |36st |500lb (3 persons standing or 1 person sitting)
Maximum Travel:
Up to 4000mm (157 1∕2”) |2 Levels
Configuration:
Single entrance |Double entry (Thru Cab)
Door Specification:
Full height |1915mm (75 3∕8”) |Reversible right-hand or left-hand swing
Entrance Security:
Light curtain
Operation:
Hold-to-run controls
Landing Call Stations:
2x Wireless remote-controls (3x AAA batteries each) |Remote cradle for each floor
Power Supply:
220 –240V single phase |15 amp
Battery Backup:
Lift can be lowered to the ground floor in the event of a power failure
Additional Features:
Corded telephone connected to fixed landline (by others)
Handrail
Emergency lighting and alarm included
Immediate stop upon release of controls
Load sensitive top plate above lift
Obstruction sensor pad at base of lift cab
Lighting Type:
Ceiling LED strip lighting |Cab floor foot LED lights
Installation:
Typical installation takes two days
Structure:
Not required |Lift is fully self-supported on its own guide rails through aperture
Hoist Enclosure:
Not required |Lift is fully self-contained
Compliance:
ASME A17.7-2007 |CSA B44.7-07 |Machinery Directive 2006/42/EC | AS 1735.15
Options Available:
Half height door
Cell phone
Perch seat


User Manual (U.S.)
2018.07.20
v.2
Page |9
*Note: Images in the Lifton Trio User Manual, may depict the Duo or Trio. Many parts are universal with the exception to the Footprint and Lift Cab Size/Shape.
SECTION 7 OPERATION
7.1. Operating Controls
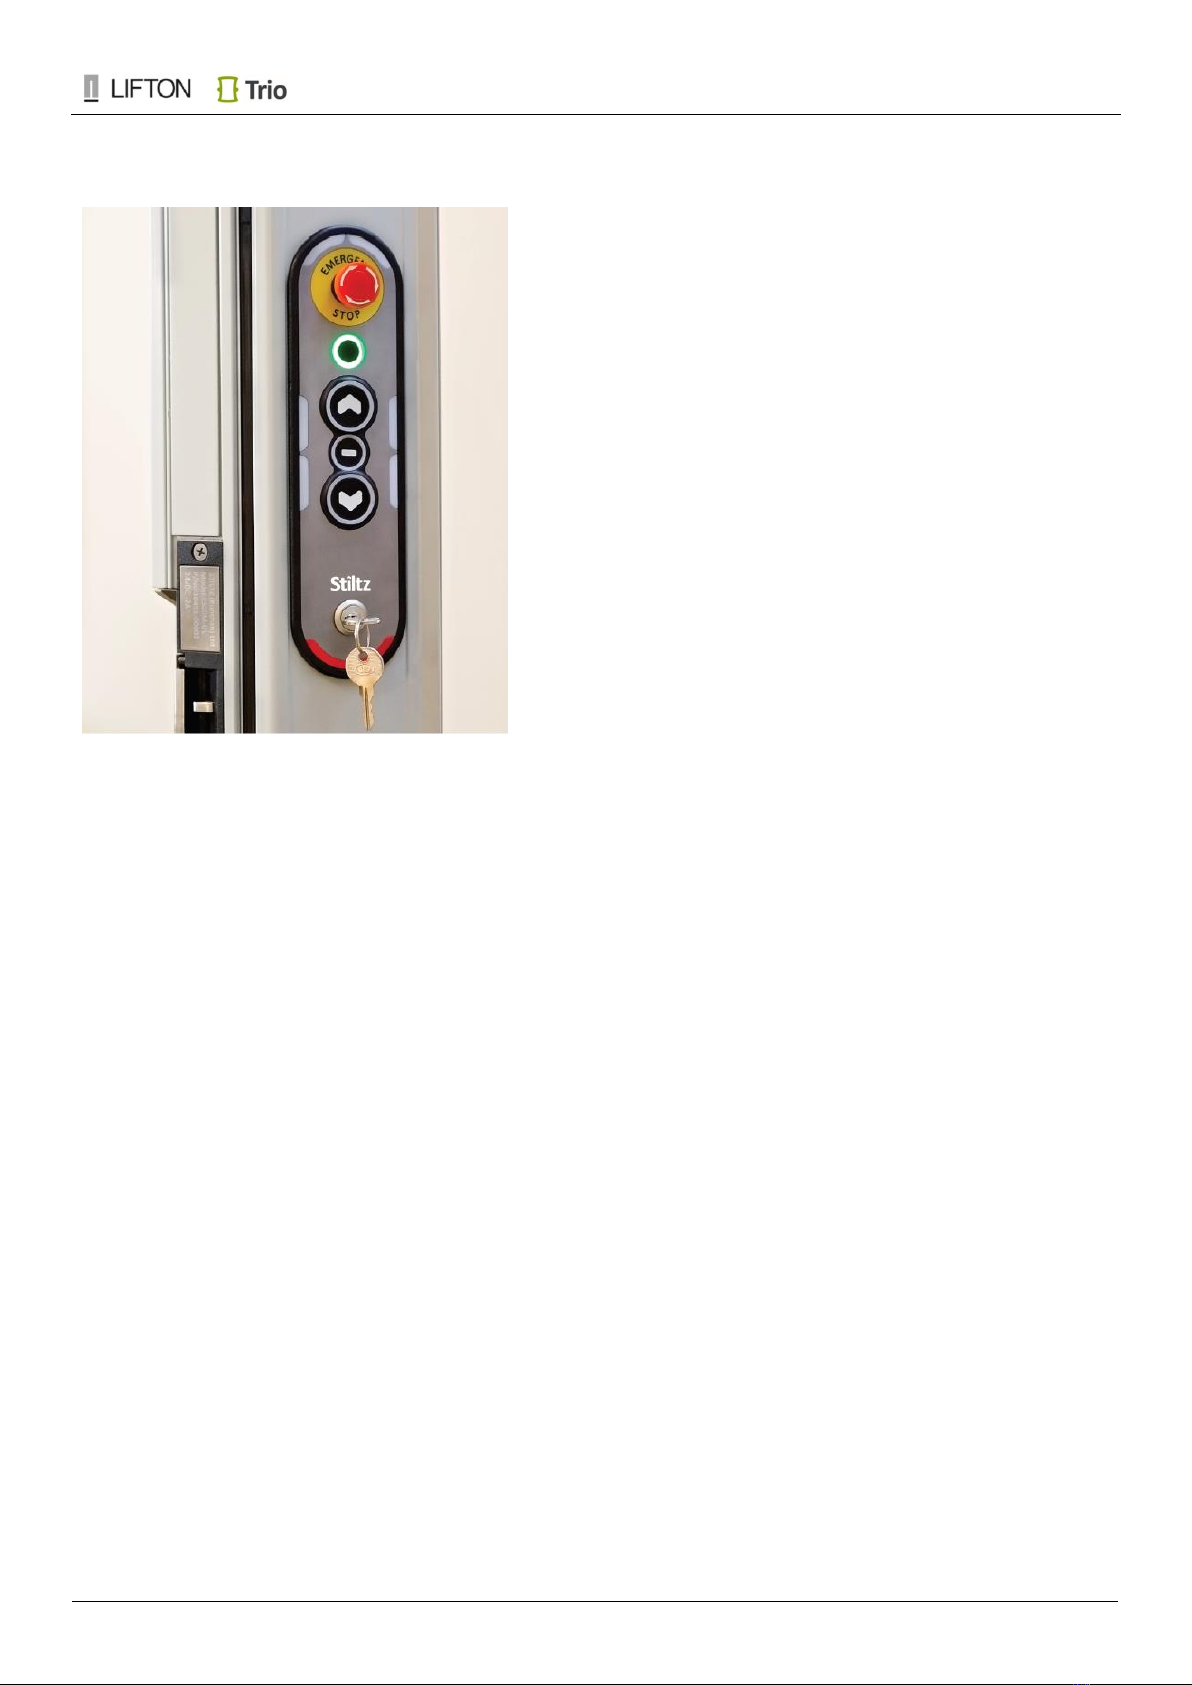
Travelling in the Lift
1. When entering the lift, the lights come on automatically. Stand
(or sit) in the lift facing the opening.
2. Close the door and make sure that you are not obstructing the
safety light curtain across the lift entrance. If obstructed, the lift
will not travel, and a buzzing sound will indicate continued
obstruction of the safety light curtain. If you are in the entrance
area, there will also be a white light illuminated
indicating a light curtain obstruction.
3. If the load is greater than specified for this lift (230kg or 500lb)
the overload light will be illuminated. The lift will not move until
the weight is reduced.
4. Ensure any passengers or items travelling with you are fully
contained within lift car.
5. Select the desired direction (see image of control panel on
page 10). Depress and hold the appropriate button for travelling
up or down. The lift will move while the button is depressed.
6. Hold the button down until the lift stops at its destination.
7. If you see an unsafe situation, release the button and either
wait until it is safe to continue or return to the floor from which
you came.
Calling the Lift
You can position the two remote controls anywhere around your
home and these allow you to control the lift, and to call it
when it's parked on the other level. The remote control can be
used to move the lift to the desired floor.
1. If possible, first check to make sure that nobody is inside the
lift trying to operate it from within.
2. Press the call button on the remote control and keep it pressed
until the lift has come to a stop on the desired floor. Please note:
you can stop the lift at any time by releasing the button.
3. If the lift encounters obstruction when being called either up
or down, it will stop. If this occurs, reverse the direction the lift
is travelling in and return it to the starting point. Clear the
obstruction, and as soon as the obstacle has been removed from
the operation area, the lift will continue its journey.

User Manual (U.S.)
2018.07.20
v.2
Page |11
*Note: Images in the Lifton Trio User Manual, may depict the Duo or Trio. Many parts are universal with the exception to the Footprint and Lift Cab Size/Shape.
SECTION 8 SAFETY FEATURES
The numerous safety features have been designed to ensure safe and comfortable lift travel. They prevent –or stop –
the lift from moving in case of a malfunction or in the event of an object or person blocking the operating radius.
In order to guarantee this and to protect the lift against potential failure, all safety features must be activated before
operating the lift.
It is important that you are familiar with all safety features.
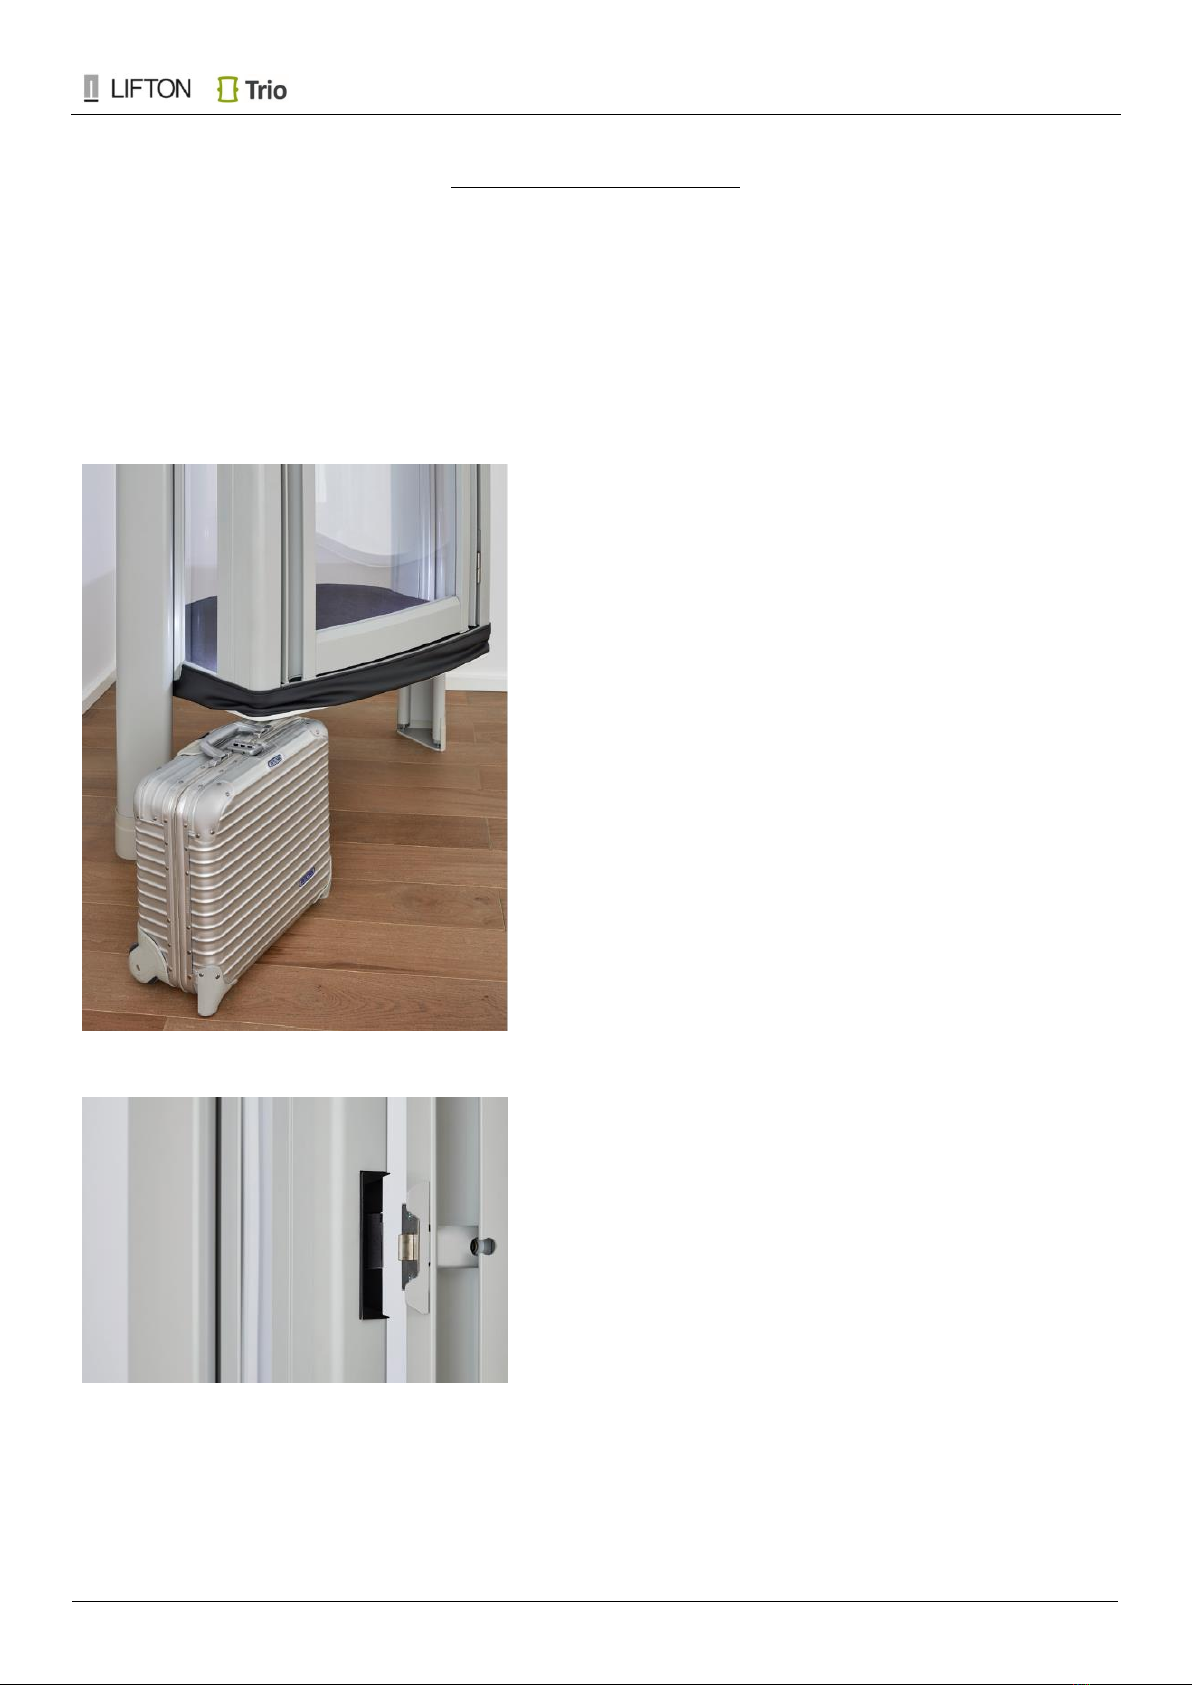
8.1. Safety Pan and Floor Plug Sensors
There are safety sensors in the Lift Car floor and Lift Car roof
which will stop the lift immediately if it comes into contact with
any obstacle. The lift can then only proceed in the opposite
direction. The journey can be continued as soon as the
obstruction has been cleared.
8.2. Door Lock and Open-Door Sensor
The door's locking mechanism ensures that the Lift Car door stays
closed while the lift is moving. Sensors check - even before
moving –whether the door has been closed. A key for the lift
door is provided to open the safety catch and let passengers exit
in an emergency situation.
All lifts are equipped with a light curtain. This safety light curtain
creates a barrier across the entrance of the lift and either
prevents, or stops, the lift from moving further if there is an
obstruction blocking the safety light curtain. To notify the user
that the safety light curtain is obstructed, a white warning light
will be illuminated on the control panel inside the cabin.
User Manual (U.S.)
2018.07.20
v.2
Page |12
*Note: Images in the Lifton Trio User Manual, may depict the Duo or Trio. Many parts are universal with the exception to the Footprint and Lift Cab Size/Shape.
8.3. Additional Safety Sensors
Balance sensors will stop the Lift Car if a problem exists with
either of the lift ropes.
Overload sensors will determine whether the lift is overloaded
prior to moving. To notify the user that the lift is overloaded, the
related area on the control panel inside the cabin will flash. (See
page 10).
The Slack Rope sensor detects if the lift ropes are slack and will
prevent the lift car from attempting to travel any further. In the
unlikely event that the regular limit switches should fail, there are
auxiliary switches located above and beneath the Lift Car. If those
should fail at the same time, there are further back up switches
that will stop the lift in an emergency. Once those emergency
stops are activated, the lift will stop until the incident has been
investigated by a service technician, and the problem has been
corrected.
The lift is equipped with an emergency stop button. Pressing the
red emergency stop button while travelling in the lift will stop the
lift immediately and trigger the alarm. Therefore, this button
should only be used in extreme situations; such as the lift failing
to stop when the control button is released. The emergency
system must be reset once the cause of the incident has been
resolved. A key switch prevents operation while the lift is in “off”
mode. This switch also resets the controls after an emergency
stop.
8.4. Safety Brake
In the event of any rope related issues, an integrated brake system will stop the lift. The safety brake stops the lift
immediately in the unlikely event of a hoist rope failure. If any of these safety features are activated, they must be
disengaged and reset by a Lifton service technician.
8.5. Battery Lowering System
In the event of a power failure occurring whilst the lift is in operation, the lift is fitted with an emergency power supply
and emergency lights that come on automatically. The lift can be moved to the lower floor on emergency power by
using the normal lift controls. The raise control is then ineffective. All safety features also remain fully operational
during lowering on emergency power.
Note; the main power switch in the ceiling of the lift must not be turned off with the intention to save electricity. The
lift only draws electricity like a kitchen appliance. Turning the main power switch off will activate the battery back-up
system and drain the battery if used unnecessarily. A flat battery will prevent operation of the lift.
8.6. Emergency Evacuation Procedure
8.6.1. When main power is lost, during travel, after a short delay the lift cab lights in the ceiling will illuminate.
8.6.2. If the emergency stop button is used, the C.O.P. will need to be reset before the lift can be moved
downwards.
8.6.3. Turn ‘off’ the emergency stop button by twisting the button (it will pop outwards), to eliminate horn.

User Manual (U.S.)
2018.07.20
v.2
Page |13
*Note: Images in the Lifton Trio User Manual, may depict the Duo or Trio. Many parts are universal with the exception to the Footprint and Lift Cab Size/Shape.
8.6.4. Reset the C.O.P. by turning the key ‘off’ then back ‘on’. After the emergency stop button has been
activated, and turned ‘off’, the C.O.P. must be reset before the lift will move even on battery backup.
8.6.5. The battery back-up system will activate automatically and permit the lift will to descend only. The lift will
not automatically descend the user must control the movement of the lift always.
8.6.6. When the lift reaches, the lowest level served, the lift cab door should automatically release allowing the
occupant to exit the lift safely.
Important; step 8.6.7. only to be carried out by a Lifton trained technician.
8.6.7. If the lift cab does not move downwards due to a safety circuit breach or the door does not automatically
release at the ground floor or mid-way. Insert the triangular door release key into the lift cab door latch
from the outside face, twist the key and the door latch will release allowing the door to open. When the
latch is released, and still within the strike housing, the lift cab door can be lifted off the hinges.
8.7. Cleaning
Important; only use soapy water to clean polycarbonate/plexiglass. Do not use products including (but not limited to)
ammonia, alcohol, solvents, acetone, glass cleaners –these will cause the polycarbonate/plexiglass to go cloudy.
8.7.1. Use a soft or microfiber cloth to clean all dust from the lift cab, and guide rails. Then, use soapy water only to
clean any polycarbonate/plexiglass i.e. lift cab door or Vista model back panel.
8.7.2. Vacuum the floor carpets and ensure no dust/debris falls inside guide rails, which may conflict with gripper
rods/plates.

User Manual (U.S.)
2018.07.20
v.2
Page |14
*Note: Images in the Lifton Trio User Manual, may depict the Duo or Trio. Many parts are universal with the exception to the Footprint and Lift Cab Size/Shape.
SECTION 9 TROUBLESHOOTING
Most of the difficulties encountered, are associated with the safety features built into the Lifton Trio home lift. These
features are in place to ensure the safe use and comfort of users of the lift. Below is a trouble shooting guide for all
lifts within the Lifton Range.
Problem
Possible Causes
Solution
1. The lift will not operate.
a. The most common cause is
an obstruction of the light
curtain, which guards the lift
cab entrance. This can easily
be caused by a handbag or
arm. The light curtain (LC)
light will flash.
Clear the obstruction and be
vigilant that there is no
obstruction periodically blocking
the light curtain. To prevent this,
stand closer to the rear wall of
the lift.
b. The cab operating panel
(c.o.p.) key switch has been
switched ‘off’.
Turn the key ‘on’. The ‘on’
position is when the key is in the
horizontal position.
c. The c.o.p. emergency stop
button has been depressed.
The stop button is a safety stop
button that requires turning
clockwise once pressed. Ensure
the button is pressed, then turn
clockwise until the button 'pops'
out. Turn the key switch ‘off’ and
then back to ‘on’ – to reset lift.
d. The lift cab door latch is
making poor contact with
the electric strike tongue.
Move your body position is the
lift cab and try moving again.
Slightly lift and/or slightly
push/pull the lift cab door. Call
your Authorized Lifton Dealer to
arrange a service.
e. The main power, from the
home to the lift is off. This is
easily identified, as the red
main switch indicator lamp,
the in ceiling towards the
rear of the lift, is off.
Emergency battery lowering will
be activated, immediately after
the power outage. The lift will go
downwards from the upper level
to the lower level, if the power
goes out. If the lift is at the lower
level, it will not move upwards
until the power is restored. If the
power is on in the rest of the
house, check the indicator light
on the ceiling of the lift. If this is
off, wait until power is restored.

User Manual (U.S.)
2018.07.20
v.2
Page |15
*Note: Images in the Lifton Trio User Manual, may depict the Duo or Trio. Many parts are universal with the exception to the Footprint and Lift Cab Size/Shape.
Problem
Possible Causes
Solution
f. Someone has tried to
manually lift the lift cab.
Call your Authorized Lifton
Dealer, who installed your Lifton
Trio home lift. The lifting
mechanism may be displaced
and will require resetting. They
will speak to you and ask for
some clarity and will suggest the
best course of action.
g. The lift has passed either of
its lower or upper landing
stopping points.
The door will open, and you can
exit the lift. Call your Authorized
Lifton Dealer to arrange a
service.
2. Both light curtain (LC) and
overload (OL) lights, on the
cab operating panel (c.o.p.),
are flickering and flashing
alternatively.
a. The over-speed sensor has
failed.
Call your Authorized Lifton
Dealer to arrange a service visit
to rectify the issue.
3. Both light curtain (LC) and
overload (OS) lights, on the
cab operating panel (c.o.p.),
are flickering and flashing
alternatively
a. The battery backup system is
activated.
Ensure the main power cable is
connected. Ensure the switch in
the lift cab ceiling is on (glowing
red). Call your Authorized Lifton
Dealer to arrange a service.
4. The lift cab will not operate
from the remote controls.
a. Remote control batteries
may need replacing.
Replace batteries. All lift remote
controls use 3 x AAA batteries.
b. The receiver may not be
receiving the signal from the
remote control.
Move to within 3m (10’) of the
lift. This is the optimum range of
the remote controls.
5. The lift cab will not travel
downwards but will only
travel upwards.
a. There is an obstruction
under the lift cab.
Remove obstruction before
attempting to use the lift.
6. The lift cab will not travel
upwards but only travel
downwards.
a. There is an obstruction
on the shaft lid or the lift
cab ceiling.
Remove obstruction before
attempting to use the lift.
b. The main power is off, and
the lift cab is operating on
the emergency battery.
Wait until the main power is
restored.
c. The safety cover could be
catching on the guides etc. as
it is being lifted.
Safely observe from the upper
floor whether the cover is tilting
instead of coming up level.
7. The lift cab is moving
upwards or downwards
independently.
a. Landing remote controls are
often kept in people’s
pockets, and therefore
pocket controlling if the
button is depressed.
Keep the landing remote controls
at each landing, and not
accidently being depressed. Call
your Authorized Lifton Dealer to
arrange a service.

User Manual (U.S.)
2018.07.20
v.2
Page |16
*Note: Images in the Lifton Trio User Manual, may depict the Duo or Trio. Many parts are universal with the exception to the Footprint and Lift Cab Size/Shape.
Problem
Possible Causes
Solution
8. The downlights in the lift cab
ceiling are dim and the
remote controls work
intermittently or not at all.
a. The lift cab ceiling lights only
time out when parked at the
top and bottom floors. If
between floors the ceiling
lights will drain the battery.
Ensure the lift is parked at the
top and bottom, not mid-travel.
b. The lift battery is running
low.
Call your Authorized Lifton
Dealer to arrange a service.
9. The door will not open.
a. The lift is not at the landing.
Use the c.o.p. buttons or the
remote controls to move the lift
to the correct floor. Ensure the
control button is being pressed
until the lift comes to a complete
stop.
b. The door is hitting the
threshold of the upstairs
floor.
Drive the lift down using the
c.o.p. buttons or remote
controls. Ensure the button is
depressed until the lift comes to
a complete stop.
10. A buzzer is sounding.
a. The stop button is pressed.
Turn the stop butting clockwise
until it 'pops' out towards you.
Reset the lift by turning the key
switch ‘off’and then back ‘on’
again.
b. The backup battery system
has fault.
Call your Authorized Lifton
Dealer to arrange a service.
11. A humming sound from the
relays on the electrical panel.
a. Too much voltage is being
supplied to the electrical
panel.
Check the voltage with a meter,
the 110v step-up transformer
may be set to 230v input not the
required 115v input switch.

User Manual (U.S.)
2018.07.20
v.2
Page |17
*Note: Images in the Lifton Trio User Manual, may depict the Duo or Trio. Many parts are universal with the exception to the Footprint and Lift Cab Size/Shape.
SECTION 10 WARRANTY
The Lifton home lift is warranted against faulty manufacturing workmanship or materials for a period of 24 months
from the installation by an Authorized Lifton Dealer. The warranty period commences four weeks after the shipping
date from the manufacturer and is connected to the lift and initial installation address, transferable to new home
owners. Removing and relocating the lift will void the warranty unless it is for the original owner and carried out by an
Authorized Lifton Dealer.
Lifton or the Authorized Lifton Dealer will provide:
•All equipment associated with the Lifton home lift including; guide rails; gripper rods; lift cab; hoist unit
(electrical control and mechanical drive equipment); and safety equipment i.e. safety covers top and bottom.
•Installation drawings.
•Emergency battery backup for lighting and lowering of the Lifton home lift in the event of power failure.
Client, builder or general contractor provides:
•Floor aperture per the Lifton floor template and shaft lid or landing gate/hoistway door if required.
•Power, per the position provided in the specification and clear access during the installation.
•All patching, painting and finishing of the surrounding building areas.
The warranty does not cover accidental, deliberate and cosmetic damage or damage caused by the end users failure
to follow safety or user directions or reasonable wear and tear or follow routine maintenance schedule.
All installation and maintenance must be carried out by an Authorized Lifton Dealer or Lifton service technician. Any
attempt to repair or move the product from its installed location by anyone will void the warranty.
The removal or modification of any parts or panels in any way altering the use of the Lifton home lift outside the
intended or designed purpose will void the warranty.
Battery or step-up transformer (if provided) failure is not covered by this warranty. Note; turning off the main switch
in the lift cab ceiling or circuit breaker or disconnecting the wall socket will engage the battery backup system. This
will drain the charge from the battery preventing access to the battery backup system (when needed).
Please note. If any post installation construction or painting work is carried out around the lift, it is essential that
the lift is wrapped in dust proof coverings. For example, sheet rock dust can affect the safety gripper rod braking
system, as can wood dust the electrical components and micro limit switches. Failure to protect the unit from post
installation construction work may affect operation and void the warranty.
Any cost of repairs and subsequent works because of actions voiding the warranty and associated with returning the
lift to its fully functional state, will be at the owner’s expense and invoiced at the applicable rate by an Authorized
Lifton Dealer.
For further information regarding this limited warranty, please contact Lifton in writing.
FOR OWNER’S RECORDS
Customer Name:
. . . . . . . . . . . . . . . . . . . . . . . . . . . . . . . . . . . . . . . . . . . . . . . . . . . . .
Installation Address:
. . . . . . . . . . . . . . . . . . . . . . . . . . . . . . . . . . . . . . . . . . . . . . . . . . . . .
Dealer/Installer Name:
. . . . . . . . . . . . . . . . . . . . . . . . . . . . . . . . . . . . . . . . . . . . . . . . . . . . .
Date Installed:
. . . . . / . . . . . / . . . . . . . . . .
Serial/Job Number:
. . . . . . . . . . . . . . . . . . . . . . . . . . . . . . . . . . . . . . . . . . . . . . . . . . . . .

User Manual (U.S.)
2018.07.20
v.2
Page |18
*Note: Images in the Lifton Trio User Manual, may depict the Duo or Trio. Many parts are universal with the exception to the Footprint and Lift Cab Size/Shape.
THIS PAGE IS INTENTIONALLY LEFT BLANK

User Manual (U.S.)
2018.07.20
v.2
Page |19
*Note: Images in the Lifton Trio User Manual, may depict the Duo or Trio. Many parts are universal with the exception to the Footprint and Lift Cab Size/Shape.
THIS PAGE IS INTENTIONALLY LEFT BLANK

User Manual (U.S.)
2018.07.20
v.2
Page |20
*Note: Images in the Lifton Trio User Manual, may depict the Duo or Trio. Many parts are universal with the exception to the Footprint and Lift Cab Size/Shape.
Lifton Team or Authorised Lifton Dealer
LIFTON HOME ELEVATORS
(UNITED KINGDOM)
Building 5, Bay 1
First Avenue
Pensnett Estate
Kingswinford DY6 7TE
Tel: 0808 250 4739
www.lifton.co.uk
LIFTON HOME ELEVATORS
(UNITED STATES)
57 S. Commerce Way,
Unit 300,
Bethlehem, PA 18017
Tel: (610) 419-3200
info@liftonhomelifts.com
www.liftonhomelifts.com
Table of contents
Other Stiltz Mobility Aid manuals


