Stirling STR-PRHGC User manual

AFTER SALES SUPPORT
1300 886 649
AUS MODEL: STR-PRHGC PRODUCT CODE: 10931 09/2019
Model Number STR-PRHGC
Canopy Rangehood
90cm Curved Glass
INSTRUCTION MANUAL

2AFTER SALES SUPPORT
1300 886 649
AUS MODEL: STR-PRHGC PRODUCT CODE: 10931 09/2019
Welcome
Congratulations on choosing to buy a STIRLING®product.
All products brought to you by STIRLING®are manufactured to the highest
standards of performance and safety and, as part of our philosophy of
customer service and satisfaction, are backed by our comprehensive 3 Year
In Home Warranty. We hope you will enjoy using your purchase for many years
to come.

3
AFTER SALES SUPPORT
1300 886 649
AUS MODEL: STR-PRHGC PRODUCT CODE: 10931 09/2019
Contents
02 Welcome
04 Warranty Details
05 General Safety Instructions
08 Product Overview
09 Installation
16 Instructions
17 FAQs & Troubleshooting Guide
18 Other Useful Information
23 Repair and Refurbished Goods or Parts Notice

4AFTER SALES SUPPORT
1300 886 649
AUS MODEL: STR-PRHGC PRODUCT CODE: 10931 09/2019
Canopy Rangehood 90cm Curved Glass
Warranty Details
The product is guaranteed to be free from defects in workmanship and
parts for a period of 36 months from the date of purchase. Defects that
occur within this warranty period, under normal use and care, will be
repaired, replaced or refunded at our discretion. The benets conferred by
this warranty are in addition to all rights and remedies in respect of the
product that the consumer has under the Competition and Consumer Act
2010 and similar state and territory laws.
Our goods come with guarantees that cannot be excluded under the
Australian Consumer Law. You are entitled to a replacement or refund for
a major failure and to compensation for any other reasonably foreseeable
loss or damage. You are also entitled to have the goods repaired or
replaced if the goods fail to be of acceptable quality and the failure does
not amount to a major failure.
REGISTER YOUR PURCHASE AT www.aldi.com.au/en/about-aldi/product-registration/ TO KEEP UP-TO-DATE WITH IMPORTANT PRODUCT INFORMATION

5
AFTER SALES SUPPORT
1300 886 649
AUS MODEL: STR-PRHGC PRODUCT CODE: 10931 09/2019
Important installation precautions
• IMPORTANT! Please ensure that you read the entire instructions before
getting the rangehood professionally installed.
• WARNING: Professional installation only! This rangehood must
be installed by a suitably qualied person in strict accordance with
all instructions in this manual. All electrical work associated with the
installation of this rangehood must be carried out by a licensed electrician in
accordance with local and national electrical codes as applicable.
• Ventilation: As heat, steam and moisture will be created during use of the
appliance, take care to avoid injury and ensure that the room is adequately
ventilated. Additional ventilation may be required if the appliance is going
to be used for prolonged periods of time or at the same time as appliances
burning gas or other fuels. Consult your installer if you are in doubt about the
amount of ventilation required.
• Cables: Do not allow electrical ttings or cables to come into contact with
areas on the associated cooking appliance that gets hot.
• Air discharge: Make sure to follow your local laws that apply to external
air evacuation when installing and using the rangehood. The exhaust air
must not be discharged into a ue which is used for exhausting fumes from
appliances burning gas or other fuels.
• Clearances: This rangehood is designed for installation above a cooking
appliance, at a distance of 650-750mm from the cooking surface. It is not
intended to be installed over a hob having more than four hob elements.
Please refer to pages 9–15 for comprehensive installation instructions.
• WARNING: Installation: Failure to install the screws or xing device in
accordance with the instructions may result in electrical hazards.
IMPORTANT SAFETY INSTRUCTIONS
READ CAREFULLY AND KEEP FOR FUTURE REFERENCE
Read this manual thoroughly before rst use, even if you are familiar with this
type of product. The safety precautions enclosed herein reduce the risk of
re, electric shock and injury when correctly adhered to. Keep the manual in
a safe place for future reference, along with the completed warranty card and
purchase receipt. If you sell or transfer ownership of this product, pass on
these instructions to the new owner.
Always follow basic safety precautions and accident prevention
measures when using an electrical appliance, including the following:
General Safety Instructions (Cont.)

6AFTER SALES SUPPORT
1300 886 649
AUS MODEL: STR-PRHGC PRODUCT CODE: 10931 09/2019
General Safety Instructions (Cont.)
Electrical safety and usage conditions
• Voltage and frequency: Before plugging the unit into an appropriate
electrical outlet, make sure your outlet voltage and circuit frequency
correspond to the voltage stated on the appliance rating label.
• Power cord: Check the cord regularly for damage. Do not use the
appliance if any part is damaged. A damaged cord must be replaced by the
manufacturer or a similarly qualied person in order to avoid a hazard.
• Disconnect: Before cleaning the rangehood, make sure to switch it off and
unplug it from the electrical supply. Do not disconnect the appliance with wet
hands. Grip by the plug, do not pull by the cord when disconnecting.
• Domestic use only: This rangehood is designed for indoor domestic use
only. It should be built above a domestic cooking appliance following the
instructions. It is not intended for commercial, trade or industrial use.
• Intended purpose: Only use this rangehood for its intended purpose, in its
intended environment and as described in this manual. Any other use may
cause re, electric shock or injury. Do not modify the appliance in any way.
• Use common sense: These instructions are not intended to cover every
possible condition and situation. As with any electrical household appliance,
common sense and caution are therefore always recommended when
installing, operating and maintaining the equipment.
• Usage restriction: This rangehood is not intended for use by persons
(including children) with reduced physical, sensory or mental capabilities, or
lack of experience and knowledge, unless they have been given supervision
or instruction concerning use of the appliance by a person responsible for
their safety.
• Children: Supervise children to ensure they do not play with the appliance.
Close supervision is necessary when any appliance is used by or near children.
• No timer: The appliance is not intended to be operated by means of an
external timer or separate remote control system.
• CAUTION! Take care when the rangehood is operating simultaneously with
an open fireplace or burner that depends on air from the environment and
is supplied by other than electrical energy, as the rangehood removes air
from the environment which a burner or replace needs for combustion.
• Ventilation: The rangehood removes air from the environment during use.
Always provide adequate ventilation for safe operation of the rangehood.
This is particularly important when the rangehood is used at the same time
as ued heaters burning gas or other fuels.
• Unattended: Do not leave the rangehood unattended during use.

7
AFTER SALES SUPPORT
1300 886 649
AUS MODEL: STR-PRHGC PRODUCT CODE: 10931 09/2019
General Safety Instructions (Cont.)
• CAUTION! No open flame cooking: Do not use an open ame for cooking
underneath this rangehood; do not ambéunder the rangehood. Open
ames can damage the lters and present a re hazard.
• After use: Always switch off the rangehood after use and before cleaning.
• CAUTION! Accessible parts may become hot when used with cooking
appliances.
• CAUTION! Do not touch the light bulbs after the appliance has been used as
they may be hot. Let them cool down before cleaning and maintenance.
• WARNING: Fire risk! Clean your rangehood regularly as instructed in this
manual. There is a re risk if cleaning is not carried out in accordance with
the instructions.
• Cleaning: The rangehood and its lter should be cleaned regularly to
avoid creating a re hazard. Before cleaning the rangehood or carrying
out maintenance, always switch the power off at the outlet and unplug the
rangehood. Wipe the exterior surfaces with a soft cloth or sponge moistened
with warm water and a little non-abrasive, non-corrosive liquid detergent.
• No steam cleaning: Never use a steam cleaner for cleaning the appliance.
• Filter maintenance: The grease bafe lters must be cleaned regularly (at
least every two months) in order to prevent a re hazard. Regular cleaning
also ensures better efciency, as grease and grime can impede the airow.
The grease bafe lters are made of high-density stainless steel. Please
ensure you never use a corrosive detergent during cleaning. Refer to
page18 for comprehensive cleaning and maintenance instructions.
Do not check the status of the lters while the rangehood is in use.
If you install charcoal lters, also ensure to change them regularly (every
three to six months, depending on usage).
• Light source: The light source contained in this appliance (LED round
lamp, DBR-1.5-S-68, max. 1.5W, 12V, 68mm) must only be replaced by
the manufacturer or an authorised service agent. If the light source needs
replacing, please call our after sales support centre for a service.
• Damage: Do not use the rangehood if any part, including the supply cord,
has been damaged, is faulty or does not work properly. Only have it repaired
by an authorised service centre. Incorrect repair could expose you to the risk
of electric shock, re or injury. Prolonged use of the unit in such conditions
could cause re or electrocution. In case of damage, contact our after sales
support line for advice.
• Misuse: We assume no liability for any eventual damages caused by
incorrect installation, product misuse or noncompliance with the instructions.

8AFTER SALES SUPPORT
1300 886 649
AUS MODEL: STR-PRHGC PRODUCT CODE: 10931 09/2019
NOTE: Due to continued product improvement, images and illustrations in this manual
may vary slightly from the product purchased. All images in this manual are for
reference purposes only. Parts are not necessarily pictured to scale.
Product Overview
Scope of delivery
Premium glass canopy rangehood
1 Stainless steel ue
2 Glass canopy
3 Control panel buttons [ STOP - LOW - MID - HIGH - LIGHT ]
4 LED lights (2)
5 Removable, washable bafe lters (2)
Installation kit (individual parts are illustrated opposite)
Documentation (not shown)
Instruction manual, Quick start guide, Warranty card
1
4 5
23

9
AFTER SALES SUPPORT
1300 886 649
AUS MODEL: STR-PRHGC PRODUCT CODE: 10931 09/2019
Installation kit
The scope of delivery includes the following parts (shown not to scale):
Installation
Unpacking
• This product has been packaged to protect it against transportation
damage. Unpack the appliance and remove all packaging materials from
around the rangehood. Keep all packaging materials in a safe place. It will
help prevent any damage if the product needs to be transported in the
future, and you can use it to store the appliance. Whenever possible, reuse
the carton and recycle it when disposing of the packaging materials.
• Plastic wrapping can be a suffocation hazard for babies and young
children, so ensure all packaging materials are out of their reach and
disposed of safely.
Description Part Quantity
Canopy rangehood
(curved glass) 1
Expandable 150mm
exhaust duct 1
Installation hardware
(4 pcs ST4*8 screws,
9 pcs ST4*30 screws,
9 pcs plastic screw sockets)
1 packet
Stainless steel chimney
pieces (upper and lower) 2
Wall bracket (hook) for the
rangehood 1
Wall bracket for inside
chimney 1
Outside chimney bracket 1

10 AFTER SALES SUPPORT
1300 886 649
AUS MODEL: STR-PRHGC PRODUCT CODE: 10931 09/2019
Installation (Cont.)
WARNING!
• All electrical work associated with the installation of this rangehood
must be carried out by a licensed electrician.
• This rangehood must be correctly installed by a suitably qualied
person in strict accordance with all applicable rules and regulations
and following the instructions in this manual.
• Do not try to install the rangehood yourself; doing so will expose you
to danger and void the warranty. Improper installation, adjustment,
alteration or service can cause injury or damage. We decline any re-
sponsibility for injury or damage, to persons or property, as a result of
improper installation.
• The wall canopy is heavy. Take proper care during the installation to
prevent personal injury.
Important installation safety advice
• Make sure the power is switched off prior to beginning the installation.
• For safety reasons, this rangehood must be earthed.
• Ensure that the area behind the installation surface to be drilled is clear of
any electrical cables or pipes, etc. An electrical outlet must be located near
the power cord exit from the rangehood, and it should always be accessible
to allow isolation from power during cleaning or maintenance.
• As the glass and stainless steel surfaces are easily damaged during
installation, we recommend that, wherever possible, you protect the
rangehood with the cardboard box or plastic wrap during the installation. We
also recommend you protect the cooktop surface below with cardboard or
the like to prevent damaging it during the canopy installation.
• The rangehood must be mounted onto a solid wall, stud, beam or truss that
is strong enough to support the weight of the product (approx. 15.4kg).
• Ensure that the rangehood is mounted in a level position, both horizontally
and vertically. This is essential to ensure the rangehood operates correctly
and prevents grease build-up at one end.
• All ducting must comply with building codes and local requirements.
A 150mm round exhaust duct is supplied, however all other ducting
accessories are not included in the scope of this delivery.
• If you are not ducting but re-circulating the air, ensure that any side outlet
grilles are not obstructed as this will affect the efciency of the rangehood.

11
AFTER SALES SUPPORT
1300 886 649
AUS MODEL: STR-PRHGC PRODUCT CODE: 10931 09/2019
NOTE: All dimensions in Fig. 1 above are in millimetres (mm).
Product dimensions
Installation (Cont.)
Typical tools required (not supplied)
For rangehood installation: Electric drill
Screwdriver
Tape measure
Spirit level
For ducting work: Jig saw
Ladder
Duct tape
Fig. 1
400-780
85

12 AFTER SALES SUPPORT
1300 886 649
AUS MODEL: STR-PRHGC PRODUCT CODE: 10931 09/2019
Installation (Cont.)
Ducting options
For optimum performance, this canopy rangehood should be vented to the
outside wherever possible, either straight up and through your roof (Fig. 2), or
through your wall (Fig. 3).
Alternatively, you may vent the duct into your ceiling cavity and then out
through your eaves (Fig. 4).
Important ducting advice
• Always use correctly sized ducting – DO NOT reduce the size of the ducting.
• Always use solid ducting – DO NOT use flexible ducting.
• Always use non-flammable ducting.
• Always duct to the outside – DO NOT duct into the ceiling space.
• Avoid sharp 90° bends as much as possible – use 120° bends instead
wherever possible.
• Duct to the outside atmosphere using the shortest duct run possible.
• Use cylindrical ducting whenever possible.
• After preparing the wall for ducting, and before installing the rangehood,
make sure the area is clean to avoid suction of any remaining bits of wood,
dust or sawdust.
Recirculating mode
This rangehood may also be installed in recirculating mode, where the air
is vented back into the kitchen after it has passed through charcoal lters.
However, operation in recirculating mode with charcoal lters installed
generally lowers the rangehood’s suction power. That is why these charcoal
lters are not included in the scope of this delivery.
Charcoal lters may not be cleaned and need to be replaced when required.
To purchase charcoal lters for this rangehood, please contact our after sales
support centre.
Fig. 4
Fig. 2 Fig. 3
13
AFTER SALES SUPPORT
1300 886 649
AUS MODEL: STR-PRHGC PRODUCT CODE: 10931 09/2019
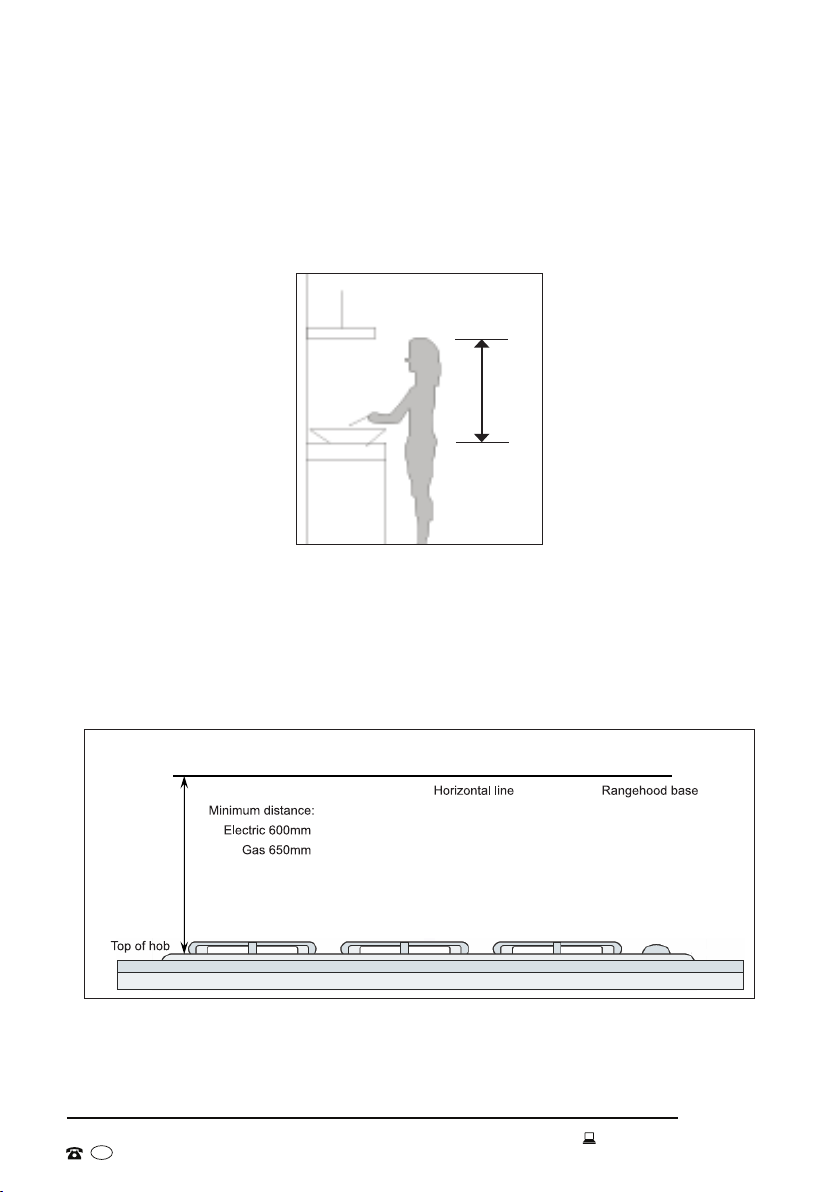
Installation height
This canopy rangehood is designed for installation above a cooking
appliance. For optimum performance, the canopy rangehood should be
installed at a distance of 650-750mm from the cooking surface (Fig.5).
Installation (Cont.)
• Above an electric cooktop, the rangehood must have a minimum height
of 600mm from the underside of the rangehood to the cooktop face
(Fig.6).
• Above a gas cooktop, the rangehood must have a minimum height of
650mm from the burner to the underside of the rangehood (Fig.6).
Fig. 6
Fig. 5
650mm
to
750mm
14 AFTER SALES SUPPORT
1300 886 649
AUS MODEL: STR-PRHGC PRODUCT CODE: 10931 09/2019
Installation (Cont.)
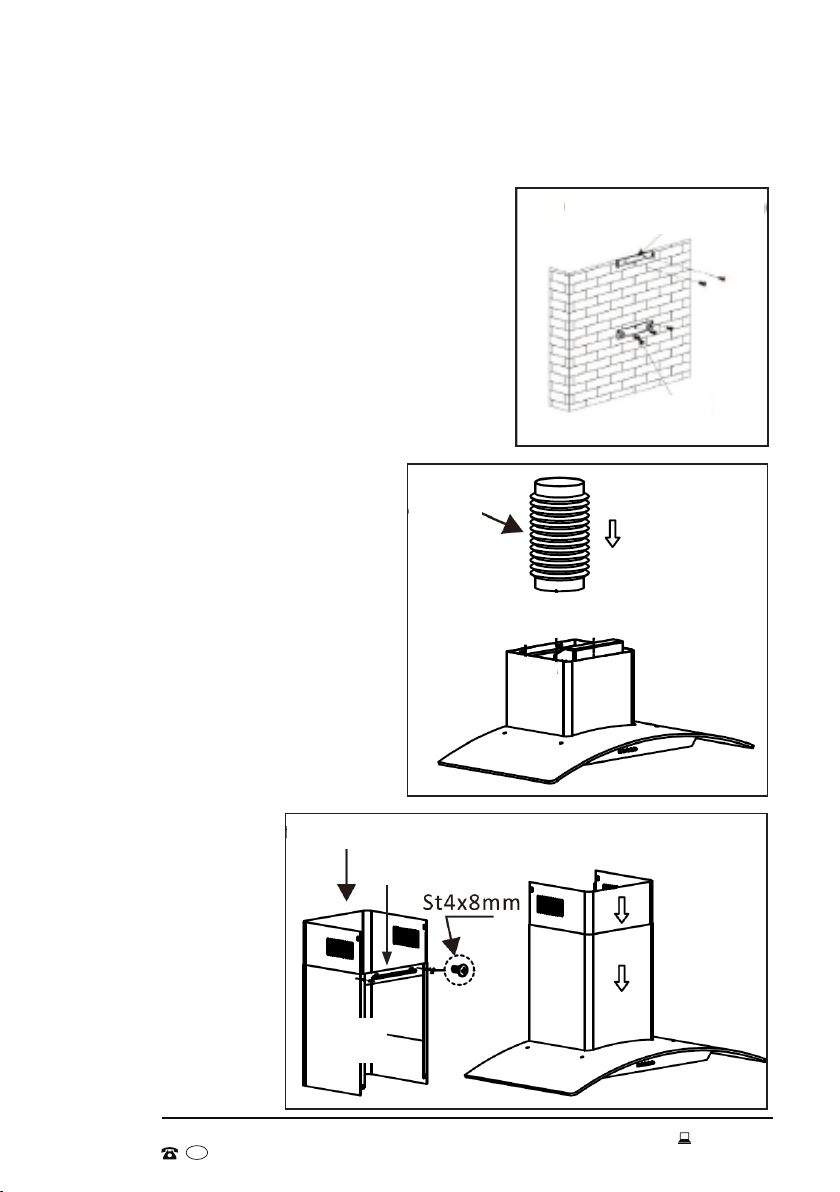
Installing the canopy rangehood
• Once the installation height has been
determined, use the supplied fasteners
and wall plugs to install the wall bracket
(hook) on to the wall, ensuring that it is
secured in a level position. The mounting
bracket connects to the canopy at the top,
i.e., where the chimney connects into the
canopy (Fig. 7).
• Also using the fasteners and wall plugs,
install the outside chimney bracket for the
outside chimney pieces (Fig. 7).
Fig. 7
Hook
• Using the screws provided,
attach the expandable
150mm exhaust duct to the
canopy (Fig. 8).
• With the two chimney pieces
together, fix the outside
chimney bracket onto the
outside chimney (flue) piece.
• Ensure that the inner
chimney piece can move
freely inside. Now attach
the chimney pieces to the
canopy (Fig. 9).
Inner chimney
bracket
Inner chimney Fig. 9
Outer chimney
bracket
Outer
chimney
Exhaust
duct
Fig. 8

15
AFTER SALES SUPPORT
1300 886 649
AUS MODEL: STR-PRHGC PRODUCT CODE: 10931 09/2019
Fig. 10
• Lift the canopy (including the chimney pieces) onto the wall bracket (hook).
Adjust the height of the inside chimney piece and fix it into place with the
screws (Fig. 10).
• After adjusting the position of the canopy, fix it into place with the safety
screws (Fig. 11) into the wall, using the screw holes as marked in Fig. 11a
(you will need to remove the grease filters first).
WARNING: Failure to install the screws or xing device in accordance with
these instructions may result in electrical hazards!
Installation (Cont.)
Fig. 11
ST4x8mm Fig. 11a

16 AFTER SALES SUPPORT
1300 886 649
AUS MODEL: STR-PRHGC PRODUCT CODE: 10931 09/2019
Operation
Make sure the rangehood is properly connected to the power supply and the
power is switched on at the outlet.
The rangehood features easy to use push button controls (Fig. 12) at the front
panel, which offer you three speed levels of extraction, and illumination.
After the glass canopy rangehood has been properly installed, insert the
power plug into an appropriate electrical outlet and let the unit run for a few
minutes prior to using it while cooking.
Instructions
• Press the (Low) button for operation of the rangehood at low speed.
• Press the (Mid) button for operation of the rangehood at medium speed.
• Press the (High) button for operation of the rangehood at high speed.
• Press the (Light) button and the two lights will come on. To turn the
lights off, simply press the (Light) button again.
• Press the (Stop) button to switch the rangehood motor off.
Fig. 12

17
AFTER SALES SUPPORT
1300 886 649
AUS MODEL: STR-PRHGC PRODUCT CODE: 10931 09/2019
Problem Possible cause Solution
The lights
work but the
motor does
not work.
The motor is blocked
or jammed, or the
capacitor is damaged.
Call our after sales support centre for
advice.
Neither the
lights nor
the motor
works.
Light bulbs are
damaged or blown.
Call our after sales support centre for
advice.
Power plug is loose.
Ensure the rangehood plug is rmly
inserted into the electrical outlet and
the outlet is switched on.
There is
insufcient
suction
power.
The grease bafe
lters are clogged.
Remove and clean the bafe lters
and reinstall them when they are dry.
The distance between
the rangehood and
your cooktop is too
great.
Have your installer readjust the
installation height, ensuring that the
minimum clearances required by the
building code are observed.
The outlet is blocked, or
the exhaust duct is too
long, bending too much
or has collapsed.
Check that the ducting and outlets
are free of blockages. Also ensure
that the duct is in proper working
condition.
Insufcient ventilation.
Make sure your kitchen is
adequately vented to allow the
entry of fresh air.
The range-
hood is
vibrating
against the
wall.
The rangehood canopy
is not xed to the wall
correctly.
Check and ensure that all screws
are tightened properly.
If you experience problems with your rangehood, or it appears not to be
operating correctly, check in the list below for answers to frequently asked
questions. If none of the solutions offered help you solve your problem, please
contact our after sales support centre for advice using the details at the bottom
of the page. Do not attempt to repair the appliance yourself!
FAQs & Troubleshooting Guide
In the event of an emergency, switch off all rangehood controls, switch the
rangehood off at the power outlet and immediately unplug, then call our after
sales support centre on 1300 886 649.

18 AFTER SALES SUPPORT
1300 886 649
AUS MODEL: STR-PRHGC PRODUCT CODE: 10931 09/2019
Other Useful Information
Cleaning and maintenance
Cleaning the rangehood exterior
To protect the main body of your rangehood from corrosion or stains, clean
it regularly, at least every two months. Wipe the exterior surfaces with a soft
microfibre cloth moistened with warm water and a little non-abrasive, non-
corrosive liquid detergent. Alternatively, use a dry cloth and a glass cleaner
for cleaning the glass canopy.
WARNING: Make sure to keep the motor and electrical connections dry.
Cleaning the grease baffle lters
The grease bafe lters must be cleaned regularly in order to prevent a re
hazard. Regular cleaning also ensures better efciency, as grease and grime can
impede the airow. We recommend cleaning them at least every two months.
The grease bafe lters are made of high-density stainless steel. Please ensure
you never use a corrosive detergent during cleaning.
• To remove the grease lters, squeeze the spring loaded latch with your
ngers and gently lower the lters out. Follow the same process to reinstall.
• To clean the lters, either handwash them or wash them in a dishwasher.
• For best results when handwashing the lters, wear gloves and use warm
water with a little dishwashing detergent. Leave the lters to soak for a few
minutes, then clean them with a soft brush. Do not apply too much pressure,
as the delicate lters can easily get damaged. Rinse with clean water.
• Alternatively, wash the grease lters in your dishwasher, making sure the water
temperature does not surpass 60°C.
• After cleaning, leave the lters to dry completely before reinstalling them into
the appliance.
WARNING: Never reinstall the lters when they are still wet.
CAUTION!
• Before cleaning the rangehood or carrying out maintenance, always
switch the power off at the outlet and unplug the rangehood.
• It is important to clean the lters regularly as oil and food residues can
become a re hazard.
• Do not use a corrosive detergent or an abrasive cloth as these could
damage the stainless steel and glass surfaces.
• Never use a steam cleaner to clean any part of the rangehood.

19
AFTER SALES SUPPORT
1300 886 649
AUS MODEL: STR-PRHGC PRODUCT CODE: 10931 09/2019
Service and repair
If the appliance is damaged, do not attempt to repair it yourself. Do not
disassemble or modify the appliance. If it requires repair or service, contact our
after sales support centre to arrange for examination or return of the product.
Spare parts
Our after sales support centre stocks a wide range of spare parts for the
glass canopy rangehood. To purchase a part, call the centre on 1300 886 649
Bafe lter
Charcoal lter
Electrical box holder
Exhaust pipe
Hook
LED lamp
Motor
Power board
Push button
Push button box
Light bulb replacement
The light source contained in this appliance has the following specifications:
Type: LED round lamp
Code: DBR-1.5-S-68
Max. wattage: 1.5W
Voltage: 12V
Size: 68mm
If the light source needs replacing, do not attempt to replace it yourself. It
must only be replaced by the manufacturer or an authorised service agent.
Please call our after sales support centre for a service.
Other Useful Information (Cont.)
Service calls
Please note that the appliance must be accessible for the service technician
to perform any necessary repair. If the appliance is installed in such a way
that damage may be caused during the repair, the service technician may not
complete a repair.

20 AFTER SALES SUPPORT
1300 886 649
AUS MODEL: STR-PRHGC PRODUCT CODE: 10931 09/2019
Technical specifications
Rated voltage / frequency 220–240V ~ / 50Hz
Dimensions (W x D x H) W900mm x D500mm x H400–780mm (ue)
+ H85mm (canopy)
Weight approx. 15.4kg
Motor power 120W
Lamp power Max. 2 x 1.5W
Lamp specications LED round lamp, DBR-1.5-S-68, max. 1.5W,
12V, 68mm
Total input power 123W
Operation speeds 3 (Low, Mid, High)
Filters (installed) 2 Washable bafe lters
Other Useful Information (Cont.)
Circuit diagram
Table of contents
Other Stirling Ventilation Hood manuals

Stirling
Stirling SRH91B User manual

Stirling
Stirling STR-SRH User manual

Stirling
Stirling STR-BRH User manual

Stirling
Stirling SRHGC90 User manual

Stirling
Stirling SRH60 User manual

Stirling
Stirling Black Edition STR-PRHGC User manual

Stirling
Stirling SORHP1-RH User manual

Stirling
Stirling Premium STR-PRHTP User manual

Stirling
Stirling STR-BRH User manual

Stirling
Stirling SUM52 User manual
Popular Ventilation Hood manuals by other brands


Hydro-Force
Hydro-Force Nautilus MX3-500RP operating manual

Electrolux
Electrolux EFC 980 user manual

Electrolux
Electrolux EFC 635 X user manual

Victory
Victory UC500 Installation guide and user's manual

Pelgrim
Pelgrim DSG880WIT Instructions for use

Zephyr
Zephyr Cypress AK7836CS Use, care and installation guide