Stoneridge SE5000-8.1 User manual

Driver & Company Manual
SE5000-8.1 Smart Tachograph
STONERIDGE - EVERY ANGLE COVERED
www.stoneridgeelectronics.com
www.se5000.com


Welcome
Welcome
Thank you for choosing the SE5000-8.1
Stoneridge Smart Tachograph.
At Stoneridge we believe in making your
life easier working as a driver or as a fleet
owner. Your SE5000-8.1 Tachograph has
been designed with this in mind, with
functions such as simple menu options,
high speed downloads, and remote
download capability.
TachographVersion
Smart Tachograph SE5000-8.1
Type approval number: e5 0002
This manual is designed for revision A
This Manual
Use this manual to familiarize yourself
with how to operate the tachograph
(Vehicle Unit, VU), in order to obtain the
maximum use from it. The manual
addresses both drivers and fleet owner
companies with vehicles where the
tachograph is installed.
The manual consists of three parts:
lDriver Part with information for
the driver.
lCompany Part with information
for the company owning the vehicle.
lReference Part with additional
information used as a reference.
We recommend that all users read the
Driver Part as a start. This will give you
enough information to start using the
tachograph. As company owners you also
have to read the Company Part in order
to understand your obligations. You can
then use the Reference Part to look up
specific details while using the tachograph.
Changes
Stoneridge Electronics reserves the right
to introduce changes in design, equipment,
and technical features at any time. You
cannot, therefore, base any claims on the
data, illustrations or descriptions in this
Manual.
Copyright
This manual must not be reprinted,
translated, or otherwise reproduced in
whole or in part, without written
permission from Stoneridge Electronics
AB.
Operating Safety
Risk of accident!
Only operate the tachograph while the
vehicle is stationary. Operating the
tachograph while driving will distract
your attention from the traffic and you
may cause an accident.
Internet Information
Further information about Stoneridge
SE5000-8.1 Smart Tachograph and about
Stoneridge can be found at:
www.stoneridgeelectronics.com
Don't open the Case
The tachograph has been installed by
authorised personnel.
A tachograph case must never be opened.
No tampering with or modifications to the
tachograph are permitted. A tamper label
1

Welcome
is placed inside the printer housing. The
tamper label must not be torn apart.
Here you can see where the tampering
label is placed and how it looks when it is
untouched.
lThe label itself will be red
lOn the left-hand side of the label
there will be a security ink section
lOn the right-hand side Stoneridge
Electronics AB and a data matrix
code (contains the serial number of
the Tachograph) is printed
A tampered label might look like this, and
a few examples to check for.
lVoid appears as text on the label
lNot correctly attached on the
tachograph
lThe red label is damaged
lThe security ink on the left is
broken
Note!
The tampered label in the image above
is missing the security ink on the right
side of the label.
Note!
Unauthorized persons that modify this
equipment are committing a punishable
offence, depending on the legislation in
the country concerned.
Other Documents
Besides this Driver & Company Manual
there are a number of other documents
that contain information about the
tachograph.
lDriver Quickguide - Gives quick
information about how to handle
the tachograph as driver.
2

Welcome
lCompany Quickguide - Gives you
as fleet owner a quick lesson in how
to use the tachograph.
lWorkshop Manual - Contains
information for certified smart
tachograph workshops. This
information is only handed out to
workshops qualified by Stoneridge
training program.
lControl Manual - Contains
information for control officers on
how to carry out controls on the
tachograph and the driver situation.
3

Contents
Contents
Welcome 1
TachographVersion 1
This Manual 1
Changes 1
Copyright 1
Operating Safety 1
Internet Information 1
Don't open the Case 1
Other Documents 2
Contents 4
Driver Part 7
The SE5000-8.1 Smart Tachograph 8
Card Trays 8
Printer Panel 8
Buttons 9
DSRC 9
Display 9
Motion Sensor 9
Dashboard Integration 10
Different Display Views 10
Display Views in DDS ON 10
Display View in DDS OFF 10
Default Display 10
Current Speed 11
Time Left Driving 11
Time Left Resting 11
Driver 1 and Driver 2 11
UTC Date and Time 11
Local Date and Time 12
Ferry/Train 12
Working Time 12
Driver Timer 12
Menus 13
How are Activities Registered? 13
Manually Registered Activities 13
Before you Start Driving 14
Insert a Card 14
At the End of the Day 15
Eject (Withdraw) Driver Card 15
Data Stored on the Card 15
Two Driver Scenario 15
Begin and End Places 16
Begin Place 16
End Place 16
Manually register Begin and End
Place 16
At Card Insertion 17
Manual Entries 17
Change a Manual Entry 19
Clear all Entries 19
Selection of Activity 19
Border crossing 20
Working Time Directive (WTD) 21
DDS in Driver Scenarios 21
Start Driving with DDS 21
Time Left Driving 21
Warning and Pre-warning 21
Taking a Break 22
Towards the End of the Day 22
Weekly Driving Time Limit 22
Calendar Time Limit 23
Ferry or Train Scenario 23
Activate Ferry/Train condition 23
End Ferry/Train condition 23
Driving Out of Scope 24
Load / unload operation 24
More on Time Left Driving 25
4

Contents
DDS Calculations and
Limitations 25
Driver Timer Display (DTD) 25
Period of Availability (POA) 26
In DDS calculations 26
In WTD calculations 27
INFO Menu 27
How to reach INFO MENU 27
Calendar Time Left until Rest 27
Cumulated Driving Time
Driver 1/2 27
Time to Download and
Calibrate 28
Product and certification 28
Part number and hardware 28
GNSS Positioning 28
Company Locked in 29
DSRC display 29
Driver Settings 29
Change Language 29
DDS Presentation ON/OFF 29
DDS Warnings ON/OFF 30
Change Local Time 30
Daylight Saving Time 30
Local time function 30
Drivers Consent to Export
Personal Data 31
Invert Colours on the Display 31
View Vehicle Registration
Number 31
Bluetooth 32
Enable the Bluetooth function 32
Pairing to Bluetooth (ITS) 32
Connect to an already paired
device (ITS) 33
Remove a paired device (ITS) 33
Remove all paired devices (ITS) 34
Allow RHMI 34
Manual entries via RHMI 34
Power Saving Mode (Sleep
function) 35
Care of Tachograph 35
Care of Cards 35
Card damaged, lost or stolen 35
Printouts 35
Printout Data 36
Change the Paper Roll 36
Company Part 39
Company Inspection 40
Keep a Record 40
Inspection Fails 40
Workshop Inspection 40
Lock-in/Lock-out Data 41
Selling the Vehicle 41
When inserting a Company
Card. 41
Another Company still Locked-
in 41
Lock-in Data 42
Lock-out Data 42
Downloading - why? 42
Equipment 43
Downloading Procedure 43
Keep a Record 43
Certificate - when not
Downloadable 43
Download with Control Card 44
Company Card 44
Data Stored at Lock-in/out or
Download 44
Company Card Stored Data 44
5

Contents
Tachograph Stored Company
Activity Data 45
Company Settings 45
Show Download Process 45
WTD Presentation ON/OFF 45
D8 Data Format 45
Set Activity when Switching
Ignition Key on/off 46
Set Timeout for Manual Entries 46
Set Vehicle Registration Number
(VRN) 46
Begin and End place 47
DDS Settings 47
Table with all DDS Settings 47
DDS Displays 48
WTD Settings 50
Reference Part 51
Symbols 52
Symbol Combinations 53
Available Languages 54
Available Countries 54
Built-in Test 56
Other tests 58
Display Messages 59
Printout Examples 73
Daily Printout (card) (1/2) 74
Daily Printout (card) (2/2) 75
Daily Printout (VU) (1/3) 76
Daily Printout (VU) (2/3) 77
Daily Printout (VU) (3/3) 78
Events and Faults (card) 79
Events and Faults (VU) 80
Drive Time Info 81
Technical Data (1/2) 82
Technical Data (2/2) 83
Overspeeding 84
Vehicle Speed 85
Engine Speed (rpm) 86
Status D1/D2 87
Manual Entry Sheet 88
Data and Specifications 89
DDS Calculations and Limits 89
DDS in Details 89
Certification and Approval 90
Avoid High Voltage 90
Data stored in the Tachograph 90
Insertion and Withdrawal Data 90
Driver Activity Data 91
Other Data 91
Data stored on the Card 91
Insertion and Withdrawal Data 91
Driver Activity Data 92
Electromagnetical Compability 92
Operating Temperature 92
ATEX Tachograph 93
Hazardous Goods Vehicles 93
The ATEX Tachograph 93
Visible Differences 93
Contact Stoneridge 93
Index 94
6

Driver Part
Driver Part
The Driver Part contains the following:
lSE5000-8.1 Smart Tachograph- a
presentation on what you can see on
the SE5000-8.1 Smart Tachograph,
the card tray, printer panel, buttons
and the different displays. Finally,
information on how activities are
registered is given.
lBefore you Start Driving -
information about the most frequent
handling of the tachograph.
lAt Card Insertion - Describes how
to carry out manual entries.
lDriver Settings - this section
contains all settings available to the
driver.
lDriver Card - how to insert and
withdraw a card.
lPrintouts - how to handle the built-
in printer.
7
Driver Part
The SE5000-8.1 Smart
Tachograph
This is a brief presentation of what you
can see of the tachograph. The illustration
below shows what can be seen when you
e.g. enter the vehicle and touch any key on
the tachograph. Normally the tachograph
is resting and not showing any information
in the display window, but a touch of any
button will wake it up.
The tachograph is also referred to as the
Vehicle Unit (VU). In addition to the
tachograph there is a Motion Sensor
attached to the vehicle and the
Tachograph. Read more about the sensor
and integration with the vehicle under
Motion Sensor on the facing page and
Dashboard Integration on page10.
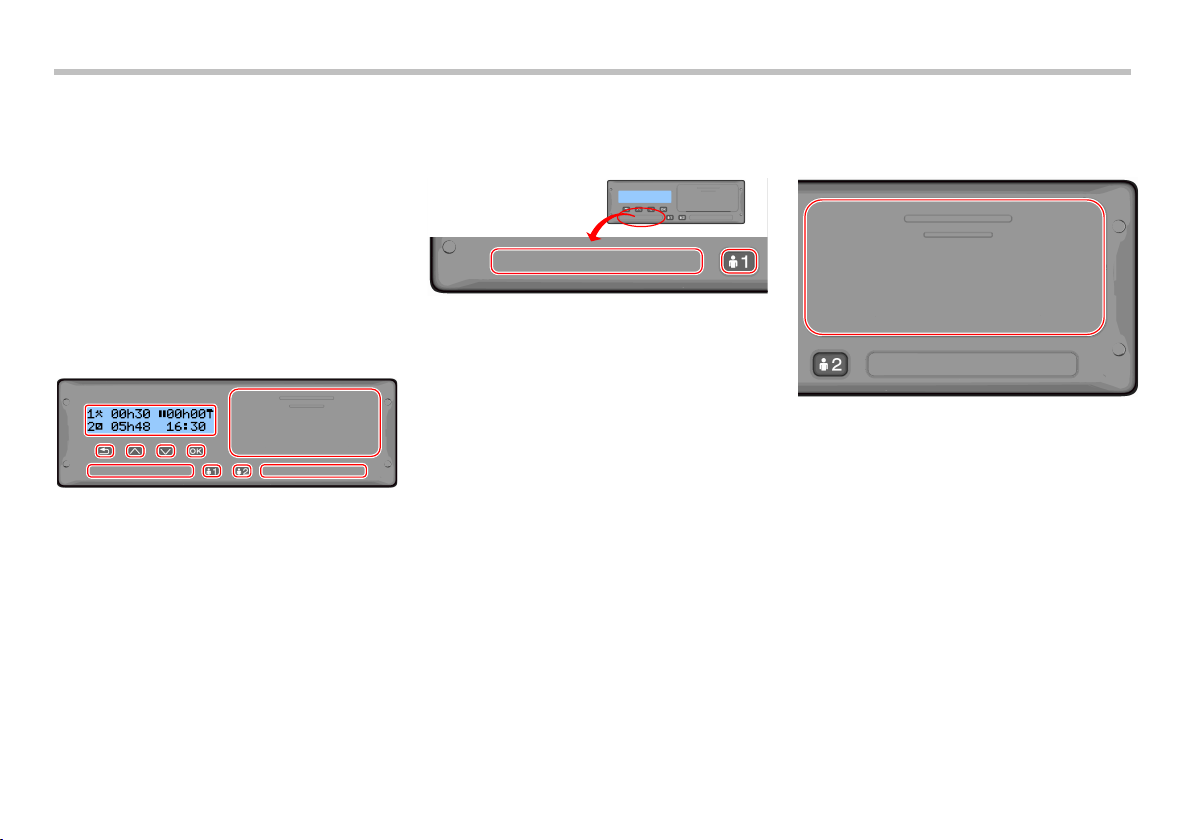
Card Trays
There are two card trays where you insert
your driver card.
lTray 1 is operated by the button
marked 1 and is used for the current
driver card.
lTray 2 is operated by the button
marked 2 and is used for a co-driver
card.
lOpen and Close the trays:
nTo open - Press the button
and hold it until it opens.
nClose the tray by pushing it
in gently.
Printer Panel
Behind the printer panel there is a printer
containing a paper cassette with a paper
roll. The printer is used e.g. to make
printed records of information stored in
the tachograph. The printed paper will
come out from a small opening at the
bottom of the printer panel.
8

Driver Part
Buttons
Back lMoves back in a menu
lReturns to the standard
display (press
repeatedly)
Arrow
up
lMoves up in the menu or
a set of views
lIncreases a value
l'Toggles options
Arrow
down
lMoves down in a menu
or a set of views
lDecreases a value
lToggles options
OK lOpens the menu
lConfirms a selection
lMoves horizontally in
a menu
lClears a message or
warning
DSRC
The DSRC, is a unit that is separate from
the vehicle unit, and it is used to perform
targeted roadside checks via microwave
communication link.
It will prove road-side check officers that
you are following the legislation and may
avoid them stopping you for a formal
control.
Display
00h30
05h48
00h00
16:30
The display is, like any other display unit,
used in many different ways:
lBasically the display is used to show
information.
lTogether with the four buttons (not
the numbered buttons) the display is
used to navigate in a menu system.
lThe display is also used as a
feedback when entering information
or into the tachograph or changing
settings.
Motion Sensor
The Motion Sensor, or just sensor, is
transferring the motion signals from the
vehicle to the Tachograph. This is a part of
the Tachograph installation and must not
be tampered with. Any attempt to tamper
with the sensor or the sensor cable is
recorded in the Tachograph.
9
Driver Part
Dashboard Integration
Some vehicles can display some of the
Tachograph information on an integrated
display. Here are examples on the type of
information that can be displayed:
lSpeed
lTravelled distance
lAccumulated Daily Driving Time
lAccumulated Driving Time
lMessages, Warnings and Faults.
Different Display Views
The tachograph has two different standard
set of Display Views that you easily can
browse by using the arrow buttons.
Depending on the two settings below the
set of views are different.
lDDS ON (Driver Decision
Support ON.
lDDS OFF (Driver Decision
Support OFF.
Display Views in DDS ON
In the standard set of Views, DDS is
shown and the set of Views are:
lDefault Display.
lWorking Time *.
lDriver Timer Display (DTD) ***
lCurrent Speed.
lTime Left Driving.
lTime Left Resting.
lFerry/Train **.
* If enabled, see DDS sections for details.
** If active, see DDS sections for details.
*** See DTD section for more details.
Display View in DDS OFF
DDS can be disabled and then the set of
Views contains the following:
lDefault Display.
lDriver 1.
lDriver 2.
lUTC Date and Time.
lLocal Date and Time.
lDriver Timer Display (DTD) *
lCurrent Speed.
* See DTD section for more details.
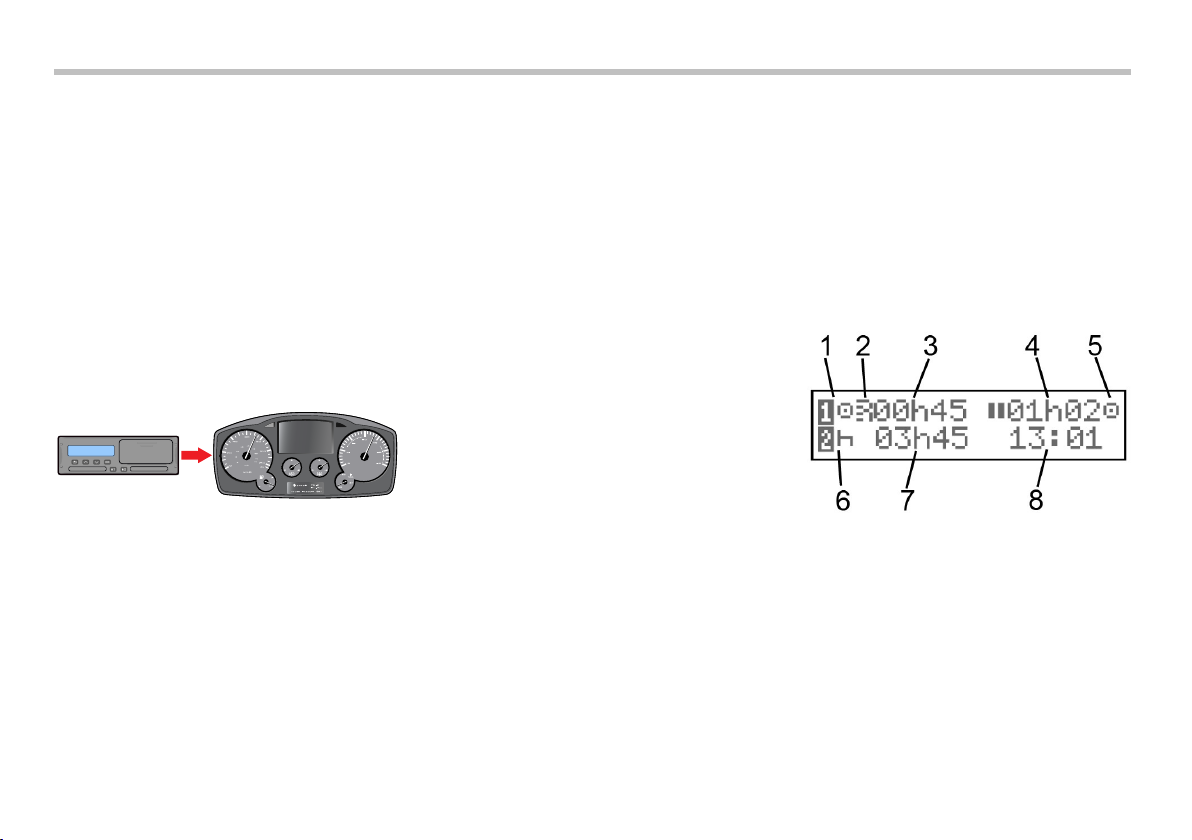
Default Display
1. Driver's current activity.
2. Indication if there is an open ITS or
RHMI connection.
3. Driving time since last break/rest if
driving, otherwise duration of current
activity.
4. Driver's cumulated break time.
10

Driver Part
5. Operating mode of tachograph.
Operational mode is automatically
entered when no card is inserted or
when a driver card is inserted in the
tachograph.
6. Co-driver's current activity.
7. Duration of the co-driver's activity.
8. Local time. Replaced by Ferry/OUT
when that such mode is activated.
Current Speed
3 4
1 2
045km/h
-- 000173,9km
1. Type of card inserted in tray 1.
2. Current speed.
3. Type of card inserted in tray 2.
4. Odometer.
Time Left Driving
12
4
3
h 9h00
4
29
1. Time left driving view is shown.
2. Time left driving until next activity.
3. Next activity (start of daily rest).
4. How long the resting time must be to
get more driving time.
Time Left Resting
1
3
2
4
h 4h30
0
45
1. Driver's current activity (resting).
2. Time Left Resting until more driving
time is available.
3. Co-driver's current activity (available).
4. Drive time available after this
break/rest.
Driver 1 and Driver 2
3
4
2
1
5
2h32 1h17
5h45 42h00
1. Indicates if driver or co-driver
information is shown.
2. Drive time since last break.
3. Cumulated break time.
4. Daily driving time.
5. Cumulated driving time during the
current and previous week.
UTC Date and Time
3
2
1
4
24/4 12:30
2019 UTC
11

Driver Part
1. Date.
2. UTC time.
3. Year.
4. Indicates that it is UTC time that is
used.
Local Date and Time
5
123
4
15/12 12:55
2019 (UTC+01h00)
1. Date.
2. Local time.
3. Local time icon.
4. Year.
5. Local time zone offset.
Ferry/Train
123
4
1. Ferry/Train presentation.
2. Remaining interruption time (max 1h).
3. Indication that "Interruption Time"
needs to be reduced to fit the Daily
rest period in a 24h period.
4. Remaining Daily Rest time.
Working Time
123
5
4
1. Indicate that driver
information is shown.
2. Working time since last break.
3. Daily working time.
4. Daily break time.
5. Weekly working time.
Driver Timer
1. Selected activity
2. Type of counter
3. Remaining drive time during Drive or
Work / Remaining break time during
Rest or Availability
4. Accumulated drive time since
calculations started
12

Driver Part
Menus
There are four main menus in the display,
used for making selections and settings.
You navigate in the menus by using the
buttons on the tachograph.
PRINT Printout selections
SETTINGS Available settings
PLACES Selection of begin/end places,
Out of Scope, Ferry/Train or
Load/Unload
INFO In the INFO menu you can
toggle between five different
display views, see INFO
Menu on page 27.
How are Activities Registered?
Activities performed by the driver and the
co-driver during the day are registered on
the driver card.
Available activities:
Driving While driving the vehicle.
Work While working when the
vehicle is standing still, for
example when loading the
vehicle.
Available While not working, for
example when you are a
co-driver.
Rest While taking a break.
?unknown
activity
No activity type recorded.
Manually Registered Activities
The following are the two main situations
when you register activities manually:
lWhen you need to record activities
when no driver card was inserted,
see above
lIf the vehicle is standing still and
you would like to change the current
activity set by the tachograph. For
example, you may change the
driver's activity from Work to Rest.
Press shortly on button 1 (to make
selections for the driver) or on
button 2 (to make selections for the
co-driver) repeatedly until the
desired activity is displayed. Driving
is always selected automatically and
cannot be changed.
Note!
For traffic safety reasons you may only
operate the tachograph when the vehicle
is standing still.
13

Driver Part
Before you Start Driving
The following scenario describes a normal
working day with a single driver where:
lDriver Card was ejected at the end
of the last working day.
lDriver was resting until card was
inserted.
lDriver Card is inserted again
when the new working day starts.
Note!
A driver card must be inserted in the
tachograph in order to identify the driver.
The driver card is personal and may not
be used by anyone else but the rightful
card holder.
Insert a Card
Since this is a single driver scenario card
tray 1 is used. If a co-driver is present
he/she must insert their card in tray 2.
1. Press and hold button 1 on the
tachograph until the tray is opened.
2. Insert the card with the chip facing
forward and upwards.
3. Close the tray by pushing it carefully
forward.
If the inserted card is unknown to the
tachograph, drivers consent is requested to
export personal data. The display will
show:
OK to exp
pers. data?
Select YES or NO and then press OK.
The display will, for a moment, show your
name, the time for your last withdraw and
then it will show:
Rest until
now?
4. Press OK. The display will show:
End country
5. Select the End country for your
previous shift and press OK. The
display will show:
Begin country
6. Select the start country of your journey
and press OK. The display will show:
Entries
printouts?
7. Select whether to make a printout of
the entered data by selecting YES or
NO and then press OK. The display
will show:
Confirm
entries?
8. Select whether to confirm the manual
entries done by selecting YES or NO
and then press OK. The display will
show:
Ready to drive
after veh. Check
You are ready to drive. Registration of
work activity is mandatory by some
countries to confirm that the vehicle check
took place.
The card tray will be locked:
14

Driver Part
lWhen the vehicle is in motion.
lWhile the tachograph is busy
processing a driver card.
lIf the power supply to the
tachograph is interrupted.
lIf ignition is OFF for ADR
tachographs.
Note!
If end country was selected when you
ejected the card you do not need to
register it again. The tachograph does
not automatically prompt for begin/end
place if card was withdrawn for less than
9 hours.
Note!
If the tachograph fails to read the card
(driver card authentication), see
Display Messages on page 59.
At the End of the Day
When the driving is done for the day or
when driver and co-driver change roles,
the card often will be ejected from the
tachograph.
Eject (Withdraw) Driver Card
1. Press button 1 or 2 on the tachograph.
The display will show:
End country
Portugal
2. Select your end country and press OK
to confirm. The data is stored on the
card and the tray is opened.
3. Press the card up slightly from
underneath through the opening on the
tray, or push the edge of the tray down
until the driver card comes out.
4. Close the tray by pushing it carefully
forward.
Note!
You cannot eject the card while:
- Driving
- Data on the card is being processed
- (in ADR vehicles) when ignition is OFF
Data Stored on the Card
All activities such as working, driving, and
resting are registered on the driver card as
well as in the tachograph. When driving
the card must be inserted in the
tachograph and if you change vehicle you
must bring your card with you to the other
vehicle. The card fits into all smart
tachograph regardless of the brand.
Consequently you will always have
updated driver data on your card.
The driver card stores data up to the limit
of its internal memory. After this limit,
new data will overwrite the oldest data.
Two Driver Scenario
The present driver's card shall always be
inserted in tray 1 and the co-driver's card
in tray 2. When the drivers swap seats they
have to swap the cards as well so that the
driving time will be registered on the
current driver's card.
15

Driver Part
Note!
It is strongly recommended that the
cards are handled in following
sequence:
At withdraw: First withdraw driver's card
in slot 1 and wait until card is ejected.
Then withdraw co-driver's card in slot 2.
At insertion: First insert co-driver's card
in slot 2 and answer the questions. Then
insert driver's card in slot 1 and answer
the questions.
It is strongly recommended to NOT swap
card at midnight, 23:59 - 00:01, due to
card data processing performed by the
VU (regulation requirements).
It is strongly recommended to NOT swap
card during Ferry or Train Scenario.
Begin and End Places
When the working day starts and ends, the
tachograph needs to know both begin
place and end place of the journey.
The tachograph can automatically suggest
registering a Begin or End place if the card
is left in tachograph during the daily rest.
See Company Settings on page 45 for
further information.
If the function to automatically suggest
Begin/End place is activated, you can use
it as described below.
Begin Place
If the card has been inserted for 180 or
more minutes and the tachograph has
been recording Rest activity for that
period, you will be prompted with Begin
place when you turn the ignition on.
Confirm if you wish to register a Begin
Place, and thereafter confirm the Country.
End Place
If you set the activity to rest and then turn
the ignition off, you will be prompted to
register the End place. This will also
trigger if you change the activity to rest
after you turned the ignition off. Confirm
if you wish to register an End place and
thereafter confirm the Country.
Note!
Pressing the Back button will cancel the
prompt for Begin or End place.
Manually register Begin and End
Place
You can register the places at any time
during the day, and during a manual
entries procedure. When ejecting the
driver card, you will get a question about
entering the end place.
To manually register the places during the
working day:
1. Press OK to show the menu.
2. Select:
PLACES
3. Press OK and navigate to:
Begin place
4. Press OK and select the place.
5. Press OK to confirm.
6. To register destination place, perform
the same procedure again but navigate
to:
End place
7. Press OK to confirm the destination
place. Your places are registered.
16
Driver Part
Note!
Any place/country registration will be
stored on both cards if there are two
valid cards inserted.
At Card Insertion
When you have performed activities
without the driver card inserted you need
to register these activities manually. We
assume that you register the activities next
time you insert the driver card. Please note
that all activities are entered in local time.
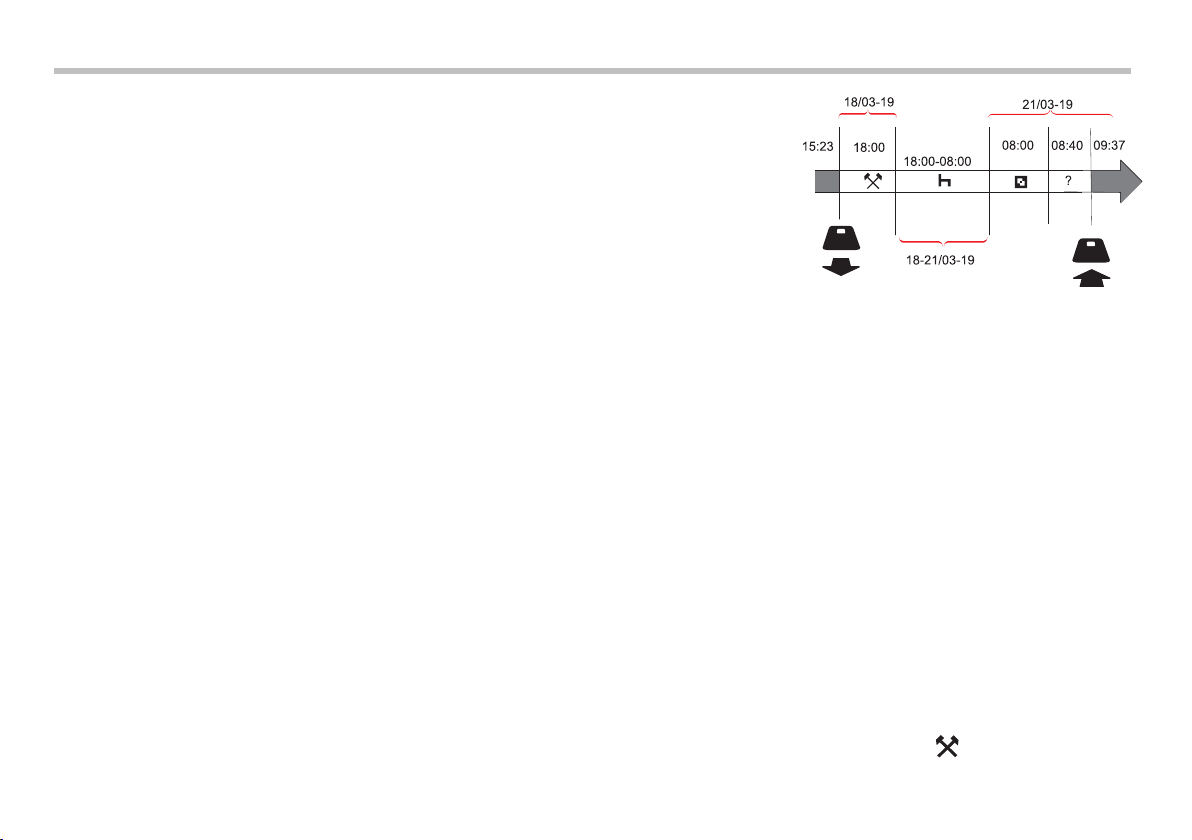
Manual Entries
The following scenario describes a
situation when you need to register manual
entries (with your card inserted). Please
note that you will most likely not be able
to get the same presentation on your
display.
lFriday at 15:23 18/3 2019: You
arrived and ejected the driver card.
lFrom 15:23 until 18:00: You
performed other work.
lFrom 18:00 over the weekend
until 08:00 Monday 21/3: You
rested.
lFrom 08:00 to 08:40: You were
available.
lFrom 08:40 to 09:37: You
performed other work with
unaccounted time. Unaccounted
time is time that should not be
registered on the driver card, for
example driving with an analogue
tachograph.
lMonday at 09:37 21/3 2019: You
insert the driver card.
Note!
Manual entries can also be performed
using a Bluetooth device. For more
information, see Bluetooth on
page 32.
To register manual entries according to the
scenario above, do as follows:
1. Insert the driver card. The display will
show:
Rest until
now?
2. Select NO and press OK. The display
will show:
Add manual
entries?
3. Press OK. The display will show the
date and time for the last card ejection
together with the following:
end
shift
You will now register the other work you
performed 18/3.
4. Highlight the symbol.
17

Driver Part
18/03
15:23
5. Press OK.
18/03 21/03
15:23 09:37
6. The date 18/03 is correct but 21/3 to
the right needs to be changed to 18/03.
Change it by scrolling back to 18/03,
using the arrow buttons.
18/03 18/03
15:23 09:37
7. Press OK to confirm.
8. Change the time (hour) to 18 by
scrolling forwards to 18.37 and press
OK.
18/03 18/03
15:23 18:37
9. Change the minutes to 00 by scrolling
forwards to 18:00 and press OK.
18/03 18/03
15:23 18:00
10. Press OK again to confirm. The display
will show the date and time when the
other work was finished together with:
end
shift
You will now register the time when you
rested.
11. Highlight the rest symbol and press
OK.
18/03 21/03
18:00 09:37
12. Press OK to confirm the date (21/03,
which already is correct.
13. Change the hour by scrolling to 08 and
press OK.
14. Change the minutes by scrolling to
08:00 and press OK.
15. Since the rest was longer than nine
hours, the following is displayed.
Begin country
16. Select start country and press OK.
17. Press OK again to confirm. The date
and time when the rest was finished is
displayed together with the following:
begin shift
You will now register the time when you
were available.
18. Highlight the available symbol and
press OK.
18/03 21/03
08:00 09:37
19. Press OK to confirm the date (21/03),
which already is correct.
20. Change the hour by scrolling to 08 and
press OK
21. Change the minutes by scrolling to
08:40 and press OK.
22. Press OK again to confirm. The date
and time when the available period was
finished is now displayed together with
the following:
begin shift
You will now register your work with
unaccounted time. This will not be
registered on the driver card.
23. Highlight the ? symbol and press OK.
?
21/03 21/03
08:40 09:37
18
Table of contents
Other Stoneridge Automobile Accessories manuals

Stoneridge
Stoneridge ELD1.0 User manual

Stoneridge
Stoneridge SE5000-8 RG User manual

Stoneridge
Stoneridge SE5000-8 User manual

Stoneridge
Stoneridge SE5000 Use and maintenance manual

Stoneridge
Stoneridge MirrorEye 0416100 User guide

Stoneridge
Stoneridge Optac 3 User manual

Stoneridge
Stoneridge SE5000 User manual

Stoneridge
Stoneridge ORLACO Sets MirrorEye MP User guide


