STOROpack AIRmove2 User manual
AIRmove² - Perfect Protective Packaging
User Manual

AIRmove2- Perfect Protective Packaging 1

AIRmove2- Perfect Protective Packaging 2
Copyright © STOROpack
All rights reserved.
Dear customer,
Thank you for choosing our AIRmove2 . For optimal use, please familiarize yourself with the contents of this
user manual and pay special attention to our instructions concerning safe operation of the device.
General information:
Unless expressly authorized, reproduction, copy or translation of this device, its accessories or the technical
documentation without previous approval of STOROpack GmbH + Co. KG is strictly forbidden.
STOROpack GmbH + Co. KG cannot be held responsible for any involuntary errors in this manual. Please,
don’t hesitate to forward us any proposals to improve this user manual.
Asia-Pacific: + 852 3421 2392
Europe: + 49 800 78 67 67 22
North America: +1 800 827 7225
South America: +55 11 5677 4699
Email : packaging@STOROpack.com
www.STOROpack.com
*** Conditions of use ***
This device can only be used to manufacture packaging material
made of plastic film. The user of this device is committed to follow all
instructions in this guide book. The user is also entirely responsible for all
safety precautions of this device.
In case of modification or disregard of this instruction we will cancel all
warranty conditions and the manufacturer’s liability.
STOROpack GmbH + Co. KG cannot be held responsible for any damages caused by
improper use of the machine or void air cushions.

AIRmove2- Perfect Protective Packaging 3
Contents
1. Introduction.......................................................................................................................................... 4
2. Safety Instructions .............................................................................................................................. 4
3. Declaration of Conformity................................................................................................................... 6
4. Description of AIRmove2..................................................................................................................... 6
4.1 Technical Specifications.................................................................................................................... 6
5. Box Contents ....................................................................................................................................... 7
6. Machine Overview ............................................................................................................................... 7
6.1 Keypad Functions ............................................................................................................................. 8
7. Setting Up the Device for Use ............................................................................................................ 8
7.1 Assembly of the Film Roll Holder ...................................................................................................... 8
7.2 Film Roll Holder Positions for Smooth Film Flow .............................................................................. 8
7.3 Display and Keypad Location............................................................................................................ 9
7.4 Fitting a New Film Roll .................................................................................................................... 10
7.5 Power Switch and Connections....................................................................................................... 11
7.6 First Parameter Set-Up ................................................................................................................... 11
8. Menu Structure .................................................................................................................................. 12
8.1 Start Film production ....................................................................................................................... 12
8.2 How to Adjust Air Settings............................................................................................................... 13
8.3 How to Adjust Sealing Temperature................................................................................................ 13
8.4 How to Adjust Runtime.................................................................................................................... 14
8.5 How to Use External Input Devices................................................................................................. 14
8.6 Extern IN Mode 0 ............................................................................................................................ 14
8.7 External Input Mode 1 ..................................................................................................................... 15
8.8 External Input Mode 2 ..................................................................................................................... 15
8.9 Mode 2 Stop Delay.......................................................................................................................... 16
8.10 How to Change Film Type............................................................................................................... 16
8.11 Factory settings............................................................................................................................... 17
9. External Start and Stop Devices....................................................................................................... 18
10. Troubleshooting AIRmove²............................................................................................................... 19
11. How to Change Wear Parts............................................................................................................... 20

AIRmove2- Perfect Protective Packaging 4
1. Introduction
This user manual has been compiled by STOROpack with all due care to enable safe and fault-free
production of air pillows with the AIRmove2machine. Before operating AIRmove2, familiarize yourself with
the contents of this user manual to guarantee safe operation. When the AIRmove2is in operation, the user
must ensure that nobody will be bodily damaged due to unauthorized intervention into the production
process.
2. Safety Instructions
To guarantee personal safety, the following instructions must be carefully observed:
1.) Work Area
a. Keep the work area clean and well lit. Cluttered and dark areas invite accidents.
b. Place the AIRmove2machine on a flat, dry surface.
c. Do not operate AIRmove2in explosive atmospheres, such as in the presence of
flammable liquids, gases or dust. Do not place flammable materials in, on or around the
machine.
2) Electrical Safety
a. The power plug must match the outlet and the outlet must be appropriately grounded. Do
not modify the plug in any way. Do not use adapter plugs or extension cords.
b. Do not expose the AIRmove2machine to wet conditions. As with any piece of electrical
equipment, operating the machine when wet will increase the risk of electrical shock.
c. Do not abuse the power cord. Never use the cord for carrying, pulling or unplugging the
AIRmove2machine. Keep cord away from: heat, oil, sharp edges or moving parts.
Damaged or entangled cords increase the risk of electrical shock.
d. For installation and maintenance work, the machine must always be turned off by the main
switch and be disconnected from the main power connection. The machine operator must
avoid any contact with the electrical parts.
e. All safety and protective measures and facilities must have been applied and be
maintained in accordance with IEC instructions (International Electrotechnical
Commission).
f. The machine instructions are provided by STOROpack’s own staff or staff delegated by
STOROpack. STOROpack’s liability under IEC regulations no longer applies if changes or
additions are made to the machine without STOROpack’s permission.

AIRmove2- Perfect Protective Packaging 5
3) Personal Safety
a. Stay alert, watch what you are doing and use common sense when operating the
AIRmove². Do not use AIRmove² when you are tired or under the influence of drugs,
alcohol or medication.
b. Prevent accidental starting. Ensure the switch is in the off position before plugging in.
c. Avoid loose clothing, jewellery, long hair, etc. from contact between the drive wheels. Do
not place anything between the drive wheels other than STOROpack film. This includes
paper, metal, tools, etc.
d. There is an extremely sharp knife blade under the Air injector assembly. As this is a part
that may wear over time and must be replaced, great care must be taken when removing
and handling the blade. Strictly adhere to the blade replacement instructions in the user
manual.
e. The film is sealed by using a heated wire which is located under a Teflon belt. (below the
blue protective covers). This wire gets very hot and may cause burns if touched. During
normal operation the wire is not exposed, but care must be taken when replacing film or
replacing the Teflon belt. Switch the machine off and allow the wire 2-3 minutes to cool
down before performing any operation exposing the wire. Instructions for replacement can
be found in the user manual.
4) AIRmove2Use and Care
a. Switch the machine off and disconnect the plug from the power source before performing
any operation to the AIRmove2machine. This includes replacing film, cleaning or
maintenance.
b. DO NOT lift using the power cord.
c. The AIRmove2machine requires periodic cleaning –more often if operated in dirty or
dusty conditions. Check for misalignment or binding of moving parts, broken parts and
any other condition that may affect the operation. Do not operate a damaged machine.
d. This system was designed for processing a specific film type. In order to guarantee
smooth function, only original STOROpack’s consumables should be used.
e. In emergency situations, set the main switch to “0”. The machine will be switched off
within a few seconds (when indicator is turned off completely). After eliminating the
emergency situation or fault, the machine can be switched on again according to the user
manual.
f. The manufacturer is not liable for any modifications of the machine which are made
without written approval from STOROpack.
AIRmove2- Perfect Protective Packaging 6
3. Declaration of Conformity
Declaration of Conformity
We declare under our sole responsibility that the product described as AIRmove2machine is in conformity
with the following standards or standardization documents: 2006/42/EEC, amended by 91/368/EEC,
93/44/EEC and 93/68/EEC.
Standards; EN ISO 12100:2010 Safety of machinery.
M. Korten
Vice president Ideepak b.v.
19-09-2016, Ideepak b.v. Industrieweg 24, Stramproy –Holland 6039 AP
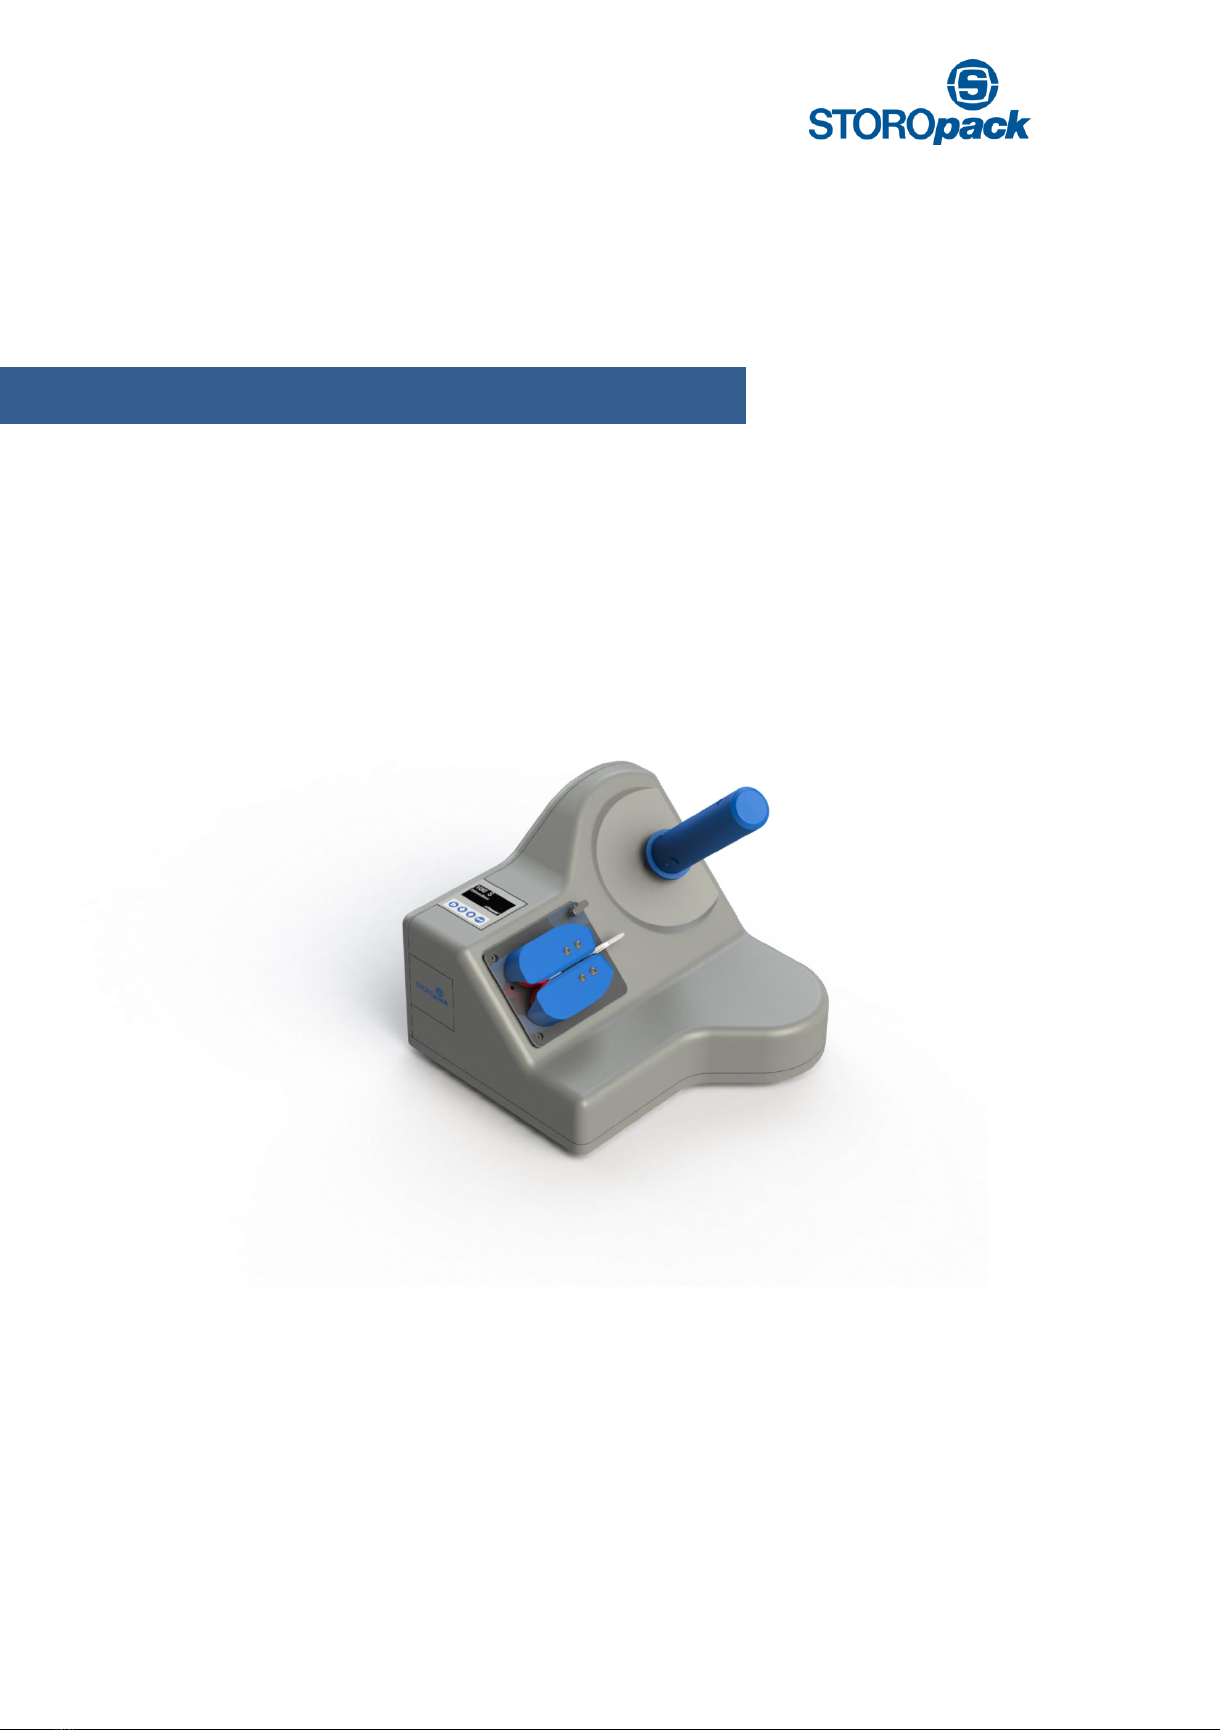
4. Description of AIRmove2
AIRmove2converts pre-perforated tubular films of 200 mm (8”) and 400 mm (16”) width into air cushions.
This chapter explains the technical data, the setup and operation of AIRmove2.
4.1 Technical Specifications
Voltage
95 –250 VAC; 50/60 Hz
Power consumption (max.)
97 W
Power consumption
76 W
Power consumption (stand-by mode)
6,2 W
Recommended main fuse
3.15 AMP
Dimensions
370 mm x 364 mm “ | 14 2/3“ x 14 1/3“
Height
329,5 mm | 13“
Transport speed
Max. 10 m/min. | ~33 lin.feet./min
Weight
7.1 kg | 15.65 lbs.
Sound pressure level
52 db
AIRmove2- Perfect Protective Packaging 7
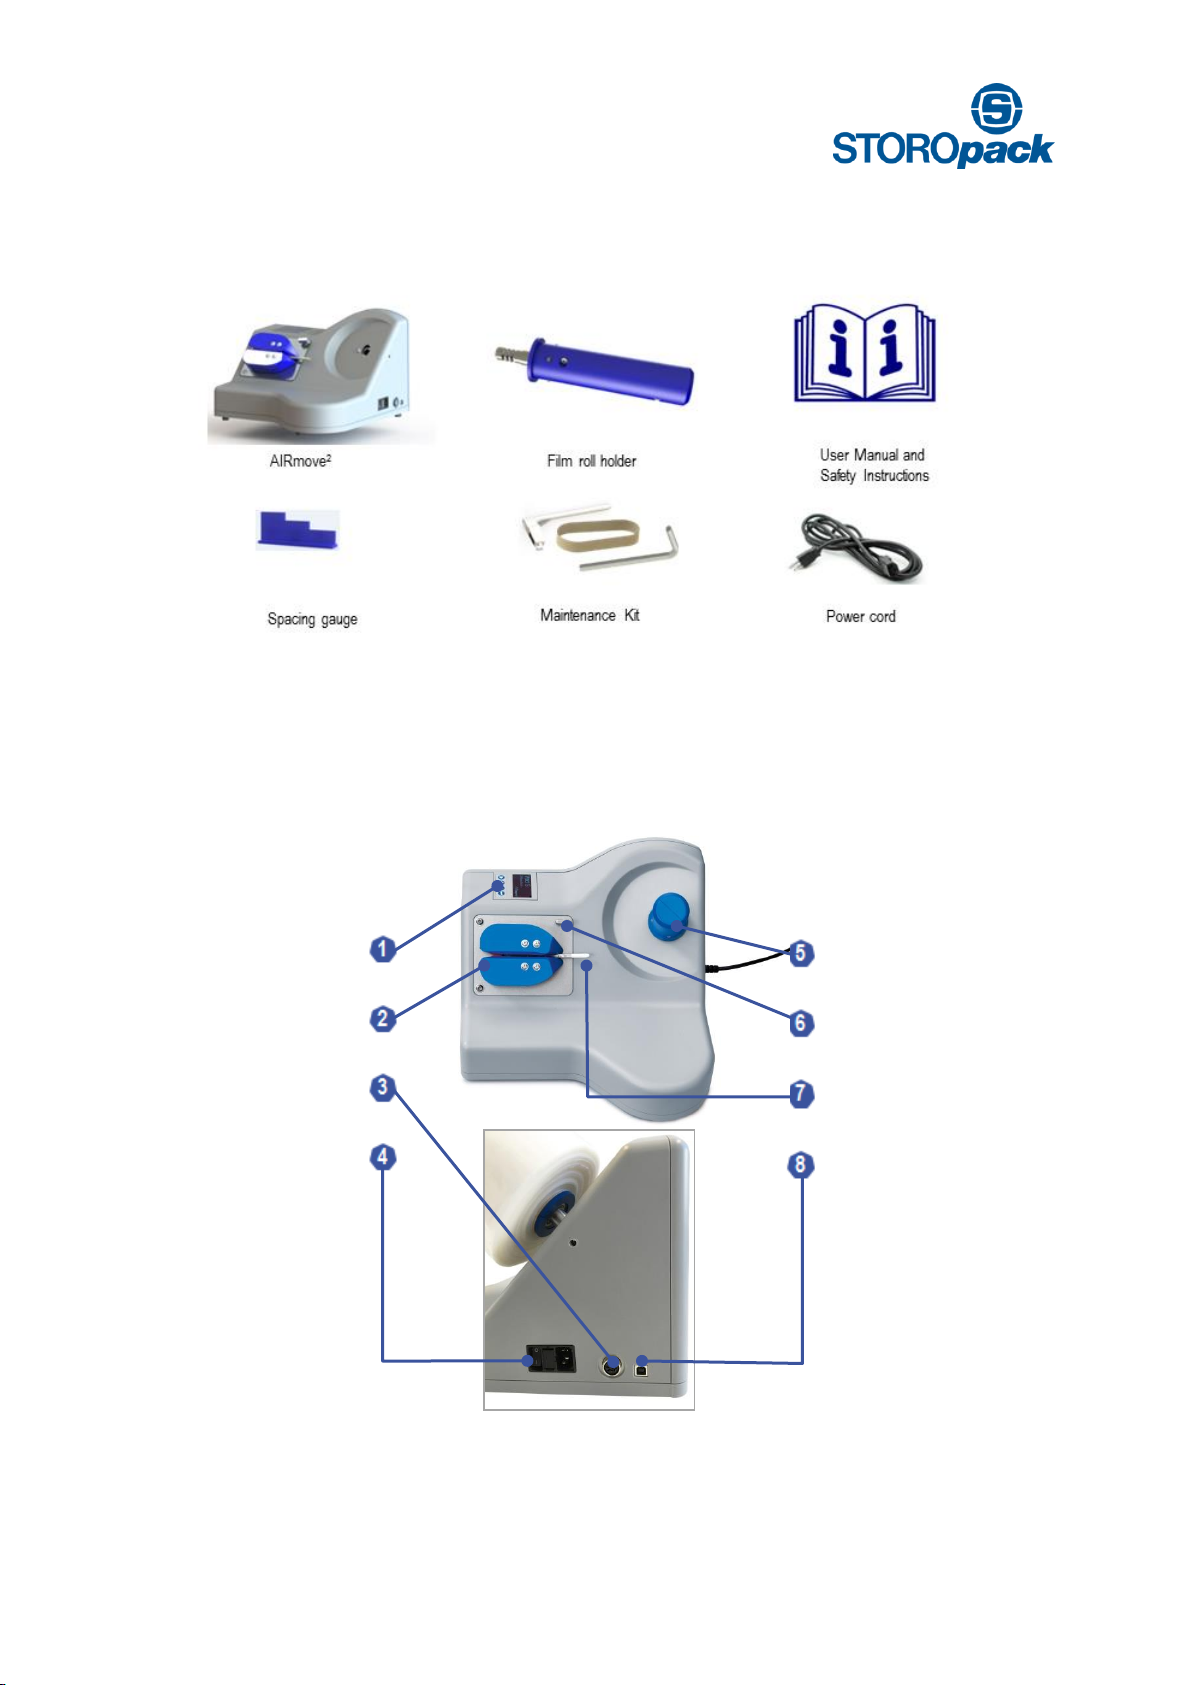
5. Box Contents
6. Machine Overview
The AIRmove2 consists of the following components:
1
The film roll holder of the AIRmove2will be delivered disassembled.
USB-B connector
Control panel
Unlock knob
Main power
switch and
power socket
Film roll holder
Sealing unit
Injector
External input
connection

AIRmove2- Perfect Protective Packaging 8
6.1 Keypad Functions
7. Setting Up the Device for Use
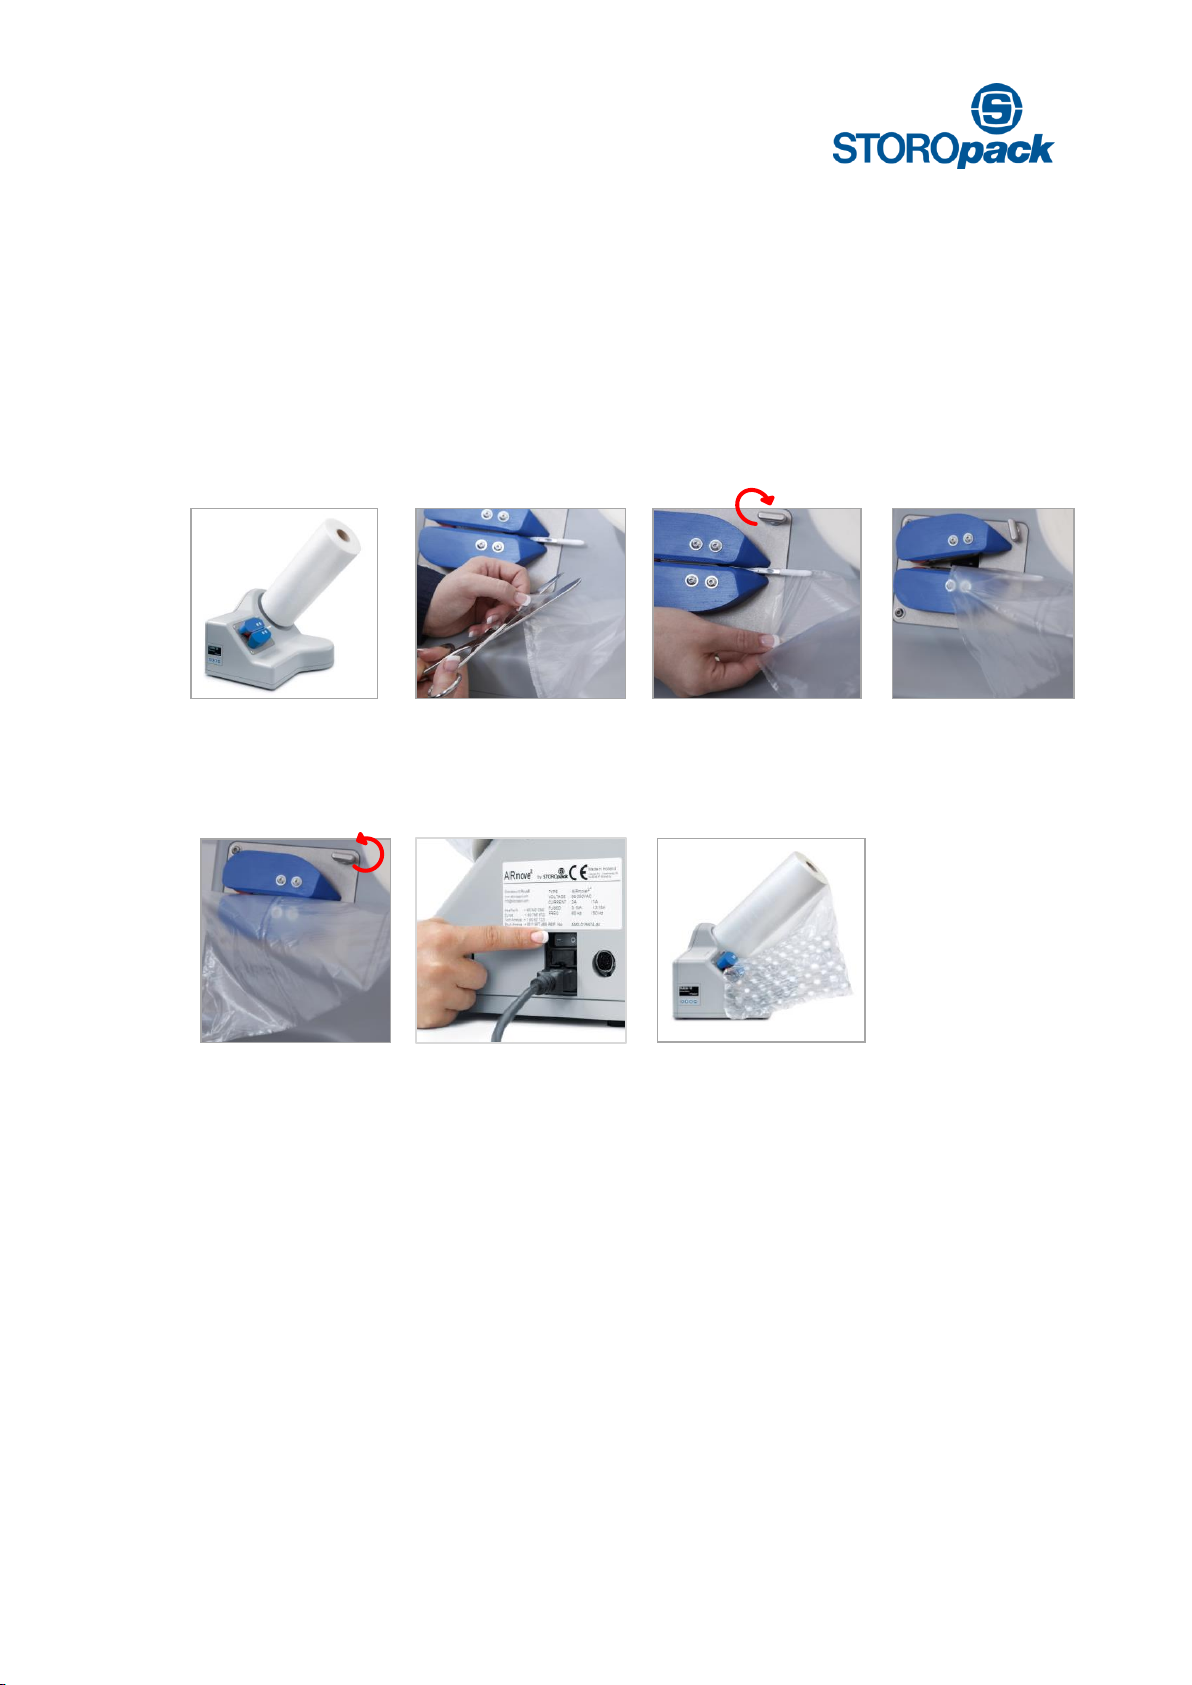
7.1 Assembly of the Film Roll Holder
Remove the AIRmove2machine and the blue film roll shaft from the box. Insert the metal part into hole on
the front side of the machine.
7.2 Film Roll Holder Positions for Smooth Film Flow
Airmove2films are available in three different options:
Film description
Air Pillow dimensions
Length
Void S, 25 µ
200 mm x 120 mm
350 m
Bubble M, 25 µ
400 mm x 160 mm (29b)
350 m
Cushion M, 25 µ
400 mm x 250 mm (16p)
350 m
Film description
US Air Pillow dimensions
Length
Void S, 1.0 mil
8” x 5”
1150’
Bubble M, 1.0 mil
16” x 9.76”
1150’
Cushion M, 1.0 mil
16”x 6”
1150’
Position
Name
Function
Start/Stop Button
Starts or stops the machine
Arrow up
Increases the value
Scrolls up
Arrow down
Decreases the value
Scrolls down
Enter Button
Confirms
Enter menu
Enter menu item
AIRmove2- Perfect Protective Packaging 9
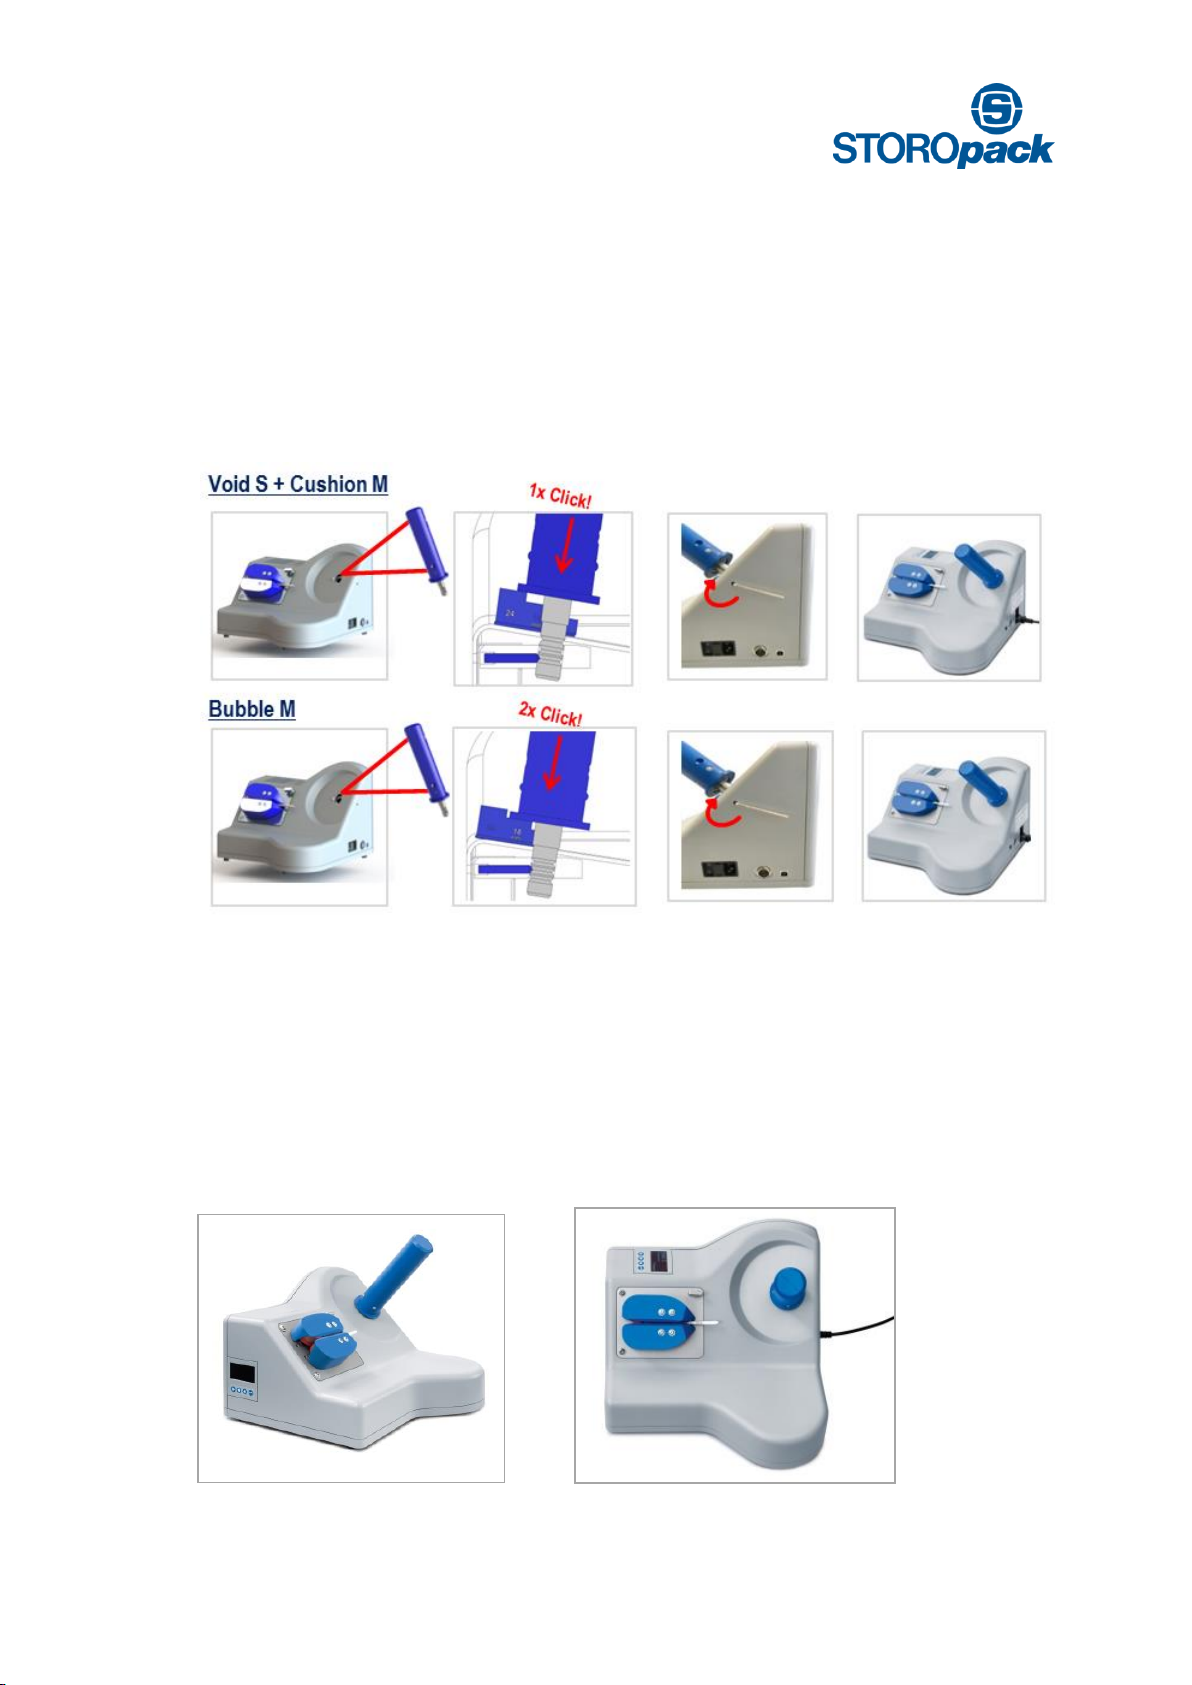
Therefore you must choose between two film roll holder positions. By loosening the screw in the cover on
the right side of the machine, you can adjust the film roll holder.
You will hear and feel a “click” when the shaft arrives at each position. Alternatively you can use the spacing
gauge to find the right setting.
Cushion M + Void S = 24 mm (15/16”)
Bubble M = 18 mm (11/16”)
The screw needs to be tightened again afterwards.
7.3 Display and Keypad Location
With your Airmove2machine there are two possible display positions. To change keypad position, first make
sure you disconnect from the power supply.
Remove the four screws in the cover of the machine with the provided allen key in the box. Insert the display
into the desired position (see picture 1 and 2). Then replace the cover and tighten the four
screws. Reconnect to the power supply to continue.
1.) Keypad front position 2.) Keypad top position
AIRmove2- Perfect Protective Packaging 10
7.4 Fitting a New Film Roll
Make sure the machine is not running while changing rolls!
If there is an empty roll on the machine, remove it from the film roll holder. To fit a new film roll, please
proceed as follows: Slide the new film roll onto the film roll holder. Ensure that the film is oriented to unwind
from the underside of the roll.
The film roll has continuous cross perforations and a non-continuous cross-seal. There is a gap between the
edge of the film and the perforations.
Cut a little corner off the film gap. Slide the gap over the white injector. Turn the unlock knob clockwise to
unlock the top sealing unit. Slide the film between the sealing units as far as possible until you feel
resistance.
Turn unlock knob counter clockwise to lock the top sealing unit. Always make sure that the knob is locked to
ensure a good seal quality!

AIRmove2- Perfect Protective Packaging 11
7.5 Power Switch and Connections
After checking the power supply, the system can be switched on. The main switch is on position “I”.
Power switch, fuse and
main power entry
Circular DIN connector,
8 pins
USB B type connector
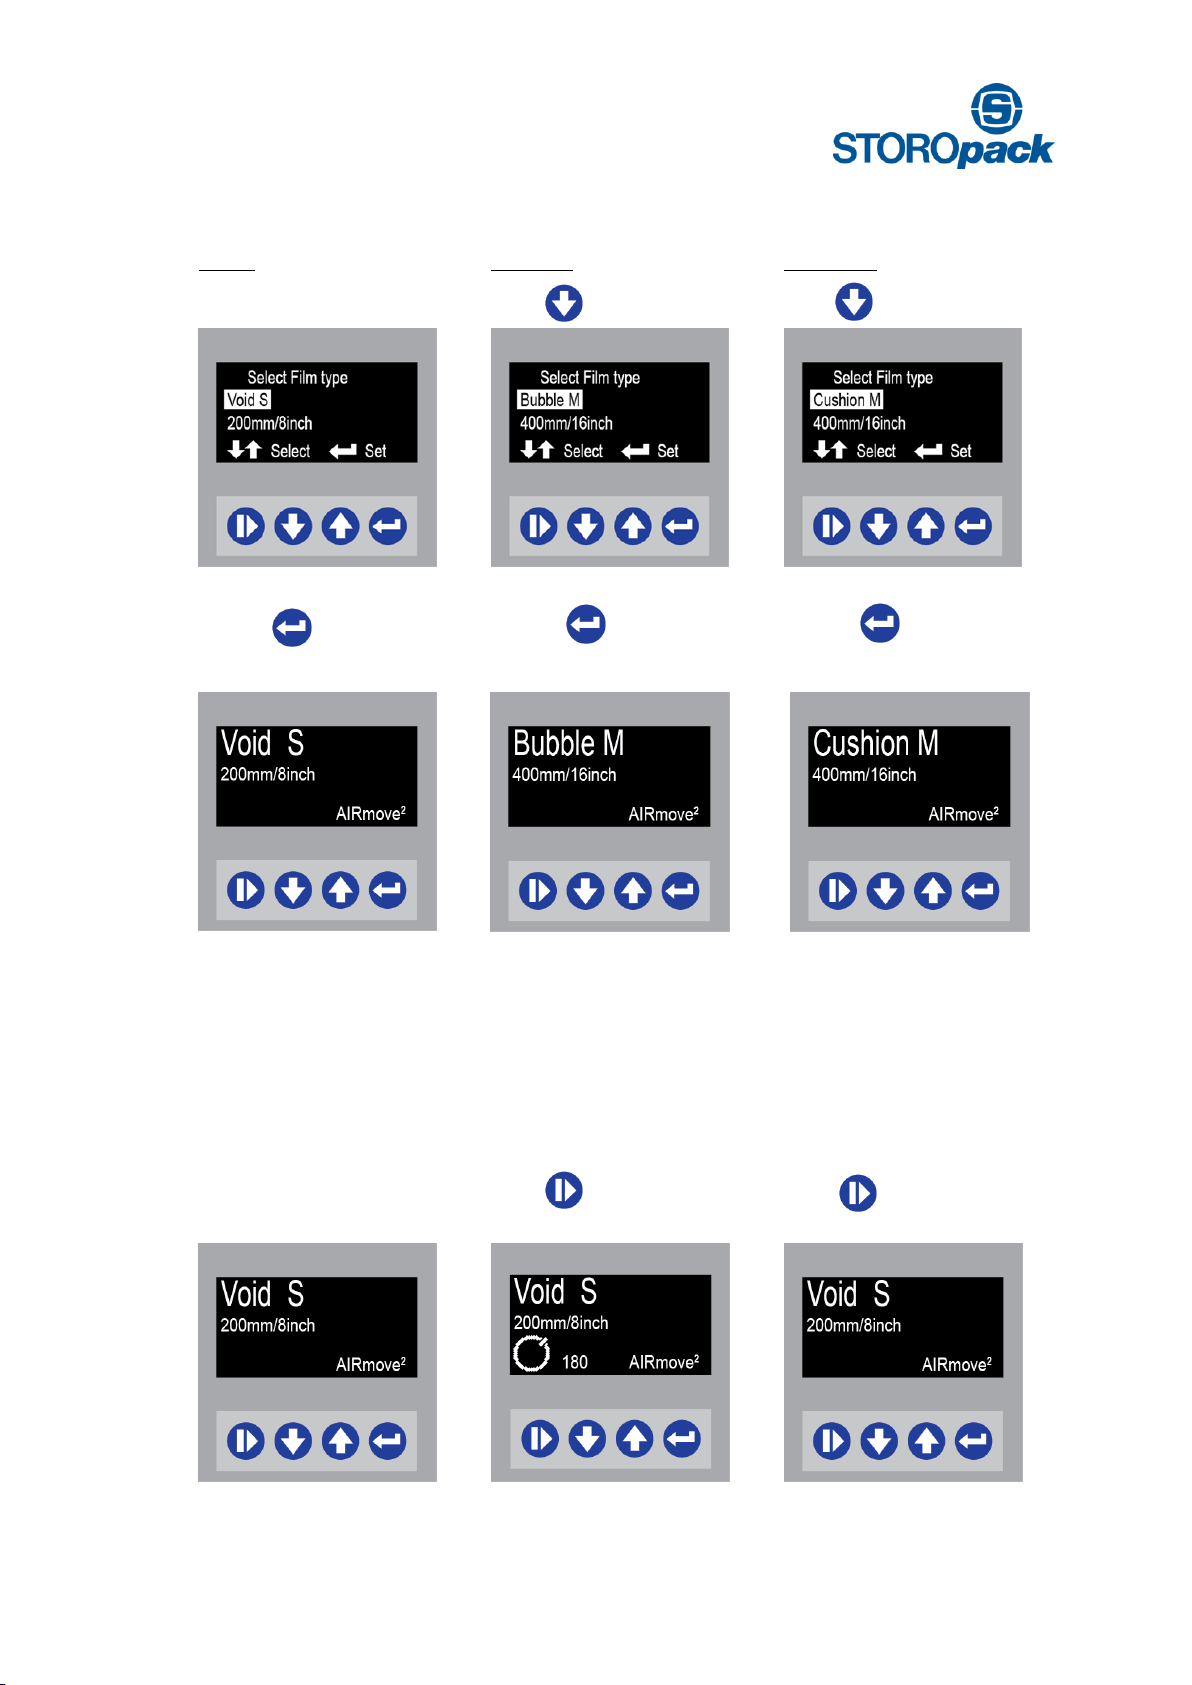
7.6 First Parameter Set-Up
To ensure the best quality Air pillows, Airmove2operates using three different film type menus. After fitting a
film roll the appropriate film type menu must be chosen. The Start screen will appear after switching the
machine on:
Machine off Power switch on first time Start display
Power switch [ 0] Power switch on [ 1] Display Software
display off first display (2 sec) Machine Software
Machine Number
AIRmove2- Perfect Protective Packaging 12
There are three different film type menus available when you turn on the machine the first time.
Void S
Bubble M
Cushion M
Void S is already highlighted
Press for Bubble M
Press 2 x for Cushion M
press to confirm choice for
Void S as the film to process
press to confirm choice for
Bubble M as the film to process
press to confirm choice for
Cushion M as the film to process
8. Menu Structure
8.1 Start Film production
Once a menu is selected with its pre-set parameters the machine is ready to operate. Every menu follows
the same steps:
Machine is ready to start Void S
film production
Press to start Void S film
production
Press again to stop
Void S film production
AIRmove2- Perfect Protective Packaging 13
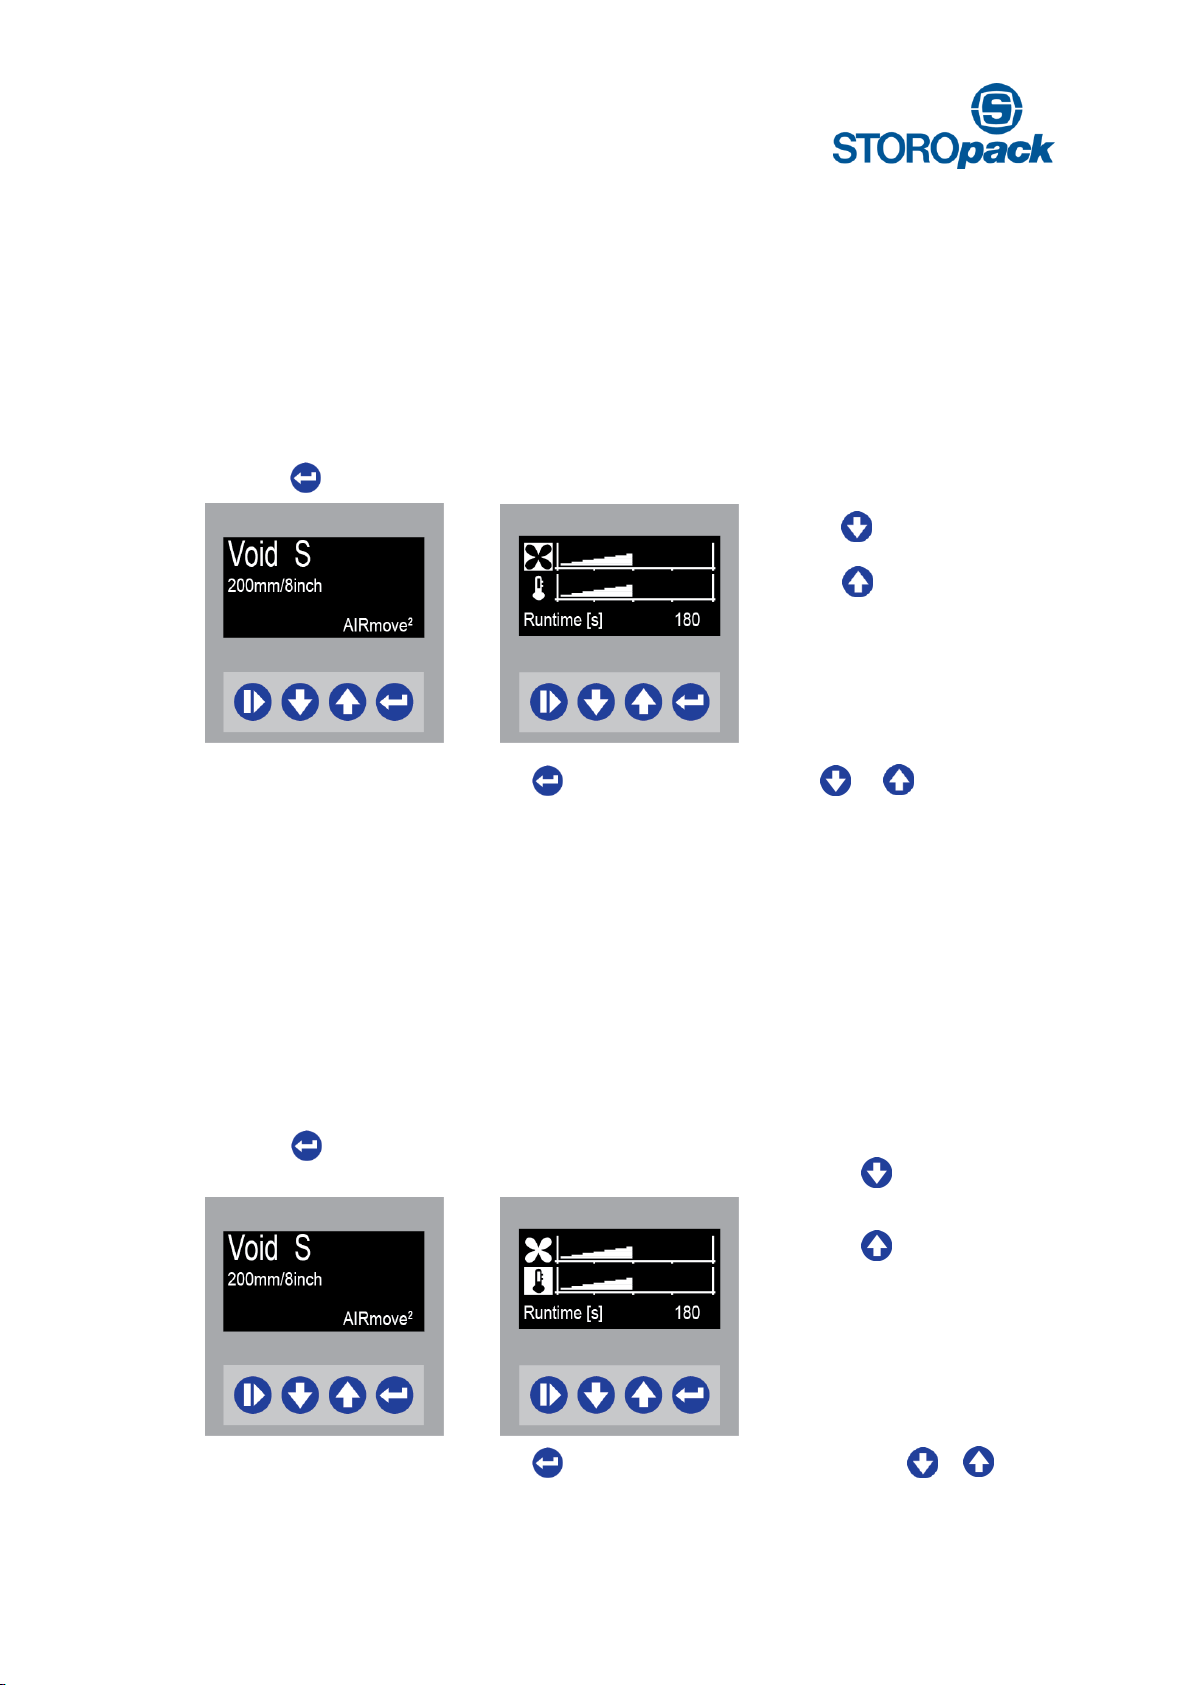
8.2 How to Adjust Air Settings
The chosen AIRmove² film type menus automatically run on the correct air and temperature settings. You do
not need to adjust machine settings manually, but if the automatic settings are not optimal for some reason,
the keypad allows you to change the following settings:
Display Void S
ready to start
Press 1 x for air settings
Display Air Settings
Amount of air is now adjustable
Press to decrease air
Press to increase air
Even while the machine is running press to change air settings by using or . While the machine
is running the Runtime sign will not show up.
8.3 How to Adjust Sealing Temperature
The chosen AIRmove² film type menus automatically run on the correct air and temperature settings. You do
not need to adjust machine settings manually, but if the automatic settings are not optimal for some reason,
the keypad allows you to change the following settings:
Display Void S
ready to start
Press 2 x for temperature
settings
Display Temperature Settings
Sealing temperature is now
adjustable
Press to decrease
temperature
Press to increase
temperature
Even while the machine is running press to change temperature settings by using or .
While the machine is running the Runtime sign will not show up.
AIRmove2- Perfect Protective Packaging 14
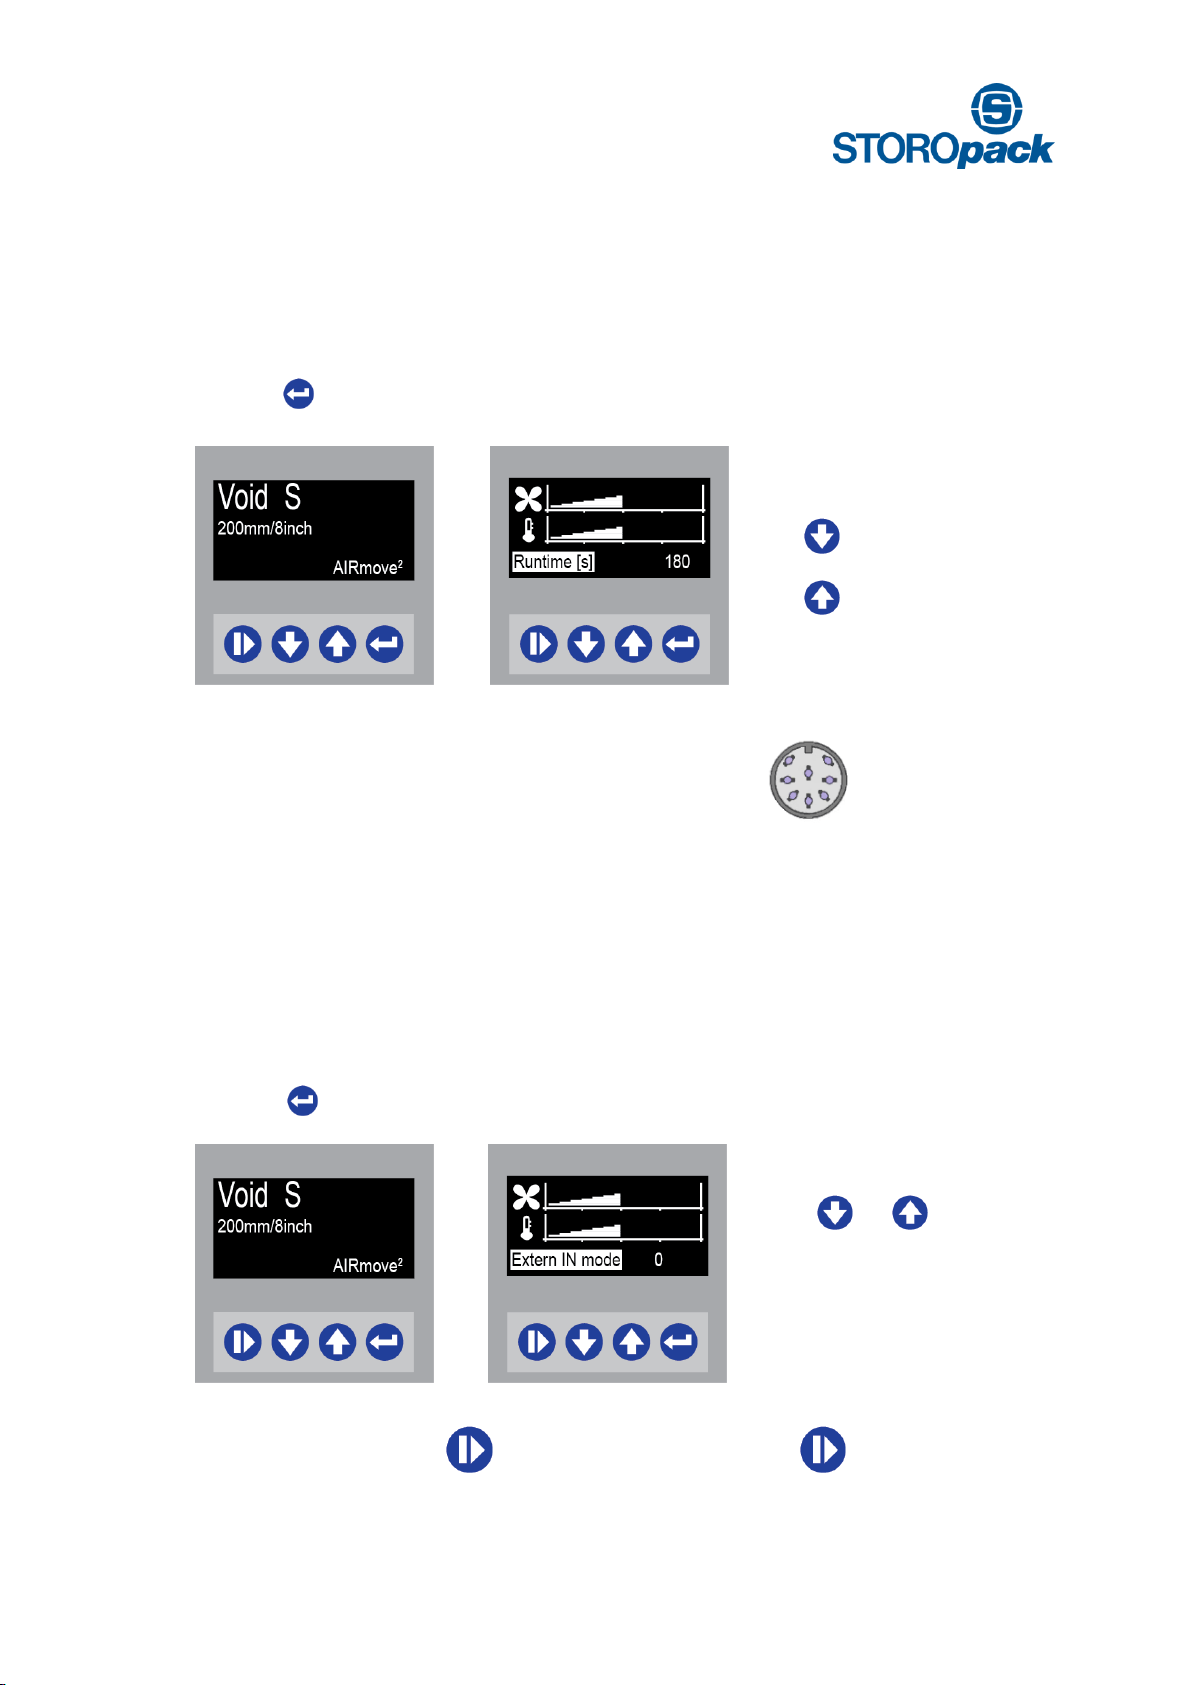
8.4 How to Adjust Runtime
To produce a desired amount of air pillows, a specific Runtime can be set. Runtime is indicated in seconds
and its factory settings are 180 sec. The set Runtime will run down to “0” and production will stop.
Display Void S
Press 3 x to get to the
Runtime Menu
Change Runtime settings
Minimum setting is 1 sec
Maximum setting is 2400 sec.
Press to decrease runtime
Press to increase runtime
8.5 How to Use External Input Devices
Use the Circular DIN connector to attach the external input device.
External start and stop devices enable an ergonomic operation of the machine. A foot pedal allows hand-
free production of air cushions, a push-button allows easy operation when the machine is out of reach. The
Extern IN mode enables you to use an external device, which will be connected to the machine. Following
options are available for the Extern In Mode:
8.6 Extern IN Mode 0
Display Void S
Ready to start
Press 4 x to change
Extern IN mode
Extern IN mode
Possible options [ 0 ], [ 1 ]
and [ 2 ].
Press or to adjust the
desired Extern IN mode
You can choose between manual and device control options (foot pedal or push button).
AManually Start: push Stop: push
BExt. Device Start: press down and release pedal Stop: press down and release pedal
AIRmove2- Perfect Protective Packaging 15
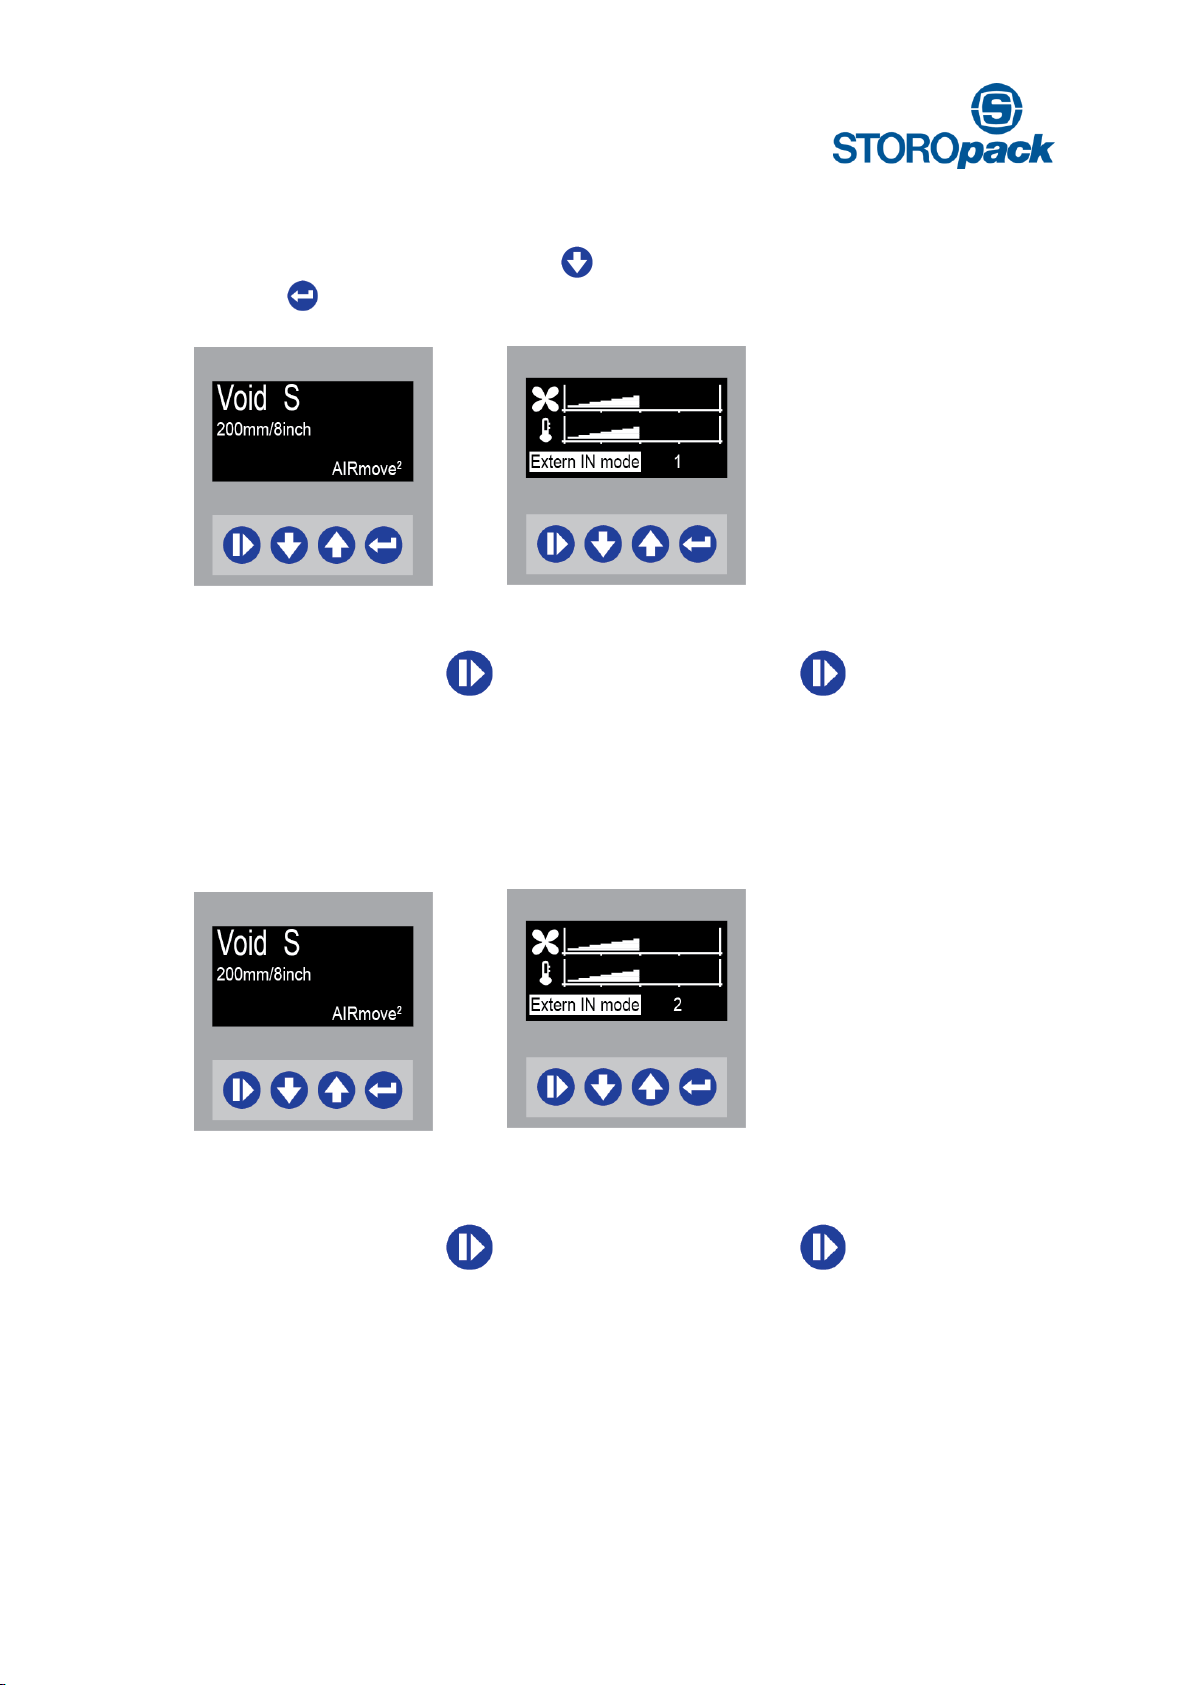
8.7 External Input Mode 1
Ready to start
Press 4 x to change
Extern IN mode
Press to set
Extern IN Mode 1
You can choose between manual and device control options (foot pedal or hand-buzzer).
AManually Start: push Stop: push
BExt. Device Start: press down pedal Stop: release pedal
8.8 External Input Mode 2
External input mode on [ 2 ] the machine works as using mode [ 1 ] but has a stop delay option.
You can choose between manual and device control options (foot pedal or push button).
AManually Start: push Stop: push
BExt. Device Start: press down pedal Stop: release pedal
(stop, if stop delay time has gone by)
With External input mode on 2 , a stop delay is set. Ex-works settings for Extern stop delay are 7 sec.
AIRmove2- Perfect Protective Packaging 16
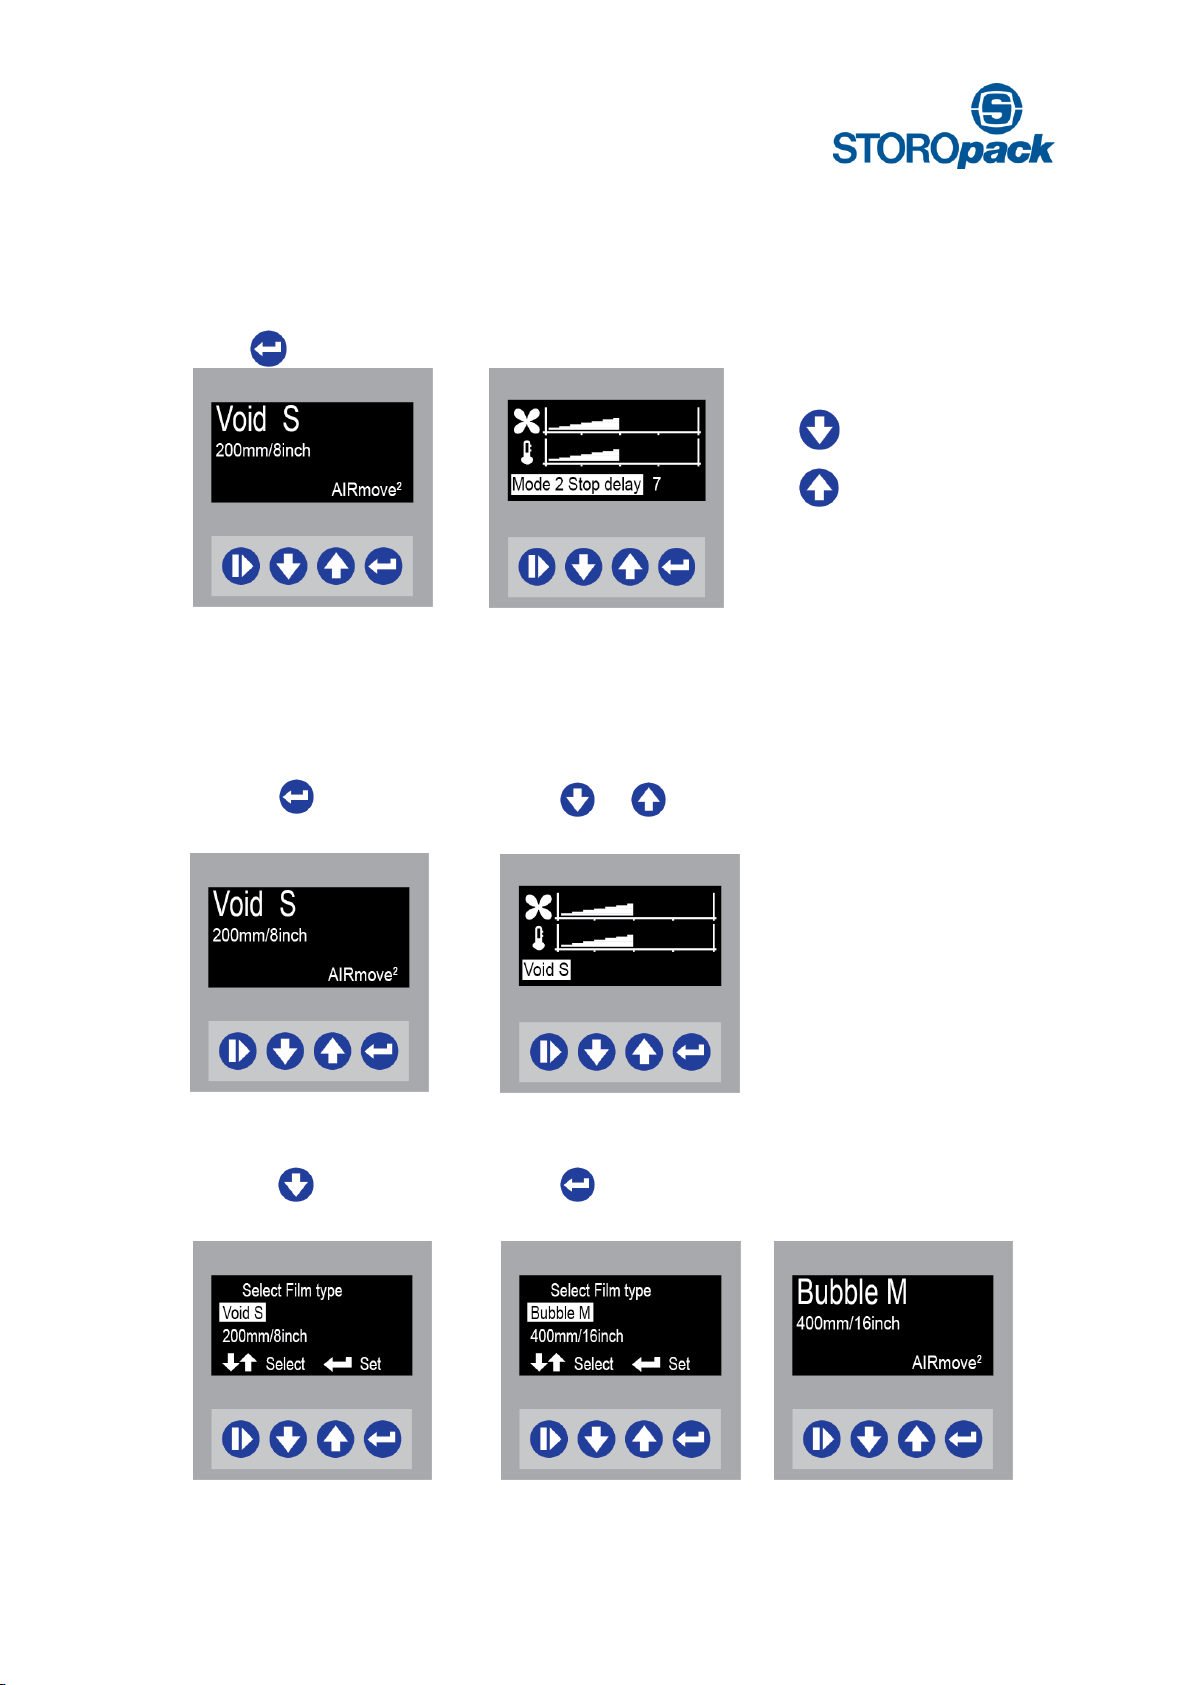
8.9 Mode 2 Stop Delay
Display Void S
ready to start
Press 5 x to change stop delay
Change Mode 2 Stop Delay
Stop delay is indicated in
seconds
Press to decrease stop delay
Press to increase stop delay
8.10 How to Change Film Type
Changing the menu to a new film type when loading a different kind of film.
Display Void S
Press 6 x until film type
shows up
Press or to change
the film type
Selection Void S
Press 1 x to change to
Bubble M
Selection Bubble M
Press and
Bubble M will be set
Bubble M

AIRmove2- Perfect Protective Packaging 17
Selection Void S
Press 2 x to change to
Cushion M
Selection Cushion M
Press and
Cushion M will be set
Cushion M
8.11 Factory settings
The ex-works setting enables resetting all choices, parameters, adjustments and changes back to the
factory settings.
Machine off
Power switch [ 0]
display off
Power switch on
Power switch on [ 1]
Press +
and hold while switching on the
machine.
Release the buttons + when
the display runs
All settings have been reset, proceed with section “First-parameter Set-up” again to choose a film type.
AIRmove2- Perfect Protective Packaging 18
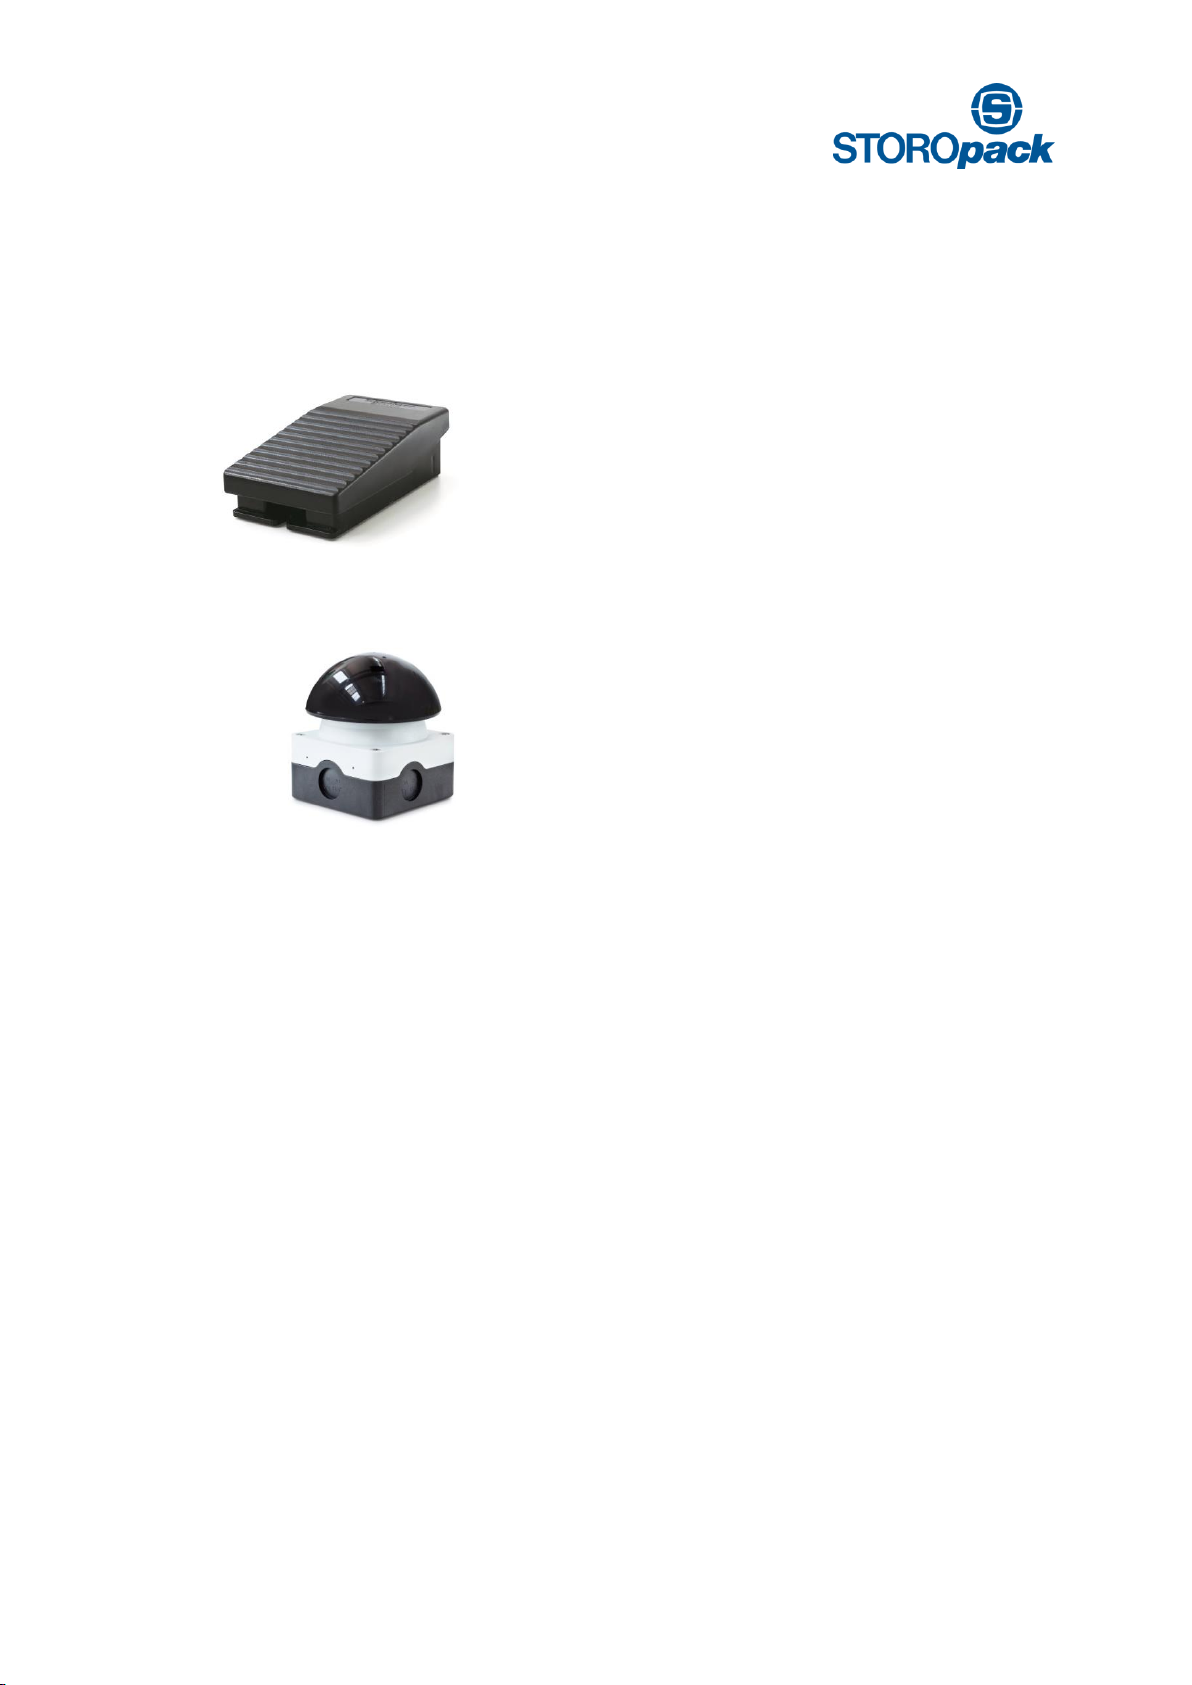
9. External Start and Stop Devices
External start and stop devices enable an ergonomic operation of the machine. A foot pedal allows hand-
free production of air cushions, a push button allows easy operation when the machine is out of reach.
Foot controls allow the worker to activate the film production
manually by pressing down on a foot switch or pedal, leaving
the hands free during the production process.
The Extern IN mode of the AIRmove² is for remote control
with an external device, foot pedal or on/off knob, connected
to the machine.
AIRmove² can also be equipped with a push button which
enables easy use when the machine is out of reach.
AIRmove2- Perfect Protective Packaging 19
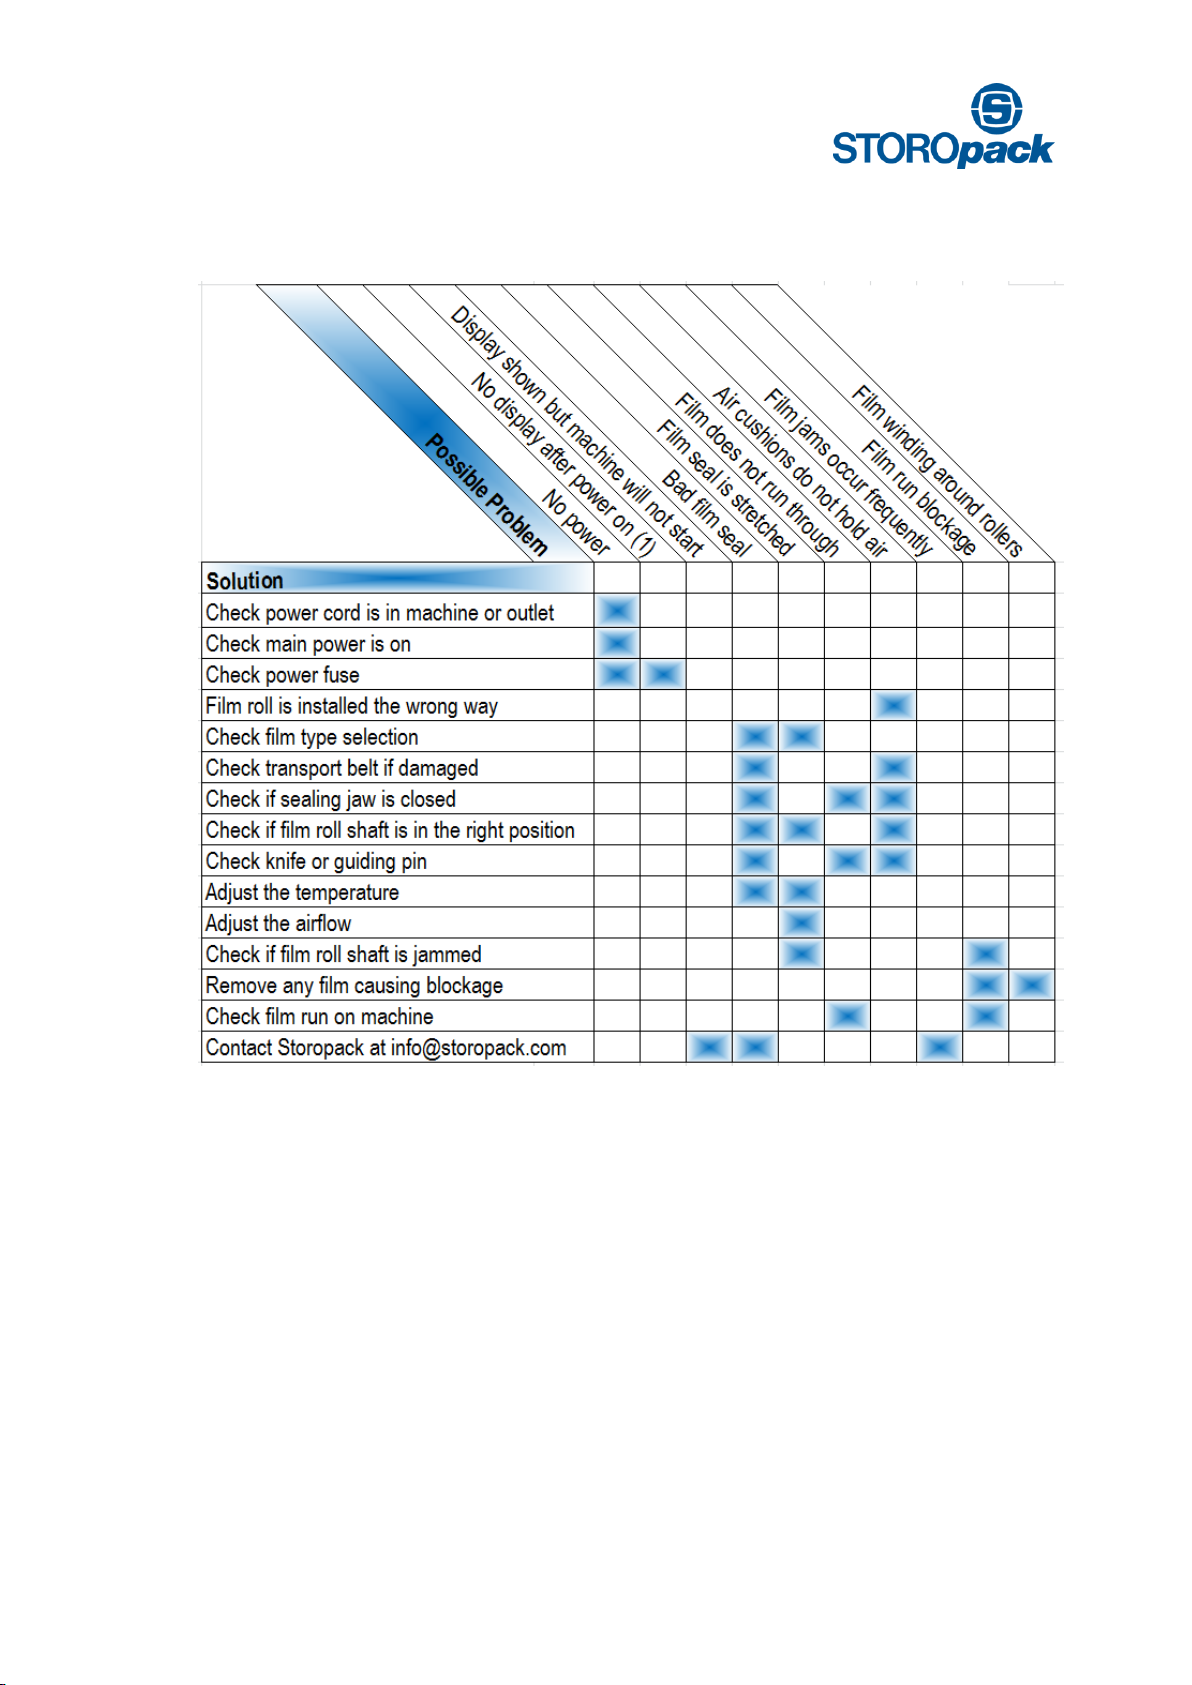
10. Troubleshooting AIRmove²
Other manuals for AIRmove2
1
Table of contents
Other STOROpack Packaging Equipment manuals

Popular Packaging Equipment manuals by other brands


ITW Mima
ITW Mima Girotec RDL 1800 Service and installation manual

Tepack
Tepack ?4?-12 operating instructions

3M
3M AccuGlide HST 41000 Instructions and parts list

Catoma
Catoma Switchblade Frameset Operator's manual

3M
3M AccuGlide II STD Instructions and parts list

Siebeck
Siebeck JET 2000 Translation of the original operating manual


