Stratacache PD215T8-SC Instruction manual

NINGBO PLUS AND POPSCREENS ELECTRONIC TECHNOLOGY CO., LTD
PD215T8-SC
Quick User Guide
Note:InformationinthisGuideissubjecttochangewithoutnotification.
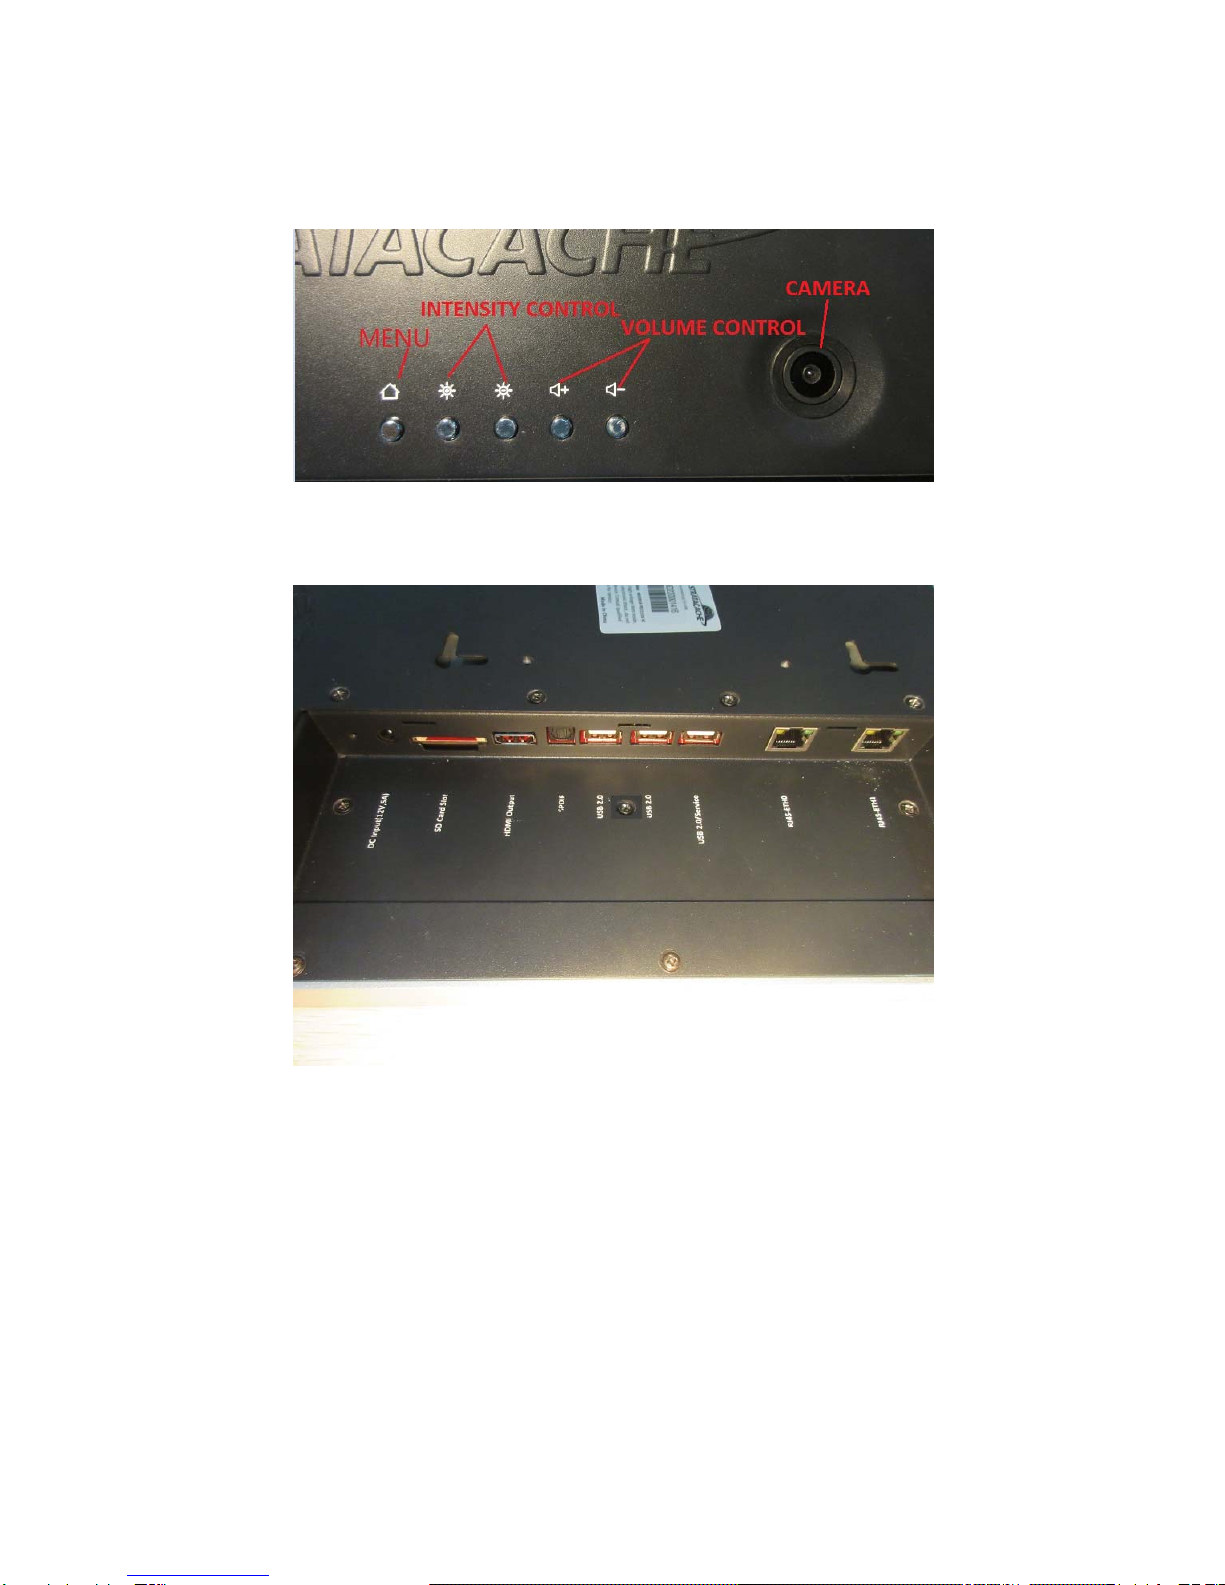
(I)Body and Button Introduction
PORT

(II) Getting Started
1.After receiving electrify source , computerautomatically start up, unplug the computer shutdown, no
switch on and switch off button;Power input voltage is 100-240 - VAC 50/60 HZ, power output voltage is
12 v, 5 A
2. Button function
1. Main menu button: return to use desktop after pressing main menu button.
2. Volume button: press(+)button,increase the volume;press (-)button, decrease volume.
3. Brightness adjustment: press brightness (+) ,increase the screen brightness; press brightness
(-),decrease screen brightness.
4. Memory card application
1、Insert memory card :
Insert memory card to slot, use finger press the card into the slot until hear “click”. The right corner in
the screen will reminde: preparing the SD card. When install the memory card successfully, this reminder
will disappear.
2、Browse memory card file:
Enter the file manager, choose SD card in equipment list, enter the root directory, begin to browse the
file in the SD card.
3、Pull out memory card:
Click the menu button, enter the setup, enter the SD card and equipment memory setting, and click
“remove the SD card”, system will reminder “SD card removed successfully”; press card slightly, and
harf of card will pop up , then take it out.
5. Use of USB port
Totally three USB ports, USB2.0 port can support USB2.0 and backward compatibility. USB2.0 s
ervice port used for programming. When insert U disk, keyboard and mouse, the right corner of
screen will reminde: preparing the SD card. SD card installed successfully, this reminderwill dis
appear.
6.This product support HDMI HD output, HD video can be output to the TV display devices etcthrough
the HDMI .
7. Virtual keyboard and Input
1. Click any Input Box
2. The virtual keyboard pop up at bottom
3. Press input box for 3 seconds to switch the pop-up input options
4. Click "go" to determine when input is complete
8. Connect Network with WiFi
1. Click "Menu" button
2. Select "Wireless and network"
3. Click on check "WI-FI" option to turned on or off the WIFI network (please select On)
4. Click to enter "WI-FI Settings" option and searched WI-FI networks are displayed,then click the
known "Wireless AP" name to connect and possible password is required.
9. FAQ
1. Can’t start the device. Plug the power again. If it still doesn’t work, then it might be the problem

ofdevice, please contact the after-sales service center.
2. Can’t recognize TF card. Please make sure the following points about TF card:
①Using TF card with good quality ②TF card<32G.
4. WiFi Signal is weak. Make sure WiFi signal source is within the range of 20 meters and there is not
too much barriers (Note: The wall could reduce WiFi signal a lot),and make sure your hands don’t
cover the wire housing in the back panel.
5. Touch doesn’t work appropriately. Make sure the fingers away from the touching field while holding
the device.
6. Image can’t rotate with the direction of device. Check “setting” to see if “Auto Rotation” is canceled.
7. Crash. While operating some low-quality software in the device, the system will crash. Just need to
Unplug the power cable, and the device will be forced to shut down.
13. The boot is too slow. In the common situation, the boot takes about 30 seconds.But if the device
has unexpected shutdown like crash, it will take much longer time to boot the device.
Please see the actual product for knowing more detailed function.
FCC STATEMENT
1. This device complies with Part 15 of the FCC Rules. Operation is subject to the following two
conditions:
(1) This device may not cause harmful interference.
(2) This device must accept any interference received, including interference that may cause undesired
operation.
2. Changes or modifications not expressly approved by the party responsible for compliance could void
the user's authority to operate the equipment.
NOTE: This equipment has been tested and found to comply with the limits for a Class B digital device,
pursuant to Part 15 of the FCC Rules. These limits are designed to provide reasonable protection against
harmful interference in a residential installation.
This equipment generates uses and can radiate radio frequency energy and, if not installed and used in
accordance with the instructions, may cause harmful interference to radio communications. However,
there is no guarantee that interference will not occur in a particular installation. If this equipment does
cause harmful interference to radio or television reception, which can be determined by turning the
equipment off and on, the user is encouraged to try to correct the interference by one or more of the
following measures:
Reorient or relocate the receiving antenna.
Increase the separation between the equipment and receiver.
Connect the equipment into an outlet on a circuit different from that to which the receiver is connected.
Consult the dealer or an experienced radio/TV technician for help.
RFwarningforMobiledevice:
ThisequipmentcomplieswithFCCradiationexposurelimitssetforthforanuncontrolled
environment.Thisequipmentshouldbeinstalledandoperatedwithminimumdistance20cm
betweentheradiator&yourbody.
Table of contents
Popular Tablet manuals by other brands

Elitegroup Computer Systems
Elitegroup Computer Systems TP10RA1 quick start guide

Lenovo
Lenovo TAB 2 A10-70 quick start guide

Motion Computing
Motion Computing J3400 user guide

WayteQ
WayteQ xTAB 8Q Tablet PC user manual

Samsung
Samsung Mondi Getting started guide

Pendo
Pendo PendoPad PNDPP41K7SLV Quick start guide & user manual


