Bak USA seal User manual

BAK USA Technologies Corp.
425 Michigan Ave.
Buffalo, New York 14203
Seal User Guide
For Windows 10

Thanks for embracing the evolution of mobile
technology with Bak USA. We hope you enjoy
your Seal experience. To best use your Seal
rugged tablet, please refer to this guide.
Hello there.
Bak USA
Seal User Guide
Version: v3 // 2018

Attention
Be sure to keep the power cord away from young children
• As with all electrical products, precautions should be observed during handling and use to prevent electric
shock. The power supply (adapter) should not be handled by children.
• Do not drop, crush, step on, or otherwise abuse the power supply, battery pack, or power cord.
• Periodically inspect the Seal, power supply, and power cord for damage. Replace if necessary.
• Report any damage or loose parts to the seller immediately.
• Do not leave the Seal plugged in or powered on when enclosed in a non-ventilated container (such as a
backpack) as overheating may occur.
• You are encouraged to take a 5-minute break every 30 minutes of use.
Safety Precautions
Please read and understand the following precautionary measures before using your Seal
Please follow these guidelines for the safe and proper handling of your Seal, power supply, battery
pack, and power cord.
CAUTION
RISK OF EXPLOSION IF BATTERY IS REPLACED BY AN INCORRECT TYPE. DISPOSE OF USED BATTERIES ACCORDING
TO THE INSTRUCTIONS.
IT IS RECOMMENDED TO USE THIS DEVICE IN AN ENVIRONMENT WHERE THE AMBIENT
TEMPERATURE IS NO MORE THAN 120°F.
TO PREVENT POSSIBLE HEARING DAMAGE, DO NOT LISTEN AT HIGH VOLUME LEVELS
FOR LONG PERIODS.
1. Do not place near re or other sources of heat
2. Do not expose to magnetic elds
3. Do not place heavy objects to add heavy pressure on the Seal

Introduction..................................................................................................................................
Package contents.......................................................................................................................
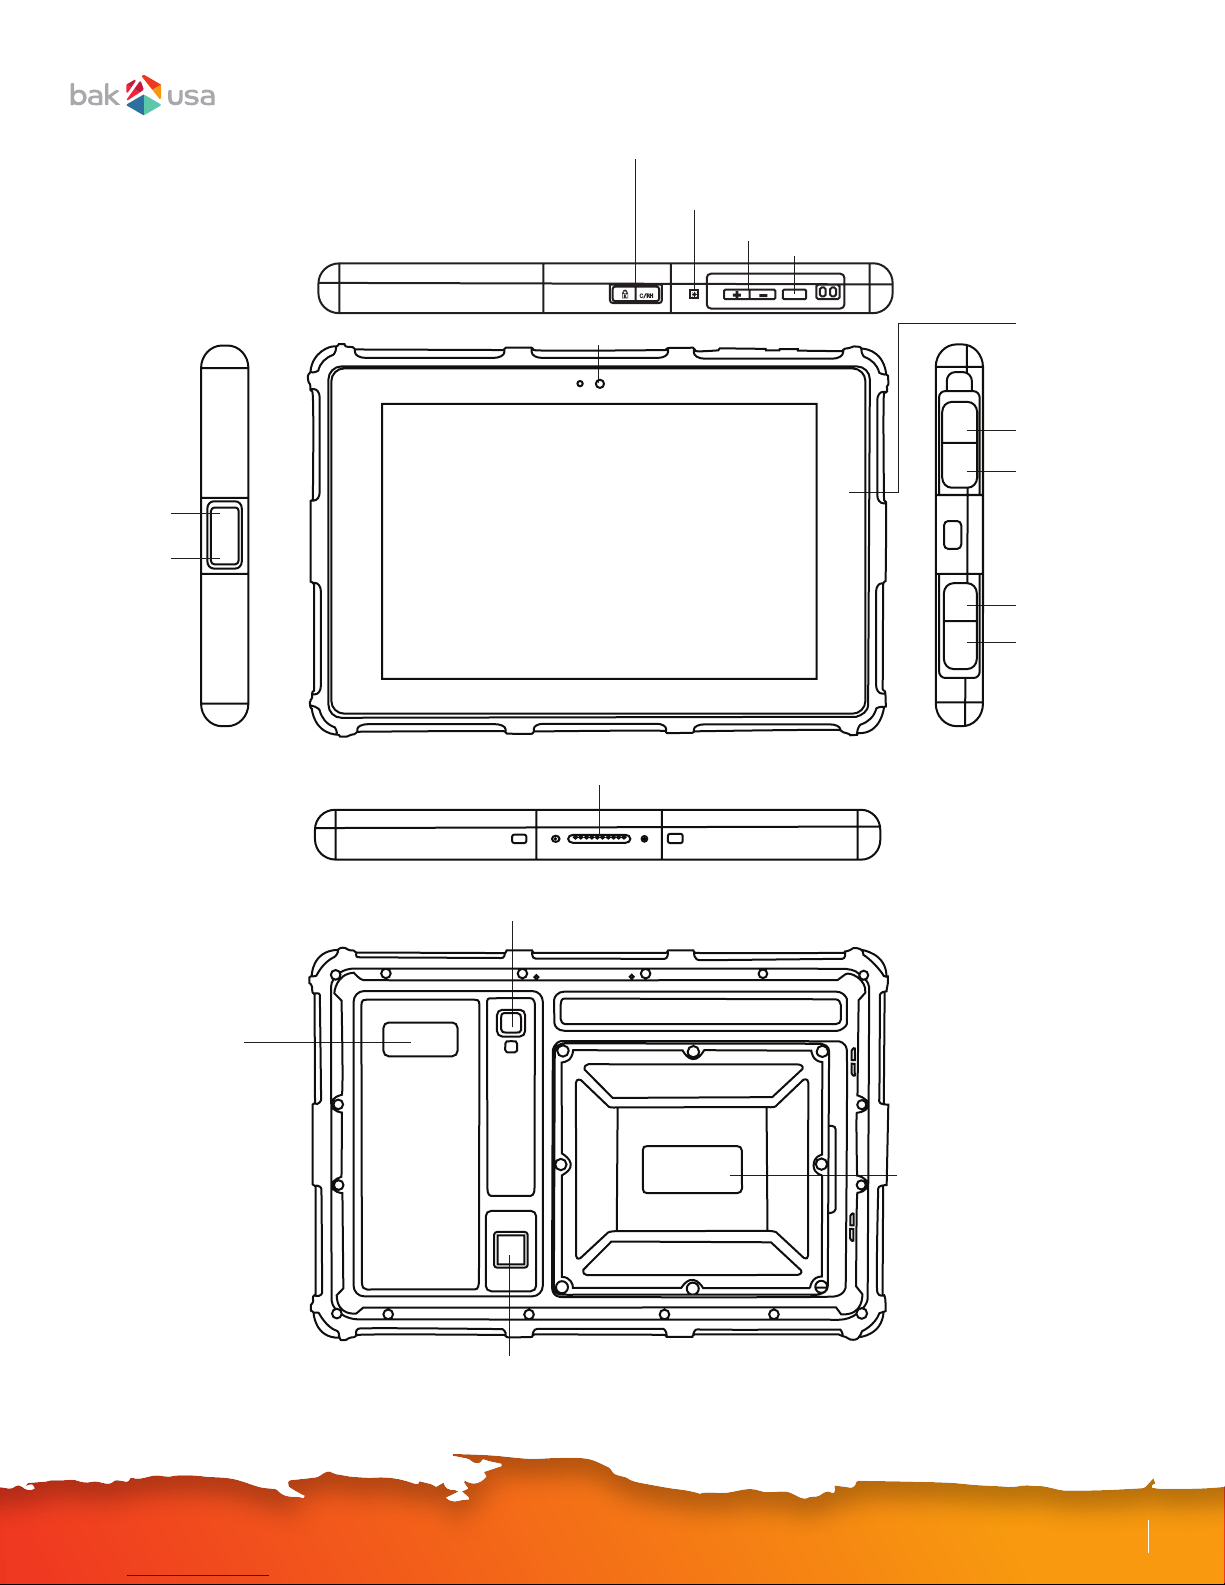
Layout............................................................................................................................................
Views........................................................................................................................................
1
1
2
2
Power ON/OFF.............................................................................................................................
Power your Seal......................................................................................................................
Power ON for the rst time..................................................................................................
Power OFF your Seal.............................................................................................................
Using your active stylus..........................................................................................................
Putting your Seal into sleep mode......................................................................................
Waking up your Seal..............................................................................................................
Basic touchscreenoptions.........................................................................................................
3
3
3
3
4
4
4
5
Content
Section 1 Getting to Know Your Seal
Section 2 Using Your Seal
Section 3 Windows Interface
Desktop and virtual desktop experience................................................................................
Taskbar..........................................................................................................................................
Start menu....................................................................................................................................
Search box—Cortana.............................................................................................................
App shortcuts area................................................................................................................
Notication area.....................................................................................................................
Settings screen............................................................................................................................
Activating Windows.....................................................................................................................
Setting up your Microsoft Account..........................................................................................
Replacing desktop with start screen.......................................................................................
Pinning and unpinning your app...............................................................................................
Pinning an app to start menu or taskbar.............................................................................
Section 4 Setup and Connection
7
8
8
9
9
10
11
12
12
13
14
14

Charging your battery................................................................................................................
Inspecting your battery status.................................................................................................
Removing an app........................................................................................................................
Wireless LAN...............................................................................................................................
Enabling wireless connection...............................................................................................
Connecting to a wireless LAN..............................................................................................
Connecting an external device.................................................................................................
Connecting to the USB port..................................................................................................
Connecting to the HDMI port...............................................................................................
Section 5 Battery
Section 6 Windows Help and Troubleshooting
Troubleshooting..........................................................................................................................
Section 7 Specication
14
14
14
14
15
15
15
18
19
20
24

2. Power Cord
Package Contents
Carefully unpack your box and take out the items listed as below.
If any items are missing or damaged, contact the seller immediately.*
1. Getting to Know Your Seal
1. Seal Tablet
*Depending on your order, the optional add-ons might be included in a separate package.
1
3. Stylus

The Hardware
Headphone Jack
Battery
USB-A 3.0
USB-C 3.0/Charging
Port
Front Camera
Power
Micro HDMI
Charge State Light
10-Pin Interface
Back Camera
Fingerprint Reader
Near Field
Communcation
Barcode
Scanner
(Optional*)
Flashlight
Kensington Anti-Theft Lock
Volume
Flashlight/Barcode Scanner ON/OFF Button
*If Barcode Scanner is added,
the ashlight is not available.
2

1. If this is the rst time you power on the Seal, connect the
AC adapter and fully charge the battery
2. Press and hold the power button until the charging
indicator light ashes (approximately 3-4 seconds)
Power ON Your Seal
Powering ON/OFF
Power ON for the First Time
1. Activate your Windows 10
2. Sign in to or create your Microsoft account
3. Setup a wireless connection and more
Follow the on-screen instructions to complete the initial setup
3
2. Using Your Seal
1. Tap the Windows Icon in the lower left corner of the
Desktop, or press the Windows key on a connected keyboard
2. In the Start menu, tap Power
3. Select Shut down from the power option menu, as shown
on the right
Power OFF Your Seal
Save all your data before powering OFF your Seal.
From the Start menu:
Perform the initial set-up:

When you will be away from your Seal for a short time, put the Seal to sleep. To do so, perform
one of the following:
• Press the power button once briey
OR
• Open the Start menu, select Power and then Sleep
Put Your Seal into Sleep Mode
To wake up your Seal, press the power button once briey.
Using Your Active Stylus
After following the installation for the batteries in your stylus, you can use the
stylus immediately.
To perform a left-click, touch the tip of your stylus to the screen.
To perform a right-click, touch the tip of your stylus to the screen and press the
lower button (the button closest to the tip).
To perform a double-left click, touch the tip of your stylus to the screen and
press the upper button (the button farthest from the tip).
Upper Button: Double Click
Lower Button: Right Click
Lower Button: Single Click
4

• Do not use sharp objects to touch the screen
• Do not touch the touchscreen with a conductive material
• Functions may vary based on the app you are using
Basic Touchscreen Operations
5
Touch an item to start an app, open a link, or
perform an optional function. This is similar to a
left-click with a mouse.
Touch an item twice in quick succession.
Press and leave your nger on an item. This brings
up detailed information or opens a menu with more
options for the item. This is similar to a right-click
with a mouse.
Tap
Gesture Name Explanation
Double-Tap
Press and hold

6
Touch two ngers to the screen, and then bring
them together or pull them apart to zoom in and
out on visual apps (such as pictures and maps).
Touch your thumb and forenger to an item, and
then twist in a circular motion to rotate an object.
Not all items are rotatable.
Drag your nger across the screen to scroll
through lists and pages, to move an object, to
draw, or to write.
Pinch
Rotate
Scroll
Gesture Name Explanation

To launch the feature click
the app icon (pictured left).
The Desktop screen is as shown below and natively provides the
virtual desktop feature.
7
Desktop and Virtual Desktop Experience
3. Windows Interface

The black bar on the bottom of the desktop is called the Taskbar.
It provides several key features:
• Start menu
• Search box
• App shortcuts area
• Notication area
To open the Start menu, click or tap the Windows icon (aka
Start button) at the left end of the Taskbar. The Start menu
will appear, as shown below.
Taskbar
Start Menu
For how to set up this menu, please refer to page 14.
8

9
Search box—Cortana
Next to the Start menu is the search box, as shown below.
When you select this box, a window will pop out, as shown below.
After you set up the Cortana, the search box will look like this:
This is the Cortana icon. Cortana is a new virtual
assistant built into Windows 10. Click here to nish
the setup, and then control Cortana with either your
keyboard or voice commands. Control Cortana to
perform intelligent searches and more.
App Shortcuts Area
In this area, you can put the shortcuts of your frequently used apps.
For how to arrange this area, please refer to page 14.

Notication Area
The right part of the Taskbar holds several icons that display the status
of your Seal, as shown below.
This is called the Notication Area.
10
Show more hidden status icons.
Shows you the current battery status.
For details, please refer to page 19.
Show the status of your wireless
network connection.
Show the system notications and
several shortcuts.
Icon Description

2. Select Settings to open the Settings screen, as shown below.
To access to the Settings screen:
1. Click the Windows icon in the
lower left corner of the Desktop
11
4. Setup and Connection

Activating Windows
To use all the features of your Windows Seal, you may need to activate your
Windows system. To register and activate your Windows, perform the following:
1. Open the Start menu and click Settings
2. Click Update & security
3. Select Activate
4. Follow the instructions to activate Windows
Setting up Your Microsoft Account
To share les or settings with other devices running Windows 10, or to download
and purchase apps from the Microsoft Store, please set up a Microsoft account.
To set up your Microsoft account
1. Open the Settings screen and select Accounts
2. Select Your account
3. Select Sign in with a Microsoft account instead
4. Follow the on-screen instructions
12

Replacing Desktop with Start Screen
If you are more familiar with the interface similar to the Start screen
introduced in the Windows 8 series, you can set your Seal to show the Start
screen instead of the Desktop every time you power on your Seal. To do so:
1. Open the Settings screen
2. Select Personalization
3. In the Personalization screen, enable the option Use Start full screen.
After these steps, you will see the Start screen every time you turn on
your Seal, as shown below
13

Pinning and Unpinning your App
to Start Menu or Taskbar
1. Press, hold, and release on the app that you want to remove from
your Start menu or Taskbar
2. Tap Unpin from Start or Unpin from Taskbar to remove it from
your Start menu or Taskbar
1. Open the Start menu and select All Apps
2. Press, hold, and release on the app that you want to appear on
your Start menu or Taskbar, and an option menu will appear
3. To add the app to your Start menu or Taskbar, click Pin to Start
or Pin to taskbar
1. Open Settings menu and select Network & Internet
2. Select Wi-Fi and set the function to ON
3. Make sure you have switched the Airplane mode to OFF. To
conrm that Airplane mode is disabled, go to the Desktop and
check the Notication Area. If you see an airplane icon displayed
on the lower right, you must disable Airplane mode
To remove an app:
To add an app:
Wireless LAN
Enabling a wireless connection
Once you have enabled the wireless connection, the Seal will automatically scan for available wireless
networks and display them in the wireless LAN network list. To connect to your desired wireless network,
click the network’s name in the list, and then click Connect.
Connecting to a wireless LAN
Note: Some networks require a network security key or password for connection. If necessary, ask the network
administrator or the Internet Service Provider (ISP) for the required information.
14

Your Seal comes with one USB-A 3.0 port and one USB-C 3.0 port. Connect USB devices to either of the
USB ports using a USB cord. Once you plug a USB device into a USB port on your device, Windows will
automatically load a driver for that device. After the driver has been loaded once, you can disconnect and
reconnect the same device without having to install any drivers on subsequent reconnections.
Disconnecting the USB port
Connecting an External Device
Note: If Windows requires you to install the driver before connecting, check the documentation provided by
the device’s manufacturer before connecting the Seal.
To disconnect a USB storage device, make sure you click the Safely
Remove Hardware icon (pictured left) in the Notication Area of the
Taskbar to remove the device before disconnecting.
Note: If your USB device uses a power cord, connect the device to a power
source before connecting it.
Connecting to the HDMI Port
You can connect an external device (monitor, TV, projector, etc.)
that has a Micro HDMI port. This lets you connect your Seal to a
larger display with a higher resolution.
1. Power OFF the external device
2. Locate the Micro HDMI port on your Seal
3. Connect one end of your Micro HDMI cable to the port, and the other end to
the Micro HDMI port on the external device
4. Power on the external device; when connecting a TV, you may need to
congure your TV to external device mode
5. Open the Settings screen, select System and then Display
6. Tap Multiple displays to open the drop-down list
7. From the list, select your desired monitor mode
8. Tap Apply and conrm your settings
16
Other manuals for seal
1
Table of contents
Other Bak USA Tablet manuals